
Terms you’ll need to understand:
✓ | WordPad |
✓ | Notepad |
✓ | Text file |
✓ | Rich Text Format |
✓ | Windows Mail |
✓ | |
✓ | Junk e-mail |
✓ | Phishing |
✓ | Windows Calendar |
✓ | Windows Fax and Scan |
✓ | Meeting Space |
✓ | Windows Sidebar |
✓ | Gadget |
Techniques/concepts you’ll need to master:
✓ | Use WordPad and Notepad to create and modify files. |
✓ | Use Windows Mail to access e-mail. |
✓ | Secure Windows Mail. |
✓ | Use Windows Calendar to organize appointments, set reminders, and set tasks. |
✓ | Create multiple calendars and group them together. |
✓ | Use Windows Fax and Scan to fax and scan documents. |
✓ | Use Windows Meeting Space to conduct meetings and share documents during the meeting. |
✓ | Configure the Windows Sidebar and its gadgets. |
Windows Vista includes a number of productivity applications to help users communicate, collaborate, and manage business and personal information. Although many organizations use Microsoft Office 2007 as their primary set of applications, and although Microsoft Office has far more capability, it is important to know what functionality the built-in tools provide and how to configure and support them to perform tasks that other applications do not support. Some of these applications include Windows WordPad, Windows Mail, Windows Calendar, Windows Meeting Space, and Windows Fax and Scan.
Windows WordPad is a simple word processor that enables you to create more complex documents by changing fonts, adding bullets, adding color, adding pictures, and aligning text. All of this formatting is saved with your document using RTF format (RTF is short for Rich Text Format), so no matter who opens it, it will appear as if you created it.
Windows Notepad is a simple text editor that enables you to create and edit text documents. Because many configuration files are written in as text files, Notepad becomes a commonly used application for desktop support technicians.
E-mail, short for electronic mail, is a fast and convenient way to communicate with others by transmitting and sending text messages with file attachments (documents, pictures, sound, and movies) over a network, including the Internet. You can send a single message to groups of people and forward messages that you receive to other people. Because e-mail messages are created and sent electronically, they can be easily stored and retrieved. Organizations that are fully computerized and have many users make extensive use of e-mail because it is fast, flexible, and reliable.
To use e-mail, you need the following:
A network and/or Internet connection
An e-mail program or web-based service
An e-mail address that consists of a username, the at symbol (@), and the name of your Internet service provider (ISP) or web-based e-mail provider.
Windows Mail is an e-mail and newsgroup client software package that replaced Outlook Express, which came with Windows XP. It enables you to exchange email with others, and it enables you to organize, manage, and protect your e-mail.
To use e-mail in Windows Mail, you must set up an e-mail account. You need the following information from your network administrator or ISP:
Your e-mail address
Password
Names of your incoming and outgoing e-mail servers
To add an account, you run the Add User Account Wizard, which can be started by doing the following:
You then follow the instructions through the wizard. If you do not know the names of your services, your address, or your password, contact your ISP or network administrator.
If you do not receive e-mail, check the following:
Make sure your computer is properly connected to the Internet by opening a web page on the Internet.
If this is your first time trying to receive e-mail from this e-mail account on this computer, verify that the account/server information is set up properly. If you don’t know your account information, check with your system administrator or your ISP. Account information can be accessed by opening the Tools menu and selecting Accounts.
Click Send/Receive to retrieve your e-mail again.
After you have added an account, Windows Mail checks for new e-mail messages when you first start it. E-mail you receive is stored in your Inbox.
By default, it then checks every 30 minutes after that. To change how often it checks for new e-mail, open the Tools menu and select Options. Then, change the Check for New Messages Every x Minute option.
The Inbox is one of several folders that hold e-mail. To see a list of e-mail you’ve received, click the Inbox in the Folders list. Your e-mail messages display in the Message list. The list shows who sent the mail, the subject, and when it was received. To read a message, click it in the Message list. The contents of the message display below the Message list in the Preview pane. To read the message in a separate window, double-click it in the Message list. To reply to a message, click the Reply button.
To create a new e-mail message in Windows Mail, click the Create Mail button. A new message window opens. In the To box, enter the e-mail address of at least one recipient. If you are sending the message to multiple recipients, enter a semicolon (;) between e-mail address. You can also specify recipients in the CC box, short for carbon copy. CC is typically used when you want to send informational e-mails to a person and you don’t expect action from them. In the Subject box, type a title for your message.
To attach a file to the message, click the Attach File to Message button on the toolbar (located just below the menu bar). Locate the file, select it, and then click Open. The file displays in the Attach box in the message header.
To send the message, click the Send button. If you are connected to a network, the e-mail will be received by the recipients.
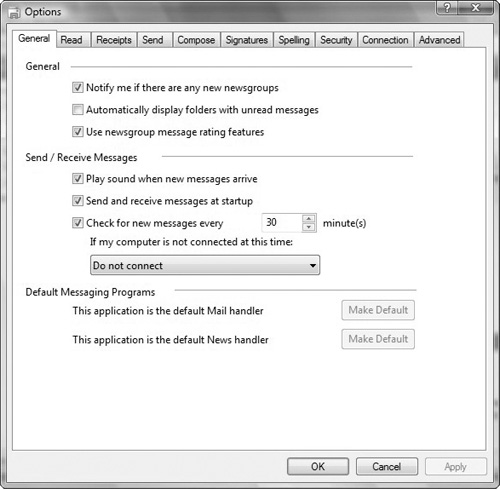
To configure the settings for Windows Mail, open the Tools menu and select Options. An Options dialog box displays with multiple tabs, as shown in Figure 11.1. The options include the following:
General settings for configuring newsgroup behavior, send and receive timings and behavior, and default messaging programs
Read settings for configuring how messages appear, how newsgroups messages are downloaded, and how fonts are used in Windows Mail
Receipts settings for configuring how read receipts behave
Send settings for configuring the format to send e-mail and news messages, and general settings for actions to take when mail is sent
Compose settings for configuring fonts and stationery used in e-mail and news messages, and settings for using business cards
Signatures settings for configuring a personalized signature to add to your outgoing e-mail
Spelling settings for configuring your spelling checker preferences
Security settings for configuring secure e-mail by using certificates, for using virus protection for your e-mail, and whether to allow image downloads
Connection settings for configuring how the connection to the mail server behaves
Advanced settings for configuring maintenance and troubleshooting
With the popularity of e-mail and because of its low cost, users have to deal with junk e-mail. Junk e-mail is unsolicited e-mail that usually contains advertisements, flyers, and catalogs that may or may not contain fraudulent schemes and pornography. In addition, viruses are often spread through junk e-mail.
Windows Mail includes a Junk E-Mail Filter that analyzes the content of messages sent to you and moves suspicious messages to a special Junk E-Mail folder, where you can view or delete them at any time. And if a junk e-mail message slips past the filter into your Inbox, you can specify that any future messages from the sender be automatically moved to the Junk E-Mail folder.
Windows Mail automatically screens junk e-mail. However, you can customize how junk e-mail is filtered by opening the Tools menu, selecting Junk E-mail options, and selecting one of the following protection levels:
No Automatic Filtering. Use this option if you want to stop blocking junk e-mail messages altogether. Windows Mail will continue to block messages from domain names and e-mail addresses on your Blocked Senders list.
Low. Use this option if you don’t receive many junk e-mail messages and want to block only the most obvious junk e-mail messages. This is the default setting.
High. Use this option if you receive a large number of junk e-mail messages and want to block as many as possible.
Safe List Only. Use this option if you want to receive only messages from people or domain names on your Safe Senders list. E-mail messages from people or domain names not on your Safe Senders list will be treated as junk e-mail messages, so you should choose this option only if you are certain that every person or domain name that you want to receive messages from is on your Safe Senders list.
Of course, you can take the following steps to reduce your junk e-mail:
Use caution in giving out your e-mail address. Avoid publishing your real e-mail address in websites, newsgroups, or in other public areas of the Internet.
Before you give your e-mail address to a website, check the site’s privacy statement to be sure it does not permit the disclosure of your e-mail address to other companies.
Never reply to a junk e-mail message. The sender will know that your e-mail address is valid and might sell it to other companies. You are then likely to receive even more junk e-mail.
If you are getting junk mail from a specific e-mail address, you can add that address to the Blocked Senders list. If you have e-mail that is getting flagged as junk e-mail, you can prevent the blocking of the messages from a specific e-mail address by adding them to the Safe Senders list. If an address is on both the Safe Senders list and the Blocked Senders list, the Safe Senders list has a higher priority than the Blocked Senders list; therefore, the message will be received rather than blocked. To add addresses to the Blocked Sender’s list, follow these steps:
Open Windows Mail.
Click a message from the sender that you want to add to the Blocked Senders list.
Click the Message menu, point to Junk E-mail, and then do one of the following:
To block all future messages from that specific sender, click Add Sender to Blocked Senders List.
To block all messages from any sender whose domain name (the portion of the e-mail address after the @) is the same as the sender’s, click Add Sender’s Domain (@example.com) to Blocked Senders List.
To move a message from the Junk E-mail folder to your Inbox, follow these steps:
Phishing Filter is a Windows Mail feature that helps detect phishing websites. The Phishing Filter uses the following methods to help protect you from phishing scams:
It compares the addresses of websites you visit against a list of legitimate sites reported to Microsoft. This list is stored on your computer.
It helps analyze the sites you visit to see whether they have the characteristics common to a phishing website.
With your consent, Phishing Filter sends some website addresses to Microsoft to be further checked against a frequently updated list of reported phishing websites.
If you visit a website that has been reported as a phishing website, Internet Explorer will display a warning web page and a notification on the address bar. You can then choose to continue or close the page. If the website contains characteristics common to phishing sites, Internet Explorer will notify you in the address bar that it may possibly be a phishing website.
To keep Windows Mail secure, follow these guidelines:
Use an up-to-date antivirus program.
Make sure that virus protection is enabled for Windows Mail security options, including warning when an application tries to send mail and not to open attachments that could be potentially have a virus. You should also consider blocking images within HTML e-mail.
Use caution when opening e-mail attachments.
Be careful when clicking links in messages.
Always use a secure password. Passwords that use a combination of uppercase, lowercase, and alphanumeric characters are harder to guess than passwords that can be found in a dictionary.
If more than one user uses a computer, create a different profile for each user with its own e-mail account.
Calendar programs enable a user to organize appointments, set reminders, organize tasks, and share calendars with other users. Windows Calendar enables you to manage your schedule, let others view your schedule, and subscribe to web-based calendars.
Windows Calendar provides an individual calendar for each user account on a computer so that each user can maintain a private schedule (see Figure 11.2). You can also have one user have multiple calendars so that he can keep personal events separate from work-related events, or you can have multiple work-related calendars if you are involved with multiple projects.
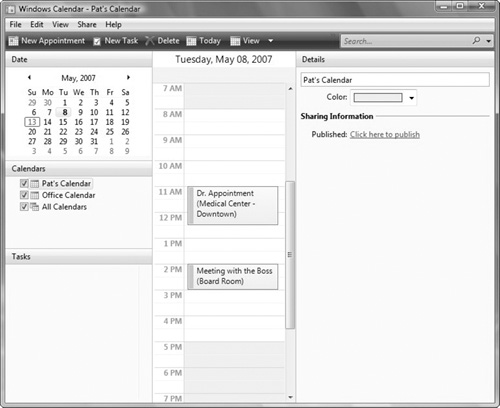
To view several calendars together, you can create a calendar group, which then enables you to view the appointments in each calendar individually, or together. Although you cannot add new appointments directly to a calendar group, you can edit existing appointments. Appointments from each calendar display in a different color, making it easy to tell which schedule each item belongs to.
To create a calendar, follow these steps:
Click the File menu, and then click New Calendar.
In the New Calendar box, enter the name you want for the calendar, and then press Enter.
To choose the color of your appointments, in the Details pane, click Color, and then click the color you want.
You can view your calendar by day, work week, week, or month. Just click the View menu, and then click the view you want. A check mark displays next to the view you select.
To create an appointment, follow these steps:
On the toolbar, click New Appointment.
In the New Appointment box, enter a description of the appointment.
In the Location box on the Details pane, type the location of the appointment.
In the Calendar list, click the calendar where you want the appointment to display.
To make an all-day appointment, select the All-Day Appointment check box.
Enter start and end times.
To make the appointment recur, in the Recurrence list, click the type of recurrence you want.
To set a reminder, in the Reminder list, click how long before the appointment you want to be reminded.
To invite someone, in the Attendees list, type the e-mail address of the person you want to invite, press Enter, click the e-mail address in the Invite list, and then click Invite.
To edit an appointment, double-click the appointment, and then type over the existing text with your changes. Finally, you can have Windows Calendar use e-mail to send and receive appointments and invitations to friends and family members.
To help manage your time, you can create tasks. To create a task, follow these steps:
On the toolbar, click New Task.
In the New Task box, enter a description of the task.
In the Calendar list on the Details pane, click the calendar where you want the task to appear.
In the Priority list, click the priority you want: Low, Medium, or High.
Enter the start and due dates.
To set a reminder, in the Reminder list, click On Date, and enter the date and time you want to be reminded.
To search for appointments or tasks based on letters, words, or other text, in the Search box, type letters or words from the appointment you want to find. The results display as you type. The more you type, the more precise the results.
You can print your calendar by day, work week, week, or month. To print the calendar, click Print on the toolbar. Under Print Style, click one of the following: Day, Work Week, Week, or Month, and then click OK.
Many organizations publish their calendars on the Internet. If these calendars are published using the iCalendar format (ICS), you can subscribe to these calendars by clicking subscribe on the toolbar and then following the instructions.
You can publish your own calendar on the Internet through a web host so that others can see and share it. If you want, you can publish your personal schedule with password protection, which means you can choose who can access and view it:
Click the Share menu, and then click Publish.
In the Calendar Name box, enter the calendar name that you want to share.
In the Location to Publish Calendar box, enter the location (such as a website) where you want to publish the calendar.
Select any other options you want, and then click Publish.
Because Windows Calendar is compatible with the iCalendar format, you can import and export calendar information to and from other applications and websites.
The Windows Fax and Scan program enables users to use a scanner to scan a document or picture into the system. Then, the same users can use e-mail to send the document to other users or a fax modem or fax server to fax the document or picture to another fax machine. It can also be configured to receive faxes from other fax machines.
Before you can send or receive faxes, you must configure a fax account. A fax account contains all the settings necessary for you to use a specified analog modem or fax server. You can create fax accounts for both an analog modem and a fax server on the same computer. You can configure a fax account to use either an internal or an external modem. To create a fax account, run the Fax Setup Wizard by selecting Fax Accounts under the Tools menu.
To scan a document, follow these steps:
Make sure that your scanner is connected to your computer and turned on.
Place a document on the scanner, or, if the scanner has a document feeder, place one or more pages in the feeder. If your scanner offers both options, use the option that you prefer.
Click the Start button, click All Programs, and then click Windows Fax and Scan.
To use Scan view, at the bottom of the left pane, click Scan.
On the toolbar, click New Scan.
In the New Scan dialog box, click the Profile list, and then click Documents. The default settings for scanning a document, which you can use or change, are automatically displayed.
To see how a document will appear when scanned, click Preview. If needed, change your scan settings, and then preview the document again. Repeat this step until you are satisfied with the preview results.
Click Scan. When the scan is complete, Windows Fax and Scan automatically displays the document so that you can view and manage it.
If you need to crop (cut the outside part of image that you do not desire to keep) an image before scanning it, click Preview in the New Scan dialog box, and then, in the preview area, drag the handles of the cropping tool to resize the image.
If a page that you’re scanning contains more than one picture, you can save each picture as a separate file by selecting the Preview or Scan Images as Separate Files check box. You can automatically forward scanned documents to an e-mail address or a network folder. To choose a forwarding option, click Tools, and then click Scan Routing.
To send a fax using your computer, you can use Windows Fax and Scan or other programs that you run on Windows. Before you try sending a fax, however, make sure that your computer is connected to a fax modem or fax server, and then follow these steps:
To fax directly from an application without going through the Windows Fax and Scan tool, open the File menu, select Print, and select Fax as the printer.
To send a fax to more than one recipient, in the To box, type the fax numbers, separated by semicolons. You can also select recipients from your Windows Contacts folder by clicking To, and then, in the list of contacts, double-clicking each contact. Make sure that you’ve saved your recipients’ fax numbers in the contact information.
A cover page, which usually contains who the fax is being sent to and from including fax numbers, is used to help prevent people other than your intended recipients from seeing the contents of the fax, especially if the fax contains personal or confidential information. Therefore, it is recommended that the first page of each fax should be the cover page.
When working within Fax view, you can easily attach a file or insert text and pictures from other faxes by using the toolbar. When you attach a file, the file will be converted into a TIF image so that it can be received by any fax device. You can also drag the file from the desktop or any folder to the new Fax windows.
To ensure that a fax has been sent, you can configure the Windows Fax and Scan to send you a receipt. To enable receipts, navigate to the Receipts tab of Fax Options on a Windows Vista computer. Then, choose the E-mail To option and specify the user’s e-mail address.
Received faxes are automatically stored in your Windows Fax and Scan Inbox. To save a copy to your Documents folder or any other folder, right-click the fax and click Save As, browse to the location, and save the fax.
To e-mail a scanned document or picture, follow these steps:
Click the Start button, click All Programs, and then click Windows Fax and Scan.
Click Scan.
Click the document or picture in the list of scanned files, and then click Forward as E-mail on the toolbar.
In the new e-mail message, enter the appropriate e-mail address for each recipient in the To and CC boxes. If you are sending to more than one recipient, separate the addresses with semicolons.
Enter the subject of the e-mail message in the Subject box and type the appropriate message.
Click Send.
You can also route all scans to an e-mail address by opening the Tools menu and selecting the Scan Routing option.
To receive faxes automatically, follow these steps:
Click the Start button, click All Programs, and then click Windows Fax and Scan.
To use Fax view, at the bottom of the left pane, click Fax.
Click Tools, and then click Fax Settings. If you are prompted for an administrator password or confirmation, enter the password or provide confirmation.
Click the General tab, and then, under Send/Receive options, select the Allow Device to Receive Fax Calls check box.
Click Automatically Answer After x Rings, and then select the number of rings after which the modem can answer incoming phone calls to try to receive a fax.
If you choose to receive faxes automatically, the modem will answer all incoming phone calls. To answer calls using your phone, you need to answer before the modem answers them.
To manually receive a fax, follow these steps:
Click the Start button, click All Programs, and then click Windows Fax and Scan.
To use Fax view, at the bottom of the left pane, click Fax.
On the toolbar, click Receive a Fax Now. The Fax Monitor dialog box appears and displays the progress of the fax.
To automatically save a copy of each fax that you receive, follow these steps:
Click the Start button, click All Programs, and then click Windows Fax and Scan.
To use Fax view, at the bottom of the left pane, click Fax.
Click the Tools menu, and then click Fax Settings. If you are prompted for an administrator password or confirmation, type the password or provide confirmation.
Click the General tab, and then click More options.
Under When a Fax Is Received, select the Save a Copy To check box, and then browse to the folder where you want to save copies.
To preview a fax, click the fax; it will display in the Preview pane below the list of faxes in your Inbox. To open a fax, double-click the fax in your list of faxes.
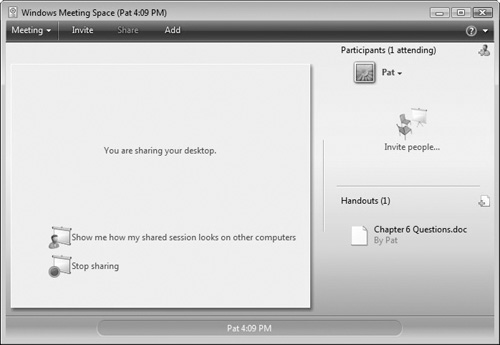
Windows Meeting Space, which is a replacement for NetMeeting, enables you to share documents, programs, or your entire desktop with other people (see Figure 11.3). One of the advantages of using Windows Meeting Space is that it uses peer-to-peer technology that automatically sets up an ad hoc network if it can’t find an existing network. So, you can use it in a conference room, a favorite hotspot, or a place where no network exists. You can join a meeting that someone else sets up, or you can start a new meeting and invite other people to join it.
After you have a method for users to connect to your computer, to start a new meeting, follow these steps:
Click Start a New Meeting, and then enter a name and password for the meeting. The password must be at least eight characters long.
If you want to change visibility or network options for the meeting, click Options.
Click the right-arrow button.
When you start Windows Meeting Space for the first time on a computer, you are prompted to turn on some services and sign in to People Near Me. If you are prompted for an administrator password or confirmation, enter the password or provide confirmation.
People Near Me identifies people using computers near you so that you can use Windows Meeting Space and other programs. When you sign in to People Near Me and then use a collaborative program such as Windows Meeting Space, a list of available people appears. Display names, computers names, and IP addresses are visible to everyone signed in to People Near Me.
You can configure People Near Me to accept invitations from anyone, no one, or trusted contacts only. A trusted contact is someone who supplies a digital certificate that you trust. The invitation can be dismissed, declined, or viewed and accepted.
Tip
Users must be on the same subnet to see available Windows Meeting Space Meetings in the People Near Me list.
There are three ways to invite people in a meeting. Either way, you first click the Invite People button. You then do one of the following:
Select the check box beside the name of each person you want to invite, and then click Send invitations.
In the Invite people dialog box, click Invite Others, and then click Send an Invitation in E-mail.
In the Invite People dialog box, click Invite Others, click Create an Invitation File, and save the file. Give the invitation file to the person you want to invite, either by making it available on a network share that the person can access, e-mailing it, or providing it on removable media.
You can join a meeting by double-clicking the invitation file that you receive from someone in the meeting. You can also join a meeting by following these steps:
Open Windows Meeting Space.
Click Join a Meeting Near Me, enter the password for the meeting, and then click the right-arrow button.
If you have trouble connecting to a meeting, confirm the meeting password. You also need to make sure that the person who is offering the meeting has the correct firewall ports open.
After people have joined the meeting, you can share documents and programs. You can also add handouts, which will be copied to the participants’ computers as they join the meeting.
The Windows Sidebar is a pane that keeps your gadgets organized and always available. Gadgets are easy-to-use mini programs (tools) that give you information at a glance for frequently performed tasks such as checking the weather, checking the time (via a digital clock), and checking email (without opening other programs).
To remove the Sidebar from the desktop, right-click the Sidebar and select Close. To reopen the Sidebar, right-click the Sidebar icon in the notification area and select Open. To close the Sidebar program, right-click the Sidebar, and select Close. Then, right-click the Sidebar icon in the notification area and select Exit. To start the Sidebar, select All Programs, Accessories, and then click Windows Sidebar.
You can keep Sidebar and any detached gadgets that are on your desktop on top of your open windows. If open windows are maximized, they will automatically lock against Sidebar. To make the Sidebar always be on top, follow these steps:
Right-click the Windows Sidebar and select Properties.
Select the Sidebar Is Always on Top of Other Windows check box, and then click Apply.
To place a gadget on the desktop, follow these steps:
Right-click the gadget you want to detach, and then click Detach from Sidebar.
Drag the gadget to the location you want on the desktop.
You can add any installed gadget to the Sidebar. If you want, you can add multiple instances of a gadget. For example, if you are keeping track of time in two time zones, you can add two instances of the Clock and set each accordingly.
You can find additional gadgets from the following website:
http://gallery.microsoft.com/vista/sidebar.aspx
To configure a gadget, you can do the following:
To configure a gadget to always be on top, right-click a detached gadget, and then click Always on Top.
To move the gadget back to the Sidebar, right-click the gadget, and then click Attach to Sidebar.
To remove a gadget from the Sidebar, right-click the gadget, and then click Close Gadget.
To change an individual gadget’s options, right-click the gadget you want to change, and then click Options.
To change the opacity of a gadget, right-click the gadget and select Opacity. Then, select the percentage of opacity.
Answer B is correct. Apparently, the user did not configure to leave the messages on the Exchange box when configuring Microsoft Mail. Therefore, you need to export messages from the Inbox folder to Exchange. Answer A is incorrect because changing the store in Windows will not change the messages on the Exchange Server that the user accesses using Microsoft Outlook. Answer C is incorrect because Microsoft Outlook is the user’s primary mail client. Therefore, importing into Windows Mail will not fix the problem. Answer D is incorrect because Outlook Web Access server provides only a web interface to e-mails that are already on the Exchange server. Therefore, no e-mails will be recovered to the Exchange server. | |
Answers B and D are correct. To shut off the junk e-mail protection, you need to configure to No Automatic Filtering. You then need to add the address on the online store to the Blocked Senders list so that messages sent from that address will be blocked. Answer A is incorrect because you don’t want to block all .com addresses. Answer C is incorrect because if you add the address to the Safe Senders list, Microsoft Mail will not block messages from this address. Answer E is incorrect because setting junk e-mail protection to Low will still block some messages that it thinks is junk mail. | |
Answer C is correct. Because the People Near Me will list only people who are on the same subnet, you must create invitations for the remote users. Answer A is incorrect because Pat not seeing the meeting is not an IP address problem. Answer B is incorrect because Pat not seeing the meeting is less likely compared to answer C. Answer D is incorrect the real problem is that the People Near Me will list only people who are on the same subnet. | |
Answer B is correct. If you don’t want your meeting sessions listed, select the Do Not Allow People Near Me to See This Session. Answer A is incorrect because this option would be used when you are out of the office with no formal network available. Answer C is incorrect because just sending invitations will not change whether a person can see the available sessions. Answer D is incorrect because signing out people will not affect whether they can see the session listed. | |
Answer A is correct. To combine several calendars together so that they can be seen as one is done using groups. Answer B is incorrect because the Merge option would physically combine calendars. Answers C and D are incorrect because importing and exporting calendars do not keep the calendars separate. | |
Answer C is correct. If you share the folders in a Publish folder, both users can access each other’s calendars while keeping all other personal files secure. Answer A is incorrect because delegation only works with Microsoft Outlook. Answers B and D are incorrect because these solutions give access to personal files. | |
Answer B is correct. To set up electronic receipts when faxes are delivered, open the Fax Options, select the Receipts tab, and choose the E-mail To option. Answer A is not used for user notification; instead it is used for logging of fax activities. Answers C and D are incorrect because these settings have nothing to do with user notifications of faxes sent. | |
Answer B is correct. To forward scanned images to an e-mail address, use the Scan Routing option. Answer A is incorrect because the Scan Settings option does not exist. Answers C and D are more difficult ways because you have to do them manually. | |
Answer B is correct. You can fax a document from any application that can print directly to the fax. Answers A, C, and D would take much longer and more effort to complete. | |
Answer C is correct. To close a Sidebar, right-click the Windows Sidebar and select Close Sidebar. Answers A and B are incorrect because they will affect the individual gadgets and not the Sidebar itself. Answer D is incorrect because the Sidebar applet does not exist in the Control Panel. | |
Answer C is correct. You can detach individual gadgets to be kept on the desktop by right-clicking the gadget and selecting Detach. Answer A would remove the gadget from the Sidebar. Answer B is incorrect because this would detach all of the gadgets except the Weather gadget. Answer D is incorrect because there is no Sidebar applet in the Control Panel. | |
Answer A is correct. The user cannot see it because the opacity was set too low. Answers B and C are incorrect because the gadget is not being blocked by another application or gadget. Answer D does not affect the Sidebar. |
Tulloch, Mitch, Tony Northrup, Jerry Honeycutt, Ed Wilson, Ralph Ramos, and the Windows Vista Team, Windows Vista Resource Kit (Pro. Resource Kit) (Redmond, Washington: Microsoft Press, 2007).
Stanek, William R., Introducing Microsoft Windows Vista (Redmond, Washington: Microsoft Press, 2006).