Terms you’ll need to understand:
✓ | Windows Deployment Services (WDS) |
✓ | Business Desktop Deployment Solution Accelerator 2007 (BDD 2007) |
✓ | Windows System Image Manager (Windows SIM) |
✓ | Answer file |
✓ | Windows image |
✓ | Catalog |
✓ | Windows PE |
✓ | Windows PXE |
✓ | ImageX |
✓ | Diskpart |
✓ | Sysprep |
✓ | Service pack |
✓ | Windows Vista Upgrade Advisor |
✓ | System Recovery Option |
✓ | Windows activation |
Techniques/concepts you’ll need to master:
✓ | List the system requirements for Windows Vista. |
✓ | Given a scenario, recommend to do a clean installation, an upgrade, or a migration. |
✓ | Perform a clean installation of Windows Vista. |
✓ | Perform an upgrade installation of Windows Vista. |
✓ | Install Windows Vista using an answer file and ImageX. |
✓ | Check for and install Windows Vista fixes, patches, and service packs. |
✓ | Upgrade Windows Vista to another version of Windows Vista. |
✓ | Determine whether a machine meets system requirements by running the Windows Upgrade Advisor. |
✓ | Repair a Windows Vista installation using the installation DVD. |
✓ | When necessary, activate Windows Vista. |
The first step to becoming a desktop technician is to know how to install Windows Vista onto a computer. Although you might think that this is a simple operation in which you insert the DVD into the drive and install it, you will quickly learn that you must first verify whether your system meets system requirements. You must then determine whether it is best to perform a clean install, upgrade a current system, or perform a clean install and migrate system settings from another system. Of course, if problems occur during the installation, you must determine the best way to overcome those problems.
Before installing Windows Vista, you need to look at the system and verify whether it has the necessary hardware to effectively run Windows Vista. If the system that you choose does not meet the system requirements, Windows Vista might not install completely, some Windows Vista features might not function properly, or system performance will be poor and unacceptable.
In contrast to previous versions of Windows, Microsoft defines three hardware levels for Windows Vista:
Minimum. The minimum hardware requirements are the minimum hardware to install Windows Vista.
Windows Vista Capable. Vista Capable PCs will meet or exceed the core Windows Vista experience and features found on Windows Vista Business and Windows Vista Enterprise versions.
Windows Vista Premium Ready. If a PC is Windows Vista Premium Ready, it delivers or exceeds the Windows Vista Capable PC, and it supports the new Windows Aero interface.
See Table 2.1 for the system requirements for Windows Vista as defined by Microsoft. Of course, if a system has a faster processor or additional RAM, your system will run faster.
Table 2.1. System Requirements for Windows Vista
Minimum | Vista Capable | Premium Ready[*] | |
|---|---|---|---|
CPU | 800 MHz | 800 MHz | 1 GHz |
RAM | 512 MB | 512 MB | 1 GB |
GPU | SVGA | Direct 9 Capable | Aero Capable |
Video RAM | 128 MB | ||
HDD | 20 GB | 20 GB | 40 GB |
HDD Free | 15 GB | 15 GB | 15 GB |
Optical Drive | CD | CD | DVD |
[*] Requires an aero Capable GPU supports Direct 9 with a WDDM driver, Pixel Shader 2.0, and 32 bits per pixel. | |||
There several ways to install Windows Vista. The method you use will depend on whether you are installing on a new computer or on a computer that is currently running another version of Windows. The three types of installations are as follows:
Clean. Performed on a new partition or when you want to completely replace the operating system on a partition. On a computer without an operating system, you boot directly from the CD or DVD. If an operating system is already on the system, you can also run Setup.exe to start the installation. You can also use an image to create a clean installation.
Upgrade. Also known as an in-place upgrade, it is used to replace or upgrade an existing version of Windows (Windows 2000, Windows XP, or Windows Vista).
Migration. Provides a clean installation of Windows Vista while migrating all current Windows settings to the new Windows Vista installation (backing up the user’s files and settings, performing a clean installation or upgrade, restoring the user’s files and settings, and reinstalling the applications).
If you work for an organization that has hundreds of computers, it is a huge task to install or upgrade Windows Vista on each computer. To assist with the deployment of Windows Vista, Microsoft offers Windows Deployment Services (WDS).
Microsoft WDS is the updated and redesigned version of Remote Installation Services (RIS), which can be installed on Windows Server 2003 and will be included with future versions of Windows servers. WDS helps organizations rapidly and remotely deploy Windows operating systems, particularly Windows Vista. Using WDS, you can deploy Windows operating systems over a network without having to be physically present at the destination computer and without using installation media.
Part of the WDS is the Business Desktop Deployment Solution Accelerator 2007 (BDD 2007), which provides end-to-end guidance for planning, building, testing, and deploying Windows Vista. BDD 2007 enables you to do the following:
Create a software and hardware inventory to assist in deployment planning.
Test applications for compatibility with Windows Vista, and mitigate any compatibility issues discovered during the process.
Set up an initial lab environment with deployment and imaging servers.
Customize and package core and supplemental applications.
Automate creating and deploying desktop images.
Ensure that the desktop is hardened to improve security within the environment.
Manage processes and technologies to produce a comprehensive and integrated deployment.
BDD 2007 includes the following tools:
Windows System Image Manager (Windows SIM). A tool that enables you to create answer files and network shares or to modify the files contained in a configuration set. The Windows SIM is part of the Windows Automated Installation Kit (WAIK), which is included with BDD 2007.
Answer file. An Extended Markup Language (XML) file that scripts the answers for a series of graphical user interface (GUI) dialog boxes and other configuration settings. The answer file for Windows Setup is commonly called autounattend.xml. You can create and modify this answer file by using Windows SIM from the WAIK.
Windows image. A single compressed file that contains a collection of files and folders that duplicate a Windows installation on a disk volume. Windows Vista is built and distributed as a single image using the new Windows Imaging (WIM) file format. The WIM file format can contain multiple images; this enables you to package several custom installations into one file.
Catalog. A binary file (CLG) that contains the state of the settings and packages in a Windows image. There must be a catalog for each version of Windows Vista contained within the image.
Windows PE. Microsoft Windows Preinstallation Environment (Windows PE) is a bootable tool that replaces MS-DOS as the preinstallation environment. Windows PE is not a general-purpose operating system. Instead, it is used to provide operating system features for installation, troubleshooting, and recovery. Windows PE can be run from CD/DVD, USB pen drive, or a network using Pre-boot Execution Environment (PXE). Windows PE 2.0, built for Windows Vista, is available for download as part of the BDD 2007 solution.
Note
PXE (pronounced pixie) is short for Pre-boot Execution Environment. PXE allows a computer to boot from a server on a network instead of booting the operating system on the local hard drive. For a system to support PXE, the PXE must be supported by the computer’s BIOS and its network interface card (NIC).
ImageX. A command-line tool that captures, modifies, and applies installation images for deployment in a manufacturing or corporate environment.
Windows Setup (Setup.exe). The program that installs the Windows Vista operating system.
Diskpart. A command-line hard disk configuration utility.
Sysprep. The utility that facilitates image creation for deployment to multiple-destination computers. Sysprep prepares an installed system ready to be duplicated as an image. It does this by removing the original security identifiers (SIDs) from the image and cleaning up various user and machine settings and log files.
The BDD 2007 can be downloaded from http://www.microsoft.com/downloads/details.aspx?FamilyId=13F05BE2-FD0E-4620-8CA6-1AAD6FC54741&displaylang=en.
When you perform a clean installation of Windows Vista, any existing data is removed, including personal data and settings. You must also reinstall all programs. Of course, before you do any installation of any machine that has any kind of data, it is recommended that you back up all personal data before you perform a clean installation.
You can perform a clean installation of Windows using the following methods:
Install from DVD.
Install from a network share.
Install using an image.
To perform a clean installation of Windows Vista, the most common method is to install it from the installation DVD. To install it by starting the computer using the Windows DVD, follow these steps:
Insert the Windows Vista DVD into the computer’s DVD drive.
Restart the computer.
When the “Press any key to boot from CD” message shows on the screen, press a key.
Follow the instructions that are displayed on the screen to install Windows Vista.
To start the computer from the Windows Vista DVD, the computer must be configured to start from the DVD drive, usually in the BIOS settings. For more information about how to configure the computer to start from the DVD drive, refer to the documentation that is included with the computer or contact the computer manufacturer.
To start the installation process from a current operating system, follow these steps:
Start the computer by using the current operating system.
Insert the Windows Vista DVD into the computer’s DVD drive.
If Windows automatically detects the DVD, the Install Now screen appears. Click Install Now. If Windows does not automatically detect the DVD, click Start, click Run, enter Drive :setup.exe (where the Drive is the drive letter of the computer’s DVD drive), and then click OK.
Click the Install Now button option.
When you reach the “Which type of installation do you want?” screen, click Custom (advanced), and then follow the instructions that are displayed on the screen to install Windows Vista.
To install Windows Vista from a network share, follow these steps:
Boot a computer that has network connectivity by using a network boot disk such as PXE boot or Windows PE.
To start the installation, either connect to a network share containing the Windows Vista files or connect to a WDS server using PXE. The network source could be a share on a file server (such as \servernamesharename) or a WDS server. If you connect to a network share on a file server, run Setup.exe. If you connect to a WDS server using PXE, installation will start automatically.
Complete the wizard.
To install Windows Vista by using an Image, you use an answer file or the command-line utility ImageX. When installing using the answer file, it will install Windows with the same parameters that are specified in the answer file. To install Windows Vista by using an answer file, follow these steps:
Build a source computer.
Use Windows SIM to create an answer file (autounattend.xml) on removable media using the source computer. Save the autounattend.xml file to removable media, such as a USB flash device or floppy disk.
Insert the removable media into the destination computer.
Boot the destination computer from DVD; Setup automatically searches for autounattend.xml.
To deploy Windows Vista by using ImageX, follow these steps:
Install and configure Windows Vista on a source PC.
Use Sysprep on the PC so that the operating system can be deployed by removing some computer-specific information such as the workstation’s SID, which must be unique.
Use ImageX on the master to create the image file.
Boot the target with the Windows PE CD.
Use Diskpart to format the drive. Diskpart is a PE tool that is used to configure the hard drive on a PC.
Use ImageX to apply the image to the target.
Exam Alert
During the exam, you will need to know the steps for setting up a Windows Vista computer using the answer file and using images.
For more information, refer to the Windows Vista Deployment Step-by-Step Guide at http://technet2.microsoft.com/WindowsVista/en/library/88f80cb7-d44f-47f7-a10d-e23dd53bc3fa1033.mspx.
For more information about Windows PE 2.0 for Windows Vista, visit http://technet.microsoft.com/en-us/windowsvista/aa905120.aspx.
If your machine meets the minimum requirements, the installation should complete without problems. If a problem does occur, follow a standard troubleshooting approach to isolate and fix the problem:
If your solution does not fix the problem, start at step 3 again.
To help identify specific problems, do the following:
Review and research error messages.
Verify the system meets minimum requirements. A common reason for an upgrade to fail is that the computer does not meet the minimum hardware requirements to support the edition of Windows Vista that you are installing.
Verify that the hardware has been installed properly.
Check to see whether there are compatibility problems with the installed devices.
Check whether a BIOS upgrade is needed. Check your computer supplier’s website to see whether a BIOS upgrade is available for Windows Vista.
Verify the installation media. Make sure that the installation media is not damaged or corrupt.
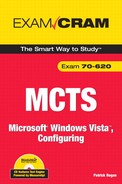
After installing Windows, check whether Microsoft has any fixes, patches, service packs, or device drivers, and apply them to the Windows system. By adding fixes and patches, you will keep Windows stable and secure. If there are many fixes or patches, Microsoft releases them together as a service pack. To update Windows Vista, Internet Explorer, and other programs that ship with Windows, go to Windows Update in the Control Panel (see Figure 2.1). Windows will then scan your system to see what you have installed and then list suggested components. This system check ensures that you will get the most current and accurate versions of anything you choose to download from the site.
To help users with the Windows updates, Windows Vista also offers Dynamic Update and Auto Update. Dynamic Update is a feature built in to Windows Setup that automatically checks for new drivers, compatibility updates, and security fixes while Windows is beings installed. All that is required is that you have a working connection to the Internet. During installation, you can choose to have Dynamic Update check for updates. It automatically downloads any device or application updates and uses these replacement files rather than the installation files, thereby ensuring you have the latest updates available. By updating your installation files as needed, Windows can quickly integrate new, certified device drivers, critical security fixes, and compatibility updates.
After you install Windows, you can use Auto Update to ensure that critical security and compatibility updates are made available for installation automatically, without significantly affecting your regular use of the Internet. Auto Update works in the background when you are connected to the Internet to identify when new updates are available and to download them to your computer. The download is managed so that it does not affect your surfing the web, and it picks up where it left off if the download is interrupted.
When the download has completed, you are notified and prompted to install the update. You can install it then, get more details about what is included in the update, or let Windows remind you about it later. Some installations may require you to reboot, but some do not.
When you perform a clean installation of Windows Vista, you do not transfer user settings from the previous operating system on the system. To reconfigure the user settings on a new machine is time-consuming for IT administrators and users who use the computers. Because Windows 2000 Professional, Windows XP, and Windows Vista use similar file systems, device drivers, and registry structures, it is possible to upgrade or migrate user settings from one Windows version to a later Windows version under certain conditions. Table 2.2 lists upgrade capabilities of different Windows versions.
Table 2.2. Upgrade Options for Windows Vista
Home Premium | Business | Ultimate | ||
|---|---|---|---|---|
Windows XP Pro[*] | Requires clean install | Requires clean install | In-place installation option available | In-place installation option available |
Windows XP Home | In-place installation option available | In-place installation option available | In-place installation option available | In-place installation option available |
Windows XP Media Center | Requires clean install | In-place installation option available | In-place installation option available | In-place installation option available |
Windows XP Tablet PC | Requires clean install | Requires clean install | In-place installation option available | In-place installation option available |
Windows XP Professional x64 | Requires clean install | Requires clean install | Requires clean install | Requires clean install |
Windows 2000 | Requires clean install | Requires clean install | Requires clean install | Requires clean install |
[*] Requires Windows XP Service Pack 2 (SP2) | ||||
For computers that have not been tested by the manufacturer and do not have the Vista Capable or Premium Ready logos (especially for older computers that were produced before Windows Vista’s release), you can also run the Windows Vista Upgrade Advisor on individual machines to learn which version of Windows Vista can be successfully installed on the computer.
Note
The Windows Vista Upgrade Advisor runs only on computers that are running 32-bit versions of either Windows Vista or Microsoft Windows XP SP2. In addition, it requires both Microsoft Core Extensible Markup Language Services (MSXML) 6.0 and Microsoft .NET Framework 2.0 are installed before it can run, both of which you can download from the Microsoft website.
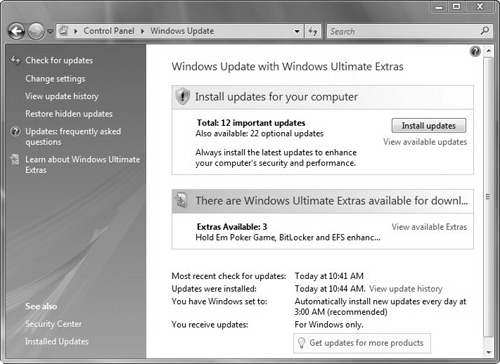
After you install Windows Vista Upgrade Advisor and perform the scan, it will recommend a suitable edition of Windows Vista to which you can upgrade. You can also use the Windows Vista Upgrade Advisor to select alternative Windows Vista editions, and then view a report of potential problems related to that edition and recommendations on changes that you might need to make (see Figure 2.2). Of course, you can install any edition of Windows Vista as long as the computer meets the minimum hardware requirements for that edition. Of course, you might encounter some problems with Windows Vista and its functionality.
Exam Alert
Anytime you need to check a system to see whether it is compatible with Windows Vista, use the Windows Vista Upgrade Advisor.
Another program worth mentioning is the Windows Vista Hardware Assessment tool. The Windows Vista Hardware Assessment solution accelerator is an inventory, assessment, and reporting tool that will find computers on a network and determine whether they are ready to run the Windows Vista operating system. The solution accelerator performs three key functions: hardware inventory, compatibility analysis, and readiness reporting. The Windows Vista Hardware Assessment Wizard can inventory and scan computers on a network that runs an operating system that supports Windows Management Instrumentation (WMI). The supported operating systems are as follows:
Windows Vista (already migrated)
Windows XP Professional (SP2)
Windows Server 2003 or Windows Server 2003 R2
Windows 2000 Professional or Windows 2000 Server
If you have Windows XP running SP2, you might be able to perform an in-place upgrade. During an in-place upgrade, the operating system is replaced while retaining all programs, program settings, user-related settings, and user data.
To perform an upgrade, follow these steps:
Verify that your system is capable of running Windows Vista by using the Windows Vista Upgrade Advisor. You also need to determine which applications have compatibility problems with Windows Vista and resolve those issues.
To protect against data loss, back up any data and personal settings before you start the upgrade.
Microsoft recommends that you turn off antivirus software during the install to ensure that it does not interfere with the installation process.
Insert the Windows Vista product DVD, and run the installation program. If your computer will support an in-place upgrade to Windows Vista, you will be able to select Upgrade during the installation process. If the Upgrade option is not available, verify the minimum system requirements, including memory and disk space.
After the upgrade has completed, log on to your computer and verify that all the applications and hardware devices function correctly. If the Windows Vista Upgrade Advisor made any recommendations relating to program compatibility or devices, follow those recommendations to complete the upgrade process.
Using the Microsoft update site, update Windows with the newest patches, fixes, and security packs.
When you migrate user settings, you are essentially installing fresh copies of Windows Vista and the applications, and then migrating the user settings from a previously used Windows computer. Two tools are used to migrate user settings:
Windows Easy Transfer (WET). Using removable media or over the network, use WET to perform a side by side migration to migrate the settings to a new computer that is already running Windows Vista.
User State Migration Tool V3.0 (USMT). Use USMT to migrate the files and settings to a removable medium or to a network share, and later restore the files and settings to the target computer.
To migrate user settings, follow these steps:
Verify that your system is capable of running of Windows Vista by using the Windows Vista Upgrade Advisor. You also need to determine which applications have compatibility problems with Windows Vista and resolve those issues.
To protect from data loss, back up any data and personal settings before you start the upgrade.
When you have successfully transferred the necessary files from your computer, insert the Windows Vista product DVD and perform a clean installation. To perform a clean installation, select Custom (advanced) during the installation process, and then follow the onscreen instructions to complete the installation.
Using the Microsoft update site, update Windows with the newest patches, fixes, and security packs.
Reinstall all programs.
Use WET or USMT to migrate both your program settings and your user-related settings to complete the migration process.
If you experience problems during an upgrade or migration to Windows Vista, you would use standard troubleshooting methodology to isolate the problem. Of course, to gather information, you do the following:
Review and research error messages.
Check logs. During setup, Windows Vista produces log files (located in Windowspanther) into which it records setup progress and information relating to problems encountered during setup.
Verify the system meets minimum requirements. A common reason for an upgrade to fail is that the computer does not meet the minimum hardware requirements to support the edition of Windows Vista that you are installing.
Check the devices and BIOS. If Windows Setup encounters a compatibility problem with a device or with the computer’s BIOS, the upgrade might fail.
Verify the installation media. Make sure that the installation media is not damaged or corrupt.
If you install one version of Windows Vista and you want to upgrade to a more enhanced version of Windows Vista, you might be able to perform an in-place upgrade to the new version of Windows Vista. You can perform an in-place upgrade between certain editions of Windows Vista, whereas you must use a clean installation and migration process for other Windows Vista upgrades. Table 2.3 shows which versions can be upgraded.
Table 2.3. The Upgradeability of Windows Vista to Other Versions of Windows Vista
Home Basic | Home Premium | Business | Enterprise | Ultimate | ||
|---|---|---|---|---|---|---|
Starter | Repair | Upgrade | Upgrade | Upgrade | Upgrade | Upgrade |
Home Basic | Clean Install | Repair | Upgrade | Upgrade | Upgrade | Upgrade |
Home Premium | Clean Install | Clean Install | Repair | Clean Install | Clean Install | Upgrade |
Business | Clean Install | Clean Install | Clean Install | Repair | Upgrade | Upgrade |
Enterprise | Clean Install | Clean Install | Clean Install | Clean Install | Repair | Upgrade |
Ultimate | Clean Install | Clean Install | Clean Install | Clean Install | Clean Install | Repair |
The process for upgrading between editions of Windows Vista is broadly similar to the process of upgrading earlier versions of Windows to Windows Vista:
Back up your data, program settings, and all user-related settings.
Install or upgrade using the Windows Vista DVD. If a direct in-place upgrade is possible, that option will be available to select during installation. Otherwise, select Custom (advanced) and perform a clean installation of the new edition of Windows Vista.
When installation has completed, ensure that you apply any updates to the new edition of Windows Vista if you did not do so during the installation process.
Install programs if you are performing a clean installation migration.
To complete the migration process, you must use WET or USMT to restore application program and user-related settings. You do not need to restore settings if you perform an in-place upgrade between Windows Vista editions.
When you perform a clean installation of Windows Vista on a hard disk partition that contains an existing Windows installation (assuming you did not reformat the hard disk), the previous operating system, user data, and program files are saved to a Windows.OLD folder. If the Windows.OLD folder exists on this drive, files from the previous Windows installation are saved during the Windows Vista installation process. Therefore, you can restore the computer to the previous Windows installation by accessing the following Microsoft website:
Often when a new operating system is released, there are software or device compatibility issues with which you have to contend. Some people may find it beneficial to have two partitions on their system, one with Windows XP and one with Windows Vista. In such a scenario, when you boot your system, you can select which operating system you want to boot. This also gives you an opportunity to test Windows Vista while having Windows XP still available.
Windows Vista Startup Repair is a Windows recovery tool that can fix certain problems, such as missing or damaged system files that might prevent Windows from starting correctly. When you run Startup Repair, it scans your computer for problems, and then tries to fix them so that your computer can start correctly.
Startup Repair is located on the System Recovery Options menu, which is on the Windows installation disc. Startup Repair might also be installed on your hard disk if your computer has preinstalled recovery options. Startup Repair might prompt you to make choices as it tries to fix problems; if necessary, it might also restart your computer as it makes repairs.
To run System Recovery from the installation DVD, follow these steps:
Insert the installation disc.
Restart your computer.
If prompted, press any key to start Windows from the installation disc.
Choose your language settings, and then click Next.
Click Repair Your Computer.
Select the operating system you want to repair, and then click Next.
On the System Recovery Options menu, click Startup Repair.
Although volume license might not require activation, retail versions of Windows Vista will need to be activated after installation. In the Welcome Center, the Activation Status entry specifies whether you have activated the operating system. If Windows Vista has not been activated, you can activate the operating system by clicking More Details to access the System console and then selecting Click Here to Activate Windows Now under Windows Activation.
Unlike in Windows XP, you can easily change the product key used by the operating system. In the System console, click Change Product Key under Windows Activation. In the Windows Activation window, type the product key, and then click Next. As in Setup, you do not need to type the dashes in the product key.
Answers B and C are correct. The system requirements specify a minimum of 512 MB of RAM and a 20-GB hard drive. The system in the question only has 384 MB of RAM and a 15-GB hard drive. The other system requirements include a 1-GHz processor and a Super VGA monitor, which the system already has. Therefore, answers A and D are incorrect. The system requirements do not specify a network card, so answer E is not correct. Of course, you will need a network card to communicate with a network. | |
Answer C is correct. The system requirements specify 15 GB of free hard disk space. The system in question only has 8 GB of free disk space. Because the system requirements specify a 1-GHz processor and 512 MB RAM, answers A and B are incorrect. Because it has been specified that Windows will go on drive C: and programs will go on drive D:, answer E is incorrect. | |
Answer A is correct. To have a system dual boot between Windows XP and Windows Vista, you have to install each operating system onto two different partitions. Because Windows XP is already on the first partition, you need to install Windows Vista on the other partition. You do not want to format the first partition because it would erase everything on that partition. So, answer B is incorrect. You don’t want to upgrade Windows, because Windows XP will not be available. So, answer C is incorrect. Answer D is incorrect because you don’t need to install Windows XP; it already exists. | |
Answer D is correct. To install the same configuration on 10 different computers, you have to use images. You already have the source system. Answer D then specifies the rest of the steps to install Vista with images. After you have the source computer, the next step is to Sysprep the system. Therefore, answers A and C are incorrect. Because you need to create a new partition before installing the image, answer B is incorrect. | |
Answer C is correct. Because the system did not find the DVD disc, you will need to fix that problem. The BIOS not allowing you to specify a DVD to boot from indicates that the BIOS is too old to support bootable DVD drives. Therefore, you need to update the system BIOS. Answers A and B are incorrect because drivers and updates will not help boot from the DVD (because these load when Windows Vista loads, and to boot from a DVD does not require Windows Vista to load). Answer D is incorrect because you don’t need the Windows PE disc to load DVD drivers. | |
Answer B is correct. The only version that can be upgraded to Windows Vista Home edition is Windows XP Home edition. Because Windows XP Home edition is the only one that can be upgraded to Windows Vista Home edition, answers A, C and D are incorrect. | |
Answer C is correct. When you perform a clean installation of Windows Vista on a hard disk partition that contains an existing Windows installation (assuming you did not reformat the hard disk), the previous operating system, user data, and program files are saved to a Windows.OLD folder. Answer A is incorrect because the Windowspanther folder is used for installation logs. Answer B is incorrect because the Windows folder is where the Windows files reside. Answer D and E do not exist in a normal Windows Vista installation. | |
Answer B is correct. When you want to see whether a system is compatible with Windows Vista, you should run the Windows Vista Upgrade Advisor. Answer A is incorrect because it will not check hardware compatibility. Answer C is incorrect because Windows Update will not specify whether a device is compatible with Windows Vista. Answer D is incorrect because updating drivers in Windows XP will not specify whether a device is compatible with Windows Vista. | |
Answer A is correct. The only two versions of Windows Vista that support DVD ripping and the ability to watch TV are Windows Vista Home Premium and Windows Vista Ultimate. Of course, to be cost-effective, Windows Vista Home Premium is less expensive than Windows Vista Ultimate. Therefore, answer C is incorrect. Answers B and D are incorrect because Windows Vista Home edition and Windows Vista Business edition do not support DVD ripping and the ability to watch TV. | |
Answer B is correct. To repair the system startup files, you have to run the Startup Repair utility located on the Windows Vista DVD. Answer A is incorrect because the Update program will replace the corrupt system files. Answer C is incorrect because the MSCONFIG program will replace the corrupt system files. Answer D is incorrect because if you perform a clean install of Windows Vista, it will erase everything on the system including programs. |
Mitch Tulloch, Tony Northrup, Jerry Honeycutt, Ed Wilson, Ralph Ramos, and the Windows Vista Team, Windows Vista Resource Kit (Pro - Resource Kit) (Redmond, Washington: Microsoft Press, 2007).
William R. Stanek, Introducing Microsoft Windows Vista (Redmond, Washington: Microsoft Press, 2006).
For more information about deploying Windows Vista, including a Deployment Step-by-Step Guide and Migration Step-by-Step Guide, go to http://technet2.microsoft.com/WindowsVista/en/library/1d093249-41e9-458a-8297-489935eeabb11033.mspx.