Terms you’ll need to understand:
✓ | File system |
✓ | NT File System (NTFS) |
✓ | File Allocation Table (FAT) |
✓ | FAT32 |
✓ | Access control list (ACL) |
✓ | Access control entry (ACE) |
✓ | Permission |
✓ | Explicit permission |
✓ | Inherited permission |
✓ | Shared folder |
✓ | Server message block (SMB) |
✓ | Universal Naming Convention (UNC) |
✓ | Link Layer Topology Discovery (LLTD) |
✓ | Public folder sharing |
✓ | Standard file sharing |
✓ | Encryption |
✓ | Encrypting File System (EFS) |
✓ | BitLocker Drive Encryption |
✓ | Trusted Platform Module (TPM) |
✓ | Compression |
Techniques/concepts you’ll need to master:
✓ | List the advantages of NTFS over FAT or FAT32. |
✓ | List and describe the NTFS file permissions. |
✓ | Using Windows Explorer, configure NTFS permissions. |
✓ | List and describe the share permissions. |
✓ | Using Windows Explorer, share a folder. |
✓ | Using Windows Explorer, encrypt a file using EFS. |
✓ | Encrypt a drive with BitLocker Drive Encryption. |
✓ | Using Windows Explorer, compress a folder. |
Now that you have installed Windows and configured it to communicate on the network, you are now ready to look at some of the services and features that Windows Vista offers. The primary file system used in Windows Vista is NT File System (NTFS), which offers a secure and reliable environment to store files. After you have placed your files in a secure environment, you can then share those files so that they can be available over the network. This chapter focuses on sharing files so that users can access files from a Windows Vista computer directly or over the network, and it explains how to control such access so that the folders remain secure using share permissions, NTFS permissions, and encryption.
The disk structure does not describe how a hard drive or floppy disk physically works, but how it stores files on the disk. In other words, it describes the formatting of the disk (file system, partitions, the root directory, and the directories). A file system is the overall structure in which files are named, stored, and organized. File systems used in Windows Vista include FAT, FAT32, and NTFS. Whereas FAT and FAT32 were primarily used in older operating systems, NTFS is the preferred file system.
An older file system used by DOS was the File Allocation Table (FAT). FAT is a simple file system that uses minimum memory. Although it is based on filenames of 11 characters, which include the 8 characters for the filename and 3 characters for the file extension, it has been expanded to support long filenames. Early DOS used FAT12, which used a 12-bit number for each cluster, but was later expanded to FAT16, which would recognize volumes up to 2 GB.
FAT32, which was introduced in the second major release of Windows 95, is an enhancement to the FAT file system. It uses 32-bit FAT entries, which support hard drives up to 2 TB, although Windows 2000, Windows XP, Windows Vista, and Windows Server 2003 support volumes up to 32 GB. FAT32 does not have the security that NTFS provides; so, if you have a FAT32 partition or volume on your computer, any user who has access to your computer can read any file on it. The main reason to use FAT32 is because you have a computer that will sometimes run Windows 95, Windows 98, or Windows Millennium edition and at other times run this version of Windows, known as a multiboot configuration.
NTFS is the preferred file system for this version of Windows. It has many benefits over the earlier FAT32 file system, including the following:
Improved support for much larger hard disks.
Because NTFS is a journaling file system that keeps track of its transactions to make sure that that entire transaction is completed before being recognized, it can recover from some disk-related errors automatically.
Better security because you can use permissions and encryption to restrict access to specific files to approved users.
A primary advantage of NTFS over FAT and FAT32 is that NTFS volumes have the capability to apply NTFS permissions to secure folders and files. By setting the permissions, you specify the level of access for groups and users for accessing files or directories. For example, to one user or group of users, you can specify that they can only read the file; another user or group of users can read and write to the file; and others have no access. No matter if you are logged on locally at the computer or accessing a computer through a network, NTFS permissions always apply.
The NTFS permissions that are granted are stored in an access control list (ACL) with every file or folder on an NTFS volume. The ACL contains an access control entry (ACE) for each user account and group that has been granted access for the file or folder and the permissions granted to each user and group. To simplify the task of administration, the NTFS permissions have been logically grouped into the standard folder and file NTFS permissions as shown in Table 5.1. If you need finer control, you need to use special permissions.
Table 5.1. Standard NTFS Folder and File Permissions
Permission Level | Description |
|---|---|
Full control | Users can read files and folders; execute files; write, modify, and delete files; change attributes of files and folders; change permissions; and take ownership of files. |
Modify | Users can read files and folders, execute files, write and modify files, delete files and folders, and change attributes of files and folders. |
List folder contents | Users can view the names of folders and subfolders in the folder. This permission is available only at the folder level and is not available at the file level. |
Read and execute | Users can see the contents of existing files and folders and can run programs in a folder. |
Read | Users can see the contents of a folder and open files and folders. |
Write | Users can create new files and folders and make changes to existing files and folders. Users cannot create new files or folders. |
Note
Remember that when you manage your folders and files and when you open up a drive or folder, you are using Windows Explorer.
To set, view, change, or remove permissions on files and folders, follow these steps:
Right-click the file or folder for which you want to set permissions and click Properties.
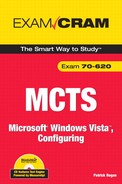
Click the Security tab to display the Data Properties dialog box shown in Figure 5.1.
Click Edit to open the Permissions for name of file or folder dialog box.
Then do one of the following:
To set permissions for a group or user that does not appear in the Group or User Names box, click Add. Enter the name of the group or user you want to set permissions for, and then click OK.
To change or remove permissions from an existing group or user, click the name of the group or user. To allow or deny a permission, in the Permissions for User or Group box, select the Allow or Deny check box. To remove the group or user from the User or Group box, click Remove.
Permissions are given to a folder or file as either explicit permissions or inherited permissions. Explicit permissions are those granted directly to the folder or file. Some of these permissions are granted automatically, such as when a file or folder is created, whereas others have to be assigned manually.
Windows offers the ability to deny individual permissions. The Deny permission always overrides the permissions that have been granted, including when a user or group has been given full control. For example, if the group has been granted read and write, yet a person has been denied the write permission, the user’s effective rights would be the read permission.
When you set permissions to a folder (explicit permission), the files and subfolders in the folder inherit these permissions (inherited permissions). In other words, the permissions flow down from the folder into the subfolders and files, indirectly giving permissions to a user or group. Inherited permissions ease the task of managing permissions and ensure consistency of permissions among the subfolders and files within the folder.
Because users can be members of several groups, it is possible for them to have several sets of explicit permissions to a folder or file. When this occurs, the permissions are combined to form the effective permissions, which are the actual permissions when logging on and accessing a file or folder. They consist of explicit permissions plus any inherited permissions.
When you are managing NTFS permissions, remember the following:
You can set only file and folder permissions on drives formatted to use NTFS.
Performing this procedure might require you to elevate permissions through the User Account Control. Chapter 6, “Configuring User Account Security,” covers the User Account Control.
To change permissions, you must be the owner or have been granted permission to do so by the owner.
Groups or users that are granted full control for a folder can delete files and subfolders within that folder, regardless of the permissions that protect the files and subfolders.
If the check boxes under Permissions for User or Group are shaded or if the Remove button is unavailable, the file or folder has inherited permissions from the parent folder.
When adding a new user or group, by default, this user or group will have read and execute, list folder contents, and read permissions.
A shared folder on a computer makes the folder available for others to use on the network. A shared drive on a computer makes the entire drive available for others to use on the network. Shared drives and folders can be used on FAT/FAT32 and NTFS volumes. If used on an NTFS volume, the user will still need NTFS permissions before accessing the share.
When you share a folder with Microsoft Windows, file sharing is based on the network basic input/output system (NetBIOS) protocol and server message block (SMB). NetBIOS, which runs on top of TCP/IP, was created for IBM for its early PC networks, but it was adopted by Microsoft and has since become a de facto industry standard. It is responsible for establishing logical names (computer names) on the network, establishing a logical connection between the two computers, and supporting reliable data transfer between computers that established a session.
After a logical connection is established, computers can exchange data in the form of NetBIOS requests or in the form of SMBs. The SMB protocol, which was jointly developed by Microsoft, Intel, and IBM, allows shared access to files, printers, serial ports, and miscellaneous communications between nodes on a network.
SMB 2.0, introduced with Windows Vista, can compound multiple actions into a single request, which significantly reduces the number of round trips the client needs to make to the server, improving performance as a result. Larger buffer sizes are supported, also increasing performance with large file transfers. In addition, durable file handles were introduced, which allow a connection to an SMB server to survive brief network outages, such as with a wireless network, without having to construct a new session.
When using the SMB protocol to share a directory or drive, these resources are accessed using the Uniform Naming Convention (UNC):
\servernamesharedname
The servername could be a NetBIOS name (computer name) or an IP address.
With earlier versions of Windows, you could use Network Neighborhood to browse network resources such as shared folders and printers. However, this system was inefficient because it relied on network broadcasts to gather such information.
To fix this problem, Windows Vista introduced Link Layer Topology Discovery (LLTD), which queries each device that supports Plug and Play Extensions (PnP-X) or web services for devices to determine its capabilities and to determine the topology of the network. It also uses version control to keep the information current. It also describes the quality of service (QoS) extensions that enable stream prioritization and quality media streaming experiences, even on networks with limited bandwidth.
The information that is gathered to create the network map and which information the computer will give out to other Windows Vista computers will depend on which network services that you have enabled or configured using the Network and Sharing Center (see Table 5.2 and Figure 5.2).
Table 5.2. Network Services Managed with the Network and Sharing Center
Feature | Settings | Result |
|---|---|---|
Network Discovery. Allows this computer to see other network computers and devices and is visible to other network computers. | On | Turns on Network Discovery. |
Off | Turns off Network Discovery. | |
File sharing. Files and printers that you have shared from this computer can be accessed by people on the network. | On | Shares created on this computer can be accessed from the network. |
Off | Shares created on this computer cannot be accessed from the network. | |
Public folder sharing. People on the network can access files in the public folder. | Off | Only local users can access the Public folder. |
On (read) | Local and network users can read the contents of the Public folder, but cannot change them. | |
On (change) | Local and network users can change the contents of the Public folder. | |
Printer sharing. Allows users to access shared printers. | On | Printers directly connected to this computer can be shared. |
Off | Printers directly connected to this computer cannot be shared. | |
Password-protected sharing. Gives access to shared folders, including the Public folder, to users who don’t have a username and password that corresponds to a user account on the computer with the shared folder. | On (recommended) | People who access access shared folders must have corresponding local user account and password. |
Off | Computer sharing the folder does not require a user account or password. |

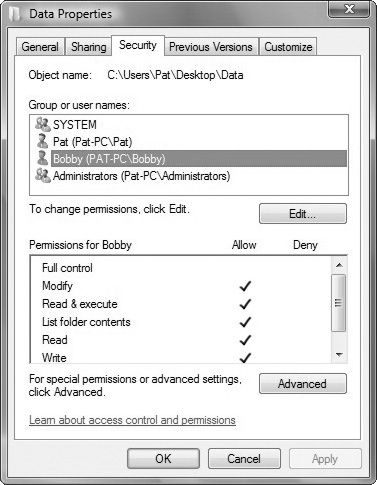
To view the topology or to view the network resources, you open a network folder or the Network and Sharing Center. However, a Windows Vista computer will not be visible on the network map, and it will not be able to map other hardware devices on the network until you enable Network Discovery service. To see the full map, click the View Full Map link in the Network and Sharing Center (see Figure 5.3).
Windows Vista supports two ways to share folders: public file sharing and standard file sharing. Of these two models, standard file sharing is preferred because it is more secure than public file sharing. However, public folder sharing is designed to enable users to share files and folders from a single location quickly and easily.
Windows Vista supports the use of only one Public folder for each computer. Any files that you want to make available publicly can be copied or moved to an appropriate folder inside the Public folder. The Public folder is located at C:UsersPublic and contains the following subfolders:
Public Documents
Public Downloads
Public Music
Public Pictures
Public Videos
Recorded TV
Another folder worth mentioning is the Public Desktop folder, which is used for shared desktop items. Any files and program shortcuts placed in the Public Desktop folder appear on the desktop of all users who log on to the computer (and to all network users if network access has been granted to the Public folder).
To access public folders using Windows Explorer, follow these steps:
Click the Start button, and then click Computer.
In Windows Explorer, click the leftmost option button in the address list and then click Public.
Public folder sharing settings are set on a per-computer basis. If you want to share a file, you just need to copy or move the file into the C:UsersPublic folder. When the file is copied or moved to the Public folder, access permissions are changed to match that of the Public folder so that all users who log on to the computer and all network users (if network access has been granted to the Public folder) can access the file.
By default, files stored in the Public folder hierarchy are available to all users who have an account on this computer and can log on to it locally. You cannot access the Public folder from the network. To enable and configure public folder sharing, follow these steps:
Click Start, and then click Computer. In Windows Explorer, click the leftmost option button in the address list, and then click Public.
On the Windows Explorer toolbar, click Sharing Settings.
Open the Network and Sharing Center.
Expand the Public Folder Sharing Panel by clicking the Expand button.
Under Public Folder Sharing, select the public folder sharing option you want to use. The options available are as follows:
Turn On Sharing So Anyone with Network Access Can Open Files
Turn On Sharing So Anyone with Network Access Can Open, Change, and Create Files
Turn Off Sharing
Permissions are shown in Table 5.3.
Click Apply to save the changes.
Creating and managing a shared folder is a little bit more of a manual process than the public sharing model, but allows you to share any folder on the Windows Vista computer, and it gives you more fine-tuned control over sharing the folders.
Standard file sharing enables you to use a standard set of permissions to allow or deny initial access to files and folders over the network. Standard file sharing settings are enabled or disabled on a per-computer basis. To enable file sharing, follow these steps:
Click Start, and then click Network.
On the Explorer toolbar, click Network and Sharing Center.
Expand the File Sharing Panel by clicking the related Expand button.
To enable file sharing, select Turn On File Sharing. To disable file sharing, select Turn Off File Sharing.
Click Apply.
When a user accesses a file or folder in a share over the network, the two levels of permissions are used: share permissions and NTFS permissions (if it is on an NTFS volume). The three share permissions are as follows:
Owner/co-owner. Users allowed this permission have read and change permissions and the additional capabilities to change file and folder permissions and take ownership of files and folders. If you have owner/co-owner permissions on a shared resource, you have full access to the shared resource.
Contributor. Users allowed this permission have read permissions and the additional capability to create files and subfolders, modify files, change attributes on files and subfolders, and delete files and subfolders. If you have contributor permissions on a shared resource, the most you can do is perform read operations and change operations.
Reader. Users with this permission can view file and subfolder names, access the subfolders of the share, read file data and attributes, and run program files. If you have reader permissions on a shared resource, the most you can do is perform read operations.
Note
If the user accesses the computer directly where the share folder is located and accesses the folder directly without going through the share, share permissions do not apply.
Because a user can be member of several groups, it is possible for the user to have several sets of permissions to a shared drive or folder. The effective permissions are the combination of all user and group permissions. For example, if a user has the contributor permissions to the user and a reader permission to the group, of which the user is a member, the effective permissions would be the contributor permission. Like NTFS permissions, deny permissions override the granted permission.
To create a shared folder using the shared folder model, you have to complete a multipart process:
Share the folder so that it can be accessed.
Set the share permissions.
Check and modify the NTFS file system permissions.
There are two methods to set permissions on a shared resource, depending on the resource type:
Using the File Sharing Wizard to set permissions of a file or folder. You can start the File Sharing Wizard by right-clicking the file or folder, and then clicking Share. The wizard enables you to select the user and group that can share the file or folder, and allows you to set permissions on the file or folder for each user or group.
Using Windows Explorer to set permissions on a resource. You can use Windows Explorer to set permissions through the Share option or through the Properties page on a resource. When you right-click the object, selecting the Share or Properties option displays the Properties dialog box. Permissions can be set or modified by using the Advanced Sharing button on the Sharing tab.
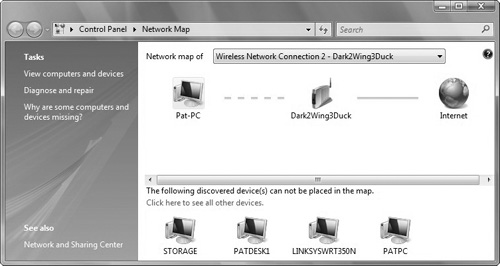
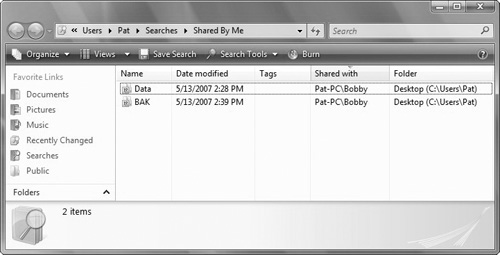
When a folder is shared, a symbol of two users is added at the bottom left of the folder icon (see Figure 5.4). If you click Show Me All the Files and Folders I Am Sharing in Network and Sharing Center, you can view all shared folders on the system (see Figure 5.5).
When accessing a shared folder on an NTFS volume, the effective permissions that a person can use in the share folder are calculated by combining the shared folder permissions with the NTFS permissions. When combining the two, first determine the cumulative NTFS permissions and the cumulative shared permissions and apply the more restrictive permissions, the one that gives the least permission.
After you share a file or folder, users can connect to it as a network resource or map to it by using a driver letter on their machines. After a network drive has been mapped, users can access it just as they would a local drive on their computer.
To map a network drive to a shared file or folder, follow these steps:
Click Start, and then click Computer.
In Windows Explorer, click the Map Network Drive button on the toolbar. This displays the Map Network Drive dialog box.
Use the Drive field to select a free drive letter to use, and then click the Browse button to the right of the Folder field.
In the Browse for Folder dialog box, expand the Network folders until you can select the name of the workgroup or the domain with which you want to work. When you expand the name of a computer in a workgroup or a domain, you’ll see a list of shared folders. Select the shared folder you want to work with, and then click OK.
Select Reconnect at Logon if you want Windows Vista to connect to the shared folder automatically at the start of each session.
If your current logon doesn’t have appropriate access permissions for the share, click the Different User Name link. You can then enter the username and password of the account with which you want to connect to the shared folder. Typically, this feature is used by administrators who log on to their computers with a limited account and also have an administrator account for managing the network.
Click Finish.
If you later decide you don’t want to map the network drive, click Start, and then click Computer. In Windows Explorer, under Network Location, right-click the network drive icon and choose Disconnect.
You can also type in a UNC in the Run box or the address bar in Windows Explorer. To display the Run box quickly, use the Windows logo key + R shortcut. If you don’t have a Windows logo key or if you prefer to use the mouse, you can add the Run option to the Start menu in Windows Vista, as follows:
If someone has administrative privilege on a Windows Vista computer or has unauthorized physical access to the device, including if the computer/hard drive was stolen, that person can take ownership of files and folder, change permissions of a file, and access the file. Data can be secured against these risks by using encryption.
Encryption is the process of converting data into a format that cannot be read by another user. After a user has encrypted a file, it automatically remains encrypted when the file is stored on disk. Decryption is the process of converting data from encrypted format back to its original format. After a user has decrypted a file, the file remains decrypted when stored on disk.
Windows Vista offers two file encrypting technologies: Encrypting File System (EFS) and BitLocker Drive Encryption. EFS is used to help protect individual files on any drive on a per-user basis. BitLocker is designed to help protect all the personal and systems files on the drive Windows is installed on if your computer is stolen, or if unauthorized users try to access the computer. You can use BitLocker Drive Encryption and EFS together to get the protection offered by both features. Table 5.4 shows the main differences between BitLocker Drive Encryption and EFS.
Table 5.4. A Comparison Between EFS and BitLocker Drive Encryption
BitLocker Drive Encryption | |
|---|---|
EFS encrypts individual files on any drive. | BitLocker encrypts all personal and system files on the drive where Windows is installed. |
EFS encrypts files based on the user account associated with it. If a computer has multiple users or groups, each can encrypt their own files independently. | BitLocker does not depend on the individual user accounts associated with files. BitLocker is either on or off, for all users or groups. |
EFS does not require or use any special hardware. | BitLocker uses the Trusted Platform Module (TPM), a special microchip in some newer computers that supports advanced security features. |
You do not have to be an administrator to use EFS. | You must be an administrator to turn BitLocker encryption on or off after it has been enabled. |
Windows Vista includes EFS, which allows a user to encrypt and decrypt files that are stored on an NTFS volume. When you use EFS, folders and files are still kept secure against those intruders who might gain unauthorized physical access to the device (for example, as by stealing a notebook computer or a removable drive).
EFS is used to encrypt data in files and folders with a key. This key is stored in protected storage as part of your user profile, and it provides transparent access to the encrypted data.
Several improvements have been made to EFS in Windows Vista. Smart cards are now supported for storing user EFS keys in addition to administrative recovery keys. If you use smart cards for logon, EFS can operate as a single sign-on service that gives transparent access to your encrypted files. The System Page file can also be protected by EFS when you configure it by using Group Policy.
When you are using encrypted files on a network, client-side cached copies of network files can also be encrypted, providing security for these files even if the portable computer is lost or stolen. When you use Windows Vista in conjunction with a supported server platform, encrypted files can be transmitted over the network, and the receiving Windows Vista client will decrypt them.
Note
EFS is available only in the Windows Vista Business, Enterprise, and Ultimate versions. EFS is not fully supported on Windows Vista Starter, Windows Vista Home Basic, and Windows Vista Home Premium.
To encrypt a folder or file, follow these steps:
Right-click the folder or file you want to encrypt, and then click Properties.
Click the General tab, and then click Advanced.
Select the Encrypt Contents to Secure Data check box, and then click OK.
After you encrypt the file, encrypted files are colored green in Windows Explorer.
To decrypt a folder or file, follow these steps:
Right-click the folder or file you want to decrypt, and then click Properties.
Click the General tab, and then click Advanced.
Clear the Encrypt Contents to Secure Data check box, and then click OK.
The first time you encrypt a folder or file, you should back up your encryption certificate. If your certificate and key are lost or damaged and you do not have a backup, you won’t be able to use the files that you have encrypted. To back up your EFS certificate, follow these steps:
Open Certificate Manager by clicking the Start button, typing certmgr.msc into the Search box, and then pressing Enter.
Click the arrow next to the Personal folder to expand it.
Click Certificates.
Click the certificate that lists Encrypting File System under Intended Purposes. (You might need to scroll to the right to see this.) If there is more than one EFS certificate, you should back up all of them.
Click the Action menu, point to All Tasks, and then click Export.
In the Export Wizard, click Next, click Yes, export the private key, and then click Next.
Click Personal Information Exchange, and then click Next.
Type the password you want to use, confirm it, and then click Next. The export process will create a file to store the certificate.
Enter a name for the file and the location (include the whole path) or click Browse and navigate to the location, and then enter the filename.
Click Finish.
Store the backup copy of your EFS certificate in a safe place.
If the encrypted file needs to be shared with another user on the same computer, you need to do the following:
The person with whom you want to share files needs to export his EFS certificate and give it to you by doing the following:
Open Certificate Manager by clicking the Start button, typing certmgr.msc into the Search box, and then pressing Enter.
Click the arrow next to the Personal folder to expand it, and then click the EFS certificate that you want to export.
Click the Action menu, point to All Tasks, and then click Export.
In the Certificate Export Wizard, click Next.
Click No, Do Not Export the Private Key, and then click Next.
On the Export File Format page, click Next to accept the default format.
The export process creates a file to store the certificate in. Type a name for the file and the location (include the whole path), or click Browse, navigate to the location, and then type the filename.
Click Finish.
After you get the EFS certificate from the person you want to share the file with, you need to import the certificate:
Open Certificate Manager by clicking the Start button, typing certmgr.msc into the Search box, and then pressing Enter.
Select the Personal folder.
Click the Action menu, point to All Tasks, and click Import.
In the Certificate Import Wizard, click Next.
Type the location of the file that contains the certificate, or click Browse, navigate to the file’s location, and then click Next.
Click Place All Certificates in the Following Store, click Browse, click Trusted People, and then click Next.
Click Finish.
To add the EFS certificate to the shared file, follow these steps:
Right-click the file you want to share, and then click Properties.
Click the General tab, and then click Advanced.
In the Advanced Attributes dialog box, click Details.
In the Encryption Details dialog box that displays, click Add.
In the Select User dialog box, click the certificate, and then click OK.
A new feature that was added to Windows Vista is BitLocker Drive Encryption, which is designed to protect computers from attackers who have physical access to a computer. Without BitLocker Drive Encryption, an attacker can start the computer with a boot disk and then reset the administrator password to gain full control of the computer, or the attacker can access the computer’s hard disk directly by using a different operating system to bypass file permissions.
BitLocker Drive Encryption is the feature in Windows Vista that makes use of a computer’s TPM. A Trusted Platform Module (TPM) is a microchip that is built in to a computer. It is used to store cryptographic information, such as encryption keys. Information stored on the TPM can be more secure from external software attacks and physical theft. BitLocker Drive Encryption can use a TPM to validate the integrity of a computer’s boot manager and boot files at startup, and to guarantee that a computer’s hard disk has not been tampered with while the operating system is offline. BitLocker Drive Encryption also stores measurements of core operating system files in the TPM.
If the computer is equipped with a compatible TPM, BitLocker uses the TPM to lock the encryption keys that protect the data. As a result, the keys cannot be accessed until the TPM has verified the state of the computer. Encrypting the entire volume protects all the data, including the operating system itself, the Windows registry, temporary files, and the hibernation file. Because the keys needed to decrypt data remain locked by the TPM, an attacker cannot read the data just by removing your hard disk and installing it in another computer.
During the startup process, the TPM releases the key that unlocks the encrypted partition only after comparing a hash of important operating system configuration values with a snapshot taken earlier. This verifies the integrity of the Windows startup process. During computer startup, if BitLocker detects a system condition that can represent a security risk (for example, disk errors, a change to the BIOS, or changes to any startup files), it will lock the drive, go into Recovery mode, and require a special BitLocker recovery password (48-digit key is entered with the function keys in 6 groups of 6 digits) to unlock it. Make sure that you create this recovery password when you turn on BitLocker for the first time; otherwise, you could permanently lose access to your files. Recovery mode is also used if a disk drive is transferred to another system.
On computers with a compatible TPM, BitLocker can be used in three ways:
TPM-only. This is transparent to the user, and the user logon experience is unchanged. If the TPM is missing or changed, or if the TPM detects changes to critical operating system startup files, BitLocker enters its Recovery mode, and you need a recovery password to regain access to the data.
TPM with startup key. In addition to the protection provided by the TPM, a part of the encryption key is stored on a USB flash drive. This is referred to as a startup key. Data on the encrypted volume cannot be accessed without the startup key.
TPM with PIN. In addition to the protection provided by the TPM, BitLocker requires a personal identification number (PIN) to be entered by the user. Data on the encrypted volume cannot be accessed without entering the PIN.
By default, the BitLocker Setup Wizard is configured to work seamlessly with the TPM. An administrator can use Group Policy or a script to enable additional features and options.
On computers without a compatible TPM, BitLocker can provide encryption, but not the added security of locking keys with the TPM. In this case, the user is required to create a startup key that is stored on a USB flash drive.
On computers with a compatible TPM, BitLocker Drive Encryption can use one of two TPM modes:
TPM-only. In this mode, only the TPM is used for validation. When the computer starts up, the TPM is used to validate the boot files, the operating system files, and any encrypted volumes. Because the user doesn’t need to provide an additional startup key, this mode is transparent to the user, and the user logon experience is unchanged. However, if the TPM is missing or the integrity of files or volumes has changed, BitLocker will enter Recovery mode and require a recovery key or password to regain access to the boot volume.
Startup key. In this mode, both the TPM and a startup key are used for validation. When the computer starts up, the TPM is used to validate the boot files, the operating system files, and any encrypted volumes. The user must have a startup key to log on to the computer. A startup key can be either physical, such as a USB flash drive with a machine-readable key written to it, or personal, such as a PIN set by the user. If the user doesn’t have the startup key or is unable to provide the correct startup key, BitLocker will enter Recovery mode. As before, BitLocker will also enter Recovery mode if the TPM is missing or the integrity of boot files or encrypted volumes has changed.
The system requirements of BitLocker are as follows:
Because BitLocker stores its own encryption and decryption key in a hardware device that is separate from your hard disk, you must have one of the following:
Your computer must have at least two partitions. One partition must include the drive Windows is installed on. This is the drive that BitLocker will encrypt. The other partition is the active partition, which must remain unencrypted so that the computer can be started. Partitions must be formatted with the NTFS file system.
Your computer must have a BIOS that is compatible with TPM and supports USB devices during computer startup. If this is not the case, you must update the BIOS before using BitLocker.
To find out whether your computer has TPM security hardware, follow these steps:
Open BitLocker Drive Encryption by clicking the Start button, Control Panel, Security, and then clicking BitLocker Drive Encryption. If you are prompted for an administrator password or confirmation, enter the password or provide confirmation.
If the TPM administration link appears in the left pane, your computer has the TPM security hardware. If this link is not present, you will need a removable USB memory device to turn on BitLocker and store the BitLocker startup key that you’ll need whenever you restart your computer.
To turn on BitLocker, follow these steps:
Open BitLocker Drive Encryption by clicking the Start button, Control Panel, Security, and then clicking BitLocker Drive Encryption. If you are prompted for an administrator password or confirmation, enter the password or provide confirmation.
Click Turn On BitLocker. This opens the BitLocker Setup Wizard. Follow the instructions in the wizard.
To turn off or temporarily disable BitLocker, follow these steps:
Open BitLocker Drive Encryption by clicking the Start button, Control Panel, Security, and then clicking BitLocker Drive Encryption. If you are prompted for an administrator password or confirmation, enter the password or provide confirmation.
Click Turn Off BitLocker. This opens the BitLocker Drive Encryption dialog box.
To decrypt the drive, click Decrypt the Volume. To temporarily disable BitLocker, click Disable BitLocker Drive Encryption.
The BitLocker Control Panel applet enables you to recover the encryption key and recovery password at will. You should consider carefully how to store this information, because it will allow access to the encrypted data. It is also possible to escrow this information into Active Directory.
NTFS compression provides the capability to selectively compress the contents of individual files, entire directories, or entire drives on an NTFS volume. NTFS compression uses file compression that works by substitution. It starts by locating repetitive data with another pattern, which is shorter. Windows tracks which files and folders are compressed via a file attribute. As far as the user is concerned, the compressed drive, folder, or file is simply another drive, folder, or file that works like any other. Although you expand the amount of space for volume, the performance of the PC will be slower because it has to process the compression and decompression of files. Therefore, do not use compression unless you are compressing files that are rarely used or when disk space is critical. If disk space is critical, use this as a temporary solution until you can delete or move files from the drive or you can extend the volume.
To compress a file or folder on an NTFS drive, follow these steps:
Open Windows Explorer.
Right-click the file or folder that you want to compress, and select the Properties option.
Click the Advanced button.
Select the Compress Contents to Save Disk Space check box.
Click OK or Apply button.
If you select to compress a drive or folder, select Apply Changes to This Folder Only (or Apply Changes to the Folder, Subfolder, and Files), and then click the OK button.
To compress an NTFS drive, follow these steps:
Click the Start button, and then click Computers.
Right-click the drive that you want to compress.
Select the Compress Drive to Save Disk Space check box.
Click the OK or Apply button.
To uncompress a drive, folder, or file, uncheck the Compress Contents to Save Disk Space box or the Compress Drive to Save Disk Space box.
Answer A is correct. To manage folders and files and their NTFS permissions, you use Windows Explorer. Answer B is incorrect because Active Directory Users and Computers is used to manage the user and computer accounts within Active Directory, not NTFS permissions. Answer C is incorrect because the Computer Management Console, which includes the Disk Administrator, can be used to look at the Event Viewer and status of the disks and to manage the file system volumes, but has nothing to do with NTFS permissions. Answer D is incorrect because the Disk Administrator has nothing to do with NTFS permissions. | |
Answer C is correct. NTFS is the only one that provides security features such as encryption and NTFS permissions and the ability to use transaction tracking to keep the file system reliable. Answers A and B are incorrect because they do not offer the features just mentioned for NTFS. Answer D is incorrect because this was the name given to the FAT file system that supported long filenames. Answer E is incorrect because NFS is a file system used in UNIX/Linux machines and is not supported by Windows Vista as a file system. | |
Answer A is correct. When you access a computer remotely through the share, you include the share permissions and the NTFS permissions (which can both restrict access). When you access the local folder directly, only the NTFS permissions apply. Therefore, they could have the same or more restrictive access if both are applied. Answers B and C are incorrect because if the user is accessing it remotely, the share permissions may further restrict. Answer D is incorrect because the share and NTFS permissions combined may also give the same access rather than just more restrictive. | |
Answers A, B, C, and D are correct. When you combine the NTFS permissions assigned to Pat and to the Manager group that Pat is a member of, Pat can read, write, execute, and delete the files in the folder. When you access a folder directly on a local computer, share permissions do not apply. Because answers A, B, C, and D are correct answers, answer E cannot be correct. | |
Answers A and C are correct. When you combine the NTFS permissions assigned to Pat and to the Manager group that Pat is a member of, Pat can read, write, execute, and delete the files in the folder. However, the read share permission only allows you to read and execute the files, blocking writing and delete when going through the shared folder. Answer B and D are incorrect because the read permission blocked the write and delete permissions. Because answers A and C are correct answers, answer E cannot be correct. | |
Answer E is correct. Pat is a member of the Managers group. Because deny all NTFS permissions has been granted to the Managers group, it blocks all permissions for Pat. Answers A, B, C, and D are incorrect because no access permissions always wins. | |
Answer A is correct. When you get a TPM error, you need to restart the computer and enter the recovery password in the recovery console. Answer B is incorrect because you cannot log on as any user because of the TPM error. Answer C is incorrect because disabling the feature in BIOS will not decrypt the disk. Answer D is incorrect because it will not be able to open the TPM Management Console. | |
Answer C is correct. For other users to access your shared folders, including the Public folder, you need to enable the Password Protected Sharing option. Answer A is incorrect because this scenario does not mention any problem with name resolution. Answer B is incorrect because the Public Folder Sharing option would not affect the other shared folders. Answer D is incorrect because it is needed for Link Layer Topology Discovery (LLTD). | |
Answer C is correct. One place to store the report is in the Public folder where they both can have access to it. Answers A, B, and D are not the best answers because they do not provide a secure environment where one user cannot look at the data files of another user. | |
Answer B is correct. Because BitLocker encrypts the entire drive, BitLocker is the best solution. Answer A is incorrect because you can connect a stolen hard drive to another system that has another operating system and bypass much of the security on the drive, including security set by NTFS permissions. Answer C is incorrect because IPSec is used to encrypt data being transmitted over the network. Answer D is incorrect because EFS is used to encrypt data files only, not system files. | |
Answer A is correct. To view the computer using the network map, you need to have the Link Layer Topology Discovery (LLTD) operational. Therefore, you need to have the Network Discovery service. Answers B and C are incorrect because share and NTFS permissions have nothing to do with a computer showing on the network map. Answer D is incorrect because there is no indication that there is a name-resolution problem. | |
Answer B is correct. You need to have two NTFS volumes, not one. Answers A, C, and D are incorrect because they are requirements for BitLocker. |
Mitch Tulloch, Tony Northrup, Jerry Honeycutt, Ed Wilson, Ralph Ramos, and the Windows Vista Team, Windows Vista Resource Kit (Pro - Resource Kit) (Redmond, Washington: Microsoft Press, 2007).
William R. Stanek, Introducing Microsoft Windows Vista (Redmond, Washington: Microsoft Press, 2006).
Patrick Regan, Working with Windows 2000 and 2003 (Upper Saddle River, New Jersey: Prentice Hall, 2004).