
Terms you’ll need to understand:
✓ | Desktop |
✓ | Sidebar |
✓ | Gadget |
✓ | Start menu |
✓ | Taskbar |
✓ | Quick Launch toolbar |
✓ | Notification area |
✓ | Control Panel |
✓ | Welcome Center |
✓ | Plug-and-play |
✓ | Signed driver |
✓ | Device Manager |
✓ | Windows Aero |
✓ | Color depth |
✓ | Refresh rate |
✓ | Theme |
✓ | Ease of Access Center |
✓ | Parental control |
✓ | Administrative tools |
Techniques/concepts you’ll need to master
✓ | Identify parts of the desktop used in Windows Vista. |
✓ | Use the Control Panel to configure certain aspects of Windows Vista. |
✓ | Load and manage device drivers. |
✓ | List the requirements for Windows Aero. |
✓ | Using the Ease of Access Center to enable accessibility technology. |
✓ | Use parental controls to limit access on Windows Vista. |
Before learning how to configure and troubleshoot Windows Vista, you need to become familiar with the Windows Vista interface. This includes understanding how to use the desktop, the Start menu, and taskbar. In addition, when you open programs, the programs will appear in windows. You will then need to know how to navigate between the programs and how to manage the windows that the programs are running in. If you are familiar with Windows XP, you will find some similarities between Windows XP and Windows Vista. However, you will find enough differences that will cause you lots of grief if you don’t know where to go.
Similar to Windows XP, the Windows Vista interface is based on the desktop, which is the main screen/graphical space that you see after you turn on your computer and log on to Windows. Like the top of the actual office desk, it serves as a surface for your work (see Figure 3.1).
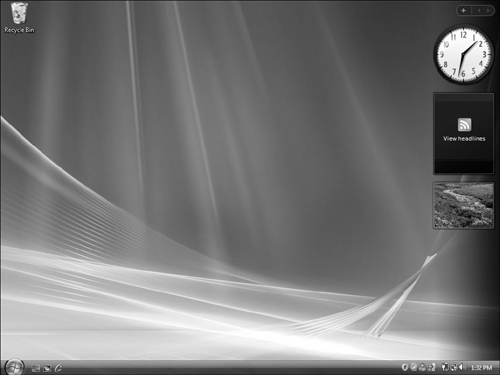
When you work at your office desk, you will open up folders that contain office documents such as letters and reports. You may spread them on your desk so that you can easily and quickly access them. When working on a Windows Vista machine, you open programs or documents. Sometimes, these programs and documents are located in folders throughout your computer disk drives. Of course, the folders are used to organize your programs and data files so that you can find things in the future. Other times, you place files and folders, shortcuts to files and folders, or shortcuts to programs directly on the desktop, arranging them however you want so that you can easily access them.
To represent the files, folders, and programs, Windows Vista uses icons. A shortcut is an icon that represents a link to an item, rather than the item itself. You can identify shortcuts by the arrow on their icon. Like Windows XP, double-clicking an icon starts or opens the item it represents. If you double-click the Internet Explorer icon Internet Explorer will start. If you double-click a report that was written using Microsoft Word, Microsoft Word will start, and the report will be opened. When you double-click a shortcut, the item opens.
By default, when you first start Windows, you’ll see at least one icon on your desktop: the Recycle Bin. Depending on how your computer is configured, after its initial installation, you may have additional desktop icons, including the Control Panel, Internet Explorer, or Computer icon. Of course, depending on your preference, you can add or remove icons. Some people like to have a clean, uncluttered desktop with few or no icons, whereas others like to have their frequently used programs, files, and folders.
To add a shortcut to the desktop, follow these steps:
Locate the item that you want to create a shortcut for.
Right-click the item, click Send To, and then click Desktop (create shortcut). The shortcut icon appears on your desktop.
To add or remove common desktop icons such as Computer, your personal folder (My Documents), Network, the Recycle Bin, Internet Explorer, and Control Panel, follow these steps:
Right-click an empty area of the desktop, and then click Personalize.
In the left pane, click Change Desktop Icons.
Under Desktop icons, select the check box for each icon that you want to add to the desktop, or clear the check box for each icon that you want to remove from the desktop, and then click OK.
To remove an icon from the desktop, right-click the icon, and then click Delete. If the icon is a shortcut, only the shortcut is removed; the original item is not deleted.
To move a file from a folder to the desktop, follow these steps:
By default, Windows lines up the icons in columns on the left side of the desktop. However, you can move an icon by dragging it to a new place on the desktop.
You can have Windows automatically arrange your icons. Right-click an empty area of the desktop, click View, and then click Auto Arrange. Windows lines up your icons starting in the upper-left corner, locking them into place. To unlock the icons so that you can move them again, click Auto Arrange again, clearing the check mark next to it.
By default, Windows spaces icons evenly on an invisible grid. To place icons closer together or with more precision, turn off the grid. Right-click an empty area of the desktop, click View, and then click Align to Grid to clear the check mark. Repeat these steps to turn the grid back on.
To move or delete a bunch of icons simultaneously, you must first select all of them. Click an empty area of the desktop and drag the mouse to surround the icons with the rectangle that appears. Then release the mouse button. Now you can drag the icons as a group or delete them.
Note
In a list of items, you can select multiple items that are sequential (in order) such as files and folders by clicking the first item. You would then click and hold down the Shift key and use the arrows on the keyboard or by the mouse to select the next sequential item or items. To select nonsequential items, click and hold down the Shift key and use the mouse to select each item.
To temporarily hide all of your desktop icons without actually removing them, right-click an empty part of the desktop, click View, and then click Show Desktop Icons to clear the check mark from that option. To get the icons back, click Show Desktop Icons.
Whenever you open a program, file, or folder, it appears on your screen in a box or frame called a window (that’s where the Windows operating system gets its name). Of course, these windows will often partially or completely hide the desktop as the windows are placed on top of the desktop. To see the entire desktop without closing the programs or windows, right-click the taskbar and select the Show the Desktop option. You can also click the Show Desktop button on the Quick Launch toolbar. To restore all the windows, click the Show Desktop button again.
Besides icons, the desktop also includes the taskbar and the Windows Sidebar. The taskbar (similar to Windows XP) is located at the bottom of the screen. It shows which programs are running and allows you to switch between the different programs running. The taskbar also contains the Start button, which opens the Start menu so that you can access programs, folders, and computer settings.
The Windows Sidebar is a pane on the side of the Microsoft Windows Vista desktop where you can keep your gadgets organized and always available. Gadgets are easy-to-use mini programs that give you information at a glance and provide easy access to frequently used tools such as checking the weather, checking the time using a digital clock, or checking e-mail without opening up other programs.
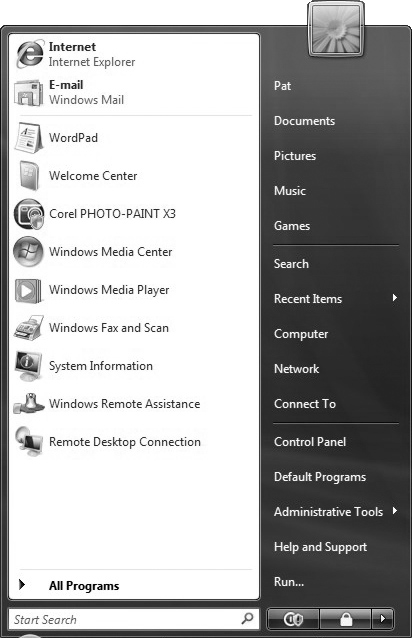
To start programs, access folders, make changes to Windows Vista, access Help, log off the computer, switch to a different user account, or turn off the computer, you should use the Start menu. To open the Start menu, click the Start button in the lower-left corner of your screen. You can also press the Windows logo key on your keyboard.
The Start menu is divided into three basic parts:
The large left pane shows a short list of programs on your computer.
In the lower-left corner is the Search box, which enables you to look for programs and files on your computer by typing in search terms.
The right pane provides access to commonly used folders, files, settings, and features. It’s also where you go to log off from Windows or turn off your computer.
The Start menu detects which programs you use the most, and it places them in the left pane for quick access (see Figure 3.2).
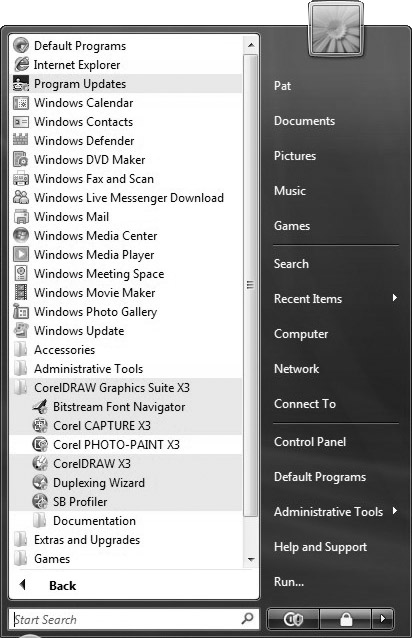
One of the most common uses of the Start menu is opening programs installed on your computer. To open a program shown in the left pane of the Start menu, click it. The program opens, and the Start menu closes. If you don’t see the program you want to open, click All Programs at the bottom of the left pane, as shown in Figure 3.3. Instantly, the left pane displays a long list of programs in alphabetic order, followed by a list of folders.
Note
If you are unsure what a program does, move the cursor over its icon or name, and a box will appear that contains a description of the program.
To find things quickly, use the Windows Vista Search box, which is located in the Start menu. It searches programs, all the folders in your personal folder (which includes Documents, Pictures, Music, Desktop, and other common locations), your e-mail messages, saved instant messages, appointments, contacts, your Internet favorites, and Internet history (see Figure 3.4). A program, file, or folder will appear if the item that you are searching for is in the title, the actual contents of the file, or in the properties of the file (such as the author of the document).
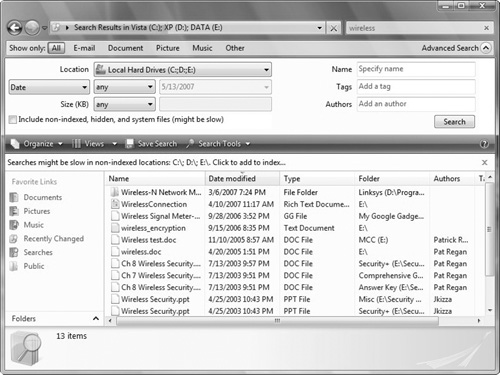
To open a folder or file, click it. You can also click See All Results to display the search results in a folder with more advanced options; or you can click Search the Internet to open your web browser and search the Internet for your term. If your search produces no results, you can click Search Everywhere to search your entire computer. To clear the search results and return to the main programs list, click the Clear button (X).
The right pane of the Start menu contains links to parts of Windows that you are likely to use frequently, including the following:
Personal folder. Opens for the currently logged-on user and contains user-specific files including the Documents, Music, Pictures, and Videos folders. The folder is named for the name of the user account that is currently logged on.
Documents. Opens the Documents folder, where you can store and open a user’s personal documents such as letters, reports, and spreadsheets.
Pictures. Opens the Pictures folder, where you can store and view digital pictures and graphics files.
Music. Opens the Music folder, where you can store and play music and other audio files.
Games. Opens the Games folder, where you can access all the games on your computer.
Search. Opens a window where you can search your computer using advanced options.
Recent Items. Opens a list of files you’ve opened recently.
Computer. Opens a window where you can access disk drives, cameras, printers, scanners, and other hardware connected to your computer.
Network. Opens a window where you can access the computers and devices on your network.
Connect To. Opens a window where you can connect to a new network.
Control Panel. Opens the Control Panel, where you can customize the appearance and functionality of your computer, add or remove programs, set up network connections, and manage user accounts.
Default Programs. Opens a window where you can choose which program you want Windows to use for activities such as web browsing, editing pictures, sending e-mail, and playing music and videos.
Help and Support. Opens Windows Help and Support, where you can browse and search Help topics about using Windows and your computer.
At the bottom of the right pane, you will find the Power button and the Lock button. The Power button is used to turn off the computer; the Lock button is used to lock your computer without turning it off. After it is locked, you need to use your password to unlock it. Clicking the arrow next to the Lock button displays a menu with additional options for switching users, logging off, restarting, or shutting down.
The taskbar is the long horizontal bar at the bottom of your screen. By default, the taskbar is always on top, making it always visible even after you open several windows or programs.
The taskbar has four main sections:
The Start button, which opens the Start menu
The Quick Launch toolbar, which enables you to start programs with one click
The middle section, which shows which programs and documents are open and enables you to quickly switch between them
The notification area, which includes a clock and small icons that show the status of certain programs and computer settings
To the immediate right of the Start button is the Quick Launch toolbar. As mentioned earlier, it enables you to launch or start programs with a single click. By default, the Quick Launch toolbar also contains the Show Desktop button (used to temporarily hide all open windows and show the desktop). You can also click the Switch Between Windows button to switch between open windows using Windows Flip 3D.
To add programs to the Quick Launch toolbar, locate the program in the Start menu, right-click it, and then click Add to Quick Launch. You can also drag the program’s icon (and folders) to the Quick Launch toolbar. The program’s icon will then appear in the toolbar. To remove an icon from the Quick Launch toolbar, right-click it, click Delete, and then click Yes.
Note
If some of the icons are missing on the Quick Launch toolbar, you will see double chevrons, which indicates that the icons won’t fit in the toolbar. You can access the double chevrons to access the hidden toolbar programs. To overcome this problem, resize the toolbar so that the entire Quick Launch toolbar will display.
The notification area, on the far right side of the taskbar, includes a clock and a group of icons that show the status of a program (or they provide access to certain settings). When you move your cursor to a particular icon, you will see that icon’s name or the status of a setting. Double-clicking an icon in the notification area usually opens the program or setting associated with it.
Occasionally, an icon in the notification area will display a small pop-up window (called a notification) to notify you about something. Click the Close button (X) in the upper-right corner of the notification to dismiss it. If you don’t do anything, the notification will fade away on its own after a few seconds.
To reduce clutter, Windows hides icons in the notification area when you haven’t used them for a while. If icons become hidden, click the Show Hidden Icons button to temporarily display the hidden icons.
The Control Panel is a graphical tool used to configure the Windows environment and hardware devices. To access the Control Panel, you can click the Start button on the taskbar and select Control Panel. You can also display the Control Panel in any Windows Explorer view by clicking the leftmost option button in the address bar and then selecting Control Panel (see Figure 3.5).
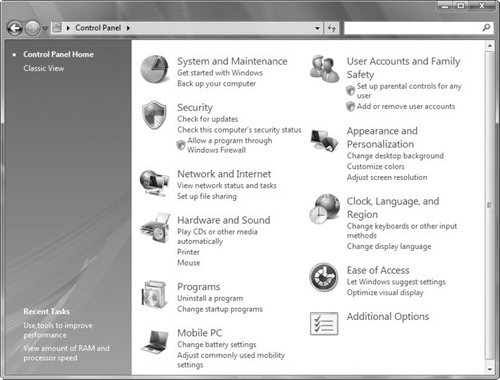
Of the 10 categories that are listed, each category includes a top-level link, and under this link are several of the most frequently performed tasks for the category. Clicking a category link provides a list of utilities in that category. Each utility listed within a category includes a link to open the utility, and under this link are several of the most frequently performed tasks for the utility.
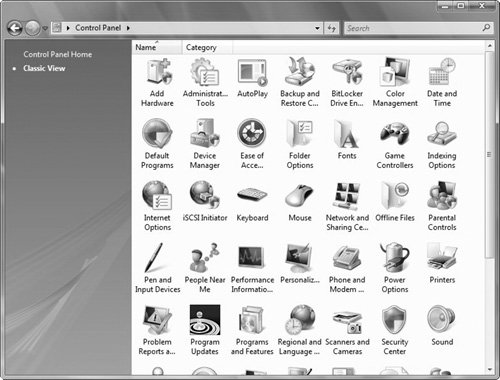
As with Windows XP, you can change from the default Category view to Classic view. The Control Panel in Windows Vista has two views: Category view and Classic view. Category view is the default view, which provides access to system utilities by category and task. Classic view is an alternative view that provides the look and functionality of Control Panel in Windows 2000 and earlier versions of Windows (see Figure 3.6).
To simplify the process of setting up a new computer, Windows Vista includes the Welcome Center. This screen pulls all the tasks you’ll most likely want to complete when you set up your computer into a single location. Such tasks include connecting to the Internet, adding user accounts for different people, and transferring files and settings from another computer using Windows Easy Transfer. You can also identify the edition of Windows Vista by looking at the Welcome Center (see Figure 3.7).
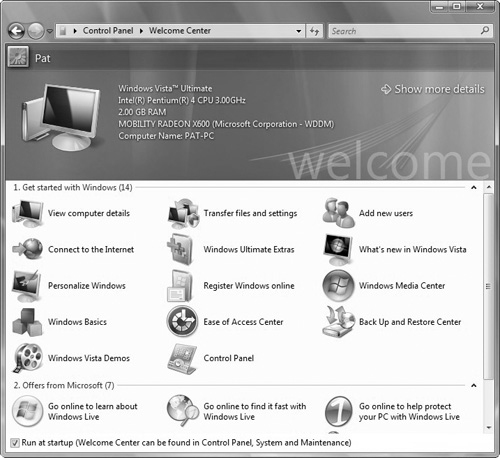
The Welcome Center automatically displays when you use the computer for the first time. You can choose to have it display every time you start your computer or turn it off. The Welcome Screen displays information about your PC (such as CPU type and amount of RAM) and provides access to both utilities and links to downloads from the Microsoft website (or from the original equipment manufacturer [OEM] where the PC was purchased).
On the lower-left side of the screen, you will find a Run at Startup box. Uncheck this box and close the Welcome Center. When you next reboot, the Welcome Center will not be displayed. To visit the Welcome Screen in the future, click the Start button, click Control Panel, click System and Maintenance, and then click Welcome Center.
Device drivers are programs that control a device. They each act like a translator between the device and programs that use the device. Each device has its own set of specialized commands that only its drivers knows. Whereas most programs access devices by using generic commands, the driver accepts the generic commands from the program and translates them into specialized commands for the device.
Device drivers are needed for a device to work. These drivers can be retrieved from the following sources:
Bundled with Windows Vista
Supplied with a device
Updated with Windows Update
Updated from the manufacturer’s website
Sometimes you might have to download an updated driver from Microsoft or the manufacturer’s website to fix problems with device functionality caused by poorly written drivers or by changing technology.
Plug-and-play refers to the capability of a computer system to automatically configure expansion boards and other devices. You should be able to plug in a device and play with it, without worrying about setting DIP switches, jumpers, and other configuration elements. If you connect USB, IEEE 1394, and SCSI devices to a Windows Vista system, Windows Vista will automatically detect these devices. When you connect a PCI or AGP plug-and-play expansion card and turn on the computer, Windows Vista will detect these devices. If Windows Vista does not have a driver available on the device after detection, Windows Vista will prompt you to provide a media or path to the driver.
To ensure reliable drivers, Microsoft implemented signed drivers starting with Windows 2000. A signed driver is a device driver that includes a digital signature, which is an electronic security mark that can indicate the publisher of the software and information that can show whether a driver has been altered. When it is signed by Microsoft, the driver has been thoroughly tested to make sure that the driver will not cause problems with the system’s reliability and not cause a security problem.
By default, if a driver is not signed, signed by a publisher that could not be properly identified, or has been altered since its release, Windows Vista will notify you. Of course, you should install only drivers that are properly signed.
Device drivers that are included on the Windows Vista installation DVD or downloaded from the Microsoft update website include a Microsoft digital signature (making it a signed driver). If you have problems installing a driver or device is not working properly, check with Microsoft’s update website and visit the device manufacturer’s support website to obtain an up-to-date digitally signed driver for your device.
The Device Manager lists all hardware devices on your computer and allows you to change the properties for any device. Using the Device Manager, you can view a list of installed devices (see Figure 3.8). When a device is added to the system, the device list is re-created.
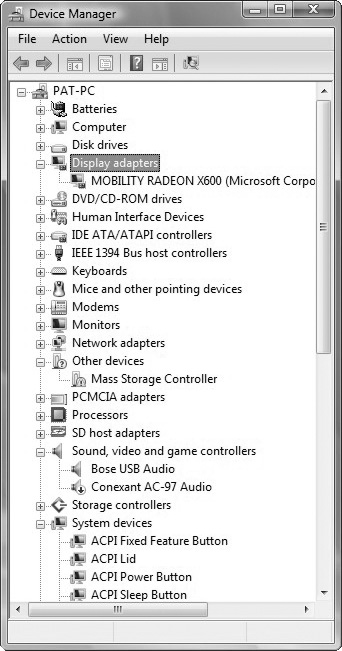
To access the Device Manager, you must be logged on to the system as an administrator. To Open Device Manager, click the Start button, click Control Panel, click System and Maintenance, and then click Device Manager. If you are prompted for an administrator password or confirmation, enter the password or provide confirmation.
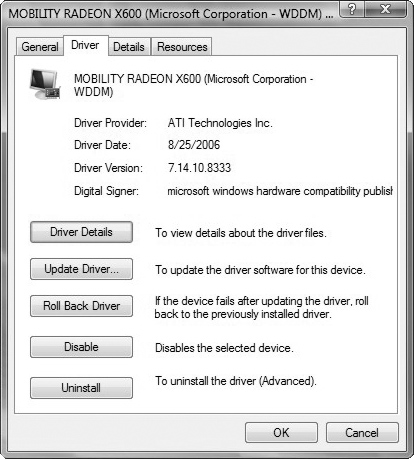
If you locate and double-click a device, you will be able to do the following (see Figure 3.9):
Uninstall a device. The Device Manager can be used to uninstall the device driver and remove the driver software from the computer.
Enable or disable devices. Instead of uninstalling the driver installer, you can use the Device Manager to disable the device. The hardware configuration is not changed.
Update device drivers. If you have an updated driver for a device, you can use the Device Manager to apply the updated driver.
Roll back drivers. If you experience system problems after you update a driver, you can roll back to the previous driver by using Driver Rollback. This feature enables you to reinstall the last device driver that was functioning before the installation of the current device driver. If there’s no previous version of the driver installed for the selected device, the Roll Back Driver button will be unavailable.
Troubleshoot devices. If a device is not operating correctly, you can use the Device Manager as part of your troubleshooting process. For example, you might see a device listed as Unknown Device next to a yellow question mark.
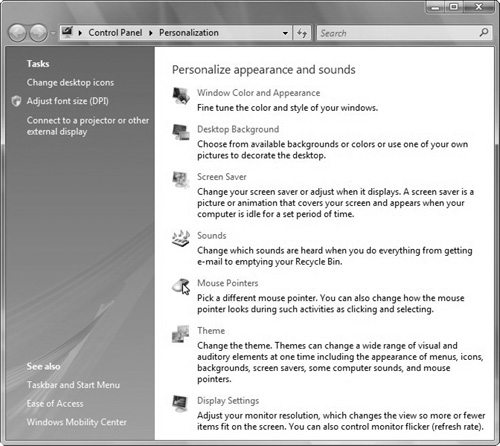
As a desktop technician, you will sometimes be tasked to adjust the look and feel of Windows, such as the background, the screen saver, and the display settings. These settings are found by clicking the Start button, clicking Control Panel, clicking Appearance and Personalization, and clicking Personalization (see Figure 3.10).
Screen resolution refers to the clarity of the text and images on your screen. At higher resolutions, items appear sharper because they use more pixels to form the images on the screen. Typically when you use a higher resolution, images will appear smaller, so more items fit on the screen. At lower resolutions, fewer items fit on the screen, but they are larger and easier to see. At very low resolutions, however, images might have jagged edges.
To change the resolution, follow these steps:
Open Display Settings by clicking the Start button, Control Panel, Appearance and Personalization, and Personalization. Then click Display Settings.
Under Resolution, move the slider to the resolution you want, and then click Apply (see Figure 3.11).
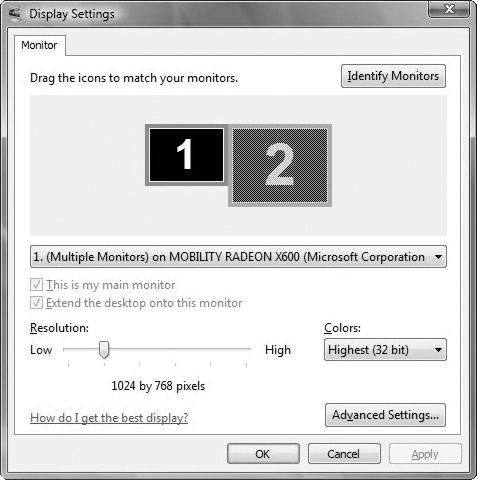
To set the color depth (the number of bits that determine the number of possible colors on the screen), follow these steps:
Open Display Settings by clicking the Start button, Control Panel, Appearance and Personalization, and Personalization. Then click Display Settings.
Under Colors, select the color depth. For the most possible colors, set to Highest (32 bit), and then click OK.
To set the monitor refresh rate (the frequency at which the screen is redrawn), follow these steps:
Open Display Settings by clicking the Start button, Control Panel, Appearance and Personalization, and Personalization. Then click Display Settings.
Click Advanced Settings.
Click the Monitor tab, and select a refresh rate.
Click Apply. The monitor might take a moment to adjust. If you get a message asking whether you want to keep the changes, click Yes. If you get this message and don’t apply the changes within 15 seconds, the refresh rate will revert back to your original setting.
Click OK.
To change the desktop theme to Windows Vista, follow these steps:
Open Theme Settings by clicking the Start button, Control Panel, Appearance and Personalization, and Personalization. Then click Theme.
In the Theme list, click Windows Vista, and then click OK.
To change the color scheme to Windows Aero, follow these steps:
Open Appearance Settings by clicking the Start button, Control Panel, Appearance and Personalization, and Personalization. Then click Window Color and Appearance. If the Appearance Settings dialog box does not display, at the bottom of the page, click Open Classic Appearance Properties.
In the Color Scheme list, click Windows Aero, and then click OK.
To turn on window frame transparency, the color scheme must first be set to Windows Aero. Then you must do the following:
Open Personalization by clicking the Start button, Control Panel, Appearance and Personalization, and Personalization.
Click Window Color and Appearance.
Select the Enable Transparency check box.
If you sometimes have trouble seeing items on your screen, you can adjust the settings to make text and images on the screen appear larger, improve the contrast between items on the screen, and hear onscreen text read aloud. You can adjust these settings on the Make the Computer Easier to See page in the Ease of Access Center:
Open the Make the Computer Easier to See page by clicking the Start button, Control Panel, Ease of Access, Ease of Access Center, and then clicking Make the Computer Easier to See.
Select the options that you want to use:
Choose a High Contrast Color Scheme. This option enables you to set a high-contrast color scheme that heightens the color contrast of some text and images on your computer screen, making those items more distinct and easier to identify.
Turn on Narrator. This option sets Narrator to run when you log on to your computer. Narrator reads aloud onscreen text and describes some events (such as error messages appearing) that happen while you’re using the computer.
Turn on Audio Description. This option sets audio descriptions to run when you log on to your computer. Audio descriptions describe what’s happening in videos.
Turn on Magnifier. This option sets Magnifier to run when you log on to your computer. Magnifier enlarges the part of the screen where the cursor is pointing and can be especially useful for viewing objects that are difficult to see.
Adjust the Color and Transparency of the Window Borders. This option enables you to change the appearance of window borders to make them easier to see.
Make the Focus Rectangle Thicker. This option makes the rectangle around the currently selected item in dialog boxes thicker, which makes it easier to see.
Set the Thickness of the Blinking Cursor. This option enables you to make the blinking cursor in dialog boxes and programs thicker and easier to see.
Turn Off All Unnecessary Animations. This option turns off animation effects, such as fading effects, when windows and other elements are closed.
Remove Background Images. This option turns off all unimportant, overlapped content and background images to help make the screen easier to see.
Windows Aero is the premium visual experience of Windows Vista. It features a transparent glass design with subtle window animations and new window colors. Part of the Windows Aero experience is Windows Flip 3D, which is a way to arrange your open windows in a three-dimensional stack that you can quickly flip through without having to click the taskbar. Aero also includes taskbar previews for your open windows. When you point to a taskbar button, you’ll see a thumbnail-size preview of the window, whether the content of the window is a document, a photo, or even a running video. Beyond the new graphics and visual polish, the Windows Aero desktop experience includes smoother window handling, increased graphics stability, and glitch-free visuals, all of which give you a simple, comfortable, and high-quality experience.
Exam Alert
Be sure to remember the minimum requirements and configuration for Windows Aero to function.
Remember that the following editions of Windows Vista support Aero:
Windows Vista Business
Windows Vista Enterprise
Windows Vista Home Premium
Windows Vista Ultimate
In addition, the display adapter must support the following:
DirectX 9, with Pixel Shader 2.0
Windows Vista Display Driver Model (WDDM)
Finally, the system must have the following graphics memory:
Graphics Memory | Support Single-Monitor Resolution |
|---|---|
64 MB | Up to 1,310,720 pixels (equivalent to 1280x1024) |
128 MB | Up to 2,304,000 pixels (equivalent to 1920x1200) |
256 MB | Greater than 2,304,000 pixels |
You must also configure the display system to the following:
A color depth of 32 bits per pixel (bpp)
A refresh rate higher than 10 hertz
The theme set to Windows Vista
The color scheme set to Windows Aero
Window frame transparency on
If your system has a built-in graphics adapter based on the Unified Memory Architecture (UMA), you need 1 GB of dual-channel configured system memory, and your system must have 512 MB of RAM available for general system activities after graphics processing.
A theme is a collection of visual elements and sounds for your computer desktop. A theme determines the look of the various visual elements of your desktop, such as windows, icons, fonts, and colors, and it can include sounds. For Aero to work, you must configure Windows Vista to use the Windows Vista theme or a theme created by modifying the Windows Vista theme.
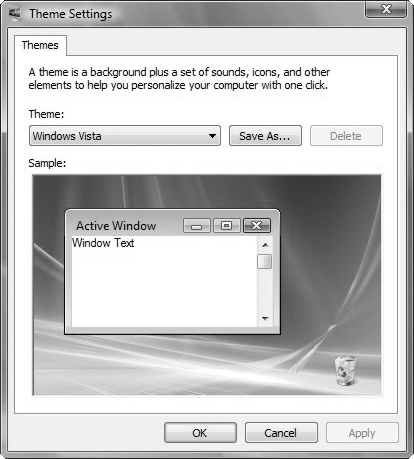
To set the theme, follow these steps:
Click the Start button, Control Panel, Appearance and Personalization, and Personalization. Then click Theme.
Under Theme, select the theme you want, and then click OK (see Figure 3.12).
Windows Aero features windows that are truly translucent. This glass effect enables you to focus on the content of a window, while providing better context for the surrounding elements on your desktop. For added personalization and to get exactly the look and feel you want, you can change the
Color of your windows
Saturation of the screen colors
Level of transparency
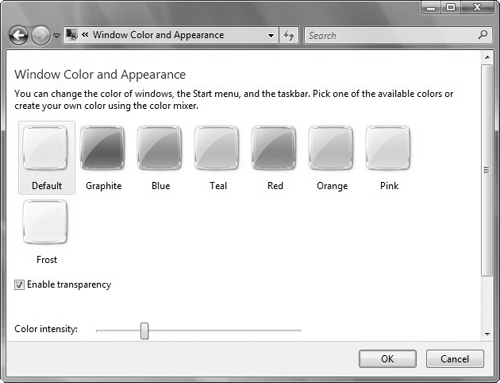
To configure Windows color and appearance, follow these steps:
Clicking the Start button, Control Panel, Appearance and Personalization, and Personalization. Then click Windows Color and Appearance.
You can then change the color of the windows, Start menu, and taskbar and enable or disable transparency (see Figure 3.13).
If you have a program that is incompatible with the Windows Aero color scheme, one of the following may happen:
Some of the visual elements, such as the window frame transparency, may be temporarily turned off.
You might receive a message that the color scheme has been changed to Windows Vista Basic.
Flip 3D does not function.
Verify that your hardware configuration, screen resolution, theme, color scheme, and color depths have not changed. Another cause could be because your computer does not have enough memory to run all the programs that you have open and also run the Windows Aero color scheme.
In this scenario, close some of the applications and retry the Flip 3D feature. If an application is incompatible with the Windows Aero color scheme, some of the visual elements will be automatically disabled and then reenabled after the incompatible application has been closed.
Windows Vista includes accessible technology that enables computer users to adjust their computers to make them easier to see, hear, and interact with. The accessibility settings in Windows Vista are particularly helpful to people with visual difficulties, hearing loss, pain in their hands or arms, or reasoning and cognitive issues.
Windows offers several programs and settings that can make the computer easier and more comfortable to use. Additional assistive technology products can be added to your computer if you need other accessibility features.
The Ease of Access Center is a central location that you can use to set up the accessibility settings and programs available in Windows (see Figure 3.14). In the Ease of Access Center, you’ll find quick access for setting up the accessibility settings and programs included in Windows. You’ll also find a link to a questionnaire that Windows can use to help suggest settings that you might find useful.
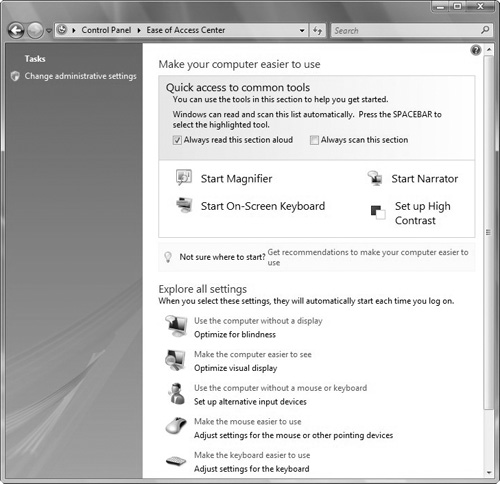
To open the Ease of Access Center, click the Start button, Control Panel, Ease of Access, and then Ease of Access Center. Another way to access the Ease of Access Center is to press the Windows logo key + U. You can open a mini Ease of Access Center by clicking the Accessibility icon, located in the lower-left corner of the logon page.
You can adjust the following settings:
Use the Computer Without a Display. Windows comes with a basic screen reader called Narrator that reads aloud text that displays on the screen. Windows also has settings for providing audio descriptions for videos and controlling how dialog boxes display. In addition, many other programs and hardware are compatible with Windows and available to help individuals who are blind, including screen readers, Braille output devices, and many other useful products.
Make the Computer Easier to See. Several settings are available to help make the information on the screen easier to understand. For example, the screen can be magnified, screen colors can be adjusted to make the screen easier to see and read, and unnecessary animations and background images can be removed.
Use the Computer Without a Mouse of Keyboard. Windows includes an onscreen keyboard that you can use to type. You can also use Speech Recognition to control your computer with voice commands and to dictate text into programs.
Make the Mouse Easier to Use. You can change the size and color of the mouse cursor, and you can use the keyboard to control the mouse.
Make the Keyboard Easier to Use. You can adjust the way Windows responds to mouse or keyboard input so that key combinations are easier to press, typing is easier, or inadvertent key presses are ignored.
Use Text and Visual Alternatives for Sounds. Windows can replace two types of audio information with visual equivalents. You can replace system sounds with visual alerts, and you can display text captions for spoken dialog in multimedia programs.
Make It Easier to Focus On Reading and Typing Tasks. A number of settings can help make it easier to focus on reading and typing. You can have Narrator read information on the screen, adjust how the keyboard responds to certain keystrokes, and control whether certain visual elements are displayed.
Note
For more information about assistive technology products, visit the Information for Assistive Technology Manufacturers website at http://www.microsoft.com/enable/at/atvinfo.aspx.
Concerned parents want to protect their children. Because the Internet opens a new world of information gathering, communication, commerce, productivity, and entertainment, it presents new risks for information disclosure, and easy access to inappropriate content in websites, messages, file downloads, games, and audio/video multimedia.
Exam Alert
Remember that parental control is not available if the computer is part of a domain. It also only applies to standard user accounts.
Parental controls are not available if your computer is connected to a domain. In addition, parental controls are applied only to standard user accounts, not administrative accounts. Of course, you will need an administrator user account to enable and configure parental controls.
To turn on parental controls for a standard user account, follow these steps:
Open parental controls by clicking the Start button, Control Panel, and then, under User Accounts, click Set Up Parental Controls. If you are prompted for an administrator password or confirmation, enter the password or provide confirmation.
Click the standard user account for which you want to set parental controls.
Under Parental Controls, click On.
After you have turned on parental controls for your child’s standard user account, you can adjust the individual settings that you want to control (see Figure 3.15). You can control the following areas:
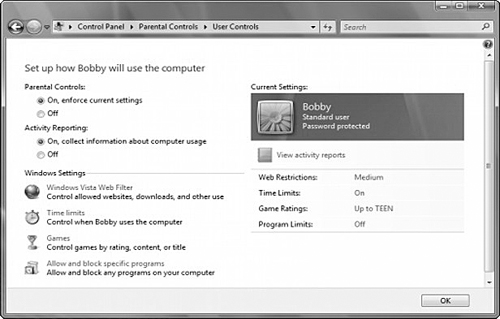
Web restrictions. You can restrict the websites that children can visit, make sure children visit only age-appropriate websites, indicate whether you want to allow file downloads, and set up which content you want the content filters to block and allow. You can also block or allow specific websites.
Time limits. You can set time limits to control when children are allowed to log on to the computer. Time limits prevent children from logging on during the specified hours and, if they are already logged on, they will be automatically logged off. You can set different logon hours for every day of the week.
Games. You can control access to games, choose an age rating level, choose the types of content you want to block, and decide whether you want to allow or block unrated or specific games.
Allow or block specific programs. You can prevent children from running programs that you don’t want them to run.
After you’ve set up parental controls, you can set up activity reports to keep a record of your child’s computer activity.
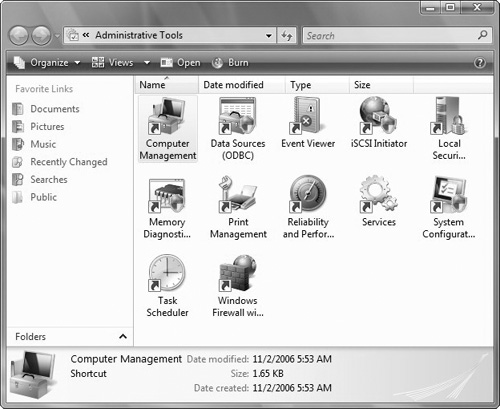
Administrative Tools is a folder in Control Panel that contains tools for system administrators and advanced users. The tools in the folder might vary depending on which version of Windows you are using.
Many of the tools in this folder, such as Computer Management, are Microsoft Management Console (MMC) snap-ins that include their own Help topics. To view specific help for an MMC tool, or to search for an MMC snap-in that you do not see in the following list, open the tool, click the Help menu, and then click Help Topics.
Open Administrative Tools by clicking the Start button, Control Panel, System and Maintenance, and then clicking Administrative Tools.
Some common administrative tools in this folder are as follows:
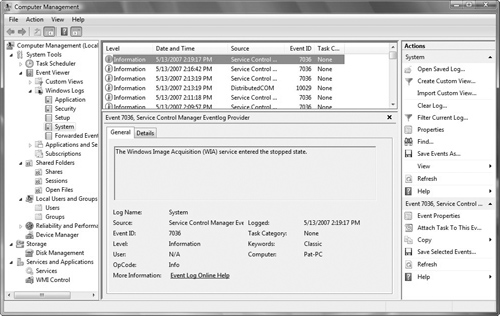
Computer Management. Manage local or remote computers by using a single, consolidated desktop tool. Using Computer Management, you can perform many tasks, such as monitoring system events, configuring hard disks, and managing system performance (see Figure 3.16).
Data Sources (ODBC). Use Open Database Connectivity (ODBC) to move data from one type of database (a data source) to another.
Event Viewer. View information that is recorded in event logs about significant events, such as a program starting or stopping, or a security errors.
iSCSI Initiator. Configure advanced connections between storage devices on a network.
Local Security Policy. View and edit Group Policy security settings.
Memory Diagnostics Tool. Check your computer’s memory to see whether it is functioning properly.
Print Management. Manage printers and print servers on a network and perform other administrative tasks.
Reliability and Performance Monitor. View advanced system information about the CPU, memory, hard disk, and network performance.
Services. Manage the different services that run in the background on your computer.
System Configuration. Identify problems that might be preventing Windows from running correctly.
Task Scheduler. Schedule programs or other tasks to run automatically.
Windows Firewall with Advanced Security. Configure advanced firewall settings on both this computer and remote computers on your network (see Figure 3.17).
Answer D is correct. You can quickly see what version of Windows Vista a system is running by looking at the Welcome Center. Answers B, C, and D are incorrect because none of them show what version you are using. | |
Answer A is correct. Answers B, C, D, and E are recommended places to get drivers. Answer A is not a good place because you cannot verify where the driver came from and whether it has been tampered with. | |
Answers A, B, and D are correct. It is always recommended to use signed drivers because you can verify where the driver came from, you can verify that the driver has not been tampered with, you can verify that the driver has been thoroughly tested to be reliable. Answer C is incorrect because you cannot control who can access a specific driver. | |
Answer B is correct. Problems with drivers are indicated by an exclamation point. Answer A is incorrect because a red X indicates a disabled device in Windows XP. Answer C is incorrect because a down arrow indicates a device is disabled. Answer D is incorrect because Device Manager does not flash. | |
Answer B is correct. To configure accessibility options, use the Ease of Access Center. Answer A is incorrect because the accessibility applet was the name used in Windows XP. Answers C and D are incorrect because the Administrative Tools and system applet are not used for any accessibility options. | |
Answers A, D, E, and F are correct. To enable Windows Aero, you must have set the monitor settings to a refresh rate higher than 10, set the color to 32 bit, set the theme to Windows Vista, and set the color scheme to Windows Aero. Answer B is incorrect because the key combination will not enable or disable Windows Aero. Answer C is incorrect because the resolution is not a direct factor for Windows Aero. | |
Answer B is correct. If an application is not compatible with Windows Aero, it might cause the Flip 3D to stop functioning. Answer A is a possible cause, but it is more likely that it is answer B. Answers C and D are incorrect because nothing else was changed on the system, and Flip 3D was functioning before the application was started. | |
Answers B, E, and F are correct. For Windows Aero to function, you must have the color depth set to 32 bit, the monitor refresh rate set to greater than 10 hertz, and the theme set to Windows Vista. Answer A is incorrect because Windows Aero requires 32 bits. Answers C and D are incorrect because resolution is not a direct factor for Windows Aero. | |
Answer B is correct. Because the video card only has 32 MB of video RAM, you need to upgrade the card that has at least 64 MB. More memory might be needed if you have a high resolution. Answers A, C, and D are incorrect because they all meet the minimum requirements to run Windows Aero. | |
Answer B is correct. You can use parental controls to run only allowed programs that you specify. Answer A is incorrect because the Windows Vista Home Basic edition has parental controls. Answer C is incorrect because Web Filter will not stop Messenger. Answer D is incorrect because you should not use administrative accounts to do daily tasks. | |
Answer C is correct. Parental controls only affect standard users, not administrative users. Answer A is incorrect because parental controls would not have been enabled if that computer was part of a domain. Answer B is incorrect because you don’t need to upgrade (because parental controls are available in the Windows Vista Home Basic edition). Answer D would require an administrative account to disable parental control, and it is therefore unlikely that this is correct. | |
Answer C is correct. Because the computer is not part of a domain, which means no group policies, answers A, B, and D are incorrect. So, the only other way to control when someone can log on is by using parental controls. | |
Answers B and C are correct. To load drivers, you must have the device connected first. Then, it is always recommended to use signed drivers. Answer A is incorrect because applications do not have to be digitally signed. Answer D is incorrect because you must have the device connected before you load the driver. |
Mitch Tulloch, Tony Northrup, Jerry Honeycutt, Ed Wilson, Ralph Ramos, and the Windows Vista Team, Windows Vista Resource Kit (Pro - Resource Kit) (Redmond, Washington: Microsoft Press, 2007).
William R. Stanek, Introducing Microsoft Windows Vista (Redmond, Washington: Microsoft Press, 2006).
Visit the Microsoft Accessibility website for solutions, tutorials, and case studies at http://www.microsoft.com/enable.