
This chapter helps you to prepare for the exam by covering the following Microsoft-specified objectives for the Configuring Applications Included with Windows Vista section of the TS: Microsoft Windows Vista, Configuring exam:
Configure and troubleshoot media applications.
<objective>Windows Vista brings new advances in Windows Media Center, Windows Media Player, Windows Photo Gallery, and Windows Movie Maker. Many companies use media-related applications for various purposes such as advertising, and more home users are discovering what they can do with digital gadgets including cameras, TVs, DVD players, game boxes, and so on. Microsoft expects you to know how to configure and troubleshoot these applications.
</objective>Configure Windows Mail.
<objective>Windows Mail is the successor to Outlook Express and builds in additional security features including spam filtering, anti-phishing, and so on. With the importance of email as a business and personal communication medium, it is important that you keep abreast of the latest advances in this field.
</objective>Configure Windows Meeting Space.
<objective>Windows Meeting Space enables you to conduct small-scale meetings in places such as restaurants and airport lounges, as well as the more usual boardroom setting. You can share information, and users can insert comments and make edits. Microsoft expects you to know how to configure and troubleshoot this important resource.
</objective>Configure Windows Calendar.
<objective>Windows Calendar is a full-fledged task- and appointment-managing application. You can create multiple calendars and share and publish your calendars so that members of a work team or family can coordinate their activities. Because this is an important productivity tool, Microsoft expects you to acquire proficiency in its configuration.
</objective>Configure Windows Fax and Scan.
<objective>Windows Fax and Scan enables you to scan documents and send and receive faxes. As with Windows Mail, Fax and Scan can integrate with other applications to provide enhanced business and personal communication. Know how to configure this application and how it integrates with other applications including email and productivity suites.
</objective>Configure Windows Sidebar.
<objective>Windows Sidebar provides a series of mini-applications known as gadgets, which enable you to keep up-to-date while pursuing other activities on your computer. Know the various configuration options presented by this resource.
</objective> </feature>Outline
Microsoft has endowed Windows Vista with a rich set of built-in applications. You have already looked at many of the available features including the Security Center, Internet Explorer 7, Windows Defender, Windows Firewall, and the Network and Sharing Center. In this chapter, you learn about additional applications that Microsoft has built into various editions of Vista including media-based applications, Windows Mail, Windows Meeting Space, Windows Calendar, Windows Fax and Scan, and Windows Sidebar. Windows Vista Ultimate includes the complete set of these applications, and the other editions of Vista support various subsets or reduced functionality levels of these applications.
Objective: Configure and troubleshoot media applications.
Windows Vista Home Premium and Windows Vista Ultimate contain the following media-based applications that enable you to work with and enjoy your music, photos, videos, and TV programs on your computer:
Windows Media Center—. Enables you to view all types of media and access other networked media components, such as TVs and projectors, by means of Media Center Extenders
Windows Media Player—. Enables you to play music, videos, movies, and so on
Windows Photo Gallery—. Enables you to view and catalog your digital photo collection and perform simple edits
Windows Movie Maker—. Enables you to create professional-looking movies from digital camcorder and image files
The following sections describe each of these applications in greater detail.
Included with the Home Premium and Ultimate versions of Windows Vista, Windows Media Center is a one-stop, complete multimedia application that lets you watch and record TV, listen to digital music, play games, listen to FM and Internet radio stations, or access content from online media services. You can also burn CDs and DVDs. Support is included for digital and high-definition cable and satellite TV. Windows Media Center Extender devices enable you to enjoy digital media on any device connected to your home network.
Windows Media Center includes the following features:
Enhanced TV experience—. You can pause, record, and rewind multiple live TV programs including HDTV if your computer is equipped with more than one TV tuner card. Windows Media Center supports two dual-tuners.
Media Center Extender support—. You can communicate with any TV connected to your home network when used with a device such as an Xbox 360.
Built-in TV and movie guides—. You can locate TV programs and movies from broadcast, cable, or satellite sources.
Enhanced developer program—. Developers can utilize the Windows Media Center Presentation Layer and Windows Presentation Foundation to create additional applications and services that can be used with a remote control and a Media Center Extender.
Photo, video, and music libraries—. You can enjoy videos and photos on your TV, create slide shows that include sound tracks, and burn photos and videos to DVD. You can sort music according to album or artist name, genre, song title, year, and so on. You can also burn music to CD or sync to portable music players.
DVD playback—. You can quickly access your DVD movies including those stored on external DVD changers.
Parental Controls—. You can limit TV and movie viewing according to ratings established by agencies such as the Motion Picture Association of America (MPAA).
Note: Windows Media Center and Parental Controls
The Parental Controls feature in Windows Media Center is separate from the Parental Controls feature discussed in Chapter 4, “Configuring and Troubleshooting Post-Installation System Settings.” You need to configure both features to protect children from unwanted content.
The following sections provide more details about setting up and running Windows Media Center, along with the use of a networked projector with Windows Media Center.
Windows Media Center is available by default on the All Programs menu. To get started with Windows Media Center, follow the steps outlined in Step by Step 7.1.
Setting Up Windows Media Center
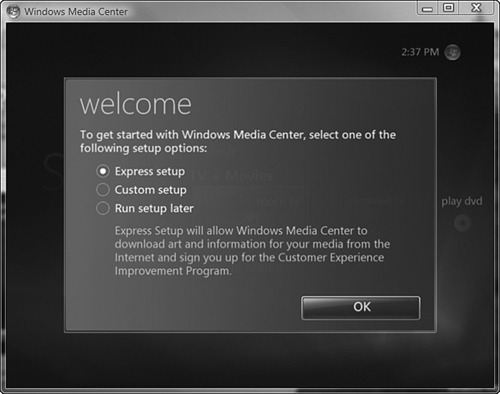
Click Start, All Programs, Windows Media Center. You receive the setup options shown in Figure 7.1.
Select Express Setup, and then click OK.
Options available on the Setup screen depend on the hardware devices attached to your computer. If you have a TV tuner card installed, options for setting up the TV and watching recorded TV are available (see Figure 7.2).
To select an available option, click the arrows at the edge of the screen. To obtain additional options, select Music, TV + Movies, or Sports. The visible options depend on your selection as well as the available hardware.
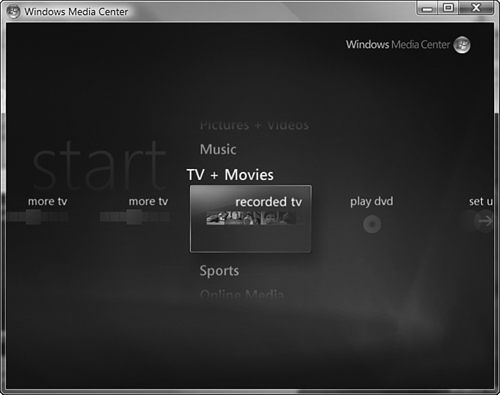
After you have set up Windows Media Center, the screen in Figure 7.2 appears automatically when you start it. As you save media content to your computer, the screen displays available content. For example, if you have saved a set of music CDs to your computer, the CD cover images will appear, enabling you to play a CD by clicking its image.
Windows Media Center also includes a Tasks option, which enables you to modify settings for TV, pictures, music, extenders, or library setup. From this option, you can also burn a CD or DVD, sync with external devices, add extenders, or access options for shutting down the computer.
For additional information about Windows Media Center and Media Center Extenders, consult Windows Media Center in the “Suggested Reading and Resources” section at the end of this chapter and the Windows Vista Help and Support Center at Microsoft.com.
Tip: Windows Firewall and Media Center Extenders
If you experience problems with your Media Center Extenders connecting to your Windows Vista computer, ensure that Windows Firewall is allowing the extenders to communicate. On the Exceptions tab of the Windows Firewall Settings dialog box, ensure that the Media Center Extenders option is selected. You learned about Windows Firewall in Chapter 5, “Configuring Windows Security Features.” Refer to Figure 5.34 in the section, “Basic Windows Firewall Configuration.”
Windows Media Center facilitates the use of network projectors for giving business presentations or slide shows from your computer. The Connect to a Network Projector Wizard enables you to connect your network projector across a wired or wireless network. This wizard sets up and shares your projector in a similar fashion to other shared resources on your computer. Network communications are protected by Remote Desktop Protocol (RDP) encryption in a similar manner to that used by Terminal Services connections. If you are using a wireless network, security protocols configured on this network such as Wi-Fi Protected Access (WPA) and Wi-Fi Protected Access version 2 (WPA2) encrypt the communication. You learned about these protocols in Chapter 6, “Configuring Network Connectivity.”
To connect a network projector, first ensure that it is turned on and connected to the same subnet to which your computer is connected. Then follow Step by Step 7.2.
Connecting a Network Projector
Click Start and type
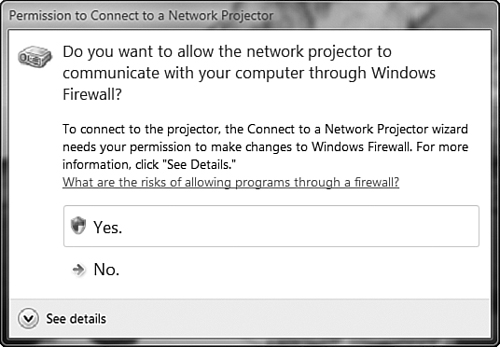
network projectorin the Search box. Then select Connect to a Network Projector to start the Connect to a Network Projector Wizard. (You can also select the wizard from the All Programs, Accessories menu.)If communication with the projector across Windows Firewall is not enabled, the wizard starts by asking you to allow the network projector to communicate through Windows Firewall (see Figure 7.3). Click Yes, and then click Continue in the UAC prompt that appears.
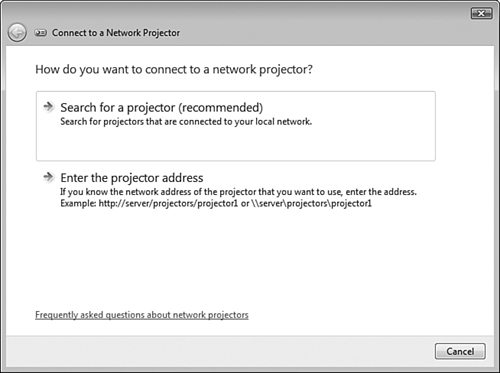
The wizard asks whether you want to search for the projector or enter the projector address (see Figure 7.4). If you know the network address, select the Enter the Projector Address option and enter the Universal Naming Convention (UNC) or Hypertext Transfer protocol (HTTP) address of the projector. If the projector has a password, enter this password. Then click Next and skip to step 5.
If you do not know the network address of the projector, select the Search for a Projector option. The wizard displays a Select a Network Projector page that displays the network location of any available projectors. Select the desired projector and then click Next. If necessary, click Search to locate your projector.
Follow the remaining instructions to connect and share your projector.
After you have completed the wizard, you receive the Network Presentation dialog box, from which you can perform the following actions:
Connect—. Connects to the projector, which displays the desktop image of your computer, with presentation settings optimized for best performance across the network.
Pause—. Pauses the connection to the projector, which displays a still image. You can perform other actions on the computer while continuing a verbal presentation.
Resume—. Restarts a paused presentation.
Disconnect—. Disconnects your computer from the projector. Any presentation software in use on your computer still runs until you exit from it.
If you encounter problems in connecting to the network projector, refer to the Help and Support Center for several troubleshooting suggestions.
Tip: Presentation settings and media presentations
When giving a presentation from a mobile computer, turn the screen saver off and turn presentation settings on. Also ensure that your computer is not going to enter Sleep mode during the presentation. Doing so prevents your display from going blank during a presentation. You can adjust presentation settings from the Windows Mobility Center. Refer to Chapter 9, “Configuring and Troubleshooting Mobile Computing” for information on the Windows Mobility Center.
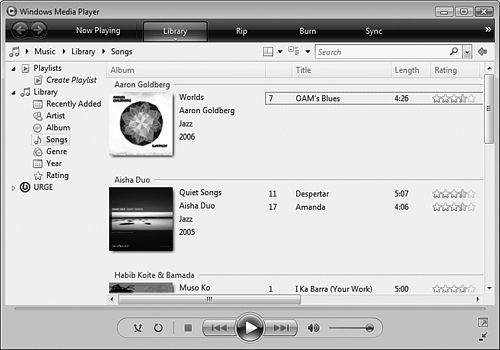
Windows Vista features version 11 of Windows Media Player, which offers a high level of choice and flexibility for managing digital media, including music, photos, and videos. The following are several of the more significant improvements in Windows Media Player 11 (see Figure 7.5):
Improved access to features—. You can rapidly access common settings from the menu bar, which offers activities such as Rip, Burn, and Sync.
Improved navigation—. Integrated Back and Forward buttons enable you to move quickly forward or backward between screens.
Album art—. Thumbnail views of album covers are displayed in the interface, assisting you in locating items of your choice. Windows Media Player can locate missing album art or offer to add your own images.
Revamped playback controls—. These controls are laid out in a simpler, more intuitive fashion, enabling you to access options more rapidly.
Simplified media libraries—. You can easily organize your music by properties such as artists, albums, songs, genres, years, and ratings. Right-click Library and select Show More Views to add additional categories to the list.
Playlist options—. You can display available playlists by selecting Playlists from the options on the main screen. Right-click Playlists and select Create Playlist to create a new playlist.
URGE—. The main control panel of Windows Media Player 11 includes a link to the URGE online music store operated by the MTV music network.
Ripping and burning options—. Select the Rip option from the menu bar to copy audio CDs to your hard drive, or select Burn to burn an audio CD, a data CD, or DVD.
Synchronizing with other computers and external music players—. Select the Sync option from the menu bar to copy your music library to an external player or update the music on the player. You can also use manual sync to select the files and playlists to be synchronized. In addition, you can synchronize music with other computers or add music obtained elsewhere to your library.
Improved video experience—. Windows Media Player 11 enhances the enjoyment of DVDs. A DVD encoder eliminates the need to purchase an additional plug-in. Discs are played more smoothly and in full screen mode.
View options—. You can customize your media library views with options that include Icon, Tile, Expanded Tile, and Detail View. Furthermore, you can customize the layouts to provide any desired experience.
The following sections provide more information on setting up and configuring Windows Media Player, along with the Media Center Library and the options available from the Options dialog box.
It is simple to set up and start enjoying the benefits of Windows Media Player 11, as Step by Step 7.3 shows.
Setting Up Windows Media Player
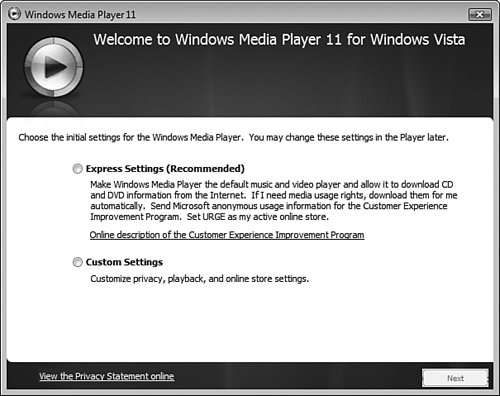
Click Start, All Programs, Windows Media Player. You receive the setup options shown in Figure 7.6.
To enable the functions described in the setup screen automatically, select Express Settings and then click Finish. To customize Windows Media Player, select Custom Settings and then click Finish.
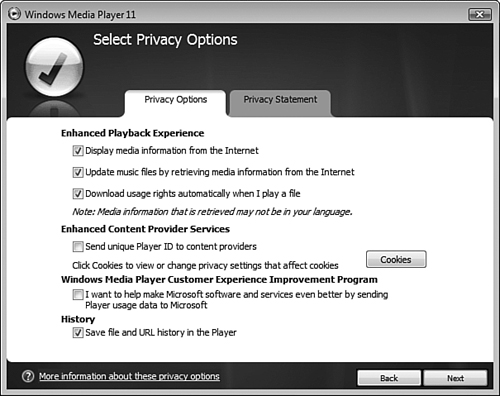
If you select Custom Settings, you receive the Select Privacy Options screen shown in Figure 7.7. Make your choice from the selection options provided.
To view privacy statements, click the Privacy Statement tab and then click the View Statement buttons provided. When finished, click Next to continue.
On the Customize the Installation Options screen, you receive choices to add shortcuts to the desktop and the Quick Launch bar. Select the desired options, and then click Next.
The Select the Default Music and Video Player screen asks whether you want to choose the file types played by Windows Media Player 11 or make Windows Media Player 11 the default music and video player. Make a choice and click Next.
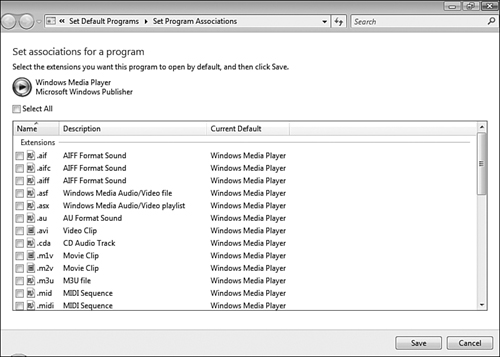
If you select the Choose the File Types that Windows Media Player 11 Will Play option, the Set Associations for a Program dialog box shown in Figure 7.8 opens. Select the desired extensions, and then click Save.
The Choose an Online Store page enables you to choose an online store from which you can purchase music downloads. Select a choice, and then click Install to set up a store or Finish to complete the setup wizard without setting up an online store.
Windows Vista configures your options for Windows Media Player and opens the player after a few seconds (refer to Figure 7.5 shown previously).
Click the Library toolbar option on the main Library page of Windows Media Player to display the available navigation options, as shown in Figure 7.9:
Media type—. Enables you to choose the media type currently displayed in the library by selecting from Music, Pictures, Video, Recorded TV, and Other.
Add to Library—. Displays the Add to Library dialog box, which enables you to select folders to be monitored for media files. You can select your personal folders or all folders that you can access. Click Advanced Options to display additional options including adding or removing monitored folders.
Media Sharing—. Enables you to share your media files with others or find media shared by others. Click Networking to open the Network and Sharing Center for additional sharing options already covered in Chapter 6.
Apply Media Information Changes—. Displays an Apply Changes dialog box that charts the progress of applying the changes you have specified. When completed, click Close.
Add Favorites to List When Dragging—. When selected, you can rapidly create playlists of favorite songs by dragging categories such as an album or genre from the Details pane to the List pane.
More options—. Displays the Options dialog box shown in Figure 7.10, which offers the options described in the next section.
Help with Using the Library—. Opens the Help and Support Center to a page displaying recommended links for using the media player.

Select More Options from the Library menu to display the Options dialog box, from which you can configure the options provided by the following tabs (you can also bring up this dialog box by pressing Alt to display a pop-up menu and then selecting Tools, Options):
The next sections describe each tab in detail.
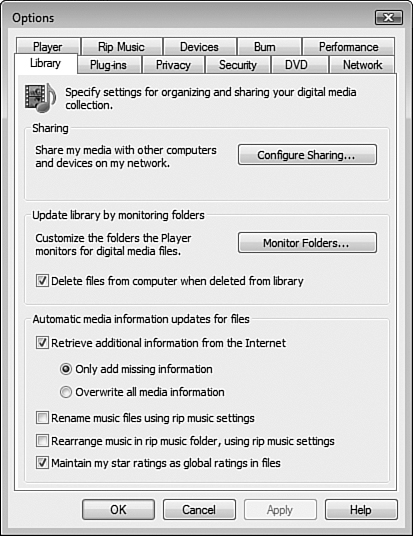
The Library tab, shown previously in Figure 7.10, enables you to configure settings for organizing and sharing your digital media. The following options are available:
Sharing—. Enables you to share your media with other networked computers and media devices. Click Configure Sharing to open the same Media Sharing dialog box as accessed from the Media Sharing option in the Library toolbar.
Update Library by Monitoring Folders—. Enables you to select which folders are monitored for digital media files. Click Monitor Folders to display the Add to Library dialog box as described previously. You can also delete media files when removed from the library by selecting the check box provided.
Automatic media information updates for files—. Enables you to specify how media information is downloaded from the Internet, how music files are set up for ripping, and how star ratings are maintained.
Plug-ins enable you to modify the display appearing in the Windows Media Player window as your songs are playing. This tab enables you to search for plug-ins and visualizations on the Internet according to preconfigured category lists. Click Properties to modify available properties for some plug-ins or Remove to remove plug-ins from the list.
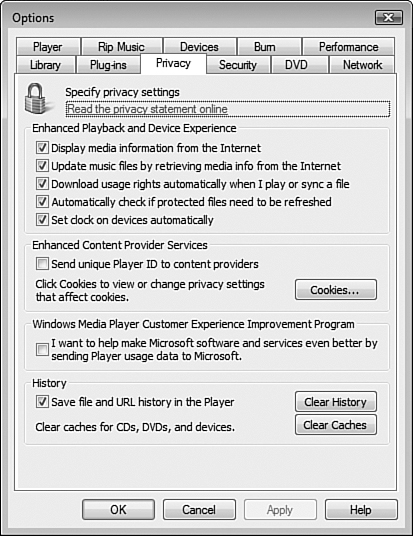
Shown in Figure 7.11, the Privacy tab enables you to configure the following privacy options:
Display Media Information from the Internet—. Select this check box to obtain information about CDs and DVDs that you play. Windows Media Player sends an identifier to a Windows Media database or database used by the online music store you have specified.
Update Music Files by Retrieving Media Info from the Internet—. Select this check box to automatically obtain and update media information for music files in your library.
Download Usage Rights Automatically When I Play or Sync a File—. Select this check box to automatically download usage rights, which enable you to perform actions on media files, such as playing a song, burning it to an audio CD, or synching it to a portable device. Usage rights, which utilize Microsoft Digital Rights Management technology, preserve the rights of copyright holders for protecting music or video products. If this check box is not selected, Windows Media Player does not automatically acquire usage rights, but rather prompts you to download usage rights.
Automatically Check If Protected Files Need to Be Refinished—. Select this check box to scan your library for files that have missing or expired usage rights as well as those that are about to expire. It then attempts to download these rights from the Internet.
Set Clock on Devices Automatically—. Select this check box to verify the time and date on a portable device being synched.
Enhanced Content Provider Services—. Select the check box provided to uniquely identify your copy of Windows Media Player to web servers, enabling them to perform tasks such as monitoring your connection, obtaining statistics, and enabling access to content. The servers will place cookies on your computer to facilitate this access. Select Cookies to open the Privacy tab of the Internet Properties dialog box and configure which cookies are accepted or read.
Windows Media Player Customer Experience Improvement Program—. Select the check box provided to join this program, which helps to improve the quality, reliability, and performance of software such as the Media Player.
History—. Select the check box provided to keep a history of your most recently played media files. Select the command buttons provided to clear the accumulated history or cached media information about devices connected to the computer.
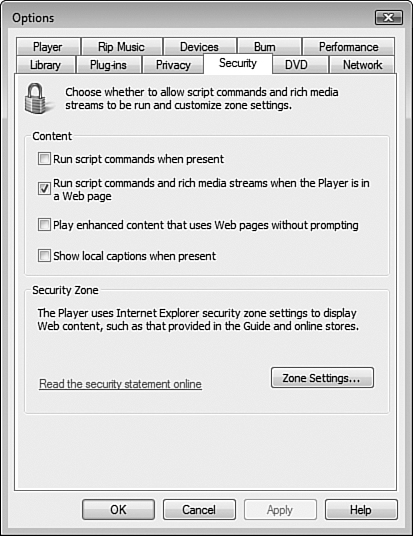
Shown in Figure 7.12, the Security tab enables you to configure several enhanced security options that govern the playback of media by Windows Media Player:
Run Script Commands When Present—. Select this check box to enable script commands to run when you play digital media content containing these commands. While script commands can enhance your playback experience, malicious scripts can run without your knowledge and perform improper actions.
Run Script Commands and Rich Media Streams When the Player Is in a Web Page—. Select this check box to enable scripts to run when you play digital media content from a web page. Clearing this check box might prevent rich-media streams such as those containing HTML, a PowerPoint slide show, or digital media content from playing.
Play Enhanced Content that Uses Web Pages Without Prompting—. Select this check box to prompt you when you play digital media content that is enhanced with web pages. This enables you to verify that you want to view the enhanced content and helps to avoid playing content containing malicious web pages.
Show Local Captions When Present—. Select this check box to enable Windows Media Player to locate and display Synchronized Accessible Media Interchange (SAMI) captions of media content from all content zones. When not selected, SAMI captions are displayed from the Internet zone only.
Security Zone—. Click Zone Settings to open the Security tab of the Internet Options dialog box as described previously in Chapter 5.
For more information on Windows Media Player security options, refer to Security and Windows Media Player 11 in the “Suggested Readings and Resources” section.
The DVD tab enables you to prevent users from playing DVDs according to ratings established by the MPAA. You can also specify default language settings to be used for audio language, lyrics, captions, and subtitles, and the DVD menu.
The Network tab enables you to specify how Windows Media Player accesses the Internet to obtain and play streamed digital media content. The following settings are available:
Protocols for MMS URLs—. Select the check boxes in this section to specify which protocols Windows Media Player uses when receiving a MMS URL. You can choose any or all or Real Time Streaming Protocol (RTSP)/User Datagram Protocol (UDP), RTSP/Transmission Control Protocol (TCP), and Hypertext Transfer Protocol (HTTP).
Multicast Streams—. Select the check box provided to enable Windows Media Player to receive media content in multicast streams.
Streaming proxy settings—. Specifies settings for protocols used by Windows Media Player when your computer connects to the Internet through a proxy server. Select the desired protocol and then click Configure to specify the proxy settings for the selected protocol. By default, Windows Media Player is configured to use proxy settings specified in the Internet Options dialog box.
Note: Windows Firewall and Windows Media Player
Windows Firewall might block UDP and multicast streams when you are on a public network such as a Wi-Fi hotspot. To enable reception of these streams, open the Exceptions tab of the Windows Firewall Properties dialog box and select the Windows Media Player check box.
The Player tab enables you to specify how often Windows Media Player checks for updates as well as several additional player settings. You can select the following options:
Automatic Updates—. Select the appropriate radio button to check for updates daily, weekly (the default), or monthly. You can also choose to download codecs (software programs used to compress or decompress media files) for unrecognized file types automatically.
Keep the Player on Top of Other Windows—. Select this check box to keep Windows Media Player in the foreground when you run other programs. This is useful for selecting the playback controls rapidly.
Allow Screen Saver During Playback—. Select this check box to allow the screen saver to appear after the number of minutes specified in the Screen Saver tab of the Display Properties dialog box. When cleared, the screen saver cannot appear when you are playing long media files such as movies. Clear this check box to avoid interruption of these media types.
Add Media Files to Library When Played—. Select this check box to automatically add files from your computer or the Internet (such as downloaded .mp3 files) to your library if they are not already present. Files played from removable storage or shared network locations are not added.
Connect to the Internet (overrides other commands)—. Select this check box for automatic connection to the Internet, overriding other connection options. This is useful when working offline and you select a feature that requires Internet access.
Start the Mini Player for File Names that Contain This Text—. Specifies which media files will be played in Compact mode. Type a portion of the filename to be played in Compact mode in the text box provided. For example, you can play voice messages from your email by typing text from the filename here.
The settings in the Rip Music tab, shown in Figure 7.13, govern when and how Windows Media Player copies (rips) music files from an audio CD inserted in the computer’s CD-ROM drive. You can configure the following settings:
Rip Music to This Location—. Specifies the location to which music is saved. By default, this is
C:Users<user_name>Music. Click Change to specify a different location and click File Name to specify information to be included in default filenames.Format—. Click the drop-down list to specify which format is used by default. You can choose from several Windows Media Audio formats, MP3, or WAV files.
Copy Protect Music—. Select this check box to protect audio tracks when copied to your computer. This means that media usage rights are required to play, burn, or sync the files, or copy them to another computer. This option is available only when you are using a Windows Media Audio format for ripping music.
Rip CD When Inserted—. Select this check box to automatically start the copying of music when you insert a CD if the Rip Music tab is displayed, or always, according to the option selected.
Audio Quality—. Adjust the slider for your desired balance between high quality (large file size) and smaller file size (reduced quality).

The Devices tab enables you to specify the properties for CD and DVD drives, displays, speakers, and portable audio devices connected to your computer. Select the desired device and click Properties. Click Advanced to specify file synching options, including allowing files to convert in the background and temporary file storage location.
The Burn tab enables you to configure settings for recording (burning) audio and data files to CD and DVD discs. The following settings are available:
Burn Speed—. Select from Fastest, Fast, Medium, or Slow burning rate, and select the check box provided to automatically eject the disk when burning is complete. Normally, you should keep this at the default Fastest rate; reduce the burn speed only if you are encountering problems burning.
Apply Volume Leveling Across Tracks on the CD—. Select this check box to minimize the volume differences between songs on audio CDs so that you do not need to adjust the volume while you are playing the CD. This option is selected by default.
Add a List of All Burned Files to the Disk in This Format—. Selects the format used when creating a playlist of all files on the disc. By default, this playlist is created in the .wpl format. If the device used for playing your disc does not support this format, select the .m3u format from the drop-down list.
Use Media Information to Arrange Files in Folders on the List—. Select this check box to organize files burned to CDs or DVDs into folders arranged according to media type, artist, album, and so on. This option is selected by default. If you clear this option, all burned files are placed in the root folder of the disc.
Fit More Music on the Disk by Converting to a Lower Bit Rate—. When you select the Convert To option, Windows Media Player converts files to the WMA format and compresses them according to the setting you select. Reducing file size enables you to fit more songs on a CD with possible loss of audio quality.
The Performance tab offers the following options that affect the performance of Windows Media Player 11. You should generally leave these options at their default settings, except for the video border color, which you can set according to your preference:
Connection Speed—. Enables you to select the connection speed from a range of 28.8 Kbps dial-up to 10 Mbps LAN speeds. The default option sets the speed to that used by your network or Internet connection.
Network Buffering—. Enables you to select the number of seconds of content to be buffered.
DVD and Video Playback—. Provides four options that control playback from these devices. By default, playback controls are displayed when using full-screen mode. You can control video playback with a mouse that has extra thumb button controls by clearing the Display Full-Screen Controls check box. Refer to the Help and Support Center for more details.
Video Border Color—. Enables you to modify the color used by Windows Media Player when it is set to display in Full mode. Click Change to select from a palette of basic colors or define a custom color for your use.
Windows Media Player provides additional options for rip, burn, and sync from the menu bar:
Rip—. Copies, or rips, tracks from an audio CD to the default music location specified in the Rip Music tab of the Options dialog box. When you insert an audio CD and select this menu item, Windows Media Player displays the title, artist, genre, and year of the album plus a list of songs on the CD. Ripping starts by default if you have configured this option. You can select the songs to be copied by selecting or clearing check boxes associated with each song.
Burn—. Creates an audio CD, data CD, or DVD. Insert a blank disc and drag items to the space provided in the right side of the screen. When you have completed the burn list, click Start Burn to copy the files to the disc. Windows Media Player creates a folder structure on the new disc according to the options you have selected in the Burn tab of the Options dialog box.
Sync—. Synchronizes your media files to a portable device such as an mp3 player. When you connect your device, the Sync section of the Windows Media Player window displays information about the device. You can then drag the desired items to the space provided in the right side of the screen. When you have completed the sync list, click Start Sync. You can also choose to copy your entire music library to your device, provided that the device has enough storage capacity (more than 4GB) to hold your library. If you select this option, Windows Media Player updates your device according to the content of your music library each time you connect it.
Tip: Synching is two-way
You can also sync files from your media device to your computer. This is worthwhile if you’ve used the device to purchase music directly or if you have synched to the device from another location such as a friend’s computer. Just click Start Sync to synchronize the device’s content with Windows Media Player.
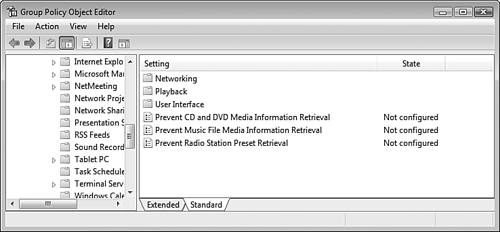
Group Policy in Windows Vista contains several settings related to Windows Media Player. Open the Group Policy Object Editor and navigate to User ConfigurationAdministrative TemplatesWindows ComponentsWindows Media Player to display the following options, which are shown in Figure 7.14:
Networking—. Includes settings for configuring HTTP and RTSP proxies, hiding the Network tab of the Options dialog box, configuring network buffering and streaming media protocols. For more information refer to the “Network Tab” section.
Playback—. Contains settings for allowing the screen saver to appear and preventing the download of codecs.
User Interface—. Contains settings for preventing the anchor window from being displayed, hiding the Privacy and Security tabs of the Options dialog box and locking Windows Media Player in Skin mode.
Prevent (category) Retrieval—. Includes settings to prevent media information from being downloaded automatically from the Internet, according to the three categories of media shown in Figure 7.14.
For further information on all policies, double-click a policy to view its Properties dialog box and select the Explain tab.
Windows Vista introduces a new media application designed to manage the growing collections of digital photos anyone with a digital camera rapidly amasses. Freed from the restrictions imposed by running out of film or the costs of film processing, most of us rapidly accumulate hundreds to thousands of photos and start to have difficulty locating and cataloging these great numbers of shots.
Windows Photo Gallery enables you to import photos and videos from cameras, scanners, removable media, other computers on the network, or the Internet. You can view the images, add or edit metadata, assign ratings, catalog the images to facilitate searching for them later, and burn them to CD or DVD. You can even apply simple fixes to your images.
Click Start, All Programs, Windows Photo Gallery to open the application as shown in Figure 7.15. The toolbar provides the following commands:
File—. Enables you to perform actions such as importing photos and performing general file management activities. Available commands are discussed later in this section.
Fix—. Enables you to perform simple repair activities on the selected photo including adjusting its exposure and color, cropping, and fixing red eye.
Info—. Enables you to display and edit metadata.
Print—. Enables you to print your photos on a local or network printer or order prints from an online service.
E-mail—. Enables you to resize the selected photos to a size suitable for insertion in an email message and then opens Windows Mail and attaches the images to a new message.
Burn—. Enables you to create a CD or DVD containing the selected images.
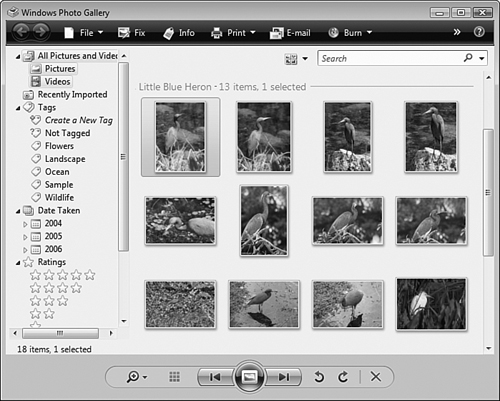
Controls at the bottom of the gallery enable you to magnify portions of the image, view it at actual size, rotate it clockwise or counterclockwise, or delete the image. You can also move to the next or previous image or play a slide show of your images.
By default, Windows Photo Gallery displays images according to the folder in which they are located. You can use the View, Group By command to change group images according to one of several metadata properties, including date taken, file size, image size, camera, and tags. (Note that a tag is a descriptive keyword that enables you to locate photos with common attributes, such as an individual in the photograph.)
Table 7.1 summarizes the commands available from the File menu in Windows Photo Gallery.
Table 7.1. Windows Photo Gallery File Commands
Command | Purpose |
|---|---|
Add Folder to Gallery | Enables you to select a folder containing pictures and videos to be included in the gallery. Browse to the desired location and then click OK. |
Import from Camera or Scanner | Enables you to select a device containing photos to be imported from a dialog box listing all available devices such as cameras, scanners, or memory card readers. Windows Photo Gallery uses the new Media Transfer Protocol (MTP) for importing images. MTP offers enhanced capabilities including support for additional devices such as portable media players and cellular phones, faster transfer of files, support for wireless connectivity to supported devices, and improved support for audio and video formats. |
Delete, Rename, Copy, and Select All | Function exactly as the corresponding commands in any window’s File menu. |
Screen Saver Settings | Brings up the Screen Saver tab of the Display Properties dialog box. You can select images from your gallery to be used in a custom screen saver. |
Share with Devices | Brings up the Media Sharing dialog box, which enables you to share music, pictures, and videos on the network. This dialog box is similar to the Media Sharing dialog box included with Windows Media Player. |
Properties | Displays a Properties dialog box for the selected image. By default, the Details tab appears, which provides detailed information including metadata recorded by the camera when the photo was taken. |
Options | Brings up the Windows Photo Gallery Options dialog box, which enables tooltips, copies of originals after you perform fixes, and checks for updates to Windows Photo Gallery. The Import tab of this dialog box provides options that govern the importing of images from cameras, scanners, CDs, and DVDs. |
Exit | Exits Windows Photo Gallery. |
When you select an image and click Fix, Windows Photo Gallery displays the selected image along with a series of commands, as shown in Figure 7.16.
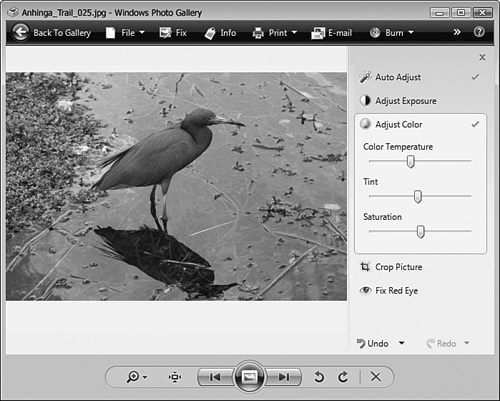
You can perform the following actions on the selected image:
Auto Adjust—. Attempts to perform automatic fixes of the image’s exposure and color values. You can use other controls to override the fix performed by this control.
Adjust Exposure—. Provides two sliders with which you can adjust an image’s brightness and contrast.
Adjust Color—. Provides three sliders in which you can adjust an image’s color temperature, tint, and saturation.
Crop Picture—. Enables you to crop the image.
Fix Red Eye—. Enables you to remove the red appearance of a subject’s eyes frequently found in flash photos where the flash has reflected back from the retinas of the subject’s eyes.
You can also undo or redo changes by selecting the options at the bottom of this list.
Windows Photo Gallery also includes the following options:
Searching for images—. Type text into the Search box at the top of the gallery, and Windows Photo Gallery will display images containing the text as a tag, filename, or caption.
Image Preview—. Hover your mouse over an image to view an enlarged thumbnail with simple date. Double-click any image to preview it. The image is enlarged and displayed along with assigned tags and star ratings. You can use the controls at the bottom of the gallery to enlarge, rotate, or delete an image, move through the images, or start a slide show.
Play a slide show—. Use the control at the bottom of the gallery to start a slide show. The show displays at full screen resolution. To control slide show behavior, right-click to obtain a pop-up menu, which enables you to pause or resume the show, step forward or back by one image, or adjust the speed of the show. You can choose the Shuffle option to play images in random order or click Exit to return to the photo gallery.
Display an image as your desktop wallpaper—. Right-click the desired image and choose Set as Desktop Background.
Create or add image tags—. Use tags to classify your images and search for them. From the navigation bar located at the left side of the window, click Create a New Tag. A box appears in which you can type the name of the tag. To add tags to an image, right-click the image and choose Add Tags. This displays the image and its tags at the right side of the gallery and enables you to add additional tags. You can even add a non-existent tag, and the tag will be created and added to the Tags list in the navigation bar.
Assign ratings and display images by rating—. Assign a rating to an image by selecting the image and clicking Info. Then select the number of stars desired. View images with a specific rating by selecting the number of stars under Ratings from the navigation bar. Return to displaying images regardless of rating by selecting All Pictures and Videos at the top of the navigation bar.
View photos by folder or by date taken—. Select the desired action from the navigation bar. Select All Pictures and Videos to return to displaying all images.
Windows Movie Maker and Windows DVD Maker
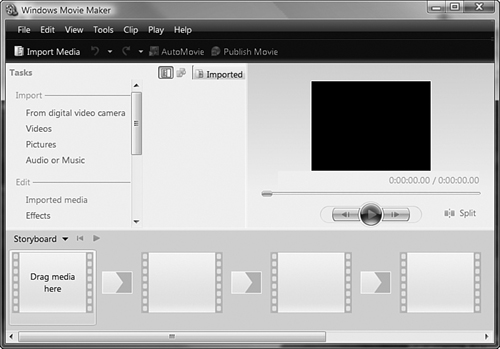
Windows Movie Maker and its companion application, Windows DVD Maker, enable you to create, import, manage, and edit digital videos in regular or high-definition format. You can view these videos on ordinary DVD players, so that you can share them with family and others. These applications are included with the Home Premium and Ultimate editions of Windows Vista.
Click Start, All Programs, Windows Movie Maker to display the interface shown in Figure 7.17. This program is intuitive and contains a full set of tools for creating and working with your videos. You can even add titles, special effects, and transitions—enough accessories to enable almost anyone to create movies easily. Developers can use a Microsoft software development kit to create additional styles and transitions for even more creativity.
The following are several important features of Windows Movie Maker and Windows DVD Maker:
Support for high-definition video—. You can use Windows Movie Maker to create, edit, and manage high-definition videos.
Simplified importing of videos from digital camcorders—. Windows detects these devices as soon as you connect them, and Windows Movie Maker includes a wizard that facilitates the importation of videos.
Integration with Windows Photo Gallery—. You can use the sorting and filtering capabilities built into Windows Photo Gallery to locate pictures and videos. You can also view and manage your videos from this application.
DVD authoring and burning—. You can transfer videos from your digital camcorder onto professional-looking DVDs that you can share with others. You can also burn your photos and data files to data DVDs.
High quality graphics capabilities—. Windows Movie Maker leverages the power of graphical processing units (GPUs), thus enabling the CPU to concentrate on other activities. Consequently you receive improved graphics performance in all actions including those involving high-definition video creation.
Configuring Windows Mail
Objective: Configure Windows Mail.
Windows Mail is the successor to Outlook Express, which was the default email client in versions of Windows prior to Vista. With the present email concerns such as the proliferation of unsolicited junk messages (spam), email-borne viruses, and phishing attacks, Microsoft revamped the email client to come up with a more secure, easy-to-use mail application.
The following are several of the more important improvements introduced with Windows Mail:
Improved reliability—. Windows Mail utilizes new technology to improve the handling of large email messages and data files containing thousands of messages.
Instant search—. As with other bundled applications, you can rapidly search across thousands of email messages, even those that are years old. In addition, the Instant Search feature on the Start menu locates email messages along with other retrieved items.
Spam filter—. Windows Mail screens and analyzes incoming messages to spot and remove junk email. It can identify junk messages from the very first time you start using it.
Phishing filter—. Windows Mail checks for messages containing fraudulent links to phishing websites and helps protect users from scams and identity theft.
Improved newsgroup capabilities—. You can more easily manage and contribute to newsgroups and discussion groups.
The first time you open Windows Mail, it starts a wizard that simplifies the input of your email account information (see Figure 7.18).
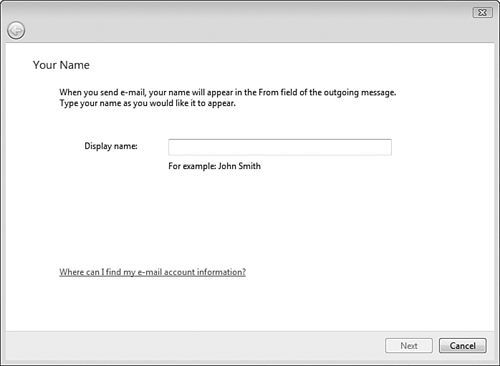
Follow Step by Step 7.4 to set up the first email account.
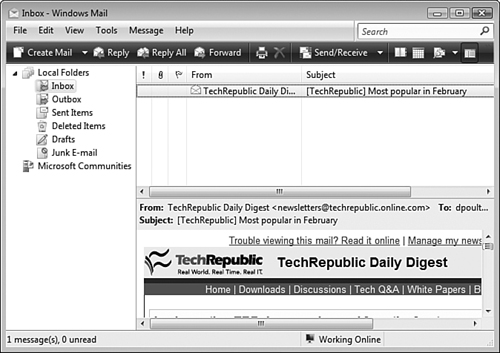
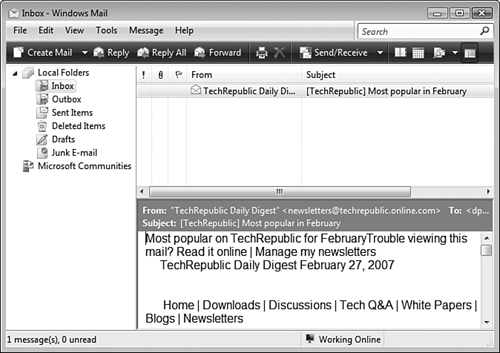
After you have configured your first email account, Windows Mail displays the default view shown in Figure 7.19.
It is simple to configure additional email accounts, as Step by Step 7.5 shows.
Creating New Email Accounts
From the Tools menu of Windows Mail, select Accounts. The Internet Accounts dialog box appears and displays your configured email and news accounts.
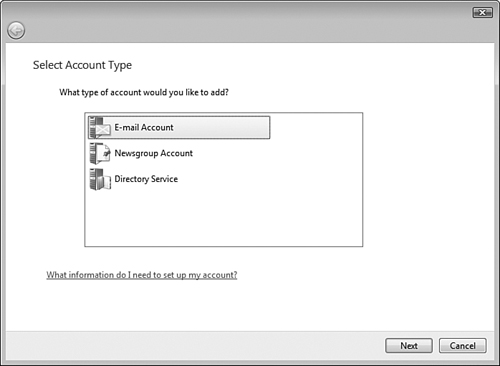
Click Add. Windows Mail starts a wizard that asks you to select the type of account you want to set up (see Figure 7.20).
Select E-mail Account, and then click Next.
Follow the instructions provided in Step by Step 7.4 to create the account.
Every account in Windows Mail has a complete set of properties associated with it. To access these properties, click Tools, Accounts to display the Internet Accounts dialog box shown in Figure 7.21.
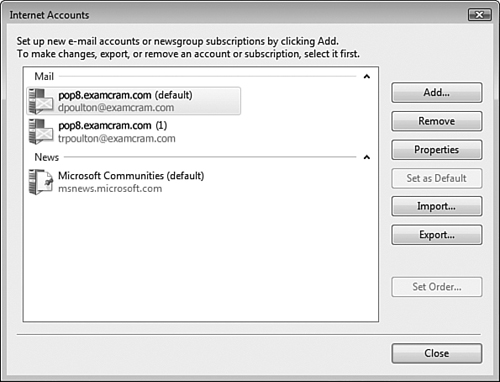
To specify which email account should be used as a default when sending email messages, select it and click Set As Default. To configure account properties, select it and click Properties. From the Properties dialog box that appears, you can configure the following properties:
General tab—. Enables you to modify the user information, including name, organization, email address, and reply address. The reply address option is used if you want replies to your messages sent to a different account from that used for sending—for example, if you send work-related messages from your home email account and want replies to go to your work email account.
Servers tab—. Enables you to change the FQDN of the incoming and outgoing email servers. You can also change the username and password required to connect to the email server, specify account logon using Secure Password Authentication, and configure authentication properties for the outgoing email server.
Connection tab—. By default, Windows Mail uses the same connection properties used by Internet Explorer. If you require the use of a LAN or VPN connection, you can specify these settings here.
Security tab—. Enables you to specify digital certificates to be used for signing and encrypting messages, as well as an encryption algorithm.
Advanced tab—. Enables you to modify the port numbers used by the incoming and outgoing servers, specify the use of Secure Sockets Layer (SSL) for server connections. You can specify a length of time (one minute by default) that Windows Mail tries to access the server before issuing a timeout message, break apart messages larger than a specified size, and leave copies of messages on the email server. The latter option is useful if you are checking your messages from a remote location and want to download them later when you return to the office.
Exam Alert: Default ports
By default, the outgoing mail (SMTP) server uses TCP port 25. The incoming mail server uses TCP port 110 if configured with the POP3 protocol, and TCP port 143 if configured with the IMAP4 protocol. You should know these common port numbers for the exam. If you have modified these port numbers in error, click the Use Defaults button on the Advanced tab of the account’s Properties dialog box.
You can configure various aspects of Windows Mail using the toolbar menu options. The following list and subsequent sections present the more important Windows Mail options you should be aware of:
Besides standard file options including the creation of new messages, saving, printing, and so on, you can create and modify the folder structure into which messages are saved. The Save As option enables you to save a copy of a message as a different file type such as plain text or Microsoft Word document. You can also view the properties of the selected message and specify that you want to work offline.
The Import command enables you to import the following items into Windows Mail:
Windows Contacts—. You can import contacts from a previous address book in any of the following formats:
comma-separated (CSV) values
Lightweight Directory Import File (LDIF) values from a Lightweight Directory Access Protocol (LDAP) server such as an Active Directory domain controller
vCard
Windows Address Book File (contacts stored in Outlook Express on an older computer)
Click Import and specify the path to the file to be imported.
Messages—. You can import email messages from any of Microsoft Exchange, Outlook, Outlook Express 6, and Windows Mail 7. Specify the required format, click Next, and confirm the location displayed or type the proper location.
Mail Account Settings—. You can import the configuration information associated with other email accounts.
News Account Settings—. You can import the configuration information associated with other newsgroup accounts.
The Export command enables you to export the following items:
Windows Contacts—. You can export Windows contacts to CSV or vCard files, thereby enabling another user to use them with another program or an older version of Windows.
Messages—. You can export email messages to Microsoft Exchange or another copy of Windows Mail.
Note: Default newsgroup in Windows Mail
Windows Mail contains a preconfigured account for Microsoft’s msnews.microsoft.com news server, which hosts more than 2,000 microsoft.public.* newsgroups. You can configure accounts for receiving newsgroup postings from other sources if you want. If you have a Hotmail or other Microsoft Passport account, you can rate messages on the Microsoft newsgroups.
The Identities command starts a wizard that informs you that identities are no longer used because individual user accounts improve email security. This wizard enables you to import account information and messages from identities used in previous Outlook Express versions including those associated with a different Windows account.
The Edit menu contains all the common editing commands plus commands that enable you to mark messages as read or unread, mark conversations as read, and mark all messages as read. You can move or copy messages to different folders, delete messages, and empty the Deleted Items folder.
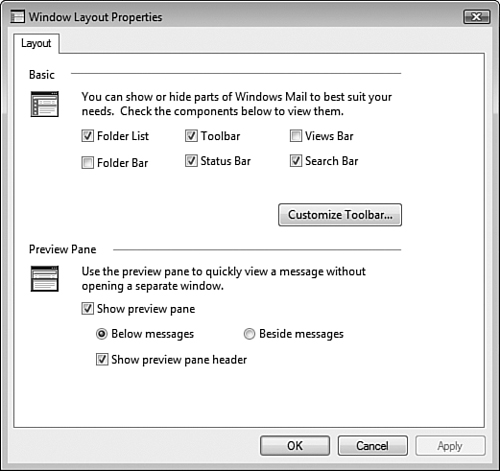
The View menu enables you to customize the appearance of the Windows Mail interface. Click View, Layout to obtain the dialog box shown in Figure 7.22 and select the components you want to hide or display.
In addition, you can modify the current view to show all messages, hide read messages, hide read or ignored messages, or create a customized view. The latter opens a dialog box that enables you to specify which conditions should be met for messages to appear in the message list. You can sort messages according to several characteristics, modify the size of text used to display messages, and the character encoding used in message display.
Step by Step 7.5, “Creating New Email Accounts,” mentioned the configuration of Windows Mail accounts from the Tools menu. This menu also enables you to send and receive messages immediately, synchronize all mail accounts, access Windows Contacts and Windows Calendar, add the sender of the current message to the Contacts list, configure message rules for email and newsgroup messages, and access options related to junk messages. Windows Calendar is discussed later in this chapter in the section, “Configuring Windows Calendar.”
Click Tools, Options to access the Options dialog box shown in Figure 7.23. From the tabs in this dialog box, you can configure the following options.
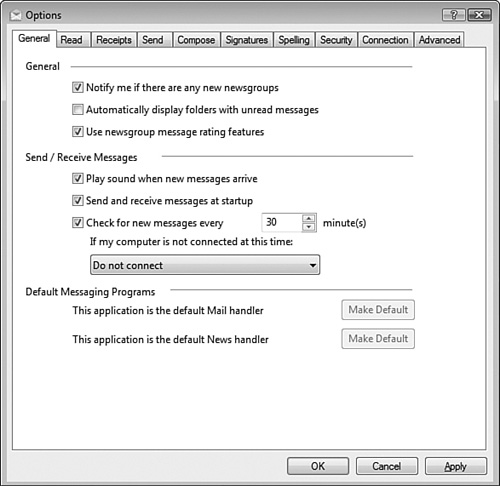
The General tab contains the following three sections that relate to newsgroups, the sending and receiving of messages, and default email and newsgroup programs:
General section—. Select these options to configure newsgroup behavior.
Send/Receive Messages—. Choose from settings that determine how Windows Mail checks for incoming messages and notifies you.
Default Messaging Programs—. Specify whether you want Windows Mail as your default program for handling email and newsgroups.
The Read tab contains the following options that pertain to the reading of email and newsgroup messages:
Reading Messages—. You can specify the number of seconds that elapse before Windows Mail considers a newly displayed message to have been read. You can also automatically expand grouped messages, download messages viewed in the preview pane, and show tool tips in the message list for items whose title is too long to appear in the message list. You can also specify that all messages are to be displayed in plain text; selecting this option can guard against execution of HTML-based viruses or worms or malicious scripts but renders display of formatted email in a less intuitive fashion (see Figure 7.24).
News—. You can specify how many headers are downloaded at a time (the default is 300, and the maximum is 1000) and mark all messages as read when you exit the newsgroup.
Fonts—. You can specify which font is used for viewing messages by default, as well as settings that determine how international messages are encoded and displayed.
The Receipts tab enables you to request a read receipt for messages you send to verify that the recipient has received and read the message. You can also choose when you send read receipts for messages others have requested receipts for—the choices are to notify me for each request (the default), never send a receipt, or always send a receipt. Click the Secure Receipts button to bring up the Secure Receipt Options dialog box that enables you to request secure receipts for digitally signed messages or choose from options for sending secure receipts that are similar for those for regular read receipts.
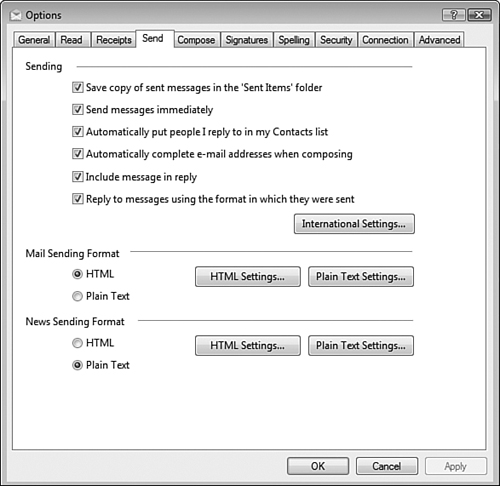
The Send tab, shown in Figure 7.25, contains largely self-explanatory options that govern how messages you create are sent. To send mail or news messages in HTML format, select the appropriate option and click the HTML Settings dialog box. Options on this dialog box enable you to specify the format of MIME-encoded text, send pictures with messages, and indent messages on reply. Plain text settings also enable you to specify MIME-encoded formatting options, automatically wrap text at a specified number of characters, and use the “<” character when indenting original text that you are replying to or forwarding.
The Compose tab enables you to specify the following options for messages you are preparing to send:
Compose Font—. Specify the default font to be used when creating mail and newsgroup messages.
Stationery—. To use a background stationery for message display, select the check box provided (for mail and/or news) and then click Select. From the Select Stationery dialog box, select the desired pattern or click Create New to access a wizard that helps you create a customized pattern such as a letterhead.
Business Cards—. Enables you to include your business card when creating mail and newsgroup messages. Select the check box provided and then click Edit.
The options on the Signatures tab enable you to add a signature to all outgoing messages. The signature is a text message that is automatically appended to all messages when you select the Add Signatures to Outgoing Messages option. If you do not want the signature added to replied or forwarded messages, select the Don’t Add Signatures to Replies and Forwards option. You can also select a file that contains a text- or HTML-based file to be used as your signature.
Select the check box provided in the Spelling tab to use the Microsoft Word standard and custom dictionaries to spell-check your messages before sending them. You can also choose whether or not uppercase words, words with numbers, original text in a replied or forwarded message, or Internet addresses should be spell-checked. Select the Language drop-down list to access a comprehensive set of languages to be used for spell checking.
The Connection tab contains options for connecting to the Internet when sending and receiving messages. By default, a dial-up link asks before switching connections; you can disable this option if desired. You can also specify that a dial-up connection hangs up after sending and receiving messages. This tab also provides a link to the Internet Explorer connection settings, which Windows Mail uses. Click the Change button to access the Connections tab of the Internet Properties dialog box.
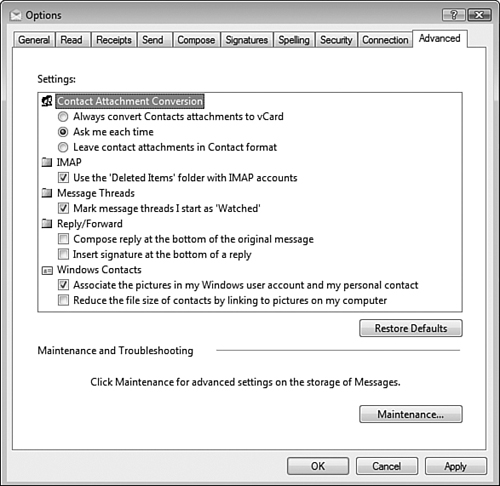
The Advanced tab, shown in Figure 7.26, contains a series of settings that configure attachment conversion, IMAP settings, message threads, reply/forward behavior, and use of pictures associated with Windows Contacts. Click the Maintenance button to access the Maintenance dialog box, which enables you to choose how old messages are cleaned up and the saving of commands from mail, news, and IMAP servers in log files for troubleshooting purposes.
In these days of a seemingly unrelenting barrage of malware, spam, phishing, and other types of attacks against computer systems worldwide, email security is of paramount importance to individuals and companies alike. In recent years, many companies have backed off from using email as a prime communications medium because of the occurrence of these attacks. In addition, recent security legislation such as the Health Insurance Portability and Privacy Act (HIPPA) and Sarbanes-Oxley has underscored the importance of data security and proper data retention, including that of email. With these concerns at hand, Microsoft has upgraded the security of email handled by Vista’s Windows Mail application to handle many new concerns.
You can think of spam as any email message you did not request—in other words, unsolicited commercial email. Despite recent legislation in the United States and elsewhere regulating such email, spam still accounts for a large percentage of total email messages.
Microsoft has incorporated junk email options from Outlook into Windows Mail. Briefly stated, these options assess incoming messages for characteristics common to junk email. Any messages flagged as junk are placed in the Junk E-mail folder and do not reach your Inbox. The Junk E-mail folder is found in the main Windows Mail window (refer to Figure 7.19), from which you can check the messages in case a legitimate message has been improperly sent there. From the Tools menu, select Junk E-mail Options to access the Junk E-mail Options dialog box shown in Figure 7.27.
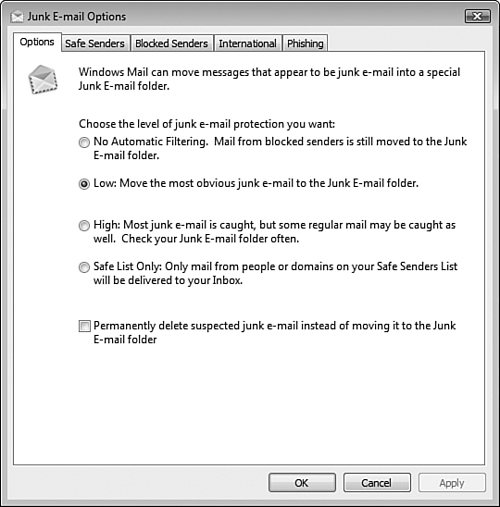
From the Options tab, select one of the four options for spam protection. If you are receiving large quantities of spam, select the High option, but as the dialog box advises, you should check the Junk E-mail folder frequently for messages that have been misclassified as junk. Only select the check box for permanently deleting junk messages if you are positive that the junk mail filter is not catching any legitimate messages.
The Safe Senders tab enables you to create a Safe Senders list. Addresses or email domain names that appear on this list whose messages are never to be treated as junk. Click Add to enter email addresses or Internet domain names. By default, messages from contacts in Windows Contacts are always trusted; you can also add the addresses of those to whom you send messages to the Safe Senders list.
The Blocked Senders tab enables you to create a Blocked Senders list, which contains address or email domain names whose messages are always treated as junk.
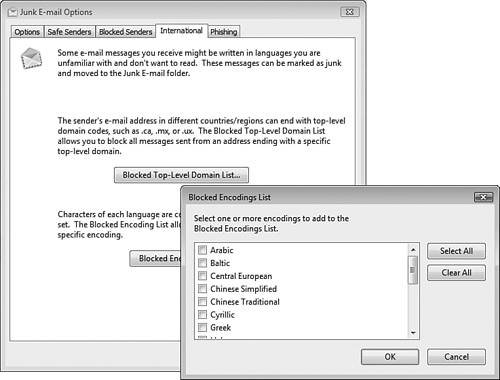
The International tab enables you to always block email sent from foreign countries with top-level DNS domain codes that you select from a list accessed from this tab. This is useful because many spammers operate from Third-World countries and send millions of messages around the world in seconds. Such spammers frequently use language characters that are encoded in special character sets. From this tab you can also select encoding sets that should always be blocked (see Figure 7.28).
The Phishing tab enables the Phishing Filter contained in Internet Explorer to check links contained in incoming messages for suspected phishing websites, thereby providing an extra level of protection against data and identity theft. You can flag messages containing links to suspected phishing websites or move these messages directly to the Junk E-Mail folder.
Open the Options dialog box and select the Security tab shown in Figure 7.29 to access options related to virus protection, downloading of images, and the digital signing and encryption of outgoing email messages.
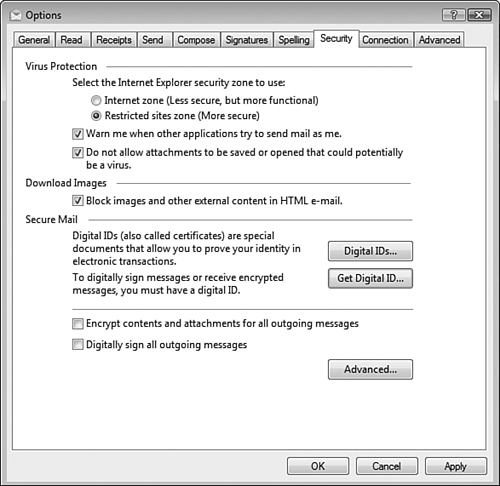
Anyone whose computer has ever been infected by an email-borne virus will fully appreciate the new options provided by Windows Mail. The Virus Protection section of this dialog box provides several options that help to protect you against these types of viruses and worms. This section provides the following options:
Select the Internet Explorer Security Zone to Use—. You can choose either the Internet zone or Restricted Sites zone. By default, Windows Mail uses the Restricted Sites security zone, which disables scripting of active content. You should keep this option selected unless you are certain that content in a legitimate message requires this capability to function properly.
Warn Me When Other Applications Try to Send Mail as Me—. Viruses and worms often attempt to replicate by sending copies of themselves to others on your contacts list. When selected, this option displays a warning message if activity of this type happens.
Do Not Allow Attachments to Be Saved that Could Potentially Be a Virus—. Windows Mail checks attachments for file types used by virus authors to distribute their code. If it finds such a file type, it disables opening or saving of the file and displays a warning message informing you of this fact.
Keep the option in the Downloaded Images section selected to prevent images and other external content included with HTML email messages from being downloaded. These types of content have been known to contain malicious code; they can also inform a spammer that your email address is legitimate, thereby resulting in your receiving more junk messages. Windows Mail displays an information bar to inform you that some images have been blocked. Click this bar to display the images in the selected message.
The Secure Mail section enables you to configure the use of digital certificates for signing or encryption of your email messages. A digital ID or certificate enables recipients of your email messages to verify your identity and ensure that you actually sent the message. Encryption of your messages prevents unauthorized individuals from viewing or modifying your messages in transit. If someone attempts to modify the message, the recipient is informed.
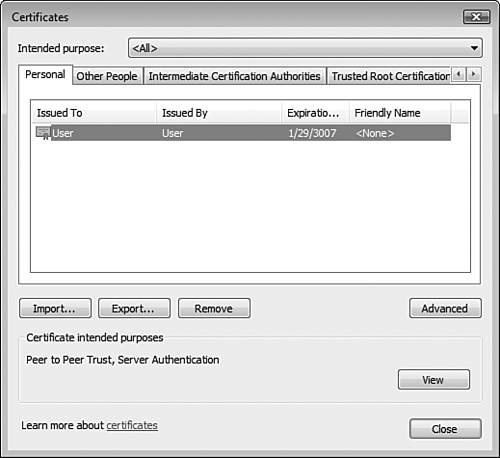
To obtain a digital ID, click the Get Digital ID command button. This opens Internet Explorer to a Microsoft web page that contains links to certification authorities such as VeriSign and Thawte. Follow the instructions provided. Once you’ve received your certificate, click the Digital IDs command button. This displays the dialog box shown in Figure 7.30, which enables you to view and manage your digital certificates. Click Import to import your certificate and follow the instructions in the wizard that starts. Also click Advanced and select the Secure Email option in the Certificate Purposes section of the Advanced Options dialog box that appears.
After you have installed your certificate, you can choose to digitally sign and/or encrypt any or all messages you send. To sign or encrypt all messages, select the appropriate check boxes in the Secure Mail section. To digitally sign a single message, compose the message and then click Tools, Digitally Sign. This attached your digital ID so that the recipient can verify your identity. To encrypt a single message, click Tools, Encrypt. The recipient must have a copy of your digital ID to read the encrypted message; Windows Mail displays a help screen the first time the recipient opens or previews an encrypted message. Microsoft suggests that your recipient should send you a digitally signed message beforehand.
If a digitally signed or encrypted message is altered in transit, Windows Mail displays a security warning containing information about the problem that has occurred. Read the message and use the information provided to decide whether to open the message.
For additional information regarding email security in Windows Vista, refer to Windows Mail and Resulting Internet Communication in Windows Vista, in the “Suggested Readings and Resources” section.
Objective: Configure Windows Meeting Space.
New to Windows Vista is Windows Meeting Space, which is a new collaboration tool that enables face-to-face interaction among small groups of users in any location using a wired or wireless network. You can initiate a session and then use the People Near Me feature to invite others to share the same view of your applications and data and collaborate in real time. You can also configure a password that helps to prevent unauthorized users from joining your meeting.
Note: Windows Meeting Space and Office Live Meeting
Windows Meeting Space is a peer-to-peer application that functions directly between Windows Vista computers used by individuals attending the meeting without the need for servers. This program is designed to support collaboration across small groups of up to 10 simultaneous users in any location anytime. If you are conducting large-scale meetings that involve collaboration across multiple locations and over the Internet, you should use Microsoft Office Live Meeting.
The following list introduces several of the more important features in Windows Meeting Space:
Total support for wireless networking—. Supports both infrastructure (connection through an access point) and ad hoc (direct connection between computers) wireless networking.
Shared control of presentations—. Enables the meeting facilitator to pass control to others, who can perform revisions even while the facilitator is broadcasting the original document from his computer.
Compatibility—. Enables users to broadcast all files or applications; you are not limited to data created using Microsoft applications.
People Near Me—. Enables you to check availability of others across the network and invite them to join your meeting.
Sessions Near Me—. Enables you to search for meeting sessions and ask to join them.
File sharing among multiple users—. Enables all users to modify and save files. If one user saves a change, this change is replicated immediately to others in the meeting.
Exam Alert: All users require Windows Vista computers
Users joining a meeting must have any version of Windows Vista installed on their computers. The user starting a meeting can have any version of Vista except Home Basic; persons with Vista Home Basic can join but not start a meeting in Windows Meeting Space. A question could present options that involve users of older Windows computers.
The following sections describe setting up Windows Meeting Space, conducting meetings, and sharing and editing handouts.
The first time you use Windows Meeting Space, you have to go through a setup routine. This process automatically configures Windows Firewall to allow communication and enables People Near Me and file replication. Step by Step 7.6 outlines the procedure.
Setting Up Windows Meeting Space
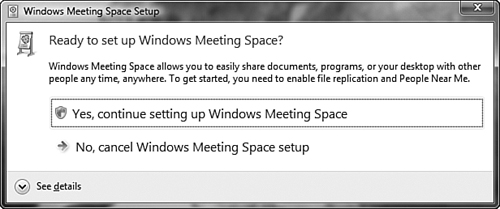
Click Start, All Programs, Windows Meeting Space. You see the screen shown in Figure 7.31.
Select Yes, Continue Setting Up Windows Meeting Space. Because this procedure involves configuring security-enabled applications such as Windows Firewall, you must accept a UAC prompt to continue.
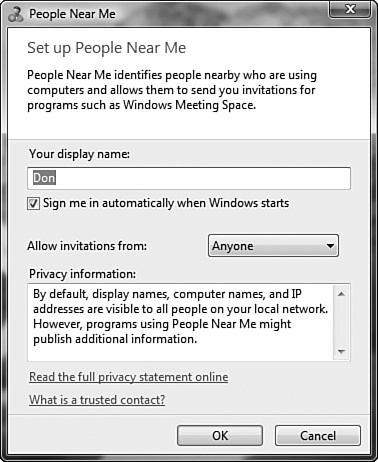
After several seconds, the Set Up People Near Me dialog box appears (see Figure 7.32). Confirm that your username appears or type the proper name. Select the appropriate option in the Allow Invitations From drop-down list as shown, and then click OK.
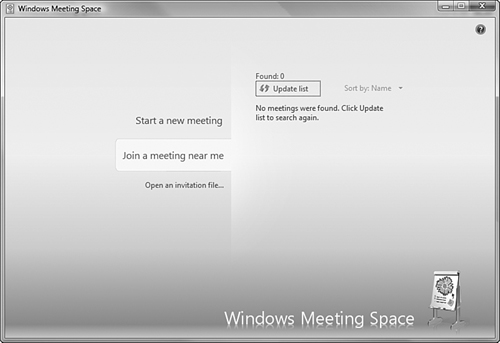
Windows Meeting Space starts and presents the screen shown in Figure 7.33. If Windows Meeting Space finds meetings within the range of your network, it displays these meetings. To join a meeting, select Join a Meeting Near Me.
As noted in the previous section, after you have set up Windows Meeting Space, you can start a new meeting or join an existing one. Running a meeting using Windows Meeting Space is simple, as Step by Step 7.7 shows.
Using Windows Meeting Space
Click Start, All Programs, Windows Meeting Space. From the screen shown in Figure 7.33, select Start a New Meeting.
Accept the meeting name provided or type a descriptive name of your choosing. Then type a password of at least eight characters and click the green arrow. You should follow the customary rules for creating a strong password.
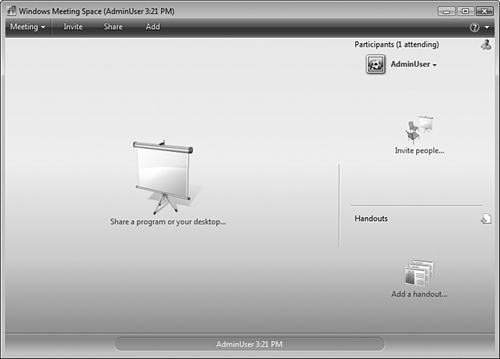
A progress bar appears as the meeting is created, and then the screen shown in Figure 7.34 appears.
To invite others to join your meeting, click the Invite People icon or click Invite from the menu bar. The Invite People dialog box displays the names of individuals who are signed in to People Near Me on the network. Select the people you want to invite and then click Send Invitations. This sends instant messages to those you selected.
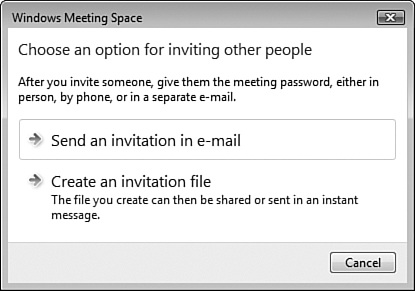
If you want to invite others not on the list, click Invite Others, to display the Windows Meeting Space dialog box shown in Figure 7.35. This dialog box enables you to choose between email or an invitation file for inviting others to your meeting.
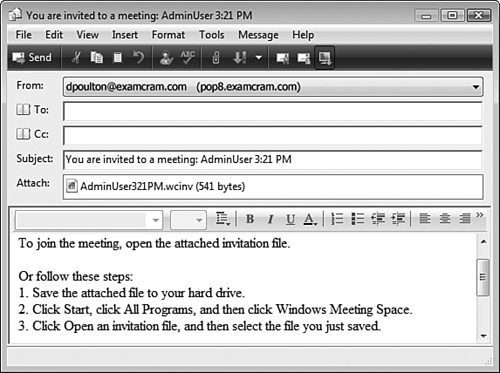
If you choose the email option, Windows Meeting Space creates an invitation file, opens a new message in Windows Mail, and attaches the invitation. As shown in Figure 7.36, the message includes instructions for the recipient for joining the meeting. Type the email address of the person you have invited, and then click Send.
If you choose the invitation file option, the Save As dialog box appears. Accept the filename or type one of your choosing, and then click Save. By default, the file is saved to your Documents folder unless you click Browse Folders to select a different folder. You can copy the file to a shared folder or floppy disk and deliver it to the desired individuals or use instant messaging to send the invitations.
Accepting an invitation to join an existing meeting is simple, as Step by Step 7.8 shows.
As people join the meeting, all attendees see the names of those who have joined in the participants list in Windows Meeting Space. If people leave the meeting, their names are automatically removed.
You can also join meetings in session near you without receiving an invitation. When you start Windows Meeting Space, the Join a Meeting Near Me option displays any meetings it is able to locate on your network. Select the meeting you want to join, and then type the password established by the meeting facilitator.
Windows Meeting Space enables you to share handouts, applications running on your computer, or your entire desktop with others in your meeting. Handouts are any document files created using a program such as Microsoft Office or even a non-Microsoft program that you want others to view and possibly edit. By sharing programs or your entire desktop, you can perform actions such as demonstrating the program or any other action that you might perform on your computer. Step by Step 7.9 outlines procedures that you can follow to share information.
Sharing Information in Windows Meeting Space
To share handouts with others, click Add a Handout (or click Add in the menu bar). You receive a message box informing you that handouts will be copied to each participant’s computer.
Click OK, and then in the Select Files to Add dialog box, select or browse to the desired files. Then click Open. The filename of the handout appears in the Handouts section of the Windows Meeting Space window. Meeting attendees can edit handouts while they are shared.
To share a program or deliver a presentation, start the program on your computer.
Click Share a Program or Your Desktop (or click Share in the menu bar). You receive a message box asking you whether you want other people to see your desktop.
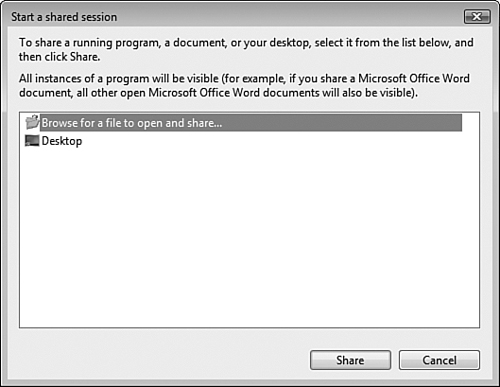
Click OK, and then in the Start a Shared Session dialog box shown in Figure 7.37, select the appropriate option and click Share.
The program or desktop you have shared is opened in a window on top of the Windows Meeting Space window on all participants’ computers. The title bar of the shared program on your desktop displays a
Currently Sharingmessage to remind you that the program is shared.To conclude the meeting, select Meeting from the menu bar and then click Exit. Click Yes to save the handouts or No to close the meeting without saving changes users have made to the handouts. If you save the handouts, choose a location to save them and then click Save.
Caution: Only one person can edit a handout at a time
If more than one person edits a handout at the same time, only those changes made by the last person are saved. As each person saves changes, they overwrite changes made by previous users. If another person is editing the handout, wait until she is finished before you add your edits.
You can also communicate in the meeting session by passing text notes or ink notes to a single person. Right-click the person to whom you want to send a note and select Pass a Note for a text note or Ink for an ink note. Type the message you want to send, and then click Send.
Configuring Windows Calendar
Objective: Configure Windows Calendar.
Windows Calendar is a full-fledged calendar application that enables you to keep track of meetings and appointments. It enables you to create tasks and appointments, create alerts to remind you of scheduled items, create task lists, and share calendars with coworkers or family members. The following are several important features of Windows Calendar:
Managing a personal schedule—. Windows Calendar enables you to create and keep track of appointments, events, and tasks. You can include all-day events as well as recurring ones.
Scheduling and prioritizing of tasks—. You can create a task list and include priority flags and completed flags.
Sharing of calendars—. You can create multiple calendars and share them with others in your workgroup or family so that everyone knows what others have scheduled.
Alerts—. Windows Calendar can remind you of approaching meetings or appointments or tasks that you should be completing soon.
Calendar publication—. Windows Calendar uses the open-standard iCalendar format, which enables you to publish your calendar on the Web for others to view.
Invitations—. Windows Calendar enables you to send and receive invitations to events and appointments by means of email attachments.
To start Windows Calendar, click Start, All Programs, Windows Calendar. You can also type calendar in the Search box or select Windows Calendar from the Tools menu of Windows Mail. Any of these actions brings up the Windows Calendar as shown in Figure 7.38.
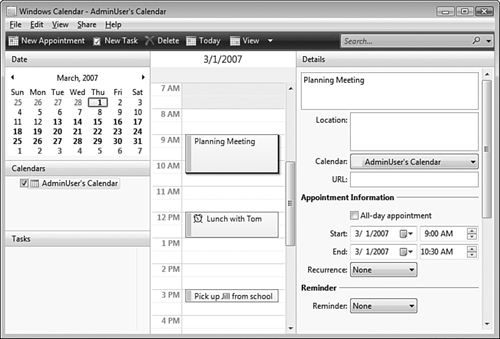
The Windows Calendar interface is divided into the following sections:
Date—. Shows the current month’s calendar. You can use the arrows to move to other months or select a date in the visible month to schedule tasks or events on that date. The current date is marked with a colored box.
Calendars—. Displays a list of available calendars and enables you to access multiple calendars (for example, business and personal calendars).
Sharing of calendars—. Enables you to create multiple calendars and share them with others in your workgroup or family so that everyone knows what others have scheduled.
Events—. The central part of the calendar displays an hourly view of the date selected in the Date area with the appointments and meetings you have scheduled.
Details—. Enables you to create new appointments and tasks and configure properties for these items.
Windows Calendar makes it simple to navigate between dates, months, and years by providing several view methods. Follow Step by Step 7.10 to navigate Windows Calendar.
You can also move to a specific date by selecting Go to Date from the View menu. Type the desired date or use the drop-down arrow to browse to the desired month. Then click OK.
You can also modify the view displayed in the central panel of the calendar. Click the downward pointing arrow at View from the toolbar to obtain the following options:
Day—. The default view, shows the current or selected day with hourly blocks.
Work Week—. Displays Monday to Friday of the current or selected week with hourly blocks.
Week—. Displays the entire current or selected week in hourly blocks.
Month—. Displays the current or selected month.
From this location, you can also toggle the view of the navigation (date, calendars, and tasks) and details panes on or off. Click the View toolbar button to toggle the central panel between the four available views.
Windows Calendar provides several tools that enable you to create appointments, all-day events, and tasks.
To create a new appointment, navigate to the date of the desired appointment and then perform one of the following tasks:
In the Events pane, click the time of the desired appointment and then type a descriptive title.
Click New Appointment in the toolbar and type a descriptive title.
From the File menu, select New Appointment. Then type a descriptive title.
By default, Windows Calendar creates the appointment in the hour that includes the current time. To create an appointment at a different hour, select the desired hour and then perform one of the preceding actions.
After you have created a new appointment, the Details pane enables you to add detailed information about the appointment, including the following:
Details—. Type additional information regarding the purpose of the appointment. Anything you type here will be added to the appointment title in the View pane.
Location—. Type the location of the appointment.
Calendar—. If you have more than one calendar, select the desired calendar from this list.
URL—. Add an Internet or intranet address related to the appointment if you have one.
Appointment Information—. Type or scroll to the appropriate start and end dates and times. To schedule an all-day appointment, select the check box provided. To schedule a multi-day appointment such as a vacation, select the check box and then type the appropriate start and end dates.
Recurrence—. To schedule a recurring appointment, select the appropriate option from this drop-down list. You can select None, Every Day, Weekly, Monthly, Yearly, or Advanced. The Advanced option displays a dialog box that enables you to specify the interval of repetition and the number of times or expiry date.
Reminder—. Click the drop-down list to display a length of time before the appointment start that you will be notified. By default, no reminder is specified. You can select zero minutes or time intervals ranging from five minutes to two weeks. When you have specified an interval, an alarm clock icon is displayed on the appointment in the View panel. When the reminder time comes up, you receive a dialog box like the one shown in Figure 7.39. You have the following options:
Dismiss All—. Closes all the displayed reminders.
View Item—. Displays details of the item in the Details panel.
Dismiss—. Closes this reminder.
Snooze—. Closes the reminder but redisplays it again after the selected interval (five minutes by default; click the drop-down list to choose another interval).
Participants—Add the email addresses of meeting attendees by typing them or adding them from your contacts list and send invitations.
Notes—Add additional information related to the current appointment.
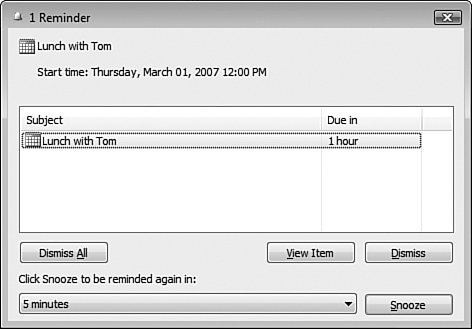
Windows Calendar enables you to create a list that helps you to remember important tasks. To create a task, click New Task from the toolbar or select New Task in the File menu. Then type a descriptive title. The task is displayed in the Tasks panel, and details of the task appear in the Details panel. You can specify the following details about the task in the Task Information section:
Completed—. Select this check box when you complete the task.
Priority—. Select none (the default), low, medium, or high. Tasks are prioritized in the Tasks list according to the options you select here.
Start and due dates—. Specify start and due dates for the task.
As with appointments, you can place the task in a specific calendar, include a URL associated with the task, and set a reminder.
You can use more than one calendar if you want to keep tasks and appointments related to different activities separate. For example, you can create a business calendar and a personal one or different calendars for different clients. Step by Step 7.11 shows how to create a new calendar.
As shown in Figure 7.40, Windows Calendar displays all events configured for your calendars in the Events panel, color-coded according to the colors you have specified for each calendar. If you want to view only events configured for a specific calendar, clear the check boxes in the Calendars panel for those calendars whose events you do not want to appear.
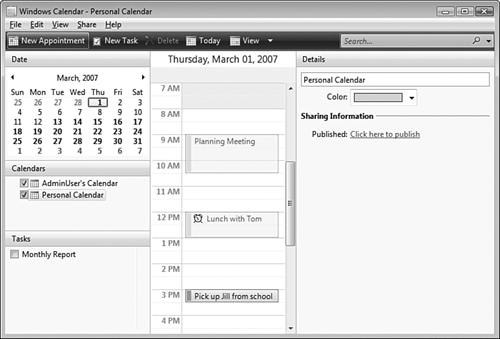
In addition, you can import and export calendars in Windows Calendar. Select File, Import to display the Import dialog box. Specify the filename in the Import File text box and select the destination of the imported calendar (you can merge events into an existing calendar or create a new one). To export a calendar, click File, Export. Specify a filename and click Save. Files are imported and exported in the iCalendar (.ics) format.
If you belong to work groups or teams in which the members need to coordinate their activities to facilitate the planning of meetings and get-togethers, Windows Calendar enables you to share and publish your calendars. Others can subscribe to your calendar and add it to their list of calendars, and you can do the same with calendars belonging to others. Follow Step by Step 7.12 to publish your calendar.
Publishing a Calendar
Select the calendar to be published from the Calendars pane. Information on the calendar appears in the Details pane.
Click the Click Here to Publish link. You can also click Publish from the Share menu.
The Publish Calendar dialog box shown in Figure 7.41 appears. Modify the calendar name if required and select a location to publish the calendar, such as a web page or shared folder location.
Select the calendar details to be shown in the published calendar and if desired, select the check box to automatically publish changes. Then click Publish.
Windows Calendar copies your calendar to the specified location and informs you that it has finished its task. Click Finish.
After you have shared your calendar, the Details pane displays sharing information when no events are selected. Select the check boxes provided to publish changes automatically and include items such as notes, reminders, and tasks in the published changes.
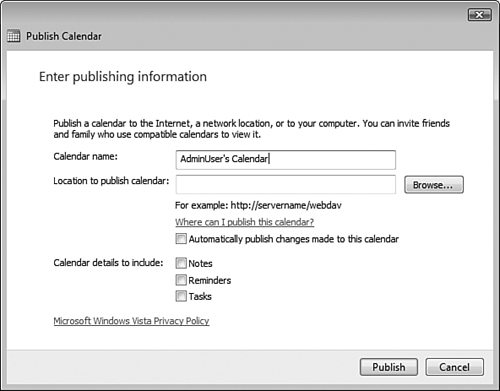
You can also share a calendar by email. From the Share menu, select Send via E-mail. Windows Mail opens a New Message window with the selected calendar file attached. Type the recipient’s email address and add any relevant information in the body of the message, and then click Send.
It is simple to subscribe to another user’s published calendar, as Step by Step 7.13 shows.
After you have shared your calendar or subscribed to another user’s published calendar, you can synchronize changes to your calendars. In the Share menu, click Sync to synchronize the selected calendar or Sync All to synchronize all published and subscribed calendars.
The Share menu item also enables you to stop publishing or unsubscribe from shared calendars. Select Share, Stop Publishing to stop publishing the selected calendar and click Unpublish. Also select the check box provided to delete your calendar from the server if desired. To stop subscribing to a published calendar, select it and click Delete from the menu bar (or press the Delete key). Click Yes to confirm your actions.
Configuring Windows Fax and Scan
Objective: Configure Windows Fax and Scan.
Windows Fax and Scan simplifies the tasks of sending and receiving faxes, scanning images and documents, and sharing these items with others. You can perform all these tasks and manage these items from a single location. Windows Fax and Scan recognizes different user accounts on your computer and identifies the sender of faxes accordingly.
The following are several key features of Windows Fax and Scan:
Single-click faxing and scanning—. Enables you to fax or scan documents as easily as it is to use email.
Simplified routing of faxes and scanned documents—. Enables you to create routing lists of server shares and email addresses for receiving copies of faxed and scanned documents.
Drag-and-drop functionality—. Simplifies the task of filing and sorting your faxes and scanned documents.
Live preview capability—. Enables you to see how documents will look prior to scanning so that you can modify settings as required.
Click Start, All Programs, Windows Fax and Scan to start this application. As you can see in Figure 7.42, Windows Fax and Scan shares many characteristics with Windows Mail. The Inbox, Outbox, and Sent Items folders function in the same way as the corresponding folders in Windows Mail. The Incoming folder holds information about faxes currently being received and the Drafts folder saves copies of faxes that you’re creating but haven’t yet sent.
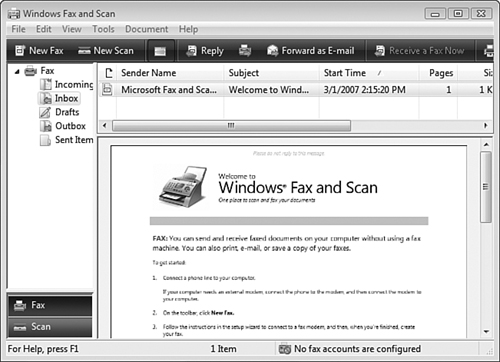
When you first open Windows Fax and Scan, you need to create fax accounts for each person who will be using the application. Follow Step by Step 7.14 to set up fax accounts.
Tip: Fax receive options
You can modify fax receive options at any time from the Fax Settings dialog box. Click Tools, Fax Settings, and then click Continue on the UAC prompt that appears. The General tab enables you to select a device if you have more than one fax device. You can choose to manually answer an incoming call or specify the number of rings after which the call is automatically answered.
You can send simple faxes consisting of the cover page only or multi-page faxes that include the cover page plus pages from a document. To send a simple fax, follow the procedure outlined in Step by Step 7.15.
You can also send a fax document directly from many applications such as Microsoft Word. Windows Fax and Scan includes a fax printer driver that renders your document as a fax and sends it to your fax modem. After creating the document, select File, Print and then select Fax from the printer list in the application’s Print dialog box. This displays the New Fax dialog box, from which you can follow the steps outlined in Step by Step 7.15 to send the fax.
When you receive a fax, Windows Fax and Scan alerts you by playing a sound and displaying a Review Fax Status message box as the fax comes in. When this message box disappears, the fax appears in your inbox, from which you can process it in much the same manner as you would do with an incoming email message. You can even reply to the fax sender or forward it to another fax number. In either of these cases, Windows Fax and Scan creates a new fax message, which you can send in the same manner as described in Step by Step 7.15.
Windows Fax and Scan enables you to scan documents and images from scanners attached to your computer or located on the network. The Live Preview feature in Windows Fax and Scan shows you how the scanned document will appear on your computer before you perform the final scan so that you can modify settings if required.
To scan a document, follow the procedure in Step by Step 7.16.
You can also scan and fax a document in a single step. From the File menu, choose New, Fax from Scanner. Follow the instructions of Step by Step 7.16 to scan the document and Step by Step 7.15 to fax it. The scanned document is automatically attached to the fax.
Configuring Windows Sidebar
Objective: Configure Windows Sidebar.
Windows Sidebar is a pane that appears by default on the right side of your display and includes a variety of items known as gadgets. Included by default are an analog clock, a slide show, and a link for viewing news feeds. You can also display web-based information such as news updates, traffic or weather maps, and so on. You can download additional gadgets from an online gadget gallery to customize the sidebar view.
Follow Step by Step 7.17 to configure Windows Sidebar properties.
Configuring Windows Sidebar Properties
If Windows Sidebar does not appear on your desktop, click Start, All Programs, Accessories, Windows Sidebar to open it.
Right-click an empty area in the sidebar and choose Properties. The Properties dialog box shown in Figure 7.43 appears.
Select the appropriate options from this dialog box. If you want the Sidebar to always appear even when you have a large number of windows open, select the Sidebar Is Always on Top of Other Windows option. If you have multiple monitors, you can choose to display Sidebar on any monitor you want by selecting its number from the drop-down list.
To see which gadgets are currently running, click View List of Running Gadgets. The dialog box that appears shows which gadgets are running. Click Remove to remove unwanted gadgets from the sidebar.
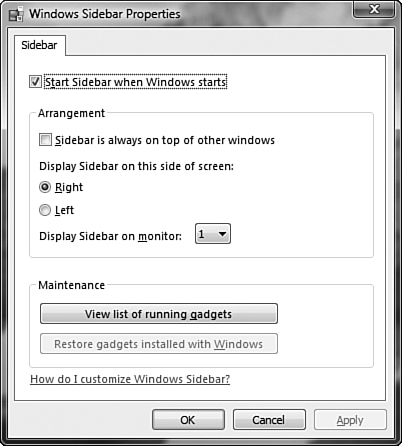
Windows Vista includes a default set of gadgets, of which only the three already mentioned appear by default. You can add additional gadgets by right-clicking an empty area of the Sidebar and choosing Add Gadgets. The dialog box shown in Figure 7.44 appears.
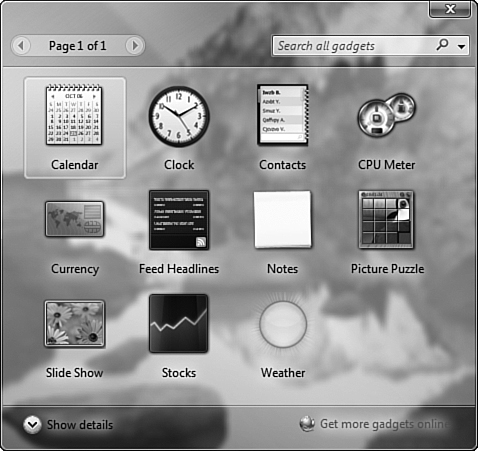
To add a gadget, right-click it and choose Add Gadget. To remove an added gadget, right-click it and choose Close Gadget, and then click Close Gadget in the message box that appears.
You can also download additional gadgets. To do so, select the Get More Gadgets Online link. This opens Internet Explorer to a Microsoft web page that enables you to download additional gadgets from a large number of categories including fun and games, lifestyle, mail and contacts, news and feeds, safety and security, search tools, tools and utilities, and so on. Developers can even create their own gadgets and post them to the web page (check this on the link provided).
Tip: Viewing additional gadgets
If you have added more gadgets to the Sidebar than can be displayed at any one time, a right-pointing arrow appears at the top of the Sidebar. Click this arrow to view the hidden gadget or gadgets. Click the left-pointing arrow to return to the original set of gadgets.
Some gadgets have configurable properties. Right-click a gadget and choose Options. As shown in Figure 7.45, you can modify the behavior of a gadget using these options.
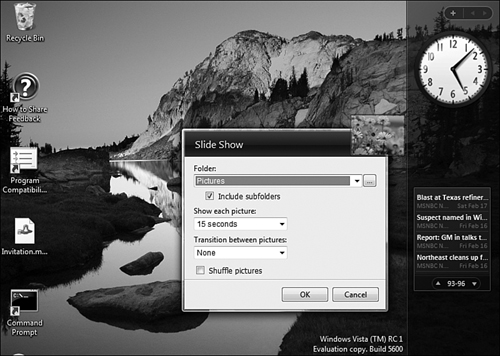
Tip: Closing the Sidebar
If you need to close the Sidebar to obtain additional viewing space, right-click a blank area within the Sidebar and choose Close Sidebar. This minimizes the Sidebar into an icon in the notification area. This is particularly useful if you have configured the Sidebar to always appear on top of other windows. To make the sidebar reappear, click this icon.
In this chapter, you learned about some of the native applications included with most editions of Windows Vista. Windows Vista Home Premium and Ultimate include the Windows Media Center, which provides a one-stop, complete multimedia application that lets you watch and record TV, listen to digital music, play games, listen to FM and Internet radio stations, or access content from online media services. These two editions of Vista also include the Windows DVD Maker, which enables you to create DVDs containing videos, photos, and/or data.
All editions of Vista include the Windows Media Player, which enables you to manage most types of digital media such as music and videos, the Windows Photo Gallery, which helps you manage your collection of digital photos, and the Windows Movie Maker, which enables you to create, import, manage, and edit digital videos.
Windows Mail is the successor to Outlook Express and provides a complete package for sending, receiving, and keeping track of email messages. Windows Mail includes new security capabilities such as the ability to filter junk email (spam) messages, block phishing messages, and protect against viruses. You can configure Windows Mail to digitally sign and encrypt your outgoing messages.
Windows Meeting Space enables you to conduct small meetings between users of networked computers. You can share handouts, applications, and your Windows desktop among meeting attendees, and attendees can edit handouts.
Windows Calendar enables you to schedule and manage tasks and appointments. You can create multiple calendars and share calendars with others such as coworkers and family members.
Windows Fax and Scan enables you to send and receive messages and documents from your computer through an attached fax modem. This application shares many of the characteristics of Windows Mail. You can scan documents and even fax scanned documents to other locations.
Windows Sidebar is a pane that appears on your desktop and includes gadgets such as a clock, mini-slide show, and news feeds. You can modify the set of gadgets that are displayed and even download additional gadgets from the Internet.
Windows Meeting Space in Windows Vista enables you to conduct meetings in a location where several users can assemble together and connect their computers in a wired or wireless fashion. Here you run a meeting, perform a presentation, and share some handouts. You should have two or three computers running Windows Vista to perform these exercises. Each computer should be configured with a different username, and these users should be members of the Administrators group.
The changes that were made at the second computer have been saved, and those that were originally made at this computer have been lost. This happened because more than one user cannot edit the handout at the same time. If they do, only the changes made by the last user to save them are retained. | |
Both the changes that were made at the second computer and the second (but not the first) set of changes made at the third computer have been saved. This happened because the latest edit was done after the changes made from the second computer were saved to all computers. | |
D. Shirley should install a second TV tuner card in her computer. Windows Media Center enables her to watch and record TV shows on her computer, but she cannot do both at the same time without a second TV tuner card. The second TV tuner card would also enable her to record two TV shows at the same time, assuming she is not trying to watch anything at that time. Windows Vista Home Premium contains all the features of Windows Media Center, so Shirley does not need to upgrade to Windows Vista Ultimate. Therefore answer A is incorrect. Shirley cannot circumvent this problem by either watching or recording a show with Windows Media Player, so answers B and C are incorrect. For more information, see the section, “Windows Media Center.” | |
A. By clearing the Allow Screen Saver During Playback check box, you can prevent the screen saver from appearing while you are watching a DVD movie in Windows Media Player. To access this check box, you need to open the Options dialog box to the Player tab. Note that besides the Library menu, you can also access this dialog box by pressing Alt, which displays a small menu from which you can access Options from the Tools submenu. Neither the Devices nor Performance tab of this dialog box contains the Allow Screen Saver During Playback check box, so answers B and C are incorrect. The right-click menu for an item in the Library view does not contain a Properties option, so answer D is incorrect. For more information, see the section, “Windows Media Player Configuration Options.” | |
B. You should select the Use Media Information to Arrange Files in Folders on the Disc option, which is found on the Burn tab of the Options dialog box. You could create folders in Windows Explorer for each performer and copy the tracks to the respective folder, but this would take more effort, so answer A is incorrect. The Rip Music tab pertains to copying music from audio CDs to the computer and not to creating audio CDs, so answer C is incorrect. You can burn audio CDs from Windows Media Center, but the tracks would not be arranged according to performer, so answer D is incorrect. For more information, see the section, “Windows Media Player Configuration Options.” | |
A, B, D. Windows Photo Gallery enables Jim to remove the red eye, lighten the dark photos, and play a slide show of his photos, among other actions that he can perform on them. Windows Photo Gallery does not enable Jim to sharpen his photos, so answer C is incorrect. For more information, see the section, “Editing Images in Windows Photo Gallery.” | |
C. Karen should put the email address of the client into the Safe Senders list in the Junk E-Mail Options dialog box. By doing so, all messages from the client are routed to her Inbox without first being checked for characteristics common to junk email (spam). If she were to select the No Automatic Filtering option on the Options tab of the Junk E-Mail Options dialog box, she would receive messages from the client in her Inbox, but she could also receive junk email messages containing undesirable content, so answer A is incorrect. If she were to clear the Move Phishing E-Mail to the Junk Mail Folder option, she could receive messages that attempt to hijack personal information in her Inbox. At the same time, messages from her client could still go to the Junk E-mail folder, so answer B is incorrect. If she were to clear the Block Images and Other External Content in HTML E-mail option, messages from her client could still go to the Junk E-mail folder, so answer D is incorrect. For more information, see the section, “Configuring Mail Security.” | |
D. You should select Encrypt from the Tools menu of the New Message dialog box when you are composing each message to a client. This option uses your digital ID to encrypt the message and any attachments included with the message. The option to digitally sign a message confirms to a recipient that you were the person who actually sent the message. However, it does not protect the message from being viewed or altered during transit; therefore, answers A and C are incorrect. If you were to select the Encrypt Contents and Attachments for All Outgoing Messages option, all outgoing email messages including those to your friends and family would be encrypted. These individuals would be unable to read your messages without having a copy of your digital ID, so answer B is incorrect. For more information, see the section, “Configuring Mail Security.” | |
B. You need to upgrade the Windows XP computers to Windows Vista Business. Windows Meeting Space is a new feature of Windows Vista and is available in all editions. Because it is not included and cannot be installed in Windows XP, the users of these computers cannot access the meeting until their computers are upgraded to Windows Vista Business or Ultimate. It is not possible to upgrade a Windows XP Professional computer to Windows Vista Home Premium, so answer A is incorrect. Norman’s computer is fully capable of hosting a meeting using Windows Vista Business, so you do not need to upgrade it to Windows Vista Ultimate; therefore, answer C is incorrect. Access to the Wi-Fi hotspot is not a concern in this scenario, so answer D is incorrect. Windows Meeting Space enables Norman to distribute handouts to other meeting participants without the need for printing them, so answer E is incorrect. For more information, see the section, “Sharing Information.” | |
B. You should create two calendars named Business and Personal in Windows Calendar and publish the Business calendar to a shared folder so that your employees can subscribe to this calendar. Windows Calendar includes the capability of creating more than one calendar so that you can keep appointments of different types separate but still view them together. If you publish your calendar to a shared folder without creating separate calendars, your employees will be able to view your personal appointments, so answer A is incorrect. Because Windows Calendar enables you to share and publish calendars, you do not need to email the Business calendar to your employees, so answer C is incorrect. You could delete the personal appointments, publish the calendar, and then reinsert the personal appointments with the Automatically Publish Changes option cleared; however this would take far more effort than needed and you would need to repeat this action each time you had to reshare the calendar, so answer D is incorrect. For more information, see the section, “Configuring Windows Calendar.” | |
A, C, D. Brian can drag the Word document to the New Fax window. He can also insert it as an attachment or print it to the fax from Microsoft Word. If he copies the document and tries to paste it into the New Fax window, he might lose some of the formatting. Furthermore, the Copy and Paste commands are found in the Edit menu and not the File menu. Therefore, answer B is incorrect. For more information, see the section, “Configuring Windows Fax and Scan.” | |
A. You should click the arrow at the top of the Sidebar. This arrow appears when you have installed more gadgets than will fit on the Sidebar. Right-clicking a gadget and choosing Move enables you to move the gadget elsewhere on the sidebar but not elsewhere on the desktop, so answer B is incorrect. Removing gadgets might make the default gadgets appear, but you will no longer have the gadgets you have added visible, so answer C is incorrect. Moving the Sidebar to a second monitor does not change the viewable area of the Sidebar unless this monitor is capable of higher resolution. This does not necessarily enable you to view the default gadgets, so answer D is incorrect. For more information, see the section, “Windows Sidebar Gadgets.” |
The following are some recommended readings on the subject of configuring applications included with Windows Vista:
Course
Microsoft Official Curriculum course 5116, Configuring Windows Vista Application and Tools. Module 2, Configuring Windows Vista Media Applications; and Module 3, Configuring Windows Vista Productivity Applications. Information available at http://www.microsoft.com/learning/syllabi/en-us/5116aprelim.mspx.
Websites
Microsoft. Windows Media Center. http://www.microsoft.com/windows/products/windowsvista/features/details/mediacenter.mspx
Microsoft. Security and Windows Media Player 11 http://www.microsoft.com/windows/windowsmedia/player/11/security.aspx
Microsoft TechNet. Windows Mail and Resulting Internet Communication in Windows Vista. http://technet2.microsoft.com/WindowsVista/en/library/3682f7a1-e919-49c8-bdd1-715b56995cba1033.mspx
Microsoft TechNet. Windows Vista Windows Meeting Space Step by Step Guide. http://technet.microsoft.com/en-us/windowsvista/aa905127.aspx