
7. System Services
—Business slogan
System Services, hereinafter referred to as services, are applications that provide custom capabilities to other applications. They can be found in the Services submenu of the application menu, as shown in Figure 7.1. Services are usually background-only applications and do not have a user interface as a normal application would, although they might display a window for user input or feedback if needed. Examples of services include spell checkers, screen grabbers, and text manipulators such as the one we will look at in this chapter.
Figure 7.1. The Services menu.

Services are installed in either the Applications or /Library/Services folders. Those in the Applications folder are normal applications and must be run once in order to have their items added to the Services menu. They are then “remembered” by the operating system. Those in the /Library/Services folder are loaded at login.
The items added to the menu can either be commands or submenus of commands. In Figure 7.1, the Summarize application offers a single service and is listed as a single menu item: Summarize. The MyTextService application, on the other hand, offers multiple services and therefore uses a submenu filled with commands.
Although the contents of the Services menu are populated when an application launches, the items are disabled by default. When the user clicks on the Services menu, the responder chain in the current application is traversed to locate objects that can read or write the types of data provided by the services in the menu. If any are found, those items are enabled in the menu. For example, you wouldn't have text manipulation services enabled if you currently had an image selected in a window. Many Cocoa objects provide default behaviors for the various clipboard types. NSTextField, for example, can automatically handle text-based services. See the later section “The Application Connection” for more information on how your application can make use of specific services.
The Result
In this chapter, I will discuss a service called MyTextService, as shown in Figure 7.1. MyTextService provides three standard manipulations that can be performed on any selected text: uppercase, lowercase, or capitalized case. Selected text will be edited in place. Figures 7.2 and 7.3 show the TextEdit application before and after selecting Convert to Capitalized Case. Note how the lowercase and uppercase text is converted immediately, in place, to capitalized case.
Figure 7.2. TextEdit just before selecting Convert to Capitalized Case from the MyTextService menu.

Figure 7.3. TextEdit just after selecting Convert to Capitalized Case from the MyTextService menu.

Let's look at the project.
The Project
Figure 7.4 shows the MyTextService project in Project Builder. You can create this project using the Cocoa Bundle template in the New Project Assistant, although you will need to make some changes, as discussed next. Let's look at the project settings.
Figure 7.4. The MyTextService project.
The Project Settings
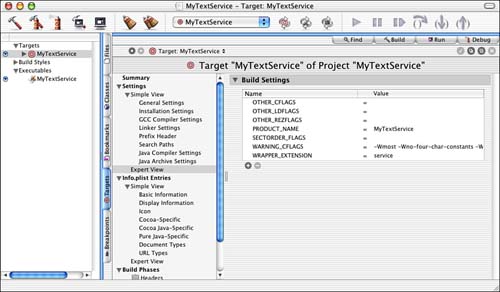
The first thing you will want to verify is that in the Target settings, the WRAPPER_EXTENSION is set to service. As mentioned previously, applications can provide services as well, but we will be implementing a background-only version of our service that will live in the /Library/Services folder. If we do not use the service extension, the operating system will not recognize and load our service properly (see Figure 7.5).
Figure 7.5. The MyTextService Target settings.
The next project settings to be concerned with are much more involved—the InfoPlist settings, as shown in Figure 7.6. Many of these items will look familiar, but there are a few distinct additions and differences for this project than you've seen previously.
Figure 7.6. The MyTextService InfoPlist entries.

First, you will want to make sure that the CFBundlePackageType entry is set to APPL and not BNDL. Although we used the Bundle template project, we are really writing an application. You will also want to set the NSPrincipalClass entry to NSApplication. The last application-specific item is the NSBGOnly entry. You will need to add this entry yourself if it does not exist in your template and set its value to 1. This tells the operating system that this application has no user interface and will therefore not appear in the Dock. This is key to creating what can be called a faceless background application—an application that runs silently, performing its duty unseen by the user.
Note
As you've learned in the past, there is more than one way to skin the Cocoa cat. You might consider starting with an application template as opposed to a Bundle template. Either way, you will have to tweak a few items in the project settings.
The next entry you will see is the NSServices array. This array is the heart and soul of the Service mechanism. It contains an array of dictionaries that specify the services offered by MyTextService. I will discuss item 0 in this array, but items 1 and 2 are similar with the exception of the menu item name and user data that they pass to MyTextService.
The first thing you see in array item 0 is a dictionary item named NSMenuItem. This dictionary contains a solitary item named default, which specifies the name of the menu item to be added to the Services menu. You can specify a submenu name as well by using a / in this string. Because MyTextService provides multiple services, we add a submenu named MyTextService and then the specific text of the service to be offered; in this case, Convert to lowercase.
You can optionally add a keyboard equivalent for your menu items by adding a NSKeyEquivalent dictionary to the plist. Similar to the NSMenuItem dictionary, the NSKeyEquivalent dictionary consists of a single item named default. You should use keyboard equivalents sparingly because the Services menu is a systemwide feature and you could easily use a key combination already in use elsewhere in the system or application you are trying to serve. My suggestion is to avoid them unless necessary.
Next is the NSMessage entry. This entry is a string that represents the method name to be invoked in the application's service provider object. The operating system will construct an Objective-C method of the form -methodName:userData:error: and call the method in that manner. You will see this method implemented later in this chapter.
NSPortName is the port to which the application should listen for service requests. In most cases, this is the application name itself. Therefore, in our case, it is MyTextService.
NSReturnTypes and NSSendTypes are two array entries that list the types of data that the service is capable of reading and writing. In this example, we only deal with text data, so we list NSStringPboardType in both entries. You can add as many types to these arrays as required. These values are used when the operating system looks for matches between the types of data an application has to offer and what services can manipulate it.
Note
NSPasteboard.h defines many of the standard pasteboard types. These include Strings, Filenames, PostScript, TIFF, RTF, RTFD, Tabular Text, Font Styles, Rulers, File Contents, Colors, HTML, PICT, URL, PDF, Vcard, and more.
NSUserData is a string value that is passed in the userData parameter of the NSMessage-defined method call. Although you do not have to make use of this field, I chose to implement MyTextService by using the same NSMessage entry for all three of our services and using the NSUserData entry to specify which formatting to apply to the incoming text: lowercase, uppercase, or capitalization. We could have just as easily had three different NSMessage entries—one for each formatting option.
Last, the optional NSTimeout numerical string entry can be used to indicate the number of milliseconds that the operating system should wait for a response from a service. This only applies when a response is required. By default, if it is not specified, the NSTimeout is 30 seconds (30,000 milliseconds). If the NSTimeout value is exceeded, the operating system aborts the service request and continues.
As you can see, you have a lot of control over the specifics of your service. Let's see what the source code looks like that brings this all together.
The Source Code
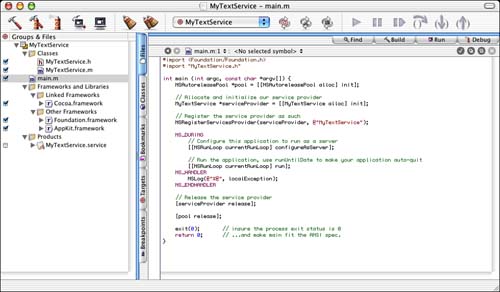
There are only a few listings to be concerned about in this project. The application itself needs a main function, but it's different from what you normally have seen. In fact, it's about 20 times the size of a normal Cocoa application's main function (see Listing 7.1).
Listing 7.1. MyTextService main
#import <Foundation/Foundation.h>
#import "MyTextService.h"
int main (int argc, const char *argv[]) {
NSAutoreleasePool *pool = [[NSAutoreleasePool alloc] init];
// Allocate and initialize our service provider
MyTextService *serviceProvider = [[MyTextService alloc] init];
// Register the service provider as such
NSRegisterServicesProvider(serviceProvider, @"MyTextService");
NS_DURING
// Configure this application to run as a server
[[NSRunLoop currentRunLoop] configureAsServer];
// Run the application, use runUntilDate to make your
// application auto-quit
[[NSRunLoop currentRunLoop] run];
NS_HANDLER
NSLog(@"%@", localException);
NS_ENDHANDLER
// Release the service provider
[serviceProvider release];
[pool release];
exit(0); // insure the process exit status is 0
return 0; // ...and make main fit the ANSI spec.
}
We start out by allocating and initializing our own NSAutoReleasePool to take care of any autorelease memory used throughout the running of our application. We then allocate and initialize our MyTextService object. Once allocated, we call NSRegisterServicesProvider to register our provider by name with the operating system's services mechanism. This is where the NSPortName Info.plist entry comes into play—these strings should match exactly.
Next, you will notice a block of code that includes the macros NS_DURING, NS_HANDLER, and NS_ENDHANDLER. These macros are defined in NSException.h and are similar to the TRY/CATCH block you might be familiar with from the C++ programming language. This is our safety net should any exceptions occur during the execution of the application. The NSLog function will display the exception information.
We then obtain the current NSRunLoop instance of the current thread (actually creating a new one) by calling the NSRunLoop class method +currentRunLoop. Calling -configureAsServer makes the NSRunLoop instance suitable for use by a server process—currently a no-op under Mac OS X, but included for historical consistency. Calling the -run method causes the application to begin running.
Note
NSRunLoop's -runUntilDate: method could have been called instead of the -run method. This allows us to autoquit our application after a certain amount of time. By calling -run, our service will execute until the machine shuts down, restarts, or the user logs out.
Having said that, some programmers, including one named Mike, would consider this current behavior a bug. Services that do not need to perform some type of background processing (network IO, data processing, and so on) should quit as soon as they are done performing their service. This would be especially true if the service consumed large amounts of memory while it was idle. There's no sense in hanging around when you might no longer be needed.
Once the application has exited, we can -release our service provider object, -release the autorelease pool, and exit the main function. You can also use the applicationWillTerminate: delegate message to handle any cleanup.
The MyTextService class is a subclass of NSObject with one method defined, -changeCase:userData:error:. This is where the NSMessage Info.plist entry comes into play—the name of this method and the value of NSMessage should match exactly (see Listing 7.2).
Listing 7.2. MyTextService Interface in MyTextService.h
@interface MyTextService : NSObject {
}
- (void)changeCase:(NSPasteboard *)pboard
userData:(NSString *)userData
error:(NSString **)error;
@end
The implementation of MyTextService does nothing more than implement the changeCase: method. Let's look at Listing 7.3 in detail.
Listing 7.3. MyTextService—changeCase:userData:error: in MyTextService.m
@implementation MyTextService
- (void)changeCase:(NSPasteboard *)pboard
userData:(NSString *)userData
error:(NSString **)error
{
NSString *pboardString;
NSString *newString;
NSArray *types;
Boolean success;
// Verify the types currently on the pasteboard
types = [pboard types];
if (![types containsObject:NSStringPboardType]) {
*error = NSLocalizedString(@"Error: couldn't edit text.",
@"pboard doesn't have a string.");
return;
}
pboardString = [pboard stringForType:NSStringPboardType];
if (!pboardString) {
*error = NSLocalizedString(@"Error: couldn't edit text.",
@"pboard couldn't give string.");
return;
}
// Compare the mode so we do the correct thing
if ([userData isEqualToString:@"upper"]) {
newString = [pboardString uppercaseString];
} else if ([userData isEqualToString:@"lower"]) {
newString = [pboardString lowercaseString];
} else if ([userData isEqualToString:@"cap"]) {
newString = [pboardString capitalizedString];
}
if (!newString) {
*error = NSLocalizedString(@"Error: couldn't edit text.",
@"pboardString couldn't edit letters.");
return;
}
types = [NSArray arrayWithObject:NSStringPboardType];
// Load the value of the checkbox from the Preference Pane example
success = CFPreferencesAppSynchronize(
CFSTR("com.triplesoft.mypreferencepane"));
// Force a synchronization so we get the latest "live" preference
if (success && CFPreferencesGetAppBooleanValue(
CFSTR("Boolean Value Key"),
CFSTR("com.triplesoft.mypreferencepane"), NULL)) {
// Use [NSPasteboard generalPasteboard] instead of pboard to
// send the results to the clipboard
[[NSPasteboard generalPasteboard] declareTypes:types owner:nil];
[[NSPasteboard generalPasteboard] setString:newString
forType:NSStringPboardType];
} else {
// Send the results directly back to the app who requested it
// if set or if key does not exist
[pboard declareTypes:types owner:nil];
[pboard setString:newString forType:NSStringPboardType];
}
return;
}
@end
This method takes three parameters: the NSPasteboard that contains the data in a format that the service can process, the userData NSString from the NSUserData Info.plist entry, and an error NSString. The NSPasteboard can be edited in place, as you will see shortly. The human-readable error NSString can be returned should there be an error within our service.
The first thing we want to verify is that there are types on the NSPasteboard that we can handle. In theory, we should be covered here (remember our NSReturnTypes and NSSendTypes in Info.plist), but we check anyway. Assuming that there is an NSStringPboardType, we grab it from the NSPasteboard. We then compare the userData NSString and alter the text as appropriate using the NSString methods -uppercaseString, -lowercaseString, or -capitalizedString. If the conversion was successful, we then prepare to return it to the application that requested it.
You will notice that we look at the com.triplesoft.mypreferencepane preference settings using the CFPreferencesAppSynchronize and CFPreferencesGetAppBooleanValue functions. This is called foreshadowing. We look to a future chapter to see something that we will be adding as a feature. Actually, in Chapter 8, “Preference Panes,” we will implement a Preference Pane that will work with MyTextService to allow us to choose whether we should return the edited text directly back to the application that requested it or to the general (systemwide) pasteboard. Returning the text to the requesting application places the text directly back into the application, as shown in Figures 7.2 and 7.3. Returning to the general pasteboard places the edited text in a buffer that allows you to paste it in any application you desire without altering the original data.
By default, the text will be pasted back into the requesting application, but the steps are the same no matter where we return it to. First, we create an NSArray of types, reusing the types variable, which contains one item representing the NSStringPboardType. We then call the -declareTypes:owner: method of the NSPasteboard in question passing the array. Last, we set the newString variable as type NSStringPboardType to the NSPasteboard by calling the -setString:forType: method. That's it!
Note
Note that in order for services to be loaded from the /Library/Services folder, you must log out and log in again after you first place it there. However, once it is registered with the operating system, you can replace it as many times as necessary during development, and your latest code will always be executed properly. Note, however, that the service is left running once you select it from the Services menu. Therefore, you might have to quit it manually before you can replace the file for subsequent runs. Consider automatically quitting your daemonized service once it has performed its work to avoid this problem.
The Application Connection
If you're writing a Cocoa application, most of the default user interface objects automatically implement and handle service menu functionality by default. That is, text-related objects know how to deal with the NSStringPboardType, and so on. However, if you are writing a custom class and you want that class to have the capability of using services, you can implement this mechanism in your class easily enough.
First, your custom class will need to be a subclass of NSResponder in order to respond to the events sent from the Services mechanism. In your custom class's +initialize class method, you will need to call NSApp's +registerServicesMenuSendTypes:returnTypes: class method passing the types that your object can send and return. These lists need not be the same. For example, you might accept a TIFF file and return an ASCII text formatted picture for use on the Internet. Your subclass can register any number of types, public or private. See Listing 7.4 for an example of its use.
Listing 7.4. Registering Pasteboard Types
+ (void)initialize
{
NSArray *sendTypes;
NSArray *returnTypes;
/* Make sure code only gets executed once. */
static BOOL initialized = NO;
if (initialized == YES) return;
initialized = YES;
sendTypes = [NSArray arrayWithObjects:NSStringPboardType, nil];
returnTypes = [NSArray arrayWithObjects:NSStringPboardType, nil];
[NSApp registerServicesMenuSendTypes:sendTypes returnTypes:returnTypes];
return;
}
Your custom class will also receive calls to its -validRequestorForSendType:returnType: method throughout its instantiation. If your object can handle the type of data requested, you return self. Otherwise, you call through to the super class -validRequestorForSendType:returnType:. This method can be called many times during an event loop and so should be as fast as possible—there's no dillydallying in this method. See Listing 7.5 for an example of its use.
Listing 7.5. Validating Pasteboard Types
- (id)validRequestorForSendType:(NSString *)sendType returnType:(NSString *)returnType
{
if ((!sendType || [sendType isEqual:NSStringPboardType]) &&
(!returnType || [returnType isEqual:NSStringPboardType])) {
if ((!sendType || [self selection]) && (!returnType || [self isEditable]))
{
return self;
}
}
return [super validRequestorForSendType:sendType returnType:returnType];
}
Note
Be sure to read all about the NSPasteboard class. You can do many things by putting your data on the clipboard. Copying and pasting is one of those things that many developers try to avoid, but it can really add a kick to your application. It can make your application much more usable, especially if you allow data to be transferred with other applications. Just think if you couldn't paste an image into a Photoshop document! Where would we be today?
When the user selects an item from the Services menu, your custom class's -writeSelectionToPasteboard:types: method is called. This method must return the requested type of data to the service, returning YES if successful. The -writeSelectionToPasteboard:types: method is part of the NSServicesRequests protocol. See Listing 7.6 for an example of its use.
Listing 7.6. Writing Pasteboard Types
- (BOOL)writeSelectionToPasteboard:(NSPasteboard *)pboard types:(NSArray *)types
{
NSArray *typesDeclared;
if (![types containsObject:NSStringPboardType]) {
return NO;
}
typesDeclared = [NSArray arrayWithObject:NSStringPboardType];
[pboard declareTypes:typesDeclared owner:nil];
return [pboard setString:[self selection] forType:NSStringPboardType];
}
After the service has manipulated the data, it returns the data to the object by calling its -readSelectionFromPasteboard: method. The object then extracts the data from the pasteboard and displays it to the user. It should return YES if successful. The -readSelectionFromPasteboard: method is part of the NSServicesRequests protocol. See Listing 7.7 for an example of its use.
Listing 7.7. Reading Pasteboard Types
- (BOOL)readSelectionFromPasteboard:(NSPasteboard *)pboard
{
NSArray *types;
NSString *theText;
types = [pboard types];
if (![types containsObject:NSStringPboardType]) {
return NO;
}
theText = [pboard stringForType:NSStringPboardType];
[self replaceSelectionWithString:theText];
return YES;
}
Note
Applications can create something called Add-on Services that are not directly in your application's bundle. You simply create a bundle with a .service extension that contains an Info.plist with the appropriate NSServices entries. The NSMessage and NSPortName values are those implemented in your application. This is a nice way to implement a plug-in style approach to services.
Here's one last thing of interest: Your application can invoke a service programmatically by calling the NSPerformService function. Although you normally would not use this, you can easily call a service by name, passing an NSPasteboard using this function. NSPerformService is defined in NSApplication.h.
That's about all there is to it to support Services in your application. In fact, if you only use the standard Cocoa types of user interface objects and don't need to support any custom data types on the clipboard, you don't even have to do this much!
Try This
Here are some ideas to expand the text service project in this chapter; try these on your own.
Add some more advanced string manipulation functionality to the -changeCase:userData:error: method. You will add a new array item with different NSMenuItem and NSUserData entries.
Add a method other than -changeCase:userData:error: to see how the service works with different NSMessage values.
Build a service that manipulates images instead of text. You can use some of the functionality shown in the Cocoa plug-ins described in an earlier chapter.
Conclusion
You learned a great deal in this chapter and explored your first operating system–level piece of code. We will continue this journey in subsequent chapters and see how to extend the operating system by adding little bits of specific code here and there. Many other projects are based on the Cocoa bundle project template, so stay tuned!