
3. Cocoa Applications
“Two nibs are better than one.”
—Anonymous
Now that you know a bit about what makes Mac OS X tick, let's jump right in and create a document-based application using Cocoa. If you're reading this book, you might have created simple non–document-based applications in Cocoa. We'll be doing this throughout later chapters as test-bed programs are created. You know how simple they are to put together quickly. The document-based application, however, is a bit more complex. But once you see one examined, you will have little trouble creating your own.
Document-based applications allow a user to work with multiple documents at the same time. Whereas a non–document-based application usually has one window and can only manage one set of data at a time, document-based applications can have many windows open simultaneously—each accessing different source data. One window is always the focus of the user while the other windows are ready and waiting for input, sitting quietly in the background. When discussing sets of data, having the ability to open multiple views simultaneously gives you the ability to work in parallel on many tasks.
Note
When I refer to a set of data, this can mean file-based data sitting on your local hard disk or stream-based data that is transferred over a network, possibly from a database. A document-based approach can be used to edit either of these types of data.
Mail.app, Microsoft Word, Adobe Photoshop, Project Builder, and Interface Builder are all examples of applications that take a document-based approach. You can have multiple images open in Photoshop and edit between them, back and forth, as much as you like.
As of this writing, iTunes and iPhoto are both examples of applications that are not truly document based. That is, they can only operate on one item at a time. ITunes only plays one song at a time. IPhoto only allows you to edit one image at a time. When developers refer to document-based applications, they usually mean the ability to open multiple documents at once. Windows users know this as the multiple document interface (MDI).
The specific requirements of your application will determine whether it should be document-based or not. If your users want to work with more than one set of data, you probably want to use a document-based application. Many times, this will be obvious; sometimes it will not. If you're unsure, look for other applications that work similarly to yours and see how you might learn from their approaches. Also, be sure to talk to potential users of your application to see what they would expect from it.
The Result
Let's discuss the document-based application that we will be examining in this chapter. RadarWatcherX, shown in Figure 3.1, allows you to create, open, and save multiple documents that repeatedly load a Doppler radar image and scan a “watch box” for specific colors in the image. This allows you to choose your local radar image from any weather-related Web site and keep an eye on a specific area within the image for storms or heavy rain that might be approaching. If the colors you choose appear in the watch box, an alarm will sound!
Figure 3.1. A RadarWatcherX document window.

Although you might not be able to tell from the screenshot, RadarWatcherX implements many common (and some not so common) tasks that you might need when building applications in Cocoa. Some of these include
• Document window management
• Saving and opening XML property lists (plists)
• Custom views
• Scrolling views
• Timers
• Internet connectivity
• Image manipulation
• Application preferences
If you are not familiar with some of these items, don't worry. I will discuss them enough here to get you started, and some (such as property lists) will be elaborated on in future chapters. Let's dive into the project file and source code and see how this project works.
Note
Property lists (plists) are text files that are formatted in either XML format or an older ASCII format. They are a great solution to store preference data because they support many different data types within the text. You can store numbers, strings, even raw data such as icons and pictures. You will see property lists used throughout your Cocoa development experience.
The Project
As you can see, this application project in Figure 3.2 consists of a fair number of classes and resources. You should download the source code from the Web site for this book and follow along as we dissect the pieces. This is not a step-by-step recreation of the project, but rather a detailed discussion of the major pieces of the completed project.
Figure 3.2. The RadarWatcherX project in Project Builder.

When I began this as a new project, I made use of Project Builder's New Project Assistant, seen in Figure 3.3, by selecting New Project from the File menu and selecting Cocoa Document-based application. The Assistant makes it easy to create a new project based on a template. There are templates for AppleScript, Carbon, and Cocoa applications as well as other more esoteric types. Use the templates; they can be a great time-saver and help you learn as you explore new aspects of Mac OS X programming.
Figure 3.3. The Project Builder New Project Assistant.

First Things First: Copyrights and Credits
The first thing I normally do in an application is take care of “fixing” all the little things that I know I'll have to do eventually. This includes editing the items in the InfoPlist.strings file, as well as adding a Credits.rtf file, if it does not already exist, to the project. The InfoPlist.strings, seen in Figure 3.4, contains a few important localized strings such as the copyright and application version information. The optional Credits.rtf file, seen in Figure 3.5, contains detailed information that appears in a scrolling list in the About Box, which indicates who did what and why on this project. You can create it with TextEdit and add it to the project as you would any other file. Once added, you can edit it directly in Project Builder. Both of these files are saved inside the application as part of its package.
Figure 3.4. InfoPlist.strings contents.

Figure 3.5. Credits.rtf contents.

Note
These filenames are case sensitive as are many things in the UNIX environment on which Mac OS X is based. If you ever find that something isn't working right but you know a file is in the correct location, make sure to check the case. People have spent hours searching for bugs caused solely by the case of a single character.
First Things First: Other Info.plist Entries
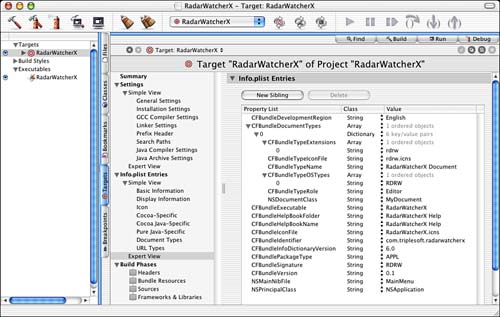
Many other entries can be added to Info.plist that are not required to be localized. I find that the easiest way to manage these entries is by using Expert View in the Targets tab (see Figure 3.6). Entries in this list are in outline view format and contain such information as the document types supported by the application (including filename extensions), the help filename, the icon filename, the bundle identifier (a string that uniquely identifies this application), the main nib filename, and the name of the principal class in the application. Ultimately, these entries are stored in a property list file.
Figure 3.6. Info.plist entries.
Note
Although we are looking at Expert View, you can see from the screen shot that there is also a Simple View. Simple View's contextual layout might be easier on your eyes and brain. Click on Simple View or any one of its sub-views to see what it looks like.
One thing to note is that all of your projects that save default preferences (discussed later in this chapter) will need to have a unique CFBundleIndentifier entry. Add this key if there isn't already a placeholder for it. The convention is to use the reverse domain of your company with the name of the product at the end. In my case, TripleSoft Inc. uses the domain name triplesoft.com. RadarWatcherX is the name of my project. Therefore, my unique identifier is com.triplesoft.radarwatcherx. For your own projects, you should change the domain name accordingly. If you do not have a domain name, you can use something based on your email address, such as com.mac.billjones.myappname.
You can actually add your own custom keys to this list as well. Many times developers will place values in keys in this file that they then read in to their application at runtime. These values might or might not be editable by the user via the application's user interface. You can use NSBundle's -infoDictionary method to access the contents of the Info.plist file. You might consider putting the names of preference files here or the name of a server that you use to check for the latest version of your software. Any value that you simply don't want to hard-code is a good candidate for Info.plist.
First Things First: Application and Document Icons
Next, you might choose to add an icon to your application and documents. Some folks might prefer to save this until the end of the development cycle; that's fine too. However, any application that you plan to release to the public should have a set of custom icons. This can be an interesting task to accomplish on your own for a variety of reasons. Let's discuss.
First, your icons need to look good these days. Before OS X existed, you could get away with an icon that didn't look all that professional. OS X and Aqua have changed the game, and many non-artistic types have not been able to keep up. If you make an icon, be sure to make it look like it belongs in OS X and not System 3.2. If you are an incredibly talented programmer but your sister got the artistic skills, let her make the icon.
A few applications are available that can help you on your quest to make decent looking icons. There might be more, but these are the best I've found:
• Adobe Photoshop or Photoshop Elements (http://www.adobe.com/) are excellent applications for high-end image manipulation, but you still need some talent.
• Stick Software's AquaTint (http://www.sticksoftware.com) assists you in creating glossy, liquid Aqua-style images with ease. AquaTint comes with very helpful documentation that can assist you in making great looking icons. Remember, the Alpha Channel is your friend when creating OS X icons.
• Infinity-to-the-Power-of-Infinity's Can Combine Icons (http://www.ittpoi.com/) is another excellent application that makes it easy to layer precreated images together to make eye-catching (and meaningful) icons. Using this in conjunction with AquaTint can be a winning proposition.
• Icon Factory (http://www.iconfactory.com/) is a great Web site that offers thousands of icons for use on your Macintosh. You will need to check with the author of any icons before you use them with your application, but this is a good place to locate talented artists who might help you on the icon creation side of the equation.
Note
Apple Computer also provides some great information on Aqua icon design philosophy. Visit http://developer.apple.com/ue/aqua/icons.html for more information.
Ultimately, you will use the IconComposer application, included with the OS X development tools and seen in Figure 3.7,, to create a file of type icns. This file contains all the data for any particular icon. In this case, I have created two of these files—one for the application icon and one for the document icon.
Figure 3.7. IconComposer window showing the application icon.

After you have the icon files created, you can easily add them to the project and add the appropriate Info.plist entries as shown previously. In this case, our CFBundleIconFile is set to the filename of our application icon: RadarWatcherX.icns.
The document icon configuration is a bit more complex. We need to fill in the CFBundleDocumentTypes array with information on the file extensions and icon filenames. Our documents end in .rdrw as shown in the CFBundleTypeExtensions array, and our icon file for that file type is rdrw.icns as shown in the CFBundleTypeIconFile entry. We also need to fill in CFBundleTypeName, CFBundleTypeOSTypes, CFBundleTypeRole, and NSDocumentClass of our document. RadarWatcherX only supports one document type, but it could easily manage multiple document types with multiple icons simply by adding the proper additional array items.
Note
Whenever you alter the icons of an application, they might not always “take” right away. That is, if you create an icon, set up all the Info.plist entries properly, the icons appear, and then you decide to tweak the image of the icon, you might not see it in the Finder right away. Sometimes you need to log out and log back in for the changes to take effect. The Finder caches icons and doesn't always notice that a change has occurred. This can happen with other data within your application as well, such as version information, and so on. If things don't seem right, try logging out, restarting, or copying the application to another computer to verify that it is just your environment and not your project itself causing the trouble. Restart the computer as a last resort.
Interface Builder
The next thing I usually jump on in a project is the user interface. Assuming that you've planned your application well enough, you probably know what the menus and document window will look like. The first thing you will notice when working with a document-based Cocoa application is that you have two nib files: MainMenu.nib for the application resources and MyDocument.nib for the document resources; both are shown in Figure 3.8.
Figure 3.8. RadarWatcherX in Interface Builder.

MainMenu.nib contains the main application menus and any instances of classes that need to work at the application level. This is where you would put your AppController, for instance. This allows you to easily make it the delegate of the NSApplication object, which is the File's Owner. You can also set up your menus in this file and link them to actions that you create in the First Responder. Menu items are usually connected to the First Responder, so the actions can be routed properly to any object that responds to them—in our case, our document object.
You can create any number of single-window applications without ever having to worry about File's Owner or First Responder—you simply create controllers that span the life of the program, and all is well. However, when you create document-based applications, these items become a lot more important. The File's Owner, for example, represents what is essentially the nib's default controller. Items in the nib are usually hooked up directly to the File's Owner's IBOutlets.
MyDocument.nib contains our main document window that is linked to actions and outlets in the File's Owner, the MyDocument class. Our documents only have one window attached to them, but you can have documents with multiple windows if you so desire. Our document window also contains a custom view that we will discuss later, RadarView.
Note
If you do create a document-based application in which the documents have multiple windows associated with them, you will want to create a separate nib file for each window. Each nib file will be owned by an NSWindowController subclass. For example, a document with a front view window and a back view window would include two NSWindowControllers—one for each. There would also be two nib files—one for each. Each NSWindowController would be the File's Owner in one of the nib files. The NSDocument can then manage the multiple controllers for you. This approach will allow you to fully leverage the power of Cocoa's document-based application model.
There are multiple ways to manage your nib files, source files, and the connections between them. You can create your source files in Project Builder and drag the header files to Interface Builder to have it update itself with the outlets and actions that you've defined in the class. You can also create the source files from within Interface Builder using items in the Classes menu and have them automatically added to the project. In most cases, I initially create the files in Interface Builder and then do further editing in Project Builder, dragging the header file to Interface Builder each time I make a change so that everything is in sync. As you tweak your user interface, you might find this approach to be useful as well. Maybe someday, Interface Builder and Project Builder will be one application, but for now this is the way it works.
Main
The function “main” of any Cocoa application, document-based or otherwise, simply contains a call to the NSApplicationMain function (see Listing 3.1). This function initializes your application and kicks off the main event loop. You need not worry about anything beyond this unless your application has special needs. Project Builder automatically generates this file for you when the project is created.
#import <Cocoa/Cocoa.h>
int main(int argc, const char *argv[])
{
return NSApplicationMain(argc, argv);
}
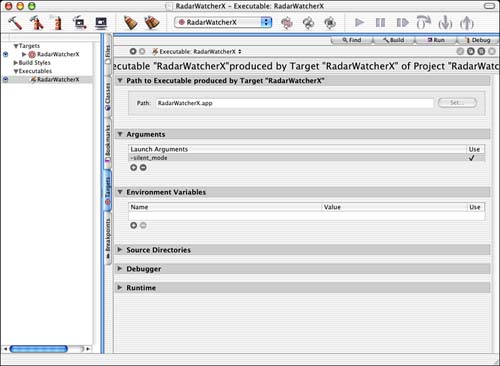
Although RadarWatcherX doesn't make use of this feature, you can set up your application to accept arguments when it is launched. By selecting Edit Active Executable from the Project menu in Project Builder, you can easily add environment variables and arguments. You can process these arguments in main or by using NSProcessInfo's arguments method to examine the arguments later on. Although these arguments won't be used when your application is launched from the Finder, you can have Project Builder pass them when it launches your application directly, as seen in Figure 3.9.
Figure 3.9. Editing the RadarWatcherX executable.
MyDocument
The NSDocument subclass MyDocument is the centerpiece of our project. This class handles everything in our document from saving and opening RadarWatcherX document files, keeping track of changes to the document, and managing the automatic reloading of the radar image. Let's look at the functions in MyDocument.
Storing Document Data via MutableDictionary
The first thing you will notice in the MyDocument.m source file is a list of global NSStrings (see Listing 3.2). These are used to represent the key values of the key/data pairs in the property list-based document files that MyDocument manages. Essentially, each user interface element in the document window has a key value associated with it to allow easy saving and retrieving of the value. MyDocument.h contains the associated extern declarations.
Listing 3.2. NSMutableDictionary Keys
NSString *keyURL = @"keyURL";
NSString *keyReloadSeconds = @"keyReloadSeconds";
NSString *keyWatchBoxRect = @"keyWatchBoxRect";
NSString *keyColors[kNumColors] = {@"keyColors1", @"keyColors2", @"keyColors3",
@"keyColors4", @"keyColors5"};
NSString *keyIgnoreSinglePixels = @"keyIgnoreSinglePixels";
NSString *keyCloseColors = @"keyCloseColors";
The -init override method of MyDocument in Listing 3.3 creates the NSMutableDictionary instance variable that is used to store the current key/value pairs for the document. The entries are then initialized. Note how you can easily add numerous types of objects to a dictionary by calling the dictionary's -setObject:forKey: method. Dictionaries are a great way to store hierarchical or flat data that needs to be represented by a key. After this code is executed, the dictionary is filled with valid default values for the document. Later in the -dealloc override, called when the document is closed, we will release the NSMutableDictionary and set it to nil.
m_md = [[NSMutableDictionary dictionary] retain];
[m_md setObject:kDefaultURL forKey:keyURL];
[m_md setObject:[NSNumber numberWithInt:kDefaultReloadSeconds]
forKey:keyReloadSeconds];
[m_md setObject:NSStringFromRect(NSMakeRect(0,0,0,0))
forKey:keyWatchBoxRect];
[m_md setObject:[NSArchiver archivedDataWithRootObject:[NSColor clearColor]]
forKey:keyColors[0]];
[m_md setObject:[NSArchiver archivedDataWithRootObject:[NSColor clearColor]]
forKey:keyColors[1]];
[m_md setObject:[NSArchiver archivedDataWithRootObject:[NSColor clearColor]]
forKey:keyColors[2]];
[m_md setObject:[NSArchiver archivedDataWithRootObject:[NSColor clearColor]]
forKey:keyColors[3]];
[m_md setObject:[NSArchiver archivedDataWithRootObject:[NSColor clearColor]]
forKey:keyColors[4]];
[m_md setObject:[NSNumber numberWithInt:NSOffState]
forKey:keyIgnoreSinglePixels];
[m_md setObject:[NSNumber numberWithInt:NSOffState]
forKey:keyCloseColors];
Note
There are so many styles, but so little time. Through my years of programming, I've developed my own style, as you might have as well. When I first came to Objective-C, I noticed that a lot of the sample code I saw made it difficult to distinguish instance variables from local variables. To remedy this, I tend to use an m_ before my instance variable names. The m comes from the C++ term “member variable.” I've seen others use only an _. Any way you choose to do it, if you see an m_ in this book, you can be sure that you are looking at an instance variable.
Reading and Writing Document Data via MutableDictionary
There are numerous ways to save data using a document-based application. In our case we are using an NSMutableDictionary and the NSDocument -writeToFile:ofType: and -readFromFile:ofType: methods. This makes a very straightforward approach to manage our data. Simply implementing these two functions handles all the file-related items in the File menu. This is a very nice feature of the Cocoa framework.
In order to save to a file, we override the -writeToFile:ofType: method of NSDocument as shown in Listing 3.4. This method takes a filename and a file type as arguments and returns a BOOL YES upon success. Because our document only saves one file type, we essentially ignore the file type argument. Before we can write our NSMutableDictionary to the file on disk, however, we need to ensure that it is up-to-date with the current settings of the controls on the screen.
Figure 3.10. The RadarWatcherX File menu.

We use various methods to create data in the proper format to pass to the -setObject:forKey: method of the NSMutableDictionary. For example, we want our rectangle to be a string format so that we can easily see the values in the file. As of this writing, NSColorWell objects don't know how to write themselves to property lists, so we archive them as raw data. We also retrieve the current state of the check boxes. Other user interface items, such as the text fields, are already up-to-date via the NSTextDidChangeNotification notification that is sent to MyDocument each time the user types them in. The last thing we need to do is tell the NSMutableDictionary to -writeToFile:atomically:. That's all there is to it!
Listing 3.4. MyDocument -writeToFile:ofType:
// NSRect are best off saved as string representations
// so the developer can edit them
[m_md setObject:NSStringFromRect([m_radarView watchBoxRect])
forKey:keyWatchBoxRect];
// NSColor should save but do not, so we must archive
// and unarchive them to get them to work
[m_md setObject:[NSArchiver archivedDataWithRootObject:[m_colorWell1 color]]
forKey:keyColors[0]];
[m_md setObject:[NSArchiver archivedDataWithRootObject:[m_colorWell2 color]]
forKey:keyColors[1]];
[m_md setObject:[NSArchiver archivedDataWithRootObject:[m_colorWell3 color]]
forKey:keyColors[2]];
[m_md setObject:[NSArchiver archivedDataWithRootObject:[m_colorWell4 color]]
forKey:keyColors[3]];
[m_md setObject:[NSArchiver archivedDataWithRootObject:[m_colorWell5 color]]
forKey:keyColors[4]];
// Retrieve the state of the checkbox
[m_md setObject:[NSNumber numberWithInt:[m_ignoreSinglePixelsButton state]]
forKey:keyIgnoreSinglePixels];
[m_md setObject:[NSNumber numberWithInt:[m_closeColorsButton state]]
forKey:keyCloseColors];
// Write the current dictionary to the file
return [m_md writeToFile:fileName atomically:YES];
Note
Atomically?
When writing to a file atomically, you are telling the dictionary to write to a backup file first; then if no errors have occurred, rename the backup file to the specified filename. Otherwise, the file is written directly to the specified filename.
Now, to read the data back, we override the -readFromFile:ofType: method of NSDocument as shown in Listing 3.5. This method takes the same arguments as -writeToFile:ofType:. We simply release our current dictionary and load the dictionary from the file using the +dictionaryWithContentsOfFile: method of NSMutableDictionary.
Listing 3.5. MyDocument -readFromFile:ofType:
// Release the current dictionary
[m_md release];
m_md = nil;
// Load the new data from the file
m_md = [[NSMutableDictionary dictionaryWithContentsOfFile:fileName] retain];
if (m_md) {
// Update the UI in case this is a Revert
[self updateUI];
// Return a positive result
return YES;
}
return NO; // Failure
If it loaded properly, we update our user interface by calling –updateUI, shown in Listing 3.6, which handles converting the archived data back to a format we can use. That is, for example, for every call to NSArchiver, we must have a balanced call to NSUnarchiver.
Listing 3.6. MyDocument -updateUI
// Update the UI with the data from the latest file or revert action
[m_urlTextField setStringValue:[m_md objectForKey:keyURL]];
[m_reloadSecondsTextField setStringValue:[m_md objectForKey:keyReloadSeconds]];
// NSColor should save but do not, so we must archive
// and unarchive them to get them to work
[m_colorWell1 setColor:[NSUnarchiver unarchiveObjectWithData:
[m_md objectForKey:keyColors[0]]]];
[m_colorWell2 setColor:[NSUnarchiver unarchiveObjectWithData:
[m_md objectForKey:keyColors[1]]]];
[m_colorWell3 setColor:[NSUnarchiver unarchiveObjectWithData:
[m_md objectForKey:keyColors[2]]]];
[m_colorWell4 setColor:[NSUnarchiver unarchiveObjectWithData:
[m_md objectForKey:keyColors[3]]]];
[m_colorWell5 setColor:[NSUnarchiver unarchiveObjectWithData:
[m_md objectForKey:keyColors[4]]]];
// Set the state of the checkbox
[m_ignoreSinglePixelsButton setState:[[m_md objectForKey:keyIgnoreSinglePixels]
intValue]];
[m_closeColorsButton setState:[[m_md objectForKey:keyCloseColors]
intValue]];
// Tell the radar view what the current watch box
// rectangle is so it can draw it properly
[m_radarView setWatchBoxRect:NSRectFromString([m_md objectForKey:
keyWatchBoxRect])];
One thing to note is that the -readFromFile:ofType: method is not only called when a document file is opened, but also when the user selects Revert or Open Recent.
Now that you know how to read and write the data to the disk, let's see what it looks like saved in the file. Listing 3.7 shows the property list file that is saved by the routines listed previously. Although the file ends in .rdrw, it is really just a text file. You can open it in any text editor. Note that the colors are “archived” as raw data, whereas the watch box rectangle can be edited by hand if you like.
Listing 3.7. RadarWatcherX .rdrw Data File
<?xml version="1.0" encoding="UTF-8"?>
<!DOCTYPE plist PUBLIC "-//Apple Computer//DTD PLIST 1.0//EN"
"http://www.apple.com/DTDs/PropertyList-1.0.dtd">
<plist version="1.0">
<dict>
<key>keyCloseColors</key>
<integer>0</integer>
<key>keyColors1</key>
<data>
BAt0eXBlZHN0cmVhbYED6IQBQISEhAdOU0NvbG9yAISECE5TT2JqZWN0AIWEAWMBhARm
ZmZmAYM/EJCRAAGG
</data>
<key>keyColors2</key>
<data>
BAt0eXBlZHN0cmVhbYED6IQBQISEhAdOU0NvbG9yAISECE5TT2JqZWN0AIWEAWMBhARm
ZmZmAQAAAYY=
</data>
<key>keyColors3</key>
<data>
BAt0eXBlZHN0cmVhbYED6IQBQISEhAdOU0NvbG9yAISECE5TT2JqZWN0AIWEAWMBhARm
ZmZmgz9W1tcAAAGG
</data>
<key>keyColors4</key>
<data>
BAt0eXBlZHN0cmVhbYED6IQBQISEhAdOU0NvbG9yAISECE5TT2JqZWN0AIWEAWMBhARm
ZmZmgz9AwMEAAAGG
</data>
<key>keyColors5</key>
<data>
BAt0eXBlZHN0cmVhbYED6IQBQISEhAdOU0NvbG9yAISECE5TT2JqZWN0AIWEAWMBhARm
ZmZmAQABAYY=
</data>
<key>keyIgnoreSinglePixels</key>
<integer>1</integer>
<key>keyReloadSeconds</key>
<integer>300</integer>
<key>keyURL</key>
<string>http://weather.noaa.gov/radar/images/SI.krax/latest.gif</string>
<key>keyWatchBoxRect</key>
<string>{{297, 304}, {46, 38}}</string>
</dict>
</plist>
Tracking Changes
Another important task that the document must tend to is tracking changes to itself. Whenever you open a document, it is considered clean. As soon as you make a change, it becomes dirty. If the user attempts to close a dirty document (or quit the application while a dirty document is open), he is prompted to save the document. It is up to the document itself to track its clean/dirty state.
You can get rather complex in tracking these changes, but we do it rather simply in RadarWatcherX. Essentially, whenever the user makes a change to a user interface component, we call the NSDocument method -updateChangeCount: passing NSChangeDone. This increments the change count of the document telling us it is dirty. As long as we call this method each time a change is made, NSDocument will automatically handle asking the user to save if needed.
Timer
MyDocument uses the value in the keyReloadSeconds key to set a timer. This timer is created and set when the user clicks the Start button and the subsequent –startRadar: action is called. We use the NSTimer +scheduledTimerWithTimeInterval:target:selector:userInfo:repeats: class method to create a repeating timer (see Listing 3.8). The timer takes an NSTimeInterval to know how often to fire, which object contains the method to execute, and the selector (method) within the target to call. In this case, the -refreshRadar: method is called when the timer fires. The timer is destroyed by invalidating and releasing the timer instance variable when the user presses the Stop button.
m_timer = [[NSTimer scheduledTimerWithTimeInterval:
(NSTimeInterval)[[m_md objectForKey:keyReloadSeconds] doubleValue]
target:self selector:@selector(refreshRadar:) userInfo:nil repeats: YES]
retain];
refreshRadar
The -refreshRadar: method in Listings 3.9 through 3.11 is where the most important work of RadarWatcherX occurs. This is where the radar image is loaded and analyzed for colors. It is not only called from the timer, but also when the user presses the Reload button. Let's look at what is going on in this function.
Listing 3.9. MyDocument –refreshRadar: Image Loading
// Load the current image from the URL and display
// it on the screen, releasing any previous image
// Note we must use this method and not [NSImage
// initWithContentsOfURL] because it uses the cache
NSData *data = [[NSURL URLWithString:[m_md objectForKey:keyURL]]
resourceDataUsingCache:NO];
NSImage *image = [[NSImage alloc] initWithData:data];
Before anything, we attempt to load the current URL typed into the URL field. Using +[NSURL URLWithString:] and –[NSURL resourceDataUsingCache:NO] we force the image to be loaded from the server and not from our local cache. Given the data we then attempt to initialize an NSImage from it. Because NSImage understands a variety of image formats we can easily load JPEG, GIF or PNG files, to name a few.
Next, if we were able to create the image, we pass it immediately to our RadarView, as shown in Listing 3.10. We will look at RadarView in more detail in a moment, but for now simply know that RadarView is a subclass of NSView and is the “owner” of the image that is displayed on the screen. MyDocument simply manages the means to obtain the image at regular intervals. RadarView is the class that handles the details of manipulating the image itself. Once we pass the image to RadarView, which retains it, we release it. We also update the user interface to display the current time as the “Map last loaded” time.
Listing 3.10. MyDocument –refreshRadar: Image Loaded
// If we loaded an image...
if (image) {
// Pass it to the RadarView for display
[m_radarView setImage:image];
// We no longer need the image, m_radarView
// has "retained" it at this point
[image release];
// Update the current time as the last time we loaded the image
[m_statusTextField setStringValue:[NSString localizedStringWithFormat:
@"Map last loaded %@", [NSCalendarDate date]]];
Note
Speaking of -retain and -release, this is one of the big gotchas in Cocoa programming. It's easy enough to understand that if a block of memory is being used by one object, you don't want another object to free it. This is the concept of retain and release. If I retain an object, I am essentially increasing the -retainCount of that object by 1. Releasing an object lowers the -retainCount by 1. When the -retainCount reaches 0, the object is freed and is no longer valid.
The problem is that it can be difficult to know when you “obtain” an object if it has already been retained, or if you should retain it. If you retain it, you should also release it; but should you release it if you did not retain it?
The simple rule of thumb is that if you explicitly +alloc and -init an object, you should retain and release it as appropriate. If you obtain an object from another mechanism, it is probably created using -autorelease. This means that if you do not explicitly retain it, it will be released automatically at the end of the event loop. This is made possible by something called an autorelease pool, which is discussed in subsequent chapters. Autorelease pools make it easy for us to use NSString class methods in a function without having to worry much about managing the memory that NSString uses. However, if no autorelease pool is being used, you should consider your memory use carefully.
Now that RadarView has the image and has displayed it on the screen, we can check it for the colors we are concerned about. See Listing 3.11. Essentially, we ask RadarView to see if the given color is within the current watch box, taking into account the ignoreSinglePixels and closeColorState options. Because we have five NSColorWells, we call the RadarView five times—each with a different color. If RadarView returns that the color was found in the watch box, we alert the user.
Listing 3.11. MyDocument –refreshRadar: Image Checking
// Check for colors
BOOL ignoreSinglePixelsState =
([m_ignoreSinglePixelsButton state] == NSOnState);
BOOL closeColorsState = ([m_closeColorsButton state] == NSOnState);
if (([[m_colorWell1 color] alphaComponent] > 0) &&
([m_radarView isColorInImageInRect:[m_colorWell1 color]
ignoreSinglePixels:ignoreSinglePixelsState
closeColors:closeColorsState] == YES)) {
[self displayAlert:@"Found Color 1!"
msg:@"A color was found in the watch box."
defaultButton:@"OK"];
}
if (([[m_colorWell2 color] alphaComponent] > 0) &&
([m_radarView isColorInImageInRect:[m_colorWell2 color]
ignoreSinglePixels:ignoreSinglePixelsState
closeColors:closeColorsState] == YES)) {
[self displayAlert:@"Found Color 2!"
msg:@"A color was found in the watch box."
defaultButton:@"OK"];
}
if (([[m_colorWell3 color] alphaComponent] > 0) &&
([m_radarView isColorInImageInRect:[m_colorWell3 color]
ignoreSinglePixels:ignoreSinglePixelsState
closeColors:closeColorsState] == YES)) {
[self displayAlert:@"Found Color 3!"
msg:@"A color was found in the watch box."
defaultButton:@"OK"];
}
if (([[m_colorWell4 color] alphaComponent] > 0) &&
([m_radarView isColorInImageInRect:[m_colorWell4 color]
ignoreSinglePixels:ignoreSinglePixelsState
closeColors:closeColorsState] == YES)) {
[self displayAlert:@"Found Color 4!"
msg:@"A color was found in the watch box."
defaultButton:@"OK"];
}
if (([[m_colorWell5 color] alphaComponent] > 0) &&
([m_radarView isColorInImageInRect:[m_colorWell5 color]
ignoreSinglePixels:ignoreSinglePixelsState
closeColors:closeColorsState] == YES)) {
[self displayAlert:@"Found Color 5!"
msg:@"A color was found in the watch box."
defaultButton:@"OK"];
}
} else {
NSBeep();
}
For now, this summarizes MyDocument's responsibilities. Basically, it exists to manage the user interface and the document data. You could easily break out the user interface management functions into another window controller object if you felt it necessary. If your program needed more than one window per document, you would do this. Also, if your document class became too big, you might consider it as well. There is always more than one way to implement a task, especially in Cocoa! Peruse the code for more details and error checking code.
RadarView
Let's take a look at RadarView. As you saw in Figure 3.8, RadarView is a Custom View in Interface Builder that is of type RadarView. When the nib file is loaded, a RadarView is automatically instantiated for us. The most important instance variables of RadarView are the radar image itself, which is passed in by MyDocument, and the watch box rectangle, which is drawn by the user and completely managed by RadarView. Placing the RadarView in an NSScrollView in Interface Builder makes it scrollable if the image is larger than the view.
Note
Something you will notice right away is that when a new image is loaded in a RadarWatcherX window, the scroll view scrolls in such a way that you see the lower-left corner of the image as the anchor point. The reason for this is that Mac OS X has changed the positioning of the world for “old school” Macintosh developers. It used to be that the upper-left corner was 0, 0 in the coordinate system of an image or view. Mac OS X changes this so that the lower-left corner is now 0, 0. There are ways of altering this for any particular view if you need to, but the odds are once you get used to it, you'll rarely have a need to.
Watch Box
By overriding NSView's –mouseDown:, -mouseDragged:, and –mouseUp: methods, in Listing 3.12, RadarView can completely manage the drawing and tracking of the watch box. Essentially, when the mouse button is clicked in the view, the down point is saved. As the mouse cursor is dragged, the current point is saved and the rectangle is drawn in the -drawRect: method. When the mouse button is released, the final point is saved and the final rectangle drawn.
Listing 3.12. RadarView Mouse Overrides
- (void)mouseDown:(NSEvent *)event
{
if (m_image && !m_locked) {
NSPoint p = [event locationInWindow];
m_downPoint = [self convertPoint:p fromView:nil];
m_currentPoint = m_downPoint;
[self setNeedsDisplay:YES];
[m_document updateChangeCount:NSChangeDone];
}
}
- (void)mouseDragged:(NSEvent *)event
{
if (m_image && !m_locked) {
NSPoint p = [event locationInWindow];
m_currentPoint = [self convertPoint:p fromView:nil];
[[self superview] autoscroll:event];
[self setNeedsDisplay:YES];
}
}
- (void)mouseUp:(NSEvent *)event
{
if (m_image && !m_locked) {
NSPoint p = [event locationInWindow];
m_currentPoint = [self convertPoint:p fromView:nil];
[self setNeedsDisplay:YES];
}
}
Checking for Colors
When MyDocument asks RadarView to check for colors in Listing 3.11, the -isColorInImageInRect:ignoreSinglePixels:closeColors: method does the work. This method walks each pixel in the watch box in the image and compares it against the color passed from MyDocument.
If ignoreSinglePixels is YES, more than one of a color must be in the image in order for it to be considered “found.” The problem is that some radar images have “blips” or artifacts that can mislead RadarWatcherX. If there is only one red pixel in a watch box, it probably isn't a storm, but just some sort of ground clutter falsely interpreted by the radar itself.
If closeColors is YES, colors match if their hue component is within 10 degrees and their brightness component is within 20%. These are arbitrary values that I found worked well with the maps I was working with. The idea here is that some maps don't use a specific orange—for example, they might use a variety of oranges. This helps to alleviate the problem in which you are looking for an orange that is slightly off from the actually orange used in the map.
Listing 3.13. RadarView -isColorInImageInRect:ignoreSinglePixels:closeColors:
- (BOOL)isColorInImageInRect:(NSColor *)color
ignoreSinglePixels:(BOOL)ignore
closeColors:(BOOL)close
{
int x, y;
long found = 0;
// Lock the image focus so we can perform direct pixel reads
[m_image lockFocus];
// Update the watch box rect
m_watchBoxRect = [self currentRect];
for (x = m_watchBoxRect.origin.x;
x < m_watchBoxRect.origin.x + m_watchBoxRect.size.width; ++x) {
for (y = m_watchBoxRect.origin.y;
y < m_watchBoxRect.origin.y + m_watchBoxRect.size.height; ++y) {
NSColor *newColor = NSReadPixel(NSMakePoint(x, y));
if (close) {
if ((InRange([color hueComponent],
[newColor hueComponent], .036)) &&
(InRange([color brightnessComponent],
[newColor brightnessComponent], .05))) {
found++;
}
} else {
if (([color redComponent] == [newColor redComponent]) &&
([color greenComponent] == [newColor greenComponent]) &&
([color blueComponent] == [newColor blueComponent])) {
found++;
}
}
}
}
// Unlock the image focus and return the result of our search
[m_image unlockFocus];
return (ignore ? (found>1) : (found>0));
}
After looking at this code, can you think of any ways to optimize it? Try swapping the loops so that you walk Y before you walk X. Does this speed up your program? With a small watch box, you probably won't notice any difference, but on a large map with a large watch box, you just might. You might also consider walking the image data directly, avoiding the use of NSReadPixel altogether. These graphics optimizations are beyond the scope of this book but something you might consider should you write more graphics-oriented software in the future.
Note
To use NSReadPixel to access the individual pixels of an image, you must wrap your pixel accesses with calls to NSImage -lockFocus and NSImage -unlockFocus. This is similar to having to use SetPort in previous Macintosh operating systems.
RadarView has it pretty easy: keep track of an image and a watch box and then use that information to match the colors in the image. You could easily make RadarView call out to a more specialized image analysis class to perform the color matching. It could even send the image to another computer for analysis if it really needed to crunch numbers.
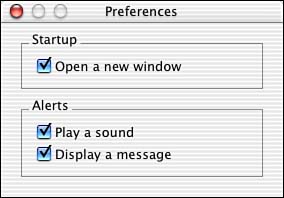
Application Preferences
The last thing I want to talk about in RadarWatcherX is the application-level preferences. RadarWatcherX documents have plenty of settings that are document specific. Radar map URLs, colors to look for, reload intervals, and so on. However, other settings are more global in nature that RadarWatcherX keeps track of. These include whether to open a new window when the application starts up and how to alert the user when a matching color is found within a watch box.
Yet Another Nib and Some Code
As you saw in Figure 3.2, there is a third nib file in the RadarWatcherX project. Preferences.nib contains the NSWindow shown in Figure 3.11. PreferenceController, which is a subclass of NSWindowController, is the File's Owner. PreferenceController is defined as shown in Listing 3.14. Note the extern NSStrings used to store the preferences and the three IBOutlets and IBActions for the controls.
Listing 3.14. PreferenceController.h
#import <AppKit/AppKit.h>
extern NSString *pkeyInitialized;
extern NSString *pkeyOpenNewWindow;
extern NSString *pkeyPlaySound;
extern NSString *pkeyShowAlert;
@interface PreferenceController : NSWindowController {
IBOutlet NSButton *m_newWindowButton;
IBOutlet NSButton *m_playSoundButton;
IBOutlet NSButton *m_showAlertButton;
}
- (IBAction)changeNewWindowButton:(id)sender;
- (IBAction)changePlaySoundButton:(id)sender;
- (IBAction)changeShowAlertButton:(id)sender;
@end
Figure 3.11. RadarWatcherX application-level preferences.
Before we look at the code that makes the PreferenceController work, let's see how it is accessed from our AppController, shown in Listing 3.15. First, when the AppController is initialized, it takes a moment to default our preferences should that be needed. By loading the +standardUserDefaults dictionary from NSUserDefaults and seeing if they have already been initialized, we can set up our default preference values easily. Remember the Info.plist entry for CFBundleIdentifier? This is the name of the file used to store our preferences in ~/Library/Preferences/. The com.triplesoft.radarwatcherx.plist file is created at this point by NSUserDefaults.
Listing 3.15. AppController +initialize
+ (void)initialize
{
// Create the user defaults dictionary
NSUserDefaults *defaults;
defaults = [NSUserDefaults standardUserDefaults];
if ([defaults integerForKey:pkeyInitialized] == 0) {
// Save our defaults if not already initialized
[defaults setObject:[NSNumber numberWithInt:1]
forKey:pkeyInitialized];
[defaults setObject:[NSNumber numberWithInt:NSOnState]
forKey:pkeyOpenNewWindow];
[defaults setObject:[NSNumber numberWithInt:NSOnState]
forKey:pkeyPlaySound];
[defaults setObject:[NSNumber numberWithInt:NSOnState]
forKey:pkeyShowAlert];
}
}
Note
Note that the +initialize method is executed when the application's icon is still bouncing in the dock. If you needed to do any time-consuming processing at application startup, you might consider doing it in the -applicationDidFinishLaunching: delegate notification instead. This notification is sent once the icon has stopped bouncing and can make your application feel snappier.
Now, any portion of our application can check a preference value with a simple call to NSUserDefaults as demonstrated when the application asks its delegate, AppController, if it should open an untitled file when it starts up.
Listing 3.16. AppController –applicationShouldOpenUntitledFile:
- (BOOL)applicationShouldOpenUntitledFile:(NSApplication *)sender
{
return ([[NSUserDefaults standardUserDefaults]
integerForKey:pkeyOpenNewWindow] == NSOnState);
}
Note
-applicationShouldOpenUntitledFile:, shown in Listing 3.16, is an example of a delegate method. These methods are implemented by the delegate of a class and are called from the instance of the class. For example, the delegate of NSApplication, in this case our AppController, can implement the -applicationShouldTerminateAfterLastWindowClosed: method to let the application know if it should terminate after the last window is closed. Remember, we receive these delegate methods because we registered AppController as an application delegate in the nib file.
Delegate methods are a great way to add custom behaviors to a structured framework. You can see all the available delegate methods in the Cocoa documentation. You use Interface Builder to set up a delegate relationship just as you connect actions and outlets. Simply connect the delegate outlet of the class in question to the instance that is the delegate. Once connected, implement the delegate methods you are interested in and respond accordingly. Remember, not all objects allow delegates, and those that do differ from class to class. That is, NSView does not use delegates at all, and the delegates implemented in NSApp are different from those in NSWindow.
When the user selects Preferences from the application menu, the AppController -showPreferencePanel: method is executed, as shown in Listing 3.17. At this time, if the preferenceController instance variable has not been allocated, it is. The -showWindow: method of NSWndowController is then called to display the preferences. Later on, when the application quits and the AppController is deallocated, it also releases the preferenceController. The preferenceController sticks around for the entire life of the application once it has been created.
Listing 3.17. AppController –showPreferencePanel:/-dealloc
- (IBAction)showPreferencePanel:(id)sender
{
// Create the PreferenceController if it doesn't already exist
if (!preferenceController)
preferenceController = [[PreferenceController alloc] init];
// Display it
[preferenceController showWindow:self];
}
- (void)dealloc
{
// We are done with the PreferenceController, release it
[preferenceController release];
[super dealloc];
}
PreferenceController Code
The PreferenceController code itself, shown in Listing 3.18, is rather straightforward with just a few tricks. Upon being initialized by AppController, the PreferenceController must call its super -initWithWindowNibName:, passing the proper nib name—in this case, Preferences.
Listing 3.18. PreferenceController.m
#import "PreferenceController.h"
NSString *pkeyInitialized = @"pkeyInitialized";
NSString *pkeyOpenNewWindow = @"pkeyOpenNewWindow";
NSString *pkeyPlaySound = @"pkeyPlaySound";
NSString *pkeyShowAlert = @"pkeyShowAlert";
@implementation PreferenceController
- (id)init
{
// Load the Preferences.nib file
self = [super initWithWindowNibName:@"Preferences"];
return self;
}
- (void)windowDidLoad
{
NSUserDefaults *defaults;
// Load our default values and set the preference controls accordingly
defaults = [NSUserDefaults standardUserDefaults];
[m_newWindowButton setState:[defaults integerForKey:pkeyOpenNewWindow]];
[m_playSoundButton setState:[defaults integerForKey:pkeyPlaySound]];
[m_showAlertButton setState:[defaults integerForKey:pkeyShowAlert]];
}
- (IBAction)changeNewWindowButton:(id)sender
{
// Save back the new value of this control to the defaults
[[NSUserDefaults standardUserDefaults] setInteger:[sender state]
forKey:pkeyOpenNewWindow];
}
- (IBAction)changePlaySoundButton:(id)sender
{
// Save back the new value of this control to the defaults
[[NSUserDefaults standardUserDefaults] setInteger:[sender state]
forKey:pkeyPlaySound];
}
- (IBAction)changeShowAlertButton:(id)sender
{
// Save back the new value of this control to the defaults
[[NSUserDefaults standardUserDefaults] setInteger:[sender state]
forKey:pkeyShowAlert];
}
@end
Then, when -windowDidLoad is called after the nib loads our window, we can access the +standardUserDefaults to set the initial state of the controls in the Preferences window.
Last, when each button is clicked and the state changes, we write the current value back to the +standardUserDefaults. This means that as soon as a check box is clicked, the value is live. If another portion of the application attempted to access the value, it would be in sync with the current state of the check box. Note, however, that the file may not be written to disk immediately. NSUserDefaults does not provide concurrency between two processes.
That's about all there is to it!
Try This
Here are some ideas to expand RadarWatcherX; try these on your own.
Add slider controls to the document window to adjust the sensitivity of the closeColors option. Adding one for hue and one for brightness sensitivity should do the trick and make the application more controllable, depending on the maps the user chooses.
Add the ability to make more than one watch box in a document. Multiple watch boxes with their own color selections could really expand the usefulness of the application.
Add the ability to email a user as an alert option. You can use the -deliverMessage:subject:to: method of the NSMailDelivery class in Apple's Message framework located in /System/Library/Frameworks. Although no formal documentation exists for this framework, extensive notes are in the header file. While you're there, look at the header files from other frameworks you don't recognize. You can learn a lot by poking around (read-only) in the depths of your system's directory structure!
Conclusion
You learned a lot in this chapter. The combination of looking through the source code while reading the enhanced explanations here will help you to get a grasp on designing and implementing a document-based Cocoa application of your own.
If you are confused, reread the chapter one section at a time and concentrate on the relationships between the source code in Project Builder and the user interface items in Interface Builder. Cocoa allows you to almost transparently link these items together. Through the magic of the Cocoa framework, they all become connected at runtime.
Also, make sure to learn to use the debugger in Project Builder. It may be confusing and overwhelm you at first, but, trust me, if you learn a few commands (that is, 'po,' also known as print object), you will be able to understand more about what is happening in your application. Set breakpoints on all your functions, especially delegate methods, to see when they are called and what parameters are being passed. Type 'help' in the debugger for more information.
With a little commitment and some hard work, it will all start to come together for you and you will be poised to build the next killer app!