
9. Status Items
“Should? Will. Should? Will. Should? Will. Did!”
—quote based on Cocoa delegate methods
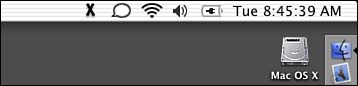
This chapter discusses those little black and white icons on the right side of the menu bar as displayed in Figure 9.1. Before we assign these items a real name, let's make something perfectly clear: They are not all created equal. Those created by Apple that can be command dragged to swap locations and added simply by dropping a bundle on the menu bar are called NSMenuExtras. However, the NSMenuExtra class is a private API, so, as developers who do not work for Apple, we need to create NSStatusItems instead.
Figure 9.1. The menu bar filled with “little black and white icons.”
Also, Apple says status items are reserved for Apple's use only (see Aqua Human Interface Guidelines, page 63). Further, these items are intended to display hardware or network status/settings only. This is why you will see iChat and Airport but not Mail.app. Having said that, third-party developers should respect this guidance by using status items to communicate hardware or network information only. For example, a disk light application seems acceptable, but a Web browser may not be. The example shown in this chapter is an example of the technology, not what to do with it.
NSStatusItems aren't so bad in and of themselves. True, they are the not-so-coordinated cousins of the NSMenuExtra, but they can get the job done. As mentioned, you can't move them around the menu bar by command dragging. You also cannot add them to the menu bar by dropping their bundle on it. They also don't work perfectly if you click down elsewhere in the menu bar and then drag over the NSStatusItem—you have to click directly on the NSStatusItem to have them show their menu contents. Other than these few idiosyncrasies, if you need an item to display status in the menu bar, this is the way to do it. For sake of argument, I will refer to items in the menu bar as status items even though you know that this is not completely correct.
Note
If you're in a hacking mood, there are ways of making NSMenuExtra talk. That is, some programmers have reverse-engineered the API and used it in non-Apple products. This is risky business because you never know when Apple will alter the API just enough to cause your software not to work anymore. Feel free to experiment, but keep this in mind before releasing any software that uses undocumented features of the OS.
And remember…
- Apple claims status items are for its use only.
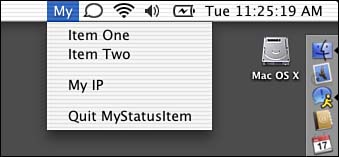
- Apple says status items are for reporting hardware or network settings only. See Figure 9.2 for some examples.
Figure 9.2. The menu of the MyStatusItem status item.

- Applications should not create/use status items for displaying globally available menu commands. Instead, applications should use Dock menus. See Chapter 15, “SOAP,” for more information on creating and managing Dock menus.
The Result
Figure 9.2 shows a menu bar with a variety of status items. The one on the left is the MyStatusItem status item that we will be examining in this chapter. Note that when you click on it, its menu is displayed. The menu contains four items—six if you count the item separators. The first two cause an alert to be shown, the third displays the local IP address of the computer, and the fourth causes the program to quit, making the menu and status item disappear from the menu bar. We will look at these in more detail shortly.
Other status items in the Jaguar menu bar, from left to right, include those for iChat, AirPort, Volume, Battery, and the Date and Time. You might notice that many of these are controlled via an option in a Preference Pane as to whether or not they appear. Figure 9.3 shows the Energy Saver Preference Pane. Note that at the bottom of the window there is a check box entitled “Show Battery Status in the Menu Bar.” If this check box is turned on, the battery status item will display in the menu bar. If it is turned off, the battery status item disappears.
Figure 9.3. The Energy Saver preference pane offers the option to display the battery status in the menu bar.

Let's look at the project that makes MyStatusItem appear in the menu bar.
The Project
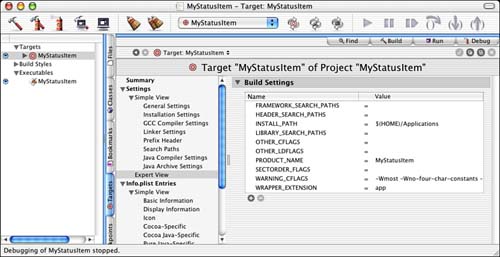
Figure 9.4 shows the MyStatusItem project in Project Builder. This project was created by starting with the standard Cocoa application template in the New Project Assistant. You will notice that the only source code files other than the standard items are AppController.m and AppController.h. All of our work is done in our AppController class although you could easily place it somewhere else depending on the needs of your application. We also have a TIFF file that we added to the project that contains the X image used in the menu bar. MainMenu.nib has hardly been touched with the exception that we filled out our window with some text that will be displayed when you run the application and linked our AppController to the File's Owner (NSApplication) as its delegate. Any other changes to MainMenu.nib are negligible and not pertinent to the project.
Figure 9.4. The MyStatusItem project.

The Project Settings
There isn't much to say about the Target Settings in Figure 9.5—status quo here.
Figure 9.5. The MyStatusItem Target settings.
The InfoPlist Entries in Figure 9.6 are also about as straightforward as you can get—standard for a Cocoa application. The one possible exception is that we've added the NSBGOnly entry. This entry is currently set to 0, so it is essentially disabled. You might remember from earlier chapters that setting this entry to 1 causes our application to become a background-only application; that is, with no user interface, per se. We will look into this in more detail later in the chapter.
Figure 9.6. The MyStatusItem InfoPlist entries.

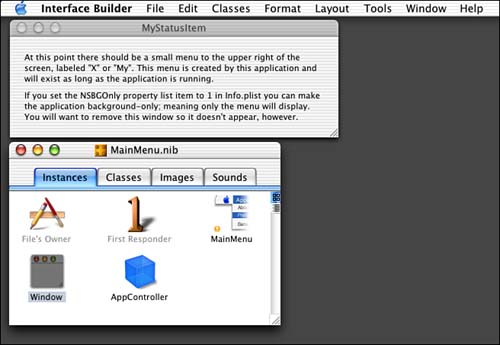
The Nib File
As mentioned previously, our MainMenu.nib file is also straightforward. We created a window that appears when the application is launched. Figure 9.7 displays the window as shown in Interface Builder. If you want to experience the literary art of foreshadowing, read the text of the window in Figure 9.7.
Figure 9.7. The MyStatusItem MainMenu.nib file.
Let's jump into the source code.
The Source Code
AppController.m is our only custom source file in this project. We have the AppController subclass of NSObject, which is defined as shown in Listing 9.1.
Listing 9.1. AppController Interface in AppController.h
#import <Cocoa/Cocoa.h>
@interface AppController : NSObject
{
NSStatusItem *m_item;
NSMenu *m_menu;
}
- (void)selItemOne:(id)sender;
- (void)selItemTwo:(id)sender;
- (void)selItemIP:(id)sender;
- (void)selItemQuit:(id)sender;
@end
The only instance variables we need to manage are a pointer to the NSStatusItem, the actual item that sits in the menu bar, and the NSMenu that is displayed when you click on the NSStatusItem. Both of these instance variables are created at runtime in the AppController's -init method.
The -init method of AppController (see Listing 9.2) is where all things are created. Upon initializing ourselves by calling our super class, we begin the process of creating the NSStatusItem and NSMenu. First, we call the +systemStatusBar class method of NSStatusBar. This will return the global system NSStatusBar to which we will attach our NSStatusItem. The system status bar is the only status bar that is currently available to add items to, as of this writing.
Listing 9.2. AppController -init Method in AppController.m
- (id)init
{
[super init];
if (self) {
// Get the system status bar
NSStatusBar *bar = [NSStatusBar systemStatusBar];
// Add an item to the status bar
#ifdef USE_TEXT_TITLE
m_item = [[bar statusItemWithLength:NSVariableStatusItemLength]
retain];
[m_item setTitle: NSLocalizedString(@"My",@"")];
#else
m_item = [[bar statusItemWithLength:NSSquareStatusItemLength]
retain];
[m_item setImage:[NSImage imageNamed:@"x"]];
#endif
[m_item setHighlightMode:YES];
// Create a menu to be added to the item
m_menu = [[[NSMenu alloc] init] retain];
[m_menu setAutoenablesItems:YES];
[m_menu addItem: [[NSMenuItem alloc] initWithTitle:
NSLocalizedString(@"Item One",@"")
action:@selector(selItemOne:) keyEquivalent:@""]];
[m_menu addItem: [[NSMenuItem alloc] initWithTitle:
NSLocalizedString(@"Item Two",@"")
action:@selector(selItemTwo:) keyEquivalent:@""]];
[m_menu addItem: [NSMenuItem separatorItem]];
[m_menu addItem: [[NSMenuItem alloc] initWithTitle:
NSLocalizedString(@"My IP",@"")
action:@selector(selItemIP:) keyEquivalent:@""]];
[m_menu addItem: [NSMenuItem separatorItem]];
[m_menu addItem: [[NSMenuItem alloc] initWithTitle:
NSLocalizedString(@"Quit MyStatusItem",@"")
action:@selector(selItemQuit:) keyEquivalent:@""]];
// And add the menu to the item
[m_item setMenu:m_menu];
}
return self;
}
We then have implemented two mechanisms to create the NSStatusItem—one using text as the item title and one using an image. In Figure 9.2, you could see that the X TIFF image represents the status item. However, you can just as easily use text as the item title, as shown in Figure 9.8.
Figure 9.8. Using text as the title of an item.
Depending on the mechanism you choose, you will either pass the NSVariableStatusItemLength or NSSquareStatusItemLength constant to NSStatusBar's -statusBarWithLength: method. Both of these are defined in NSStatusBar.h. If you are using text as your title, you need to specify the variable length because text can be any (variable) length. You should probably consider keeping your status item's title short, however, because status bar space is at a premium. The -statusBarWithLength: method will return a new NSStatusItem that you should -retain. Your new item will be added to the left of any preexisting items in the status bar. You will then call either the -setTitle: or -setImage: methods of NSStatusItem on the newly returned status item to label it properly. Before we begin to build the menu that attaches to the status item, we call the -setHighlightMode: method to enable the user feedback highlighting of the status item when it is clicked—some people call this inverting.
Next, we must create the menu that is attached to the status item. First we +alloc, -init, and -retain an NSMenu item. We then call NSMenu's -setAutoEnableItems: method to enable the use of the NSMenuValidation informal protocol. This causes our AppController's -validateMenuItem: method to be called to determine whether a particular menu item should be enabled or not at any particular time. You will see this method in action shortly.
The next six successive calls to the -addItem: method append items to our NSMenu instance variable. The first call adds an item named “Item One” and sets the action of the item to our AppController's method –selItemOne:. The key equivalent is left empty as is recommended for status items. Remember, a limited number of keyboard equivalents are available, so system-level software should avoid them when capable. We continue adding the other items, and some separator items as well, until our menu is built. The last step in this function is to attach the newly created menu to the status item by calling NSStatusItem's -setMenu: method.
The AppController's -dealloc method (see Listing 9.3) handles the -release of NSStatusItem and NSMenu.
Listing 9.3. AppController -dealloc Method in AppController.m
- (void)dealloc
{
[m_item release];
[m_menu release];
[super dealloc];
}
The AppController's -validateMenuItem: method (see Listing 9.4) is executed due to our call to NSMenu's -setAutoEnableItems:. This method is called once for each item in the menu any time the menu is displayed. This allows us to dynamically enable or disable our items. Returning YES causes the menu item to be enabled; NO disables it.
Listing 9.4. AppController –validateMenuItem: Method in AppController.m
- (BOOL)validateMenuItem:(NSMenuItem *)menuItem
{
// NSString *selectorString;
// selectorString = NSStringFromSelector([menuItem action]);
// NSLog(@"validateMenuItem called for %@", selectorString);
if ([menuItem action] == @selector(selItemOne:))
return YES;
if ([menuItem action] == @selector(selItemTwo:))
return YES;
if ([menuItem action] == @selector(selItemIP:))
return YES;
if ([menuItem action] == @selector(selItemQuit:))
return YES;
return NO;
}
The two methods in Listing 9.5 are the actions for the first two items in the menu—Item One and Item Two. Remember in the -init method, we designated action methods for each menu item. These actions merely display an alert to the user to show feedback that we selected the menu item.
Listing 9.5. AppController –selItemOne: and –selItemTwo: Methods in AppController.m
- (void)selItemOne:(id)sender
{
int result;
NSBeep();
result = NSRunAlertPanel(@"MyStatusItem",
@"Thank you for selecting menu item one.", @"OK", @"", @"");
}
- (void)selItemTwo:(id)sender
{
int result;
NSBeep();
result = NSRunAlertPanel(@"MyStatusItem",
@"Thank you for selecting menu item two.", @"OK", @"", @"");
}
Listing 9.6 shows the action called when the My IP menu item is selected. This method merely uses the NSHost +currentHost method and the -address and -name methods to report the current IP address and hostname to the user. Figure 9.9 shows what this alert looks like when displayed. Note that these numbers represent your computer on your local network and might be different from the IP address that the world sees you as through a router.
Listing 9.6. AppController –selItemIP: Method in AppController.m
- (void)selItemIP:(id)sender
{
int result;
NSString *theString = [NSString localizedStringWithFormat:
@"IP Address: %@
DNS Name: %@",
[[NSHost currentHost] address], [[NSHost currentHost] name]];
NSBeep();
result = NSRunAlertPanel(@"MyStatusItem", theString, @"OK", @"", @"");
}

Finally, when the user selects Quit MyStatusItem from the status item menu, the –selItemQuit: method is called as shown in Listing 9.7. After confirming the user's intention to quit, the NSApplication's +sharedApplication class method is called to return the instance of your application. Subsequently calling the -terminate: method causes the application to quit. If you need to override this mechanism, you can implement the -applicationShouldTerminate: method to have one last chance to cancel the termination. If you need to clean up after your application, you can implement the applicationWillTerminate: method to perform those tasks.
Listing 9.7. AppController –selItemQuit: Method in AppController.m
- (void)selItemQuit:(id)sender
{
int result;
NSBeep();
result = NSRunAlertPanel(@"MyStatusItem",
@"Quit the application and remove this menu?",
@"Yes", @"No", @"");
if (result == NSAlertDefaultReturn) {
[[NSApplication sharedApplication] terminate:self];
// Respond to applicationWillTerminate for cleanup
}
}
Note
In Figure 9.7, you see the window that is displayed when this application is run. By removing this window and setting the NSBGOnly entry in the Info.Plist entries from Figure 9.6 to a value of 1, you can make the application “almost silent.” By making these few changes, you can launch the application at login and simply have the menu appear with no other signs of the application running. It will not even appear in the Dock.
Try This
Here are a few things to try to implement using the MyStatusItem project as a start.
Remove the window and make it a background only application by setting the NSBGOnly Info.Plist entry to 1. Then, alter the first two menu items to display useful information, such as the My IP item does.
Try adding a menu item that displays a window that allows you to paste in the URL of an image file on the Internet. Load the image file and display it in a window with the height and width displayed as well as the size in bytes. Save the image to a file on the desktop.
Conclusion
The ability to create status items really opens the door for your programming ideas. Keep your eyes peeled for the publicizing of the NSMenuExtra API should it ever become so and consider using it instead of NSStatusItem for future development. Moreover, be sure to keep in mind the rules mentioned in the beginning of this chapter.