
4. Cocoa Plug-ins
“…the documentation doesn't specify (there is no documentation)…”
—nibs
Where would web be without plug-ins? Plug-ins are also known as plug ins, PlugIns, or whatever you want to call them. A plug-in is usually a file or bundle that is created and compiled separately from a host application, that follows a specific API (application programming interface) or protocol, and that is used by the host application to extend its functionality in some way.
Adobe Photoshop uses plug-ins to allow third-party developers to extend the functionality of its image editing capabilities. By publishing an API and making it available to the public, Adobe has essentially “opened up” Photoshop to developers everywhere. These developers can create plug-ins that work directly within the Photoshop application environment. In addition, they do not require access to the original Photoshop source code, undoubtedly valuable to Adobe!
Music software also uses plug-ins to allow editing of digital audio. Plug-ins in the audio world include those that create reverb, echo, and other effects. The same concept applies; third-party developers download an SDK (software development kit) that provides all the information necessary to communicate with the host application via a plug-in API. Most of the time, a plug-in accepts some type of data (audio or image data, for example), processes it, and returns the processed version to the host. The host then displays the alterations to the user. The user need not be concerned that the host application was written by one company and the plug-in by another—it all just works!
Within OS X are numerous ways to provide plug-in capabilities to an application. This chapter discusses two methods that work well within Cocoa applications. Chapter 5, “Carbon Plug-ins,” discusses writing plug-ins using a Carbon-based API for use within Carbon or Cocoa applications.
The Results
There are two results in this chapter.
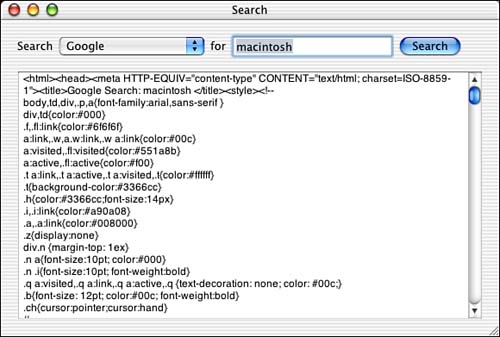
First, I will discuss a plug-in architecture that uses what I refer to as “dumb” plug-ins. These plug-ins are nothing more than text-based plist configuration files that are loaded in by the application, parsed, and used to provide options to the user. In our case, we provide a search window that allows you to choose from a variety of Internet search engines to query for a search term. The raw HTML results are then displayed in a scrolling NSTextView. The contents of the search pop-up button are loaded from the available plug-in plist files. This makes the application easily extensible without altering the underlying source code.
Figure 4.1. PlistPlugin search engine application window.
Second, I will discuss a plug-in architecture based on the NSBundle class. The host application loads plug-ins that, in and of themselves, are bundles and call methods within them to provide image-editing capabilities. Each plug-in is listed in and can be selected from the Filter menu. The application and the plug-in bundles adhere to a specific, albeit simplistic, protocol to allow quick and easy communication between the two. The plug-ins are passed the image, alter it, and pass it back to the host application for display—just like Photoshop, but maybe not as advanced.
Both of the projects in this chapter are simple Cocoa applications used to feature the architecture implementations over anything else. In a real application, you may choose to implement a document-based approach depending on your needs.
Figure 4.2. NSBundle image editing application window.

The First Project: plistPlugin
As you can see in Figure 4.3, this project is straightforward. We have an AppController, which we only use to make a delegate of the NSApplication so that we can implement the -applicationShouldTerminateAfterLastWindowClosed: method. By implementing this method, you can quit the application simply by closing the main window. This convenience is used in most of our example applications.
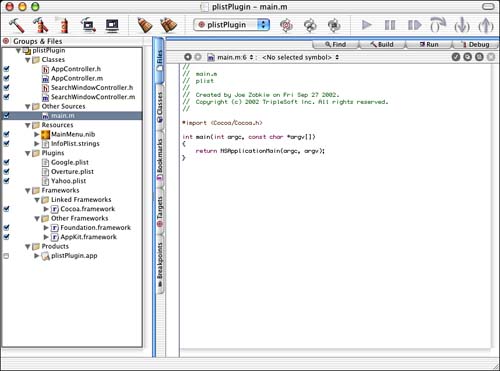
Figure 4.3. The plistPlugin project in Project Builder.
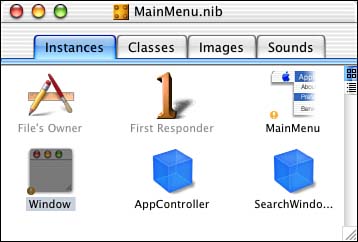
SearchWindowController is where all the action is. This is the class that not only controls the window (responding to the Search button), but also loads the plug-ins. Figure 4.4 illustrates how our nib file is arranged. Both AppController and SearchWindowController are instantiated, and connections between the Window and SearchWindowController are as you would expect for a window with a few outlets and an action.
Figure 4.4. The plistPlugin MainMenu.nib in Interface Builder.
Before we look at the details of how the plug-ins are loaded and called, let's talk about the plug-ins themselves for a moment.
The Plug-ins: What
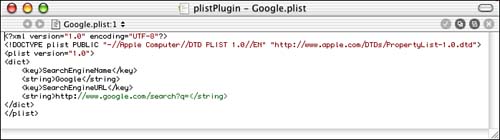
You can see that we created a Plug-ins group in the project file. In that group, we added the three plug-ins that we created for this project—one for each of three different search engines that the program supports (see Figure 4.5). These plug-ins are nothing more than XML format text files ending in .plist.
Figure 4.5. The Google.plist plug-in.
The files contain two keys that are used by the application. The SearchEngineName key value contains the name of the search engine as it should be displayed in the pop-up button list. The SearchEngineURL key value contains the URL that is used to access the search engine. The search term entered by the user is appended to the end of the SearchEngineURL key value. In the case of Google, the SearchEngineURL key value starts out as
http://www.google.com/search?q=
Once the host application appends the search term to it, it will look like
http://www.google.com/search?q=macintosh
If you were to type this URL in to an Internet browser, you will see that it is all Google needs to perform a search.
Note
Google runs on a Web server. When we access the preceding URL, we are contacting Google's Web server and asking it to perform a search of its database and return the results. You can easily write a Web server script using PHP, or some other scripting language, and access it remotely from your application using this same method. You need not limit this technique to search engines alone. This is how some applications implement the “Internet Version Check” that we will demonstrate in a later chapter.
The Plug-ins: Where
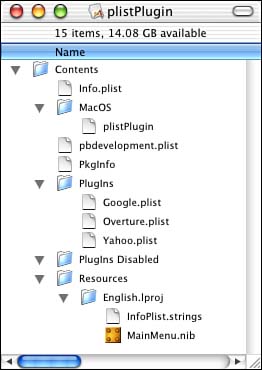
But where are these plug-ins? The plug-ins themselves live in the PlugIns directory inside the host applications bundle. See Figure 4.6 for the hierarchical layout of the compiled application. Note that the plug-ins are all gathered quietly together within the application itself. You can see this as well by control clicking on the plistPlugin application and selecting Show Package Contents from the pop-up menu.
Figure 4.6. The plistPlugin application package contents.
The Plug-ins: How
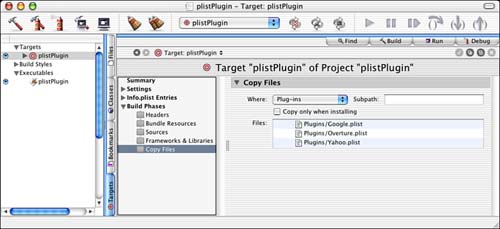
How did the plug-ins get there? Figure 4.7 shows the Copy Files settings of the plistPlugin Target in the project. By adding a Copy Files Build Phase, we are able to choose which files get copied where within the application bundle. In our case, we chose to have the three search engine plug-ins copied to the Plug-ins directory. (See what I mean about the many capitalization versions of plug-in—even within Apple's own software.) If you are not familiar with Project Builder in this capacity, be sure to consult the Project Builder documentation.
Figure 4.7. The plistPlugin Target Copy Files settings.
Note
You can actually store the plug-ins in many different locations. They do not have to be within the application that uses them. In fact, many third-party plug-ins are more likely to be installed in the user's ~/Library/Application Support/ directory. You might consider placing the plug-ins in your application's Resources directory if they need to be localized (that is, Contents/Resources/English.lproj/Google.plist).
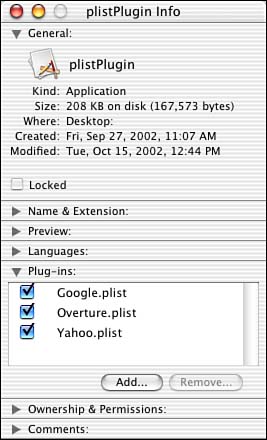
An interesting twist on using plug-ins stored in the PlugIns directory within the application is that you can enable and disable them easily from within the Get Info window of the application itself. Figure 4.8 shows the plug-ins that are within the plistPlugin application. By simply turning off the ones we don't want and restarting the application, they will be disabled. That's a nice feature!
Figure 4.8. The plistPlugin application Info window.
SearchWindowController
Now we'll move on to the source code to see how this all fits together. As mentioned previously, the SearchWindowController is where all the action is. It has two methods that handle 99% of its work. -awakeFromNib loads the plug-ins and is called automatically by the Cocoa framework once the main window in the nib file is loaded. When the user clicks the Search button, the -doSearch: method appends the search term to the search URL, initiates the search, and displays the results. Let's look at these methods.
// Called to initialize our fields if we need to –
// this is where we will load our plugins
- (void)awakeFromNib
{
NSString* folderPath;
// Remove all items from the popup button
[m_searchEnginePopUpButton removeAllItems];
// Locate the plugins directory within our app package
folderPath = [[NSBundle mainBundle] builtInPlugInsPath];
if (folderPath) {
// Enumerate through each plugin
NSEnumerator* enumerator = [[NSBundle
pathsForResourcesOfType:@"plist"
inDirectory:folderPath] objectEnumerator];
NSString* pluginPath;
while ((pluginPath = [enumerator nextObject])) {
// Load the plist into a dictionary for each plugin
NSDictionary* dictionary =
[NSDictionary dictionaryWithContentsOfFile:pluginPath];
if (dictionary) {
// Read the items in the plist
NSString* searchEngineURL =
[dictionary objectForKey:@"SearchEngineURL"];
NSString* searchEngineName =
[dictionary objectForKey:@"SearchEngineName"];
if (searchEngineName && searchEngineURL) {
// Add the string the array
[m_searchEngineArray addObject:searchEngineURL];
// and add a menu item (menu items and
// array items will have the same index,
// which makes it easy to match them up
// when the user presses the search button)
[m_searchEnginePopUpButton addItemWithTitle:searchEngineName];
}
}
}
}
}
Don't let Listing 4.1 scare you; once you take it apart, it isn't half as bad as it looks. After clearing out the pop-up button, we use NSBundle to return the -builtInPlugInsPath—that is, the path to the Plugins directory within our application bundle. We then enumerate through the PlugIns directory for all files ending in .plist, which is how our plug-ins are named. Then we load the contents of each plug-in file into a temporary dictionary. Have I mentioned how great property list files are for storing NSDictionary data? After we have the file contents in the dictionary, we can easily extract the SearchEngineURL and the SearchEngineName key values. Assuming that we get them both (that is, the file is not corrupt), we add the URL to an array that is an instance variable of our SearchWindowController and add the name to our pop-up button list. The index of the URL in the array will always be in sync with the index of the name in the pop-up button, which will come in handy in the next method!
Note
If you chose to store your plug-ins in the Resource directory as mentioned earlier, you would change the enumeration logic in Listing 4.1 to look in specific lproj-like directories for the plugins (that is, Contents/Resources/English.lproj/Google.plist).
Listing 4.2 contains the action that is called when the user presses the Search button. As noted previously, the array of URLs and the pop-up button items have the same array indices. Therefore, we can simply pull the URL from the array using the index of the currently selected item in the pop-up button list. We then use one of the Core Foundation routines to encode the search term into the proper format for URLs. This will turn a space into a %20, for example. Once encoded, we concatenate the strings to create the complete search URL. We then use NSURL to load the contents of the URL, and if results are returned, we display them in the scrolling text field.
// This action is called when the user clicks the Search button
- (IBAction)doSearch:(id)sender
{
NSString *results;
// Since the menu items and array items both
// have the same index, we can easily load the URL
// based on the menu item that is selected
NSString *searchEngineURL = [m_searchEngineArray
objectAtIndex:[m_searchEnginePopUpButton indexOfSelectedItem]];
// We must then encode the string that the user
// typed in (ie: replacing spaces with %20)
NSString *encodedSearchText =
(NSString*) CFURLCreateStringByAddingPercentEscapes(NULL,
(CFStringRef)[m_searchTextField stringValue],
NULL, NULL, kCFStringEncodingUTF8);
// Once encoded, we concatenate the two strings, the URL and the search text
NSString *completeSearchURL =
[NSString stringWithFormat:@"%@%@", searchEngineURL,
encodedSearchText];
// Begin user feedback
[m_progressIndicator startAnimation:self];
[m_searchButton setEnabled:NO];
// We then attempt to load the URL and save the results in a string
results = [NSString stringWithContentsOfURL:
[NSURL URLWithString:completeSearchURL]];
if (results) {
// If we have results we display them in the text view
NSRange theFullRange = NSMakeRange(0,
[[m_resultsTextView string] length]);
[m_resultsTextView replaceCharactersInRange:theFullRange
withString:results];
} else {
NSRunAlertPanel(@"Error",
@"NSString stringWithContentsOfURL returned nil",
@"OK", @"", @"");
}
// End user feedback
[m_searchButton setEnabled:YES];
[m_progressIndicator stopAnimation:self];
}
As you can see, there really isn't much to this. It's a simple way to implement a plug-in architecture that not only allows your application to be extended easily, but also gives the user some control over which plug-ins are enabled and disabled. You can even publish an API that would allow non-programmers to extend your application using this mechanism. Remember, no programming is required for the plug-in creator in this example.
Note
Many extremely useful Core Foundation routines can be used directly with Cocoa objects. All you have to do is typecast your Cocoa NSString, for example, to the proper type as done previously. When you can substitute a Cocoa object for a Core Foundation data type with little more than a typecast, this is called “toll-free bridging.” This also works the other way around; some Core Foundation data types can be “toll-free bridged” to Cocoa objects. Note that not all objects are bridgeable. NSBundle and CFBundle, for example, are not bridgeable. When in doubt, check the Core Foundation documentation. CFURL.h and CFString.h are two header files to begin your explorations.
The Second Project: MyNSBP_App and MyNSBP_Plugin
The second Cocoa plug-in project actually consists of multiple project files. There is a host application project file and then a plug-in project file. In this case, the application will display the image and manage the plug-ins. The plug-in will alter the image by removing one of the primary colors, red, green or blue, as chosen by the user.
Let's look at the two project files in general first, and then we will delve deeper into the source code of each. You will see many similarities between the previous plistPlugin project and this project.
The Host Application: Overview
Once again in this project, seen in Figure 4.9, we use an AppController strictly for the -applicationShouldTerminateAfterLastWindowClosed: method—nothing else to say there. The ImageWindowController, an override of NSObject, manages the main application window and handles menu selections from the Filter menu. MyNSBP_Protocol.h houses the protocol that all plug-in filters follow in order to be used by this application.
Figure 4.9. The MyNSBP_App project in Project Builder.

Note
Want another option? It seems that there are always options when programming for Mac OS X. Instead of using a protocol, we could have chosen to implement a public class interface that our third-party developers would override to create their custom filters. This class would be the link between the application and the plug-in—much like our protocol is in this example. Both mechanisms are perfectly acceptable and are many times a matter of personal taste.
On the resource side of things, the TIFF file is used as our default image in the window—a colorful photo of Tampa Bay, Florida that was taken by esteemed photographer Ed McNair. MainMenu.nib, as seen in Figure 4.10, contains the window resource as well as instantiations of the AppController and the ImageWindowController— standard stuff for a simple Cocoa application. InfoPlist.strings contains what you would expect as well—our copyright and version information.
Figure 4.10. The MyNSBP_App MainMenu.nib in Interface Builder.

You will also notice that we have created a plug-ins group containing two plug-ins that are generated from other projects—one of which will be discussed in a moment; the other is a bonus, and not discussed here. Further, if you were to look in the Target information for the MyNSBP_App, you will see that we set up another Copy Files Build Phase to copy the built plug-ins into the PlugIns directory within our application's bundle. This is the same type of setup we had in the plistPlugin example; the only difference is in this case we are copying entire bundles into the PlugIns directory and not just .plist files. Shortly, you will see how our application loads these enhanced plug-ins as compared to loading the .plist files.
The Plugin: Overview
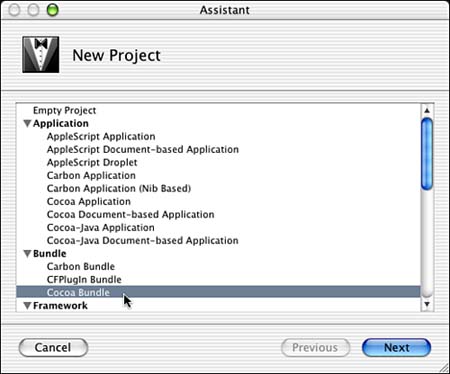
The plug-in project, seen in Figure 4.11, will look subtly different from the others you've seen. The most important thing to note is that this project does not build an application. Instead, the plug-in created is a bundle. The project was started by using the Project Builder New Project Assistant, seen in Figure 4.12, and creating a Cocoa Bundle.
Figure 4.11. The MyNSBP_RemoveColor project in Project Builder.

Figure 4.12. The Project Builder New Project Assistant.
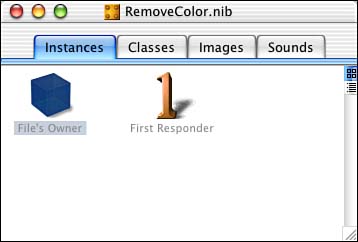
MyNSBP_RemoveColor is the guts of our plug-in. The MyNSBP_RemoveColor class is a subclass of NSObject that adheres to the MyNSBP_Protocol protocol. This is also the principal class of our project. Notice that the plug-in project includes MyNSBP_Protocol.h just as the host application does. The associated RemoveColor.nib file, as shown in Figure 4.13, is essentially empty, containing only the default File's Owner and First Responder. The File's Owner is set to the principal class MyNSBP_RemoveColor. You could leave this empty .nib file out if you so desire; I left it in the project in case we needed to add something later during development.
Figure 4.13. RemoveColor.nib in Interface Builder.
Note
A principal class is essentially a custom, named main entry point into a bundle. You can typically access all the functionality in a bundle through its principal class. NSApplication is usually the principal class when you are creating an application. However, in this case, the principal class is that of our plug-in, MyNSBP_RemoveColor. Properly defining the principal class is important, as you will see later on when our application has to call our plug-in based on this value. The principal class typically acts as a traffic cop because it controls all other classes in a bundle. It also manages interactions between internal classes and those outside the bundle.
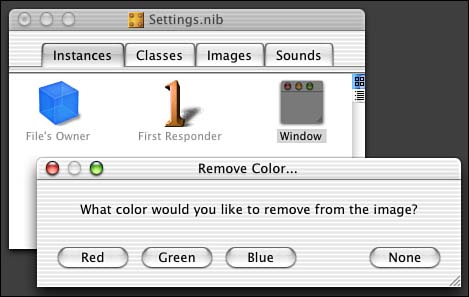
Getting back to classes, the SettingsController class is an override of NSWindowController and is simply used to manage the modal window that is displayed when you choose this particular filter as shown in Figure 4.14. The associated Settings.nib file is used in conjunction with the SettingsController class mentioned previously, which happens to be its File's Owner. Note also that the window is connected to the outlet of the File's Owner—this is key.
Figure 4.14. Settings.nib in Interface Builder.
Let's look at the application and plug-in code in more detail.
The Host Application: Detail
As mentioned previously, the ImageWindowController is the meat of the host application project, shown in Figure 4.15. It has only a few instance variables that are nothing more than outlets to the NSMenuItem (Filter menu) and the NSImageView. It also maintains two NSMutableArrays—one for a list of plug-in classes and the other for a list of plug-in instances. These arrays are allocated when the object is initialized and deallocated when it is destroyed. The arrays are used when actually calling one of the plug-ins. Let's look at the code used to load the plug-ins first in Listing 4.3.
Listing 4.3. ImageWindowController's awakeFromNib
// Called to initialize our fields if we need to –
// this is where we will load our plugins
- (void)awakeFromNib
{
NSMenu *filterMenu = [m_filterMenuItem submenu];
NSString *folderPath;
// Locate the plugins directory within our app package
folderPath = [[NSBundle mainBundle] builtInPlugInsPath];
if (folderPath) {
// Enumerate through each plugin
NSEnumerator *enumerator =
[[NSBundle pathsForResourcesOfType:@"plugin"
inDirectory:folderPath] objectEnumerator];
NSString *pluginPath;
int count = 0;
while ((pluginPath = [enumerator nextObject])) {
// Get the bundle that goes along with the plugin
NSBundle* pluginBundle = [NSBundle bundleWithPath:pluginPath];
if (pluginBundle) {
// Load the plist into a dictionary
NSDictionary* dictionary = [pluginBundle infoDictionary];
// Pull useful information from the plist dictionary
NSString* pluginName = [dictionary
objectForKey:@"NSPrincipalClass"];
NSString* menuItemName = [dictionary
objectForKey:@"NSMenuItemName"];
if (pluginName && menuItemName) {
// See if the class is already loaded, if not, load
Class pluginClass = NSClassFromString(pluginName);
if (!pluginClass) {
NSObject<MyNSBP_Protocol>* thePlugin;
// The Principal Class of the Bundle is the plugin class
pluginClass = [pluginBundle principalClass];
// Make sure it conforms to our protocol and attempt
// to initialize and instantiate it
if ([pluginClass
conformsToProtocol:@protocol(MyNSBP_Protocol)] &&
[pluginClass isKindOfClass:[NSObject class]] &&
[pluginClass initializePluginClass:pluginBundle] &&
(thePlugin = [pluginClass instantiatePlugin])) {
// Add a menu item for this plugin
NSMenuItem *item;
item = [[NSMenuItem alloc] init];
[item setTitle:menuItemName];
[item setTag:count++];
[item setTarget:self];
[item setAction:@selector(doFilter:)];
[filterMenu addItem:item];
[item release];
// Add the class to our array
[m_pluginClasses addObject:pluginClass];
// Add the instance to our array
[m_pluginInstances addObject:thePlugin];
}
}
}
}
}
}
// Update our self image
[self doResetImage:self];
}
Figure 4.15. NSBundle image editing application window.

As you know, -awakeFromNib is called once our nib file has been completely loaded. We are guaranteed that all of our outlets are connected at this point. Therefore, this is the perfect method to initialize our user interface. In our case, we load our plug-ins and subsequently build the contents of the Filter menu.
Note
Where's a better place to load? Although we are loading our plug-ins in –awakeFromNib in this example, it might be better for your application to load them in NSApplication delegate's –applicationDidFinishLaunching: method. The reason is that during –awakeFromNib, your application's icon is still bouncing in the dock. By loading in – applicationDidFinishLaunching:, you have already surpassed the bouncing icon and your application load time will seem snappier to the user. This will become very apparent if you have many plug-ins to load at startup. You might also consider deferring the initialization and instantiation of each plug-in until they are actually used—yet another optimization!
Also note that –awakeFromNib has a dark side. If you have more than one controller object in your nib file, you generally can't say which one will receive –awakeFromNib first. This can become a problem if one controller attempts to access the other for whatever reason and it is yet to completely exist!
The first thing we do is access the submenu of the Filter menu item so that we can add more items to it later. Then we access the main application bundle and request the -builtInPlugInsPath. Next, we enumerate the PlugIns directory for all files ending in .plugin. Remember that in the plistPlugin project, we enumerated for .plist files—same concept here.
For each plug-in that we find, we access its bundle using NSBundle's -bundleWithpath: method passing the path to the plug-in. This gives us an NSBundle that we can then work with to dissect the plug-in and access the code and resources that we are interested in. Once we load the info.plist data into a dictionary, using the -infoDictionary method of NSBundle, we can begin to pull the key values from it. Once again, this is very similar in concept to plistPlugin.
The main key values we are interested in are the principal class, represented by NSPrincipalClass, and the menu item name, represented by NSMenuItemName. You will see how these are configured when I discuss the plug-in project shortly. For now, know that they exist; this will become clear once we look at the plug-in code in detail. Given the principal class name, MyNSBP_RemoveColor, we can access the class object itself for the plug-in by calling NSClassFromString. If this function returns a nil class, we know that the class has yet to be loaded from the bundle and we must load it.
To load the class, we declare an NSObject variable that conforms to the MyNSBP_Protocol—that is, a local variable that will represent our plug-in. We then call NSBundle's -principalClass method, which returns the plug-in's principal class after ensuring that the code containing the definition itself is loaded. Simply put, the -principalClass method loads the code.
Note
After calling the NSBundle -principalClass method, which uses –load to load the code, the receiver posts an NSBundleDidLoadNotification. Using this mechanism, you can perform actions when the bundle has successfully loaded.
Now that we have the class, we want to verify that it is actually one of our plug-ins. The odds are that it will be. But you never know when a user might accidentally drag a plug-in in to our application bundle, so it doesn't hurt to check. We validate a few items as follows: Does the class conform to the MyNSBP_Protocol? Is it based on NSObject? If these check out, we call the +initializePlugInClass: class method of the plug-in to enable it to keep track of its own bundle and then the +instantiatePlugin class method to enable it to create itself. These will be discussed in more detail later.
We add the plug-in's name to the menu, setting the target to the ImageWindowController and the action to the -doFilter: method within it. You will also note that we set the tag value of the menu item to the index of the menu item. This allows us to figure out which plug-in item was selected from the menu and access the associated class and instance arrays, as in plistPlugin, by menu item index. You will see this in detail in the -doFilter: method later. We then use -addObject: to append our plug-in class and instance to the two arrays. Once again, we depend on the synchronization of the items in the arrays and those in the Filter menu.
Note
You will notice that many classes throughout Cocoa have a -tag value associated with them. This tag can be set to any value you desire. If you are a Macintosh programmer from way back, you might have referred to a tag as a refCon.
Last, but not least, we call the -doResetImage: method of ImageWindowController (see Listing 4.4) to make our picture appear. Essentially, this method loads the TIFF from our bundle, creates an NSImage out of it, and sets it as the image of the NSImageView in our window. Note that we have to make a copy of the image otherwise the image itself is “edited” when we execute our filters on it. When this happens, there is no way to reset it without relaunching the application. That's the magic of caching!
// Called when the user pressed the Reset Image
// button, restores the image in the view
// We must make a copy otherwise the actual
// picture.tiff tends to get "edited"
- (IBAction)doResetImage:(id)sender
{
NSImage *theImage = [[[NSImage imageNamed:@"picture.tiff"] copy] autorelease];
[m_imageView setImage:theImage];
}
Note
If you were allowing the user to load an image from a file, instead of from your own bundle, you would use –initWithContentsOfFile: instead of –imageNamed: to reset the image.
Okay, so now we have an image displayed in the window, a menu filled with filters, and nowhere to go. At this point, we expect the user to select an item from the Filter menu. Once they do this, the -doFilter: method is called in ImageWindowController. This method couldn't be simpler; let's take a look.
// Called when one of the plugins is selected from the Filter menu
- (IBAction)doFilter:(id)sender
{
NSObject<MyNSBP_Protocol>* thePlugin;
// Get the proper plugin instance from the array based on tag value
thePlugin = [m_pluginInstances objectAtIndex:[sender tag]];
if (thePlugin) {
// Pass the image to the plugin, which will alter it and pass it back
NSImage *theAlteredImage = [thePlugin doPlugin:[m_imageView image]];
// Set the altered image to be the current image
[m_imageView setImage:theAlteredImage];
// Update the view
[m_imageView setNeedsDisplay:YES];
}
}
Because each Filter menu item calls this method as its action, we need a way to figure out which plug-in was selected from the menu. Remember the -tag value? By retrieving the -tag (the index) of the sender (the menu item), we can tell which plug-in was selected. We then pull that index from the instances array, and, like magic, we have the plug-in instance.
Now that we have the plug-in instance, we call the -doPlugin: method within it, passing the image from the NSImageView. The plug-in will manipulate it and return it as theAlteredImage. We finish off by setting theAlteredImage as the image of the NSImageView and forcing it to update with -setNeedsDisplay:.
One last thing to note is that when the window is about to close, we have to release the memory occupied by our plug-in classes and instances. In Listing 4.6, we simply enumerate the arrays and release the objects in them. The one exception is that we call the plug-in's +terminatePluginClass class method to balance the +initializePluginClass: class method called during -awakeFromNib for the items in the classes array.
Listing 4.6. -windowWillClose:
// Called when the window is about to close
- (void)windowWillClose:(NSNotification*)notification
{
Class pluginClass;
NSEnumerator *enumerator;
NSObject<MyNSBP_Protocol> *thePlugin;
// Enumerate through the instances and release each
enumerator = [m_pluginInstances objectEnumerator];
while ((thePlugin = [enumerator nextObject])) {
[thePlugin release];
thePlugin = nil;
}
// Enumerate through the classes and terminate each
enumerator = [m_pluginClasses objectEnumerator];
while ((pluginClass = [enumerator nextObject])) {
[pluginClass terminatePluginClass];
pluginClass = nil;
}
}
Remember, you've only seen one side of the architecture up to this point. Once you later see how the plug-in and protocol work, you might want to reread this section and then everything should become clear. Feel free to take a break at this point if your mind is feeling numb. This is some complex stuff, especially if it is completely new to you. Take it slow, and don't be surprised if you have to review it a few times before it makes complete sense.
The Plug-in Protocol
Before diving into the plug-in itself, let's talk for a moment about the protocol that the plug-in conforms to. A protocol is a list of method declarations not directly associated with any particular class definition. Any class can adopt the protocol by implementing the methods and adding the protocol name to its interface definition. For example, the MyNSBP_RemoveColor class is a subclass of NSObject that implements the MyNSBP_Protocol, as you can see in Listing 4.7.
Listing 4.7. MyNSBP_RemoveColor Interface Definition
@interface MyNSBP_RemoveColor : NSObject<MyNSBP_Protocol> {
}
- (int)askUserWhatColorToRemove;
@end
So how is the protocol defined? Listing 4.8 shows the MyNSBP_Protocol definition from MyNSBP_Protocol.h. Note that this protocol contains four methods—three class methods and one instance method. The class methods can be called without instantiating an object. The instance method requires a valid object before it can be called. This is standard Objective-C and shouldn't be any surprise.
Listing 4.8. MyNSBP_Protocol Definition
@protocol MyNSBP_Protocol
+ (BOOL)initializePluginClass:(NSBundle*)theBundle;
+ (void)terminatePluginClass;
+ (id)instantiatePlugin;
- (NSImage*)doPlugin:(NSImage*)theImage;
@end
At this point, MyNSBP_RemoveColor need only implement the functions in the protocol. As you saw in the MyNSBP_App implementation, once you have a class, you can query it to see if it conforms to a protocol by using the -conformsToProtocol: method. The protocol defined here is known as a formal protocol. There are also informal protocols, but they do not allow the use of the -conformsToProtocol: mechanism, for example. Protocols are useful for declaring methods for other objects to implement, to hide a class definition yet provide an interface to an object, or to illustrate and provide for similarities between classes from different hierarchies.
Note
You can learn more than you ever thought you wanted to know about protocols in “The Objective-C Programming Language” publication from Apple. In fact, this is a great reference in any case to have on hand as you program in Objective-C. A PDF version of this document is available on the Apple Developer Web site at http://www.apple.com/developer/.
The Plug-in: Detail
You made it to the plug-in! We need to spend a few moments in the project settings before diving into the source code. Because this project is not standard to what we are used to seeing, there are a few things to point out that should be edited.
First in the Build Settings (see Figure 4.16), we need to change the WRAPPER_EXTENSION key to be plugin instead of the default bundle. This is the filename extension that will be used when our plug-in is built. In reality, it doesn't matter what we make this extension, but plugin is simply a standard. Because we are placing our final built plug-ins in the PlugIns directory, why not make them end in .plugin?
Figure 4.16. MyNSBP_RemoveColor build settings.

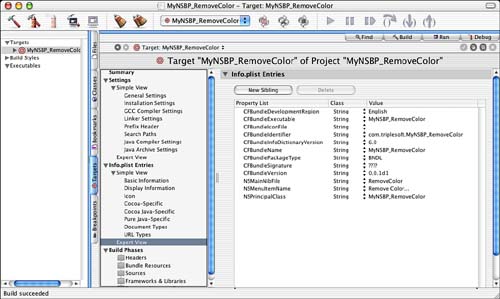
Second, in the Info.plist Entries (see Figure 4.17) we see the standard items that we have seen in the past. However, two in particular need to be pointed out. The NSMenuItemName key is set to Remove Color. This text is used in the Filter menu. The NSPrincipalClass is MyNSBP_RemoveColor for this project. This class implements the MyNSBP_Protocol protocol. You saw both of these values accessed in the MyNSBP_App's -awakeFromNib method; now you see where they were configured.
Figure 4.17. MyNSBP_RemoveColor Info.plist entries.
Let's move on to the source code!
Figures 4.18 and 4.19 show the before and after of calling the MyNSBP_RemoveColor to remove green from the image. Note that the Remove Color window is actually within the plug-in itself and called modally from it. You'll see how this all works in the next few pages.
Figure 4.18. About to remove green using MyNSBP_RemoveColor.
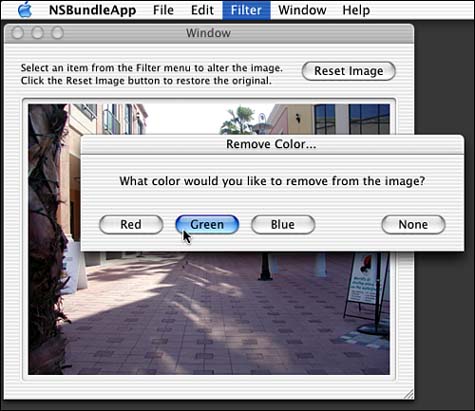
Figure 4.19. Having just removed green using MyNSBP_RemoveColor.

As you saw in the MyNSBP_App -awakeFromNib method, the plug-in class is initialized with a call to the plug-in's +initializePluginClass: class method. The plug-in's bundle is passed to this method so that it can -retain it for later use. But this is not necessary and is only an example of doing so. The plug-in's +terminatePluginClass class method is called from MyNSBP_App's -windowWillClose: method to allow it to clean up and, in our case, release its bundle before the plug-in itself is released by the host application. See Listing 4.9 for the implementations of these methods in the plug-in.
Listing 4.9. MyNSBP_RemoveColor +initializePluginClass:/+terminatePluginClass
// Called to initialize our class, currently just to save our bundle
+ (BOOL)initializePluginClass:(NSBundle*)theBundle
{
if (g_pluginBundle) {
return NO;
}
g_pluginBundle = [theBundle retain];
return YES;
}
// Called to terminate our class, currently just to release our bundle
+ (void)terminatePluginClass
{
if (g_pluginBundle) {
[g_pluginBundle release];
g_pluginBundle = nil;
}
}
Also in MyNSBP_App's -awakeFromNib is a call to the plug-in's +instantiatePlugin class method. This is a class method that returns the actual plug-in object. The method simply allocates and initializes an MyNSBP_Plugin object and loads its associated nib file, RemoveColor.nib. There is nothing in the nib file that we are using, but if there were, we could implement -awakeFromNib in the plug-in as well to access those items (see Listing 4.10).
Listing 4.10. MyNSBP_RemoveColor +instantiatePlugin
// Called to instantiate our plugin, currently to alloc, init and load the nib
+ (id)instantiatePlugin
{
MyNSBP_RemoveColor* instance =
[[[MyNSBP_RemoveColor alloc] init] autorelease];
if (instance && [NSBundle loadNibNamed:@"RemoveColor" owner:instance]) {
return instance;
}
return nil;
}
The plug-in's -doPlugin: method (see Listing 4.11) is called when the user selects the plug-in from the Filter menu. As you remember, it is passed an NSImage and expected to alter it and return the altered version to the host application. The first thing this plug-in does is ask the user what color to remove by showing the window in Figure 4.18. We will look at how the -askUserWhatColorToRemove method works in a moment, but for now know that it returns an integer of 0 if None was selected, 1 for Red, 2 for Green, or 3 for Blue.
Listing 4.11. MyNSBP_RemoveColor –doPlugin:
// Called to alter the image
- (NSImage*)doPlugin:(NSImage*)theImage
{
int whichColor = [self askUserWhatColorToRemove];
// If the user chose a color (other than None)
if (whichColor) {
NSRect theRect;
// Calculate theRect of the image
theRect.origin.x = theRect.origin.y = 0;
theRect.size = [theImage size];
// Lock the focus, draw, and unlock
[theImage lockFocus];
// Set the proper color
if (whichColor == 1) { // red
[[NSColor redColor] set];
} else if (whichColor == 2) { // green
[[NSColor greenColor] set];
} else if (whichColor == 3) { // blue
[[NSColor blueColor] set];
}
// Fill the rect with the NSCompositePlusDarker mode to remove the color
NSRectFillUsingOperation(theRect, NSCompositePlusDarker);
// Unlock the focus
[theImage unlockFocus];
}
// Return the image to the caller (altered or not)
return theImage;
}
Assuming that a color was chosen, this method prepares for the alteration by calculating the rectangle of the image, locking the focus, and setting the proper color for drawing. Then, using the NSRectFillUsingOperation function and the NSCompositePlusDarker drawing mode, the rectangle is filled. This mode removes the color that is currently set from the image. This is much quicker than looking at each pixel and removing the green component by hand. Once complete, we unlock the focus and return the image—albeit with no green.
Note
NSRectFillUsingOperation is one of many drawing routines in NSGraphics.h. Take a look at the contents of this header file for a lot of useful functions.
The -askUserWhatColorToRemove method (see Listing 4.12) is a handy one to have around because it shows what it takes to display a modal window from within an application (or in this case, from within a plug-in in an application). The first thing this method does is allocate and initialize our SettingsController object. This causes the -initWithWindowNibName: method to be called from the SettingsController's -init method (see Listing 4.13). At this point, the SettingsController and the nib file associated with it are both loaded and ready to be used.
Listing 4.12. MyNSBP_RemoveColor -askUserWhatColorToRemove
// Ask the user what color to remove
- (int)askUserWhatColorToRemove
{
int whichColor = 0;
// Allocate our settings dialog box
SettingsController *sc = [[SettingsController alloc] init];
if (sc) {
// Run the dialog box modal. The SettingsController will call
// stopModalWithCode with the tag of the button that was pressed
// to end the modal loop.
[sc showWindow:self];
whichColor = [NSApp runModalForWindow:[sc window]];
// Deallocate the preference controller, we no longer need it
[sc release];
sc = nil;
}
// return the chosen color, or 0 (none)
return whichColor;
}
Assuming that the SettingsController was allocated without error, we call its -showWindow: method, which displays the modal window. This works because in Interface Builder the window is connected to the window outlet of the File's Owner, which is the SettingsController. We then call NSApplication's -runModalForWindow: method passing the window in question. This method will manage the window modally until the user clicks one of the buttons in the window—all of which are connected to the -myDoneAction: method in SettingsController (refer to Listing 4.11).
Listing 4.13. SettingsController Implementation
@implementation SettingsController
- (id)init
{
// Load the Settings.nib file
self = [super initWithWindowNibName:@"Settings"];
return self;
}
- (IBAction)myDoneAction:(id)sender
{
[NSApp stopModalWithCode:[sender tag]];
}
@end
When a button is pressed and -myDoneAction: is triggered, NSApp's -stopModalWithCode: method is called passing the tag of the button that was clicked—either 0, 1, 2, or 3. Back in -askUserWhatColorToRemove, the SettingsController is released and the selected value is returned. This is one way you can implement simple modal windows in Cocoa!
A Word About Symbol Collisions
Whenever you have more than one code base intended to work together in a way such as outlined in this chapter, you need to be concerned with symbol collisions. Symbol collisions are when you have defined the same symbol more than once and they cause a problem. A symbol can be a C function or variable name, classnames, formal protocol names, and class/category name pairs. For example, if two separate plug-ins have a class named MyController, when the second one loads, you might find that it causes problems in the host application when the symbols collide.
You see, the Objective-C runtime dislikes symbol collisions. In the past, it would not load code from a bundle if it defined a symbol that had already been loaded by an application, library, or another plug-in. Since Mac OS X 10.2, this has been relaxed somewhat; the runtime will try its best to keep your program limping along without any guarantee that it will succeed.
However, in the case of the MyController class, a host of problems might occur. The second class loaded might not implement the same methods, causing a “doesn't respond to method” error when the class is called. It might implement a method of the same name, but return different results. In one of the worst cases, it might take less (or more) memory to store the instance variables of the class and might cause your program to crash when they are read or written to.
The best way to protect C-style symbols (functions, variables, and so on) from interfering with other code elements is to define them as static or private extern. That is, limit the scope of the symbol either to the file in which it is defined or the file in which it is linked.
The only way to protect Objective-C symbols (classes, protocols, class/category name pairs, and so on) is to use relatively unique symbol name prefixes. One method is to prefix your symbols with the same unique identifier. For example, if you were writing a screen effect that displayed pictures of the beach, you might name your classes BeachView, BeachSettings, and so on. A better way would be to use the reverse domain prefix—such is done with property list files throughout this book, but that can be cumbersome. Can you imagine having classes named ComTripleSoftBeachView and ComTripleSoftBeachSettings?
So, the good news is that Mac OS X 10.2 is better about these things than previous releases, but it's still not foolproof. NSBundle-based plug-in authors need to be more aware of the risks of symbol collisions in their bundle code and know how to protect themselves from it.
Try This
Here are some ideas to expand the plug-in projects in this chapter; try these on your own.
Find a search engine that is not supported by the plistPlugin application and create a new plug-in for it. Add the plug-in to the application without recompiling it.
Write a new filter plug-in for the image editing application. Try writing a plug-in that removes all the pixels that are a specific color in the image. Use what you've learned in Chapter 3, “Cocoa Applications,” to allow the user to choose a color and to access the individual pixels in the image.
Make the Remove Color window in Figure 4.14 a sheet so that it does not lock up the application while it is selected. You will need to pass the main application window in to the plug-in in order to accomplish this, via –doPlug:. You might consider renaming this method -filterImage:window:.
Did you know that you could actually build multiple project pieces in the same project file? Try retrofitting the NSBundle project in this chapter to build both the application and all the plug-ins in one single Project Builder project file. You will essentially create multiple Targets in Project Builder. This is a good way to implement code if you are writing all the pieces, but our example provides for third parties to write the plug-ins while someone else, such as yourself, writes the application.
Conclusion
Congratulations! This was a very complex chapter to get through in one piece. Even if the concept of plug-ins isn't new to you, implementing them in the ways described here might have been. Using Cocoa and Objective-C is a new paradigm for many Macintosh developers of old. It's okay to be a little confused as you weave through the maze that is OS X software development. The point is, in this chapter, you have been given working examples of two plug-in architectures that you can use in your own development projects. In the next chapter, I will show yet another plug-in architecture for those of you supporting Carbon-based applications.