
10. Screen Effects
—Remy Zero
Screensavers have been around since the first screen needed saving. Today, however, they are used more for fun than necessity. Back in the day of monochrome monitors, if you left a command prompt (or a menu bar) on the screen for a long period of time, you would suffer from the dreaded burn-in. The image on the screen would be permanently burned into the monitor. Screensavers would blank the screen and display moving objects so that you would still know the computer was running, but it wouldn't suffer from this horrible fate.
In the early days of the Macintosh, two popular screensavers came to life: Pyro, which made great looking fireworks and After Dark, which started the screensaver module revolution. After Dark was solely responsible for Flying Toasters and other such impossibilities. As display technology advanced and screensavers became more entertainment oriented, Apple decided to start calling them screen effects.
Note
Throughout this chapter, you will see some references to screensavers and some to screen effects. Since the name change with OS 10.2, not all parts of the OS have caught up. They are called different things in different places, at least for the time being. Eventually, this problem will fix itself.
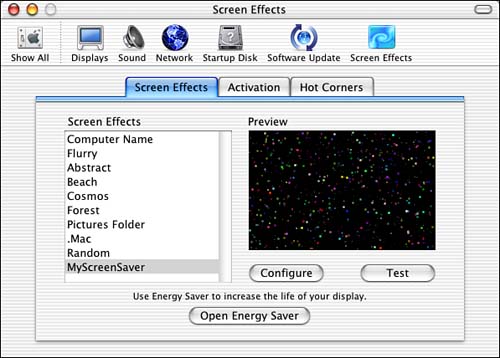
Figure 10.1 shows the main Screen Effects tab of the Screen Effects preference pane in the System Preferences application. This tab allows you to choose which screen effect you would like to use for your screen. You can configure any available options of the screen effect from this tab and test it. The small Preview area shows you what the effect looks like with its current settings. Note that the screen effects in the list are read from the various Screen Savers directories. During development, I install mine in ~/Library/Screen Savers, but the root Library/Screen Savers is also another popular spot. Most of Apple's screen effects are stored in /System/Library/Screen Savers.
Figure 10.1. The Screen Effects preference pane's Screen Effects tab in the System Preferences application.
The Activation tab, shown in Figure 10.2, allows you to set the time of inactivity required before the screen effect starts. You can also set a security option of whether to ask for the password when the computer wakes from a screen effect. These settings are global to all screen effects.
Figure 10.2. The Screen Effects preference pane's Activation tab in the System Preferences application.
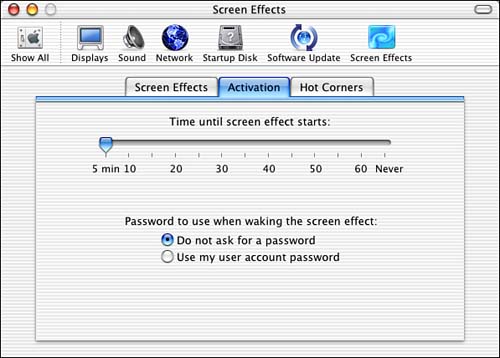
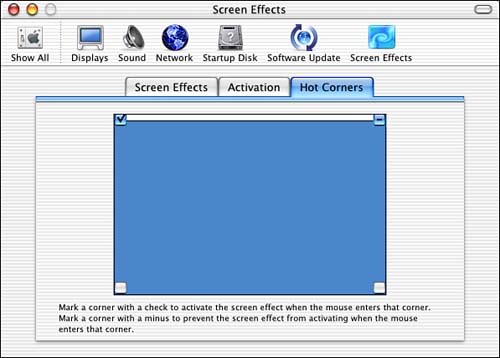
Figure 10.3 shows the Hot Corners tab where you can set the “Make Active Now” and “Never Make Active” corners. If you move the mouse into a corner with a check mark, the screen effect will come on immediately. If you move the mouse into a corner with a minus sign, the screen effect will never come on, effectively disabling the time setting in the Activation tab. These settings are also global to all screen effects.
Figure 10.3. The Screen Effects preference pane's Hot Corners tab in the System Preferences application.
Let's explore the screen effect we will be discussing in this chapter.
The Result
Figure 10.1 shows the result of the project examined in this chapter. MyScreenSaver, which was written just before Apple started calling them screen effects, draws the representative particles of the outer reaches of deep space—also known as little colored dots.
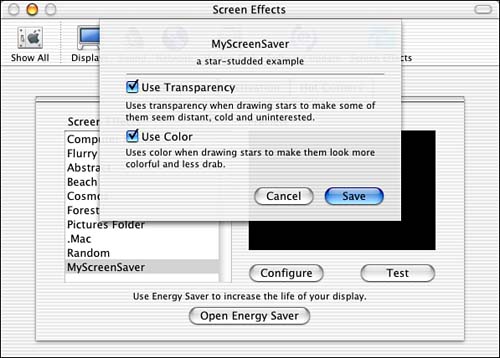
Figure 10.4 shows the results of pressing the Configure button on the Screen Effects tab. Note that two options are offered; Use Transparency and Use Color. Enabling Use Transparency draws the stars with a transparent effect, via the alpha channel, as you will see in the source code. Enabling Use Color draws the stars using color as opposed to grayscale only.
Figure 10.4. The MyScreenSaver screen effect configure sheet in the System Preferences application.
Note
What is an alpha channel? When you choose a color to draw, there are many ways to do so. The most popular way is to choose a red component, a green component, and a blue component. The additive effect of these choices creates any color in the spectrum. However, a fourth component is known as the alpha component or alpha channel. The alpha channel provides transparency to the colors so that you can see through them.
An alpha channel value between 0 and 1 creates the color as if it were stained glass—you can see through it in varying amounts depending on the value. An alpha channel value of 1 creates the color as if it were paint on wood—you can't see through it at all. An alpha channel value of 0 creates a color that is entirely transparent—like air; whatever other color components it might have will not be visible to mere mortals.
Let's look at the project file for MyScreenSaver.
The Project
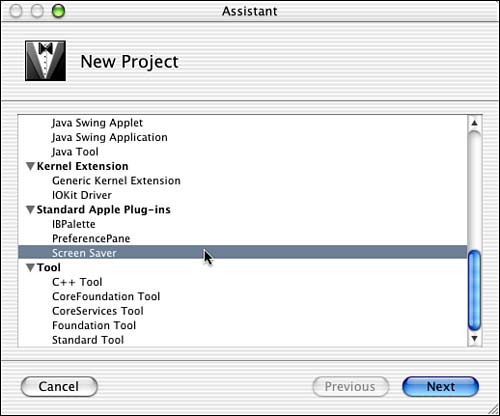
Figure 10.5 shows the MyScreenSaver project in Project Builder. The project was started by using the Screen Saver template in the New Project Assistant as shown in Figure 10.6.
Figure 10.5. The MyScreenSaver project.
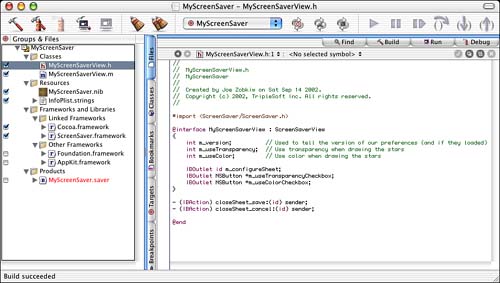
Figure 10.6. Selecting the Screen Saver template in the New Project Assistant.
The project itself has only the MyScreenSaverView.m and MyScreenSaverView.h files to contend with, as well as the MyScreenSaver.nib file. If your screen effect doesn't have any configuration settings, you won't need to add a nib file to your project.
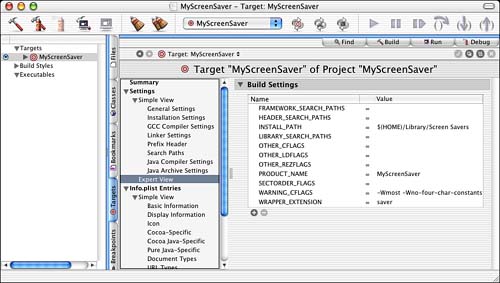
The Project Settings
The Target settings in Figure 10.7 are straightforward. Note that the WRAPPER_EXTENSION is set to saver. As of this writing, all screen effects must end in the extension .saver.
Figure 10.7. The MyScreenSaver Target settings.
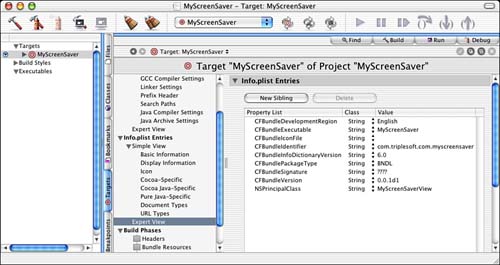
The InfoPlist entries in Figure 10.8 are also straightforward. Note that the CFBundleIdentifier is set to com.triplesoft.myscreensaver. The screen effect saves its configuration settings in this file, as you will see shortly. Note also that the NSPrincipalClass is MyScreenSaverView. I will discuss this class shortly as well.
Figure 10.8. The MyScreenSaver InfoPlist entries.
The Nib File
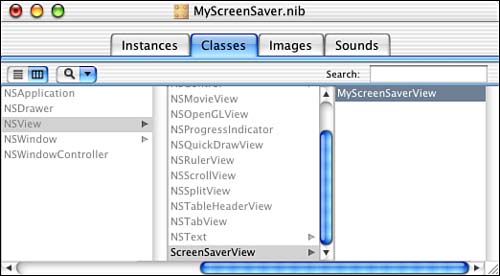
The MyScreenSaver.nib file is shown in Interface Builder in Figure 10.9. Note that because we've set it as the File's Owner, we do not need to create a specific MyScreenSaverView instance. How handy is that? You can also see the NSPanel used to lay out the configuration sheet used in the screen effect (refer to Figure 10.4). The IBOutlets in MyScreenSaverView are connected, as you would expect, to the NSPanel itself and the two check boxes within it. The Save and Cancel buttons are connected to two IBActions that you will see in the source code. Note that we do not need an instance of MyScreenSaverView although the MyScreenSaver.nib file knows about it, as shown in Figure 10.10.
Figure 10.9. The MyScreenSaver MyScreenSaver.nib file.
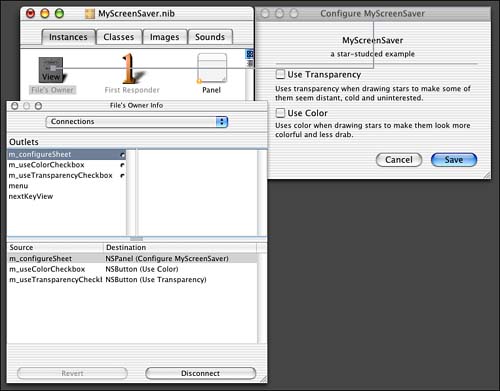
Figure 10.10. The MyScreenSaver MyScreenSaver.nib file Classes tab.
Let's look at how the code works to bring this all together.
The Source Code
The MyScreenSaverView.m and MyScreenSaverView.h files contain all the source code for our screen effect. MyScreenSaverView is a subclass of ScreenSaverView, which is a subclass of NSView. ScreenSaverView is defined in ScreenSaver.h. MyScreenSaverView is shown in Listing 10.1.
Listing 10.1. MyScreenSaverView Interface in MyScreenSaverView.h
#import <ScreenSaver/ScreenSaver.h>
@interface MyScreenSaverView : ScreenSaverView
{
int m_version; // Used to tell the version of our preferences
// (and if they loaded)
int m_useTransparency;// Use transparency when drawing the stars
int m_useColor; // Use color when drawing the stars
IBOutlet id m_configureSheet;
IBOutlet NSButton *m_useTransparencyCheckbox;
IBOutlet NSButton *m_useColorCheckbox;
}
- (IBAction) closeSheet_save:(id) sender;
- (IBAction) closeSheet_cancel:(id) sender;
@end
Our subclass keeps track of a few instance variables that are managed during runtime to specify drawing options, as well as the IBOutlets for our configuration sheet and the two check boxes on it. We also have two IBActions—one for the Save button and one for the Cancel button.
Listing 10.2 contains the -initWithFrame:isPreview: method of our MyScreenSaverView class. This method is called to initialize the screen effect. After calling through to the super class, we load the default configuration settings for our bundle (com.triplesoft.myscreensaver) by calling the ScreenSaverDefaults class method +defaultsForModuleWithName:. ScreenSaverDefaults is a subclass of NSUserDefaults.
Listing 10.2. MyScreenSaverView –initWithFrame:isPreview: Method in MyScreenSaverView.m
- (id)initWithFrame:(NSRect)frame isPreview:(BOOL)isPreview
{
// Initialize our super - the ScreenSaverView
self = [super initWithFrame:frame isPreview:isPreview];
if (self) { // If all went well...
// Load the defaults for this screensaver
ScreenSaverDefaults *defaults =
[ScreenSaverDefaults defaultsForModuleWithName:kBundleID];
// Try to load the version information to see if we have any
// saved settings
m_version = [defaults floatForKey:@"version"];
if (!m_version) {
// No saved setting, define our defaults
m_version = 1;
m_useTransparency = YES;
m_useColor = YES;
// Now write out the defaults to the defaults database
[defaults setInteger:m_version forKey:@"version"];
[defaults setInteger:m_useTransparency forKey:@"useTransparency"];
[defaults setInteger:m_useColor forKey:@"useColor"];
// And synchronize
[defaults synchronize];
}
// Now, although this is overkill if version == 0, we load the
// defaults from the defaults database into our member variables
m_useTransparency = [defaults integerForKey:@"useTransparency"];
m_useColor = [defaults integerForKey:@"useColor"];
// And set the animation time interval (how often animateOneFrame is
// called)
[self setAnimationTimeInterval:1/30.0];
}
return self;
}
Note
Many professional screen effect module writers tend to get sick of defining something like kBundleID as used in Listing 10.2. Instead, they use a dynamic method to find the bundle identifier as follows:
[[NSBundle bundleForClass:[self class]] bundleIdentifier]
This mechanism will always return the proper bundle identifier and allow you to more easily copy and paste your code from project to project.
Note
Why use ScreenSaverDefaults instead of NSUserDefaults or CFPreferences?
NSUserDefaults is great for getting and setting preferences for a specific application, such as RadarWatcherX. NSUserDefaults isn't as good for reading arbitrary default domains, nor is it good for per-user, per-machine settings such as screen effect settings. Because screen effects can be loaded into a variety of applications (system preferences, third-party programs, and so on), using an application-specific settings mechanism such as NSUserDefaults won't get you very far.
The CFPreferences API is powerful, but a little cumbersome for people who would rather do things in Objective C. Also, screen effects authors who use CFPreferences need to know specifically how their defaults should be stored. I thought that screen effects were supposed to be fun!
The ScreenSaverDefaults API gives screen effects authors a way to store per-user, per-machine settings without having to fiddle about with CFPreferences. It can be used to safely retrieve module settings no matter which application loaded the module. It also encourages people to store defaults consistently (that is, per user, per machine).
We then attempt to load the m_version instance variable using the ScreenSaverDefaults method -floatForKey:. If the value exists for this key, we know that we have saved settings. If the value does not exist, this is the first time the screen effect has been run. In that case, we initialize our values using the -setInteger:forKey: method of ScreenSaveDefaults and -synchronize them as well.
Note
At this point, you might consider using NSUserDefaults's registerDefaults: method. The registerDefaults: mechanism allows you to say “If the user hasn't got a setting for XYZ, use this setting by default.” This can do away with the need to commit the preference file in the way we are doing it here. This saves the creation of a preference file in the case in which a user simply looks at the screen effect, doesn't make any changes, and then throws it in the trash.
Now that we have the defaults either loaded or initialized, we can use the -integerForKey: method to get their values. In theory, we only have to do this if we loaded them; but to test the save and load of the defaults, we chose to do it this way during development. We could have easily added an else statement above these two lines of code.
Last, we set the animation interval timer by calling the -setAnimationTimeInterval: method of MyScreenSaverView. This determines how often the MyScreenSaverViews's -animateOneFrame method will be called while the screen effect is running. The default rate is 1/30th of a second, but you can change it to whatever you like.
Note
Did you know that you could change the frame rate of a screen effect while it's running?
Say, for example, that you have a slide show screen effect. Your user forgot to install pictures in your Pictures directory. Instead of blinking “You forgot to install your picture files!” 30 times a second, you can display it once and turn off the animation timer by using the undocumented trick of setting the animation rate to a value of less than 0.
Or, say that you've written some kind of basic computer-name display screen effect. Rather than displaying the name 30 times per second, you might want to display it once every 2 minutes.
Last, if you are an OpenGL speed freak, you might consider running the screen effect as fast as it will possibly go. Simply set the animate rate to 0 and order another battery for your laptop.
Listing 10.3 shows the -animateOneFrame method. This method is called periodically based on the value passed to the -setAnimationTimeInterval: method. The first thing we do in this method is calculate the size of the star we will be drawing between 1 and 3 pixels in diameter by calling the SSRandomIntBetween function.
Listing 10.3. MyScreenSaverView -animateOneFrame Method in MyScreenSaverView.m
- (void)animateOneFrame
{
NSRect rect;
NSColor *color;
int x;
float r;
// Calculate the star size
x = SSRandomIntBetween(1, 3);
// Make a rectangle at a random location the size of the star
rect.origin = SSRandomPointForSizeWithinRect(NSMakeSize(x, x), [self bounds]);
rect.size = NSMakeSize(x, x);
// Calculate a random color (or gray), with or without transparency,
// depending on the user preference
r = SSRandomFloatBetween(0.0, 1.0);
// use red
color = [NSColor colorWithCalibratedRed:r
// use new color or same as red if not using color
green:m_useColor ? SSRandomFloatBetween(0.0, 1.0) : r
// use new color or same as red if not using color
blue:m_useColor ? SSRandomFloatBetween(0.0, 1.0) : r
// use transparency if the user says so
alpha:m_useTransparency ? SSRandomFloatBetween(0.0, 1.0) : 1.0];
[color set];
// Draw the star
[[NSBezierPath bezierPathWithOvalInRect:rect] fill];
return;
}
Next, we call SSRandomPointForSizeWithinRect to create a rectangle of the determined size at a random location within the bounds of the rectangle that the screen effect will be drawn in. This will either be the same rectangle as the entire screen or that of the preview pane as shown in Figure 10.1.
Note
What's with these random number functions?
Unlike most other system-level software, screen effects tend to compute many random numbers. Rather than making users remember the right way to compute a random number using the UNIX random() or POSIX rand() API, Apple created a few inline functions for doing exactly this.
“But what about the random seed,” you ask? The screen effect engine initializes the random seed once before loading screen effects, so your module doesn't need to worry about that itself. In fact, modules that initialize the random seed in their init() routines aren't very interesting on multi-monitor machines—because each monitor might start with the same image!
We then calculate our random NSColor, taking into account the transparency and the color options. The -colorWithCalibratedRed:green:blue:alpha: method is one you will find yourself using over and over again when doing simple drawing. Note that all the values are floats between 0.0 and 1.0. All values of 0.0 would create a completely clear color, just like +[NSColor clearColor]—remember the alpha channel. All values of 1.0 would create white. We then -set the NSColor and draw our NSBezierPath by calling the -bezierPathWithOvalInRect: and -fill methods. Note that the -bezierPathWithOvalInRect: method takes into account anti-aliasing and draws a very nice, smooth oval.
Note
When you look at the source code of this project, you will see that you can use a -drawRect: method to draw your screen effect. Depending on your needs, this might or might not be a better approach. See the “Try This” section at the end of this chapter for a pointer on using –drawRect:.
Listing 10.4 is a simple one. The -hasConfigureSheet method simply returns YES or NO depending on whether our screen effect has a configure sheet. Because we do, we must override this method and return YES.
Listing 10.4. MyScreenSaverView -hasConfigureSheet Method in MyScreenSaverView.m
- (BOOL)hasConfigureSheet
{
return YES;
}
Listing 10.5 contains the -configureSheet method that is responsible for returning the NSWindow that is our configure sheet. You might recall that our configure sheet is stored in the MyScreenSaver.nib file from Figure 10.9. Because we store the configure sheet as an instance variable, we only need to load it once. Therefore, if it is NULL, we call the NSBundle class method +loadNibNamed:owner: method to load the MyScreenSaver.nib file. This automatically loads the configure sheet and sets the m_configureSheet instance variable (IBOutlet) to point to the sheet itself. The check box instance variables are also set to point to their user interface equivalents during the load. This makes it simple to set the state of the check boxes to the current values of the screen effect settings and return the sheet. Note also that the Save and Cancel buttons are linked to their actions during this load as well. The sheet is then displayed to the user as shown in Figure 10.4.
Listing 10.5. MyScreenSaverView -configureSheet Method in MyScreenSaverView.m
// Display the configuration sheet for the user to choose their settings
- (NSWindow*)configureSheet
{
// If we have yet to load our configure sheet,
// load the nib named MyScreenSaver.nib
if (!m_configureSheet)
[NSBundle loadNibNamed:@"MyScreenSaver" owner:self];
// Set the state of our UI components
[m_useTransparencyCheckbox setState:m_useTransparency];
[m_useColorCheckbox setState:m_useColor];
return m_configureSheet;
}
After the user alters the settings in the sheet and he clicks the Save button, the IBAction method in Listing 10.6 is called. This method loads the current default values for the screen effect, saves the current state of the check boxes to our instance variables, writes the new values to the defaults, synchronizes them, and calls NSApp's +endSheet: class method to close the sheet.
Listing 10.6. MyScreenSaverView -closeSheet_save: Method in MyScreenSaverView.m
// The user clicked the SAVE button in the configuration sheet
- (IBAction) closeSheet_save:(id) sender
{
// Get our defaults
ScreenSaverDefaults *defaults = [ScreenSaverDefaults
defaultsForModuleWithName:kBundleID];
// Save the state of our UI components
m_useTransparency = [m_useTransparencyCheckbox state];
m_useColor = [m_useColorCheckbox state];
// Write them to the defaults database
[defaults setInteger:m_useTransparency forKey:@"useTransparency"];
[defaults setInteger:m_useColor forKey:@"useColor"];
// Synchronize
[defaults synchronize];
// The sheet has ended, go in peace
[NSApp endSheet:m_configureSheet];
}
If the user had pressed the Cancel button instead of Save, there would've been nothing to do. The code in Listing 10.7 is executed in this case and merely closes the sheet by calling NSApp's +endSheet: class method.
Listing 10.7. MyScreenSaverView -closeSheet_cancel: Method in MyScreenSaverView.m
// The user clicked the CANCEL button in the configuration sheet
- (IBAction) closeSheet_cancel:(id) sender
{
// Nothing to do! The sheet has ended, go in peace
[NSApp endSheet:m_configureSheet];
}
Note
If you poke around the various Screen Saver folders, you will see some screen effects that end in .slideSaver in OS X 10.1 or later. These screen effects have no associated source code and are nothing more than a bundle filled with .jpg files in their Resources folder. Find one on your drive and take it apart, and then consider creating your own with pictures of your pet, kids, or yourself.
It wasn't that bad, huh? Ready to try some modifications on your own?
Try This
You can do so many cool things in a screen effect. Here are some to try using this project as a starting point.
Add a control to set a maximum number of stars. When this maximum number is reached, don't create any more than that number. You can choose to clear the screen and start over when you reach the maximum or keep track of the stars as you create them and redraw the same ones in a different color after the limit is reached.
Search out an image of the moon and draw it in a random location before you begin to draw the stars. You can look back at previous chapters to see how to load an image either from a resource or via the Internet and then draw it into a view. Notice how the transparency setting allows some of the stars to be seen through. Make the stars that appear over the moon image draw without transparency even if the option is set.
Try doing all of your drawing in –drawRect: and invalidate the ScreenSaverView in -animateOneFrame using [self setNeedsDisplay:YES];.
Try using a separate NSWindowController object to manage the configure sheet. Use a delegate message or notification to communicate to the screen effect.
Try improving performance by drawing more than one star at a time. Experiment with other drawing methods.
Conclusion
Whether you call them screensavers or screen effects, they are exciting pieces of code to implement. The nice thing about them is that they are self-contained. Once you put together a template project (such as the one outlined here), you can let your imagination run wild and implement any type of crazy animation you desire. There are plenty of great examples of screen effects to use as examples—from awesome lifelike flags waving in the wind to three-dimensional vortexes being twisted and turned. Screen effects are a great place to explore the power of OpenGL, the high-performance 2D/3D graphics environment. For more information on OpenGL, visit http://www.opengl.org/.