
16. Snippets
“Just one line of code; the hard part is figuring out which one.”
—Mike Trent
This chapter is designed to offer a plethora of code snippets and tips in various forms to help you get the most out of your Mac OS X development efforts. You will find various languages represented here. Many of these snippets are demonstrated in the Project Builder project that goes with this chapter. Enjoy!
Calling Carbon from Cocoa
It is very easy to call traditional Carbon functionality from within your Cocoa application. Simply include the framework Carbon.framework in your project, #import <Carbon/Carbon.h> in the source file you will be calling from, and make the call. Cocoa and Carbon live peacefully together with nary a bad thought for one another.
Drawing with QuickDraw in a Cocoa Application
First, use NSQuickDrawView. After the view's focus is locked, you can start calling QuickDraw functions.
Second, you won't get much in the way of clipping for free, as you would when working with Cocoa-native drawing commands, so be sure to perform your own clipping.
Third, when you're finished drawing, you need to flush the window contents out to screen. If you have the qdPort handy, you can simply do this:
QDFlushPortBuffer(qdPort, nil);
Displaying the Username
The NSFullUserName() function returns the full username of the currently logged in user. You can also use the NSUserName() function to get the short version of the name. See NSPathUtilities.h for more useful routines.
Finding a User's Home Directory
The NSHomeDirectory() function returns the home directory of the currently logged in user. You can also find the home directory of any username by using the NSHomeDirectoryForUser(NSString *username) function. See NSPathUtilities.h for more useful routines.
Finding Application Support Directories
In order to find application support directories in the user's Library directory, the /Library directory, and the /Network/Library directory without hard-coding path locations, you should use NSSearchPathForDirectoriesInDomains with the following values. This function returns an NSArray of results.
typedef enum {
// supported applications (Applications)
NSApplicationDirectory = 1,
// unsupported applications, demonstration versions (Demos)
NSDemoApplicationDirectory,
// developer applications (Developer/Applications)
NSDeveloperApplicationDirectory,
// system and network administration applications(Administration)
NSAdminApplicationDirectory,
// various user-visible documentation, support, and
// configuration files, resources (Library)
NSLibraryDirectory,
// developer resources (Developer)
NSDeveloperDirectory,
// user home directories (Users)
NSUserDirectory,
// documentation (Documentation)
NSDocumentationDirectory,
#if MAC_OS_X_VERSION_10_2 <= MAC_OS_X_VERSION_MAX_ALLOWED
// documents (Documents)
NSDocumentDirectory,
#endif
// all directories where applications can occur
NSAllApplicationsDirectory = 100,
// all directories where resources can occur
NSAllLibrariesDirectory = 101
} NSSearchPathDirectory;
typedef enum {
// user's home directory ---
// place to install user's personal items (~)
NSUserDomainMask = 1,
// local to the current machine --- place to install items
// available to everyone on this machine (/Local)
NSLocalDomainMask = 2,
// publically available location in the local area network
// --- place to install items available on the network (/Network)
NSNetworkDomainMask = 4,
// provided by Apple, unmodifiable (/System)
NSSystemDomainMask = 8,
// all domains: all of the above and future items
NSAllDomainsMask = 0x0ffff
} NSSearchPathDomainMask;
FOUNDATION_EXPORT NSArray *NSSearchPathForDirectoriesInDomains(
NSSearchPathDirectory directory,
NSSearchPathDomainMask domainMask,
BOOL expandTilde);
Display Alert Panel and Write to Log
The following code shows how to display an alert panel and write the message "The OK button was pressed." if the user presses the OK button. Because these are recently deprecated, you should only use these during debugging and choose sheets (NSBeginAlertSheet) instead for anything your users might see.
if (NSRunAlertPanel(@"Warning", @"Do you really want to blah?",
@"OK", @"Cancel", NULL) == NSOKButton)
{
NSLog(@"The OK button was pressed.");
}
In fact, this brings up a very good point. In the time it took to write this example and this book being published, the NSRunAlertPanel function became deprecated. Be aware that especially now, while OS X is young and growing, things will change rapidly. You might find an API stripped out from under you. Apple, however, usually gives fair warning, so you have time to find an alternative if one isn't provided for you. Keep this in mind when updating your development environment because you might be in for a surprise now and then as things evolve.
Updating the Application's Dock Image
The following code shows how to update the image that is displayed in the Dock for your application.
// Load the default image here
myImage = [NSImage imageNamed:@"NSApplicationIcon"];
// Edit the image here (add a badge, etc.)
// ...
// Set the edited image in the Dock
[NSApp setApplicationIconImage: myImage];
This can be a useful way to show progress or status of your application. Normally you will not want to alter the image so that it is no longer recognized as your application; instead use this technique sparingly (see Figure 16.1 for an example).
Figure 16.1. An application after changing the dock image programmatically.

See the sample code for this chapter.
Updating the Application's Dock Menu
The following code shows how to update the menu that is displayed in the Dock for your application and respond to the items in it. In your application's delegate, implement the –applicationDockMenu: delegate method to return an NSMenu that contains your custom items. In this implementation, m_menu is an NSMenu* instance variable, and we are adding two items to the menu: Beep Once and Alert Once. Don't forget to release m_menu when the application quits.
- (NSMenu *)applicationDockMenu:(NSApplication *)sender
{
if (m_menu == nil) {
m_menu = [[[NSMenu alloc] init] retain];
[m_menu addItem: [[NSMenuItem alloc] initWithTitle:
NSLocalizedString(@"Beep Once",@"")
action:@selector(beepOnce:) keyEquivalent:@""]];
[m_menu addItem: [[NSMenuItem alloc] initWithTitle:
NSLocalizedString(@"Alert Once",@"")
action:@selector(alertOnce:) keyEquivalent:@""]];
}
return m_menu;
}
You then implement the action methods as appropriate.
- (void)beepOnce:(id)sender
{
NSBeep();
}
- (void)alertOnce:(id)sender
{
NSRunAlertPanel(@"Warning", @"You look like blah!",
@"OK", NULL, NULL);
}
When you control-click (or click and hold) on your application's icon in the Dock, you will see your items appear in the menu. Selecting them calls the appropriate action (see Figure 16.2).
Figure 16.2. A custom Dock menu.
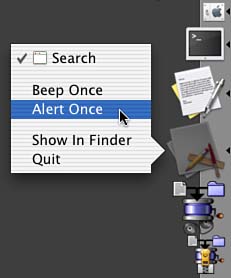
Because –applicationDockMenu: is called each time you control-click on your application's icon in the Dock, you can alter it each time if you like. This makes for a menu that can be dynamically managed depending on the state of your application.
See the sample code for this chapter.
Open a URL
The following code shows how to open a URL from within your application. This can be used if you have a Web page that you would like to open in response to a menu item being selected.
BOOL success = [[NSWorkspace sharedWorkspace]
openURL:@"http://www.triplesoft.com/"];
Get the Icon of a File
The following code will retrieve the 32×32 pixel icon of the specified file:
NSImage* theImage = [[NSWorkspace sharedWorkspace]
iconForFile:@"/path/to/file"];
Scrolling About Box
To make your application's About box contain a scrolling list of credits, simply add an RTF file named Credits.rtf to your project (see Figure 16.3).
Figure 16.3. A scrolling About box.
Checking Network Status
To check the reachability of a host on a network, you can use the SCNetworkCheckReachabilityByName function. Simply replace www.apple.com with whatever host you are interested in. You can also use the SCNetworkCheckReachabilityByAddress function if you only have an IP address. Simply add SystemConfiguration.framework to your project and #import the SystemConfiguration.h header file.
#import <SystemConfiguration/SystemConfiguration.h>
- (BOOL)isNetworkReachable
{
BOOL result;
SCNetworkConnectionFlags flags;
result = SCNetworkCheckReachabilityByName("www.apple.com", &flags);
return (result && (flags & kSCNetworkFlagsReachable));
}
The SCNetworkConnectionFlags allow you to verify a number of settings including the following:
kSCNetworkFlagsTransientConnection—Indicates that the machine in question can be reached via a transient (that is, PPP) connection.
kSCNetworkFlagsReachable—Indicates that the machine in question can be reached using the current network configuration.
kSCNetworkFlagsConnectionRequired—Indicates that the machine in question can be reached using the current network configuration, but a connection must be established first. For example, a dial-up connection that was not currently active might return this flag.
kSCNetworkFlagsConnectionAutomatic—Indicates that the machine in question can be reached using the current network configuration, but a connection must be established first. Any attempt to pass data to the machine in question will initiate the connection.
kSCNetworkFlagsInterventionRequired—Indicates that the machine in question can be reached using the current network configuration, but a connection must be established first. In addition, some form of user intervention will be required such as typing in a password, and so on.
Checking for Modifier Keys
You can use the following category, found posted on the Net with no author specified, to check for modifier keys at any time during your programs execution. This category uses Carbon function calls to check the status of the modifier keys. Simply call +isOptionKeyDown to check the status of the option key. The method will return YES if the key is down and NO otherwise.
@interface NSEvent (ModifierKeys)
+ (BOOL) isControlKeyDown;
+ (BOOL) isOptionKeyDown;
+ (BOOL) isCommandKeyDown;
+ (BOOL) isShiftKeyDown;
@end
@implementation NSEvent (ModifierKeys)
+ (BOOL) isControlKeyDown
{
return (GetCurrentKeyModifiers() & controlKey) != 0;
}
+ (BOOL) isOptionKeyDown
{
return (GetCurrentKeyModifiers() & optionKey) != 0;
}
+ (BOOL) isCommandKeyDown
{
return (GetCurrentKeyModifiers() & cmdKey) != 0;
}
+ (BOOL) isShiftKeyDown
{
return (GetCurrentKeyModifiers() & shiftKey) != 0;
}
@end
Executing AppleScripts via URL
Using NSAppleScript's –initWithContentsOfURL:error: and -executeAndReturnError: methods, you can easily load and execute a text or compiled AppleScript via the Internet from within your application. Think of the possibilities! By storing key portions of the functionality of your application on a Web server, whenever your user executes that functionality, it will be completely up-to-date with any bug fixes you deem necessary. Mind you, accessing code via the Net can become a speed liability, but depending on the need, this could be a very cool application feature!
Defaults
The program named defaults is an excellent command-line utility to manipulate user default settings in any application. The syntax is as follows:
defaults [-currentHost | -host <hostname>] <subcommand>
For example, to change "MyCompanyName" that appears at the top of every source file you create with Project Builder, you can use the following command (all on one line) in the terminal:
defaults write com.apple.projectbuilder
'PBXCustomTemplateMacroDefinitions'
"{ORGANIZATIONNAME = 'Your Company Name Here';}"
This command writes an updated value to the ORGANIZATIONNAME key of the PBXCustomTemplateMacroDefinitions array. Type man defaults in the Terminal for complete information.
Find
The find command is a very powerful command line for those just getting used to typing their commands. find recursively descends the directory tree for each chosen pathname and evaluates an expression for each item in the tree. This means you can quickly and easily search for files that match a certain pattern and perform a task on them. Let's look at some examples:
sudo find / -name ".DS_Store" –delete
This command deletes all Finder .DS_Store files on all disks.
find / -name "*.c" –print
This command prints all filenames that end in ".c".
find . -newerct '1 minute ago' –print
This command prints all filenames that have changed at the last minute.
find /System/Library/Frameworks/Foundation.framework
-type f -name "*.h" -exec
grep NSSearchPathForDirectoriesInDomains '{}' ; -print
This command looks at all the headers in Foundation, prints every occurrence of NSSearchPathForDirectoriesInDomains, and prints the name of the files in which the function name appears—it should all be typed on one line.
Type man find in the Terminal for complete information on this useful tool.
Sample
The sample command-line tool allows you to profile a process for a specified time interval. Using sample, you can gather data about the running behavior of a process. This utility stops the process at user-defined intervals, samples the current function and the stack, and then enables the application to continue. When all is said and done, you can view a report showing what functions were executing during the sampling. This program is very similar to its GUI cousin, Sampler.app.
Type man sample in the Terminal for complete information on this useful debugging tool.
Localizing Your Cocoa Application
Every Cocoa application should be localizable. It's not just a good idea; it's easy!
First, you want to use the NSLocalizedString macro, or one of its related macros, in your application whenever you reference a string. You simply pass your native language into this macro as follows:
NSLocalizedString(@"Cancel", @"Put a comment here.");
Then, you run the genstrings command-line tool to generate the .strings file for localization. The file would contain entries similar to the following:
/* Put a comment here. */
"Cancel" = "Cancel";
Your translator would then make a copy of this file and change the right-hand side of the = sign to be in the translated language. This entry would ultimately look like the following, for Spanish:
/* Put a comment here. */
"Cancel" = "Cancelación";
You then simply place the localized files back in your project as localizable resources. That's it! Now when your application makes the call to NSLocalizedString as previously, the proper text for the current localization will be returned; English, Spanish, French, and so on.
For more detailed information on localizing, you should visit the following URL:
CURLHandle
CURLHandle is a public domain Cocoa class by Dan Wood that subclasses NSURLHandle and wraps the curl command-line application. This allows you to take advantage of the power of curl from within your Cocoa application. Using curl, you can easily access network-based data using a variety of protocols including HTTP, HTTPS, GET, POST, FTP, TELNET, LDAP, and more. To learn more about the power of curl, type man curl in the Terminal application. You can download CURLHandle here: http://curlhandle.sourceforge.net/
Conclusion
I hope you've enjoyed my collection of snippets.