There are two primary reasons to add more data storage space to your MacBook, and both of them are important. One is to back up the data on your MacBook; one of the easiest ways to do this is to use Time Machine, which requires that you use an external hard drive. The other is that over time, you end up with a lot of data, especially if you create iMovie projects or you download movies or other video. Your MacBook's hard drive is only so big; adding more storage space enables you to work with more information. Also, you may want to carry some data with you even when you don't have your MacBook; a flash drive or iPod is a great choice for this purpose.
Using External Hard Drives
Maintaining Hard Drives
Using an iPod as an External Drive
Working with Flash Drives
Adding an external hard drive to your MacBook system is an easy and relatively inexpensive way of making more storage space available; it is also a requirement if you want to use Time Machine for backing up your MacBook. In this section, you learn how to add more space to your MacBook by adding, configuring, and using an external hard drive.
When it comes to choosing a hard drive to add to your MacBook, consider the following factors:
Which interface will you use to connect the drive to your MacBook? External drives use FireWire, FireWire 800, or USB 2 to connect to computers. The good news is that your MacBook supports both USB 2 and FireWire, so you can use a wide variety of external hard drives. From the performance perspective, FireWire is about the same speed as USB 2, and unless you are going to be writing to the external drive constantly while you work on projects, the communication speed is not likely to be an important factor in any case. More important will probably be the number of devices you already use with your MacBook. If you already use two or more USB devices, you might want to consider a FireWire drive because a hard drive is probably the only FireWire device you'll use. Because USB 2 is the more common technology, USB 2 drives tend to be less expensive, all other things being equal. Some external drives use both FireWire and USB 2. These multiple-interface drives are more expensive, but also provide more flexibility.
What size drive do you need? Drives come in various sizes; generally, you should get the largest drive you can afford. Hard drive prices continue to fall, and even large drives with 1TB or more of storage space are fairly inexpensive. Smaller drives, such as 750GB, are even less expensive. For backup purposes, I don't recommend you ever purchase a drive smaller than 750GB, but in all cases, a drive with more capacity is better than one with less storage space.
Does the drive need to meet specific performance requirements? If you intend to use the drive for high data rate work, such as for digital video, you need to get a drive that spins at least 7200 RPM. Some drives spin even faster, which means they can transfer data at a greater rate. However, if you are primarily going to use the external drive for backing up and for less data-intense projects, its speed isn't really important. Because faster drives are more expensive, you can save some money by choosing a relatively slow drive.
What format is the drive? There are a variety of formats available, and all drives come formatted for one system or another. Fortunately, it doesn't really matter which format the drive comes in because you can always reformat it to work with your MacBook using the Disk Utility application, which you learn about later in this section. Drives that are formatted for Windows are generally less expensive than those that have been formatted for Macs. It's usually better to get a less expensive drive formatted for Windows and then use Disk Utility to prepare the drive to work with your MacBook.
How much can you afford to spend? As with all things digital, you get more by spending more (assuming all other things being equal). For most purposes, such as backing up, you should decide how much you can afford to spend and then get the largest drive you can afford for that amount of money. If you're willing to shop around a bit, you'll be amazed how much the cost of external hard drives varies from retailer to retailer, and hard drives are also something that many retailers put on sale frequently.
Installing an external hard drive is about as simple as it gets. Follow these steps:
Connect the power supply to the drive and to an electrical outlet.
Connect the USB 2 or FireWire cable to the drive and to the appropriate port on your MacBook.
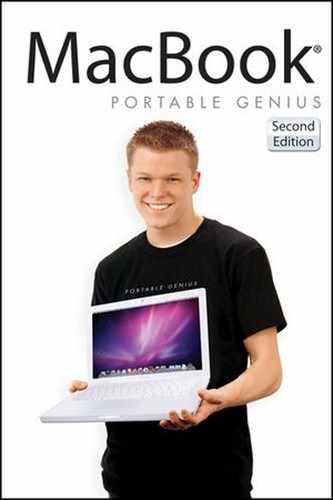
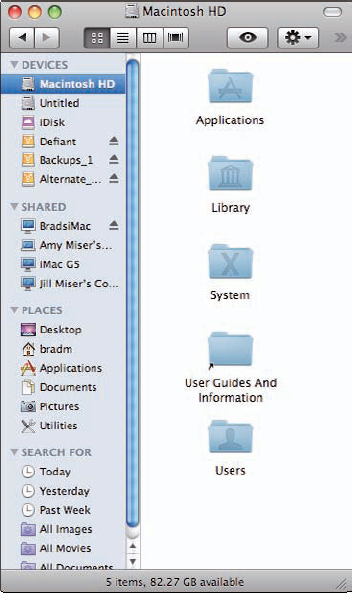
Power up the drive. If the drive is formatted so that it is compatible with your MacBook, it mounts on your desktop and you see it on the sidebar in Finder windows (see figure 13.1). If not, you won't see the device. In either case, you should reformat and initialize the drive before you start using it.
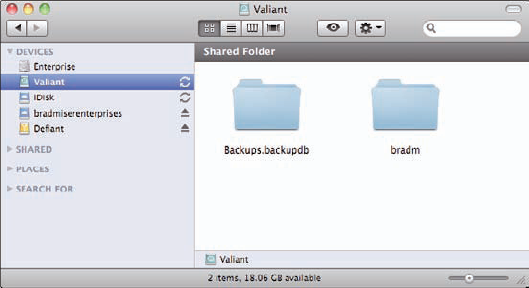
Figure 13.1. A mounted external hard drive appears in the DEVICES section of the sidebar, just like the internal hard drive.
Note
If the drive is formatted so that your MacBook Pro can access it, you might be prompted to configure Time Machine. Just click Cancel and proceed to the next secction. Time Machine is covered in Chapter 14.
Before you use a hard drive, you should initialize and format it. You can also partition a hard drive to create multiple volumes on a single drive so that it behaves as if it is more than one drive.
Note
I recommend that you reformat your external drive to ensure that you have the most storage space available and that the drive is formatted in the best way for your MacBook. Some drives include software, especially if the drive is intended for Windows computers, in which case that software is a waste of space and you should get rid of it.
When you partition a hard drive, logical volumes are created for each partition on the drive. For most practical purposes, a logical volume looks and acts just like a separate hard drive. There can be some small performance advantages to partitioning a drive, or you might choose to partition it to help you keep your data organized. For example, you might want to create one partition on the hard drive for your backups and another to install Mac OS X as an alternate startup drive.
One of the results of partitioning a drive is that all the volumes outside of the startup volume are outside of the default Mac OS X organization scheme. This can be a benefit or a problem depending on what you are doing. For example, documents you store on a separate volume aren't secured using the Mac OS X default permissions, like documents you store within your Home folder are. If you want to provide broader access to files, this is a good thing. If you don't want people to be able to access these documents outside the control of the Mac OS X security, it isn't.
Generally, you should keep your partitions pretty large unless you create one for a very specific purpose, such as to install Mac OS X for an alternate startup drive. If you run out of space on a partition, you have to delete files from it or repartition the drive, which means that you must start over and reformat the disk (resulting in all files being erased). Unless you have a very specific reason to do so, you typically shouldn't partition a drive into more than two volumes. In many cases, especially if you are only using the drive for backups, one partition is the best option.
Warning
When you follow these steps, all the information currently on the drive is erased. If the hard drive came with software installed on it, check out the software to make sure you don't have any use for it (you probably won't). If you do find some that you want to keep, copy it from the external drive onto a DVD, CD, or your MacBook's internal drive before formatting the drive.
To initialize, format, and partition a drive, perform the following steps:
Launch the Disk Utility application, which is located in the Utilities folder within the Applications folder. In the Disk Utility window, you see two panes. In the upper part of the left pane, you see the drives with which your MacBook can communicate, along with the MacBook's internal hard and optical drives. Under each disk, you see the volumes with which that disk has been partitioned. Below the drives, you see any disk images that are currently mounted on your MacBook. In the right pane, you see information and tools for the drive or volume that is selected in the left pane.
Select the drive you want to format. At the top of the right pane are five tabs; each tab enables you to view data about a drive or to perform a specific action. At the bottom of the window, you see detailed information about the drive with which you are working, such as its connection bus, type, capacity, and so on.
Click the Partition tab (see figure 13.2). In the left part of this tab, you see a graphical representation of the partitions on the disk. If the drive is currently partitioned, you see its current partitions. If you are working with a new drive or one with a single partition, you see one partition called "Untitled" (if you've not named it before). In the right part of the pane, you see information about the selected volume, such as its name, current format, and size.
Select the number of partitions you want to have on the drive using the Volume Scheme pop-up menu. You can choose Current, which leaves the partitions as they are, or the number of partitions you want from 1 to 16. After you choose the number of partitions, each partition is represented by a box in the disk graphic shown under the Volume Scheme pop-up menu. The partitions are called Untitled 1, Untitled 2, and so on.
Select a partition by clicking its box in the graphical representation of the drive. The volume's partition is highlighted and information for that volume is shown in the Volume Information area.
Figure 13.2. This drive will have two partitions: one called "Backups_1" with 200GB, and one called "Alternate_Startup" with 32.89GB.
Note
Instead of a space in a partition name, use an underscore or just run the words together so the space isn't replaced by 20% in a path name.
Name the selected volume by typing a name in the Name box. As you type the name, it is shown in the partition's box. You can name the partition just about anything you want. This name is how you identify the partition's volume in the sidebar and other locations, so use a meaningful name. In most cases, you want to use a name that indicates the purpose of the partition.
Select the format for the partition on the Format pop-up menu. In most cases, you should choose Mac OS Extended (Case-sensitive, Journaled) to take advantage of the most sophisticated format option.
Type the size of the partition in the Size box. You can enter a size up to the maximum capacity of the drive, but it also depends on the number of other partitions on the drive and how much space is allocated to each.
Note
You can also set the size of a partition by dragging its Resize handle in the Volumes pane.
Select, name, and set a size for each partition on the drive; once you've configured all the partitions on the disk, click Options. The Options sheet appears.
If it isn't selected already, click the GUID Partition Table radio button. The other options don't apply when you are using the disk with a MacBook.
Warning
If you purchase a drive that's been formatted for Windows computers using the Master Boot Record format option, it won't mount on your MacBook and will be unusable. You must format the disk with the GUID Partition Table format before you can use it.
Click OK. The format option is set and the sheet closes.
Warning
Before proceeding, make sure that the drive doesn't contain any data you need. Performing the next steps erases all the data from the drive.
Click Apply.
If you are sure that you want to initialize and partition the drive, click Partition in the Warning sheet. In this sheet, you see a summary of what will be done to the drive. After you click Partition, you return to the Disk Utility window and a progress bar appears in the lower-right corner of the window. You can use this to monitor the process. Once this process is completed, you should see the partitions you created under the drive's icon, and the drive and its partitions are ready to use.
After you configure an external hard drive, you can use it in the following ways:
Store files. You can use the drive just like the internal hard drive.
Backing up to the drive with Time Machine. I discuss Time Machine in Chapter 14.
Stop using the drive. Before you stop using a hard drive and any of its partitions, you need to eject the drive. This makes sure that all data has been written to the drive and all processes impacting it are stopped so that when you disconnect the drive, the data isn't damaged. To eject a drive, select one of its partitions and click the Eject button. If the drive has only one partition, it is unmounted and disappears from the Finder window. If the drive has more than one partition, you are prompted to eject only the selected partition by clicking the Eject button or eject the entire disk by clicking the Eject All button. You should always click the Eject All button at which point all the drive's partitions are unmounted and disappear from the Finder window. You can then disconnect the drive from the MacBook.
Start using the drive again. To start using the drive again, simply reconnect the drive to your MacBook. After a few moments, the drive is mounted, you see all of its partitions in the sidebar, and it is ready to use.
Keeping your hard drives, whether internal or external, in good working condition goes a long way to making your MacBook reliable. In this section, you learn about some of the more important disk maintenance habits you should practice to keep your drives in top form.
Warning
You should regularly maintain your hard drives to keep them operating as long as possible. If you hear a drive making an odd noise, such as becoming louder, you should expect the drive to fail soon if not immediately. Unusual sounds typically precede a hard drive's failure (but not always). Make sure you get any data you need off the drive right away, or it will be very expensive and a hassle to recover it. Never store important data in only one location.
You can do a lot for the performance of your drives by simply keeping them cleaned up. The more data on your drive, the less room you have to store new files. If your drives get too full, their performance slows down significantly. You can also run into all kinds of problems if you try to save files to drives that are full to the brim; how full this is depends on the size of the files with which you are working.
As you use a hard drive, keep an eye on its available space by selecting the drive in the sidebar and looking at the space available shown at the bottom of the Finder window (see figure 13.3). If the space available falls below 10GB, you can start running into problems when you try to save files or perform other tasks. If the space available drops below 1GB, you can count on having problems.
Note
Application installers waste a lot of disk space. If you're sure that the application version you want will continue to be available on the Web, you can delete its installation files. If you have to pay for an application, it's better to archive its files on CD or DVD in case you need to reinstall it again. Some companies remove older versions as newer versions are released, in which case you might have to pay an upgrade fee to download the application again. With a version safely archived, you can always get back to the version you purchased.
Learn and practice good work habits such as deleting files you don't need, uninstalling software you don't use, keeping your files organized (no duplicates), and archiving files you are done with (such as on a DVD). Regularly removing files that you no longer need from your hard drives will go a long way toward keeping them performing well for you, not to mention maximizing the room you have to store files you do need.
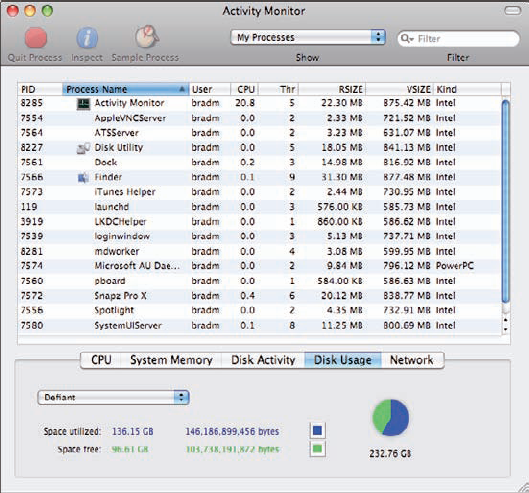
You can use Activity Monitor to get more information about how you are using a specific drive. Follow these steps:
Launch the Activity Monitor application located in the Utilities folder within the Applications folder.
Click the Disk Usage tab located at the bottom of the window.
On the pop-up menu, choose the disk or partition whose information you want to view. You see a pie chart showing the amount of free space (in green) versus the amount of space used (in blue), along with the specific values within each category (see figure 13.4).
Note
Each partition and drive has its own Trash. If you empty the Trash while an external drive that has files in its Trash is disconnected, the Trash icon becomes full again when you reconnect the drive because the Trash associated with that drive still has files in it. Just empty the Trash again once you've reconnected the drive to get rid of the trashed files.
Two of the tasks for which you can use Disk Utility are to check or repair an external hard drive. If you start having problems with a disk, first make sure that it has plenty of available space. If it doesn't, get rid of files until it does. If it does have plenty of free space, use Disk Utility to check or repair it, as in the following steps:
Launch Disk Utility.
Select a drive or partition you want to check or repair. In most cases, you should select a drive so that the entire drive is checked or repaired, rather than just one of its partitions.
Check the bottom of the Disk Utility window for information about the drive, volume, disc, or image you selected. If you select a hard drive, you see the disk type, connection bus (such as ATA for internal drives or FireWire for an external drive), connection type (internal or external), capacity, write status, S.M.A.R.T. status, and partition map scheme. If you select a partition on a drive, you see various data about the volume, such as its mount point (the path to it), format, whether owners are enabled, the number of folders it contains, its capacity, the amount of space available, the amount of space used, and the number of files it contains.
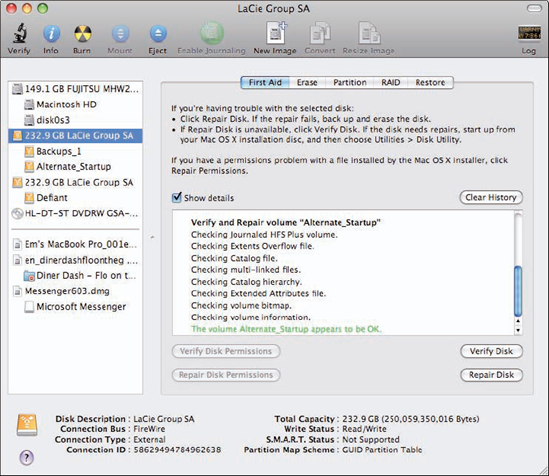
Click the First Aid tab to see some information explaining how Disk Utility works.
Click Repair Disk. The application checks the selected disk for problems and repairs any it finds. When the process is complete, a report of the results appears (see figure 13.5).
You can choose to verify a drive by clicking Verify Disk, rather than to repair it by clicking Repair Disk. When you do so, the application finds problems with the drive and reports back to you. You then have to tell the application to repair those problems.
Note
For most drives, the S.M.A.R.T. (Self-Monitoring, Analysis, and Reporting Technology) status provides an indication of the drive's health. This is Verified if the drive is in good working condition, or About to Fail if the drive has problems. If you see About to Fail, immediately copy important data onto another drive or CD/DVD. If a drive doesn't support S.M.A.R.T., the status will be Not Supported. Your MacBook internal drive supports S.M.A.R.T., but many external drives do not.
You can use Disk Utility to quickly erase and reformat an external hard drive by performing the following steps:
Launch Disk Utility.
Select a partition you want to erase.
Click the Erase tab.
Choose the format you want to use for the volume on the Volume Format pop-up menu. The format options are Mac OS Extended (Journaled), Mac OS Extended, Mac OS Extended (Case-sensitive, Journaled), Mac OS Extended (Case-sensitive), or MS-DOS (FAT).
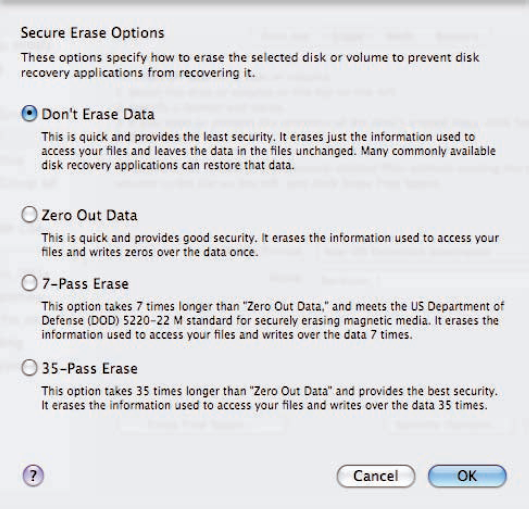
Click the Security Options button. The Secure Erase Options sheet appears (see figure 13.6).
Select one of the following options:
Don't Erase Data. This makes the data unviewable from the Finder but leaves the data physically on the drive. As your MacBook needs to write more files to the drive, it overwrites the erased space. Until the data is overwritten, it can be recovered (unerased) using an application designed to recover data. This is the fastest, but least secure option.
Zero Out Data. This option writes zeros in all sectors on the drive. This is secure because it overwrites the entire drive, which makes the data harder to recover, but is slower than the first option.
7-Pass Erase. This option writes data over the entire drive seven times. This takes a long time, and makes the data virtually impossible to recover (hey, if it's good enough for the U.S. Department of Defense, it should be good enough for you).
35-Pass Erase. This option overwrites the drive 35 times, taking even longer and making the data more than virtually impossible to recover.
Click OK. The option you selected is set and the sheet closes.
Click Erase. The confirmation sheet appears.
If you are sure you want to erase the drive, click Erase in the sheet. The drive's or partition's data is erased and is formatted with the options you selected.
Note
The purpose of the three overwrite options is to prevent data on the drive from being restored after you erase it. For example, if you were transferring a drive to someone else, you want to select one of these options so that the data you had on the drive cannot be recovered. If you are maintaining control of the drive, you probably don't need to choose one of the secure erase options, but using the Zero Out Data option doesn't add a lot of time to the process, so it isn't a bad choice.
Because you can't use Disk Utility to repair a drive with open files and your startup disk always has open files, you can't use Disk Utility to repair the internal hard drive while you are started up from it.
Note
While you can't repair the current startup disk, you can verify it. Although this won't fix any problems, it does identify that there is a problem.
If it appears that your internal hard drive has problems, you need to start up from a different disk to repair them. You can use one of the following options to accomplish this:
Start up from an alternate drive and run Disk Utility from there. If you have installed Mac OS X on an external drive, you can start up from that drive and run Disk Utility to repair the internal drive. (See Chapter 16 to learn how to start up from an alternate startup disk.) Once you're booted up, use the steps in the section about checking or repairing an external drive to select and repair the internal hard drive.
Start up from the system software disc. Insert the system software disc that came with your MacBook. Restart the computer and hold the C key down while it restarts. When it does, the Mac OS X Installation application launches. On the Utilities menu, choose Disk Utility. The Disk Utility application launches; use the steps in the section about checking or repairing an external drive to select and repair the internal hard drive.
The alternate drive option is better because you use the current version of Mac OS X and its applications (including Disk Utility) instead of the versions included on the system software disc. But in some cases, the system software option can work if you don't have an alternate external drive configured.
In addition to being a fantastic digital media device, your iPod can also be used as a portable external drive on which you can store files, just like a hard drive connected to your MacBook.
An iPod Classic packs a lot of data storage in a small package. To configure an iPod Classic to be used as an external hard drive, perform the following steps:
Connect the iPod to the MacBook. If it isn't open already, iTunes launches and connects to the iPod.
Select the iPod on the Source list.
Click the Summary tab if it isn't selected already.
Select the Enable disk use check box. You see a warning prompt that explains that because the iPod will be acting as a hard drive, you must manually eject it before disconnecting it from the computer.
Click OK at the prompt.
Click Apply. The iPod is ready to be used as a drive.
iPod shuffles don't actually have hard drives; their memory is flash memory, which means that it doesn't require any moving parts. This is why iPod shuffles can be so small and also why they have limited memory. Still, the up to 4GB they offer provides space for documents and other small files. To set up an iPod shuffle for drive use, do the following:
Connect the iPod shuffle to your MacBook. If it isn't open already, iTunes launches and connects to the iPod shuffle.
Select the iPod shuffle on the Source list.
Click the Settings tab if it isn't selected already.
Select the Enable disk use check box. You see a warning prompt that explains that because the iPod shuffle will be acting as a hard drive, you must manually eject it before disconnecting it from the computer.
Click OK at the prompt.
Drag the slider to the right to allocate more space for data or to the left to allocate less space for data (see figure 13.7). Because you are limited to the total memory in the iPod shuffle, you have to trade off memory for music versus that for data. The number of songs you set on the slider determines the number that iTunes places on the iPod shuffle when you use the AutoFill tool.
Click Apply. The iPod shuffle is ready to be used as a drive.

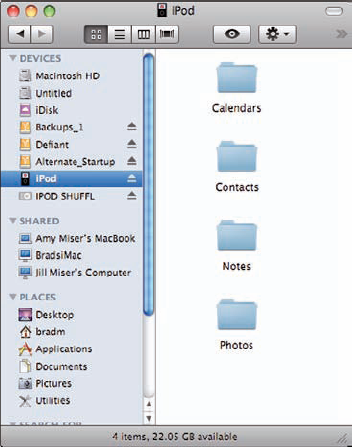
Once configured, using an iPod as a drive is like using other kinds of drives. When you select an iPod on the DEVICES list, you see the folders and files it contains (see figure 13.8).
When you select an iPod Classic, you see four folders that are used for content that is synced: Calendars, Contacts, Notes, and Photos. You should leave these folders as they are, but you can create new folders and store files within them on the iPod, just as you can other kinds of hard drives. Of course, any storage space you use for data won't be available for content in your iTunes library.
Note
An iPod makes a great portable backup drive when you travel with your MacBook. Just move files that you want to back up from the MacBook onto the iPod.
Warning
Make sure you eject iPods before disconnecting them or you risk damaging their data. You can eject iPods from the desktop or within iTunes.
Because there is no data synced for iPod shuffles, they don't have default folders. You can store as much data on the iPod shuffle as you've allocated. However, this setting only impacts the amount of music that is moved onto the iPod shuffle using the AutoFill tool. If you move more data onto the iPod shuffle than the slider setting implies, but you have moved less music onto it, you can store more data than the slider shows. If you manually manage music on the iPod shuffle, the slider setting has no effect. It only limits you when you use the AutoFill tool.
USB flash drives are a popular way to move files around. Because they have flash memory, they are very small and easy to carry. The capacity of these drives continues to increase rapidly; at press time, you can get them in up to 16GB. A flash drive can be a good way to transfer files between computers or to back up data when you are on the move.
To use a flash drive on your MacBook, simply plug it into one of the USB ports. The drive is mounted on your MacBook and you can work with it. (However, for best results, you should prepare the drive for use by reformatting it with Disk Utility using the same process as with a hard drive.)
Note
If you also want to use the drive on Windows computers, select the MS-DOS (FAT) format. This makes it easy to move files between Macs and Windows PCs.