
Sound is an important part of the MacBook experience. If you use iTunes, iDVD, Front Row, GarageBand, or any other Mac digital media application, audio is a major part of the experience. And so understanding how to get the most from your MacBook audio capabilities is fundamental to enjoying your MacBook to the fullest. On its own, a MacBook has reasonable audio capabilities. If you want to invest in a bit of hardware and some additional software, you can transform your MacBook into an audio powerhouse.
Getting Sound Out of a MacBook
Working with Sound Effects
Getting Sound into a MacBook
Many applications that you use, including iTunes, iDVD, iPhoto, DVD Player, QuickTime, and iChat, involve the use of sound. In this section, you can learn about sound output options that are available to you, and how to choose and use those options to ensure that you have a great audio experience as you work with your MacBook.
When it comes to audio, there are two fundamental options: analog or digital. Like seemingly everything else, digital is better than analog from the quality perspective, but taking advantage of digital sound is more expensive and requires a bit more work than does analog sound. With your MacBook, you can use both options in different situations.
On the analog side, you have the following methods for getting sound out of your MacBook:
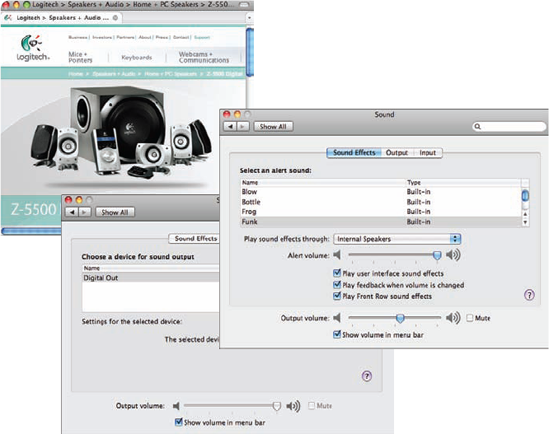
Built-in speakers. MacBooks include built-in stereo speakers that actually do a decent job considering their small size and basic capabilities. However, if the quality of sound is important to you when you listen to music or watch movies or television shows, it's unlikely that the internal speakers will satisfy you. They are a bit on the tinny side and their bass certainly isn't impressive compared to a home theater or car audio system.
Headphones. You can connect any analog headphones to the MacBook headphones/digital minijack located on the left side of the computer (it's marked with the headphones icon).
External speakers. You can connect any set of powered (also called computer) speakers to your MacBook's optical digital input/analog line out minijack.
When it comes to digital music, you need to add an external speaker system, such as a 5.1 surround sound speaker system, to be able to experience the best in sound quality for movies, television shows, and music. Fortunately, your MacBook has the internal hardware required to support digital speaker systems so that all you need to add is the system itself.
To be compatible with your MacBook, you must use a powered speaker system because the optical digital input/analog line out minijack on the MacBook doesn't provide enough power to drive a speaker, so you can't just use standard audio speakers. The good news is that there are many kinds of powered speaker sets available.
Note
Many speaker systems that are designed for iPods work great with a MacBook. As long as a speaker system has a jack for external input, you can connect that system to your MacBook.
Analog speakers are the simplest to install. If you have a two-speaker set, place one speaker on your right and one on your left. If you have a three-speaker system, place the bass unit on the ground or on your desktop. Connect the input line for the speaker set (which is usually connected to one of the satellite speakers or to the bass unit) to the optical digital input/analog line out minijack on the MacBook. Connect the speakers to the bass unit and power the system. That's all there is to it, and you're ready to control the sound (more on this later in this section).
Your MacBook has only one sound out port, which is the headphones/digital audio out port. While this looks like a typical stereo minijack port, its appearance is deceiving. When you connect a typical stereo minijack plug, it behaves like a regular stereo minijack, just like the headphones port on an iPod, and you get stereo sound output. To access the digital output from the port, you need a special adapter that connects to a digital audio cable and fits into the port in order to make the correct connections for digital audio. This is called a Mini Toslink adapter; when you buy a digital audio cable, look for one that includes this adapter (see figure 12.1). You can also purchase the cable and adapter separately.
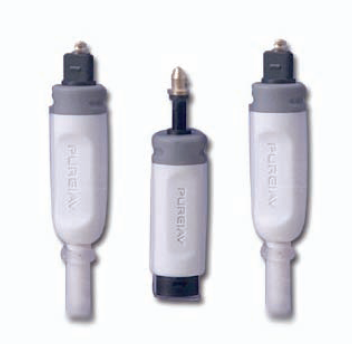
Figure 12.1. To connect to a digital sound system, you use a digital cable with a Mini Toslink adapter, such as this example from Belkin.
The input connectors on your speaker system determine the specific type of audio cable you need. There are two basic options: digital coax or Toslink (which is more commonly called optical digital). If you use a 5.1 system, it probably includes a central control unit with the input jacks; the jacks available on this control unit determine the cable you need. It probably has more than one input, including a digital optical input, digital coax input, and analog stereo input.
After you place the speakers, you need to connect their wires together at a central point; typically, you connect them to the bass speaker along with power. Then you connect the bass input wire to the control unit and use the cable you purchased to connect the control unit's input jack to your MacBook headphones/digital audio out minijack.
Note
Some speaker systems connect via one of your MacBook's USB ports. These speakers work like other external systems, with a exception that they don't disable the MacBook's internal speakers like any system connected to the optical digital input/analog line out minijack does.
When it comes to sound output, be aware that there are up to three types of volume levels:
System volume level. Sets the base level of volume output for the MacBook.
Relative volume of applications. When you adjust volume levels within applications, such as iTunes or a DVD player, you change their volume relative to the system volume level.
Physical volume level of an external speaker system. You control this with the system's volume controls. Like the system volume level, changes you make impact all of the audio coming from your MacBook.
To configure your MacBook output sound, follow these steps:
If you are using headphones or an external speaker system, connect them to the MacBook headphones/digital audio out minijack.
Open the Sound pane of the System Preferences application.
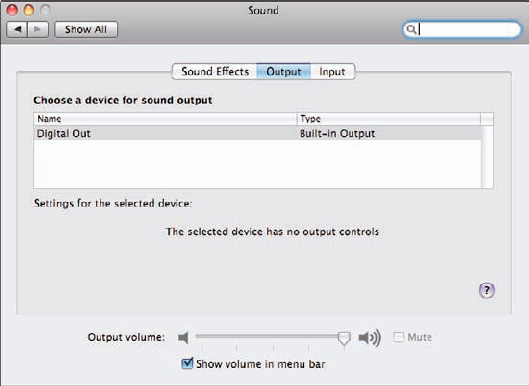
Click the Output tab (see figure 12.2). On this tab, you see the available output devices on the list at the top of the pane. When you select an output device, you see controls for the selected device below the list.
Select the output device over which you want your MacBook to play sound. The most common options are:
Internal Speakers
Headphones, which is used for headphones or for external, analog speaker systems
Digital Out, which is used for an external, digital speaker system
Use the controls that appear for the selected device to adjust its sound.
If enabled, drag the Output volume slider to near its center point. This sets the system volume level at midlevel.
Select the Show volume in menu bar check box.
Note
When you use the slider on the Volume menu (its icon is the speaker with waves emanating from it) or the volume function keys to adjust volume, you are changing the system volume level. Most applications have keyboard shortcuts to enable you to adjust the application's volume level; in iTunes, press

If you are using an external speaker system, set its volume at a relatively low level.
Open an application that you use to play audio, such as iTunes. Use that application's volume slider to set its relative volume level (see figure 12.3).
Play the audio and adjust the system volume level accordingly. Typically, you want to set the system volume at a level such that you can control the volume at each level to the amount you want, such as making it as loud as you want or being able to make it as quiet as you want. This sometimes requires experimentation to get the right balance between system volume level and application volume level. (When you are using external speakers, their volume control is yet a third level to balance.)

Note
If you are using a digital system and see the message "The selected device has no output controls" when Digital Out is selected, you use only the speaker system's controls to set system volume levels and to make other adjustments, such as the bass level, balance, surround sound field, and so on.
Note
To mute all sound, select the Mute check box or press F10. To unmute the sound, deselect the Mute check box or press F10. (Remember, when you are using a digital speaker system, these controls are disabled.) To increase the system volume level, press F12; to decrease it, press F11.
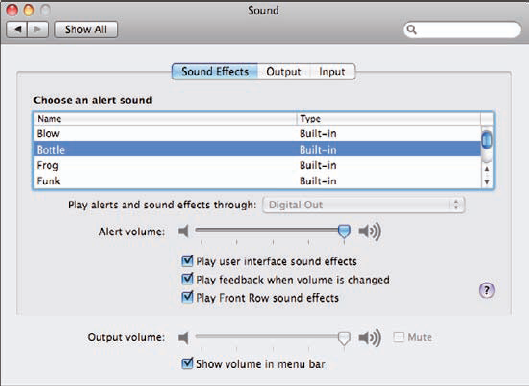
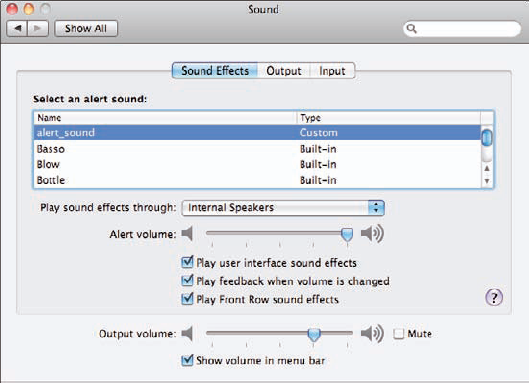
Mac OS X includes a number of sound effects that the system uses to alert you or to provide audible feedback for specific events. You control these effects on the Sound Effects tab of the Sound pane of the System Preferences application.
To configure sound effects, perform the following steps:
Open the Sound pane of the System Preferences application.
Click the Sound Effects tab (see figure 12.4).
Click a sound on the alert sound list. The sound plays and becomes the current alert sound.
If your MacBook can output sound through different devices simultaneously, such as through internal speakers and a sound system connected to a USB port, then select the system on which you want the sounds to be played on the Play alerts and sound effects through pop-up menu.
Drag the Alert volume slider to the right to make it louder, or to the left to make it quieter. This sets the volume of the alert sound relative to the system sound level. The default alert sounds have a relatively low volume level so you'll probably have to set the slider to a high level to hear the alert sound above music or other audio you are listening to.
If you don't want to hear sound effects for system actions, such as when you empty the trash, deselect the Play user interface sound effects check box.
If you don't want audio feedback when you change the volume level, deselect the Play feedback when volume is changed check box.
If you don't want to hear Front Row's sound effects, deselect the Play Front Row sound effects check box. These include sounds when you launch Front Row and when you make menu selections.
You can also create and use your own alert sounds if you want your MacBook to sport a unique way of communicating with you.
Under Mac OS X, system alert sounds are in the Audio Interchange File Format (AIFF). You can use iTunes to convert or record almost any sound into an AIFF file and use that sound as a custom alert sound.
There are two basic ways in which you can add custom alert sounds: You can add them to specific user accounts so only those users can access them, or you can add them to the system so they are accessible to everyone who uses your MacBook. The steps to add alert sounds are slightly different for each option.
There are many ways to create a custom alert sound, including the following:
iMovie. Use iMovie to create an audio track and save it as an AIFF file. Or you can save part of a movie's audio track as an AIFF file. You can also record narration or other sounds to use as an alert sound. (You learn about getting sound into your MacBook later in this chapter.)
iTunes. You can use iTunes to convert any sound in your library to an AIFF file.
GarageBand. Create a music snippet and save it as an AIFF file.
Record audio playing on your MacBook. Using an application like WireTap Pro from Ambrosia Software, you can record any audio playing on your MacBook and use what you record as an alert sound.
I have included an example showing how to use iMovie to create and save a sound as an alert sound from audio stored in your iTunes library. This technique enables you to add just about any sound as an alert sound. Here's how:
Move the audio you want to use as an alert sound into your iTunes library. You can add it from the iTunes Store, download it from the Internet, or record it in another application.
Launch iMovie.
Choose File

Name your project. The Aspect Ratio and Theme settings don't matter because you are only going to use the audio.
Click Create. The new project is created and appears in the project library.
Click the Titles button (the button with the capital "T"). The Titles Browser appears in the lower-right corner of the window.
Drag a title into the project window. It doesn't matter which title you choose because it's not going to be seen anyway. You should do this step because iMovie needs some video in a project to be able to work with audio content.
Click the Music and Sound Effects button (the musical note icon). The Music and Sound Effects Browser appears in the lower-right corner of the window.
Choose iTunes on the pop-up menu. The content of your iTunes library appears.
Search or browse for the audio you want to use as the alert sound.
Drag the audio from the Music and Sound Effects Browser and drop it in the project window.
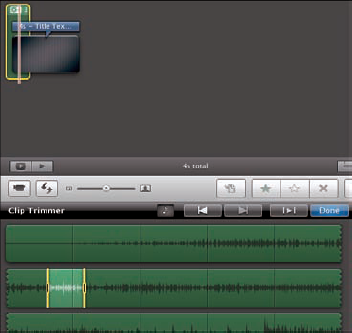
Open the audio clip's Action pop-up menu and choose Clip Trimmer. The Clip Trimmer opens in the lower-left corner of the window.
Edit the clip so it contains only the alert sound, and click Done (see figure 12.5).
Edit the title clip so it is the length of the alert sound.
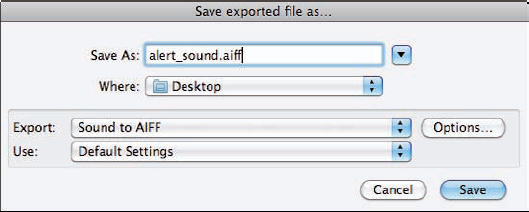
Choose Share
On the Export pop-up menu, choose Sound to AIFF.
Name the sound file; append an "f" to the existing filename extension so it is .aiff (it is .aif by default).
Choose a location in which to save the alert sound and click Save. The file is exported from iMovie and is ready to use as an alert sound.
To add a custom alert sound to a specific user account, follow these steps:
Log in to the user account under which you want to make the alert sound available.
Place the alert sound file in the user's Sounds folder that is located in the Library folder within the Home folder.
If the System Preferences application is open, quit it, then open it.
Click the Sound Effects tab.
Select and configure the custom alert sound just like one of the default sounds (see figure 12.7). Note that the type of alert sound you create is Custom to differentiate it from default sounds, which have Built-in as the type.
You can also add alert sounds to the system so they are available to all of the user accounts on your computer. To do this, you must authenticate yourself as an administrator.
To add alert sounds to your system, follow these steps:
Drag the AIFF file into the folder startupvolume/System/Library/Sounds, where startupvolume is the name of your Mac OS X startup volume.
At the prompt, provide an administrator account username and password and click OK.
If the System Preferences application is open, quit it, then open it.
Click the Sound Effects tab.
Select and configure the custom alert sound just like one of the default sounds. Alert sounds that you add to the system have the type Built-in and also behave the same as the default alert sounds, so any user can access them.
There are many situations in which you may want to put sound into your MacBook. For example, you might want to add narration to iMovie projects; you need to have audio input for audio and video chats in iChat; if you use GarageBand, you'll want to record instruments and vocals; or you might want to add narration to a slide show you create in iPhoto.
On the simplest side, you can use the MacBook's built-in microphone to record voice narration or other sounds, and it is certainly good enough for most audio and video chats. Toward the more complex, you can add an external MIDI (Musical Instrument Digital Interface) keyboard or other device that enables you to record sound from musical instruments and other sources.
Warning
The MacBook audio line in/optical digital audio in minijack is not powered. This means that you can't just plug a standard analog microphone into it and record sound. Whatever you connect to the minijack must provide amplification to be able to record sound from it. To be able to connect a microphone to it, there must be a power source for the microphone.
Using the MacBook's internal microphone is easy and is probably good enough for a number of purposes, such as audio and video chats, recording narration for iMovie and iPhoto projects, and other relatively simple projects.
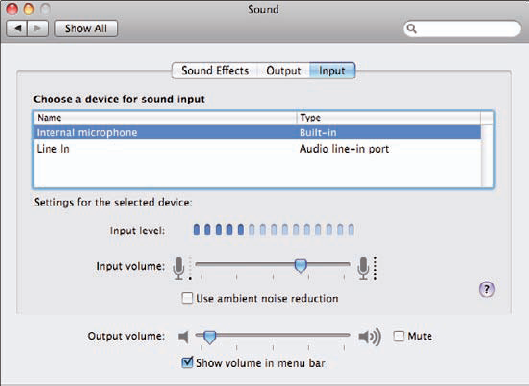
To record audio with the built-in microphone, first configure the internal microphone by following these steps:
Open the Sound pane of the System Preferences application.
Click the Input tab. On the Input tab, there are two default options: Internal microphone or Line In. Under the device list, you see the controls you use to configure the device selected on the list.
Select Internal microphone. As your MacBook receives audio input through the microphone, the relative volume of the input is shown on the Input level gauge (see figure 12.8).
As you speak or play the sound, monitor the input on the level gauge. The maximum level freezes briefly so that you can see where it is.
If the gauge shows input when you aren't speaking or playing a sound, select the Use ambient noise reduction check box. This applies a filter that screens out background sound.
Drag the Input volume slider to the left to reduce the level of input sound, or to the right to increase it. The microphone should be ready to use to record sound in an application.
A common use of recorded sound is as narration in iMovie projects. Here's how to add your own narration to an iMovie project:
Launch iMovie.
Select the project in which you want to record sound using the internal microphone and put the playhead where you want to start recording.
Click the Voiceover button (the microphone). The Voiceover dialog box appears (see figure 12.9).
On the Record From pop-up menu, choose Built-In Microphone.
Click the clip for which you want to record narration. The timer starts a countdown. When the countdown stops, the project starts to play and iMovie starts recording.
Speak in a normal conversational voice as the project plays. As you speak, monitor the sound levels using the two input gauges under the Input Volume slider. You want the sound level to be as high as possible without going into the red. If it isn't, use the tools in the Voiceover dialog box to adjust the input volume. A red bar fills the clip you are recording over, and you see a large red dot and the "Recording" message in the Preview pane.
When you finish speaking, press the spacebar. The recording stops, and an audio clip appears under the clip on which you recorded sound. The recording also stops when you reach the end of the project.
Edit the recorded audio clip just like other audio clips. For example, you can make it fade in, adjust its volume, and move it earlier or later in the project. Narration is shown in purple and is labeled as "Voice Clip."

If you are going to be recording a lot of narration or you want better quality when you have video or audio chats, a USB headset is a good option. Like other audio input devices, you configure the USB headset to record its input and then use it to record sound in applications.
Configuring a USB headset is similar to configuring the internal microphone, as you see in the following steps:
Connect the headset to a USB port.
Open the Sound pane of the System Preferences application.
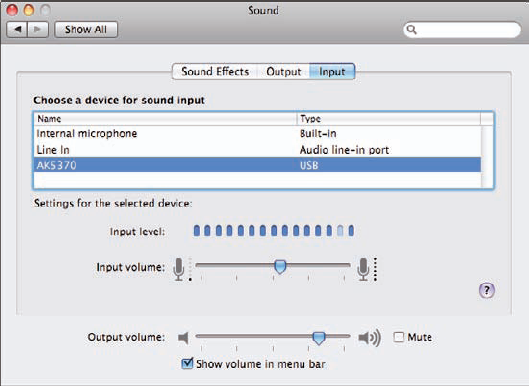
Click the Input tab (see figure 12.10). You should see the USB headset on the list of devices.
Select the USB headset. As the MacBook receives audio input through the headset, the relative volume of the input is shown on the Input level gauge.
As you speak or play the sound, monitor the input on the level gauge. The maximum level freezes briefly so that you can see where it is.
Drag the Input volume slider to the left to reduce the level of input sound, or to the right to increase it. The USB headset should be ready to use to record sound in an application.
Recording sound from a USB headset is similar to recording sound with other input sources. For example, the steps to record sound in iMovie are the same as the steps described earlier for the internal microphone, except that you select the USB headset instead of Built-in Microphone.
While it might not be obvious, a video camera can be a great way to record sound for your projects. You can then use iMovie to save that sound as a file to use in projects, to add to your iTunes library, and for other purposes. Here's how to move sound that you've recorded using a video camera into your iTunes library:
Use the video camera to capture the sound you want to use in an application.
Connect the camera to your MacBook.
Launch iMovie.
Add the clips containing the audio to the event library.
Choose File
Name your project. Again, the options don't matter because you are only using the audio.
Click Create. The new project is created and appears on the project list.
Add the clips with audio you want to save to the new project.
Edit the clips until the audio track is what you want to use.
Choose Share
On the Export pop-up menu, choose Sound to AIFF.
Choose a location and save the file. The file is exported from iMovie.
Launch iTunes.
Choose File
Move to and select the sound file you created in iMovie.
Click Open. The sound is added to your iTunes library where you can listen to it, or you can select it from other applications using the Media Browser (for example, you can select it as a soundtrack for an iPhoto slide show).
If you want to record sound from external microphones and musical instruments, you need an interface between the devices and the MacBook. These devices can use either the audio line in/optical digital audio in minijack or USB port to connect to your MacBook, but USB is a more common interface that is easier to work with in most situations.
There are a variety of USB audio devices that you can use for this purpose. Some devices include a MIDI instrument, such as a keyboard, as part of the interface device; these are convenient because you get an input source (the instrument) and the interface in one unit.
To use devices like these, connect the device to a USB port on your MacBook. You then connect microphones or instruments from which you want to record sound into the various ports.
Once the device is configured, you can choose it as the input device in audio applications, such as GarageBand, so that you can record the output of the microphones and instruments in those applications.
iPhones have the Voice Memos application that you can use to record sounds. It's intended and works best for sounds spoken into the phone or into the headset mic. To capture sound, do the following:
Tap Voice Memos. The application launches.
Tap the Record button.
Start speaking.
When you finish recording, tap the Stop button. The sound you recorded is captured as a clip.
To move the sound onto your MacBook, connect the iPhone to the MacBook, select it on the iTunes Source list, click the Music tab, and select the Include Voice Memos check box. Click Apply. The iPhone is synced and the sound clips you recorded are moved into your iTunes library (the default name of each clip is the date and time you recorded it). You can work with those clips just like other audio in iTunes; you can add it to iMovie and other projects through the Media Browser.