
Being able to take advantage of the Internet is almost as important a skill as being able to read (of course, you have to be able to read to be able to use the Internet, and so reading still wins on the importance scale). Fortunately, your MacBook is a perfect tool for getting the most out of the Internet. In order to use the Internet, you must be able to connect to it, which is where this chapter comes in.
Setting Up a Local Network with Internet Access
Connecting via a Wireless Network
Connecting via an Ethernet Connection
Connecting via a Wireless Broadband Card
Connecting via iPhone Tethering
Managing Multiple Network Connections
Troubleshooting an Internet Connection
There are many ways to connect your MacBook to the Internet. Fortunately, one of the great things about using a MacBook and related Apple technology is that you don't have to worry about all the technical details involved. It's quite easy to create and manage a local network that provides Internet access and other services, including file sharing, to multiple computers.
This chapter focuses on networks built around an Apple AirPort Extreme Base Station or Time Capsule because either one of these makes managing a network easy while providing all the features that most people need for a local network (a Time Capsule also provides wireless backup, ideal for your MacBook). MacBook networking technology supports wireless and wired networking standards, so you can use just about any network components designed to the same standards to accomplish the same purposes, but with a bit more effort and complexity, and who needs that?
There are two general steps to creating a local network. First, install and configure the AirPort Extreme Base Station or Time Capsule. Second, connect devices, such as computers and printers, to the wireless or wired network provided by the base station.
An Apple AirPort Extreme Base Station is a relatively simple device. It contains a transmitter that broadcasts the signal over which the wireless network is provided, and it has four Ethernet ports. One, the WAN (wide area network) port, connects to a broadband Internet connection, which is most commonly connected to a cable or DSL modem. The other three ports connect to an Ethernet network or to Ethernet-equipped devices, including computers, printers, and Ethernet hubs. Along with the power adapter port, the base station offers a USB port to which you can connect a USB printer or USB hard drive to share a printer or a hard drive with the network.
A Time Capsule is an AirPort Extreme Base Station with the addition of an internal hard drive; you can use this drive to store any kind of data, but it is ideal for backing up your MacBook using Mac OS X's Time Machine. Because this chapter focuses on the network aspects of these devices, you should consider the two devices equivalent throughout the rest of this chapter (the same steps will work for either device), and so you'll see the more generic term base station, which refers to either device. (Backing up with a Time Capsule and Time Machine is covered in Chapter 14.)
If possible, locate the base station in a central area so that it provides the maximum amount of wireless coverage where you install it. In most houses, a base station provides adequate signal strength, even if you locate it at one end of the house and place computers that you want to network at the other end. However, the closer the computers are to the base station, the stronger the signal is. A stronger signal means a faster, more reliable connection.
After you place the base station in its location, attach its power adapter to the base station and plug it into a wall outlet. Use an Ethernet cable to connect the cable or DSL modem to the base station's WAN Ethernet port.
You can connect an Ethernet device to each of the three LAN (local area network) Ethernet ports on the base station (see figure 3.1). For example, you can connect a network printer and a computer, or to add more than three devices, you can connect one of the ports to an Ethernet hub and then connect additional Ethernet devices to that hub.
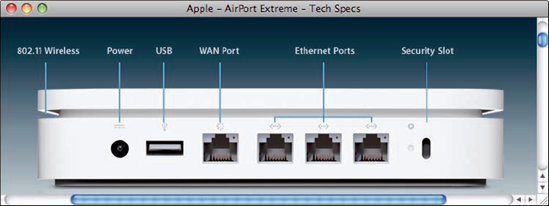
Figure 3.1. The three Ethernet ports enable you to create a wired network to go along with the wireless one.
If you want to share a USB printer with all the computers that can access the network, connect the printer's USB cable to the USB port on the base station. Likewise, you can connect a USB hard drive to the base station's USB port to share that drive on the network.
After you install the base station, you need to configure it. You can configure it manually through the AirPort Utility application, or you can use the same application with a guided approach. With either method, configure the base station from a computer with which it can communicate, either through AirPort or through an Ethernet network. To configure the base station wirelessly, make sure AirPort is enabled on your MacBook (see the section on connecting via a wireless network later in this chapter). To configure the base station through Ethernet, connect your MacBook to one of the Ethernet ports on the base station or to a port on an Ethernet hub connected to the base station.
Note
To use the guided approach, open the AirPort Utility application located in the Utilities folder in the Applications folder. Select the base station and click Continue. Follow the on-screen instructions to complete the configuration.
You must use the manual approach to configure certain aspects of the base station (and it's often easier and faster to use this approach anyway); the following steps show you how to configure a base station manually. Note that these steps are based on configuring a base station that has been configured previously. If you're starting with a brand-new base station, the details you see might be slightly different, but the overall process is the same. For example, you'll be prompted to name a new base station, whereas a previously used base station already has a name.
To configure the base station's identification and configuration password, perform the following steps:
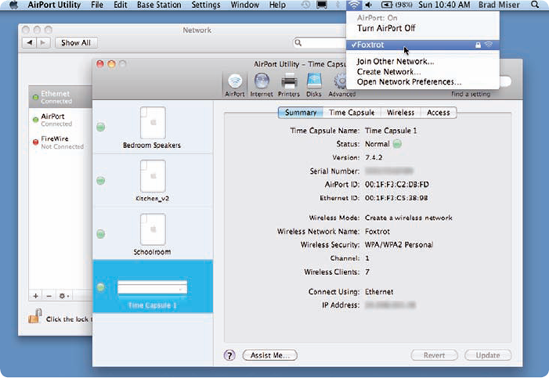
Open the AirPort Utility located in the Utilities folder in the Applications folder. The base stations with which your MacBook can communicate are shown in the left pane of the window. You see all the base stations currently in range of the MacBook you are using, and whether they communicate wirelessly or over an Ethernet connection. As soon as the application opens, it looks for new software. If new firmware is available for the base stations, the application prompts you to download and install it. If the base station is using the current version, you see a message saying so.
Select the base station you want to configure. If there is only one base station in range, it is selected automatically.
Click Manual Setup. You're prompted to type the base station's password.
Note
Two passwords are associated with a base station. One password is required to be able to administer the base station. The other password is required to join the wireless network provided by the base station (unless the network isn't secure). Usually, you should use different passwords because you may be providing the network password to people whom you don't want to be able to configure the base station.
Type the password and click OK. You next see a window that has the base station name as its title and that includes several tabs. The upper tabs provide access to general configuration areas, such as Internet, while the lower tabs provide the configuration tools for the selected area.
Click the AirPort tab.
Click the Base Station or Time Capsule sub-tab, as shown in figure 3.2.
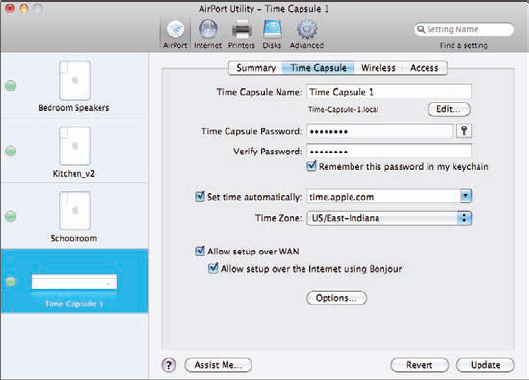
Type the base station name in the Time Capsule Name field. This is the name of the base station itself, not the name of the network it provides.
Note
To enter the contact information for the base station, its location, status light configuration, and how frequently it checks for new software, click Options.
Type the administration password in the Time Capsule Password and Verify Password fields. Again, this is the password you use to configure the base station, not the one you use to access the network it provides.
Select the Remember this password in my keychain check box. This causes your MacBook to remember the password so that you don't have to type it each time you configure the base station from your MacBook.
Select the Set time automatically check box, choose the appropriate server on the pop-up menu, and choose your time zone on the Time Zone pop-up menu.
To allow the base station to be configured over its Ethernet WAN connection, select the Allow configuration over WAN port check box.
To configure the wireless network that the base station provides, follow these steps:
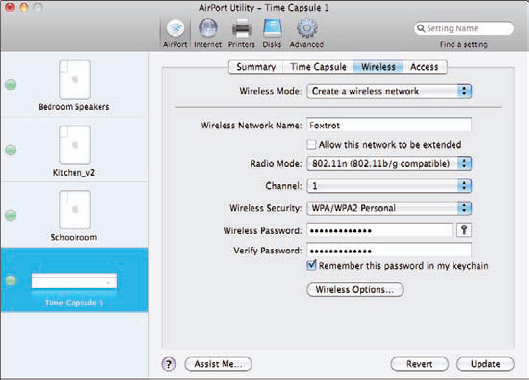
Click the Wireless sub-tab. On this tab, you configure the wireless network being provided by the base station (see figure 3.3).
Use the Wireless Mode pop-up menu to choose Create a wireless network.
Type the wireless network's name in the Network Name field. This is the name that you choose to access the network being provided by the base station.
Use the Radio Mode pop-up menu to determine the wireless standards supported on the network. The more standards you allow, such as 802.11n (802.11b/g compatible), the more types of devices are able to connect to the network.
Use the Channel pop-up menu to select the channel over which the base station communicates. Generally, the default channel works fine, but if you are having trouble communicating with devices, you can try different channels to improve signal transmission and reception. If you have multiple AirPort networks in the same area, you can use the Channel pop-up menu to have each network use a different channel so that they don't interfere with one another.
Use the Wireless Security pop-up menu to choose one of these security options:
WPA/WPA2 Personal. WPA (Wi-Fi Protected Access) is the most secure encryption technique supported on an AirPort network. However, using WPA can limit the access of some devices to the network. Use this option for a network that includes only Macintosh computers unless you're sure the other devices (including Windows computers) that you want to connect can support WPA.
WEP. WEP (Wired Equivalent Privacy) is an encryption strategy that attempts to provide wireless networks with the same level of protection that wired networks have. This option provides a good level of security, while being more compatible with Windows and other devices. For networks that include older Macs or Windows computers, select this option. There are two levels of WEP security: 128 bit or 40 bit. Almost all modern hardware and software can support 128 bit, so you should select this option because it is the more secure of the two. Use 40 bit only if you need to connect older devices to the network.
None. If you select this option, your network won't be secured and anyone within range can join it without a password. You should not use this option unless you are very sure that unauthorized users cannot access your network. This option leaves your network, and all the devices connected to it, vulnerable to attack. I don't recommend that you use this option because there isn't a good reason to have an unsecured network.
Note
WEP and WPA have Enterprise options. These are designed for large networks that use authentication servers. You are very unlikely to need these options for a network located in a home or small business.
Type the network password in the Wireless Password and Verify Password fields. This is the password that people have to type to be able to connect to the secured network.
Select the Remember this password in my keychain check box. This causes your MacBook to remember the network's password so that you don't have to type it when you connect.
To connect the base station to the Internet, follow these steps:
Click the Internet tab.
Click the Internet Connection sub-tab, as shown in Figure 3.4.
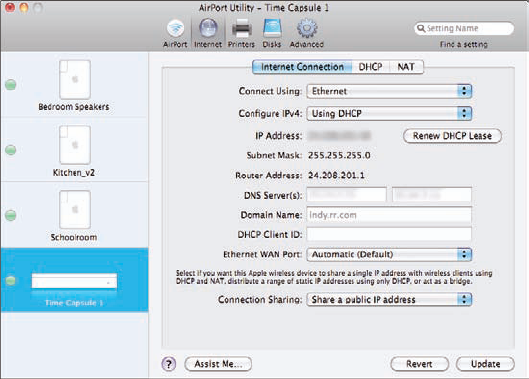
Figure 3.4. Use the Internet Connection sub-tab to configure your Internet account on the base station.
Note
There are many ways an Internet connection can be configured, and the details of each method are different. However, most cable and DSL Internet accounts are configured using details that are similar to those shown in these steps. Review the information you received from your Internet service provider to determine the details that you need to use to configure the base station to access your Internet account.
Choose Using DHCP on the Configure IPv4 pop-up menu.
On the Connection Sharing pop-up menu, choose Share a public IP address.
Click the NAT sub-tab. Make sure the Enable NAT Port Mapping Protocol check box is selected. The base station uses NAT (Network Address Translation) to shield devices that are connected to it from Internet attacks. In order to hack a device, you need its address, and NAT hides the addresses of the devices connected to the base station. Make sure that NAT is enabled for your network.
After you configure all the settings you want the base station to use, click Update. The base station is configured according to the settings you entered. When the process is complete, the base station restarts and its wireless network becomes available.
The base station is the heart of the local network. In addition to providing an Internet connection to the other devices on the network, it makes many other services available, such as file sharing and printer sharing. To add devices to the network being provided by the base station, build the network by connecting wireless devices to the network the base provides, connecting a USB printer or hard drive to the base station's USB port, connecting a network printer to one of its Ethernet ports, or adding an Ethernet router and connecting more Ethernet devices to it.
In most cases, adding a device to your network is simple. You first make the physical or wireless connection between the network and the device, and then configure the device to connect to and use the network's resources, such as its Internet connection.
To be able to connect to an AirPort network, you first enable AirPort on your MacBook. Once AirPort is enabled, you can find and connect to a wireless network.
To configure your MacBook to use AirPort, follow these steps:
Open the System Preferences application and click the Network icon to open the Network pane.
Click the AirPort option in the list of available network options in the left part of the pane. The AirPort tools appear in the right part of the pane.
If AirPort is currently off, turn it on by clicking the Turn AirPort On button. AirPort services start, and your MacBook begins scanning for available networks (you see radiating waves at the top of the AirPort menu if it is enabled). If you've previously connected to an available network, you join that network automatically and its name appears on the Network Name pop-up menu.
If you want to be prompted to join new networks, select the Ask to join new networks check box. With this enabled, when you move your MacBook into an area with networks you've not connected to previously, you're prompted to connect to those networks.
Select the Show AirPort status in menu bar check box to put the AirPort menu on your menu bar. You can use this menu to quickly select and control your AirPort connection.
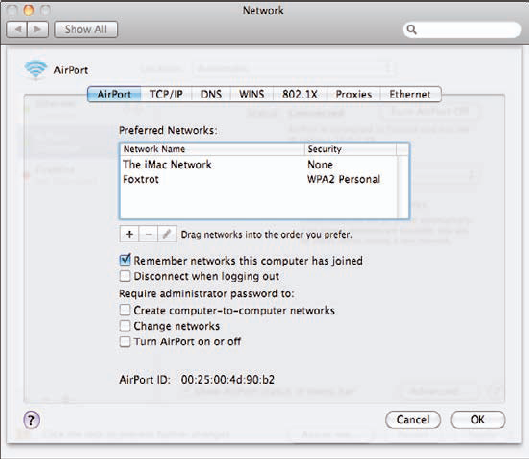
Click the Advanced button. You see the Advanced options sheet, which you can use to configure additional aspects of your AirPort connection.
Click the AirPort tab (see figure 3.5).
If you don't want your MacBook to automatically remember networks that you've used previously, deselect the Remember networks this computer has joined check box. Networks that you remember become your preferred networks that you join automatically by default, but you can disable this behavior if you don't want to automatically join networks.
Note
If multiple networks are remembered, you can drag them up or down in the list of Preferred Networks on the AirPort tab to determine the order in which those networks are joined. Put the network you want to use first at the top of the list, and your MacBook connects to that one first when it is available to you. If not, it looks for the second network on the list and continues this process until it finds an available network.
If you want to automatically disconnect from networks when you log out of your user account, select the Disconnect when logging out check box. You might want to select this option if there is some sort of time limitation or fee structure on the network that you connect to.
Click OK. The Advanced sheet closes. Your MacBook is ready for wireless communication.
To manage your wireless network connections, open the AirPort menu (see figure 3.6).
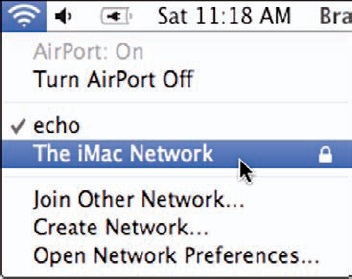
Figure 3.6. The AirPort menu is a fast and easy way to identify wireless networks in range of your MacBook.
The AirPort menu contains the following:
Signal strength of the current network. When you are connected to a wireless network, the number of darkened waves at the top of the menu indicates the strength of the signal.
AirPort status. The first two items relate to AirPort status. If it is turned on, you see AirPort: On at the top of the menu with the command Turn AirPort Off underneath it. If your MacBook is searching for a network to which to connect, the status is Scanning. If AirPort is not enabled, the status is AirPort: Off and the command is Turn AirPort On.
Available networks. The second section of the menu shows you all the networks within range of your MacBook. If you are currently connected to a network, it is marked with a check mark. If a network is marked with the Lock icon, that network is secure and you need a password to join it.
Join Other Network. You use this command to join a closed network for which you must know the network name and, almost always, the password.
Create Network. This command enables you to set up a wireless network between computers. Choose the command and use the resulting dialog box to create a wireless network. Other computers can use the network that you create to share files, play network games, and access other services that you want to provide.
Open Network Preferences. This command opens the Network pane of the System Preferences application.
If a network is open, meaning that its information is broadcast publicly, then it appears on the AirPort menu. To join an open network, perform the following steps:
Open the AirPort menu.
Select the network you want to join. If no password is required, you join the network immediately, its name is checked on the list of networks, and you see the signal strength at the top of the AirPort menu; you can skip the rest of these steps and can start using the network's resources. If a password is required, you're prompted to provide it.
Type the network's password.
If you want to see the password you entered, select the Show password check box. This can be useful because sometimes network passwords are convoluted and it can be hard to tell whether you typed it correctly.
Select the Remember this network check box.
Click OK (see figure 3.7). You join the network and its resources become available to you.
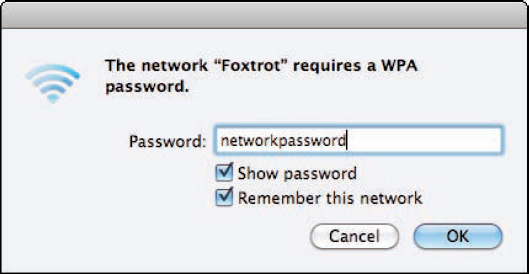
Figure 3.7. If you select the Remember this network check box, you see this dialog box only the first time you connect to a network.
Note
You can also join wireless networks from the Network pane of the System Preferences application. Choose the network you want to join on the Network Name pop-up menu and type the password at the prompt.
To control access to a network more tightly, it can be closed. This means that its name doesn't appear on the AirPort menu because its identity or existence isn't broadcast. To be able to access a closed network, you need to know it exists, what its name is, the kind of security it uses, and its password. If you have all that information, you can join it by doing the following:
Open the AirPort menu.
Select Join Other Network. A network information dialog box appears (see figure 3.8).
Type the network's name in the Network Name field.
Choose the kind of security the network uses in the Security pop-up menu.
Type the network's password.
Click Join. You join the network and its resources become available to you.

Ethernet connections are fast; in fact, your MacBook may perform better with an Ethernet connection than it does with a wireless connection. This might not be too noticeable for Internet activity, but transferring files within a local network is much, much faster. Ethernet connections are also more secure because their signals travel over a cable, so you have to be physically connected to the network with a wire, making it much harder for someone to intercept or interfere with the signal. Of course, the problem with Ethernet connections is that your MacBook has to be physically connected to the network to be able to use an Ethernet connection.
Warning
You can connect a cable or DSL modem directly to the Ethernet port on your MacBook to provide it with an Internet connection. I don't recommend this because it exposes the MacBook to attacks from the Internet. If you do connect it directly, make sure you enable the Mac OS X firewall by opening the Security pane of the System Preferences application, clicking the Firewall tab, and clicking Start before you connect the computer to the modem.
If you've installed an AirPort Extreme Base Station or Time Capsule and it has at least one open port, you can use that port to access the network, including its Internet connection. You can also connect your MacBook to an Ethernet hub connected to the base station.
When you travel, Ethernet ports into a network are generally available in businesses, schools, and hotels. In hotels, ports are enabled, but in businesses or schools, most open ports are disabled for security. If a port isn't enabled, you need to contact someone in the IT organization to have it enabled for you.
To connect your MacBook to an Ethernet network, follow these steps:
Connect one end of an Ethernet cable to an available Ethernet port on the network.
Connect the other end to the Ethernet port on your MacBook.
Open the System Preferences application and click the Network icon. The Network pane appears.
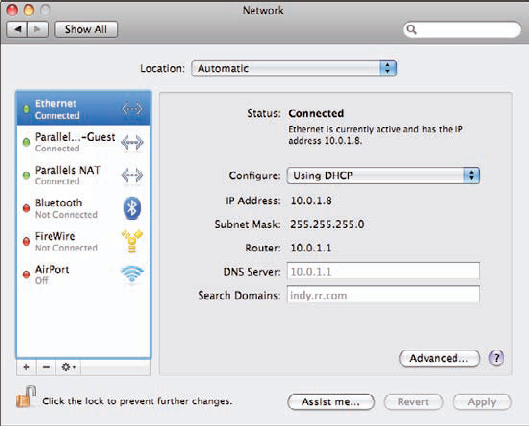
Select Ethernet from the list of available connections. Status information is shown at the right (see figure 3.9). If you see Connected, your MacBook is connected to an active network. If the status is something else, such as Not Connected, check the connections to make sure the cable is plugged in correctly. If the status continues to be something other than Connected, the Ethernet port to which your MacBook is connected may not be active.
Select Using DHCP on the Configure pop-up menu.
Click Apply. The MacBook begins using the network's resources, such as an Internet connection.
Using a wireless broadband card, you can get a high-speed Internet connection from anywhere within the service area covered by the card and service plan you are using.
If you travel regularly, a wireless broadband card can be a much more convenient way to connect to the Internet while you are on the move. Because the connection is the same for you no matter where you are located, you don't have to find and sign onto networks in various locations, making a wireless broadband card much easier to use. A wireless broadband card can also be less expensive to use than purchasing temporary accounts multiple times in the same time period.
The primary downside of wireless broadband cards is that the networks they access aren't available in every location. Like cell phones, you need to be within a covered area to be able to access the service provided on the network. The other downside of a wireless broadband card is that its connection can be a bit slower than some wireless or wired connections that are available to you. Even with this usually minor limitation, you may find a wireless broadband card to be an indispensable part of your MacBook toolkit if you travel frequently.
Obtaining a wireless broadband card is a lot like buying a cell phone; you need to purchase the USB device you use to connect to the wireless network and also sign up for a service plan.
Warning
Before you sign up for an account, check the amount of data allowed per month. Some accounts are limited, which can be a problem if you transfer lots of large files or regularly watch video streamed over the Internet (such as from a Netflix account). Excess data penalty fees can be very, very expensive, especially if you are also roaming. Roaming fees alone can also be very expensive so make sure you understand what they are before using an account outside of its designated coverage area.
Most of the major cell phone providers also offer wireless broadband cards, so visit their Web sites to research the available cards. When you look for a wireless broadband card, consider the following factors:
Mac compatibility. Most cards are compatible with Mac OS X version 10.4 and higher.
Card type. Your MacBook is compatible with a USB broadband card.
Coverage areas. Check that the network's coverage area matches up with the locations in which you use your MacBook. Make sure you focus on the coverage area for broadband connections; most maps also include coverage of the cell phone networks.
Connection speed. The most important speed is the download speed because when you use the Internet, you are primarily downloading data. Of course, faster is better.
Contract terms. There are a number of costs to factor into your decision, including the cost of the card itself (ranging from free to $200 or so), the cost of the account (usually about $50 per month for a one- or two-year commitment), and possible activation fees.
Warning
While research is both good and necessary, realize that trying a wireless broadband card is a bit of a gamble in terms of the coverage area and performance that you'll actually experience. For example, even if you primarily use your MacBook in covered areas, your location and objects in those areas can interfere with the performance of your connection. It's not a bad idea to ask for a trial period when you purchase a card so that you can return it if it doesn't work for you. Some providers allow this and some don't.
After you obtain a wireless broadband card, you need to install and configure it. The details depend on the specific card and the service provider that you use. The general steps to do this are as follows:
Once the broadband card is installed and configured, connecting to the Internet is usually pretty simple. Again, the details depend on the specific card and service you use, but the general steps are as follows:
Launch the wireless broadband card's connection application. In the application's window, you see the types of wireless connections that are available to you, including those available through AirPort.
Select the connection you want to use.
Click Connect.
If you have an iPhone and a service provider that supports it, you can connect your MacBook to the Internet via your iPhone's cellular data network. This is convenient because an iPhone can connect to the Internet in many locations, and there's usually no additional charge to use tethering functionality (however, you need to check your contract's terms to ensure this is the case).
The specific steps you use to connect to the Internet via tethering depend on the particular network you use, but the general steps follow:
Access the tethering settings on the iPhone by tapping Settings, General, Network.
Tap Internet Tethering OFF. Its status becomes ON and the iPhone starts providing an Internet connection to tethered devices.
Connect your MacBook to the iPhone's Internet connection with one of the following options:
Bluetooth. Connect your MacBook to the iPhone via Bluetooth so the MacBook's Internet connection is via the Bluetooth connection. See Chapter 11 for information about connecting your MacBook with other devices via Bluetooth.
USB. Connect your MacBook to your iPhone using a USB cable, just like when you sync your iPhone. If the tethered connection isn't detected and available on your MacBook immediately, use the Network pane of the System Preferences application to choose the Ethernet Adapter option, choose Using DHCP on the Configure pop-up menu, and click Apply. The MacBook should be able to access the Internet via the iPhone's network.
With Mac OS X, you can have multiple connections active at the same time, and you can determine which connection option your MacBook uses first. In this section, you learn how to configure the connections that you use. You can also use locations to create sets of connections so that you can easily reconfigure your MacBook for connectivity by choosing a location.
You use the Network pane of the System Preferences application to manage your MacBook's connections. Follow these steps:
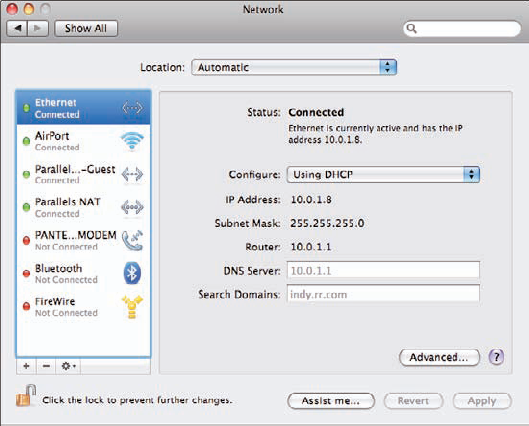
Open the Network pane of the System Preferences application. Along the left side of the pane, you see all the connections configured on your MacBook (see figure 3.10). Connections marked with a green dot are active and connected. Connections marked with a red dot are not active. Connections marked with a yellow dot are active, but not connected to anything. The connection at the top of the list is the current one.
Select a connection. Detailed information about the connection and controls you use to configure it appears in the right part of the pane. You've used some of these controls already to configure AirPort and Ethernet connections. Configuring other kinds of connections is similar.
Remove a connection that you don't use by selecting it and clicking the Remove (–) button located at the bottom of the connection list.
Open the Action pop-up menu (the gear icon) and choose Set Service Order. The Services sheet appears.
Drag services up and down in the list until they are in the order that you want your MacBook to use them, starting at the top of the list and moving toward the bottom. Typically, you want the fastest and most reliable connections at the top of the list. Each connection is tried in turn until one works. If you order them by their speed and reliability, the best available connection is always used.
Click OK. Your changes in the Services sheet are saved and the sheet closes.
Click Apply. The changes that you've made on the Network pane are saved and they take effect.
In addition to having multiple connections active, you can use locations to define different sets of connections so that you can easily switch between them. For example, you may use one Ethernet configuration to connect to the Internet at home, and a different one to connect when you are at work. Creating a location for each set of connections makes switching between them simple because you have to configure them only once and can switch between them by simply choosing a different location. (Without locations, you may have to reconfigure the Ethernet connection each time you change the location of your MacBook.)
As you've seen, you can have multiple connections active at the same time. If you use only one configuration for each connection, you don't need to use locations. Rather, you want to use locations when you use different configurations of the same type of connections, such as the Ethernet connection, that you use.
Your MacBook includes one default location, which is called Automatic. You can create new locations when you need them (you can also change or delete existing locations).
To configure a new network location, follow these steps:
Open the Network pane of the System Preferences application. The current location is shown on the Location pop-up menu at the top of the pane.
On the Location pop-up menu, choose Edit Locations. The Locations sheet appears. In the top pane of the sheet, you see the current locations that are configured on your MacBook.
Click the Add (+) button located at the bottom of the sheet. A new location called Untitled appears.
Type a name for the new location and press Return.
Click Done. The new location is saved and you return to the Network pane. The location you created is shown on the Location pop-up menu (see figure 3.11).
Configure the location by doing any of the following:
Select a connection and configure it.
Delete a connection that you don't want to include in the location.
Add a connection by clicking the Add (+) button located at the bottom of the list of connections. On the resulting sheet, select the interface you want to use on the Interface pop-up menu, type a name, and click Create. The connection is added to the list and you can configure it.
Set the order in which you want the connections in the location to be used.
When you finish, click Apply. Your changes are saved and the location becomes active.
Note
If one of the current locations is similar to the one you want to create, select it on the Locations sheet, open the Action drop-down menu, and choose Duplicate Location. Then give the copy a different name. This is faster than re-creating a location from scratch.
To change the location you are using, do one of the following:
Open the Network pane of the System Preferences application and choose the location you want to use on the Location pop-up menu. If the Apply button becomes active, click it to apply the location; some configuration changes require this, while others don't.
Choose Apple menu

You can edit or remove locations by following these steps:
Open the Network pane of the System Preferences application.
Choose Edit Locations from the Location pop-up menu. The Locations sheet appears.
Note
If you have created at least one location, you can quickly jump to the Network pane by choosing Apple menu
Perform any of the following tasks:
To rename the location, select it, open the Action drop-down menu, choose Rename Location, type the new name, and press Return.
To delete a location that you no longer use, select it and click the Remove (–) button at the bottom of the sheet.
To duplicate a location, select it, open the Action drop-down menu, choose Duplicate Location, type the new location's name, and press Return.
Click Done. You return to the Network pane.
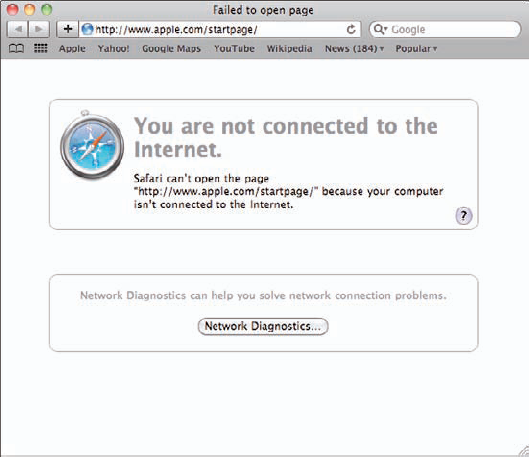
The time will come when you try to connect to a Web site or send email and you'll see error messages instead (see figure 3.12). While this probably won't happen very often, you need to know what to do when a good Internet connection goes bad. In general, the solutions to most connection problems are relatively straightforward.
One of the difficulties in solving an Internet/network problem is that there are typically a number of links in the chain, including your MacBook, other computers, an Ethernet hub, and printers, to name a few. There are, however, three general sources of problems: computers and other devices connected to the network (clients), an AirPort Base Station or Time Capsule, and the cable or DSL modem that you use to connect to the Internet.
Because there are multiple devices, the first step in solving an Internet/network issue is to determine the source of the problem. The three sources of problems can be classified into two areas: client devices or the network. To determine which area is the source of an issue, try the same action that resulted in an error on your MacBook on a different computer that's on the same network and that uses the same connection, such as an AirPort network. If the problem also occurs with other computers, you know the problem is related to the network, which is discussed in the next section. If the problem doesn't occur on a different computer, you know it's specific to your MacBook, which is discussed later in the chapter.
Solving a network problem can be tricky because there are a number of potential sources of problems within the network and some that reside outside of the network and outside of your control. Start with basic steps to see whether you can determine which part of the network is causing you problems so that you can begin to solve them. Working from the first element in the chain, do the following:
Check the status of the modem. Most modems have activity lights that indicate whether the modem is powered up and has a working connection. Check these lights to make sure the modem appears to be powered up and connected to the Internet. If the modem appears to be working, move to Step 2. If the modem doesn't appear to be working, move to Step 7.
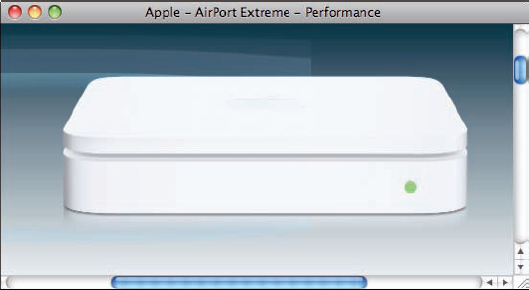
Check the status of the AirPort Base Station. It also has a light that uses color and flashing lights to indicate its status (see figure 3.13). If the light indicates the base station is working (in the current version, the status light is solid green when the base station is working correctly), move to Step 3. If not (for example, if the status light is flashing amber), move to Step 8.
Disconnect power from the base station and from the modem.
Wait at least 20 seconds.
Connect power to the base station and then to the modem. These simple steps often reset a network and restore the connection.
Try what you were doing when you first encountered the problem. If it's successful, you're finished and you can go on about your business. If not, continue with the next steps.
If the modem's power light is on (which it probably is) but the connection light is not, contact your Internet service provider to make sure service is available. Periodically check the modem status lights until the normal status lights appear; when they do, you should be good to go. If service is available, the provider can run some diagnostics from the source to determine whether your modem is connected. This can determine whether the problem lies between your modem and the provider, or is an issue with the modem and its configuration. If the source of the problem is the modem itself, the provider can help you troubleshoot and solve the issue.
Note
If Internet connectivity is critical to you, consider adding a backup Internet connection that you can use if your primary connection goes down. One choice for this is a wireless broadband card, which is useful for other purposes as well. Another option is to be aware of available hot spots in your area so that if your primary Internet connection goes down, you can take your MacBook to a hot spot to work until your connection is restored.
Remove power from the base station, wait 10 seconds, and connect it again.
Check the base station's status light. If the light goes green, the problem is solved. If not, you need to further isolate the problem.
Ensure the firewall is set on your MacBook.
Warning
Never connect a computer directly to a cable or DSL modem without some sort of firewall protection. To enable the Mac OS X firewall, open the Security pane of the System Preferences application, click the Firewall tab, and click Start. Even with this option enabled, it's not a good idea to leave the computer directly connected for more than a minute or two.
Connect the MacBook directly to the cable or DSL modem using an Ethernet cable.
Try an Internet activity. If it works, you know the problem is with the base station, and you can continue with these steps. If you can't get an Internet connection directly from the modem, you know the problem is with the modem or the Internet connection itself; contact your provider for assistance.
Troubleshoot the base station until you solve its problem. You might need to reset it and reconfigure it. See the documentation that came with the base station or use the Apple support Web site at
www.apple.com/support/airportfor help.
When you know the network is performing and other devices have connectivity, you can focus on the MacBook to solve the issue. Follow these steps:
Try a different Internet application. If one application works, but the other does not, you know the problem is related to a specific application and you can troubleshoot that application. If no Internet application works, continue with the following steps.
Open the Network pane of the System Preferences application.
Check the status of the various connections. If the status is Not Connected for a connection (see figure 3.14), you need to reconfigure that connection to get the connection working.
If the status is Connected, choose Apple menu
Click Restart at the prompt.
After the MacBook restarts, try the activity again. Restarting when you have a problem is always a good thing to try because it's easy to do and solves a lot of different issues.

While the steps in this section help with many problems, they certainly won't solve all problems. When they don't work, you have a couple of options. First, find a computer that can connect to the Internet and move to www.apple.com/support or www.google.com. Search for the specific problem you are having and use the results you find to solve it. Second, disconnect everything from your network and connect your MacBook directly to the modem (ensuring the firewall is on first). If the connection works, you know the problem is related to the network; add other devices one-by-one, starting with the base station, until you find the source of the problem. If the connection doesn't work, you need help from your Internet provider to be able to solve the problem.