
To get the most from your MacBook, you should customize the keyboard and trackpad so that they work according to your preferences. And learning to use keyboard shortcuts effectively will help you work more quickly and efficiently. You might want to add a mouse or external keyboard to your toolkit, especially for those times when you are using the computer at a desk; Bluetooth mice and keyboards enable you to do this without being tethered with cables.
Using the Trackpad Effectively
Using the Keyboard Effectively
Configuring Bluetooth on a MacBook
Adding a Bluetooth Mouse
Adding a Bluetooth Keyboard
A trackpad is an ideal input device for a mobile computer because it provides a similar degree of control that a mouse does but doesn't require anything external to the computer. The MacBook trackpad provides all the basic capabilities you need to enable you to point and click, but it certainly doesn't stop there. The MacBook's trackpad supports gestures, which go way beyond just pointing and clicking. Using combinations of your fingers and motion, you can scroll windows, zoom in, zoom out, and so on. You can use the trackpad much more effectively by tweaking its options over time.
You can configure the trackpad to work according to your preferences with the Trackpad pane of the System Preferences application. Here's how:
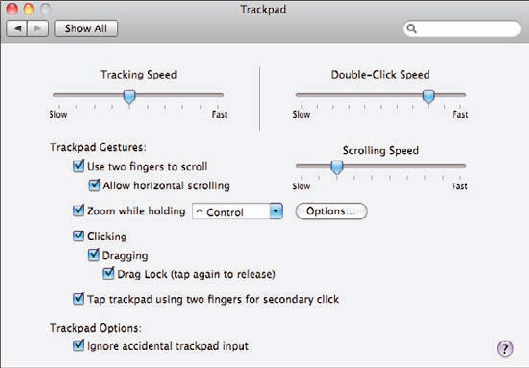
Open the Trackpad pane of the System Preferences application. The trackpad's configuration options appear (see figure 11.1).
Use the three Speed sliders at the top of the pane to set the tracking, double-click, and scrolling speeds. The faster you set the tracking and scrolling speeds, the farther the pointer moves on the screen for the same motion of your fingers on the trackpad. The faster you set the double-click speed, the less time between "clicks" on the trackpad to register as a double-click.
To be able to scroll by dragging two fingers on the trackpad, select the Use two fingers to scroll check box; when enabled, you can also select the Allow horizontal scrolling check box to be able to scroll horizontally and vertically.
To be able to zoom by dragging two fingers on the trackpad, select the Zoom while holding check box and on the pop-up menu, choose the modifier key that you want to press to activate zooming; then click Options. You see the Zoom Options sheet (see figure 11.2). (If you don't enable zooming, skip to Step 8.)
Use the radio buttons to configure how the image scrolls while you are zoomed. You can have it move with the pointer, move only when the pointer reaches the edge of the screen, or so that the pointer is always near the center of the image.
If movement seems sluggish when zoomed, deselect the Smooth images check box.
Click Done. The sheet closes.
To be able to perform a single mouse-click by tapping the trackpad, select the Clicking check box. If you don't enable this, skip to Step 11.
If you performed Step 8 and want to be able to drag objects by dragging your finger on the trackpad, select the Dragging check box.
If you enabled Dragging and want to be able to lock the pointer so an object continues to be attached to the pointer until you tap the trackpad again, select the Drag Lock check box.
To be able to perform a secondary click by tapping two fingers on the trackpad, select the Tap trackpad using two fingers for secondary click check box. A secondary click is equivalent to a right-click with a two-button mouse or a Ctrl+click. This typically activates a contextual menu when you are working in the Finder, for example.
To make the trackpad less sensitive to keep accidental inputs from occurring, select the Ignore accidental trackpad input check box. If you find commands or actions happening when you don't intend them to, make sure this is enabled.

You may have to intentionally use some of the gestures for a little while, such as using dragging, but soon you'll find them becoming second nature and you'll be able to control things on the desktop quickly and easily. If you find some unexpected actions happening, check the gestures you have configured again. Some of them might cause you a problem if they mimic a natural motion of your fingers; either disable the gesture or simply be aware of it until you get used to it.
Your MacBook's keyboard is used not only for typing but also for controlling your computer, particularly through keyboard shortcuts. In this section, you first learn how to configure the basic functions of the keyboard and then how to control the language it uses. In the latter parts, you learn how to use the keyboard to efficiently control your MacBook.
Start with the Keyboard pane of the System Preferences application, as shown in the following steps:
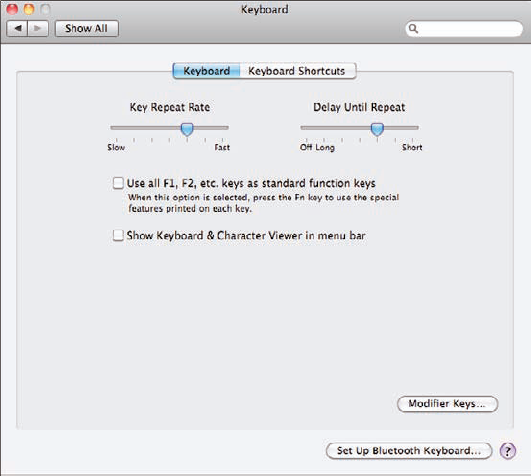
Open the Keyboard tab of the Keyboard pane of the System Preferences application (see figure 11.3).
Drag the sliders at the top of the pane to configure how keys repeat when you hold them down. The Key Repeat Rate slider controls how fast the corresponding character repeats while the Delay Until Repeat slider controls how long you hold the key down to start repeating.
If you want the function keys to behave as standard function keys instead of the default actions they are programmed to perform (such as F2 to brighten the display), select the Use all F1, F2, etc. keys as standard function keys check box. If you select this option, you must hold the Fn key down and press the appropriate key to perform its action (such as F10 to mute your MacBook).
To display the Input menu, including the Keyboard Viewer and Character Viewer commands, on the menu bar, select the Show Keyboard & Character Viewer in menu bar check box.
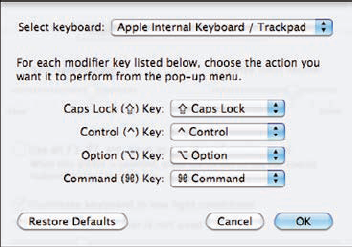
Click Modifier Keys. The Modifier Keys sheet appears (see figure 11.4).
For each of the four modifier keys, use the pop-up menu to select the action that you want to occur when you press that key. If your keyboard preference is such that the Control key is more convenient for you, you might want to set it to be the Command key, because you use that key more frequently. You can select No Action to disable a key, in which case it is grayed out on the sheet.
Click OK to set your preferences and close the sheet.
Note
I have never discovered a real use for the Caps Lock key, but I have accidentally turned it on thousands of times and found myself TYPING IN ALL CAPS, which is very annoying. You can disable this key by choosing No Action on its pop-up menu. Ah, now you don't have to yell as you type just because you accidentally hit this key.
You can configure the languages you use for the keyboard, along with other input preferences, using the Language & Text pane of the System Preferences application.
To configure languages, follow these steps:
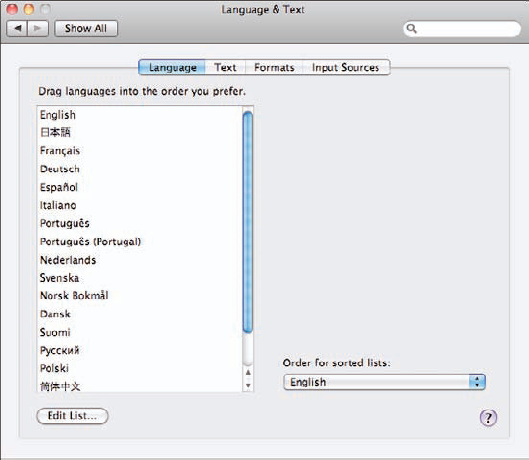
Open the Language tab of the Language & Text pane of the System Preferences application (see figure 11.5).
Click Edit List.
On the resulting sheet, click the check box for any language you don't want to be available and click OK. The sheet closes and the languages whose check boxes are not selected are removed from the list. You also see a warning that you have to log out and log in for the changes to take effect in applications.
Drag the languages up or down the list to change their order with the one you want to be the default at the top of the list.
On the Order for sorted lists pop-up menu, choose the language that should be used to sort lists. This is used regardless of the language you happened to be using at any point in time. For example, if you choose English on the list and have Italian as the current keyboard language, lists are still sorted according to English.
To configure global symbol and text substitution, use the following steps:
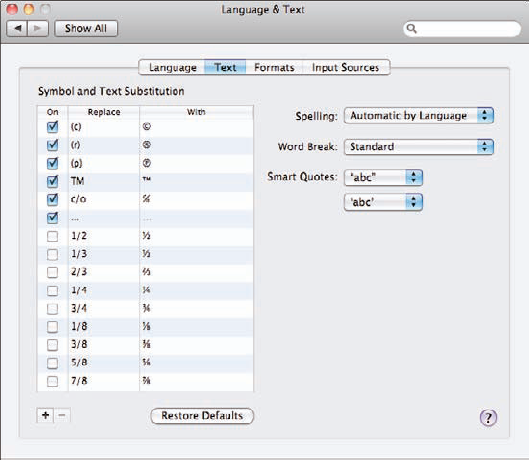
Open the Text tab of the Language & Text pane of the System Preferences application (see figure 11.6).
Note
The settings on the Text tab are global, meaning that your MacBook uses them unless overridden by an application. For example, if you use Word and have autocorrect set such that "(c)" gets corrected to the word "copyright," that setting overrides the global text substitution setting, which happens to be the copyright symbol © by default.
Select the On check box for any text substitutions you want to enable or deselect the On check box to disable a substitution.
Note
You can create custom substitutions by clicking the Add (+) button at the bottom of the substitution list. A new entry appears on the list and is enabled by default. Type the characters that will be replaced, press the Tab key, and then type what those characters will be replaced with. The substitution is added to the list and can be used just like the defaults. You can remove a substitution by selecting it and clicking the Remove (–) button (or you can just disable it by deselecting its On check box).
On the Spelling pop-up menu, choose how you want Mac OS X's Spell Check function to work. The default is Automatic by Language, which means your current language is used. You can open the menu to choose a specific language or choose Setup to do an advanced configuration of the spell checker.
On the Word Break pop-up menu, choose how you want word breaks to be applied. You can choose Standard (the default) or you can choose a specific language on the pop-up menu.
Use the Smart Quotes pop-up menu to determine what is entered when you press either single or double quotes.
You can configure format options like so:
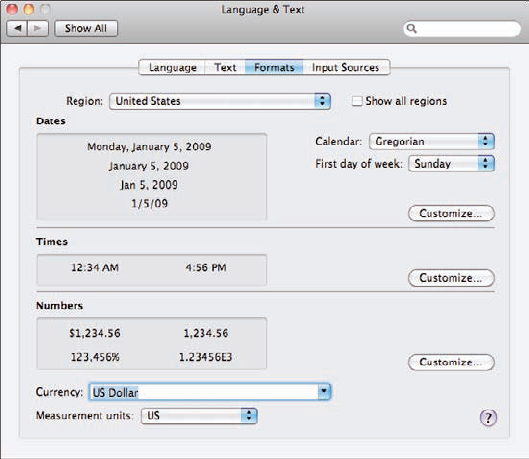
Open the Formats tab of the Language & Text pane of the System Preferences application (see figure 11.7).
Choose the region whose formats you want to use on the Region pop-up menu.
Use the pop-up menus to configure options for the various formats, such as the calendar you want, currency, and so on.
To specifically configure a format, click its Customize button, use the controls on the resulting sheet to customize the format, and click OK to use the new settings.
You can also configure the Input menu, which enables you to quickly choose among languages and select some other handy keyboard tools. Here's how:
Open the Input Sources tab of the Language & Text pane of the System Preferences application.
If you want the Keyboard & Character Viewer to be available, select its On check box. The menu appears on the Finder's menu bar.
Select the check box next to each input source you want to have available to you.
If you selected at least two input sources, select the Use the same one in all documents radio button or the Allow a different one for each document radio button to choose whether more than one input source can be available at the same time.
Select the Show input menu in menu bar check box. The Input menu appears on the menu bar; its icon is the flag for the currently selected input source.
It's worth taking some time to learn some of the ways you can control your MacBook using its keyboard; there's a lot of power hidden behind those mild-mannered keys.
The MacBook includes a number of built-in functions on the function keys that are quite useful (see Table 11.1).
Table 11.1. MacBook Default Function Keys
Function Key | What It Does |
|---|---|
F1 | Decreases display brightness. |
F2 | Increases display brightness. |
F3 | Uses Exposé to show thumbnails of all windows open in all applications; click a window to make it active. |
F4 | Opens or closes the Dashboard. |
F7 | Rewind/Previous in various applications, such as iTunes. |
F8 | Play/Pause in various applications, such as iTunes. |
F9 | Fast-forward/Next in various applications, such as iTunes. |
F10 | Mutes sound. |
F11 | Decreases volume. |
F12 | Increases volume. |
Eject | While technically not a function key because it's not labeled that way, this single-purpose key is useful nonetheless for ejecting a selected item, such as a DVD, a network volume, and so on. |
By default, you can perform these functions by simply pressing the appropriate function key. As you'll learn, you can remap these keys to different functions if you so choose. Remember, you can select the Use all F1, F2, etc. keys as standard function keys check box to make the standard function keys available; if you do this, hold the Fn key down and press the function keys shown in Table 11.1 to perform their default functions.
Note
The F5 and F6 keys don't have default actions preprogrammed for them and so are especially useful for assigning specific actions that you want to be able to activate by pressing a single key.
Mac OS X includes support for many keyboard shortcuts by default. For example, you've probably used
The Keyboard Shortcuts tab of the Keyboard pane of the System Preferences application. If you click this tab, you see a list of Mac OS X keyboard shortcuts. Select the type of shortcuts in which you are interested and the current shortcuts appear in the right pane of the window (see figure 11.8). You can also use this pane to change the current shortcuts and to create new ones.
Menus. When you open menus, keyboard shortcuts are shown next to the commands for which they are available.
Mac Help. Open the Help menu and search for shortcuts for the Finder and for your favorite applications.

Using the Keyboard Shortcuts tab of the Keyboard pane, you can configure keyboard shortcuts. You can enable or disable the default keyboard shortcuts, change them, and add your own keyboard shortcuts.
To configure default keyboard shortcuts, perform the following steps:
Open the Keyboard Shortcuts tab of the Keyboard pane of the System Preferences application. You see a list of standard OS keyboard shortcuts in various categories, such as Dashboard & Dock, Front Row, Screen Shots, and so on.
Select the category containing the shortcuts you want to change. The current commands and associated shortcuts are shown in the right pane.
Disable or enable any of the listed shortcuts by deselecting or selecting the shortcut's check box.
To change the key combination for a shortcut, double-click the current shortcut and press the new key combination you want to use for that command.
You can create your own keyboard shortcut for any menu command in any application. To add your own keyboard shortcuts, perform the following steps:
Identify the specific command for which you want to create a keyboard shortcut. If it is a command specific to an application, note the exact name of the command, including whether it includes an ellipsis. You can find commands on application menus or by accessing an application's Help system.
Open the Keyboard Shortcuts tab of the Keyboard pane of the System Preferences application.
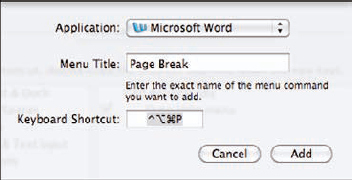
Click the Add (+) button at the bottom of the list of shortcuts. The Add Shortcut sheet appears.
On the Application pop-up menu, choose All Applications if you want the shortcut to be available for all applications, or choose a specific application to create the shortcut only within it.
In the Menu Title box, type the name of the command for which you want to create a shortcut exactly as it appears on its menu. If the command contains an ellipsis, you also need to include that because the text has to exactly match the name of the command.
Note
You can type the name of any command on any menu in an application even if it is nested within other commands. For example, Word has a Page Break command that you use to manually insert a page break in a document. To choose the command, you open the Insert menu, choose Break, and then choose Page Break. To create a shortcut for this command, enter Page Break in the Menu Title field.
In the Keyboard Shortcut field, press the key combination for the shortcut that you want to use to access the command (see figure 11.9).
Click Add. The sheet closes and when you return to the Keyboard Shortcuts tab, the shortcut you added is shown under the related application located in the Application Shortcuts category or under All Applications if you configured the shortcut to be available under all applications.
Open the application in which you created the shortcut. The keyboard command you created appears next to the command on the application's menu.
Test the shortcut. Sometimes applications already have a shortcut mapped to the shortcut you create, which can cause a conflict. You can resolve these either by disabling the application's shortcut or choosing a different keyboard shortcut.
One of the least used, but most useful, aspects of using keyboard shortcuts is keyboard navigation. You can use the keyboard to access almost any area on your MacBook in any application, including the Finder. For example, you can open any menu item by using only keys, even if that item does not have a keyboard shortcut assigned to it.
To see what the default keyboard navigation tools are, open the Keyboard Shortcuts tab of the Keyboard pane in the System Preferences application and select Keyboard & Text Input. You see the commands explained in Table 11.2. A quick explanation shows you how these work.
Table 11.2. Keyboard Navigation
Description | What It Does | Default Shortcut (hold the Fn key down if the standard function key preference is not enabled) |
|---|---|---|
Change the way Tab moves focus | By default, pressing the Tab key in windows and dialog boxes moves you only between text boxes and lists. This command toggles between that mode and having the Tab key take you to every element in a dialog box or window. | Ctrl+F7 |
Move focus to the menu bar | Highlights the Apple menu; use the Tab or arrow keys to move to other menus and commands on the menu bar. | Ctrl+F2 |
Move focus to the Dock | Makes the Finder icon on the Dock active; use the Tab or arrow keys to move to icons on the Dock. | Ctrl+F3 |
Move focus to the active window or next window | Moves into the currently active window or takes you to the next window if you are already in a window. | Ctrl+F4 |
Move focus to the window toolbar | If you are using an application with a toolbar, this makes the toolbar active. Use the Tab or arrow keys to select a button on the toolbar. | Ctrl+F5 |
Move focus to the floating window | If you are using an application that has a floating window, this takes you into the floating window. | Ctrl+F6 |
Move focus to the next window in the active application | Moves you among the open windows in the current application. | |
Move focus to the status menus in the menu bar | If you have enabled additional menus, such as the Displays menu, in the Mac OS X menu bar, this command highlights the first one; use the arrow or Tab keys to move to and select menus and their commands. | Ctrl+F8 |
Select the previous input source | When you have multiple input sources configured, this returns you to the one you used most recently. | |
Select next source in Input menu | When you have multiple input sources configured, this moves you to the previous source on the menu. | Option+ |
When something, such as a menu, is ready for your action (it is selected in other words), Mac OS X calls that being in focus. For example, the shortcut for putting the menu bar in focus is Ctrl+F2; if you haven't set your keyboard to use the standard function keys, hold down the Fn key and press Ctrl+F2. The apple marking the Apple menu is highlighted to show it is in focus. Once it is in focus, you can move to any menu and commands by pressing the right- and left-arrow keys until the menu you want to use is highlighted; then use the down-arrow key to open the menu. Once open, use the down-, up-, left-, and right-arrow keys to select the command you want. When that is selected, press the Return key to activate it. It takes a little effort to get the hang of this, but once you do, you can quickly move to any menu command.
The Input menu enables you to change the current language you are using or to activate specific tools, such as the Character Viewer. A flag representing the language you have made the default is shown at the top of this menu on the menu bar. When you open it, you see the items you configured there (see figure 11.10).
You can change the current input source, which is indicated by the check mark, to a different one by selecting a different source on the menu. When you do this, the keyboard is converted to the layout appropriate to the source you selected.
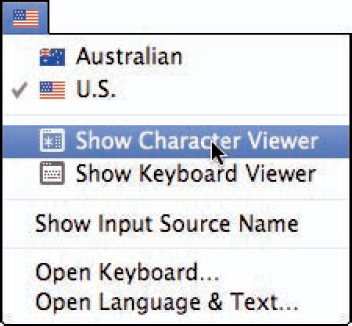
The Character Viewer is a tool to help you find special characters in various languages and quickly apply those characters to your documents. You can open the Character Viewer by doing either of the following:
Open the Input menu and select Show Character Viewer.
In the Finder, choose Edit

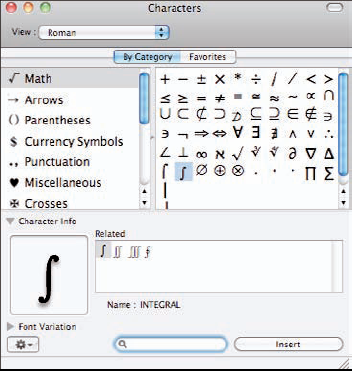
When the viewer opens, you see that it has two tabs (see figure 11.11). The By Category tab enables you to select and insert categories of characters you need. When you find a character you use regularly, you can add it to the other tab, which is the Favorites tab, so you can grab it easily and quickly.
To find and use a special character, perform the following steps:
Open the Character Viewer.
On the View pop-up menu, select the language sets you want to access. For example, to see Roman characters, select Roman. To see all possible characters, select All Characters.
Click the By Category tab.
Select the category of character you want to view in the left pane. For example, select Math to view mathematical symbols. The characters in the category you select appear in the right pane.
Select the character with which you want to work by clicking it.
Expand the Character Info section by clicking its expansion triangle at the bottom of the window. You see a large version of the selected character along with its name. You also see characters to which the selected one is related. You can choose to work with one of the related characters by clicking it. The one you click becomes selected, even if it is not in the currently selected category.
To apply different fonts to the character, click the expansion triangle next to the Font Variation tab. When you expand the Font Variation section, a preview pane appears that shows a preview of the character you have selected along with its name. You can see a version of the character in each font family in the collection selected on the Collections pop-up menu.
Select the font collection you want to use on the Collections pop-up menu.
Click the version of the character you want to use.
Continue adjusting the character until it is the way you want it.
Click Insert with Font. The character is pasted into the active document at the insertion point.
Note
If you don't apply a font to the character, the Insert with Font button is just the Insert button.
Close the viewer. Because it remains on top of all other windows, you'll probably want to keep it closed whenever you aren't using it.
Note
After you configure a character and want to reuse it, save it as a favorite. Open the Action menu at the bottom of the window and select Add to Favorites. This copies the character onto the Favorites tab. You can use it again by selecting the Favorites tab and clicking the character.
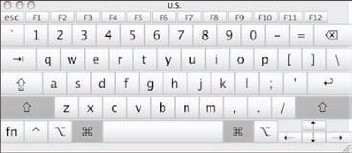
The Keyboard Viewer is a simple tool that shows you the layout of the keyboard in specific situations. To use it, select Show Keyboard Viewer on the Input menu. The Keyboard Viewer appears (see figure 11.12). You see what each key on the keyboard represents for the current input source. Hold down the modifier keys to see their impact.
Bluetooth support is built in to your MacBook, so you can wirelessly connect to and use any Bluetooth device.
Bluetooth communication is set up between two devices through a process called pairing, where each device recognizes the other and they are paired so that they can communicate with each other. A single device can communicate with more than one other Bluetooth device at the same time. Each device with which your MacBook communicates over Bluetooth must be paired separately.
To be able to pair two devices together, they must be able to "find" one another. To accomplish this automatically, the devices must be discoverable, meaning that they are broadcasting their Bluetooth signals to other devices in the area so that those devices can find and pair with the discoverable device. If you don't want your MacBook to be discoverable by other devices, you can turn this off, but pairing devices will be a bit more difficult.
Bluetooth communication requires hardware (transmitter/receiver) and software. Both of these are part of your MacBook, but you need to configure Bluetooth services on your MacBook before you try to connect Bluetooth devices to it. Here's what to do:
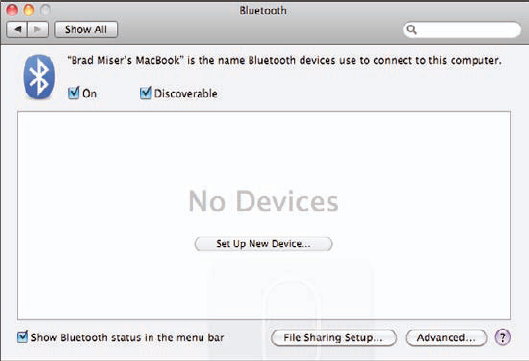
Open the Bluetooth pane of the System Preferences application. The Bluetooth pane appears. In the center part of the Bluetooth pane, you see the devices with which your MacBook is currently communicating or the "No Devices" message if you haven't paired it with any devices yet (see figure 11.13).
Select the On check box. Bluetooth services start.
Select the Discoverable check box. This makes your MacBook discoverable by other devices because your MacBook transmits signals that other devices can detect. You can still connect to your configured Bluetooth devices when this box is not selected; your MacBook just won't be able to be detected by other devices automatically.
Select the Show Bluetooth status in the menu bar check box.
Leave the Open Bluetooth Setup Assistant at startup when no input device is present check box unselected. This is for desktop computers that might only have Bluetooth input devices; because your MacBook has a built-in keyboard and trackpad, it always has input devices.
Select the Allow Bluetooth devices to wake this computer check box. When you use a Bluetooth mouse or keyboard, you'll be able to wake your MacBook with one of those devices.
Select the Prompt for all incoming audio requests check box if you want to be warned when Bluetooth audio devices attempt to communicate with your MacBook.
To share your MacBook Internet connection using Bluetooth, select the Share my Internet connection with other Bluetooth devices check box. Because it's slower than Wi-Fi, you should use AirPort or Ethernet instead of Bluetooth to share an Internet connection with other computers. However, sharing through Bluetooth can be useful for PDAs or other handheld Internet devices that only support Bluetooth communication.
Click OK. The sheet closes. Your MacBook is ready to connect to Bluetooth devices.
Using Bluetooth, you can easily connect a mouse to your MacBook.
The rest of this section focuses on Bluetooth mice, but using a wireless USB mouse is similar in many respects. The main differences are that you have to connect the USB transmitter to a USB port, and you don't have to go through the pairing process.
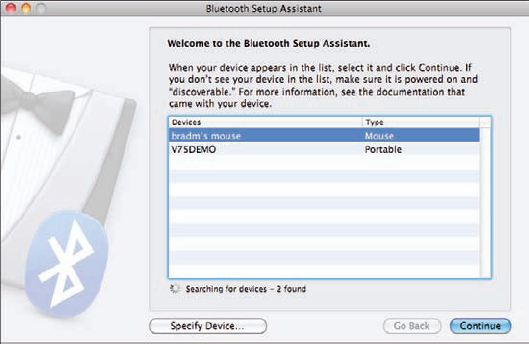
To set up a new Bluetooth device by pairing it with your MacBook, you use the Bluetooth Setup Assistant. Follow these steps:
If the mouse is not auto-discoverable, and most mice are not, then press its discoverable button. These are usually small buttons located on the bottom of the mouse. When you push this button, the mouse goes into Discoverable mode, which causes the device to start broadcasting a Bluetooth signal that your MacBook can detect. To make an Apple Wireless Mighty Mouse discoverable, turn it on by moving the switch on the underside so the sensor is exposed; the green power light illuminates.
Open the Bluetooth menu and choose Set Up Bluetooth Device. The Bluetooth Setup Assistant opens.
Click Continue.
Click Mouse.
Click Continue. Your MacBook searches for available Bluetooth mice and presents the mice it finds on the list (see figure 11.14).
Select the mouse you want to pair.
Click Continue. When the pairing is successful, you see the Conclusion screen.
Click Quit. The Bluetooth mouse is ready to configure.
Following are the steps to configure an Apple Wireless Mighty Mouse (mice that have other features are configured for those specific features, but the general process is the same):
Open the Mouse pane of the System Preferences application.
Use the sliders to determine tracking, double-clicking, and scrolling speeds.
Choose the action that happens when you press the left or right side of the mouse on the pop-up menus with lines pointing to the respective sides. A common configuration is to select Primary Button (click) on the left menu and Secondary Button (right+click) on the right menu.
Use the top pop-up menu to select the action that occurs when you press the scroll ball.
Use the pop-up menu connected to the side buttons to set the action that happens when you "squeeze" the buttons on the sides of the mouse. Though there is a button on each side of the mouse, they are connected and perform only a single action.
Use the Scrolling pop-up menu to configure the Scroll ball, such as to allow both vertical and horizontal scrolling.
To use the Scroll ball to zoom, select the Zoom using scroll ball check box, choose the modifier key to activate scrolling on the pop-up menu, and click the Options button to configure zooming options.
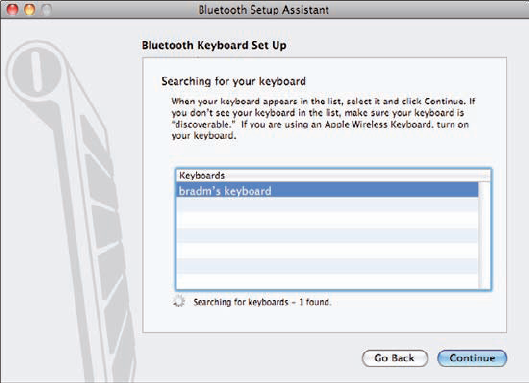
There may be times when you prefer to use an external keyboard instead of the MacBook's built-in keyboard. Just like it is with a mouse, it is easy and convenient to add a Bluetooth keyboard. Follow these steps:
If the keyboard is not auto-discoverable, press its discoverable button. These are usually small buttons located on the bottom of the keyboard. When you push this button, the keyboard goes into Discoverable mode, which causes it to start broadcasting a Bluetooth signal that your MacBook can detect.
Open the Bluetooth menu and choose Set Up Bluetooth Device. The Bluetooth Setup Assistant opens.
Click Continue.
Click Keyboard.
Click Continue. Your MacBook searches for available Bluetooth keyboards and presents all those it finds on the list (see figure 11.15). Each keyboard is indicated by its name or a series of numbers, depending on whether your MacBook can decipher the keyboard's signal to include its name.
Select the keyboard you want to pair.
Click Continue. The pairing process starts and you see the Keyboard setup screen. Here, you type the passkey shown on the keyboard to complete the pairing process.
On the Bluetooth keyboard, type the passkey shown in the Assistant's window.
Press Return. If the pairing is successful, you see the Conclusion screen.
Click Quit. The Bluetooth keyboard is ready to configure.
After you pair a Bluetooth keyboard with your MacBook, configure it using the Keyboard pane in the System Preferences application. You see controls for the specific keyboard you are using. These might or might not be the same as the MacBook's internal keyboard, but in most cases, they are similar. Steps for configuring a typical keyboard appear earlier in the chapter.
Note
If you use different preferences for the Bluetooth keyboard than what you prefer with the MacBook internal keyboard, you need to reconfigure the Keyboard preferences each time you change keyboards.