If you connect your MacBook to the Internet with an AirPort Extreme Base Station or Time Capsule, as described in Chapter 3, you create a local network at the same time. Any devices connected to your local network, whether through a wired Ethernet connection or a wireless one, can communicate with the other devices on your network. This is a good thing because Mac OS X includes a lot of network features that you'll find to be very useful. Perhaps the most useful of these features is the ability to share files, but there are plenty of other powerful network features to explore and use.
Sharing Files
Sharing Screens
Sharing Printers
Sharing an Internet Connection
If you have more than one computer on your local network, the ability to share files among those computers is really useful because you can easily move files between them. You can also store files on one computer and work on them while using any other computer on the network. The three general sharing skills you'll learn in this section are:
Configuring your MacBook to share files with other computers
Accessing files that are being shared with you
Sharing files with Windows computers
To enable other computers to access files stored on your MacBook, you need to accomplish the first two of the following tasks, while the third task is optional:
Configure user accounts to access your MacBook from other computers.
Configure file sharing services on your MacBook.
Set specific security privileges on the files and folders you share.
To be able to access files on your MacBook, a user must have a valid user account on your MacBook that he uses to log in to your computer to access the files that you are sharing. Group is the only type of user account you can't use to share your files. Any Administrator, Standard, Managed with Parental Controls, or Sharing user accounts can access your MacBook; the Sharing type of user account is especially intended to provide only sharing access to your MacBook, while the access that the other types have depend on the type. For example, an Administrator user account has administrator access to your MacBook when logged in across the network.
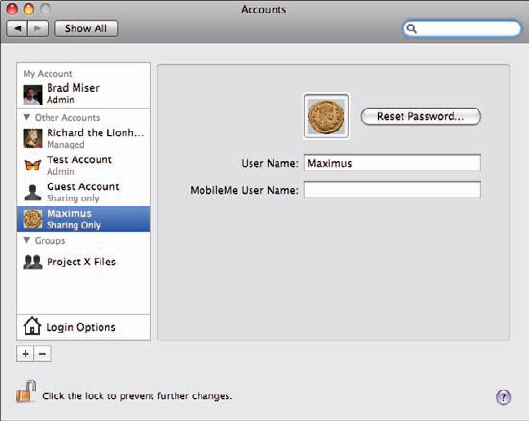
If sharing files is all you want the user to be able to do while logged in to your MacBook, create a Sharing user account (see figure 4.1). If you want to provide broader access to your computer, use a Standard or Administrator account instead. (See Chapter 2 for help creating and managing the user accounts on your MacBook.)
Note
By default, a user account called Guest Account exists on your MacBook (and every Mac, for that matter). This is a Sharing Only account that doesn't require a password to use. Initially, it provides access only to the Public folders in each user's Home folder. However, when you provide permissions to Everyone (more on this later), those permissions apply to the Guest Account.
The second part of enabling file sharing is to configure your MacBook to share its files, choose the folders you want to share, and determine the user accounts and permissions with which you want to share those folders. Here's how to perform these tasks:
Open the System Preferences application.
Click the Sharing icon. The Sharing pane opens.
To set the name by which your computer is recognized on the network, type a name for the computer in the Computer Name field. The default name is yourname's MacBook, where yourname is the name you entered when you configured your MacBook for the first time during the startup process. You can leave this name as is or create a different name.
Note
The name you see in the Computer Name field is a bit of a nickname. The real name for your computer is shown in the text below "Computer Name." This name is created based on the name you typed, but it is translated into acceptable syntax, and the extension ".local" is appended to it. For example, any spaces in the name you create are replaced with "-" and other special characters that aren't allowed are transformed. If you click Edit, you can edit the "true" name of your computer on the network.
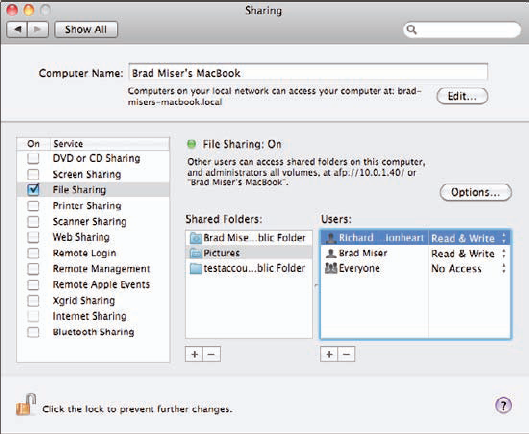
Select the On check box next to the File Sharing service in the left pane of the window. File sharing starts up, you see its status change to On, and you see your computer's address and name just below the Status text. Below this, you see the Sharing Folders section; this list shows the folders currently being shared. By default, the Public folder with each user account's Home folder is shared (which is why it is called a Public folder). In the Users section, you see the user accounts with which the selected folder is shared and the permission each user account has to that folder.
To share a folder, click the Add (+) button at the bottom of the Shared Folders list. The Select sheet appears.
Move to and choose the folder you want to share. You can only share folders for which you have Read & Write access.
Click Add. You return to the Sharing pane, and the folder you selected is added to the Shared Folders list; you see the current user accounts and associated permissions in the Users section. Initially, you see that your user account has Read & Write permissions, while Everyone has No Access (meaning that you are the only one who can use the folder).
Note
Everyone does actually mean what it says. It represents absolutely everyone that uses your MacBook or that can access it over the network. When you set a permission for Everyone, that permission is applied to all user accounts, except those for which you set specific access permissions.
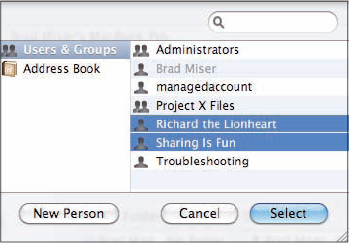
To allow a user account to access the folder, click the Add (+) button at the bottom of the Users list. The User Account sheet appears, showing all of the user accounts configured on your MacBook (see figure 4.2).
Select the user accounts with which you want to share the folder.
Note
If you click the Address Book option in the User Account sheet, you can access any person in your Address Book. If you select a contact in your Address Book, you're prompted to create a user account for that person to allow him to share files on your MacBook.
Click Select. You return to the Sharing pane and see the users on the Users list. After you add a user to the list, you set the permissions that this user has to the folder.
Note
If you'll be accessing files on your MacBook from other Macs, it's a good idea to create a user account with the same name and password on each computer to make it easier for you to log in.
Select a user on the Users list on the Sharing pane.
On the pop-up menu at the right edge of the Users list, choose the permissions for the folder that the selected user account has from the following options:
Read & Write. The user account can open and change the contents of the folder.
Read Only. The user can see and open the items in the folder, but she can't change them.
Write Only (Drop Box). The user can't see the contents of the folder or change them. All he can do is place files within the folder.
No Access. This option, available only for Everyone, prevents any access to the folder by anyone except the users shown on the Users list.
Repeat Steps 11 and 12 for each user on the Users list (see figure 4.3).
To remove a user's access to the folder, choose the user, click the Remove (–) button at the bottom of the Users list, and click OK in the warning sheet.
To unshare a folder, choose it on the Shared Folders list, click the Remove (–) button at the bottom of the Shared Folders list, and click OK in the warning sheet.
After you complete these steps, all that remains is to provide the user account information to the people with whom you'll be sharing your files.
As you saw in the previous section, you can share folders from the Sharing pane of the System Preferences application. You can also view and set sharing information for files and folders from within Finder windows. Check it out:
Open a Finder window and move to the folder or file for which you want to get or set sharing information.
Select the file or folder.
Choose File

Note
To quickly apply a set of permissions to everything within a folder, open its Info window and set the sharing permissions, as explained in this section. Open the Action menu (the gear icon) and choose Apply to enclosed items. Click OK at the prompt. All the files and folders within the selected folder have the same sharing settings.
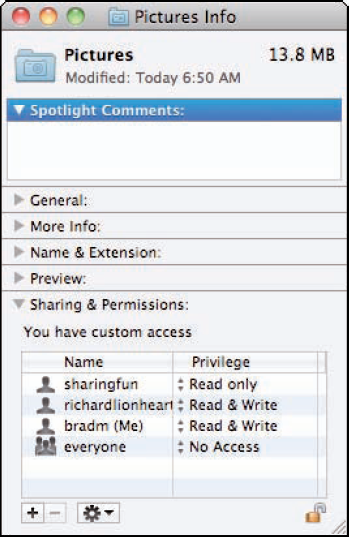
Expand the Sharing & Permissions section. You see each user account as well as the permissions that each account has to the file or folder you selected in Step 2 (see figure 4.4).
To set permissions for the folder, authenticate yourself under an Administrator account.
Click the Add (+) button to add users for the folder, or select users and click the Remove (–) button at the bottom of the window to remove users for the folder.
Use the Privilege pop-up menus to set the access permission for each user.
While it is better to give than receive, there's also the expression share and share alike. You can access files being shared with you in a couple of ways:
Browsing using the sidebar
Moving directly to a shared source by its address
Both of these methods work, but the browsing option is the easiest and fastest. If you are accessing a device that supports Bonjour, browsing is definitely the way to go.
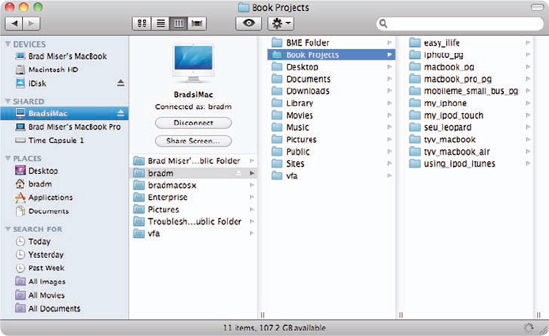
Thanks to Bonjour, as soon as your MacBook is connected to a network, any computers that are sharing files are immediately recognized and mounted on your desktop, making it easy to access the files they are sharing. When you want to access shared files, perform the following steps:
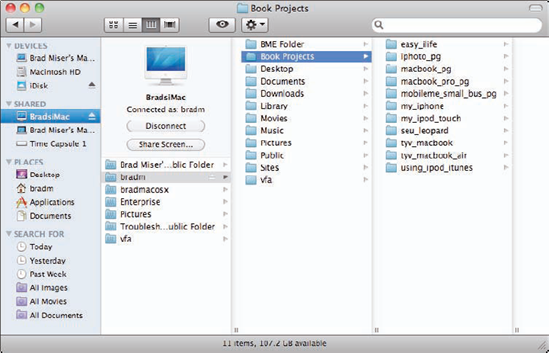
Open a Finder window in the Columns view. Use this view for consistency with these steps and easier access to the shared files.
In the Shared section of the sidebar, select the computer with the files that you want to access. In the first pane, you see the computer's name, its icon, your current connected status (as Guest, which happens automatically), and the Public folders for each user account on that computer.
Note
You don't need to log in to access Public files and folders because you are automatically logged in under the Guest account as soon as your MacBook detects another computer on the network that has file sharing enabled.
Click the Connect As button. The Login dialog box appears. The Registered User option is selected automatically.
In the Name field, type the name of the user account you want to use to log in. This should be the name of the user account that has been created for you to access the files you are allowed to share.
Type the account's password in the Password field.
Select the Remember this password in my keychain check box. This enables you to log in automatically in the future.
Click Connect. Your MacBook connects to the computer and mounts all the folders being shared with you in the Finder window; the resources you see are those for which the user account you are using has Read, Write Only (Drop Box), or Read & Write permissions (see figure 4.5).
Select the folder containing the files with which you want to work. The files in that folder become available to you under the following conditions:
If you have Read Only permission to a folder, you can view the files it contains (you can't save any changes you make to the files) or drag them to a different location to copy them there. You can't move any files into the folder, delete files from it, or save any files there.
If you have Read & Write permission to a folder, you can do anything you want with the files it contains, including making changes, copying, and deleting them.
If you have Write Only (Drop Box) permission to a folder, you can't see its contents. All you can do is drag files into the folder to copy them there.
Note
If you copy a file from a folder for which you have Read Only permissions to a new location on your MacBook, it is copied in the Locked state. If you try to make changes to the file in its new location, you are warned that it is a Locked file, and the Overwrite and Don't Overwrite buttons appear. If you choose Overwrite, a new version of the file is created that contains the changes you made and that is unlocked; from that point forward, it behaves just like a file you created on your MacBook.
For those computers that are not using Bonjour, you can move directly to a computer that is sharing its files using its address on the network. Try this:
If the computer you want to access is a Mac, open the Sharing pane of the System Preferences application and select File Sharing. You see the computer's address (starting with afp://) under the File Sharing status information. Use the address to log in to the computer.
From your MacBook's desktop, choose Go
Type the address of the computer you want to access in the Server Address field.
Click Connect. The Login dialog box appears.
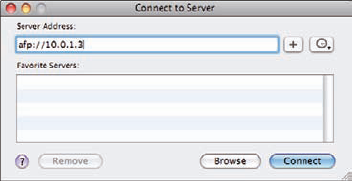
Figure 4.6. Using the Connect to Server command, you can log in to a file-sharing computer through its network address.
Warning
If your network uses Dynamic Host Control Protocol (most do), the address of computers can change over time. If you try to connect to a computer that you've successfully connected to before, check its address again to see if it has changed. If you use Bonjour to connect to a computer, you don't have to worry about this, because the address changes are managed automatically.
In the Name field, type the name of the user account you want to use to log in.
Type that account's password in the Password field.
Select the Remember this password in my keychain check box. This enables you to log in automatically in the future.
Click Connect. The Volume Selection dialog box appears. In this dialog box, you see the folders and volumes that are available to your user account on the computer to which you are logging in.
Select the volumes you want to use.
Click OK. Your MacBook connects to the other computer, and each volume you selected is mounted on your desktop. You can then use the contents of the volume according to the permissions the user account has for each item.
Note
If you regularly use an address to connect to a computer, add it as a favorite by clicking the Add (+) button in the Connect to Server dialog box; the address is added to the list of favorites shown under the Server Address field. You can move back to an address by selecting it and clicking Connect. You can also return to a recent server by opening the Recent pop-up menu (clock) located at the right edge of the Connect to Server dialog box.
If your network includes both Macs and Windows PCs, you can share files between them. The process is similar to sharing files between Macintosh computers, but there are some differences (which you could have probably guessed).
Configuring files to share with Windows PCs is accomplished very similarly to sharing files with Macs, but you need to enable Windows file sharing by also doing the following:
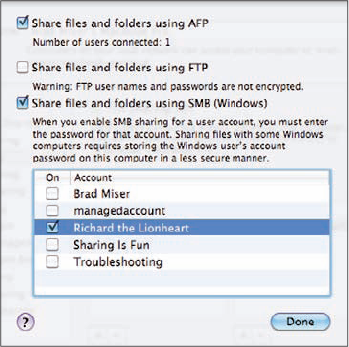
On the Sharing pane of the System Preferences application, click the Options button. The Options sheet appears (see figure 4.7).
Select the Share files and folders using SMB (Windows) check box.
Select the On check box for a user account that you want to be able to access files on your MacBook from a Windows PC. The Password dialog box appears.
At the prompt, type the user account's password in the Password field. This is the same password you created when you set up the user account.
Click OK. The dialog box closes and you return to the Options sheet.
Click Done. The selected files are available from Windows PCs on the network.
Note
You configure Windows sharing by user account; you control the folders that are shared using the tools on the Sharing tab. You can't share some folders with only Windows or only Macs. You can only enable file sharing for Windows by user account and control access to those files using the Shared Folders and Users tools. If you want to configure a folder to limit sharing only to Windows PCs, create a unique user account for Windows PC users.
After you configure your MacBook to share files with Windows computers, you can access them from a Windows PC. There are a lot of versions of Windows out there, and many variations and details related to networking for each. This section describes a fairly common configuration of a Windows XP SP2 computer accessing a wireless network provided through a Time Capsule. If you have a different configuration, the details might be a bit different for you, but the overall process should be similar. Also, these steps assume that the Windows computer is already connected to the local network through a wireless or wired connection.
You can access shared files from a Windows PC by performing the following steps:
On the PC, open the My Computer folder in a Windows Explorer window.
Click the My Network Places link in the Other Places section.
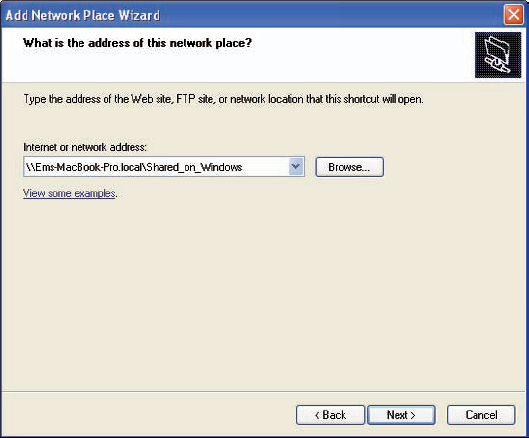
Click the Add a network place link in the Network Tasks section. The Add Network Place Wizard opens.
Click Next.
Select the Choose another network location option.
Click Next.
Type the path to and name of the shared folder you want to access on the Windows PC in the Internet or network address field (see figure 4.8). The path starts with \ followed by the computer's name and the specific folder you want to access. The computer's name is based on the "real" computer name, which is shown on the Sharing pane of the System Preferences application. For example, if your computer's name is mymacbookpro.local and the folder you have shared is called sharedfiles, the information you type in the box is \mymacbookpro.localsharedfiles.
Click Next. You're prompted to log in to the MacBook.
In the User name field, type the username for an account on the MacBook that has Windows sharing permissions enabled.
Type the account's password in the Password field.
Click OK. You see the Name screen.
Type a name for the shared folder. This can be any name you want and is how you recognize the shared folders on the PC. The default name is a combination of the folder's name, the computer's name, and its location. This tends to be very long, and so you might want to go with something simpler and shorter.
Click Next. You see the Complete screen. This confirms that you have successfully accessed the shared folder.
Click Finish. The shared folder opens on the Windows desktop, and you can access its contents based on your user security.
After you access a shared folder on the Windows PC, it remains in the My Network Places folder on the PC; you can return to the shared folder at any time by opening the My Network Places folder. If you log out of the Windows PC, you're prompted to log in to the MacBook the next time you access the shared folder.
Warning
If the Windows PC is connected to a Virtual Private Network (VPN), disconnect from that network before setting up sharing on the local network. Some VPN software can block Macs from being able to access a Windows computer.
To share a folder and its files that are stored on a Windows PC, perform the following steps:
Right-click the folder on the Windows PC that you want to share.
Choose Properties. The Properties dialog box appears.
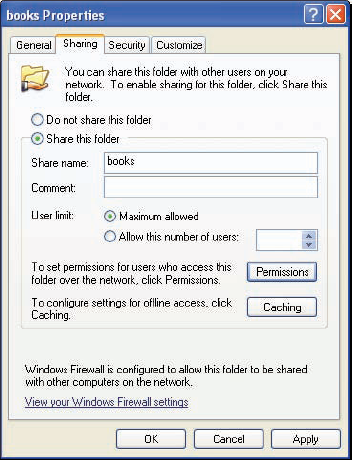
Click the Sharing tab.
Click the Share this folder radio button.
Click Permissions. The Permissions dialog box appears.
Choose a user or group at the top of the dialog box.
Select the Allow check box to allow, or the Deny check box to deny, each of the following permissions:
Change. The user account can open and change the contents of the folder.
Full Control. The user can perform any action.
Read. The user can only see the contents of the folder.
Click OK. You return to the Sharing tab (see figure 4.9).
Click OK. You're ready to access the shared folder from another computer on the network.
To be able to access shared files on a Windows PC, you need to know its address on the network and have a username and password. To log in, perform the following steps:
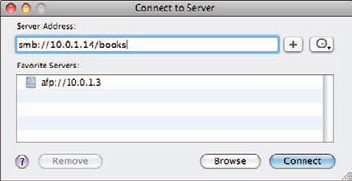
From the desktop, choose Go
Type the address of the computer you want to access in the Server Address field. The address should start with smb:// followed by the computer's IP address and the name of the shared folder. So, if the computer's IP address is 1.2.3.4 and the folder you are accessing is called books, the address you type would be smb://1.2.3.4/books (see figure 4.10).
In the Name field, type the name of the user account you want to use to log in. If your user account is part of a domain on the Windows PC, you must add the domain and as a prefix to the user account, as in xyzuseraccount, where xyz is the domain with which useraccount is associated.
Type that account's password in the Password field.
Select the Remember this password in my keychain check box. This enables you to log in automatically.
Click Connect. The shared folder is mounted on your desktop and you can access it according to your permissions.
Note
To determine the address of a Windows PC, choose Start menu
With screen sharing, you can control a Mac over the local network just as if you were sitting in front of it. This is very useful for helping other users on your network. Instead of moving to their locations, you can simply log in to their computers to provide help.
Like file sharing, you can configure screen-sharing permissions on your MacBook. You can also share the screens of other Macs that have screen-sharing permissions configured.
To share your MacBook screen with other Macs on your network, configure screen-sharing permissions. Follow these steps:
Open the Sharing pane of the System Preferences application.
Choose the Screen Sharing service on the service list. The controls for screen sharing appear.
Click Computer Settings. The Computer Settings sheet appears.
Select the Anyone may request permission to control screen check box if you want to allow anyone who can access your MacBook to request to share your screen. If you leave this unchecked, only user accounts for whom you provide screen-sharing permissions are able to control your MacBook.
Select the VNC viewers may control screen with password check box, and type a password if you want people using Virtual Network Computing connections to be able to control your MacBook. For a local network, you don't really need to allow this, and so in most cases, leave this unchecked.
Click OK. The sheet closes.
In the Allow access for section, choose one of the following options:
Click All users to allow anyone who can access your MacBook over the network to share its screen.
Click Only these users to create a list of user accounts that can share your screen. To create the list, click the Add (+) button at the bottom of the user list. The User Account sheet appears. Select the user accounts you want to share your screen and click Select. You return to the Sharing pane and the user accounts you selected are shown on the user list.
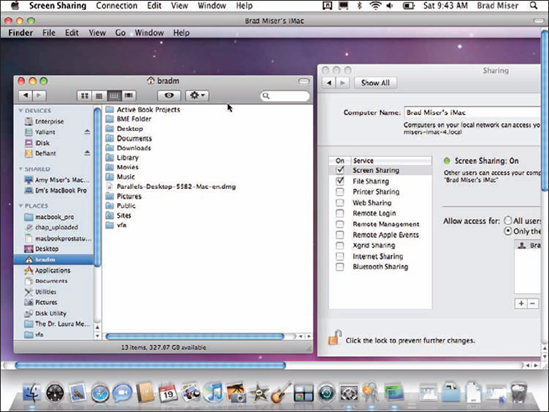
Select the On check box for Screen Sharing. Screen sharing services start and your MacBook is available to users on your local network according to the access permissions you set. The Screen Sharing status becomes On, and under that status you see the screen-sharing address of your MacBook on the network (see figure 4.11).

If you allow anyone to request to share your screen, then when someone wants to share your MacBook, you see a permission dialog box on your screen. To allow your screen to be shared, click Share Screen.
You can access other Macs being shared with you by browsing the network for available computers or by moving to a specific address.
To connect to another Mac to share its screen, perform the following steps:
Open a Finder window in Columns view. You can share screens starting from any Finder window view, but using the Columns view makes your steps consistent with these.
In the SHARED section of the sidebar, select and log in to the Mac whose screen you want to share.
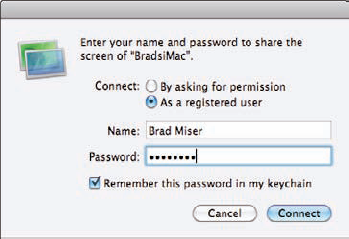
Click Share Screen (this command appears only if the user account you used in Step 2 has screen-sharing permission). The Share Screen Permission dialog box appears (see figure 4.12).
Use one of the following options to share the other Mac's screen:
To request permission to share the screen, click the By asking for permission radio button, click Connect, and wait for the person using the Mac whose screen you want to share to grant permission.
To log in using a user account with screen-sharing permissions, click the As a registered user radio button, type the username in the Name field, type the password in the Password field, select the Remember this password in my keychain check box, and click Connect.
Once the other person's desktop appears within the Screen Sharing window on your MacBook desktop, you can work with the shared Mac as you would your own.
You can also connect to a Mac to share its screen by typing its address on the network. To determine the address of a Mac whose screen you want to share, open its Sharing pane, select the Screen Sharing service, and note the address just under the Screen Sharing status information. The Mac's screen-sharing address starts with vnc://.
Once you have the other Mac's address, you can share its screen using the following steps:
From the desktop, choose Go
Type the address of the computer whose screen you want to share in the Server Address field. This address is something like vnc://1.2.3.4.
Click Connect. The Share Screen Permission dialog box appears.
Use one of the following options to share the other Mac's screen:
To request permission to share the screen, click the By asking for permission radio button and click Connect and wait for the person using the Mac whose screen you want to share to grant permission.
To log in using a user account with screen-sharing permissions, click the As a registered user radio button, type the username in the Name field, type the password in the Password field, select the Remember this password in my keychain check box, and click Connect.
Once the other person's desktop appears within the Screen Sharing window on your MacBook desktop, you can work with the shared Mac as you would your own.
When you share a Mac's screen, you use the Screen Sharing application. Its window, which has the name of the Mac whose screen you are sharing as its title, contains the desktop of the Mac whose screen you are sharing, including open Finder windows, applications, and documents (see figure 4.13). When your cursor is inside the Screen Sharing application window, any action you take is done on the Mac whose screen you are sharing. When you move outside the window, the cursor for your MacBook separates from the shared Mac's cursor and the shared Mac's cursor freezes (unless, of course, the user at that Mac is doing something, in which case you see the results of his actions).
When you access a shared Mac, its screen is automatically scaled to fit into the Screen Sharing application window. The desktop you see in the Screen Sharing window depends on the resolution of the Mac's desktop you are sharing. If it is very large, such as a 24-inch iMac that also has an external display connected to it, the information in the shared window is quite small so that it all fits on your MacBook screen. You can access the Display pane of the System Preferences application on the shared Mac to decrease its resolution so that the image appears larger on your desktop. Or, you can choose View
Warning
When you use screen sharing, you have the permissions granted by the user account you use. Be careful about what you are doing on the shared computer so that you don't accidentally do something. For example, don't use the shortcut
To move information from the shared computer to yours, copy that information on the shared computer and choose Edit
Note
If you have a MobileMe account, you can also share screens across the Internet. So, you could access a Mac at home while you are traveling with your MacBook. To do this, you set screen-sharing permissions. Type your MobileMe username and password on each computer (in the MobileMe pane of the System Preferences application) among which you want to share screens. Then use the Back To My Mac tab to configure screen sharing across the Internet. You can also share screens over the Internet through iChat, as you see in Chapter 9.
Printers are a great resource to share on a network because you seldom need one printer for each computer. More typically, one or two printers on the network are more than sufficient for everyone's printing needs. There are two basic ways to use printer sharing to make printers available on a network. You can connect a USB printer to an AirPort Extreme Base Station or Time Capsule and share it from there, or you can connect a USB or Ethernet printer directly to your MacBook and share it with the network.
Note
If a printer is networkable, you don't need to share it. Instead, connect the printer to the network through an Ethernet or wireless connection. This is better than printer sharing because no computer or base station resources are required for the networked printers.
To share a USB printer from a base station, perform the following steps:
Connect the printer to the USB port on the AirPort Extreme Base Station or Time Capsule.
Open the AirPort Utility located in the Utilities folder in the Applications folder. The base stations with which your MacBook can communicate are shown in the left pane of the window.
Select the base station to which the printer is attached.
Click Manual Setup. You're prompted to type the base station's password (if its password is saved on your keychain, it is entered automatically). The Manual Setup screen appears.
Click the Printers tab. The connected printer is shown under the USB Printers field.
Type the name of the printer in the Name field. This is the name that users select to configure the printer on their Macs.
Click Update. The base station is updated and restarts. Any computers on its network can use the printer connected to it.
Note
To be able to access a shared printer, each computer must have the printer's software installed; fortunately, Mac OS X includes the software for most printers by default.
If a Mac has a printer connected to it directly through Ethernet or USB, you can share that printer with the network. However, in order for other computers to use that printer, the Mac to which it is connected must be active (it can't be asleep) and currently connected to the same network. Because you'll probably move your MacBook around a lot, this isn't convenient. However, if your network includes a desktop Mac to which a printer is connected, you can share it using the following steps:
Connect and configure the printer to the Mac from which it is being shared.
Open the Sharing pane of the System Preferences application.
Select the On check box for the Printer Sharing service. The service starts up.
Select the check box for the printer you want to share. Other computers can use the printer by adding it; the printer's name is the current printer name with @yourmacbook, where yourmacbook is the name of the computer to which the printer is attached.
Any Mac can share its Internet connection with other computers, similar to a base station. While I don't recommend this for a permanent network (one reason is because the Mac has to be active all the time for the network to be available), it can be very useful when you are traveling with your MacBook Prp. You can share an Internet connection that you are getting through Ethernet with other computers using AirPort, or you can share an Internet connection that you are getting through AirPort over your MacBook's Ethernet port. Here's how:
Connect and configure your MacBook to access the Internet.
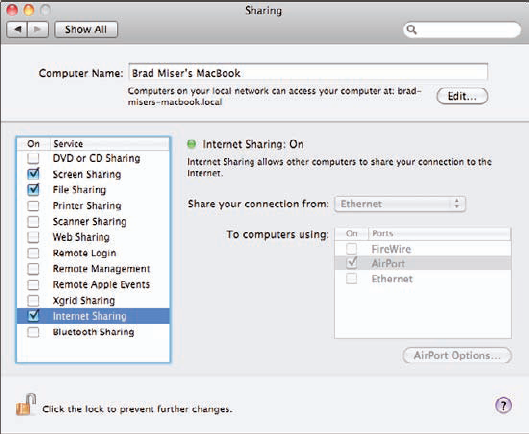
Open the Sharing pane of the System Preferences application.
Select the Internet Sharing service. Its controls appear in the right part of the pane.
On the Share your connection from pop-up menu, choose Ethernet if you get your connection through Ethernet, or AirPort if you get your connection through AirPort.
Select the On check box for the connection that other computers use to get their Internet connection from your MacBook. For example, if your MacBook is using Ethernet for Internet access, select the On check box for AirPort.
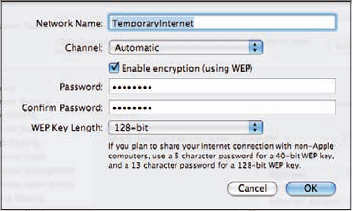
If you selected AirPort in Step 5, click AirPort Options; if not, skip to Step 13. The AirPort Options sheet appears (see figure 4.14).
Type a name for the network you are creating in the Name field. This is how others identify the network you provide.
Choose the channel for the network on the Channel pop-up menu. Automatic is usually the best choice, but you can choose a specific channel if your network has problems.
Select the Enable encryption (using WEP) check box. I recommend that you always create a secure network.
Type a password for the network in the Password and Confirm Password fields. If you're sharing your connection with Windows computers, make the password exactly 13 characters long.
On the WEP Key Length pop-up menu, choose 128-bit.
Click OK. The sheet closes, and you return to the Sharing pane.
Select the On check box for the Internet Sharing service.
Click Start in the resulting confirmation sheet. Your MacBook starts sharing its Internet connection. Other computers can connect to the Internet by joining the MacBook's wireless network if you are sharing via AirPort or by being connected to your MacBook's Ethernet or FireWire ports directly or through a hub (see figure 4.15).