What Is Macro Photography?
The Challenge of Macro Photography
Can I Afford to be a Macro Photographer?
Why Anyone Can Take Great Macro
Photographs
Try It Now
You have purchased a camera, and you are ready to explore the world of tiny subjects, details, and small things. There is a whole new world out there to be explored, with a vast number of exciting opportunities. Everywhere around you there are fascinating patterns, shapes, and items that look amazing if you get close enough.
By the end of this chapter, you will have your first tastes of macro photography, you will understand some of the theory behind it, and you will see some astounding photos that give you something to aim for as you start honing your macro photography skills.
Macro photography is the art of taking pictures of subjects up close. Some photos might be of relatively large things — such as a hummingbird or a large flower — and others might be of minuscule objects, such as the compound eye of a fly. However, macro photography isn't just about taking pictures of small things; it can also be detail shots of bigger subjects. In fact, some of the photos in this book are detail photos of skyscrapers!
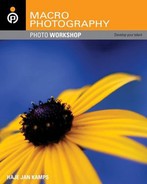
To many macro photographers, taking pictures is about capturing phenomena, items, and events that cannot easily be seen with the naked eye. A droplet falling onto a plate (see 1-1), a hummingbird in flight (see 1-2), or bubbles rising up in a glass of champagne can be seen every day; but, unless you freeze their motion, it is impossible to fully appreciate their beauty or study them in detail. The delicate structure of a bubble or the intricate detail of an orchid might remain forever mysterious to us.
Note
Capturing a droplet as it hits a surface is one of the extremely specialized branches of macro photography. It isn't easy, but it's worth a try; you will be amazed at what you can capture. Learn more about photographing everyday objects — including falling droplets — in Chapter 4.
If you are curious about the technical definition of a macro photograph, that is a grayer area. Historically, the definition was that the image had to be on the scale of 1:1 on the negative. This means that if you took a picture of a coin, you could put the coin on the developed negative, and the picture of the coin was exactly the same size as the coin.
Some sources claim that to be considered a macro photograph, the subject has to be the same size as — or larger than — its reproduction in print, as illustrated in 1-3. In other words, when you have your images printed, the prints you receive have to be a 1:1 reproduction of the coin. To me, this seems a bit impractical, because almost any photo you take can be a macro photo: You just need to enlarge the negative.
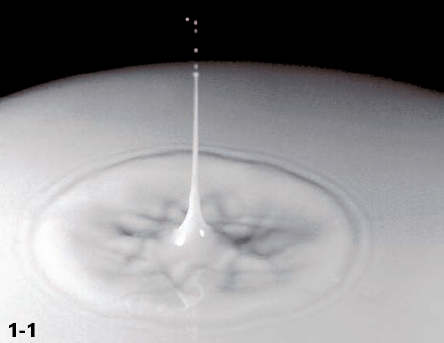
Figure 1.1. ABOUT THIS PHOTO This photo of milk falling into a saucer was lit with 2x500W floodlights. Taken with a Canon 135mm f/2.8 Soft Focus prime lens. 1/4000 sec., f/3.5 at ISO 100.
Ultimately, the definition of macro photography has changed over time — and digital technology has changed it even more. Macro photography has morphed into the act of taking pictures of small areas of a larger subject or of small subjects. That is as good a definition as any. I'm not here to split hairs; I'm in the business of taking pictures of them.
It is important to remember that anything can become a macro subject. Although two of the most eye-catching areas of macro photography are insects and flowers, you can explore many other subject options up close. The textures and shapes of foodstuffs, for example, might make an interesting theme for a macro photography project. Different fabrics, types of paper, animal furs, mechanical objects, and even the human body can make for exciting exploration.

Figure 1.2. ABOUT THIS PHOTO Hunting hummingbirds wins two prizes: Most rewarding and most frustrating photograph ever. It isn't impossible; it just takes a lot of patience and practice. Taken with a Canon 50mm f/1.8 mkII prime lens. 1/500 sec., f/6.3 at ISO 200.

Figure 1.3. ABOUT THIS PHOTO Macro photography allows you to get extremely close to your subjects, such as this feather. Taken with a Canon 55mm macro lens, 1/60 sec., f/5.6 at ISO 400. Photo by Hillary Quinn.
Have you ever flown in an airplane over your own house and looked down, only to realize how different everything looks from a distance? You have that same kind of perspective when you get into macro photography — the world can be observed from an entirely different perspective, and the rules of how you see things drastically change. The wristwatch you have worn for five years, and look at every day, might be a patchwork of fascinating, fine scratches, beautiful materials, and intricate reflections — and that's just on the outside. The inside harbors a wide array of small cogs, levers, and springs, or a collection of exciting electronic components.
Teaching yourself to see macro photography opportunities everywhere you look is half the battle in finding the most rewarding photos. It is quite satisfying to have friends look long and hard at a photo on your wall, say they love the look of it, but admit they don't know what it is. The stunned look on their faces after you explain what they are looking at is priceless.
Taking photos of small areas of larger subjects, of tiny subjects, or of small items is a rather refreshing approach to photography. Landscapes and portraits are great, of course, but you can see plenty of people nearly everywhere you go, and if you want landscapes, you can go for a walk in the countryside. In addition, you can choose to re-interpret these classic themes as macro photos. You can't express the grandeur of a landscape as a macro photograph, but you can pick out details representative of where you are, as illustrated in 1-4. Portraiture can be done with an up close twist on things, too, commonly by photographing someone's eye (see 1-5), but as with other photography, only your imagination limits your ideas.

Figure 1.4. ABOUT THIS PHOTO Figure 1-4 is an example of a landscape in macro form. The connotations of barbed wire give it a sinister feel. Taken with a Canon 28–135mm f/3.5 macro lens. 1/350 sec., f/3.5 at ISO 100.
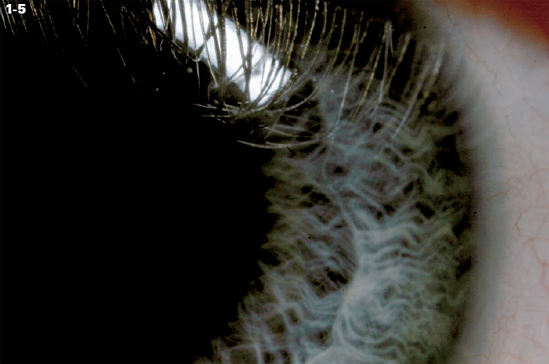
Figure 1.5. ABOUT THIS PHOTO In figure 1-5, the dramatic circular shapes make a striking photograph. Taken with a Canon MP-E 65mm f/2.8 macro lens and a MT-24EX macro Twin Lite flash. 1/125 sec., f/16 at ISO 100. Photo by Daniela Bowker.
Macro photography is challenging because many of the rules that apply to other branches of photography are meaningless when you start getting close enough for the results you want. If you want to partake in extreme macro photography, you end up very close to your subjects. In many cases, such as when photographing insects, you might find that your lens practically touches what you are trying to photograph, which creates a variety of challenges that do not occur in other types of photography.
Focusing is one of the biggest challenges you encounter in macro photography. To get sharp photos, your focusing has to be accurate, because the closer you are to your subjects, the lower your depth of field (DOF). A low DOF means that only a limited depth of your image is in focus. See 1-6 for an example of a photo that demonstrates the limited DOF you have in macro photography.
Note
Find out everything you need to know about macro photography equipment in Chapter 2.
A high DOF means that a lot more of your photograph is in focus. For macro purposes, limited DOF means that the amount of your subject that is in focus is drastically lower than if you were to take portrait photos, for example.
Figure 1.6. ABOUT THIS PHOTO A brushed metal surface shows how rapidly an image falls out of focus. The area in focus is less than a millimeter wide. Taken with a Canon MP-E 65mm f/2.8 macro lens and a MT-24EX macro Twin Lite flash. 1/125 sec., f/5.6 at ISO 100.
In addition to a limited DOF, most methods of taking macro photographs render the focusing ring on your lenses useless. With few exceptions, if you're going in close enough, you have to focus by moving your whole camera closer to — or farther away from —your subject. This does take a bit of practice, but it isn't nearly as difficult as it sounds. There are a few things that help you focus better. For example, a sturdy tripod with a macro focusing rail makes the process infinitely easier because you can make minute changes to your focus, evaluating as you go.
When working with macro photography, lighting is a serious challenge. Getting in close to your subject is easy if you use the right combinations of equipment, but generally, you lose a lot of light in the process. This means that you must use longer shutter times. When you consider how sensitive macro photography is to focusing and movement of the camera, the subject, or both, these longer shutter times can present a problem. One solution is to use artificial lighting, as was done in 1-7.
When your camera is very close to what you are photographing, much of the light you need is blocked out, just when you need it the most. You can help this by making the best of available light. Using reflectors to guide the light where you want it, using diffusers to make the light more omni-directional, and reducing shadows and fill-flash can help you get extra light where you want it. Finally, it is possible to do macro photography in a studio where you have full control over all the light, for maximum flexibility.
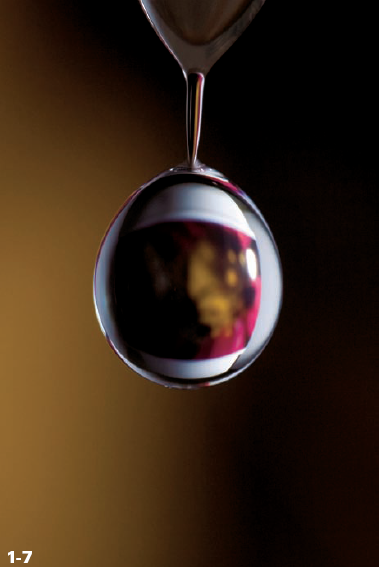
Figure 1.7. ABOUT THIS PHOTO By photographing in a studio with carefully controlled lights, you can create stunning images. Taken with a Canon EF-S 60mm f/2.8 macro lens and two external flashes. 1/200 sec., f/7.1 at ISO 100. Photo by Matthieu Collomp.
Note
In Chapter 3, I walk you through the possibilities and challenges of the light surrounding your photos. I also provide you with tips on how you can corral both the ambient light and artificial light to your advantage for the best results with your macro photos.
There are dozens of little obstacles you are likely to come across as you become more active and proficient at macro photography. Lens choice, filter use, which tripods are most suitable, choice of ISO, how to capture moving insects, use of reflectors, and the best way to enhance your photos digitally after they are captured are all examined in this book, either in Chapter 2, which deals with equipment, or in the chapter relevant to what you are photographing: flowers in Chapter 5, insects in Chapter 7, and so on.
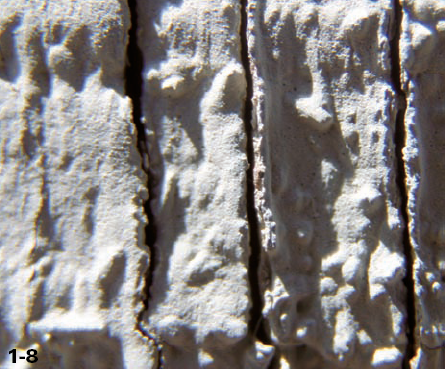
The people around you might think you are becoming a bit loony because you are constantly exploring seemingly normal objects and getting terribly excited about things that your friends fail to understand — until they see the results of your endeavors, of course. See 1-8 for an inspiring example of making all the right choices.
There is no doubt that photography can be costly — it seems that there is no end to the gadgets you can purchase for your camera. However, macro photography doesn't have to cost you a week's wages; it can be as affordable or expensive as you want it to be. It is perfectly possible to take stunning photographs — like 1-9 — without incurring any cost at all! This photo was taken by reversing a lens: holding it back-to-front against the camera body.
If you have a compact digital camera, you already have everything you need to get started. Most compact digital cameras have a macro mode, which allows you to get in close without any additional equipment.
If you have digital single lens reflex (dSLR) camera body, you have more options when taking macro shots. You can start taking macro photos right now without investing more money. In addition, only your imagination and your budget limit how close you can get to your subjects.
Assuming you already have a digital camera of some description, you don't have to invest a lot of money to be able to enjoy macro photography; at least until you decide if you want to specialize further in this photography genre.
Note
Find out how and why holding a lens back-to-front against the camera body is a cheap way of trying macro photography in Chapter 2!
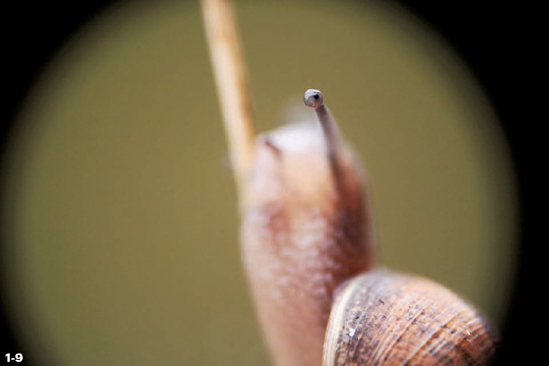
Figure 1.9. ABOUT THIS PHOTO Getting this close doesn't have to cost you anything. This photo was taken by holding a Canon 50mm f/1.8 lens front-first against the camera body. 1/500 sec., f/1.8 ISO 250. Photo by Hillary Quinn.
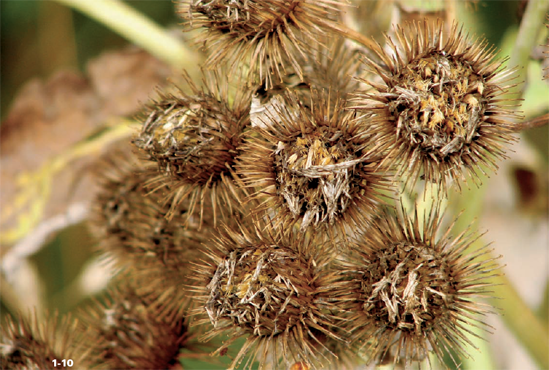
Generally, the more you want to magnify a subject, the more it costs you. You should be able to get 1:2 reproductions (meaning half life size) without spending any money. It might not sound like much, but even at this magnification, you can take stunning photos of most things, including flowers and insects (see 1-10).
If you want to get in closer than 1:2, you start to look at spending some money, but getting to 1:1 and even 2:1 (life size and twice life size) is relatively easy and doesn't have to break the piggybank. Getting beyond twice life size is where real costs start occurring, but there are also ways around many of the costs, including using some inexpensive techniques, making some of the equipment yourself, and minimizing the cost of the equipment you select.
Although there are ways to get up close with a compact digital camera, if you are serious about macro photography, you should consider investing in a dSLR. The design of a dSLR system makes attaching, modifying, and experimenting with different lenses, attachments, and accessories easier.
Macro photography is not entirely unlike playing chess: The rules are relatively simple to learn, but even if you know the rules, you are no match to Kasparov or Bobby Fischer. The great thing about macro, however, is that everything you photograph up close looks quite unusual. Even technically imperfect photos can have a high impact because you show the world in a different way.
Macro photography isn't about having the best equipment, having the most expensive camera, having access to a studio, or being able to afford to pay expensive models to pose for you. After you have learned the basics and managed to get the hang of the techniques required to get the photos, it is all in your own hands. Spotting a photo opportunity is not something you can learn from a book, it takes practice. I hope that the wide variety of examples shown throughout this book sets you on the right track and provides some inspiration.
Because there are opportunities everywhere you look, you can take macro photographs anywhere. Indoors or outdoors, when traveling or at home, whether you like to spend hours planning and setting up a shot or if you like to take a more spontaneous approach — such as grabbing a ball-point pen that happens to be on your desk as you write a book about macro photography (see 1-11) — there are always details that merit photographing, items that can be shown in a new light, and stunning photos to be found.
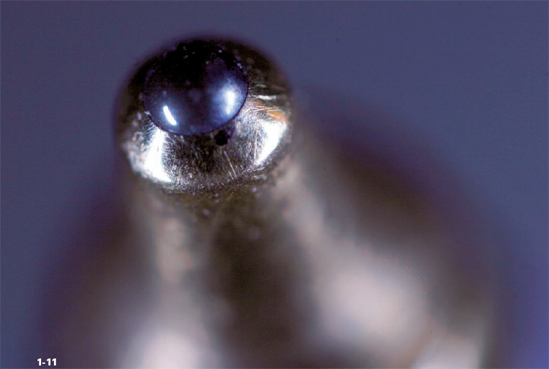
Figure 1.11. ABOUT THIS PHOTO This ball-point pen illustrates how you can look closely at the items around you with stunning results. Taken with a Canon MP-E 65mm f/2.8 macro lens, and a MT-24EX macro Twin Lite flash. 1/60 sec., f/4.0 at ISO 100.
With the same curiosity of a child with a magnifying glass, the only thing that differentiates you and another macro photographer is how creatively you can think about photography. If you figure that the side of a freshly cut baguette looks interesting, then perhaps it is, and maybe the photo will turn out great. Moss in a forest? Berries hanging on a bush? A fine mist of hair spray on a drinking glass? The more you manage to think outside of the box, give in to your own creativity, and go against the grain, the more unique and interesting your macro photos become.
Your first attempts at taking macro photographs can be easy. In fact, grab your camera right now.
If you have never tried the macro mode on your digital compact, try it out now. On most cameras, there is a button or a dial somewhere on the camera that switches the setting to macro mode. The button is normally marked with a picture of a flower and a mountain. The mountain icon indicates that camera will focus at infinity, and the flower icon is an instruction to the camera to focus close to the lens.
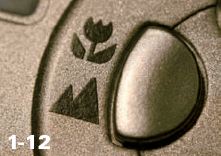
Figure 1.12. ABOUT THIS PHOTO The macro button on most compact digital cameras looks something like this. Taken with a Canon 50mm f/1.8 mkII lens reversed on 120mm bellows. 1/60 sec., f/1.8 at ISO 100.
Try this easy exercise to get started.
Dig a coin out of your pocket. Coins are something that everyone is familiar with, so they are good objects for your first attempts.
Hold your camera about two feet from your subject and press and hold the shutter button halfway down, so that your camera attempts to focus on the coin. With most compact digital cameras, if the camera can focus, a green light illuminates on the back of the camera, indicating that the camera is focused and ready to take a photo.
Now move a little bit closer, let go of the shutter button, and then press it halfway down again. See how close you can get before the camera can't focus anymore. After you are so close that the camera can't find a focal point, move back slightly until you have found the closest focal distance of your camera. If you want to cheat, this is usually printed on the camera lens or in the documentation that came with your camera.
Press the shutter all the way to take the photo. Make sure to hold the camera very still as you do this, because even the slightest movement is likely to cause blurring of your photo.
Admire your handiwork. Examine the picture on the LCD display of your camera to see if the lighting is even, if the coin is properly in focus, and if you are happy with the composition. If you can find any flaws in the photo, go back to Step 2 and try again! You can see what I came up with in 1-13.
On some compact cameras, the macro mode works only when the camera is fully zoomed out, whereas others can focus up close throughout the whole zoom range. Check your camera's manual, or try both to find out how your camera reacts. If your camera can focus up close throughout the whole zoom range, you can zoom in even closer, allowing for bigger magnification.
Experiment with your camera, and get to know its up close capabilities. You might be pleasantly surprised about how good the macro mode on your camera is!

If you have a dSLR camera, why not try and see how good your lens is at getting in close? The easiest way to find out is to put the camera into manual focus mode and set the focus to as close as possible. That means you turn the focus ring all the way away from infinity (which is usually marked as ∞ on most lenses). Now, see how close you can get to your subject and still have it in focus. When you reach this point, you have achieved the minimum focal distance.
If you are trying this with a zoom lens, attempt to get in close with the lens zoomed all the way in, as well as zoomed out. Different lens con structions mean that different lenses might have different characteristics while fully zoomed in or out. If you are lucky enough to already have a macro zoom lens, you should be able to focus up close on full zoom for maximum magnification.
Find a postage stamp. Because everybody is familiar with stamps, it means it is easy to relate to them as macro subjects: Seeing a shot of the tiny details made by the printing press is a good way to show exactly how close you can get.
Select a lens and inspect the focusing ring to find out how close you should be able to get. Most lenses have markings on them that show where the focal points of the lens are. These are normally shown as a scale on the focal ring itself and range from infinity (shown as ∞ on most lenses) to the minimum focal distance.
Set your lens into manual focus and turn the focusing ring all the way away from infinity. This ensures that your lens is set to the closest possible focal range.
Align your camera with the coin and hold your camera at the closest focal distance. The focal distance of a dSLR is measured from the imaging sensor, rather than from the front end of the lens. Most cameras have the focal plane marked on the camera body, usually as a small circle with a longer line through it, which runs parallel with your lens. Don't worry about actually measuring this distance — just guesstimate. Then move your camera closer or farther away until your coin is in perfect focus. This is the closest you can get with this particular lens.
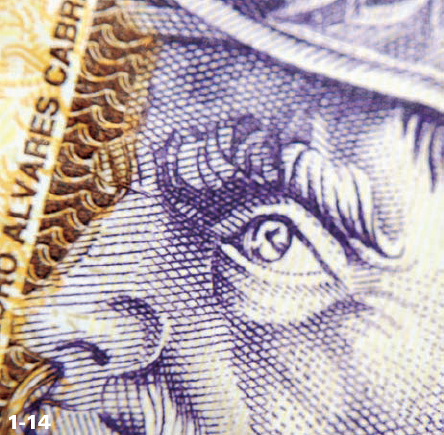
Take the photo. With your subject in perfect focus, carefully press the shutter button. See 1-14 for my result. Any camera shake at this point will translate into blurry photos, so be careful!
Admire your handiwork. Examine the picture on the LCD display of your camera to see if the lighting is even, if the coin is properly in focus, and if you are happy with the composition. If you're not happy, just try again.
Try it with all your lenses. It is useful to know how your different lenses react up close when you are working with macro photography; this is a good time to experiment with all the lenses you have. You might be pleasantly surprised about some of your lenses and disappointed about others. However, after you know the capabilities of all your glass, you are better prepared to select lenses for exercises later on in the book!
Congratulations, you have just taken your first macro photo!
Assignment
Colors, Candy, and Cameras, Oh My!
You should now understand that macro photography is not necessarily about the equipment you have. Anyone from a compact digital camera owner to a dSLR owner with a fancy lens can take an unusual and interesting macro photo with a little imagination.
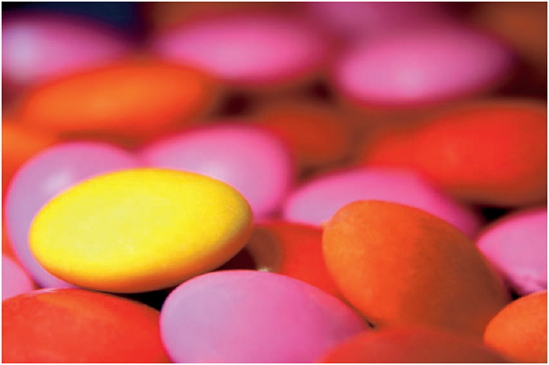
For this assignment, try your newfound talent out on creating a high-impact, colorful photo using Skittles, M&Ms, or a similar multi-colored candy. Be bold and try to find a way to make the photo different, standing out from anything you have seen before.
I have done some setup to get my image to work the way I want it to. You'll notice that I arranged the candies so that most of the warm-colored ones were in the background and a single lighter-colored one was in the foreground to catch the eye. For the lighting, I used a makeshift softbox and a flash on an off-camera cord. I took this photo with a Canon 28–135mm f/3.5 macro lens and a 24mm extension tube. The exposure was set to 1/250, f/3.5 sec. at ISO 100.
Note
Don't forget to go to www.pwassignments.com when you complete this assignment so you can share your best photo and see what other readers have come up with for this assignment. You can also post and read comments, encouraging suggestions, and feedback.