Macro On a Digital Compact Camera
Macro With a dSLR Camera
Flash and Lighting
Tripods
Macro photography is a specialized form of photography. In this chapter, I show you how you can take macro photos with your current equipment. However, if you want to get closer, you are going to need some extra equipment. The good news is that you don't have to spend too much money to get a good taste of macro photography. If you subsequently want to go farther in depth and discover more of the macro photography world, you can always invest in some of the higher quality (and more expensive) equipment.
Nowadays, you are most likely to first hear about macro photography when you pick up a digital compact camera. Most of these cameras have a macro function, which is usually identified with a fl ower icon.
On digital compact cameras, the macro function allows the camera to focus on subjects that are closer to the lens element than is possible without turning on the macro function. "Why bother?" I hear you ask, "Why not always allow the camera to focus closer?" There is some method to the madness. An auto focus camera automatically finds focus by searching through its focal range (the distances in which a lens can focus sharply on a subject) — much as you would if you were to focus manually. Interestingly, the macro function often provides images of good quality, as shown in 2-1.
To understand what the macro mode on a digital compact camera does, we have to take a look at the way focusing works. The focusing process starts at one end of the focal range, and then continues focusing until it finds the point with the highest contrasts. This is how the camera decides when something is in focus. If there is a sharp difference in the contrast levels (amount of contrast), something is in focus. If there is none, the camera thinks it is looking at something blurry, and that the scene is out of focus.
After the contrast levels start going down again, the camera realizes it has gone past its focus point, the lens position where the subject is in perfect focus. The camera now starts focusing back toward the other extreme, and it continues this process until it determines where the focus point is. This does sound a bit complicated, but it happens quite quickly because the camera assumes that the object on which you are trying to focus is between 3 feet and an infinite distance away from the camera. In effect, the camera is saving time by not even looking for the correct focus really close to the camera.
If you do want to take a picture of something that is closer than 3 feet, you have to tell your camera by pressing the Macro mode button. It then switches modes, searches for the focal point close to your camera, and ignores all the distances far away. It seems like a complicated way of doing things, but you would be rather cross with your camera if it took 4 seconds to focus every time because it was searching for the correct focal distance.
Because digital compacts don't have interchangeable lenses, it means that the compact camera approach to macro photography is a little more limited than the approach you can take if you use a dSLR camera. Don't let this discourage you. There is a lot you can do to get up close and personal with the world around you.

Figure 2.1. ABOUT THIS PHOTO The macro function built into many digital compact cameras can be powerful. Taken with a compact camera, 5 sec., f/2.7 at ISO 50. Photo by Amy Lane.
Apart from using the built-in macro functionality on digital compacts, the easiest thing you can do to improve your ability to take macro photos is to borrow or purchase some close-up filters (also known, incorrectly, as close-up lenses), as shown in 2-2. These items are called filters because they are screwed into the filter threads of a lens, but they aren't technically photographic filters. A filter changes something about the light that goes into the camera without altering its direction. The close-up filters actually bend the light, just like a lens. As such, a more correct name for them is close-up lenses.
Note
Technically, a close-up filter is rated in diopters, with the formula "1000mm / diopter rating." This means that a lens fitted with a 1x close-up filter can focus at the farthest to 1 m (1000mm). The maximum distance that a lens with a 5x close-up filter can focus down to is 1000mm / 5 = 200mm = 20 cm. To get in closer, you can just focus your camera at a closer focal distance or stack the filters.
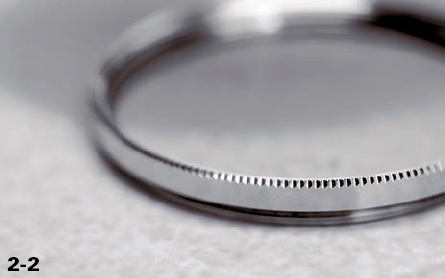
Figure 2.2. ABOUT THIS PHOTO A close-up filter screws into the front of your lens and allows you to focus closer to your subject. Photo courtesy of Sony.
Close-up filters work as a magnifying glass and allow you to focus more closely on a subject by bringing the entire focal range closer. If your digital camera has lens threading, you should be able to use these filters. If not, you can often add filter threading by using an adapter that slides onto the lens or clips onto the camera. Check with your camera manufacturer or your local camera store to find out if these threading adapters are available for your particular camera.
Close-up filters are generally available in diopters (magnification sizes) of 1x, 2x, 3x, 4x, 6x, and 10x. It is possible to stack several filters on top of each other for increased magnification. If you decide to stack close-up filters, make sure that you stack the largest magnification closest to the lens and continue in decreasing order of magnification. Image 2-3 is taken with two close-up filters stacked on top of each other, mounted on a threading adapter. The crystals are around a third of an inch across.
Optically, close-up filters are not nearly as good as a proper macro lens, and the results you get with them are often disappointing, compared to other techniques. Unfortunately, many of the techniques available to dSLR users — such as specialized macro lenses — aren't available to users of digital compacts. On the other hand, close-up filters are inexpensive, easy to take with you in the camera bag, and can serve as an inexpensive entry into the world of macro photography.
Note
FILTER THREADS ON COMPACT CAMERAS If your compact camera doesn't have filter threads built-in, don't worry. You aren't the first photographer to be disappointed about this. People have found ways to attach filters and lenses. You can, of course, just hold the filters and lenses you want in front of the camera, but this is not a good solution. The front of your lens might scratch the filter, and you have to use two hands to keep the lens and filter together.
The best alternative is to use an adapter tube, which enables you to mount filters in front of your camera lens. These adapter tubes slide around the lens barrel of your camera and are secured by screwing into the tripod mount or by clipping onto the camera body somehow. After the adapter tube is attached to the camera, you can screw filters into the adapter tube.
Some manufacturers offer these types of tubes as part of their accessory catalog, whereas others are made by third-party manufacturers. A good camera store should be able to help you, but be aware that adapter tubes aren't available for all cameras.

Figure 2.3. ABOUT THIS PHOTO Colored crystals would have been difficult to photograph if I couldn't get close enough. Taken with a compact camera with a +3 and a +1 close-up filter fitted on a threading adapter. 1/90 sec., f/5.6 at ISO 100.
Note
If you're handy with a set of tools, you can always make your own. A piece of PVC piping combined with a filter ring (carefully break and remove the glass from an old filter), glue, and some rubber bands can be turned into an adapter tube. See www.pbase.com/sinoline/casio_adapter for an example.
By definition, compact cameras don't have interchangeable lenses; however, that doesn't mean all hope is lost. There are many photographers who take incredible macro photos using creative solutions with their compact cameras.
One way to get closer is to add lenses to the camera. In professional terms, this is known as stacking lenses and is achieved by attaching a reversed lens to the lens that is already mounted on the camera. A reversed lens means that the front of the lens you are mounting is facing the front of the lens on the camera.
The great thing about stacking lenses is that you can use just about any lens as the reversed lens. The highest quality comes from using a prime lens (a non-zoom lens). For that reason, many photographers swear by them. Prime lenses can be found inexpensively in second-hand stores because serious photographers have moved on to shiny new digital SLRs and new lenses. That means that the second-hand market is flooded with perfectly fine prime lenses at low prices. If you go to your local second-hand camera shop, you can pick up an old Canon EF lens for about the same cost as a decent lunch and a cup of coffee. Alternatively, you can use an online auction site such as eBay. If the lens has mechanical faults (for example, the focus ring doesn't work), even better. You can't use the focusing ring when working with reversed lenses anyway. If the glass elements on the lens are clean and scratch-free, you can bag yourself an incredible bargain. Photo 2-4, for example, is taken with a lens that has a defective aperture mechanism. I rescued it from the garbage can in a photography shop!
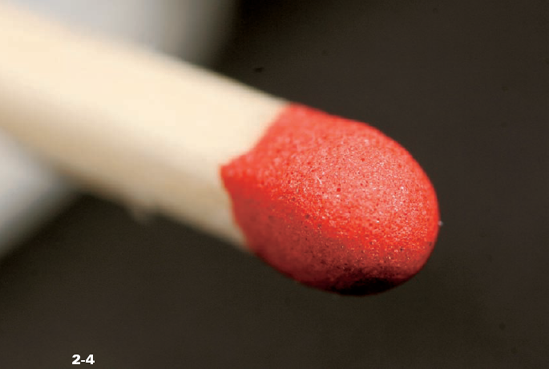
Figure 2.4. ABOUT THIS PHOTO Reversing a lens on a compact camera allows you to get up close and personal with your surroundings — in this case, a match. Taken with a compact camera with a reversed 28mm prime held in front. 1/2 sec., f/5.6 at ISO 100.
As a general rule, the wider the angle of the lens, the closer you can get to your subject. Using a reversed 28mm prime lens enables you to get closer than if you used a reversed 85mm prime. Experimentation is the key — don't hesitate to go to a local camera shop and ask to try a few of their used camera lenses so you can get a feel of what works for you.
Now that you have your lens, all you need to do is to mount it back to front. To attach the lens to the camera, you can use a lens stacking adapter, known as a male-to-male coupling ring. This is a metal ring that has a male filter ring on both sides, allowing you to attach the camera lens as if it were a filter. It helps if the lens you are attaching to your camera is large, because you are likely to experience serious vignetting (light fall-off toward the edges of the frame) of your subject. Some photographers (such as Hillary Quinn, whose photos are scattered throughout this book) save made this vignetting part of their photographic style with great effect — see 2-5 for an example. So, vignetting is not necessarily a bad thing.
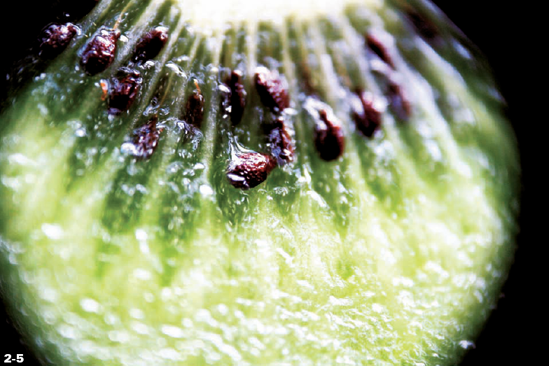
Figure 2.5. ABOUT THIS PHOTO Photo of a kiwi fruit taken with a reversed lens. Note the vignetting. Taken with a compact camera with a reversed 55mm prime lens held in front. 1/125 sec., f/5.6 at ISO 400. Photo by Hillary Quinn.
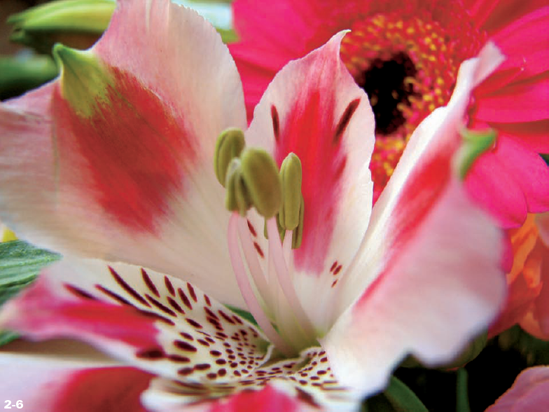
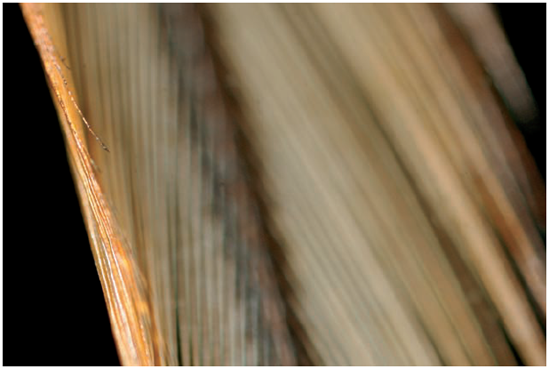
To use this lens set-up, all you need to do is to zoom your camera in all the way on the optical zoom. You have to focus by moving your lens closer or farther away from the subject. Your camera might have problems focusing and might refuse to take photos. If this happens, use the macro/infinity button to set your camera to focus on infinity (that's the little mountain icon). This way, the camera ignores the focus and takes the photo anyway. If your camera has manual focus, try to get it to focus on the closest possible focal range — that way, you can get closer to your subject. Photo 2-6 illustrates how a good macro mode can help you create beautiful images.
Digital Single Lens Reflex (dSLR) cameras have revolutionized the world of photography. Now affordable to amateur photographers, they provide all the flexibility of a traditional film SLR system, including interchangeable lenses of vastly higher quality than those on compact cameras, the possibility of using external flashes, and the better availability of accessories and tools to make taking photos easier and more creative.
The big question facing photographers is: "What brand of camera should I choose?" The two brands that instantly spring to mind are Canon and Nikon. The ongoing argument centers around Nikon being better at X, Canon having more Y, and nitpicking at silly little details. In all honesty, it does not matter which brand you choose. dSLR cameras are generally of extremely high quality. Ultimately, the decision on which camera to buy comes down to the photographer's preference more than the camera equipment used.
I chose Canon about 15 years ago. When my father gave me my first camera, a Canon A1 SLR, it was the start of a life-long addiction to photography — and a string of Canon cameras. I'm sure that if he had given me a Nikon, I'd still be a Nikon user to this day. The point is: It is utterly irrelevant which brand you choose, as long as you know how to use your camera and manage to capture the moments you want.
If you just want to have a go at macro photography without buying any additional equipment, there are a few things you can do. The first thing to try is to see how close you can actually focus with your lenses. Set the focus to manual focus and turn the focusing ring all the way away from infinity focus. Now, zoom all the way in and see how close you can get. You may be surprised by the results!
If you aren't up for buying a dedicated macro lens, close-up filters can be the first step toward photographing small things. The results are of lower quality than reversing a lens or using a proper macro lens, but close-up filters are cheaper than a macro lens, and they are easier to carry with you, if you only occasionally do macro work.
If you are willing to spend some money on getting started in macro photography, try a macro lens, which is manufactured in a special way to make the lens especially suitable for up close photography. Normal, non-macro lenses are designed so the sharpness and contrast of the lens gets better the closer you focus to infinity. The thinking behind this is that most of the photos you take are toward the end of the focusing range. With a macro lens, however, it is the other way around. Most macro lenses are quite good on the longer focal ranges, but they really excel on sharpness, contrast, and overall photo quality in the other extreme of the focus range — up close. See 2-7 for an example. Notice that the close-up subject is in focus, while the background is a bit less focused.
In practice, using a macro lens means that you can take pictures at shorter focal distances than you can with a normal lens. The most extreme macro lenses can focus down to 2 cm (approx. 0.8 inch). Such lenses are often found on digital compact cameras, in particular the models from Casio and Nikon, but this isn't necessarily the best way forward for SLR cameras. Instead, macro lenses are usually lenses that have a longer focal length, combined with the ability to focus at relatively short distances — typically 1 m or closer.
Macro lenses are available from around 50mm to as high as 300mm. Shorter focal lengths can give higher sharpness, but you have to get really close to get a full macro reproduction of your photo. If you are photographing insects or animals, a 50mm macro lens won't be of much help. To be able to focus at that magnification, you need to be practically touching the subject. Let's face it, the butterfly will be long gone by the time you trip the shutter. In addition, the lens itself is likely to cast a shadow on what you are trying to photograph, which makes things more difficult.
Note
When handholding a camera, be careful of camera shake! As a general rule, you can hold a lens at shutter times that are the reciprocal of the focal length of your lens. In other words: You can photograph as slow as 1/50 sec. with a 50mm lens and as slow as 1/180 with a 180mm lens. Longer shutter times require a faster lens, an image stabilized lens (which can gain you a couple of stops), a tripod (to eliminate camera shake), or a higher ISO value on your camera.
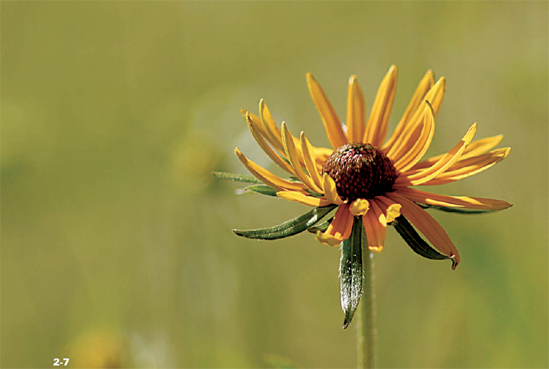
Figure 2.7. ABOUT THIS PHOTO Macro lenses are good all-around lenses that happen to be particularly good up close and focus closer than regular lenses. Taken with a Canon 28–135mm f/3.5 IS lens at approx. 120mm. 1/500 sec., f/5.6 at ISO 100.
Longer focal lengths, then, make a lot of sense. There are fine 180mm macro lenses out there; however, they present another challenge. By using a longer focal length, you start to lose a lot of light due to the way the lenses are designed. Handholding the lens becomes more difficult. Many photographers find that using a 100mm macro photo lens is the best approach. It is no coincidence that most camera systems have a 100mm macro lens in their arsenals. Canon has the excellent Canon 100mm f/2.8 Macro USM. Nikon has the mighty fine 105mm f/2.8D AF Micro-Nikkor. In addition, third-party lens manufacturers, such as Sigma and Tamron, have a series of macro lenses that cover the whole range from 50–300mm, all with full macro capabilities. The main advantage of using dedicated macro lenses is that you don't have to worry about accessories and attachments. A photo like 2-8 can be taken with a single lens, which allows for impulsivity and makes it easier to bring your macro equipment with you when you go traveling looking for macro opportunities.
In terms of price, macro lenses are usually more expensive than their non-macro counterparts. On the other hand, they are usually of significantly better quality. Even if you never plan to do any macro photography it's worth considering a macro lens if you are in the market for a high-quality lens.
More than anything else, a dedicated macro lens offers you the flexibility of being able to do macro photography on a whim — the lens you bring with you is good enough to photograph anything you come across. If you were to go on safari on a budget, for example (see 2-9), it would be highly advisable to take something like the Sigma 70–300mm APO DG MACRO lens (see 2-10) with you. Not only do you get the flexibility of a good quality tele-zoom lens, but the macro function is available at focal lengths of above 200mm, allowing you to focus at distances down to 95 cm, for reproductions of 1:2. At around $220, it's an absolute bargain.
In addition to all-around lenses that are particularly good for macro photography, there are a few special lenses out there particularly built for macro photography. Canon's MP-E65 is widely recognized as being one of the best available specialized lenses for macro photography. MP-E65 is a unique manual-focus lens designed exclusively for macro shooting, at magnifications starting at 1:1 and going all the way up to 5:1, and it has a maximum aperture of f/2.8. That means at its maximum magnification, you can fill a 35mm frame with a grain of rice — or a detail of a razor blade, such as in 2-11.
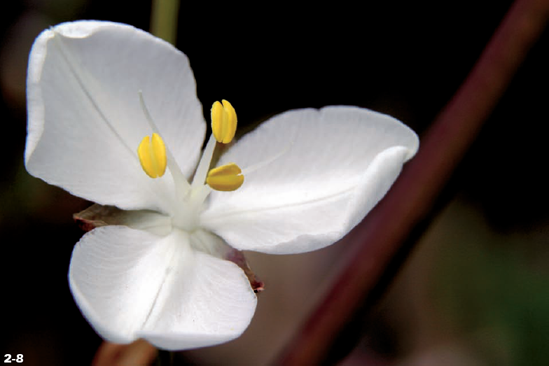
Figure 2.8. ABOUT THIS PHOTO Dedicated macro lenses take a lot of the hassle out of macro photography. Taken with a Canon 100mm f/2.8 macro lens 1/60 sec., f/9 at ISO 100.
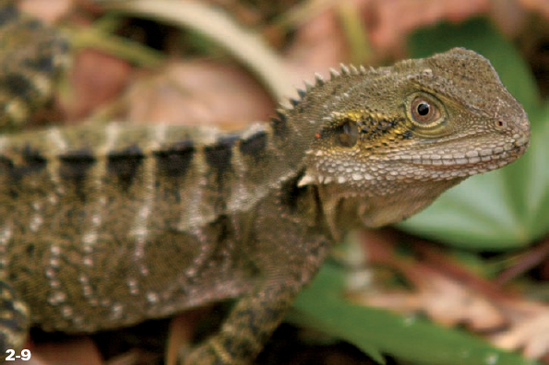
Figure 2.9. ABOUT THIS PHOTO Lizard captured in Australia. Taken with a Sigma 70–300mm f/4.5 APO DG Macro lens at approx. 200mm. 1/125 sec., f/5.6 at ISO 100.
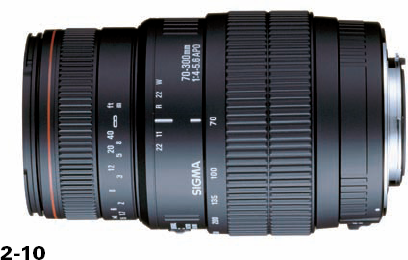
Figure 2.10. ABOUT THIS PHOTO The Sigma 70–300mm f/4.5 APO DG MACRO is an amazing lens if you're on a tight budget. Photo courtesy of Sigma.
The lens comes with all the strengths of using bellows and reversing rings, but keeps full TTL (Through the Lens) metering. For all its good qualities, this lens is useless for anything but macro photography, and it is rather pricey as well. However, if you are serious about extreme macro photography, this lens (see 2-12) is the ultimate match for ease-of-use, photo quality, and incredible magnification.
Tele converters (see 2-13) go between your camera ody and your lens, and usually come in 1.2x, 1.4x, and 2x magnifications. Tele converters allow you to trade lens speed for longer focal lengths. If you have a 100mm f/2.8 macro lens, for example, adding a 2x tele converter quarters the brightness of the lens to an f/5.6, but turns it into a 200mm macro lens. The minimum focal distance is unchanged. If you use a 1.4x tele converter, the lens becomes a 140mm lens, with a aximum aperture of f/4.0.
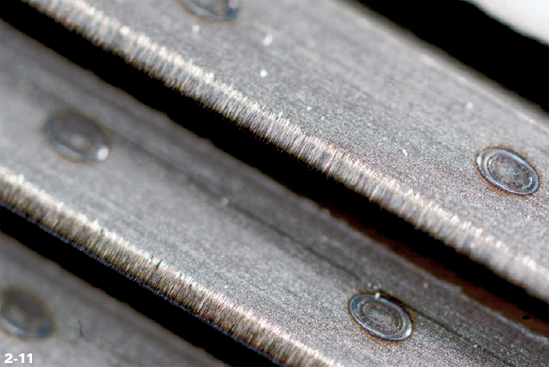
Figure 2.11. ABOUT THIS PHOTO Gilette Mach 3 razor blade, uncropped,. Notice the incredible magnification this lens is capable of. Taken with a Canon's MP-E65 f/2.8 macro lens. 1/60 sec., f/4.0 at ISO 100. Lit by a Canon Macro Twin Lite MT-24EX flash.
The Canon 100mm f/2.8 macro lens has a 1:1 macro magnification factor, so adding a 2x tele converter turns this into a 2:1 magnification factor. As an alternative to a tele converter, you can use an extension tube (which essentially is a tele converter without any optics in it).
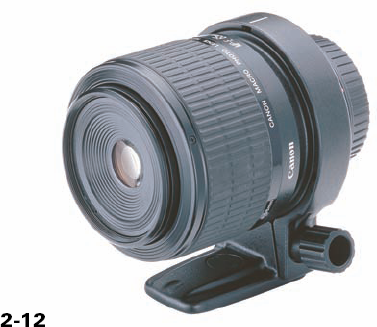
Figure 2.12. ABOUT THIS PHOTO The Canon MP-E65 doesn't look like much, but it is, in fact, one of the most powerful macro lenses you can connect to a dSLR camera body. Photo courtesy of Canon.
Tele converters are generally a bad substitution for buying appropriate lenses. If you want a 200mm, buying a 200mm lens gives far higher quality results. On the other hand, tele converters come in handy when working in telephoto genres, such as photographing animals, sports, and similar subjects. As such, a tele converter might be a better investment if you want to buy a hoto accessory that is usable beyond macro photography.
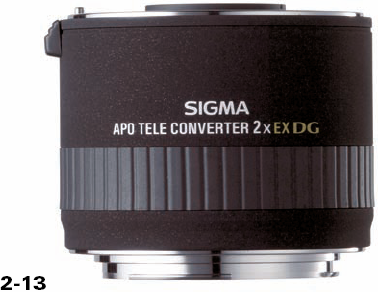
Figure 2.13. ABOUT THIS PHOTO Tele converters, such as this third-party example from Sigma, can be useful in macro photography. Photo courtesy of Sigma.
When considering tele converters, there are many choices, but the quality of the glass element is important, and — as with much else in photography — you generally get what you pay for. Because a bad tele converter can ruin your photos quite spectacularly (just look at 2-14, it's distinctly unimpressive), it can be worth sticking to the original manufacturers' tele converters.
Canon calls them extenders and sells them in 1.4x and 2.0x varieties. Nikon's versions are known as TC-14E, TC-17E, and TC-20E, with 1.4x, 1.7x, and 2.0x multipliers, respectively.
An extension tube has much of the same effect as a close-up lens, but generally has higher quality. See 2-15 for an example of a photo taken with a relatively inexpensive lens and an extension tube.

Figure 2.14. ABOUT THIS PHOTO Old padlock. Using a tele converter makes it possible to take macro photos with standard lenses, at the expense of light loss. Taken with a 28–105mm f/3.5 lens at 105mm with a non-branded 2x tele converter. 1/20 sec., f/5.6 at ISO 100.
Physically, an extension tube is a piece of metal tubing with a bayonet fitting (the connection you use to connect a camera to a lens) on both sides. You attach the extension tube to the camera as if it were a lens and the lens to the extension tube as if it were the camera. Good extension tubes connect the electronics of the camera up to the electronics of the camera lens, which means you retain control of the aperture and auto-focus of the lens.

Figure 2.15. ABOUT THIS PHOTO Snow crystals. Extension tubes make it easy to try extreme macro photography without making a big investment. Taken with a Canon 28–105mm f/3.5 lens at 105mm with a 24mm Jessops tele converter. 1/125 sec., f/13 at ISO 100.
Extension tubes often come in sets ranging from 13mm to 24mm, but they can be combined into other lengths. Add a 13mm extension tube to the 4mm tube, and you get a 37mm extension tube.
When using extension tubes, the longer the combined length of the tubes, the more light you lose. Generally, this isn't actually much of a problem. When working in high magnification, you'll want to use a tripod anyway, and most modern cameras use TTL light measuring, and measure the light correctly for correct exposures despite the extension tubes.
You can put almost any lens on an extension tube. Longer lenses offer a lower magnification, and wider-angle lenses allow you to get closer — up to a point. Connecting a 25mm extension tube to a 28mm lens, for example, is an optical impossibility. You will never be able to focus.
Extension tubes are really simple devices with nothing but air inside them, and there is no reason why you should buy famous-brand extension tubes. If you make sure they are metal, that the insides of the tube are non-reflective (for instance, matte black), and that the bayonet fittings fit your camera properly, you can't go wrong.
Note
MAKE YOUR OWN EXTENSION TUBE Because extension tubes are such simple devices, you can easily make one yourself. If you have a spare camera body cap and a lens cap, just glue them together back-to-back and then cut out the interior, so you can see through it. Depending on the type of body and lens caps, it should give you roughly a 15mm extension tube — enough to get a taste of what extension tubes can do.
If you want to get more serious, you can make your own reversal-extension tube. This combines an extension tube with a mechanism to mount a lens back-to-front inside the tube. A quick Internet search provides several different recipes for how to make your own reversal-extension tubes, such as the one I wrote a few years ago, showing how to making one out of a Pringles can (see www.kamps.org/g/?ovah).
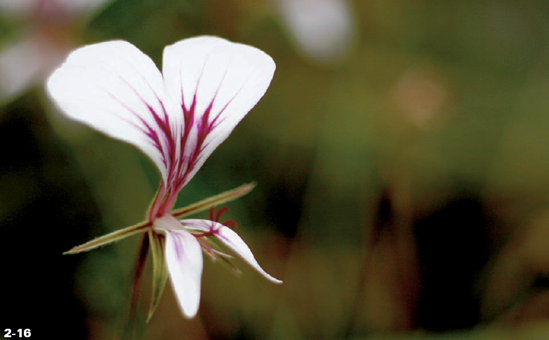
Reversing a lens, either directly on the camera body or on bellows, is a low-cost yet effective way to participate in macro photography, often with fantastic results, such as in photo 2-16. Although it is possible to just hold lenses up to your camera, I don't recommend it. Cameras are expensive, and lenses are as well. You don't want to drop either of them, scratch anything, or otherwise do damage to them. Using a reversing ring allows you to get up close, but as with all extreme macro photography efforts, getting the focus right can be difficult. A reversing ring is a metal ring that has a bayonet fitting on one end (the same type you already have on your camera lenses) and a screw fitting on the other.
Tip
To avoid buying the same filters or reversal rings for several lenses, buy stepping rings. These are filters without glass in them that have a different size thread on each side. A 52-55 stepping ring is known as a step-up ring. It screws into a 52mm lens thread and accepts a 55mm filter. Conversely, a 55-52 stepping ring is a step-down ring. The first number is always the number closest to the camera.
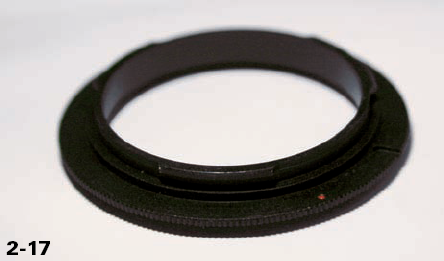
The best way to avoid ruining your equipment is o make sure that the camera and lens are securely connected to each other. That is where reversing rings come in. The ring shown in 2-17 costs less then $10 at a local camera shop. Notice that it is unbranded. However, because it is essentially a bayonet fitting (the side that is up in the photo) with a filter thread on the other side, there is not a lot that can go wrong.
If you have several lenses you regularly reverse on your camera, you may want to buy a reversal ring for each of the filter thread sizes of your lenses, or you can buy stepping rings.
Reversing rings are inexpensive and can be purchased from most camera stores. If you are planning to experiment with macro photography, a good reversing ring is the first investment to make.
Note
When you reverse a lens, all the electronics and couplings that normally are protected by your camera body are exposed. To avoid damaging these parts, you can cannibalize a lens protection cap: Cut a hole in it and connect it to your lens. It helps to protect the lens internals.
Stacking two lenses, which I described earlier in this chapter, is quite similar to reversing a lens. Instead of reversing the lens directly on your camera body, you reverse it onto another lens. This allows for high magnifications at low cost. You can use lenses you own already, and the extra equipment needed is available at a fraction of the price of a dedicated macro lens.
The main advantage of stacking lenses instead of, ay, extension tubes, is that you get minimal light loss with this method. In addition, it's inexpensive. Photographing insects up close can be trickier with reversed lenses than with other macro photography methods, as reversing lenses means you have to get really close to your subjects. In the case of 2-18, however, the bumblebee was too busy to notice.
The best combination of lenses is to connect a shorter focal-length prime lens (50mm is perfect) to the camera body, and then reverse-mount a longer focal-length lens. In theory, the magnification size of the lenses is the ratio between the two lenses used. So, mounting a 100mm lens on a 50mm lens results in a 1:2 magnification — twice life-size.
The limitation with this technique is the vignetting apparent because of the reversed lens. To overcome this problem, you can add a tele converter between the camera and the first lens, or use a longer focal-length lens closest to the camera. If the vignetting is not too severe, you can just ignore it while shooting the photograph and crop it off after you download the images to your computer.

I have discussed how extension tubes come in various sizes. The reason for this is that you need different size extension tubes for different magnifications. Now, what if you could make an extension tube that was variable in size? This is exactly what bellows are.
Bellows come in a few different designs, but generally, they are a pair of metal frames mounted on ails that attach to the camera body on one side and have a lens mount on the other side. Mounted between these frames is dark cloth, rubber, matte plastic, or paper, which extends like a small accordion. One (or both) of the frames can move along the rails to create a variable extension tube ranging from about 10mm (depending on the design of the bellows) to as much as 200mm.
Bellows can be expensive, but inexpensive variations are also available. I bought my bellows via eBay, and I paid around $25 for them from a seller in Hong Kong. The build quality is not amazing, but there are no light leaks from around the bellows themselves, and the rack-and-pinion adjustment (the little cogs and wheels shown in image 2-19) allows for precise adjustment. The pictures taken with this low-cost bellows are indistinguishable from ones taken with a much more expensive bellows system.
A good set of bellows should have a rack and pinion on at least one of the rails (two is more precise, but not strictly necessary) for accurate adjustments of the bellows length. This is important because you can use the bellows themselves to focus your macro work.
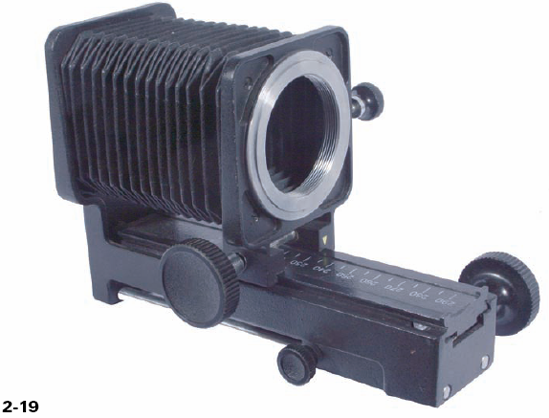
Figure 2.19. ABOUT THIS PHOTO Bellows, such as these made by Novoflex, work by allowing you precise adjustment of the length of what essentially is a variable extension tube. The camera connects on the left side, and the lens connects to the right hand side. Photo courtesy of Novoflex.
To use the bellows, you attach one end of the bellows to the camera and attach a lens to the other end of the bellows. When using this system, you lose quite a bit of light, and camera shake becomes quite difficult to avoid. A good tripod is vital, and a focusing rail comes in handy, too.
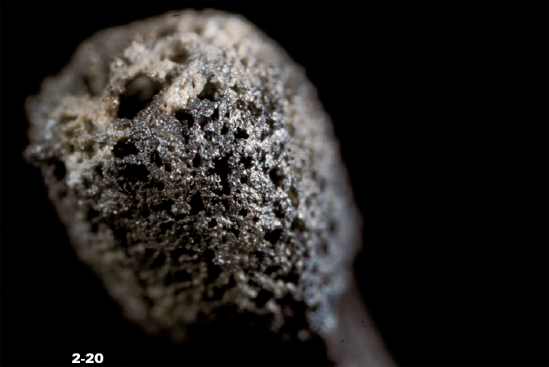
If you want even more magnification than what bellows offer on their own, try combining a reversal ring and bellows. The bellows go on the camera and the reversed lens goes on the other end of the bellows. This offers the highest magnification short of employing microscopes or similar specialized microphotography equipment. Look at 2-20 and make up your own mind!
Determining the shutter time when using bellows used to be rather complicated, because the camera's internal light measuring can't be trusted. However, with digital photography, it is a lot easier. Let the light meter make its best guess and set the camera to manual exposure. Then just take a photo. If it's too dark, use a longer shutter time and vice-versa.
When working with macro photography, you experience serious light loss. The problem with his is that the longer shutter times required make imaging chip noise an issue, and even minor vibrations can cause camera shake. In act, he movement of the mirror inside a dSLR camera can be enough to ruin a photo — that's how sensitive macro photography is. The nswer s using some form of external lighting to provide the light boost you need such as fl ash units, macro flash units, reflectors, and diffusers.
One way to get around the problem is to illuminate your subject with a flash (as shown in 2-21). This allows you to use much shorter shutter times. If your flash is powerful enough, you can take all your photos at your fastest sync time — which means faster than 1/60 second with most cameras, and as fast as your fastest shutter time with extra fast electronic flashes. Camera shake means little if you manage to use 1/4000 second exposure times!
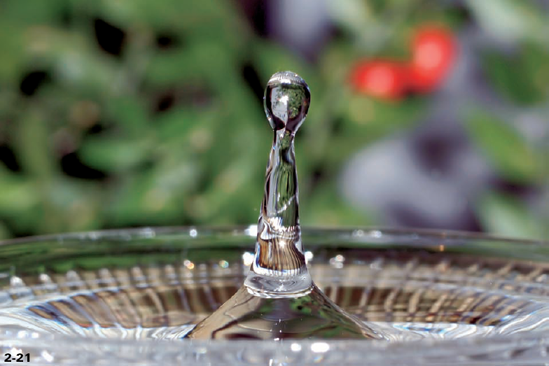
Figure 2.21. ABOUT THIS PHOTO Using a flash unit on an off-camera cord made it possible to completely freeze the motion in this photo. Taken with a Canon EF-S 60mm F/2.8 Macro. 1/250 sec., f/3.5 at ISO 100. Photo by Matthieu Collomp.
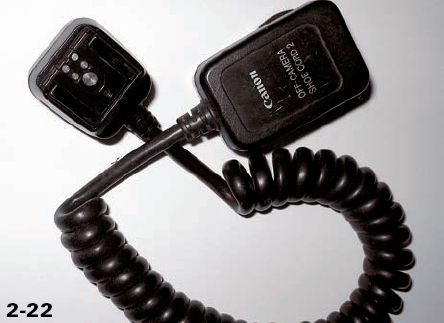
The problem that arises with using a flash is that flashes normally aim forward. In addition, the lens assembly is likely to get in the way of the light from your flash, but there is a solution: The easiest (and least expensive!) way to use a flash unit with macro is to use an off-camera cord, as shown in 2-22. It fl lows your flash to be operated as normal, but to be moved away from the hot-shoe on the camera. By using a bracket or by mounting the flash unit on a separate tripod, you retain full control of the flash without having to use one hand to aim the flash. These cords are available for all systems, both as original accessories and through third parties. Prices start at around $40. Apart from use with macro photography, an off-camera cord is most useful in portraiture and is a sound investment to improve the fl exibility and creativity of all your flash photography.
For even more control over what you are doing, consider using a specific macro flash. These come n several different types, but they are generally ring-flashes or small flash units that can be mounted on the front of the lens.
Ring flashes are unique in that the light comes from a circular shaped flash tube unit, or a series of small flash units mounted inside a circular diffuser. The idea is that the flash goes around the ens, so the light comes from all directions. In ddition, it gives a halo-shaped reflection on eflective surfaces, which some people find attractive.
For Canon systems, the macro ring flash is called R-14EX, and sells for around $500. It has ights built-in that help you focus when working up close, and the intensity of the flash discharge can be adjusted from one side to the other of the flash unit. The Nikon variant is known as Nikon SB-29s, and costs around $375. In terms of specifications and functionality, they are roughly the same. Third-party versions are also available, such as the Sigma EM-140 DG (around $375), the Sunpak DX-8R (around $175), and lots of other options. Try a Google search for "ring flash" to find yourself a bargain!
Another method of lighting your subjects is to use on-lens flashes, usually in pairs (see 2-23). The flash capacitors are kept in a unit that is placed in the hot-shoe of the camera, and the two flash heads are placed on the lens. Each of he flash heads are detachable, aimable, and separately controllable from a control panel on the back of the hot-shoe unit.
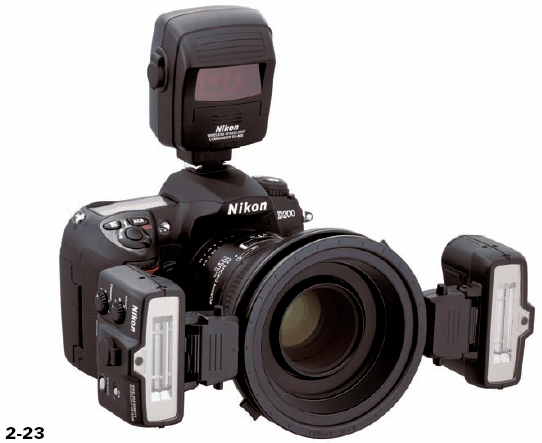
Figure 2.23. ABOUT THIS PHOTO A specific twin flash macro photography flash system offers great flexibility and superior results, allowing both handheld macro photography and full control of light conditions. Photo courtesy of Canon.
Canon (MT-24EX, around $675), Nikon (R1 wireless macro flash, around $400), and most other SLR manufacturers have twin flash solutions in their product line-ups, but at this time, I'm not aware of any third-party manufacturer who is making twin macro flashes.
Twin flashes offer more flexibility than ring flashes. You can detach the twin flash units and backlight your subject, for example. This is something that isn't possible with ring flashes. Furthermore, twin flashes tend to be slightly more powerful than ring flashes. As an example, photographing the ball inside a ballpoint pen is difficult. Doing so without a tripod is a preposterous idea, but with the power of twin macro flashes, it is entirely possible. See 2-24 for an incredible example of one of these flashes in action!
Whether you are working with natural light, floodlighting, or flash lighting, chances are that you will have to shape your lighting. Reflectors and diffusers come in extremely handy in this respect.
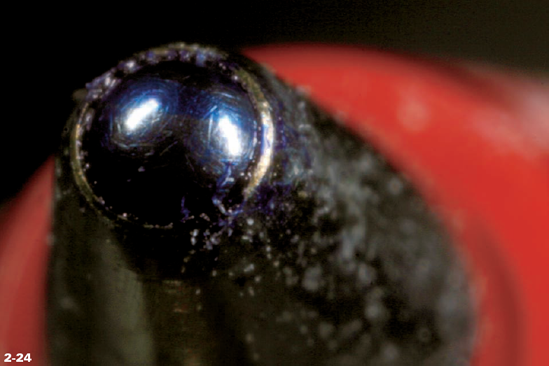
Figure 2.24. ABOUT THIS PHOTO The ball inside a ballpoint pen. Taken with a Canon MP-E 65mm f/2.8 macro lens and Canon Macro Twin Lite MT-24EX. Manual exposure at 1/250 sec., f/16 at ISO 100.
For macro work, it is worth buying a small handheld reflector. There are some big-name manufacturers of reflectors, but light doesn't know the difference between one brand or another, so if you can find a good deal on any reflector, go for it. Having said that, making your own reflector is also easy. A piece of cardboard wrapped in aluminum foil that has been crumpled a few times makes an excellent reflector and doesn't cost you anything. In an emergency, a white sheet of paper or fabric can work miracles. In 2-25, a garden candle is photographed against a pale blue sky in direct sunlight. This picture is taken into the sun and would have been impossible without the use of a makeshift reflector: A white T-shirt held up just to the left of the candle. A polarizer filter was used to turn the sky into a deeper shade of blue.
For some macro photography subjects, especially jewelry and similar shiny objects, a light tent is important to avoid reflections of your surroundings. Some macro photographers use diffusers outdoors: A light tent is able to take the strong, directional sunlight and turn it into a softer, more omni-directional light source. The added benefit is that inside the light tent there won't be any wind to disturb plants and so on.
Note
You can learn more about how diffusers work in Chapter 3.

To be able to work effectively as a macro photographer, a good, sturdy tripod is vital. The tripod has to be able to keep your camera completely still, no matter how many weird and wonderful macro attachments — such as focusing rails and specialized macro heads — you connect to it.
A good tripod should be made out of metal and be quite heavy. Lighter tripods can be used, but I find lightweight aluminum and plastic tripods too flimsy to be of any use in macro photography. Of course, if you have the sense to buy a carbon-fiber tripod, then I hardly believe you need tripod advice!
The best tripods I have been able to find for macro photography are made by Velbon and have legs that are individually adjustable in all directions. They lock off at various degrees outwards (see 2-26), and the sturdy screw-tightening extending legs are rock solid.
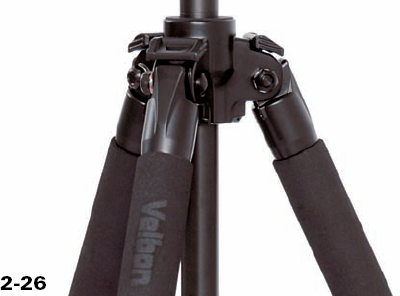
Figure 2.26. ABOUT THIS PHOTO A good tripod for macro photography work should have legs that can splay to various angles, as shown here, as part of the excellent Sherpa Pro tripod by Velbon. Photo courtesy of Velbon.
Whichever tripod you decide to go with, make sure that it has a way of attaching weight to the center post. This makes a lot of difference in terms of stability.
Some tripods offer the possibility to take the center post all the way out of the tripod and then re-insert it upside-down. The idea is that you can hen get closer to the ground. Although this is a reat idea, I find working with the camera upside-down infuriating and can't get used to it. Instead, for my macro work, I have a tripod whose legs splay all the way out, and I used an angle-grinder to cut the center post to about 3 inches in length. That way, the tripod can be touching the ground with all three legs and the center post, and the camera can be as low as 5 inches from the ground.
In addition to a sturdy tripod that has all the functionality you need, you are going to need a good tripod head, the piece that connects the legs of the tripod to the camera. A lot of the functionality of a tripod head is taste and preference. Some people like to use fluid video heads to allow for adjustments, others like the flexibility of a pistol-grip, ball-jointed tripod head, and others prefer a two-way adjustable head with two different levers for adjustments.
It is difficult to make a recommendation, as everybody's needs are slightly different. Do be aware, however, if you are buying a professional tripod, they normally don't come with a tripod head. Don't hesitate to ask to try a few different types before you make a selection that works for you.
The most difficult thing to get used to as you start crossing into extreme macro photography is the fact that autofocus is impossible. The focusing rings on your lenses are useless. It takes some time to get used to focusing by moving the camera closer to, or farther away from, the subject.
When you hold your camera in your hands, moving a camera closer or farther away is easy. You just move your hands or upper body. After the camera is on a tripod, it becomes an entirely different matter, especially because the movements often are only a couple of fractions of an inch. Having to reposition a tripod by 3mm all the time is not only annoying, it turns even the most patient photographer away from macro work for life.
The solution is to use a focusing rail (as shown on the bottom of the Novoflex macro bellows, see 2-19). Not entirely unlike the rails attached to a bellows system, a focusing rail is basically just a rack-and-pinion driven system that moves the entire camera backward and forward. You attach your camera to the focusing rail, and secure the focusing rail to the tripod.
There are several types and makes of focusing rails out there. Some are even built into tripod heads or into higher-quality bellow setups. The general rule is that you get what you pay for, and focusing rails can be purchased for anything between $40 and $600. I would argue that even an inexpensive focusing rail is better than no rail at all.
If you remain unconvinced about focusing rails, then don't buy one. I'd be willing to bet that you'll be crying out for one within a few hours of shuffling your tripod back and forth!
If you travel a lot, you might find that it is tempting to leave your tripod behind: They are often quite heavy and unwieldy. Luckily, some manufacturers have come up with clever solutions to the problem. Joby (www.joby.com), for example, created the popular Gorillapod, which is a lightweight tripod with flexible arms that can e wrapped around anything. Their newest product, the Gorillapod SLR, is sturdy enough to old a full-size dSLR with a hefty lens (just see 2-27), and it is perfect for on-site macro photography.

Figure 2.27. ABOUT THIS PHOTO The Gorillapod is a good solution as a lightweight traveling companion when you can't bring your full-size tripod. Photo courtesy of Joby.
Assignment
Your Favorite Assignment
We all have favorites — a favorite color, favorite camera or lens, and maybe you have a favorite musician and song. If you hadn't guessed yet, this assignment is all about favorites. Think about your favorite song and your favorite color. The title of your favorite song is the title of the photo in the assignment.
Use your favorite camera and your favorite macro lens arrangement, listen to your favorite song by your favorite artist, and take a macro photo that somehow illustrates the song. Make sure your favorite color is contained within the photo!
One of my favorite songs is a version of "Somewhere Over the Rainbow," performed by Israel Kamakawiwo'ole. The song has such a playful innocence and warmth. It reminds me how beautiful the world really is. I'm a big fan of earthy tones, but obviously, there are no earthy tones in the rainbow, so I had to think for a long time about this assignment. (Why did I make it so difficult?) Then my eye fell on the dream catcher hanging over my desk in my office. I looked at the colors of the feathers and thought about the connection of feathers, birds, sky, and rainbow. I love this photo, because the vast bulk of it is out of focus, but it is still obvious what the subject is. The parts that are in focus have the most beautiful colors (courtesy of a flash unit held on an arm's length, with a piece of orange paper wrapped over the flash head). Taken using a Canon 28–135mm f/3.5 IS Macro lens at around 65mm on a 24mm extension tube, with my equipment all safely mounted on my Slik 504QF II tripod. Lighting is done with two Canon 550EX flash units — one on the camera and one with a make-shift orange filter held in front of it. 1/60 sec., f/4.5 at ISO 100.
Note
Don't forget to go to www.pwassignments.com when you complete this assignment so you can share your best photo and see what other readers have come up with for this assignment. You can also post and read comments, encouraging suggestions, and feedback.