
December 17, 2015, is the day Google mentioned that HTTPS pages have top priority by default. Many Magento websites still use the default SSL pages or, even worse, don't use SSL at all.
Well, this will change now if your website depends on Google's search ranking. Using HTTP/2 in your setup is a must for high-performing and secure websites. The new protocol will be the new standard for fast and secure browsing.
HTTP/2 has many new benefits such as multiple TCP connections, cache pushing (server push), data compression, and much more. By default, HTTP/2 does not need SSL, but many browsers out there will support it only when configured using SSL. NGINX, for example, supports HTTP/2 only when configured including SSL; Apache, on the other hand, supports both, with or without SSL.
So, it is mandatory that we start using HTTP/2 including SSL for a safer and faster web.
For this recipe, we will use a Droplet created in Chapter 2, Magento 2 System Tools, at DigitalOcean, https://www.digitalocean.com/. We will be using NGINX, PHP-FPM, and a Composer-based setup including sample data for HTTP/2. No other prerequisites are required.
For the purpose of this recipe, let's assume that we need to create a Magento 2 using HTTP/2 including SSL. The following steps will guide you through this:
- First, we need to configure and create an SSL certificate. Open
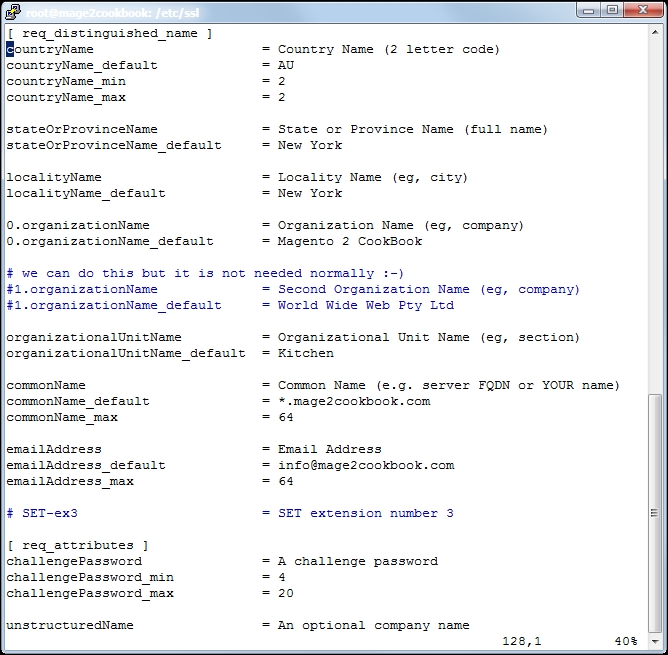
openssl.conflocated in/etc/sslwith your favorite editor:vi /etc/ssl/openssl.confGo to line 127
[ req_distinguished_name ]and change or add the settings regarding your company and domain. Change the following lines; here is an example:countryName_default = Some-CountryName stateOrProvinceName_default = Some-State localityName_default = Some-CityName 0.organizationName_default = Some-CompanyName organizationalUnitName_default = Some-DepartmentName commonName_default = Some-DomainName emailAddress_default = Some-Email
The following screenshot depicts an example of the same:
- After saving your
openssl.conffile, we can create the*.csrand*.keyfiles. We need the*.csrfile and send it to our SSL provider. You may pick any SSL provider. Run the following command to generate them:openssl req -new -newkey rsa:2048 -nodes -keyout yourname.key -out yourname.csrChange
yournamewith any given name. When running the command, questions will be asked; hit enter to prompt when the default is okay. Here is a screenshot of the process: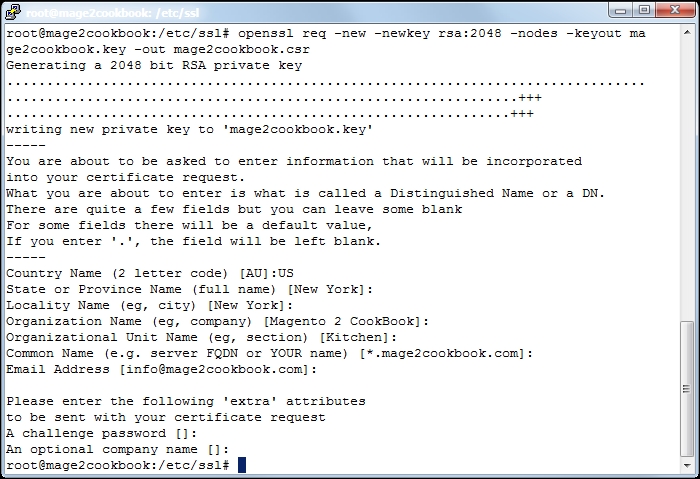
Check your certificate before you submit it. Run the following code to confirm your settings:
openssl req -in yourname.csr -text -nooutIn this example, we used a wildcard SSL certificate. The wildcard starts with
*.yourdomain.com. We use a wildcard to create unlimited subdomain names, which we will use later to create localized domain names such asde.yourdomain.comorfr.yourdomain.com.If you don't need a wildcard domain and would rather use
www.yourdomain.comor a naked domain such asyourdomain.com, commit this in youropenssl.conffile. - Submit the
*.csrfile to your SSL provider and continue all the steps necessary. Depending on your provider, it can take minutes or hours. For the purpose of demonstration, we used https://www.buy-certificate.com/. On this website, there is an option to create a 30-day free SSL certificate. The whole process takes two to three minutes. - Now let's download the ZIP file from your mail account to your Droplet and open it in your root directory. Unzip the
yourdomain-com.zipfile by running the following command:unzip mage2cookbook-com.zip - Your ZIP contains the following files (or similar ones):
Archive:   mage2cookbook-com.zip
inflating: mage2cookbook-com.cer
inflating: readme.txt
inflating: RapidSSLSHA256CA-G3.cer
inflating: GeoTrustGlobalCA.cer
inflating: siteseal_nw4all.html
- Now we will merge the certificate and CA authority key. Use the following command on the shell:
cat mage2cookbook-com.cer RapidSSLSHA256CA-G3.cer > mage2cookbook-com-2015.cert - Now let's copy the
mage2cookbook-com-2015.certfile to/etc/ssl/certusing the following command:cp mage2cookbook-com-2015.cert /etc/ssl/cert - Move the generated
mage2cookbook.keyto/etc/ssl/privateusing the following command: (Let's assume that you are running theopenssl regcommand in the/etc/ssldirectory.)mv /etc/ssl/mage2cookbook.key /etc/ssl/private - Now let's create a symbolic link of the keys. Run the following command:
ln -s /etc/ssl/private/mage2cookbook-com.key /etc/ssl/mage2cookbook-com.key
ln -s /etc/ssl/certs/mage2cookbook-com-2015.cer /etc/ssl/mage2cookbook-com.cert
Try to list all the files in the
/etc/ssldirectory using the following command. You should see the names of the files that we linked:ll /etc/ssl - Now let's go to the NGINX configuration directory and update
default.confin/etc/nginx/conf.d. Open thedefault.conffile and change it with the following settings:upstream fastcgi_backend { server 127.0.0.1:9000; } server { listen 80; listen 443 ssl http2; server_name yourdomain.com; set $MAGE_ROOT /var/www/html; set $MAGE_MODE developer; ssl_certificate /etc/ssl/yourdomain-com.cert; ssl_certificate_key /etc/ssl/yourdomain-com.key; include /var/www/html/nginx.conf.sample; access_log /var/log/nginx/access.log; error_log /var/log/nginx/error.log; location ~ /.ht { deny all; } }As you can see, we created a new
listen 443 ssl http2section. Besides thelistensection, we also createdssl_certificateandssl_certificate_key.The
http2flag in thelistensection covers the entireHTTP/2configuration. - Now, all you have to do is restart NGINX to use your new settings. Run the following command:
service nginx restart - Before we can test Magento in our browser, we need to flush and clean the cache. We also need to update Magento's configuration with the new secure URL. Run the following commands:
php bin/magento setup:store-config:set --base-url-secure="
https://yourdomain.com/"
php bin/magento setup:store-config:set --use-secure-admin="1"
php bin/magento setup:store-config:set --use-secure="1"

php bin/magento setup:static-content:deploy
php bin/magento cache:clean
php bin/magento cache:flush
Next, we go to https://www.sslshopper.com/ssl-checker.html and check our setup. Commit your domain name in the box and submit. If everything is configured correctly, the output should look as follows:

- Congratulations, you just finished configuring HTTP/2 with Magento 2. To test your HTTP/2 protocol, go to https://tools.keycdn.com/http2-test and submit
yourdomain.com.
Let's recap and find out what we did throughout this recipe. In steps 1 through 13, we created an SSL certificate, which we need to configure HTTP/2 in NGINX.
In step 1, we configured the openssl.conf file with our domain and business data. In step 2, we created a certificate request that we will be sending to the SSL provider.
In step 4, we downloaded the provided certificate file and unzipped the content. In step 6, we merged the domain certificate and certificate authority file into a single one. This file was then copied to the SSL directory.
In step 6, we copied the private key to the SSL private directory before we started creating a symlink of the private key and merge certificate in the /etc/ssl directory. The main reason why we stored the files in the private and cert directory is maintenance. When replacing or updating keys or certificates in the future, we only need to create a new symlink while our NGINX or Apache configuration can stay the same.
In step 10, we updated the NGINX configuration and added the ssl_certificate parameter including the correct SSL directory. In the listen parameter, we added the http2 flag behind the 443 ssl flag and restarted the NGINX server.
In step 12, we configured the HTTPS domains using the bin/magento setup:store-config:set option.
Setting up Magento 2 including SSL and HTTP/2 is pretty straightforward. However, by default, the only URLs that serve HTTPS are customer/account/login/, customer/account/create/, checkout/, checkout/cart/, contact/, and sales/guest/form/. Currently, it's mandatory to have a full HTTPS website (Google: HTTPS as a ranking signal).
It is easy to update the Magento configuration to serve every URL on HTTPS using the following command:
php bin/magento setup:store-config:set --base-url="https://yourdomain.com/"
php bin/magento setup:static-content:deploy
php bin/magento cache:clean
php bin/magento cache:flush