
This chapter covers the configuration of Magento's shipping options. The most difficult part of configuring Magento's shipping options is not performing the actual configuration, but deciding which options are the best for your store. You need to understand how each of the shipping options in Magento affects your finances and your customers' experience. After you decide which shipping options are the best for your store, you need to configure them. Most of the configuration options are self-explanatory.
This chapter will give you the information you need to decide which shipping options are best for you. Next, it will cover the configuration settings that are less obvious, or whose names might be misleading.
To help you decide which shipping methods are best for your business, consider the questions discussed in the subsections that follow. Each of these questions equates to a configuration option in Magento. When you know the answer to a question, you can follow through by setting the corresponding configuration option.
You can allow customers to send the items in their orders to multiple addresses. If you enable this, Magento displays a link in the Shopping Cart to Checkout with Multiple Addresses as shown in the following screenshot:
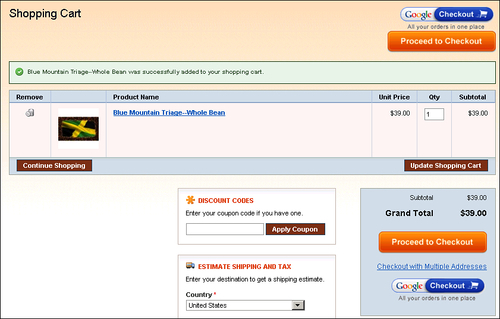
This option is set under System | Configuration | Shipping Settings | Options. When a customer chooses this, each item in the Shopping Cart can have its own shipping address. If there are two items in the cart, Magento creates two shipping addresses. If there are 20 line items, Magento creates 20 addresses.
If your customer has too many items in the Shopping Cart, and selects Checkout with Multiple Addresses, Magento can create so many shipping addresses that it will overwhelm your server. To avoid this, use the Maximum qty allowed for Shipping to multiple addresses setting to limit the number of addresses that can be created. This setting is also under System | Configuration | Shipping Settings | Options.
Magento enables you to offer your customers a choice of shippers: UPS, FedEx, DHL, and United States Postal Service. Or, you can forgo offering your customers different shippers and just offer them different shipping methods instead such as Flat Rate, or a Shipping Table.
The Flat Rate method means you add the same shipping charge to every order, no matter how small or large the order is. Think of the Flat Rate as your handling fee. When an order uses this shipping method, the customer does not choose the shipper.
If you use the Flat Rate shipping method, make sure that the sum of the Product's price and the flat rate will cover your cost for packing and shipping the Product.
The Table Rate method calculates the shipping charge using a table that you create. This table calculates the shipping charge based upon one of the following:
Destination and weight
Destination and price
Destination and the number of items in the order
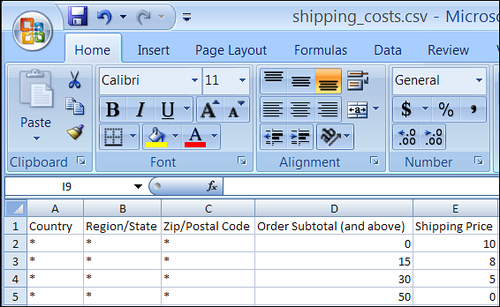
For example, the following is the shipping rate table for our demo site, which we will create later in this chapter. Notice that the shipping charge is based on destination and price. Also, notice that we have entered a wildcard (*) for the destination, so these shipping charges apply to all destinations. Effectively, we are basing the shipping charge on just the price.
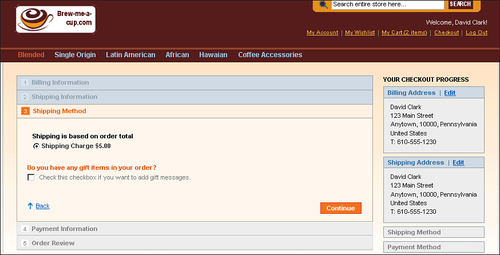
During checkout, your customer will see the shipping charge under the Shipping Method section. The subtotal for this order is $39.00, which according to the table in the previous screenshot has a shipping charge of $5.00:
When you use the Table Rate method for shipping, you can also add a handling charge. The handling charge will be added to the rate from the table, so that the customer won't see the handling charge as a separate item.
You can offer your customers one or more of the following shippers:
For each shipper that you offer, you can designate which services you make available. You do not need to offer all of the services that the shipper offers.
You can offer your customers none, one, or several of the shippers we just saw.
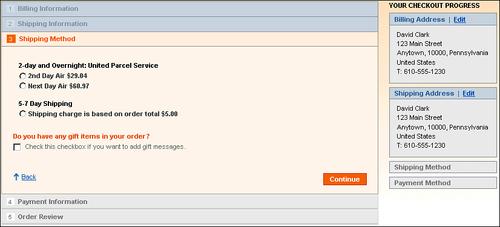
Note that you do not need to offer your customers a choice of shippers. Using the Table Rate method, you can just offer them a choice of shipping methods instead—such as "5-7 day," "2-day," and "Overnight"—and use the shipper that you think is best for that method. In the following screenshot, we use the Table Rate method to offer the customers 5-7 Day Shipping, and UPS for 2-day and Overnight shipping:
There are two places in the Configuration page where you can designate the countries to which you will ship. First, you set the default Allow Countries under System | Configuration | General as shown in the following screenshot:
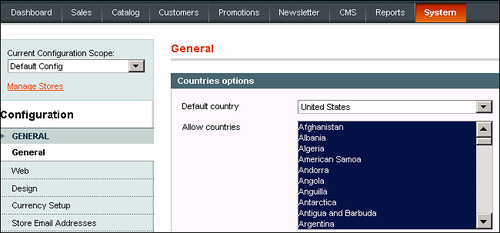
To select multiple countries, hold down the Ctrl key while clicking on each country.
Second, you can designate which countries will work with each of the shipping methods that you implement. The choices that you make for each shipping method will override the default that you set under System | Configuration | General. In the following example, we are offering Flat Rate shipping only to the United States. If the shipping address is outside of the United States, this method will not be offered.

For each of the shipping methods except for Flat Rate, you can add a handling fee. Magento adds this fee to the shipping rate that it gets from the Shipping Table or from the shipper. Your customer will not see the handling fee as a separate charge.
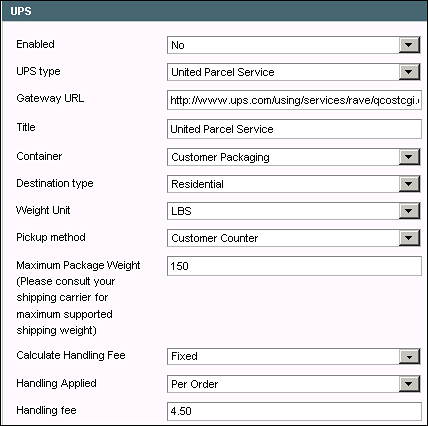
The handling fee is configured separately for each shipping method. The following is an example of adding a Handling fee to the rates for UPS:
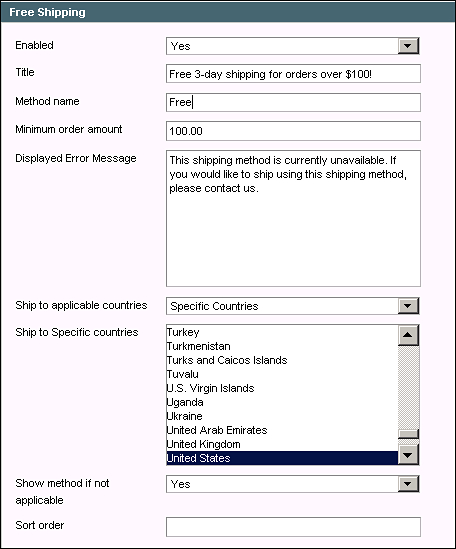
Free Shipping is a separate shipping method. To enable this, go to System | Configuration | Shipping Methods | Free Shipping, enter a Minimum order amount, and select the countries to which you will ship for free:
If the order doesn't meet the minimum amount, this shipping method will not be displayed.
Notice the field Show method if not applicable. This setting appears only if you previously selected Specific countries in the Ship to applicable counties field. If you selected All Allowed Countries, then this setting is hidden.
By default, this is set to No. If the order meets the minimum, but it's not available for the shipping address, this shipping method doesn't display. However, selecting Yes for this field displays the Free Shipping method if the order meets the minimum amount, but the country doesn't qualify. In that case, the customer gets the Displayed Error Message.
Now that you have decided what kind of shipping you will offer and what you will charge for shipping, you are ready to configure the shipping method. This section contains the overall configuration settings, plus specific configuration issues for each of the shipping methods.
At a minimum, you should set the configuration options in this section before configuring any specific shipping methods.
Select System | Configuration | General.

Select System | Configuration | Shipping Settings:
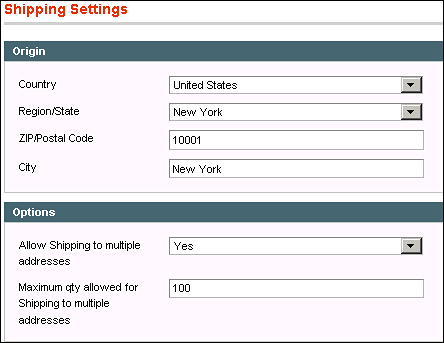
Under the Origin section, enter the information for where the shipments originate. When Magento contacts the shippers, it will use this information to calculate the shipping charges.
Under the Options section, determine if you will allow customers to ship each item to a different address, and enter the maximum number of items that you will ship separately.
Click on the Save Config button.
The general configuration options for shipping have been set. You are ready to configure individual shipping methods.
Like all other shipping methods except Free Shipping, the Flat Rate method enables you to enter a handling fee. Go to System | Configuration | Shipping Settings | Flat Rate. The handling fee can be a Fixed amount or a Percent of the order total, as shown in the following screenshot:
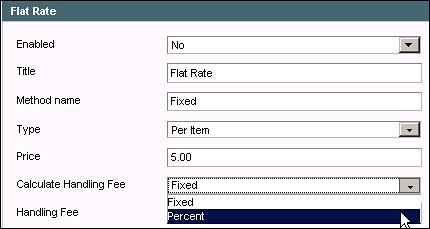
If you enter a fixed handling fee, it will be added to the price, and the shipping charge will be the same every time this method is used. If you enter a percentage for the handling fee, the system will calculate the handling fee based on the order total and add that to the shipping price.
As stated earlier, the Table Rate method calculates the shipping charge based upon one of the following:
Destination and weight
Destination and price
Destination and number of items in the order
The table of rates is created in Excel (or some other spreadsheet program), saved as a text file, and then uploaded to Magento.
Under System | Configuration, look in the upper-left corner. If the Current Configuration Scope reads Default Configuration, you must change this. This is unique to the Table Rate shipping method. From the drop-down list, select Main Website as shown here:
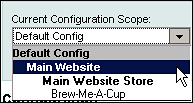
This is necessary because each table of shipping rates applies to only one store. This beginner's guide covers using Magento for only a single store; multiple stores are beyond the scope of this book. For now, just select the store that you are working with.
Go to System | Configuration | Shipping Methods. Under Table Rates, select the Condition for calculating shipping rates as shown in the following screenshot:

Click on the Export CSV button. If the button is not available, then you did not complete step 1 of these directions.
Magento will download a file named
tablerates.csvto your computer. If you do not have a spreadsheet program installed, you can just save the file to your hard drive. But if you do have a spreadsheet program, it will probably offer to open the file for you as shown in this screenshot.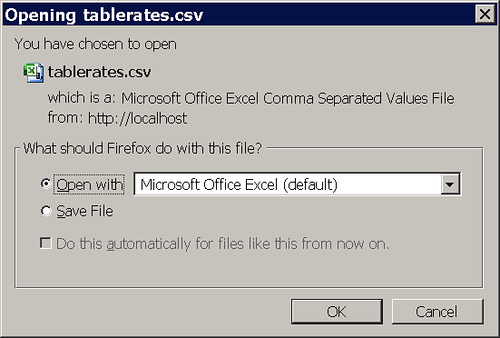
Open the file in a spreadsheet program.
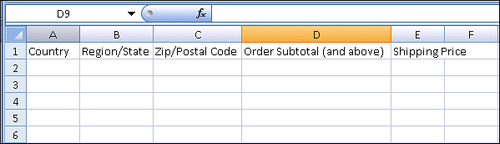
The file that you downloaded is created specifically for the Condition that you selected. In this example, notice that our Condition was Price vs. Destination, and this file contains fields for the destination (Country, Region/State, Zip/Postal Code) and the price (Order Subtotal).
Enter the conditions and shipping prices, and then save the file as
shipping_costs.csv.
Next to Import, click on the Browse... button. A dialog box will open, where you select the file you just created.
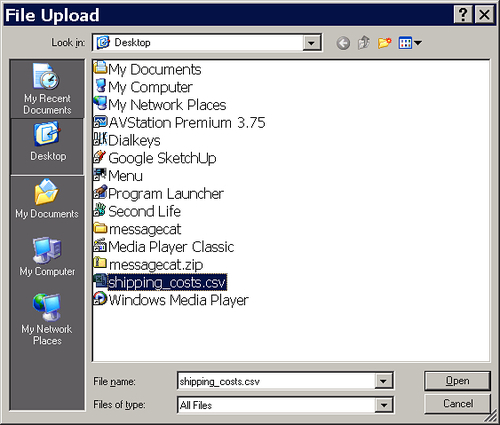
Select the file with the shipping rates, and click on the OK or Open button.
Click on the Save Config button.
Fill out the rest of the configuration fields for this shipping method, and save again.
Under System | Configuration, in the upper-left corner, change Current Configuration Scope back to Default Configuration.
When we configured the Flat Rate shipping method, we first selected the specific store to which the rates will apply. Next, we exported a blank template for the shipping rates. We opened the template in a spreadsheet program, added our rates, and saved it as a text file. We then imported the completed rates. Finally, we set the configuration scope back to the default. The result is that now Magento holds a table of shipping rates that we created.
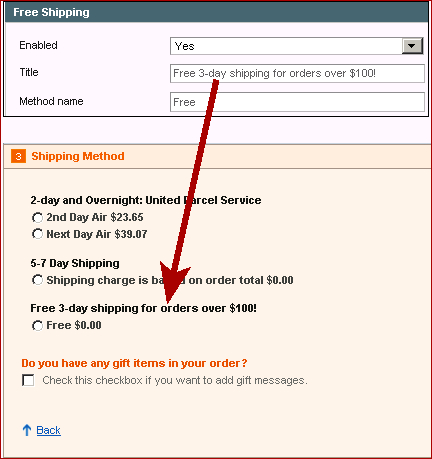
The Free Shipping method will appear only if the shipping address is in one of the allowed countries and the order total meets the minimum requirement. Even if the order qualifies for free shipping, the customer must still click and select this shipping method. Remember that the customer will see the Title that you enter, so make it something more descriptive than just Free Shipping. In our demo store, we changed the Title to explain why we offer free shipping by going to System | Configuration | Shipping Methods | Free Shipping. Look at this screenshot:
Unlike the other shippers, UPS enables you to choose a Weight Unit of pounds or kilograms. All other shippers use the default unit for your store.
Also, unlike the other shippers, you do not need to register for an account with UPS to use their gateway. This makes UPS the easiest shipper to set up.
To use USPS, you must register for a USPS web tools user ID. At the time of this writing, the URL to register is https://secure.shippingapis.com/Registration/. Or, go to http://www.usps.com/webtools/ and select the link to Register now to begin using the USPS Web Tools.
Your new account will work on their testing server. The gateway URL for the testing server is different than the default that is programmed into Magento. Enter the URL for the testing server, test it, and if it works follow the instructions in the email they sent to get your account activated for the production server.
For some users, the test server never works. These users ask to be moved to production right away and, usually, the gateway works for them.
Make sure that your product weight is in ounces and pounds, and that each product has a weight of at least one ounce. Otherwise, the USPS gateway will fail to return any shipping rates at all.
To use the FedEx gateway, you must have an Account ID. This is a "production key" that FedEx will give you when you register.
To get a production key, you must register with the FedEx Developer Resource Center. On the FedEx web site, perform a search to locate this page. Then, select the link to Obtain Production Key and follow the instructions that are online.
When FedEx supplies you with the production key, enter it into the Account ID field in System | Configuration | Shipping Methods | FedEx.
As with USPS and FedEx, DHL requires you to create an account before you can use its gateway. While Magento does have a place to configure DHL, at this time, Magento is not on DHL's list of supported software. This means that while the Magento community will help you troubleshoot DHL configuration, DHL will not help you. You can see the list of Shopping Carts that DHL supports at http://www.dhl-usa.com/xml/vendormodule.asp?nav=TechnologyTools.
Even if you're not sure which shipping options you want to use in your store, at this point you should configure at least one of them. This will enable you to test the full functionality of your Shopping Cart, and place test orders.
Configure at least one shipping option and step through the checkout process with that option enabled. This will allow you to see the complete checkout process. The easiest to configure is flat rate shipping.
Also, consider which shipper(s) you want to offer, and sign up for accounts with those shippers. When you have your accounts, you can configure Magento to connect to those shippers.
We configured the shipping options for our store. We are now ready to place test orders, which will be covered in the next chapter.
When you offer a shipper, you must offer all of that shipper's services to your customers. True/False
When you offer a shipper, you must offer all of the countries to which that company ships. True/False
You can add a handling fee for each of the shipping methods, except for (select one):
a. Free
b. Flat Rate
c. Table Rates
d. UPS
e. USPS
f. FedEx
g. DHL
Which shipper does not require you to register an account, to use its gateway (select one)?
a. UPS
b. USPS
c. FedEx
d. DHL
Magento offers relatively easy ways of configuring shipping options for your customers. All of the methods covered in this chapter have one thing in common: They add a shipping/handling charge to the customer's order, but do not interface directly with a scale, a label printer, or a postage printer. That is, after these methods calculate shipping/handling and add that amount to the order, their job is done. You must still perform these functions in a system outside of Magento.
When you offer your customers a choice of shipping methods, try to use labels that tell your customers what they can expect from a method before selecting it. For example, if you're using FedEx only for overnight shipping, instead of labelling it as "FedEx," label the method "Overnight with FedEx".
Beware of times when the shipping charge that you calculate might not cover your cost of shipping an object. For example, if you're calculating shipping based on weight and destination, and you sell an object that is very light but very bulky (like a paper chandelier), the standard shipping cost for that item's weight might not cover your cost. So, keep unusual shipping costs in mind when pricing your products.