
In Chapter 5 you learned how to add Simple Products to your store. Magento enables you to go beyond that and offer more complex Products. These include Related Products, Grouped Products, and Configurable Products
When you offer Related Products with a Simple Product, they are displayed in the Related Products block when a customer views the Simple Product. Related Products are meant to be bought along with a Simple Product. Consider using this feature when you want to sell accessories or add-ons for a Simple Product.
Grouped Products are groups of Products that are meant to be purchased together such as a suit jacket and suit pants.
A Configurable Product is a Product in which the customer gets to choose an attribute(s) of the Product such as the color, size, or material.
You can also offer discounts for buying in quantity, by using tiered pricing.
You can display Related Products for any Product in your catalog. These will appear in the Related Products block. Related Products are meant to be purchased in addition to the Product the customer is viewing.
In our demonstration store, we sell several kinds of whole-bean coffee. For each of these Products, we want to display a coffee grinder as the Related Product:
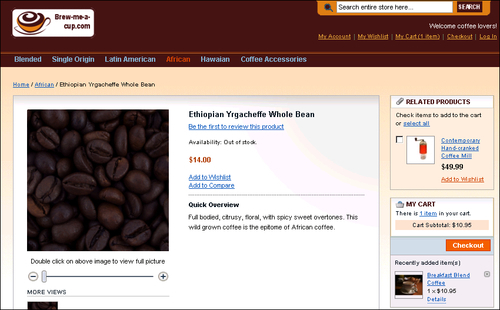
By default, the RELATED PRODUCTS block appears in the upper right corner of the page. On web pages, this is considered a highly visible spot. The block appears only if you have designated at least one related Product.
This block will not appear if the customer is viewing a Configurable Product, even if one of its configurations has a Related Product. The block appears only for Simple Products.
Notice the checkbox next to the Related Product. If a customer selects a Related Product and adds the main Product to the Shopping Cart, the Related Product will also be added. If (s)he doesn't add the main Product, the Related Product will not be added.
Follow these steps to add related Products to a Product.
When the Product's page is displayed, select the Related Products tab. to display a search box. You will use this to search for, and select, the Related Products.
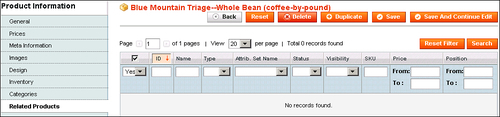
To display all of the Products in your store, click on Reset Filter. To search for a specific product, enter the criteria and click on Search.
To select a Related Product, click the appropriate box to place a check mark in the first column as shown in the following screenshot.
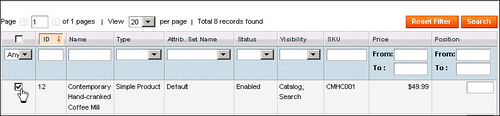
If this Product has several Related Products, specify the order in which they will appear by entering a number in the Position field, which is in the column to the far right.
Click on Save.
A Grouped Product is a shortcut for simultaneously adding several Products to the Shopping Cart. A Grouped Product is not really a Product. It is a group of Products that is displayed together. A Grouped Product can include both Simple and Configurable Products.
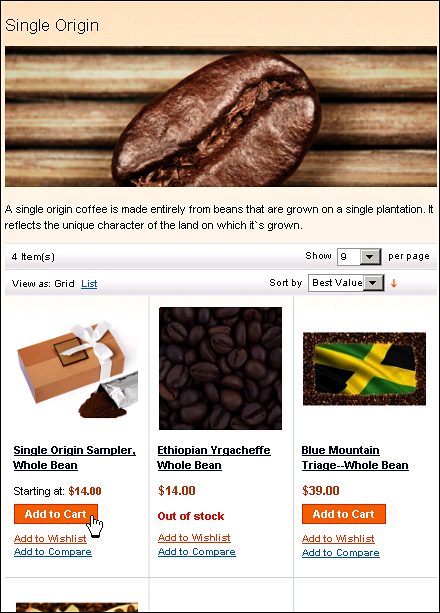
In the following example, you can see that our Single Origin Sampler consists of three separate Simple Products:
When a customer clicks on the Grouped Product's name, or the Add to Cart button, (s)he is taken to the Grouped Product's page:
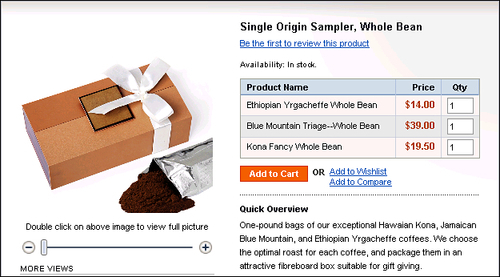
On this page, the customer chooses the quantity and adds the Grouped Product to the Shopping Cart. Notice that a Grouped Product's page clearly lists the individual Products that make up the Grouped Product. Also, notice that the system has filled in a quantity for the customer. When you create a Grouped Product, you specify a default quantity for each of its Products. While the quantity is initially set, the customer can override it and enter new quantities.
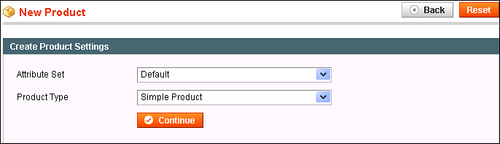
Select an Attribute Set. You do not need to select the same Attribute Set as the individual Products that make up the Grouped Product. You can choose any Attribute Set.
For Product Type, select Grouped Product.
Click on Continue. The Product Information page is displayed as shown in the following screenshot:
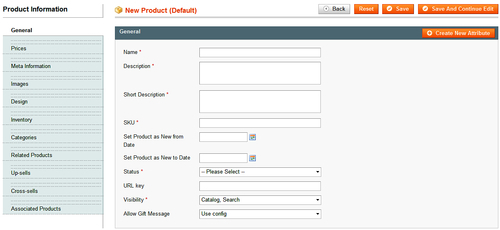
Notice that there are no tabs for Weight and Price. As the Grouped Product is a collection of individual Products, its weight and price are the sum of the individual Products.
Note
The procedure for creating a Group Product is almost identical to creating a Simple Product. Because you need to create several individual Products before creating a Group Product, these instructions assume that you know how to create a Product. Therefore, they will focus on what is unique about creating a Grouped Product. If you don't understand any part of these instructions, consider reviewing the procedure for creating a Simple Product explained in Chapter 5.
When Magento displays a product in your store, that product appears on its own page. Most of the information that your shoppers see on that page is entered here, on the General tab.
Notice that several fields on this page are marked with red asterisks. These fields are required, so you must fill them.
Note
You must fill in the required fields under the General tab before leaving the New Product page. Even if you save your work, the product will not be added to your store if you haven't filled in the required fields.
Enter Name, Description, and Short Description.
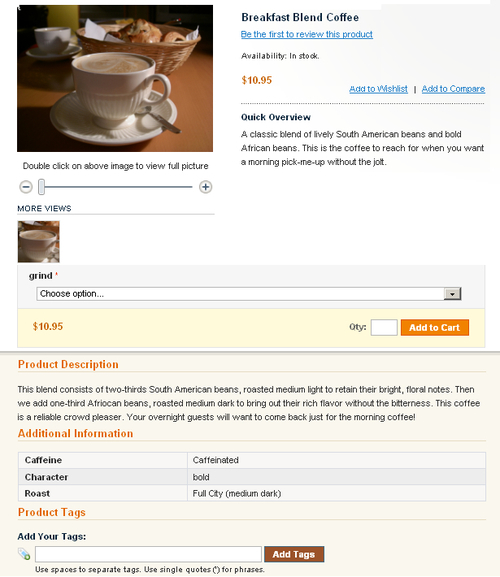
The way these fields function is similar to the fields for Simple Product. Your customers will see the product Name at the top of the product's page. The Short Description field appears below that, in the section labeled Quick Overview. The Description field appears below that.
Enter a unique SKU.
A Grouped Product has an SKU, just like a Simple Product. However, when a customer adds a Grouped Product to the Shopping Cart, the individual Product's SKUs are added to the cart. The Grouped Product's SKU is not added to the Cart.
Optionally, enter dates for Set Product as New from/to Date.
A new product can be included in the new product display, RSS feed, and/or an email announcement. Setting dates in the fields for Set product as new from/to date makes the product new to Magento. If you use any of these features, you will need to fill in the date fields. However, if you don't highlight the new products in your store, you can safely leave these fields blank.
If any of the individual Products that make up the Grouped Product are new, they will also appear as new in addition to the Grouped Product.
Select a Status for this Group.
Enabled makes this product active and displays it in your store. Disabled makes this product inactive and hides it from shoppers. It is good practice to keep a product Disabled until you've filled out all the tabs and double-checked your work.
Enter a URL key.
This field functions in the same it does for a Simple Product. The URL key field creates a search engine friendly URL. Because a URL cannot have spaces or special characters, you cannot use it in this field. If you leave this field blank, Magento will generate a search engine friendly URL for you based on the product's Name.
Select the Visibility for this Group.
This field determines if the product will not display at all in your site (Nowhere), display on the pages of your site (Catalog), show up in search results (Search), or both (Catalog, Search). Note that although a product's Status is set to Enabled, your shoppers won't be able to see or find that product if you have its Visibility set to Nowhere.
Select the setting for Allow Gift Message.
This field determines whether customers can add a gift message to this product during checkout. Yes and No are self-explanatory. Use config means that for this product, Magento will use the sitewide setting for gift messages. You will find that setting under System | Sales | Sales | Gift Messages.
Save and Continue
In the upper right corner of the New Product page, there are two Save buttons:

Save will save what you have entered in this tab, and advance you to the next tab. Save and Continue Edit will save the information that you entered, but keep you on the same tab.
Use Meta Keywords and Meta Description as opportunities to optimize the page for search engines.
For Meta Title, enter the title for this Product page. The title should include search terms that customers will use when searching for this kind of a product.
For Meta Keywords, enter keywords that describe this Product. The keywords should be the search terms that customers are likely to use when searching for this kind of product.
For Meta Description, enter a single sentence or phrase that describes the Product. If a potential customer finds this Product through a search engine, such as Google or ask.com, what description would you like the customer to see? That is what you should enter here.
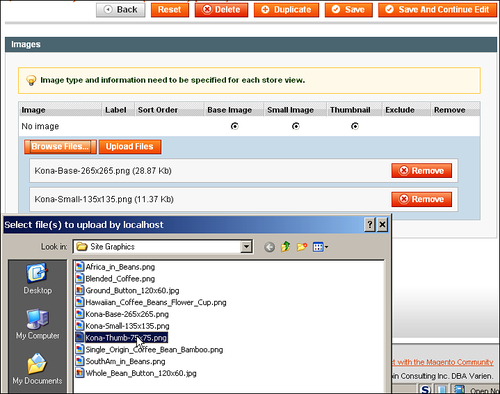
After selecting the image, click on the Open or OK button in the dialog box.
If you want the same image to be used for base, small, and thumbnail, you can move to the next step. If you want to use separate images for each of the three images, then click on Browse Files... and select the appropriate images.
After you select all the images that you want for this Product, click on Upload Files. The files will be uploaded to the Images page.
In our example, only one image has been uploaded for the product. It will be used for all three image sizes. For coffee, it did not make sense to have multiple images because there is not much to show about this product.
Select the image you want for the Base Image, Small Image, and Thumbnail Image by clicking the radio buttons shown in the following screenshot:

To exclude an image type, click on the radio button in the top row for No Image. This means that wherever Magento would have used that image size, no image will be displayed. For example, the thumbnail image appears in the Shopping Cart. If you select No Image for the Thumbnail Image, then no image will be added when this is placed in the Shopping Cart. You might use No Image when you are selling something for which an image doesn't make sense. For example, if you're selling a repair service you might not need an image.
Enter a Label for each image. This will be used as the "alt text" for that image.
Click on Save And Continue Edit.
For a Grouped Product, there are only two settings under the Inventory tab: Manage Stock and Stock Availability as shown in the following screenshot:
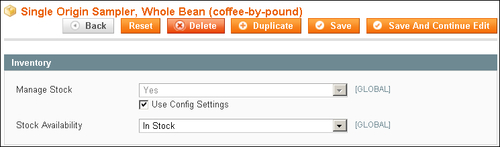
All of the other settings that you normally find under this tab are managed under individual Products.
If you want to track the inventory for this Grouped Product, set Manage Stock to Yes.
To make the Grouped Product available to shoppers select In Stock for Stock Availability. This makes the Grouped Product available. The individual Simple Products must also be in stock. If any of the Simple Products are unavailable, the shopper can still add the remaining ones to the Shopping Cart by adding the Grouped Product.
Under the Associated Products tab you select the Products that are part of this Group.
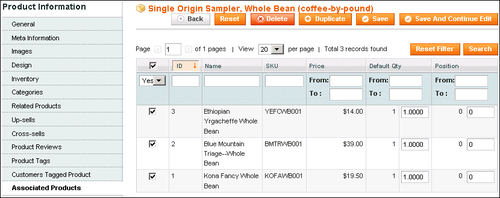
The previous screenshot shows what this tab looks like after you have added Associated Products. When you first select this tab, there will be no Associated Products.
Click on Reset Filter to view all products, or to find specific products, enter your search criterion and click on Search. This causes the Products in your store to be displayed in the list.
To select a Product, click to place a check mark in the first column.
Enter a default quantity for the Product. This will pre-fill the quantity field, Qty, when the customer selects this Group.
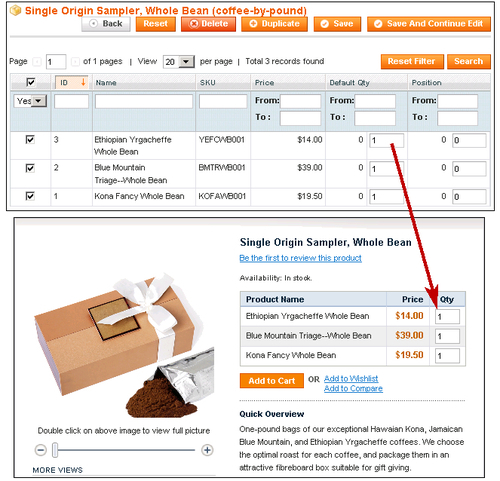
You just completed the last step in creating a Grouped Product. Now when a shopper visits the page for the product, (s)he will see a picture and description for the Group. (S)he will also see the individual Simple Products that will be added to the cart if the Group Product is added.
A Configurable Product is one where the customer gets to choose an attribute of the Product. For example, a pair of shoes is a Configurable Product if the customer gets to choose the size. Likewise, a shirt is also a Configurable Product if the customer can choose the size and colour. In our demo store, we will create a Configurable Product by enabling customers to choose the grind for a coffee.
A Configurable Product is actually a collection of Simple Products. Think about a shoe example. In the inventory, the store has many different sizes of the same model of shoe. Each size is in a different shoebox, and has a different SKU. Each size is, essentially, a different Product. When a shopper selects a specific size, (s)he is really selecting a specific Product with its own, unique SKU.
This means that for every choice you give your customers for a Configurable Product, you need to create a Simple Product. For example, suppose you sell a shirt in the following configurations:
|
Size |
Color |
SKU |
|---|---|---|
|
small |
blue |
shsmbl |
|
medium |
blue |
shmebl |
|
small |
red |
shsmre |
|
medium |
red |
shmere |
|
large |
red |
shlare |
In this case, you would allow the customer to choose two Attributes for this Configurable Product: size and color. Hence, you would create five Simple Products.
Note
This section assumes that you know how to create and use Attributes. This was covered in Chapter 3.
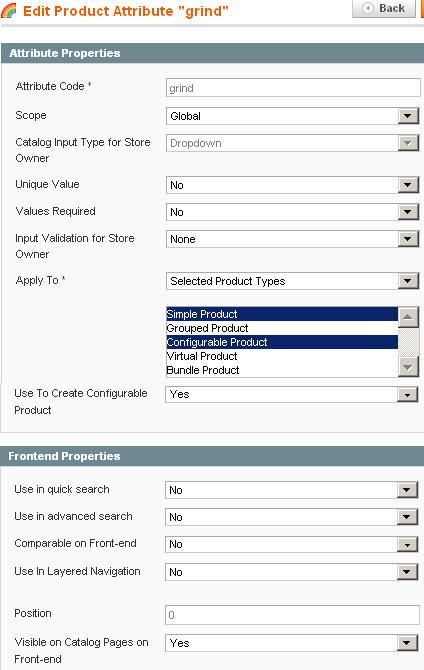
To make this Attribute configurable, set the Scope to Global. The Attribute needs to be available everywhere in your site.
Set the Input Type to Dropdown. This creates a drop-down list for the customer.
Set Use To Create Configurable Product to Yes.
Click on the Save button.
Make sure that the Attribute Set that you will use for this Configurable Product contains the configurable Attribute(s) that you just set up.
You just designated an Attribute(s) as configurable. Now, you can create a Configurable Product based on that Attribute. This means that your shoppers will be able to choose a value for that Attribute, and they will be shown a Product with that value.
Note
This next section assumes that you know how to create Products. This was covered in Chapter 5.
You must create the Products that will be associated with this Configurable Product. You will create the first Product in the same way as you would any other Simple Product. If you need complete instructions, refer to the instructions for creating a Simple Product in Chapter 5. The following section contains just the key points that you must remember when creating a Simple Product, which will be a part of a Configurable Product.
After creating the first Simple Product, you will duplicate it and use the duplicate as the starting point for the next Simple Product. This section covers creating the first Simple Product. The next section covers duplicating it and creating the rest of the Simple Products.

You must select an Attribute Set that has one or more configurable Attributes, such as the one that was set up in the previous section.
In our demo store, we selected coffee-by-pound because it contains the configurable Attribute, grind.
Note
The Simple Products can differ in more than just the configurable attribute. For example, suppose you sell t-shirts. Maybe all the small shirts are available only in black, and all the medium-sized shirts are available in black and red. In that case, you would make both size and color as configurable attributes. When a customer selects the small size, (s)he would see only black in the color selection column. When (s)he selects the medium size, (s)he would see black and red in the color selection. Both Attributes must be configurable, even if you're using them both on only some of the Simple Products in this Configurable Product.
For Product Type, select Simple Product. Remember, you are creating one of the Products that will be associated with the Configurable Product. You are creating the Configurable Product itself.
After you click on the Continue button, the Product Information page is displayed. Fill out this page as you would for any Product.
Pay special attention to the setting for the Configurable Atribute(s) that you set. In our demo store, we selected a value for grind.
When we create the other Simple Products for this Configurable Product, we will choose a different grind for each of them.
Make sure that every Product in your store needs a unique SKU.
Set the Status of this Product to Enabled, or else it won't be available to your customers.
Unlike a normal Simple Product, set the Visibility to Nowhere. This prevents the Product from having its own listing in your store. If you forget to do this, the Product will show up as both a normal product with its own listing, and as a selection under a Configurable Product. The following screenshot demonstrates that mistake. Notice that all three Simple Products, which will be choices for the Configurable Product, appear by themselves.
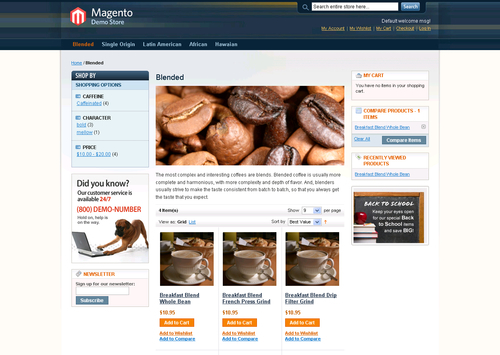
When I set the Visibility to Nowhere, these Products will disappear from the page.
Fill in the rest of the information for this Product, just as you would for any other Simple Product. If you need complete instructions, refer to the instructions for creating a Simple Product enlisted in Chapter 5.
Save the Product.
You just created the first Simple Product that will be a part of the group of Products that comprise this Configurable Product. Now you are ready to create duplicates of this Product, and use each Duplicate as the starting point for a new Product.
To begin the next part of the procedure, you should keep open the Product that you want to duplicate.
Click on Duplicate. When the Product is duplicated, you will see a message at the top of the page.
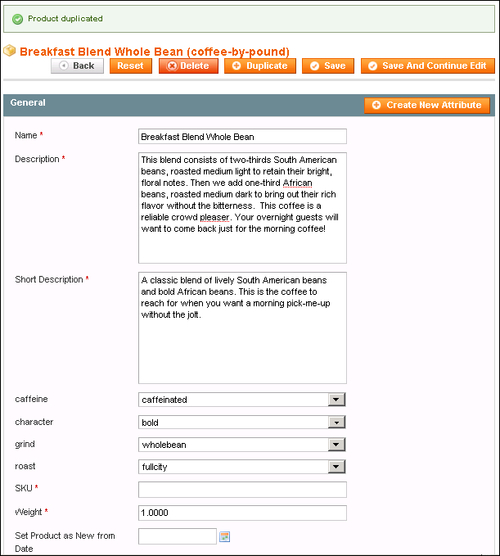
You know that you are working with a duplicate Product, and not the original, because the SKU is blank.
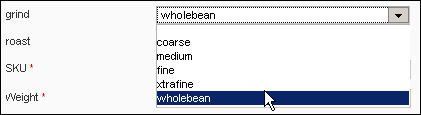
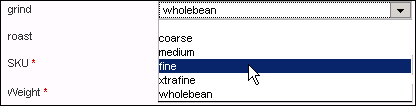
For the configurable Attribute, choose a new value.
In our demo store, we chose a new value for grind:
Enter a unique SKU for this Product.
Set the Status to Enabled.
If needed, edit the Name and Description.
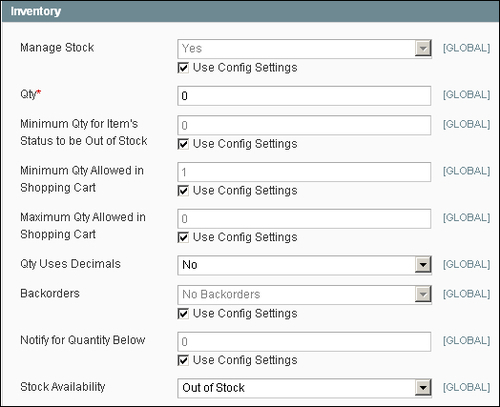
Under Inventory, the Qty for the new Product is automatically set to zero, and the Stock Availability is set to Out of Stock. You must change these.
Look through the tabs for any other information that needs to be changed for this new Product. For example, if you changed the Name and Description, would you also need to change the Meta Information? Does this Product look different enough from the others that you will need to upload new Images for the product?
Repeat as needed, until you have created all of the Products that you need for this Configurable Product.

Select an Attribute Set. You must select an Attribute Set that has one or more configurable Attributes, such as the one that was set up in the previous section.

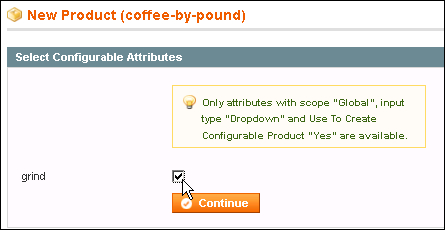
For Product Type, select Configurable Product.
Click on Continue. You will see a dialog box asking you to select the Configurable Attributes for this Product.
Note
If there are no Configurable Attributes listed, it means the Attribute Set that you selected for this Product contains no Configurable Attributes. Either go back to Catalog | Attributes | Manage Attributes and make at least one Attribute configurable, or start over and select an Attribute Set that has a Configurable Attribute.
Select the Attribute(s) that you want to be configurable. This will create a drop-down list for that Attribute, enabling the customer to choose a value for the Product.
Click on Continue. The Product Information page is displayed as shown:

Notice that there is no tab for weight. As the Grouped Product is a collection of individual Products, its weight is the sum of individual Products. The weight will be calculated after the group is added to the Shopping Cart.
The Prices tab has only one field, Not available for purchase with Google Checkout with Yes or No as options. Again, the price of the group depends upon the prices of the individual items, and is calculated when the group is added to the Shopping Cart.
Note
The procedure for creating a Configurable Product is almost identical to creating a Simple Product. As you need to create several individual Products before creating a Configurable Product, these instructions assume that you know how to create a Product. Therefore, they will focus on what is unique about creating a Configurable Product. If you don't understand any part of these instructions, consider reviewing the procedure for creating a Simple Product given in Chapter 5.
The General tab is selected for you. Let's begin there.
Fill in the fields under the General tab as you would for any other Product.
Enter a unique SKU.
Set the Status to Enabled.
Unlike the individual Products that make up this Configurable Product, you should set the Visibility to Catalog, or Search, or Catalog, Search.
Under Inventory, the only settings you will see are Manage Stock and Stock Availability. Set the Stock Availability to In Stock.
Select the Prices tab.
In the Price field, enter the base price for this Product. Later on, you will enter a price modifier for each Associate Product.
For example, suppose you sell shirts in sizes that range from extra-small to extra-extra-large. Further suppose that the price for the extra-small size is $9, small through extra-large is $10, and extra-extra-large is $11. In this field, you would enter a price of $10. Later on, you would enter a price modifier for extra-small of -$1 (negative one dollar) and a price modifier for extra-extra-large of +$1 (positive one dollar).
Look through the tabs for any other information that needs to be changed. For example, will you need a different Name and Description for the Configurable Product? Will you also need to change the Meta Information? Do you want to upload an Image that shows several versions of the Product?
Click on Save And Continue Edit.
Select the Associated Products tab.
At the top of this page you will see sections labeled Create Simple Associated Product and Quick simple product creation. If you had not created the Simple Products for this Configurable Product, you could use either of these to create a new Product. As you have already created all the needed Products, you can skip these sections. When you need to create a new Simple Product for this Configurable Product, you will have three options:
Duplicate a Product, as you did earlier.
Use Create Simple Associated Product.
Use Quick simple product creation.
The last two options are shortcuts. They are not difficult to learn, however you already know how to use the first option, and it doesn't take much longer than the other two.
At the bottom of the page, you will list all of the Simple Products that use the same Attribute Set as this Configurable Product.
Click on Reset Filter to show all products or to search for specific products, enter a search criterion and click on Search.
This causes the Products that use the same Attribute Set to be displayed in the list. The Products that cannot be associated will be shaded, while the ones that that can will not be shaded.
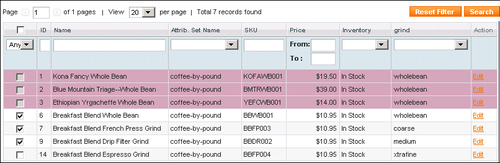
Looking at the previous screenshot, you can see that Breakfast Blend Whole Bean has a grind of wholebean. The first three Products in the list cannot be associated because they also have a grind of wholebean. Each Associated Product must have a unique setting for the configurable attributes. That is because when the customer selects a setting for the configurable attribute, the customer should see only one Product. In our example, you can assign only one Associated Product for each of these settings: wholebean, coarse, medium, and xtrafine.
To select a Product, click to place a check mark in the first column.
Click on Save And Continue Edit. After saving, Magento takes you to the General tab. Return to the Associated Products tab.
In the Super product attributes configuration section, you will see each Configurable Attribute listed.
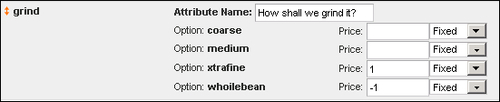
In the Attribute Name field, enter the text that you want the customer to see when they choose the setting for this Attribute.
In the Price field for each setting, enter a price modifier.
In our demo store, the result looks like this:
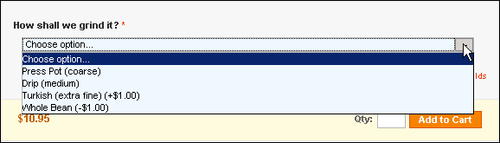
Notice the base price, $10.95, in the lower left corner. We entered this under the Prices tab. The label, How shall we grind it?, was entered under the Attribute Name. You can see the price modifiers for the Turkish and Whole Bean grinds, which we also entered earlier.
Finally, save the Product.
Your Configurable Produce is complete. When customers view this product, they will be able to select different values for the Attribute that you made configurable. When they select one of these values, they will be selecting the individual Simple Product that has a value for that specific Attribute.

Tiered pricing enables you to give special prices for a specified group, or customers, and a specified quantity. It is set under the Prices tab.
A tiered price has the following three components:
In the simplest case, you will give a discount to anyone who buys a minimum quantity. In that case, you would create a single tier, and apply the Tier Price to ALL GROUPS. For example, in the following screenshot of the Prices tab, you can see that this tier creates a 15% discount for buying three bags or more:
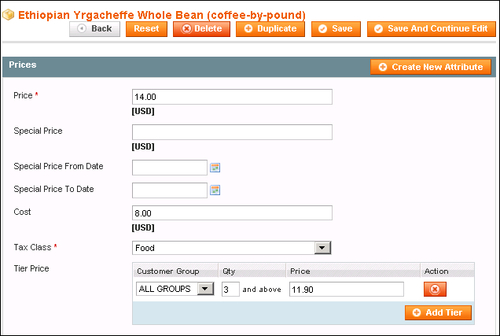
Notice that the normal price is $14.00 per pound. For the tier price, we wanted to give a 15% discount. So, we calculated that $14.00 minus 15% is $11.90 per pound. Also, notice that the Customer Group is set to ALL GROUPS.
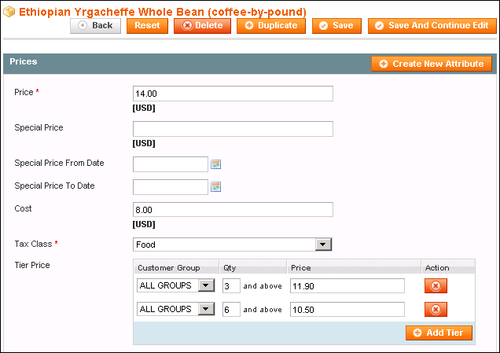
In a more complex case, you could use multiple tiers. Once again, these tiers apply to all customers.
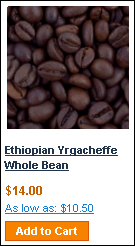
When the product is listed in your catalogue, customers see the standard price and the lowest price. Look at the following screenshot:
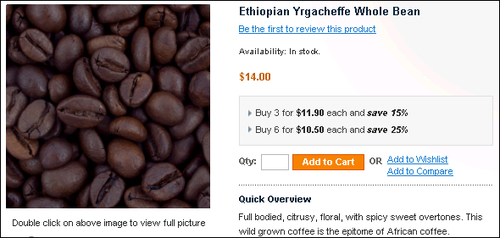
On the product's page, customers see the tier prices as shown in the following screenshot:
When you give discounts to only selected groups of customers, the process becomes a little more complex.
As stated earlier, a tiered price has three components. When setting up a tiered price for everyone, we selected ALL GROUPS for the Customer Group. Magento comes with four in-built customer groups, as shown in the following screenshot:

Under Customers | Customer Groups, you can create additional customer groups.
With customer groups, you can charge different tax rates for different kinds of customers. In the above screenshot, you can see that one customer group is called Wholesale. This group is taxed differently, as you can see from the Tax Class column.
You can also give different prices to different customer groups. This is done using the tiered pricing.

A complete discussion of customer groups is beyond the scope of this quick-start guide. However, if you need to offer different prices or tax rates to different types of customers, customer groups enable you to do that.
After you create a Product, which of these cannot be changed?
a. The Product's type (simple, group, configurable)
b. The Product's SKU
c. The Product's name
d. The Product's Attribute Set
Before creating a Configurable Product, you must:
a. Create all the Simple Products that you will associate with this Configurable Product
b. Create all the Configurable Attributes and the Attribute Set that you will use for the product
c. Create the Category that will assign to the product
If one of the Simple Products that is associated with a Grouped Product is out of stock, can the customer still add the Grouped Product to their Shopping Cart? (Yes/No)
In this chapter, we walked through the process of creating a Simple Product, which is the basis for the other product types. We then created a Group Product, which is a collection of Simple Products that is added to a shopper's cart all at once. We also created a Configurable Product. It is a collection of Simple Products that differ in one or more Attributes, and can be chosen one at a time.
Magento contains other product types, which are not covered here. Mastering the creation of Simple Products will enable you to learn about additional product types.