COUNTRY SCIENTIST BY FORREST M. MIMS III
How to Photograph the Solar Aureole
The purpose of the Country Scientist column is to provide projects that will encourage readers to do science. Whether you’re a student looking for a good science fair project, or an adult wanting to begin a personal science study, I hope that you’ll find this or a future project worthy of pursuing.
The Solar Aureole
Dust and other kinds of particulate matter cause the sun to be surrounded by a bright glow in the sky known as the solar aureole. The aureole is often faint or even nonexistent when the sun is viewed from a mountaintop. But it’s almost always present at lower elevations, especially during spring, summer, and fall.
The diameter and brightness of the aureole is related to the scattering of sunlight caused by particulate matter. This means a record of solar aureole photographs can provide a good indication of the transmission of sunlight through the atmosphere. The color of the sky beyond the aureole also provides clues about stuff in the air.
Since 1990 I’ve made almost daily measurements of the ozone layer, solar ultraviolet radiation, haze, total water vapor, and other sun and sky measurements from a field adjacent to the small farmhouse that serves as my South Texas office. In 1998, I bought my first digital camera, a 1.5-megapixel Fuji MX-700. To date this camera has provided 4,465 images (1,280×1,024 pixels) of the solar aureole and the sky over the north horizon. While the resolution is low by today’s standards, it’s more than adequate for a record of sky images.
These solar aureole images provide important information about my electronic sun and sky measurements, for they quickly reveal the presence of thin clouds or haze that might have affected the measurements. They also provide a visually convenient way to compare the clarity of the sky across the seasons and years.
Photographing the Aureole
Solar aureole photos can be made with virtually any kind of digital camera. For serious studies, you’ll want to use a camera that allows you to set the same exposure duration and f-stop for all your aureole photos. This will provide a record of the sky without unwanted automatic adjustments by the camera that alter or even remove the changes in sky brightness and color caused by dust, smoke, and other forms of air pollution.
The aureole is washed out if the sun is photographed directly. Worse, your eyes and a digital camera’s image sensor can be permanently damaged by the focused image of the sun. Therefore, it’s necessary to design an occulting device that blocks the direct sun when making solar aureole photos. To protect your eyes, it’s also necessary to use a method that does not require you to look anywhere near the sun.
I’ve developed various methods for photographing the solar aureole in which you need only look at your camera. My favorite occluder rig is a simple camera platform that keeps the sun and occluder in the same position for each photograph. This greatly simplifies the comparison of photos.
You can design your own platform or you can try my simple version, the Solar Photography Occluder Rig, explained in the DIY on the following page.
Making a solar aureole photo with the occluder in place is simple. If the sky is not overcast, put on sunglasses and a hat and go outdoors with your camera mounted on the occluder. If it’s awkward to sit in a chair or on the ground, brace the occluder rig against a stable object such as a fence or wall.
Switch on the camera, point it toward the sky away from the sun, and adjust its position so that the occluder is centered in the display. Then look at the front of the camera — not at the sun — while pointing the camera toward the sun. When the shadow of the occluder ball falls directly over the lens, press the shutter button and quickly move the camera away from the sun.
DIY SOLAR PHOTOGRAPHY OCCLUDER RIG
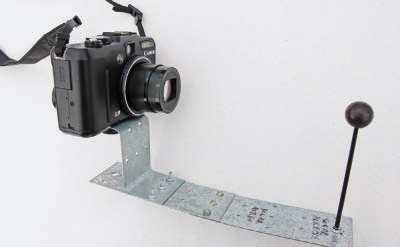
TOP: The author’s Canon G9 mounted on a simple occluder platform that blocks direct sunlight from entering the camera lens.
MATERIALS
» 1¾"×5" steel mending plates (3) or equivalent
» # 6-32 screws (6)
» #6-32 nuts (8)
» ¼-20 bolt
» 1/8" threaded rod
» Wood ball slightly larger than the diameter of the camera’s lens Found at craft or hobby stores, wood balls may come with or without a hole bored partway or entirely through.
» Black ink or paint A black marker pen works fine.
» Drill and drill bits
Join 2 of the mending plates end-to-end with three 6-32 screws and nuts, as shown in the photo above. (You may need to slightly enlarge the holes in the mending plates.) Drill out the center hole near the end of the third plate to ¼" diameter, to accept the ¼-20 bolt that will secure the camera. Bend the third plate twice as shown above and fasten it to the center of one of the 2 base plates with 3 more 6-32 screws and nuts.
Next, determine how high the wood ball needs to be so that it’s in line with the camera lens. Mount your camera atop the bent plate with the ¼-20 bolt. Hand-tighten the bolt to avoid damaging the camera; if it’s loose, insert a few washers to take up the slack. Now measure the distance from the base plates to the center of the lens. Add to this distance 1/8" plus half the diameter of the wood ball. Use a hacksaw to cut the threaded rod to this length.
Twist the cut end of the rod into the wood ball. Turn a 6-32 nut onto the uncut end of the rod until it’s about 1/8" from the end. Remove the camera and set it aside. Insert the end of the rod through the center hole in the end of the base plate opposite the camera mount and secure it with another 6-32 nut.
Complete the occluder by coating the ball and the threaded rod with black paint or ink.
Photography by Forrest M. Mims III
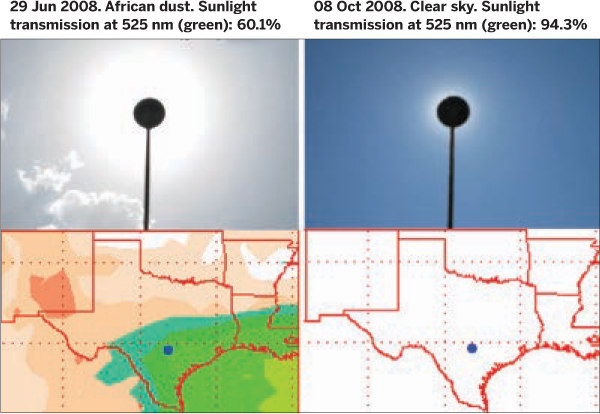
BOTTOM: The solar aureole photographed from South Texas on a day with thick dust from the Sahara (left) and a very clear day (right). Both images confirm the Naval Research Lab’s aerosol forecasts for the same days (nrlmry.navy.mil/aerosol).
Photography by Forrest M. Mims III
COUNTRY SCIENTIST
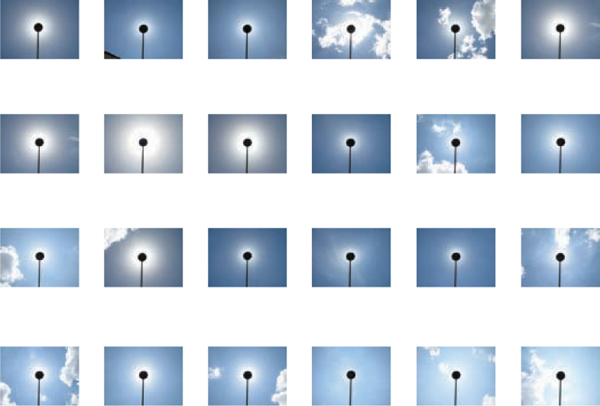
SOLAR JOURNAL: A recent series of solar aureole images made with the author’s sun occluder.
![]() CAUTION! Always wear sunglasses and never look at the sun while making aureole photographs. To avoid sunlight damage to your camera’s image sensor, you must work fast. You may void the camera’s warranty if you damage it by pointing it at the sun.
CAUTION! Always wear sunglasses and never look at the sun while making aureole photographs. To avoid sunlight damage to your camera’s image sensor, you must work fast. You may void the camera’s warranty if you damage it by pointing it at the sun.
Doing Science with Your Images
For serious scientific purposes, it’s best to make solar aureole photos at the same manual settings (I use 1/1,600 at f4) and at the same time each day the sun is visible.
Since 1990, I’ve made 2,392 aureole photos at or near local solar noon. Solar noon varies during the year, in accordance with the equation of time. You can find solar noon calculators and tables for your location online. Just search Google under “solar noon.” Some sundial sites also have solar noon tables.
An even better choice would be to photograph the aureole when the sun is at the same angle in the sky. Again, the web has various sites that provide solar angle calculators. A good choice would be to select the sun angle at noon on the winter solstice when the sun reaches its lowest point in the sky.
Going Further
Next time, we’ll use a free image processing program to analyze your solar aureole images and other kinds of photographs.
Forrest M. Mims III (forrestmims.org), an amateur scientist and Rolex Award winner, was named one of the “50 Best Brains in Science” by Discover magazine. His books have sold more than 7 million copies. He also edits The Citizen Scientist (sas.org/tcs).
Technologies from the dusty attic of the past can have as much mystery, excitement, and allure as those we imagine are just over the horizon. Today’s amateur techno-historians don’t just want to read about the gadgets of yesteryear, they want to build them, to interact with their constituent parts, right down to the rivet heads and hand-blown triodes.
Perhaps because modern technology seems so gray-box drab and utilitarian by comparison, retro makers like to bring the hand-built sensibilities of the past into their technosphere, re-casing their gadgets in highly ornamented forms of wood, brass, leather, and copper.
There’s no end to how we can revive, recast, and refashion the machinery of the past, and meld it with the technology of the present. In this issue, we explore “steampunk” and the revival of steam power, relief-etched illuminated printing, the art of mechanical time-keeping, and brilliant makers of centuries past. We’ll demonstrate how to build a parlor-proven electrostatic generator, a vacuum siphon coffee brewer, an engine with a teacup power source, and much more.![]()