
CHECKMATE, MR. BOND!
UNLOCK A SECRET COMPARTMENT WITH MAGNETIC CHESS PIECES.
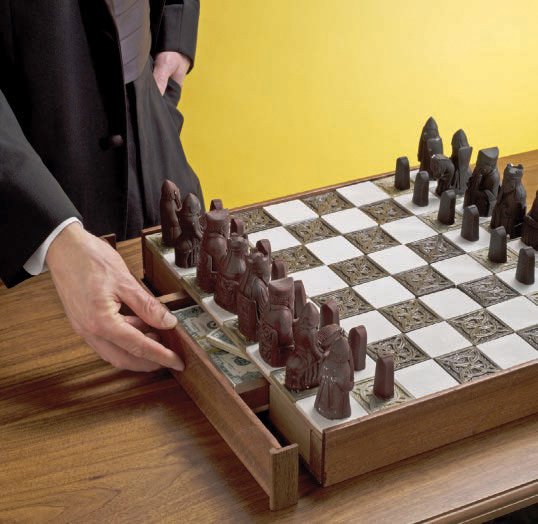
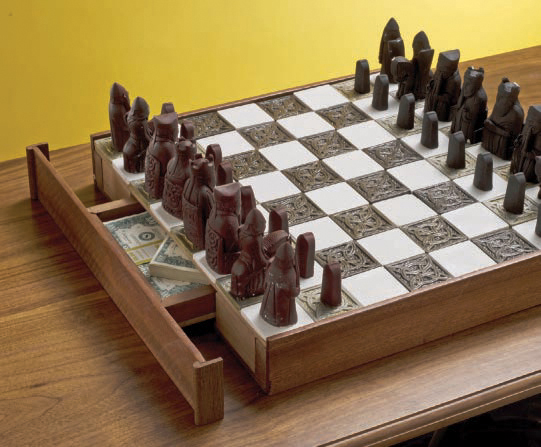
TREASURE CHESS: An ordinary-looking game board is the last place they’ll look.
Photograph by Garry McLeod
Everyone needs somewhere to stash stuff, and this chessboard provides a cunning hiding place whether you’re a super-spy or a super-villain. Moving the chess pieces across the board in a particular way will unlock a secret compartment that you can use to hide diamonds, baseball cards, or the evidence linking you to the crime of the century.
10lbs or 5kg of high-strength molding plaster such as Hydro-Stone or Denscal (Herculite Stone or Crystacast in the U.K.)
Latex chess set molds including chessmen and 2" square molds for the tiles
Acrylic paint
Acrylic clear coat (optional)
Rare earth bar magnets (4) small enough to fit inside the base of the chess pieces
PVA adhesive such as carpenter’s glue or ordinary white glue
¼" medium-density fiberboard (MDF) pieces:
16" squares (2) for the chessboard top and base
8"×12" for the drawer base
Dimensional lumber:
1×2×16" (2) for the chessboard sides. Remember that 1×2 dimensional lumber actually measures ¾"×1¾".
1×2×12½" for the chessboard back
1×2×31/8" (2) for the chessboard front
2×2×14½" (2) for the drawer guides
Hardwood:
1"×½"×8" (2) for the drawer’s front and back
1"×½"×12" (2) for the drawer’s sides
¼"×½" strip, 11½" lengths (2) for drawer runners
2½"×¼" trim boards I used reclaimed oak.
MAKE THE CHESSMEN AND TILES
1. Cast the chessmen and tiles.
Wash the latex molds in soapy water, and let any excess water drain out.
Mix the plaster with water and pour into the molds. The correct powder to water ratio for Herculite is about 2:1, but a good general rule is to aim for the consistency of thick pancake batter. Support the latex molds with jars or tins, so that the pieces don’t fall over.
2. Remove the pieces from the molds.
Once the plaster is firm and dry (in an hour or so), you can remove the pieces from the molds (Figure A). You’ll need to produce a complete set of chessmen from the molds, and also 64 tiles. Making the tiles might take a while, but it’s worth the effort.

Fig. A: The chessmen after casting.
Photography by Andrew Lewis
3. Paint the chessmen and tiles.
Once you’ve molded all the pieces, you can paint them with acrylic paint. The color scheme is up to you, but a more traditional look will probably attract less attention. Chess pieces tend to look best when left unvarnished, while the tiles will benefit from a layer of clear acrylic (Figures B and C, previous page).

Fig. B: Paint the chessmen. It seems more authentic not to varnish them.

Fig. C: The completed set, behind a section of game board tiles.
4. Install magnets in 2 chessmen.
You need to install bar magnets into 2 of the pieces, so that they can be used to activate the locking mechanism. The easiest way to do this is to hollow out the bottom of the chess pieces with a hobby drill or similar tool, and then glue the magnet in place before covering the hole with plaster (Figure D).
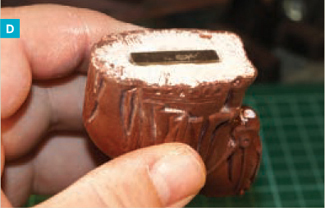
Fig. D: Two chessmen will contain magnets, which are used to open the secret drawer.
MAKE THE SECRET COMPARTMENT CHESSBOARD
1. Seal the MDF pieces.
Start by sealing the MDF pieces with a 50% solution of PVA adhesive and water.
2. Glue the wood sides to the chessboard base.
Glue boards all around the edge of the MDF base like the sides of a box, except for an 8¼" gap centered on the front (where the secret drawer will be). The thickness of these side boards isn’t critical (I used ¾"-thick 1×2 stock), although a height of at least 1¾" is recommended. You can improve on the strength of the glue with heavy-duty staples or tacks, but these aren’t absolutely necessary.
3. Add the drawer guides and runners.
Cut a slot the same size as the bar magnets across the top of each drawer guide, then glue the guides into place on the base (Figure E).
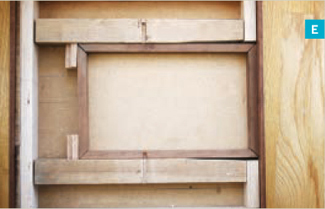
Fig. E: Chessboard with top removed, secret door closed.
A small plug of wood should be glued into the outside end of each slot to stop the magnets from falling out (Figure G). Also glue the ¼"×½" drawer runners to the base; these go under the drawer to make it easier to slide the drawer open and closed (Figure F).

Fig. F: Secret door open. Note the drawer runners underneath the drawer.
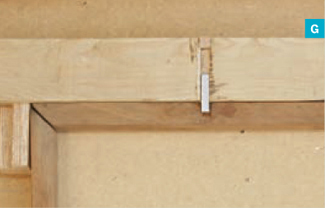
Fig. G: Close-up of the magnet slots. Note the small wooden stop to keep the magnet from falling out.
Photography by Sam Murphy (E, F, G) and Andrew Lewis (H)
4. Make a simple drawer.
Glue 1"×½" sides, the front, and the back to the 8"×12" MDF drawer base. I miter-cut the corners for strength and appearance.
To make the drawer look more presentable, you can either line it with material or apply a coat of paint. The drawer should slide freely between the drawer guides, and it should be the same height as the sides of the box (or nearly so).
Photograph by Garry McLeod
5. Add magnetic locks to the drawer.
Carefully line up the drawer with the front edge of the box, and then glue some wooden stops behind to prevent it from slipping too far inside. Now mark the drawer sides where the magnet slots are, and cut a matching recess in the drawer sides. The bar magnet should be able to slide freely into and out of the slot in the drawer.
Place the bar magnets into the slots, and temporarily place the MDF top onto the box. You can now test that the magnetic locks will work by passing a magnet over the area of the locks, sliding the bar magnets back and forth in their slots.
6. Assemble the chessboard.
Remove the MDF top and glue the tiles to it using contact adhesive. Trim the edge of the box using hardwood strips. Make sure that on the front side you glue the trim to the drawer only, not to the box sides (Figure H). The trim should be wide enough to cover the box and the edge of the tiles.

Fig. H: Remember not to glue the corner trim to the sides!
Finish the corners with a wooden corner molding of your choice, but remember to glue it in such a way that the operation of the drawer is not affected.
7. Finish.
All that remains is to finish the wood trim and give everything a final polish. I used a dark wood stain and beeswax to finish the wood, and then gave it a polish with a soft cloth.
You could just as easily use metal or plastic trim instead of wood, but I prefer the more natural look that wood offers.
Andrew Lewis also wrote “Self-Destructing Object” and “USBattery” in this volume of MAKE.