1+2+3 Alien Projector
Shine an alien, large or small, on any wall.
This simple projector shines an image of an alien on the wall. It uses an LED as the light source and projects an image varying in size from a few inches to several feet. The simple circuit consists of only a battery, resistor, switch, and LED.
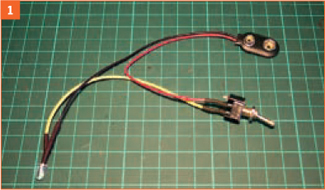
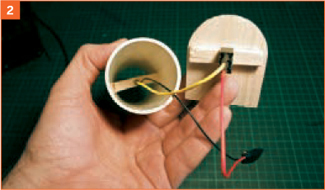
1. Build the basic circuit.
Trim the resistor and LED leads to ¼" long, and solder 1 end of the resistor onto the negative lead of the LED. Cut about 6" of wire, and solder it to the positive lead of the LED.
Put a piece of heat-shrink tubing over the black (negative) wire of the 9V battery clip, then solder the wire to the other leg of the resistor. Solder the red (positive) wire from the battery clip to the middle terminal of the switch. Place heat-shrink tubing over this wire if you wish.
Solder the positive LED wire to one of the outside pins of the switch.
2. Build the case parts.
Print the templates of the front and back plates, cut them out, and tape them to the balsa wood sheet. With a sharp knife, cut out the inside of the template first, then the outside. Use the cross on the back template to mark the hole for the switch.
Cut two 1¾" lengths of balsa wood stick. With the knife, drill a 3/16" hole in the middle of one, and a ¼" hole in the middle of the other.
Drill a ¼" hole in the middle of the balsa back plate where it’s marked, then glue the stick with the ¼" hole to the back plate.
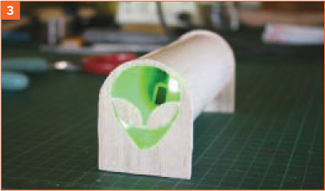
3. Put it all together.
Glue the LED into the stick with the 3/16" hole. Fit the switch to the back plate. Fit the LED stick into the middle of the PVC pipe, then glue the front plate onto the pipe. Snap the battery into the battery clip, then fit the back plate into place.
To set up the projector, place it in a dark room 1’–4’ from the wall. Move it closer to the wall for a smaller image, and farther away for a bigger image. The best thing about this project is that you can cut out any simple image and project it onto the wall, perhaps pumpkins for Halloween and a tree for Christmas.
Photography by Brian McNamara
YOU WILL NEED
LED green
Resistor 330R
Switch SPST panel mount
6" of wire
9V battery and battery clip
1¾" PVC pipe, 6½" long
3/16" balsa wood sheet, 6"×4"
3/8"×½" balsa wood stick, 4" long
Heat-shrink tubing (optional)
Saw
Wire cutters
Wire strippers
Sharp knife
Hot glue gun
Solder
Soldering iron
Download templates from: makezine.com/16/123_alien
Brian McNamara lives near Canberra, Australia. By day he works in a university workshop designing and repairing equipment for a biological research facility; by night he designs, hacks, and bends kids’ toys and musical instruments.
Make: Projects
Making is an art as well as a science, and these projects demonstrate a unique aesthetic. Snap an aerial masterpiece with your R/C pole photography setup, or sculpt recycled foam using a hot wire, 12 volts, and your imagination. Then capture the beauty of acoustic waves in visible form, using not much more than a vibrating platter and a coneless speaker.
Photograph by William Gurstelle and Karen Hansen