REMAKING HISTORY

Alessandro Volta and Electrodeposition
» Before Alessandro Volta invented the battery, the only way to produce electricity on demand was to use a friction machine and a Leyden jar — and except for parlor tricks, there wasn’t much use for this form of electricity.
The problem was that the electricity generated in this fashion produced a single, big, instantaneous spark that, while entertaining (see “Remaking History” in MAKE Volume 21), wasn’t usable in any practical way.
In 1799, Professor Volta was hard at work in his laboratory at the University of Pavia in Italy, investigating his idea that under certain conditions, dissimilar metals placed next to each other could generate an electrical current.
If this was so, he reckoned, then scientists could produce constant, even flows of electricity. Volta stacked alternating metal plates of zinc and copper. Between each group of plates he inserted disks of cardboard moistened with a weak saline solution.
This assembly became known as the voltaic pile — the first device that produced a steady source of electrical current. (An alternate configuration was his couronne de tasses, a “crown of cups” of saline solution linked by copper and zinc strips.)
When Volta published his findings in March 1800, the excitement in the scientific community was palpable. Sir Humphry Davy called the voltaic battery “an alarm-bell to experimenters in every part of Europe.”
Soon, scientists were applying constant-current electricity to just about everything they could, eagerly studying and documenting the effects. Ultimately the scientific unit of electromotive force, the volt, would be named for Volta.
Less than six weeks after Volta wrote to the president of London’s Royal Society with his findings, two British chemists, William Nicholson and Anthony Carlisle, were able to decompose water into its two component gases by electrolysis, applying electricity from a battery based on Volta’s design.
Before the chemists of the 19th century understood electrochemistry, most metal items were made from one solid hunk of metal; the same on the inside, outside, and everywhere in between.
This discovery was soon followed by Davy’s production of electric light from a continuous spark in the gap between electrodes (see “Remaking History,” MAKE Volume 20), and by perhaps the most commercially important of all early electro-chemical applications: the electrodeposition of metals.
Before the chemists of the 19th century understood electrochemistry, most metal items were made from one solid hunk of metal; the same on the inside, outside, and everywhere in between. Most silver forks and knives, for example, were solid sterling silver, making them very expensive.
Using Volta’s battery, with small amounts of metal salts and the right catalysts, it was possible to electroplate inexpensive metals with a thin, hard, and economical coating of pure nickel, copper, silver, or gold.
The Italian chemist Luigi Brugnatelli, a friend and colleague of Volta, invented electroplating in 1805, successfully plating silver medals in gold. The English caught on a few decades later, and by mid-century factories were mass-producing immense quantities of silver-plated teapots, silverware, hairbrushes, snuff boxes, and more, making life a little more refined, even luxurious, for the working classes.
In this issue’s project, we’ll use Volta’s invention to do our own copper electroplating, using materials found in most hardware stores.
MATERIALS
Copper sulfate (pentahydrate), about 175g sold as root killer in the drain cleaner section of hardware stores (brands include Rooto 1185 or Roebic K-77), or in 25g bottles from the Maker Shed (makershed.com), item #ZUNCC19
Sulfuric acid, about 125ml from the hardware store shelf next to the copper sulfate, or in 25ml bottles from Maker Shed #ZUNCS10A
Dishwashing liquid
Copper sheet, 1″×3″ from the hardware store.
Brass sheet, 1″×3″ from the hardware store. Get extra if you want to make more (or bigger) signs.
Glass loaf baking pan, 1½qt
Copper wire, 16 gauge, 2’ length
Wood block, approx. 2″×6″×1″
D cell battery (1.5V) and battery holder or low-voltage DC power supply
Test/jumper leads with alligator clips (2) such as Maker Shed #MKEL16
Wax candle
TOOLS
Tinsnips or heavy scissors
Drill with ![]() ” bit
” bit
Graduated cylinder, 50ml or 100ml Maker Shed #YLBGB24 or #YLBGB26
Beaker, 400ml
Scale grams or ounces
Bucket, large bowl, or 4-cup measuring cup
Glass stirring rod
Rubber gloves
Splash-proof goggles Maker Shed #YLBCA28
Make a Copper-Plated Sign
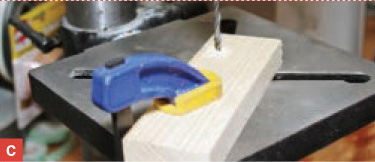
1. Cut 1×3 strips of copper and brass, then drill a ![]() ” hole in each as shown in Figures A and B.
” hole in each as shown in Figures A and B.

2. Prepare the wood block by drilling holes as shown in Figures A and C, so that the electrodes will be suspended on opposite sides of the loaf pan. Next, cut and bend two 12″ copper wires as in Figure A.
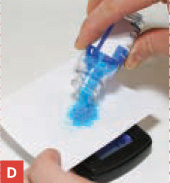
3. Measure 6oz (170g) of copper sulfate (Figure D) and mix it into 24oz (700ml) of water in a clean bucket, bowl, or large measuring cup. Stir until dissolved, but don’t worry if a small amount doesn’t dissolve.
Photography by Ed Troxell
![]() CAUTION: Put on your rubber gloves and splash-proof eye protection for the next 2 steps and all steps thereafter that require you to handle the acid solutions.
CAUTION: Put on your rubber gloves and splash-proof eye protection for the next 2 steps and all steps thereafter that require you to handle the acid solutions.
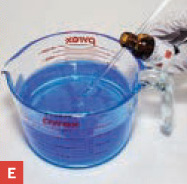
4. Slowly add 3oz (89ml) of concentrated sulfuric acid to the copper sulfate solution (Figure E). Be careful with this stuff — it is corrosive and highly toxic. Set aside.
5. Pour 350ml of water into the beaker. Slowly and carefully add 35ml of sulfuric acid to the beaker (Figure F, previous page). Stir with the glass stirring rod.

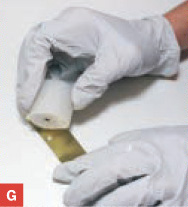
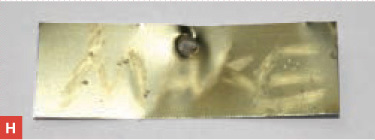
6. Thoroughly clean the brass and copper strips with dishwashing detergent and water. Rinse well and dry thoroughly. Use the wax candle to draw a design on the brass strip (Figures G and H). You can also try stenciling a design in wax.
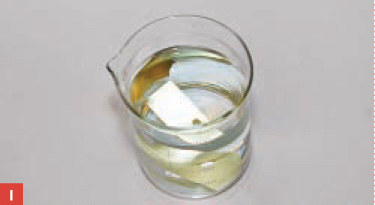
7. Immerse the brass strip in the beaker of diluted sulfuric acid (Figure I). Remove it after 2 minutes. The acid prepares the metal for plating by removing oxides and other impurities. Electroplating professionals refer to this operation as “pickling.”
8. Insert the wire hooks into the holes in the wood block and bend the wire so it lays flat on the block, taping the wire to the block if necessary. Then hang the brass and copper strips from the hooks (Figure J). The side of the brass strip with the wax design must face the copper strip.
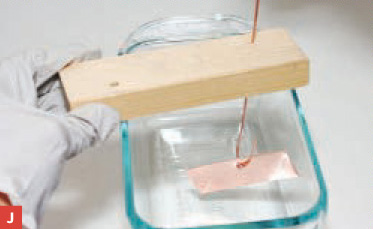
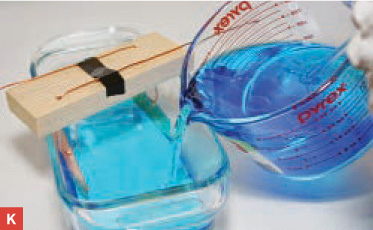
9. Pour the copper sulfate solution into the glass baking pan. Don’t overfill. Then place the wood block across the glass pan. Make certain the copper and brass strips are fully immersed in the copper sulfate solution (Figure K).
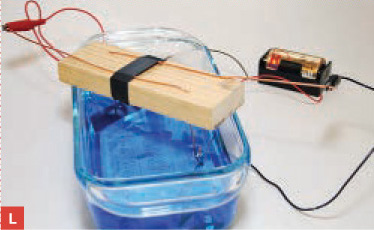
10. Use the alligator clip leads to connect the copper plate to the positive battery terminal and the brass plate to the negative battery terminal. You’re electroplating! Let the electricity flow for approximately 2 minutes (Figure L).
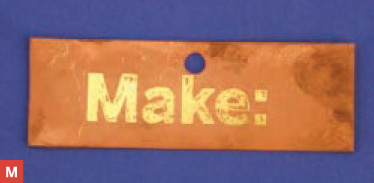
11. Remove and rinse with lots of water, then rub with a soft cloth to polish off any wax traces. Your electroplated sign is complete (Figure M).
12. To dispose of the solutions, don’t pour them directly down a storm sewer. Run cold water in your sink or bathtub and pour the solutions in, flushing them down with plenty of running water. Clean all the glassware with running water.
William Gurstelle is a contributing editor of MAKE.