THE TOWEL
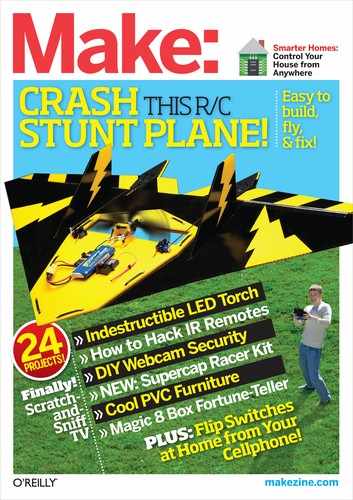
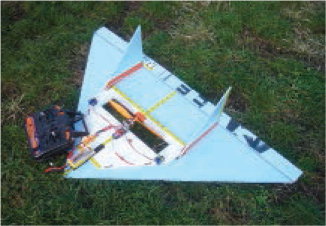
Build a robust R/C flying-wing airplane that’s fun to fly and great to learn on.
The great power of the Towel is that everyone thinks they can make one — and they’re right. Stupid-simple to build, all it takes is a spare afternoon, $100 worth of gear, and some DIY chutzpah.
The Towel is a great-flying airplane that’s optimized for typical urban flying conditions: gusty winds, small flying spaces, and rough landing spots. Unlike store-bought beginner planes, the Towel has a 1:1 thrust-to-weight ratio that makes it highly maneuverable. This allows it to fly in tight spaces and turbulence. It can also carry a camera.
Lots of people have learned to fly on the Towel. Repairs are simple and the airframe can take a lot of punishment before needing replacement, which takes minutes. It’s made from recycled materials and designed to not seriously hurt people or property.
Why the Towel moniker? Back in the day, I was flying an early version of the plane that had met Mother Earth at aggressive velocities many times. The nose had become a rumpled shadow of its former self. A fellow pilot, who was a bit of a smartass, remarked that it looked like I was trying to launch a wet towel, and the name stuck.
The Towel’s detachable deck is an innovation in DIY hobby flying. You’ll spend 80% of your build time on the deck, and only 20% on the airframe and control surfaces. This allows for a very desirable property of the Towel, which is that the airframe can be easily replaced in that 20% time frame. We can all thank Mark Harder (aka Splinter) for the deck concept.
We estimate that well over 100 Towels have been built, by kids and by vastly older kids. Here’s how you can make one.
Breck Baldwin ([email protected]) lives and works in Brooklyn, N.Y., trying to populate the sky with interesting objects. He has a Ph.D. in computer science and is the founder of LingPipe.com and chief scientist at YapMap.com.
SET UP: p.85 |
MAKE IT: p.86 |
USE IT: p.94 |
Gregory Hayes
LITTLE WING
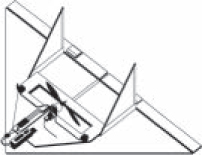
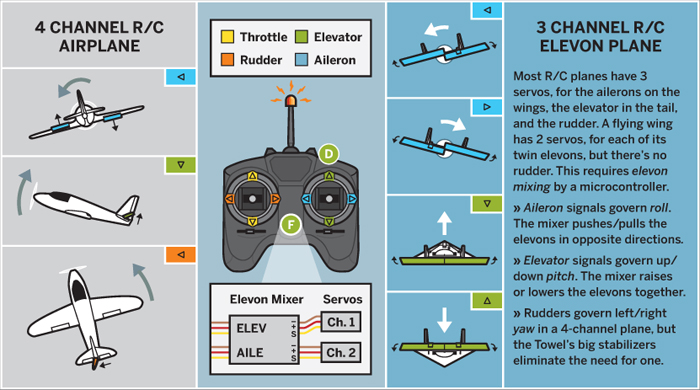
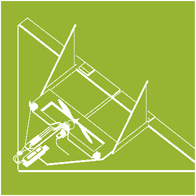
The Towel is a flying wing — a fixed-wing aircraft without a fuselage or separate tail structure. Like Northrop Corp. and Germany’s Horten brothers, we found advantages in its simple and strong construction.
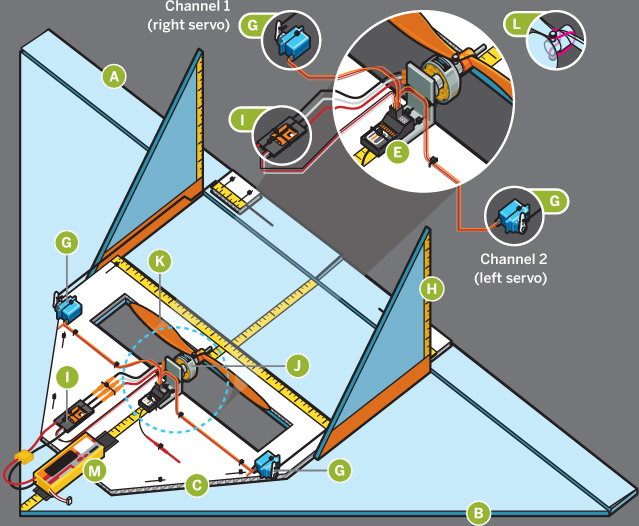
![]() Flight is steered by 2 independent elevons on the wing’s trailing edge, rather than the separate elevator and ailerons used in traditional planes.
Flight is steered by 2 independent elevons on the wing’s trailing edge, rather than the separate elevator and ailerons used in traditional planes.
![]() The airframe is cheap, rugged polystyrene foam that’s easily replaced.
The airframe is cheap, rugged polystyrene foam that’s easily replaced.
![]() The detachable deck holds the motors and electronics.
The detachable deck holds the motors and electronics.
![]() The radio transmitter sends control signals on 3 channels: throttle, aileron, and elevator.
The radio transmitter sends control signals on 3 channels: throttle, aileron, and elevator.
![]() The radio receiver relays the signals to the onboard electronics.
The radio receiver relays the signals to the onboard electronics.
![]() The elevon mixer (onboard or in the transmitter) blends the aileron and elevator signals to coordinate the 2 elevons.
The elevon mixer (onboard or in the transmitter) blends the aileron and elevator signals to coordinate the 2 elevons.
![]() Two servomotors move control rods to raise and lower the elevons.
Two servomotors move control rods to raise and lower the elevons.
![]() Twin vertical stabilizers help the plane track straight without yawing.
Twin vertical stabilizers help the plane track straight without yawing.
![]() The throttle signal governs the electronic speed controller (ESC), which provides AC power to the motor, and also powers the receiver and servos through its battery eliminator circuit.
The throttle signal governs the electronic speed controller (ESC), which provides AC power to the motor, and also powers the receiver and servos through its battery eliminator circuit.
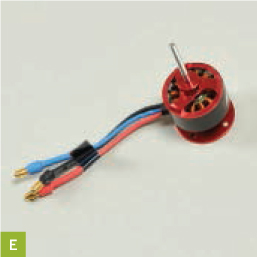
![]() The outrunner motor is a brushless AC motor that spins its shell around its windings, for low speeds and high torque without a gearbox.
The outrunner motor is a brushless AC motor that spins its shell around its windings, for low speeds and high torque without a gearbox.
![]() The propeller is a reduction-drive (RD) or “slow-flyer” type. Together with the outrunner motor, it provides a powerful 1:1 thrust-to-weight ratio.
The propeller is a reduction-drive (RD) or “slow-flyer” type. Together with the outrunner motor, it provides a powerful 1:1 thrust-to-weight ratio.
![]() The prop saver holds the prop on the shaft with an elastic O-ring so it can detach (not break) in a crash.
The prop saver holds the prop on the shaft with an elastic O-ring so it can detach (not break) in a crash.
![]() The LiPo battery pack powers 6–7 minutes of flight. Its placement is adjusted with velcro to fine-tune the plane’s center of gravity.
The LiPo battery pack powers 6–7 minutes of flight. Its placement is adjusted with velcro to fine-tune the plane’s center of gravity.
Rob Nance
SET UP.
GET the KIT
coming soon from
MAKER SHED #MSFW1
MATERIALS
Coming soon: get the complete kit in the Maker Shed item #MSFW1 (makershed.com)! Download templates for the airframe, deck, and stabilizers at makeprojects.com/v/30.
A. Extruded polystyrene insulation board, fan-fold, ¼"×24"×48" We use Dow High Performance Underlayment-PP (faced with plastic film). It weighs just 4oz for the airframe and stabilizers. Ask for leftovers at construction sites. You can also use stiff cardboard, presentation board, Coroplast, or Depron foam, but heavier materials may require a stronger motor and more nose weight. Softer materials may cause flutter.

Gregory Hayes
B. Corrugated plastic, 3mm, 11"×16" such as Coroplast. You can get it from recycled signs.
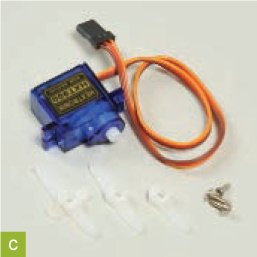
C. Servomotors with 17oz/in of torque (2) with servo extensions if needed. We like the HexTronik HXT900 and Turnigy TG9e servos.
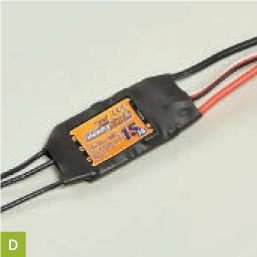
D. Electronic speed controller (ESC), rated between 15A–20A, with BEC (battery eliminator circuit)
E. Motor, brushless, outrunner style, 3mm shaft capable of 15oz thrust using 2 cells (7.4V) and a 10×4.7 or 9×6 prop, such as the classic Tower Pro Outrunner 2408-21
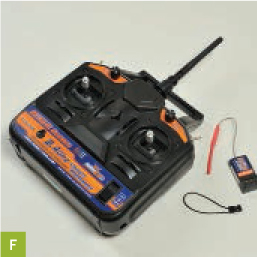
F. R/C transmitter and receiver, 3 channels or more such as Hobby King HK-T6Av2. Check hobbyking.com for the latest. It’s a dynamic market.
» Propellers, GWS slow-flyer style, 10×4.7 or 9×4.7 (3) Get a 6-pack; you’ll break some. You can also use the APC slow-fly 10×4.7, but its hole is bigger and will require a different attachment to the motor.
» Tape, double-stick, high strength, ¾"×4"
» Cable ties, nylon, at least 6" long × ![]() " (30) aka zip ties
" (30) aka zip ties
» Aluminum angle, 1½" or similar stock, to make the motor mount
» Connectors, motor to speed controller, 3.5mm (3 pair) We used 3.5 mm gold bullet connectors.
» Heat-shrink tubing, 4mm, 3" length (optional) for soldered connections
» Connectors, battery to speed controller, 15A Match your battery’s connector, or get a male/female pair. We used 30A Anderson Powerpole here. Also good: HexTronik XT60.
» LiPo battery pack, 2 cell, 1,500mA–2,000mA capable of 15 amps power draw
» Propeller saver, 3mm or other size to match your motor and prop. If you use the larger APC props you might not be able to use a prop saver, but those are stronger props anyway.
» Coat hangers, wire (2)
» Tape, hook-and-loop, ¾", 6" length aka velcro tape
» Tape, packing the uglier the better
» V-tail mixer or elevon mixer (optional) if your transmitter doesn’t have elevon mixing
TOOLS
» Needlenose pliers with wire cutters
» Felt-tip pen
» Drill with assorted small bits: ⅓ ![]() ", etc.
", etc.
» Screwdriver, Phillips head, small
» Hex key (optional) if needed to remove your motor’s mount
» Razor knife or box cutter
» Hacksaw
» Ruler
» Soldering iron and solder (optional) if your connectors need soldering
» Heat gun or butane lighter (optional) for heat-shrink tubing
MAKE IT.
BUILD YOUR TOWEL
Time: 4–5 Hours
Complexity: Easy
1. PRACTICE FLYING
While you wait for your parts to arrive, get a flight simulator. Free ones include FMS (n.ethz. ch/~mmoeller/fms) for Windows, and CRRCSim for most platforms (sourceforge. net/apps/mediawiki/crrcsim). Program your game controller to work like an R/C transmitter: up stick is down pitch. Many transmitters also have USB interfaces that can drive the flight simulator as well.

NOTE: The Towel is constantly being improved; check brooklynaerodrome. com for the latest instructions with supporting videos, parts lists, and tips on sourcing.
![]() TIP: Practice flying directly at your head, to get the left/right control reversal sorted out. You’ll learn a lot faster if you get most of your crashing done virtually.
TIP: Practice flying directly at your head, to get the left/right control reversal sorted out. You’ll learn a lot faster if you get most of your crashing done virtually.
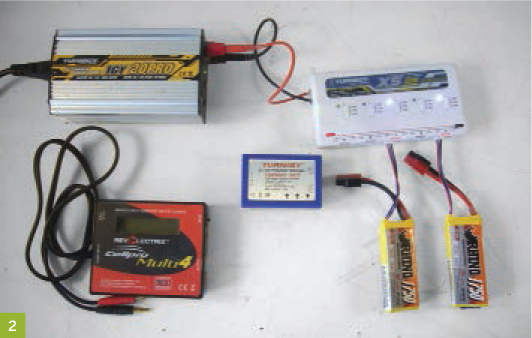
2. CHARGE YOUR FLIGHT BATTERY
The dirty little secret of R/C cars/planes/boats is that you’ll spend more money on battery chargers than most any other single item. Check brooklynaerodrome.com to see what chargers are working well and are a good value.
All modern LiPo batteries come with a charging connector that’s separate from the power leads. Pictured here is a range of chargers that cost from $8 to $100. Most chargers require 12V DC power, which can come from a car battery or a dedicated AC-adapter power supply as seen at the top left.

Karen King and Breck Baldwin
![]() CAUTION: LiPo batteries can start fires if they’re overcharged, over-discharged, or physically damaged. Never charge them unattended or leave them in a flammable environment after a crash. Charging them on ceramic tile or in a flowerpot is a good safety move.
CAUTION: LiPo batteries can start fires if they’re overcharged, over-discharged, or physically damaged. Never charge them unattended or leave them in a flammable environment after a crash. Charging them on ceramic tile or in a flowerpot is a good safety move.
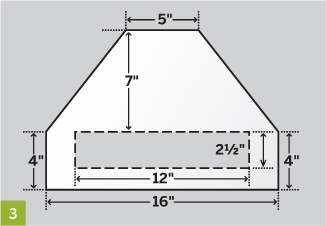
3. BUILD THE DECK
Draw out the deck on your Coroplast following the deck template, and use a ruler and box cutter to cut it out. Coroplast is a difficult material to work with, and multiple light passes with a very sharp knife work best. Muscling it just annoys the Coroplast and generally results in a sliced finger. The Towel is not meant to be a Band-Aid. Keep your blood off it.
Save the scraps, you’ll need some later.

IMPORTANT: It’s critical that the servos be well and solidly attached to the deck, and that the elevons be well connected to them. These are typical weak spots on deck builds; if they’re not well attached, then on every landing or crash, the servos shift and the trim of the Towel is lost.
Out-of-trim airplanes are very hard to fly because they require constant control input for level flight.
The length of the control rods is the only thing on the deck that must be measured precisely within +½" of precision.
4. MOUNT THE SERVOS
4a. Peel the labels off your servomotors and clean them with alcohol or another solvent if they’re greasy.

4b. Apply double-stick tape to the servos and attach them to the deck, with their wires toward the front and their shafts toward the outside edges. If the wires are short, you may need to move the servo closer to the propeller hole, or right to its edge. The prop hole is designed around the shortest servo leads we’ve found.

4c. The tape keeps the servo in place but it needs reinforcement from zip ties.
Place the holes for the zip ties very close to the servo housing so the servo can’t move. If the ties are too short they can be doubled easily, as shown here.

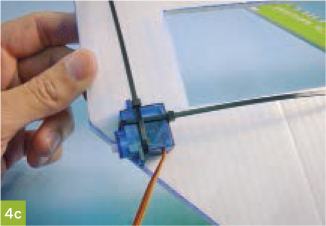

![]() TIP: Crossing the zip ties yields a strong bond to the deck to withstand crashes.
TIP: Crossing the zip ties yields a strong bond to the deck to withstand crashes.
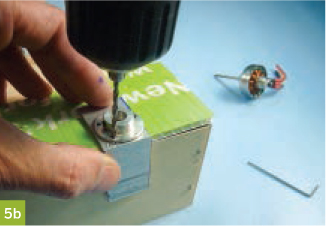
5. MAKE THE MOTOR MOUNT
5a. Use a hacksaw to cut the angle stock to the shape shown, as wide as you need it. For this build, I needed 1".

NOTES: Outrunner motors have a mounting setup that you’ll have to MacGyver into connection with the airframe. Motor mounts can be made using anything from steel to 3D-printed plastic. Aluminum angle stock usually works (my favorite source is the steps from a worn-out ladder.)
5b. For our build we use the motor’s 3 existing holes as guides to drill through the mount, then attach with zip ties. This motor required a bit of clearance in the center, so a fourth hole was needed.

5c. Next, drill holes in the motor mount for attaching it to the deck.
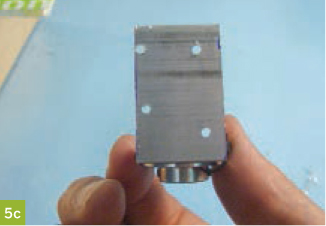
The holes closest to the motor are offset. This reduces a common stress riser (bending/breaking point) that occurs during crashes if the holes are aligned. On the front side it doesn’t matter.
5d. Attach the prop saver to the motor and make sure the screws are tight without stripping the prop saver’s aluminum threads. Usually the propeller shaft is cut flush with the end of the prop saver.
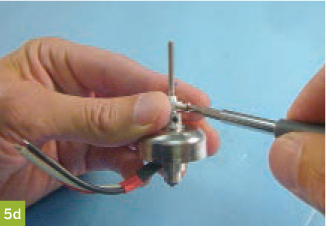
Our default setup, which is the “not get laughed off the model plane field” setup, requires soldering fussy little 3.5mm bullet connectors for the motor and ESC, and insulating the connections with heat-shrink tubing.
This is an opportunity for you to innovate and do something different. (We’ve flown planes where the connections were twisted together by hand and wrapped in electrical tape.)
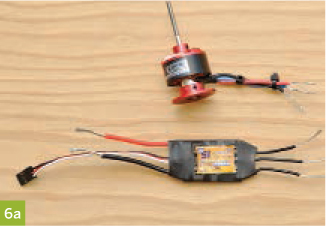
6. CONNECT MOTOR TO ESC
Connect the speed controller to the motor and to the battery. The male connectors go on the motor, female on the speed controller.
6a. Strip and tin all wires, 3 from the motor and 3 from the speed controller. Why 3? The speed controller runs the motor by applying current to 2 of the 3 leads at a time, in AC, believe it or not. There is a genie figuring it all out inside the speed controller. I have seen it escape in a puff of smoke on many occasions.
Gregory Hayes (6a)
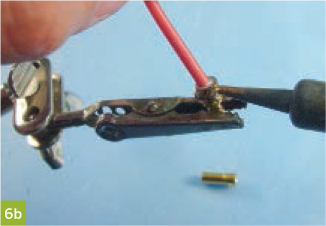
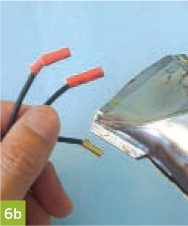
6b. The trick to soldering the bullet connectors is to stick the end of the soldering iron into a small hole in the connector, fill the end with solder, and dunk the tinned lead into the bucket of molten solder for a bit until everything is all nice and melted. Let it cool. If your fingers are getting burnt, you’re doing it right.
Heat-shrink it all up.
7. CONNECT BATTERY TO ESC
You have a broad choice of battery connections for the speed controller; we like Anderson Powerpoles. Most batteries come with some sort of connector, so you can just adopt the matching connector in that case.

NOTE: Shown in Step 7 at top is the standard Deans connection and at bottom the XT60, both of which require soldering and can be difficult to separate. In the middle is our preferred setup, with Anderson Powerpole connectors.
![]() CAUTION: Be very careful to get polarity correct. Reversed battery connections will destroy both the battery and the speed controller.
CAUTION: Be very careful to get polarity correct. Reversed battery connections will destroy both the battery and the speed controller.
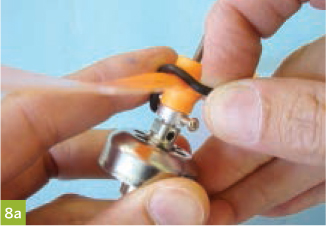
8. MOUNT THE PROP
8a. Attach the prop to the prop saver, with its raised lettering facing forward. If your prop has no lettering, look closely at its blades to see the airfoil and intuit the correct orientation. Or do what I do — run it both ways and see which generates more thrust.
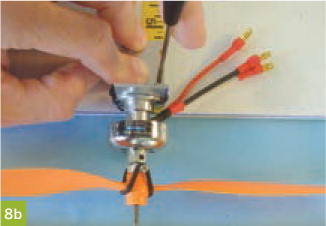
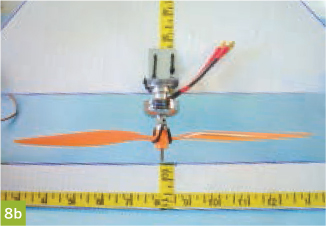
8b. Attach the motor to the motor mount using zip ties. Center the prop in the middle of the deck’s prop hole, keeping the prop blades about ¾" away from the back edge. Punch holes in the deck through the motor mount’s attachment holes and secure with zip ties.
9. CONNECT THE RADIO RECEIVER
9a. Follow your receiver’s instructions to connect it to the right servo (channel 1), left servo (channel 2), and ESC (channel 3). If you have an onboard elevon mixer (not shown), install it according to its instructions.
Turn the transmitter on with the throttle (left stick) and its trim tab both down. Connect the battery to the ESC, and the plane should come to life: the servos move with the right stick, and the motor runs with the left stick.
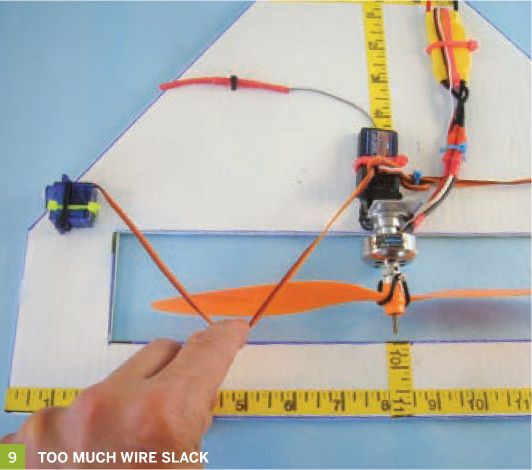
9b. Secure all components to the deck with zip ties to protect against crashes, which will be a forward force, and to be sure that nothing can get pulled backward into the prop (like the wires shown here).
10. ALIGN THE SERVO ARMS
10a. Drill out the servo arm to the diameter of a coat hanger.
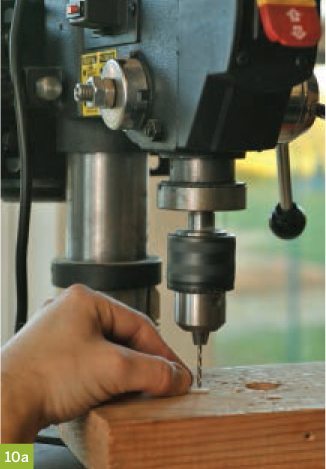
Gregory Hayes (10a)
NOTES: Some radio manufacturers (such as JR) have a different mapping for the channels. Consult your manual for elevon setup.
Make sure the motor is turning clockwise, looking from back to front; if not, switch any 2 of the 3 bullet connectors to reverse its rotation.
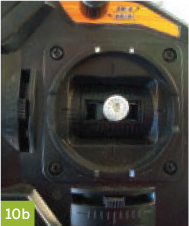
10b. Center the 2 trim tabs on the transmitter’s right stick, for elevator (up/down) and aileron (left/right). Turn on the transmitter and power up the deck.
10c. Attach both servo arms as close to 90° as possible and add their retaining screws. If necessary, use the aileron trim tab to make their angles match exactly. Retain this trim when bending and mounting the elevon control rods.
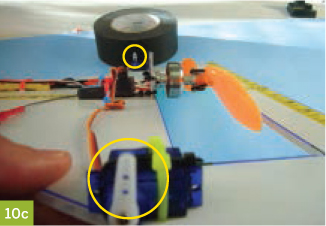
![]() TIP: If you’re a beginning R/C pilot, drill the servo arm closer to the axis of rotation. This will shorten the control throws and make the Towel easier to fly. In Step 10c you can see I’ve drilled for both beginner and advanced settings.
TIP: If you’re a beginning R/C pilot, drill the servo arm closer to the axis of rotation. This will shorten the control throws and make the Towel easier to fly. In Step 10c you can see I’ve drilled for both beginner and advanced settings.
11. BEND THE CONTROL RODS
Cut the straight bottom portion out of a coat hanger and bend a U-shaped hook on one end as shown. It’s critical that the hook be just wide enough to accommodate the servo arm — if the bend is too wide, the controls may slip out of trim or bind on the servo.

GOOD FIT

BAD FIT
12. MAKE THE AIRFRAME
12a. Follow the template to cut the airframe out of the polystyrene foam sheet.

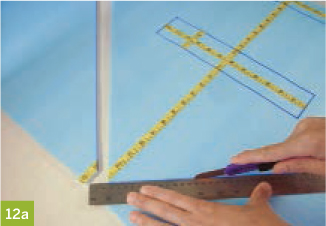
![]() TIP: Use a sharp blade, because ragged edges will compromise all your hard work for tight servos.
TIP: Use a sharp blade, because ragged edges will compromise all your hard work for tight servos.
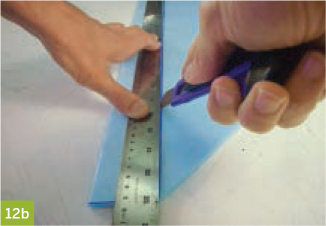
12b. Cut the elevon free by making a single beveled cut of around 30° as shown here. The degree of bevel isn’t crucial, but try to keep it constant for the length of the elevon.
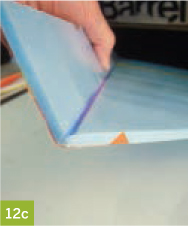
12c. Flip the airframe over facedown while leaving the elevon in place face up. Fit them together and accurately tape in a few places the joint that’s formed by the beveled cut. Then apply a strip of packing tape the length of the elevon. Don’t sweat the wrinkles. Only this side needs to be taped.
Make a ¼" slot in the elevon mid-span, to create 2 elevons that move independently.
Flip the airframe face up again so the hinge is on the work surface. Notice how the bevel works to allow the elevon’s upward motion.
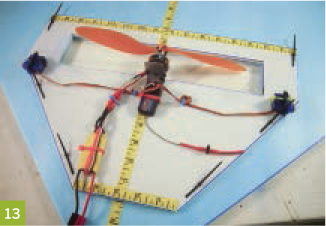
13. ATTACH THE DECK
Align the prop holes in the deck and the airframe, and attach them with 6 zip ties that pass through both pieces.
![]() CAUTION: Keep the airplane powered up until the elevon control horns are mounted, to ensure that trim is maintained. Be careful to not hit the throttle by mistake.
CAUTION: Keep the airplane powered up until the elevon control horns are mounted, to ensure that trim is maintained. Be careful to not hit the throttle by mistake.
14. MOUNT THE RODS
14a. Attach the control rods to the servos, with the rods running outside the servo arms. Use the pliers to make a 90° bend in each rod, just aft of the hinge, bending toward the center of the airframe.


NOTE: It’s important to align the bend points for both rods to ensure that the elevons move the same distance. If one is too long, you can use the trimming technique discussed in Step 16 to match them up — otherwise get another hanger and try again.
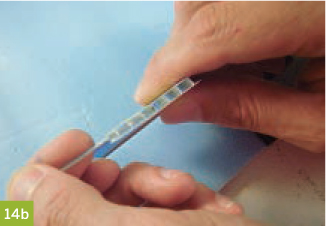
14b. Take 1½" of the prop cutout material from the deck and cut it in half. Force the end of the control rods through the flutes of the Coroplast, crosswise, to make 2 control horns. (You can’t use a flute as the hinge point because it’s too big and sloppy.) Lay the airframe flat and attach each control horn to its elevon with 2 zip ties.
Start making airplane sounds; you’re almost done.

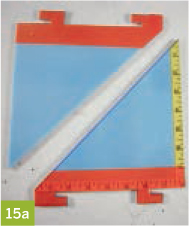
15. MAKE THE STABILIZERS
15a. Cut out the 2 stabilizers following the template, after first reinforcing the lugs with packing tape on both sides. Cut with extra care around the lugs.

15b. Line up the stabilizers right next to the control rods about ¾" forward of the hinge. Carefully cut the slots for the stabilizer lugs.
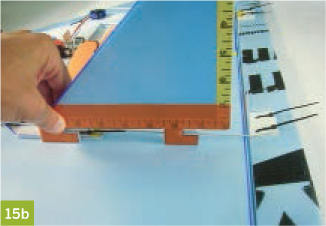
NOTES: Slightly too tight is better than too loose, otherwise the stabilizers will wobble. (This can be fixed with tape easily enough.)

If built perfectly, the elevons should lie flat on the table. Generally that’s not the case, so don’t worry.
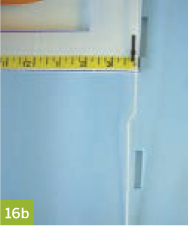
16. ADJUST THE TRIM
16a. Put the airframe on a flat surface, power up the plane and transmitter, and recheck that the servo arms are aligned, with any aileron trim tab adjustments. The goal is ¼" of “up trim” in both elevons. This is the thickness of the blue foam. If you have more than ¼" up trim already built in, then the control rod will have to be remade.

16b. If there’s less than ¼" up trim, then bend a “dogleg” in the control rod with the needlenose pliers while gripping it firmly, to effectively shorten the control rod.
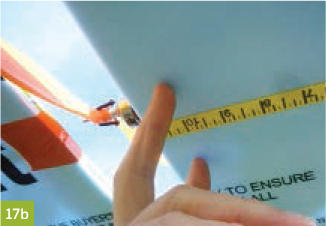
17. MOUNT THE BATTERY
17a. Stick the hook side of the velcro tape to the Towel, half on the deck and half on the airframe. Apply the loop side of the velcro to the battery pack. Make sure the battery is charged, then attach it to the Towel.
17b. Test the center of gravity (CG) by balancing the plane on your fingers. The Towel works really well with its CG at 10" from the nose. Adjust the CG by moving the battery pack’s position. That’s it!
![]() TEST BUILDER: Daniel Spangler, MAKE Labs
TEST BUILDER: Daniel Spangler, MAKE Labs
USE IT.
HAVE TOWEL, WILL TRAVEL
Karen King and Breck Baldwin
Know Your Controls
Throttle: The transmitter’s left stick is the throttle: push it forward to go faster, pull it backward to go slower.
The transmitter’s right stick operates the elevons as follows:
Pitch: Elevator signal determines the plane’s up/down attitude, or pitch. Pull the stick back to angle the nose up (both elevons go up), and push it forward to nose down (both elevons go down). It’s the reverse of a game controller.
Roll: Aileron signal determines the plane’s roll to the left or right. (It’s not really left and right turning — that’s yaw, and the Towel doesn’t use the rudder signal.) Push the stick left to roll the plane left (raise the left elevon and lower the right elevon). Push it right to roll right (raise the right and lower the left elevon).
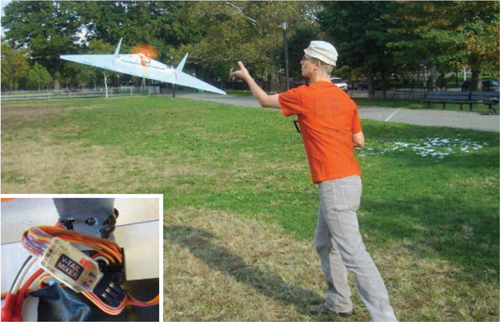
Elevon mixing: If your radio supports elevon mixing, follow the manual to achieve it. An onboard elevon mixer, aka V-tail mixer, should also provide instructions; it’s shown here (inset) connected but not yet zip-tied in place.
Control throws: The beginner-level control throws are ±¾" in both pitch and roll. If you know how to fly, then double that. Adjust the throws by either using dual rates on your transmitter or moving the servo horn holes inward (reduce throw) or outward (increase throw).
Gregory Hayes
Flight School
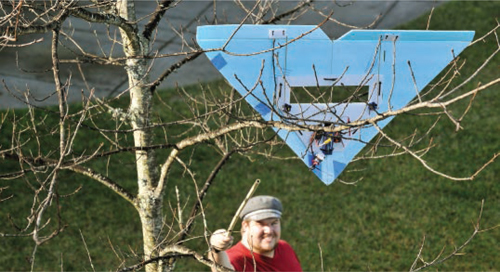
A well-built Towel takes damage like a B-17 bomber takes flak — if the motor’s still turning, then it’s flying. A few tips for successful flight:
CG and trim: The plane built for this article flew perfectly with the trim and center of gravity shown here. Get this right – it’s critical.
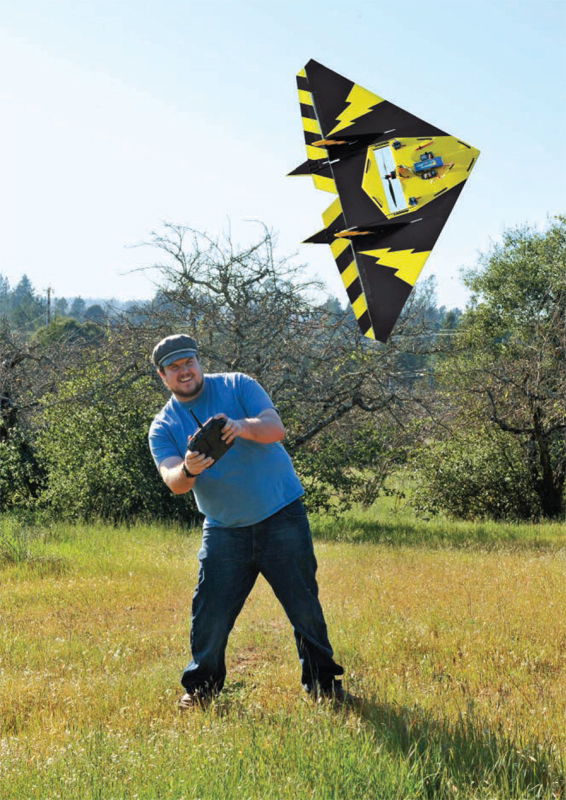
Launching: I launch the plane with my left hand, while my right thumb keeps constant contact with the right stick. I run up the throttle with my chin, up to about two-thirds throttle, and release smoothly into the air. I do not throw the Towel, nor do I drop it. It’s an easy, straight toss. Since my thumb is on the elevon controls, it’s easy to correct wind disturbances and “off” launches.
Flight training: If you’re a newbie, we recommend the Splinter Method of flight training. This is best done over deep grass in a big field with nothing to hit.
a. Have someone else launch the plane with 50% power. The pilot’s job is to keep the wings and nose level and cut throttle before the plane settles into the ground, which it should do in a few feet at 50%.
b. Once that’s working well, increase power to 75%. Fly the plane straight for 50 feet and land it by cutting throttle. Repeat until this is smooth.
c. The pilot then launches their own plane at 75% power for a 50-foot flight. No turns!
d. Once comfortable with launching and landing, the pilot will attempt to turn 180° and then land. Any sign of trouble and the immediate reaction is to cut throttle and keep the nose level. You should note that when the Towel flies at you, the left and right controls are reversed! Flight simulator time will really help with this.
e. The pilot will then attempt a 360° turn and landing.
f. Now the pilot can attempt figure-eights and further skill building.
Flight time: Standard battery packs in the range suggested will last 6–7 minutes, and take about 25 minutes to charge. Not all speed controllers have reliable automatic cutoffs for low voltage, so be mindful.
With that said — fly your Towel, send us a picture at brooklynaerodrome.com, make something different, improve upon the design, and share your build at makeprojects.com. ![]()
![]() Videos of Towels in flight, at night, with onboard cameras, and more: youtube.com/user/brooklynaerodrome
Videos of Towels in flight, at night, with onboard cameras, and more: youtube.com/user/brooklynaerodrome