FEATURES
MUSICAL TOYS OF THE ’80s
Written by Bob Knetzger

Jeffrey Braverman
REMINISCE ABOUT THE MELODIC TOYS OF YESTERYEAR — AND LEARN HOW TO MAKE YOUR OWN.
BOB KNETZGER is a designer/inventor/musician whose award-winning toys have been featured on The Tonight Show, Nightline, and Good Morning America.
THE 1980S BROUGHT BIG CHANGES FOR ELECTRONIC TOYS. Advances in integrated circuits meant electronics became inexpensive enough to be used in toys of all kinds, especially in musical toys. Instead of plastic ukuleles or plinky pianos, these musical toys were something new, with new sounds, new methods of playing, and new toyetic forms.
Playskool’s cheap and cheerful entry into musical preschool toys was Major Morgan ![]() . He had a keypad with overlays that showed how to play a tune using color-coded grids. Just swap out his overlay for a new song. The hard keypad offered no tactile feedback (oww!), and the sound circuit produced just a single note at a time, but no matter: Kids had fun with this musical soldier.
. He had a keypad with overlays that showed how to play a tune using color-coded grids. Just swap out his overlay for a new song. The hard keypad offered no tactile feedback (oww!), and the sound circuit produced just a single note at a time, but no matter: Kids had fun with this musical soldier.

Mattel was aiming for an older crowd with their Rhythm Machine ![]() . This cute keyboard featured two disco-licious features: a pitch-bending wheel (wowweEEEee!) and a toy version of a beatbox with three different drum-and-bass loops. Choose disco, Latin, or pop beats and adjust the tempo. The synthesized rhythms featured a busy bass line with a synth drum. Play along on the mini piano keys. This instantly kitschy music toy was used by the group Kraftwerk on their hit song “Pocket Calculator” in 1981.
. This cute keyboard featured two disco-licious features: a pitch-bending wheel (wowweEEEee!) and a toy version of a beatbox with three different drum-and-bass loops. Choose disco, Latin, or pop beats and adjust the tempo. The synthesized rhythms featured a busy bass line with a synth drum. Play along on the mini piano keys. This instantly kitschy music toy was used by the group Kraftwerk on their hit song “Pocket Calculator” in 1981.

Mattel’s Star Maker Guitar ![]() promised “hot” sounds, but with only one string, musical choices were limited. Pluck the thick string and press it against the molded plastic frets to change pitch. The best part was a built-in “fuzz tone” effect for a fat, distortion-soaked sound. Unlike its real-world counterpart with magnetic pickups, this toy guitar had an optical pickup that “saw” the motion of the vibrating string. The speaker was mounted directly underneath the string, producing endless feedback and long sustain. Young would-be Eddie Van Halens, shred on!
promised “hot” sounds, but with only one string, musical choices were limited. Pluck the thick string and press it against the molded plastic frets to change pitch. The best part was a built-in “fuzz tone” effect for a fat, distortion-soaked sound. Unlike its real-world counterpart with magnetic pickups, this toy guitar had an optical pickup that “saw” the motion of the vibrating string. The speaker was mounted directly underneath the string, producing endless feedback and long sustain. Young would-be Eddie Van Halens, shred on!

How about a drum set — without any drums? Nasta’s Hit Stix ![]() were a big hit that didn’t actually hit anything. Kids could play “air drums” with a big sound. Inside the tip of each drumstick was an inertial switch that triggered the snare drum sound circuit when the stick was hit or shaken. It also triggered a trend in other “air” instruments.
were a big hit that didn’t actually hit anything. Kids could play “air drums” with a big sound. Inside the tip of each drumstick was an inertial switch that triggered the snare drum sound circuit when the stick was hit or shaken. It also triggered a trend in other “air” instruments.
One of the weirder toys was Hasbro’s Body Rap ![]() . Strap on an array of little switches and then slap your own thighs, ankles, wrists, and head to beat out a rhythm of sampled drums, cymbals, and even the spoken words “body” and “rap” — ’80s hairdo not included.
. Strap on an array of little switches and then slap your own thighs, ankles, wrists, and head to beat out a rhythm of sampled drums, cymbals, and even the spoken words “body” and “rap” — ’80s hairdo not included.
Perhaps the most iconic ’80s music toy was the Magical Musical Thing ![]() from Mattel. The TV commercial featured a kid playing melodies with one finger on the toy’s keypad strip — and finishing by playing it with his head! It featured a sound circuit that was designed around the cheapest and most basic building block of digital electronics: the 4049 CMOS hex inverter chip.
from Mattel. The TV commercial featured a kid playing melodies with one finger on the toy’s keypad strip — and finishing by playing it with his head! It featured a sound circuit that was designed around the cheapest and most basic building block of digital electronics: the 4049 CMOS hex inverter chip.

Usually used for decoders and multiplexers, the lowly 4049 was re-imagined by Mattel’s thrifty engineers to create musical tones. Three of the IC’s six logic gates were linked head-to-tail with a resistor and capacitor to create a simple, self-oscillating on-off/on-off square wave generator. The output of this oscillator was hooked up to the remaining three inverters in parallel. Their combined outputs were just enough to directly drive a speaker, with no audio amplifier needed!
A network of resistors created the various musical tones. This was done using a cleverly designed membrane switch pad. The top and bottom layers were made from a single, folded piece of Mylar, printed with conductive silver traces connecting strips of resistive paint. The middle layer was a die-cut insulated spacer with holes positioned to make touch points, each labeled for a different color-coded musical note. Touching the membrane pressed together two conductive strips, which completed the circuit through a path of resistors, producing a single musical tone. The shorter the path, the less electrical resistance, the faster the circuit oscillates, and the higher the pitch! Beep boop! Follow the color-coded notes to play a song, or slide the “Thing” over your body for a flourish of notes.

Materials
» Hex inverter IC, 4049 type
» IC socket, DIP-16 as the CMOS inverter is static sensitive
» Capacitor, 0.1µF
» Resistor, 10MΩ
» Power diode, 1N4001
» Capacitor, 4.7µF, 35V
» Trimmer pots, 10kΩ, mini (8)
» Battery clip, 9V, with leads
» Mini alligator clips (10)
» Proto board or perfboard
» Wire
» Speaker, 8Ω, small
» Mylar film
» Tape, double sided
» Ribbon cable, 3", 10- or 12-conductor
» Keypad templates online at makezine.com/magicalmusical
FOR HOUSING:
» Wood or foam for pattern
» Styrene plastic sheet, 0.060" for vacuum forming
Tools
» Soldering iron and solder
» Continuity tester
» Craft knife
» Ruler
» Marker, thin, permanent ink
» Conductive ink pen
» Hole punch
» Wire stripper

Build Your Own Magical Musical Thing!
Now you can make your own custom version of this classic ’80s toy. Wire up the circuit, paint a membrane keyboard, and make a housing (or put it in a repurposed container). This DIY redo has a new added feature: a circuit-bending touch point.
1. This exact reproduction circuit is quite simple, with a minimum of components. You can easily solder it up with point-to-point wiring on a perfboard. Layout isn’t critical, but I placed the 8 trimmer pots in one neat row (Figure A).

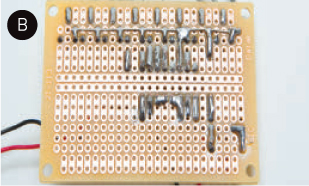
Assemble your board (Figure B), then cut it down to a minimum size.
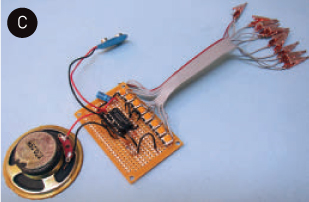
2. Instead of the fixed, printed resistors, this version has a trimmer pot for each of the 8 notes so you can tune them individually. Strip the ends of the ribbon cable and solder one wire to each of the trimmers and a mini alligator clip to each of the other ends (Figure C).
3. Test the circuit: Add the battery and touch the clip at point A to each of the other clips. You should hear a beeping tone for each clip. Twist the trimmer pots to adjust the musical tones’ pitches.
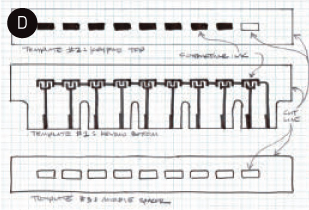
4. To make the keypad’s bottom layer, tape a piece of Mylar over Template #1 (Figure D, middle). If you’re using frosted Mylar, be sure to lay it frosted side down. Trace the cut outline with a thin permanent marker.
Bob Knetzger
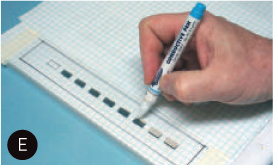
Use the conductive ink pen to trace the circuit layout. Be sure to shake the pen well between strokes — there’s a ball inside that works as an agitator. Gently squeeze the barrel while pressing the valve tip down, as you pull the pen across the Mylar — that will make a uniform, generous line.
Join line segments while still wet for best conductivity. Don’t puddle the paint on too thick — it’ll crack instead of flex when the Mylar is curved. When the paint is dry, test each of the traces with a continuity tester and touch up with the conductive ink as needed (Figure E).
5. Use Template #2 to make the top layer of the keypad. Template #3 needs no conductive ink — just trace the outline and cut out the holes for the middle spacer layer.
Tape the layers together temporarily and hook up the clips (Figure F). Press the switches to test your circuit. Again, touch up any traces or switch pads with a little extra conductive ink, if needed.

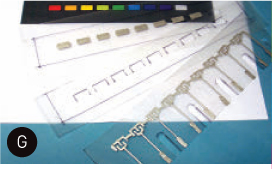
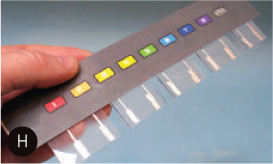
6. Trim the layers to size with your craft knife (Figure G). On the bottom layer, use the paper punch to make radiused inside corners as strain relief. Use double-sided tape to fasten the membrane switch layers together, but don’t put tape over any traces. I added a colorful label on top with numbered touch points (Figure H).
7. Reconnect the clips and play away! Use a guitar tuner app to adjust the trimmer pots for the notes you want. Tune the 8 notes to a “do-re-mi” scale for a most useful set of notes. Or you can tune them to anything you want — including the first 8 notes of any song for easy autoplay. Just swipe your finger across the keypad to play!
Lick your fingertip and touch the last position for fun circuit-bending sounds, from a low growl to a high squeal.
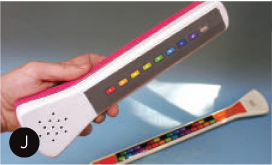
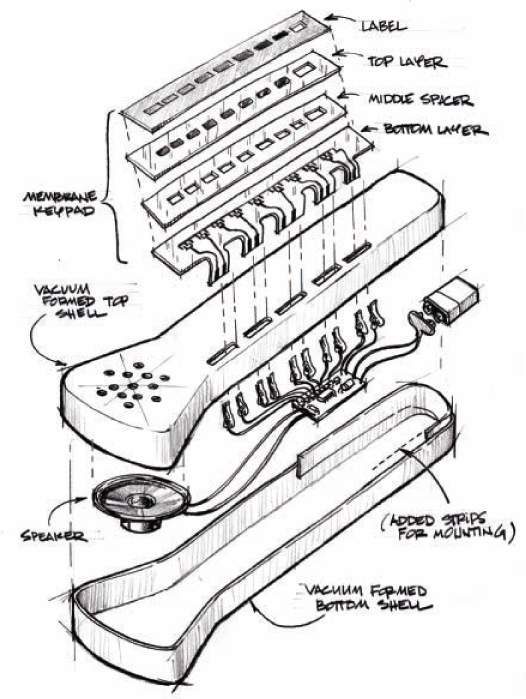
8. To finish, install it in a sturdy housing, like this mini version of the classic toy (Figures I and J). I made a symmetrical wooden pattern and used it to vacuum-form the top and bottom shells (makezine.com/kitchen-floor-vacuum-former). I trimmed them and milled slots for the keypad’s hookup, then mounted the speaker, circuit board, and battery inside. I taped the keypad in place and attached the clips before closing the shells. Alternately, you can repurpose a container or 3D print a custom case. Looks and plays great! ![]()