THE BIG PICTURE
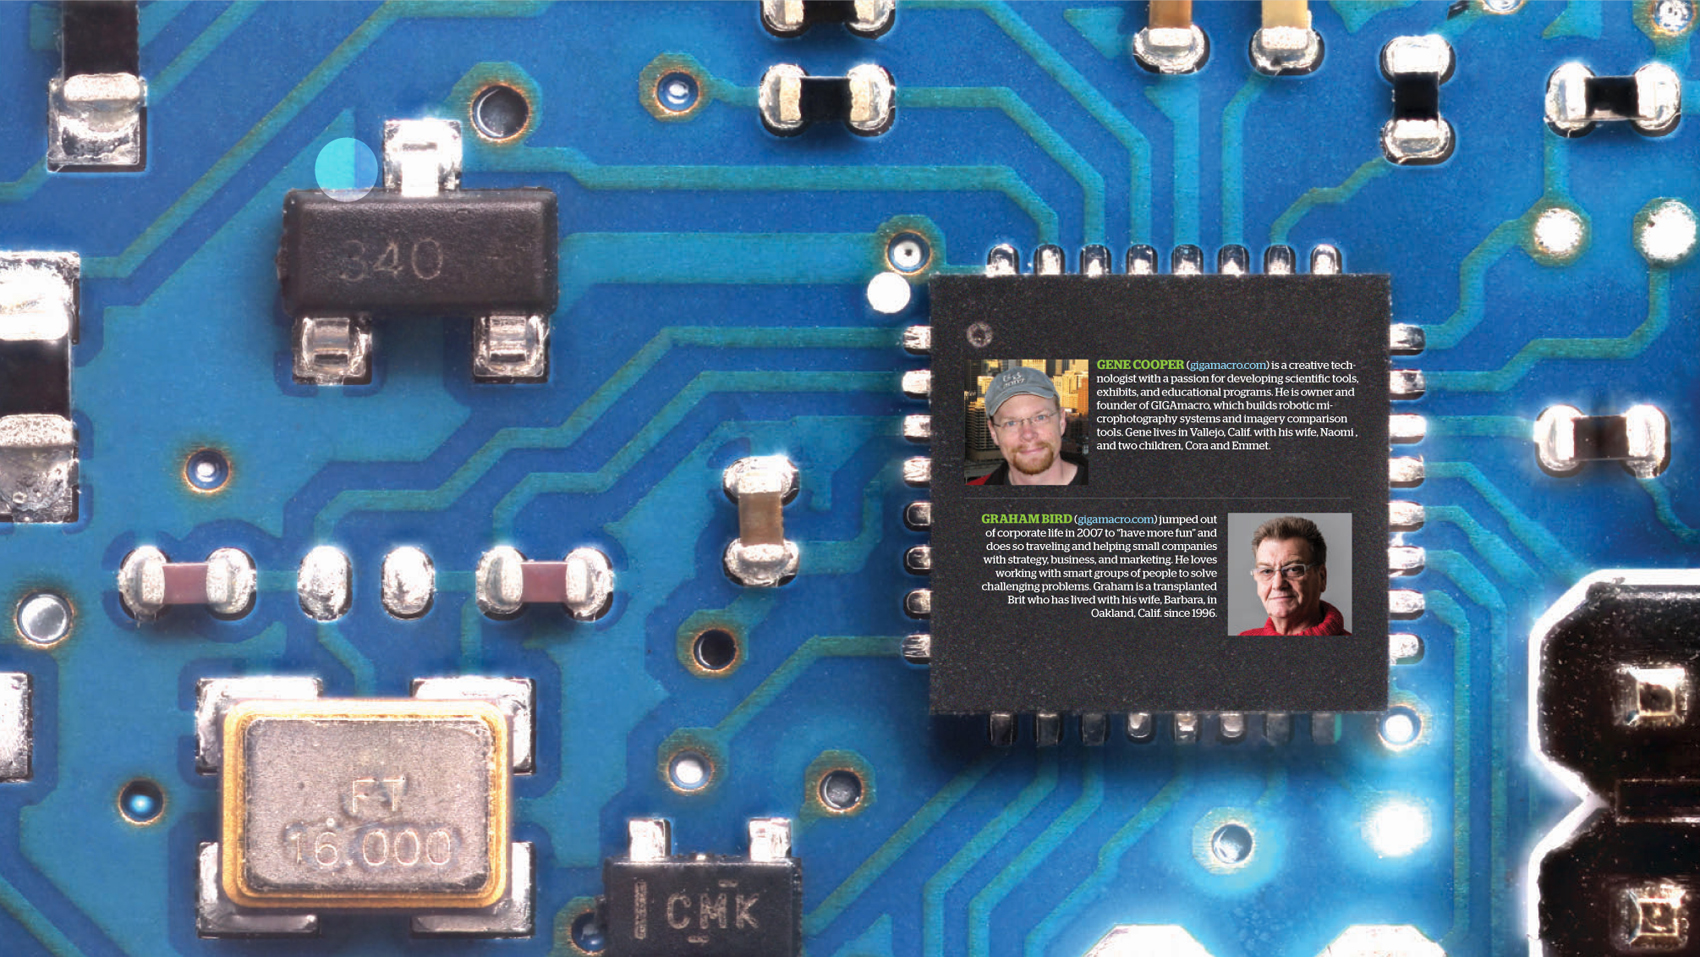
Written by Gene Cooper and Graham Bird
Time Required:
8 Hours
Cost:
$500—$1,000
Build a low-cost supermacro stacking and stitching rig.
Taking a 100+ megapixel macro photo with a basic digital camera.
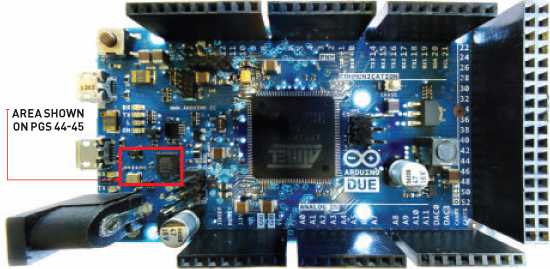
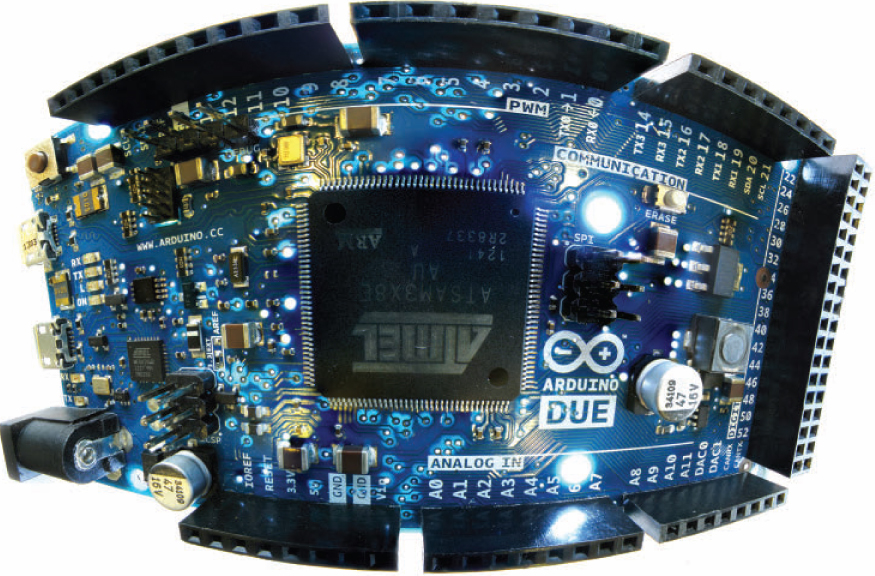
18 × 11mm segment of an Arduino Due scanned at gigapixel resolution with the GIGAmacro Magnify2 robotic camera system. Printed at this scale, the whole board would be more than 8 feet wide. Explore the whole image: makezine.com/gigamacro
Damien Scogin

Gene Cooper
TWO APPROACHES TO IMAGE STITCHING
SEEING SMALL DETAILS IS HARD. AS THE EYE GETS CLOSER TO A SUBJECT, the depth of field (the distance through which details are clearly focused) gets shorter. At about 70mm away, most human eyes can no longer focus at all. In fact, only about 2 degrees of our field of vision is actually in focus at any given instant. The rest of what we “see,” from moment to moment, is virtually constructed by our remarkable brains.
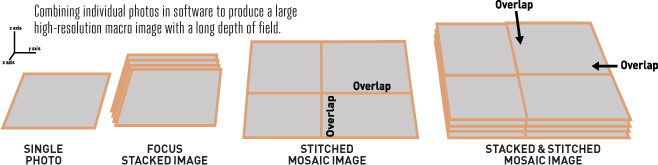
The process for making a very large digital macro image — sometimes called “stacking and stitching”—is actually similar. “Stack” is derived from “focus stacking” (which combines many images taken at different focal lengths into one image with a long depth of field), and “stitch” from “image stitching” (which combines side-by-side images with overlapping fields of view into a single continuous picture). The final product has both a long depth of field through the entire subject and a high level of detail or resolution.
For practical purposes, the achievable resolution depends only on how many images you’re able to combine. In this project, our goal is 100 megapixels (MP), which will require stacking and stitching about 200 images. A challenge using manual equipment, but by no means insurmountable.
STEP 1: CONFIGURE THE CAMERA
Figure out how close you can place your subject and still focus the camera. (Most likely, you’ll find the camera has the highest magnification when fully zoomed out.) Turn off all automatic exposure adjustments, and set the F-stop between 6.3 and 8. Turn on the built-in self-timer or set up a remote trigger release so you don’t jostle your images pressing the shutter button.
STEP 2: POSITION THE CAMERA
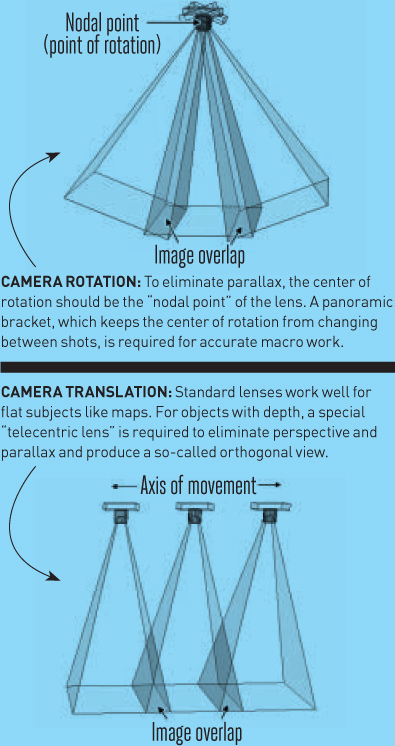
Mount your camera on the bracket so that it rotates around the “nodal point” of the lens. Finding the nodal point can be a bit tricky. Check makezine.com/gigamacro for tips.
STEP 3: POSITION THE SUBJECT
Center the thing you want to photograph under the nodal point as best you can. Get the camera as close as you can and still focus, then make sure that it will not bump into the subject even when rotated to the limits of the bracket’s motion.
STEP 4: LIGHT IT UP
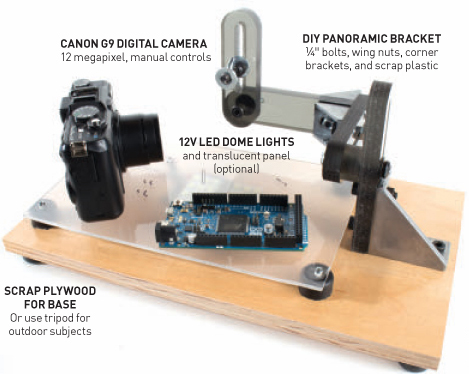
For lighting, we recommend diffused natural daylight. For the Due image, we also added a couple of 12V LED dome lights below a translucent panel underneath the board to give some backlighting.
STEP 5: TAKE SOME TEST SHOTS
Before we shoot hundreds of images, let’s try a sample stack to verify the focus-stacking process. Adjust the camera view to an area of the subject with lots of depth. Secure the bracket and take 8 images focused at different depths. Jump ahead to steps 7 and 8, and verify that the post-processed images look right before proceeding.
STEP 6: TAKE WORKING SHOTS
You’ll be shooting anywhere from 200 to 800 photos. Be patient.
ROTATORY IMAGE STITCHING SETUP
Gene Cooper

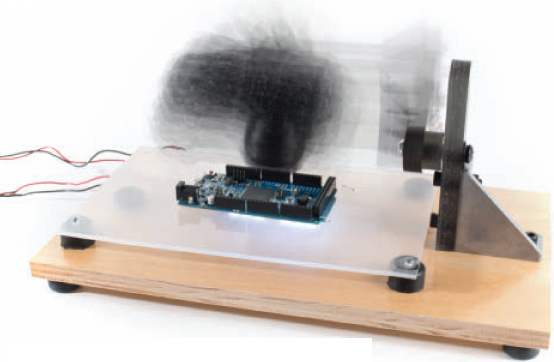
CAMERA MOVEMENT DURING THE IMAGING PROCESS
6a. Position the camera. It doesn’t really matter where you start or where you end; all that matters is that you have complete coverage when you’re done. I usually start dead center under the camera.
6b. Shoot a stack of images. Start by focusing at the nearest depth, on the features closest to the camera. Take a picture then change the focus slightly, working “deeper” into the image. How many images you take for each stack can vary between subjects and between different parts of a subject; just make sure that every feature in frame is well focused in at least one image in each stack. For the Arduino image, I shot an average of 8 images per stack.
6c. Rinse and repeat. Work your way out in a grid pattern until you’ve covered your entire subject. When you move the camera, shoot for 40-50% overlap from the last image. Covering the Arduino shown here required 25 stacks. It took about 30 minutes to take all the pictures.
STEP 7: FOCUS THE STACKS
Transfer the images from your camera to your computer and open Photoshop or other stacking software. For each “stack” of images taken at a particular position, the Photoshop workflow goes like this:
7a. Select File → Scripts → Load Files into Stack. Select only the photos from a single camera position. Check the “Align automatically” box. Click OK, and the files should load, each one in a separate layer.
7b. Select all layers in the Layers panel. Then select Edit → Auto-Blend Layers, and choose “Stack Images” for your blend method. Click OK.
7c. Save the stack to a PSD file. I like to name these files with column and row numbers to make them easier to keep track of.
STEP 8: STITCH ‘EM TOGETHER
When you’ve saved the focus-stacked images from each camera position, clear your workspace and proceed as follows:
8a. Select File → Scripts → Load Files into Stack. Choose the focus stacked images you just saved and click OK. The files will load in different layers as before.
8b. Highlight all the layers in the Layers panel, then select Edit → Auto-Align Layers. Choose “Spherical” projection and check the “geometric distortion” box. Click OK, and the files will be aligned and the canvas area automatically adjusted.
8c. Highlight all the layers again, then select Edit → Auto-Blend Layers. Choose the “Panorama” blend method and click OK. Each photo will have a mask that you can edit or change if desired. When you’re happy with the finished image, save in whatever format you like.
GOING FURTHER
This setup works wonderfully for showing incredible details on many items — experiment with insects, flowers, and coins to reveal rarely seen aspects.
Beyond 100MP, hardware and software automation becomes a practical necessity. As magnification increases, the image count rapidly climbs into the thousands. With gigapixel macro photos my company commonly combines 25,000 or more shots into a single image. We also produce equipment to help automate shooting, including off-the-shelf and custom robots. Look for the first terapixel macro photo from us in 2014! ![]()