
 SPECIAL SECTION: High-Tech DIY
BUILDING YOUR OWN LAPTOP, TABLET, OR CELLPHONE MIGHT SOUND IMPOSSIBLE. IT’S NOT.
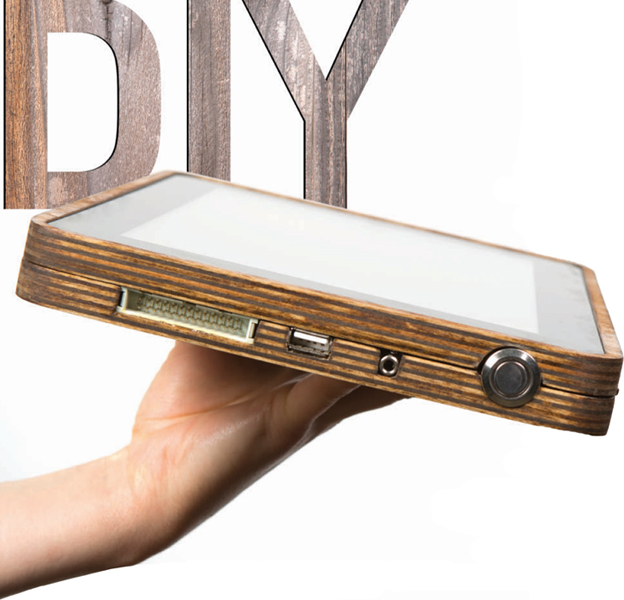
HOW I BUILT A RASPBERRY PI TABLET
I couldn’t find a tablet computer that ran Linux and was powered by a Raspberry Pi — so I made my own PiPad.
Written by Michael Castor
MICHAEL CASTOR is the product innovation manager for the Maker Shed. He is a tinkerer at heart and has a passion for solving problems and figuring out how things work. When not working for MAKE, he can be found falling off his unicycle, running in adverse weather conditions, skiing down the nearest hill, restoring vintage motorcycles, or working on his car.
IT SEEMS THAT EVERY DAY A MANUFACTURER COMES OUT WITH A NEW TABLET COMPUTER. Thinner, lighter, faster — but it also seems that they all look about the same and accomplish roughly the same things. When I set out to build my Raspberry Pi tablet I wanted something different. I wanted an all-in-one system that was usable, portable, and Linux based. Additionally, it had to look good. I wanted to use it on flights, meaning the device couldn’t freak out the TSA or the old woman sitting next to me.
A PROLIFERATION OF POTENTIAL PARTS
I started determining and accumulating parts in early 2013. I had already selected Raspberry Pi to be the brain of my tablet, and since it runs off of 5V I knew it could be powered from a cellphone charger. Most touchscreens I could find were 12V though, making the electrical work more complex. After a bit of searching I finally found what I was looking for: a touchscreen monitor with a 5V HDMI to LVDS converter from Chalk-Elec.com. I plugged the screen in as soon as I received it, and to my delight it worked perfectly with the Pi, even its capacitive touchscreen. Now I knew my dream of a Raspberry Pi tablet was possible.
According to Parkinson’s Law, “Work expands so as to fill the time available for its completion.” Thus was the case for my Pi tablet, until I found a deadline. Two weeks before Maker Faire Bay Area, I was assisting a guy in the Shed Tech Support queue who needed some help with his Maker Faire project. Working with him got my creative juices flowing, and I decided I wanted a Maker Faire project too. Crazy, right? I had all the parts, and now I had an ambitious target date that couldn’t allow for expansion. Fortunately I had started some preliminary design work so I kind of knew what I was going for. I happened to have access to a CNC machine, some ½" Baltic birch plywood, and a relatively large sheet of scrap carbon fiber lying around to form the basis of the frame.
After several days working until 4 a.m., I completed the Raspberry Pi tablet (aka, PiPad) the day before my flight. The build wasn’t without its issues — I had to remove one USB port and the Ethernet jack due to clearance problems — but everything worked and I was happy with the results.

LOOK INSIDE
CNCed Baltic birch and carbon fiber give the case a distinct look, while a variety of components give many interface options.
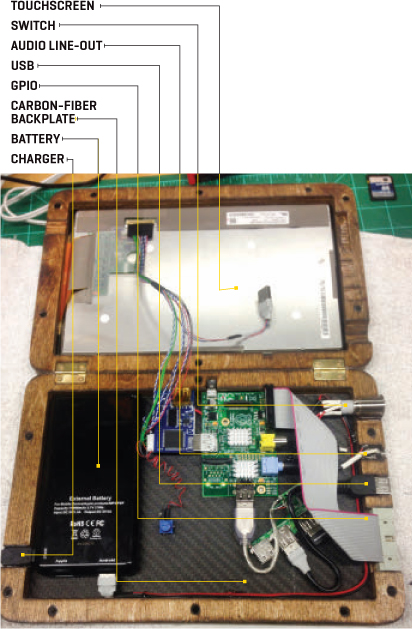
Michael Castor
BUT WHAT ABOUT THE TSA?
My new tablet didn’t raise an eyebrow going through security. On the plane though, a flight attendant kept walking by, looking closely at the home-built gadget I had on my lap. At one point I could feel her looking over my shoulder and was sure the jig was up. She nudged me and said, “I love that movie — you’re coming up to the best part!” It turns out that she’d been catching glimpses of Talladega Nights that I'd been playing using RaspBMC. I’ve taken the PiPad on most flights since and no one has said a word.
I’d emailed Raspberry Pi Foundation founder Eben Upton a few times for work but didn’t have the chance to meet him until Maker Faire New York in September. Eben is probably the most humble, down-to-earth person I’ve ever met. I really can’t say enough good things about him. After a long chat I showed him the PiPad. He gave it several compliments and after a few minutes of playing with it, he graciously signed the back at my request. His signature looks amazing on the carbon fiber!
FUTURE UPGRADES
Overall, I’m very happy with my Raspberry Pi tablet. It does what I want it to do and has been a great way to demonstrate the capabilities of the Raspberry Pi at Maker Faires. The 10,000mAh battery provides a usable six hours of runtime and the device gets constant compliments from makers (including Bunnie Huang!). I do wish I had used a battery that provides power while plugged in, though. Other changes I’d make would be mostly software related. It’s difficult to double-click on icons reliably, and the N-Trig touch driver isn’t supported by RaspBMC (but can be compiled into the kernel if I could ever get it figured out). I’ve also considered adding a camera and an IR sensor — maybe if I build another one. ![]()