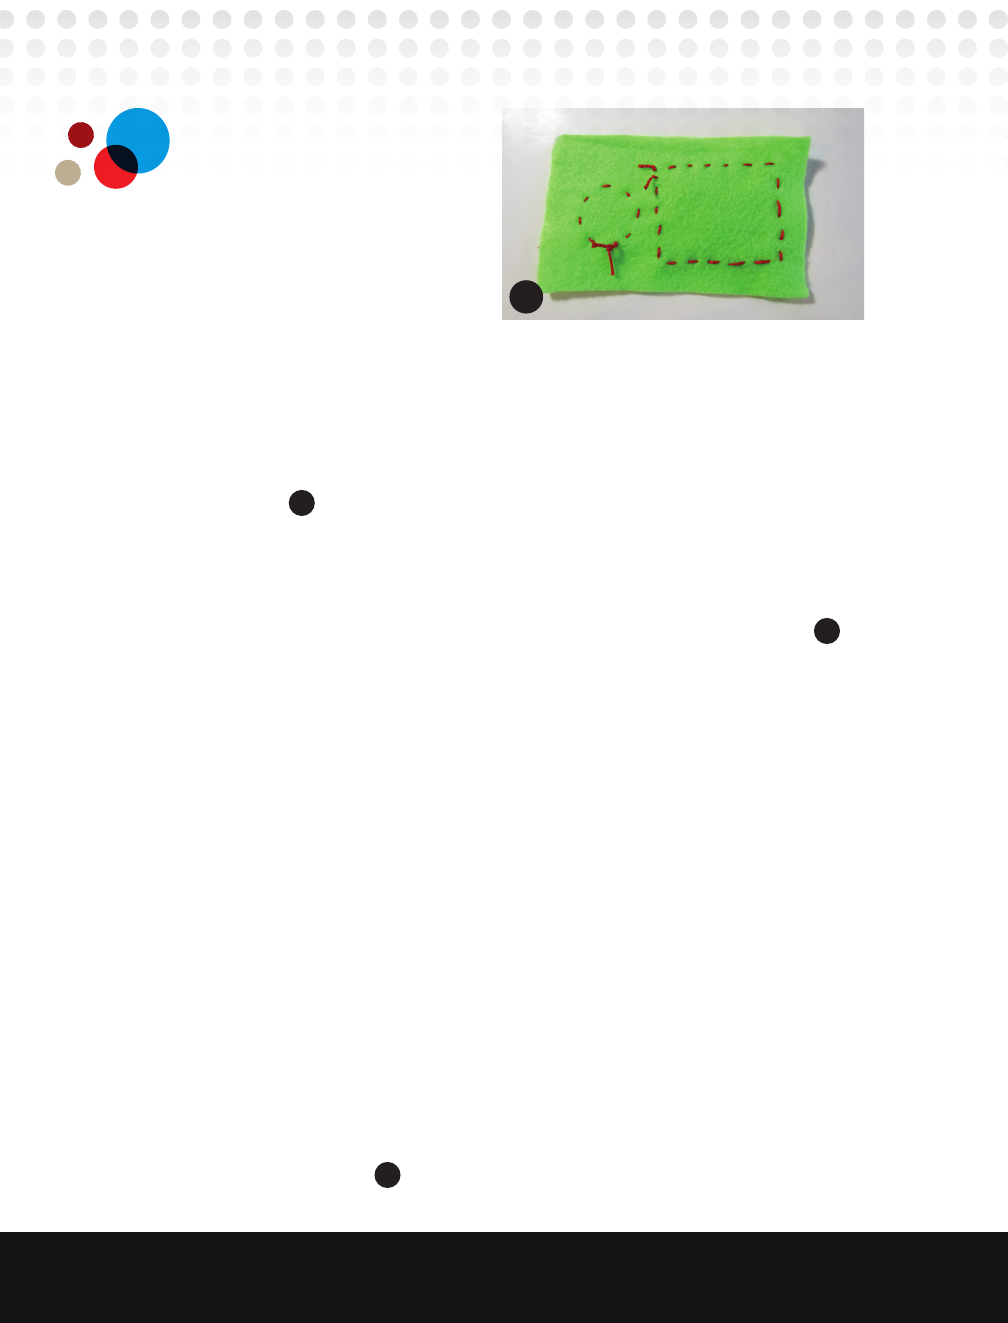
the thread gently until
the knot is up against the
wrong side of the felt.
• Go one stitch length
along the wrong side
and bring the needle up
through to the right side
again. Continue to sew
in and out, all around the edge. Keep the stitches and the spaces
between them as even as possible.
• End with the needle going down through to the wrong side.
Make a knot as close to the felt as you can. Trim any excess yarn
(Figure
G
)
.
3. When the smaller pieces are on the face, attach the face to the top layer
of fabric for the robot body the same way. Use peel-and-stick adhesive to
hold it in place, and then sew around the edge if you choose
(Figure
H
)
.
4. Now sew the two layers of the FiberBot body together along the seam.
(Don’t forget to leave the opening for the stuffing!) The seam allowance
stays on the outside. If you are using a fabric with a loose weave like
burlap, be careful not to let it unravel too much. This time, use a
backstitch to lock the stitches and help keep the stuffing inside:
• Line up the front and back layers, with the felt facing up towards
you. Use clips or straight pins if you need help keeping the layers
together.
• Thread the needle, but don’t knot the yarn. Begin at one side of
the opening along the top of the robot’s head. To hide the tail of the
yarn, start on the wrong side of the fabric (between the two layers)
and bring the needle through to the right side of the front. Take one
stitch through both layers together. Then anchor the stitch by going
over the same place three times. (Anchor the beginning and end of
every piece of yarn the same way.) End with the needle at the back
of the robot
(Figure
I
)
.
G
122
Making Simple Robots, 2nd Edition
Make_Simple_Robots_interior_FIN.indd 122Make_Simple_Robots_interior_FIN.indd 122 4/26/22 1:55 PM4/26/22 1:55 PM

H
I
Chapter 4: Making Robots Likable 123
Make_Simple_Robots_interior_FIN.indd 123Make_Simple_Robots_interior_FIN.indd 123 4/26/22 1:56 PM4/26/22 1:56 PM

J
L
N
K
M
O
124
Making Simple Robots, 2nd Edition
Make_Simple_Robots_interior_FIN.indd 124Make_Simple_Robots_interior_FIN.indd 124 4/26/22 1:56 PM4/26/22 1:56 PM

• Now go one stitch length away and bring the needle up through to
the front
(Figure
J
)
.
• From the front, loop back to the end of the last stitch and bring the
needle down to the back, filling the empty space
(Figure
K
).
• For the next stitch, do the same thing: Go one stitch length ahead,
bring the needle up from back to front, loop back to the end of the
last stitch, bring the needle down through to the back and fill the
empty stitch
(Figure
L
)
.
• Continue on down the first side. Where the stitching turns a corner,
you can reinforce it by going over the stitches twice
(Figure
M
)
.
• When you reach the bottom — the fold — stop and anchor the
thread. Then bring the needle between the two layers and out again.
Cut the yarn. Repeat to sew the other side closed
(Figure
N
)
. (If you
have two separate pieces of fabric, sew across the bottom and up
the other side, stopping at the opening.)
5. Before stuffing the body, finish off the face:
• Attach the googly eye to the felt circle with fabric adhesive
(Figure
O
)
.
• To keep the felt from muffling the speaker on the back of the
micro:bit v2, make a cardstock backing. The backing also makes it
easier to attach and remove the micro:bit. Here’s how:
• Trace around the micro:bit on the smaller felt rectangle.
• Cut a rectangle of cardstock about 2 inches (5 centimeters)
long by 1 1/2 inches (4 centimeters) wide. This is shorter than
the micro:bit, so you can still attach clips to the pins along the
bottom.
• Use peel-and-stick fabric adhesive to attach the cardstock to the
upper end of the felt rectangle where the micro:bit will go. That
way, there’s no backing behind the lower end of the board.
Chapter 4: Making Robots Likable 125
Make_Simple_Robots_interior_FIN.indd 125Make_Simple_Robots_interior_FIN.indd 125 4/26/22 1:56 PM4/26/22 1:56 PM

P
R
T
Q
S
126
Making Simple Robots, 2nd Edition
Make_Simple_Robots_interior_FIN.indd 126Make_Simple_Robots_interior_FIN.indd 126 4/26/22 1:56 PM4/26/22 1:56 PM
..................Content has been hidden....................
You can't read the all page of ebook, please click here login for view all page.