Chapter 6: Data Security
Like everything else, data in the cloud must be treated differently to that in on-premises environments. As data is leaving our local environment, and is usually accessible over the internet, we need to be extra careful. We have already mentioned that all data is encrypted at rest, and most communication goes over HTTPS (Hypertext Transfer Protocol over Secure Socket Layer) and is encrypted in the move as well. However, there are multiple steps that we can take to ensure additional security and satisfy compliance and different security requirements.
In this chapter, we will be using Azure Key Vault extensively. We've seen how Azure Key Vault can be used for secrets and password management, but we will also see how it can be used to increase data security as well.
We will cover the following topics in this chapter:
- Understanding Azure Storage
- Understanding Azure Virtual Machine disks
- Working on Azure SQL Database
Technical requirements
For this chapter, the following is required:
- PowerShell 5.1, or higher, on Windows (or PowerShell Core 6.x and later on any other platform, including Windows)
- Azure PowerShell modules
- Visual Studio Code
- An Azure subscription
Understanding Azure Storage
Azure Storage is Microsoft's cloud storage service and is highly available, secure, and scalable, plus, it supports a variety of programming languages. It is usually the first data service users encounter when they start using Azure.
All communication inside Azure data centers is over HTTPS, but what happens when we access data from outside? As per the shared responsibility model (explained in Chapter 1, Azure Security Introduction), this falls under the user's responsibility. Because of different user requirements, Microsoft does not enforce traffic over HTTPS by default, but there is an option that users can enable to enforce traffic to be encrypted.
Under Configuration, there is an option called Secure transfer required. To ensure that all traffic is encrypted and over HTTPS, we need to enable this option, as in the following screenshot:

Figure 6.1 – Azure Storage secure transfer
When Secure transfer required is enabled, all requests that are not over HTTPS will be rejected, even if they have valid access parameters (such as an access signature or a token). This enhances transfer security by allowing the request to Azure Storage only when coming by a secure connection.
Important note
It's important to remember that Azure Storage does not support HTTPS for custom domain names, so this option does not apply when a custom domain name is used.
Another thing we need to consider is what happens when files are accidentally deleted. This can occur for a number of reasons, such as a user deleting a file by mistake, or numerous applications using the same Azure Storage and one application deleting a file needed by another application. Of course, such situations can be caused by malicious attacks and with intent to cause damage as well. To avoid such situations, we can enable the Blob soft delete option under the Data Protection setting.
An example is shown in the following screenshot:

Figure 6.2 – Blob soft delete
Blob soft delete also has retention period settings, which will determine how long files will be saved after they are deleted. These settings can be adjusted to any value between 7 and 365 days. Besides recovering deleted files, Blob soft delete enables us to recover previous versions of files, too. If a file is accidentally modified, or we need a previous version of a file for some other reason, Blob soft delete can help us to restore the file to any point in time, as long as it's in the timeframe of the effective retention period.
Important note
Blob soft delete and the retention period are effective from the moment they are set and cannot be used retroactively. For example, if we discover that we lost a file and then enable this option, it will not help us recover the lost file. To be able to recover files, we need to have the option in place before the incident happens.
Data in Azure is encrypted at rest, and that's no different with Azure Storage. But data is encrypted with Microsoft-managed keys, and this is not always acceptable. In certain situations, caused by compliance and security requirements, we must be in control of keys that are used for encryption. To address such needs, Microsoft has enabled encryption of data with the Bring Your Own Key (BYOK) option. The option to use your own key can be enabled under the Encryption option, as in the following screenshot:

Figure 6.3 – Azure Storage encryption options
BYOK is enabled by the use of Azure Key Vault, where keys used for storage encryption are stored.
Once we enable Use your own key, new settings will appear where we need to provide key vault information. An example is shown in the following screenshot:

Figure 6.4 – Storage encryption with a custom key
We can either provide a key Uniform Resource Identifier (URI), which will contain information about the key vault and key that will be used for encryption, or we can use a second option, which will allow us to select the available key vault and key from a list. Both options will have identical outcomes and the storage will be encrypted. Any new files added to Azure Storage will be encrypted automatically. Any existing files will be retroactively encrypted by a background encryption process, but it will not happen instantly, and the process to encrypt existing data will take time.
Keys in Azure Key Vault can be easily created, but we can also import existing keys from a Hardware Security Module (HSM). This is for further security and compliance requirements and enables ultimate key management where crypto keys are safeguarded by a dedicated crypt processor.
Encryption in Azure Storage is not only available through the Azure portal, but also through using Azure PowerShell. The following script will create a new Azure Storage account, Key Vault, and key, and then use all the resources provided to encrypt the Azure Storage account that was just created:
New-AzResourceGroup -Name 'Packt-Encrypt' -Location 'EastUS'
$storageAccount = Set-AzStorageAccount -ResourceGroupName 'Packt-Encrypt' `
-Name packtstorageencryption `
-AssignIdentity
New-AzKeyvault -name 'Pact-KV-01' -ResourceGroupName 'Packt-Encrypt' `
-Location 'EastUS' `
-EnabledForDiskEncryption `
-EnableSoftDelete `
-EnablePurgeProtection
$KeyVault = Get-AzKeyVault -VaultName 'Pact-KV-01' -ResourceGroupName 'Packt-Encrypt'
Set-AzKeyVaultAccessPolicy `
-VaultName $keyVault.VaultName `
-ObjectId $storageAccount.Identity.PrincipalId `
-PermissionsToKeys wrapkey,unwrapkey,get,recover
$key = Add-AzKeyVaultKey -VaultName $keyVault.VaultName -Name 'MyKey' -Destination 'Software'
Set-AzStorageAccount -ResourceGroupName $storageAccount.ResourceGroupName `
-AccountName $storageAccount.StorageAccountName `
-KeyvaultEncryption `
-KeyName $key.Name `
-KeyVersion $key.Version `
-KeyVaultUri $keyVault.VaultUri
Another thing we need to consider with Azure Storage is Advanced Threat Protection (ATP). This option is enabled under Advanced Security and it takes our security one step further. It uses security intelligence to detect any threat to our data and provides recommendations in order to increase security.
An example of the Advanced Threat Protection blade under the storage account is shown in the following screenshot:

Figure 6.5 – Azure Storage ATP
ATP compares our security settings to the recommended baseline and provides us with additional security options that can be implemented. The second part is to detect unusual and potentially harmful attempts to access or exploit Azure Storage. ATP is closely connected to Azure Security Center, which will be covered in Chapter 7, Azure Security Center. But the storage account is not the only Azure service related to storage. Almost every Azure service uses some kind of storage. Among these services, we have Azure Virtual Machines (VMs) disks, so let's see how can we make these more secure.
Understanding Azure Virtual Machines disks
Azure VM is part of Microsoft's Infrastructure as a Service (IaaS) offering and is another service that a lot of users encounter early in the cloud journey. Azure VM is usually selected when the user requires more control over the environment than other services can offer. But with more control also comes more responsibility.
Besides network management, which was covered in Chapter 4, Azure Network Security, we need to address how we handle data in Azure VM, and by data, we mainly mean disks. Just like all other data, disks for Azure VM are encrypted at rest, and VM uses Azure Service Fabric to securely access content stored on these disks.
But what happens if we decide to download or export a disk used by these machines? Once a disk leaves Azure, it is in an unencrypted state and can be used in any way. This opens certain vulnerabilities that need to be addressed. What if someone gains access to Azure (but does not have access to a VM) and downloads a disk? What if someone decides to back up all disks, but to an unsecure location? These are only a couple of the scenarios that can create serious problems with unauthorized and malicious access to Azure VM disks.
Fortunately, we have the option to use Azure Key Vault and enable the further encryption of disks. Disks encrypted in this way will stay encrypted even after they are exported, downloaded, or leave an Azure data center in any way.
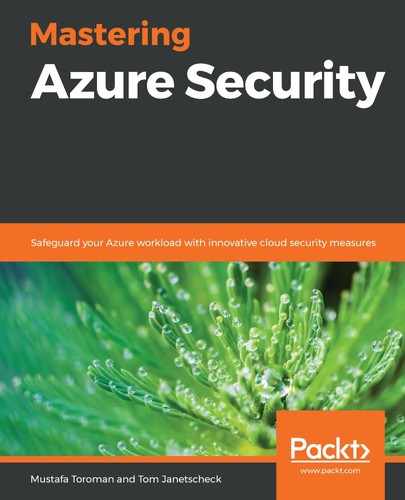
If we go to Azure VM and take a look at our disks, we can see that, by default, disk encryption is not enabled. An example is shown in the following screenshot:
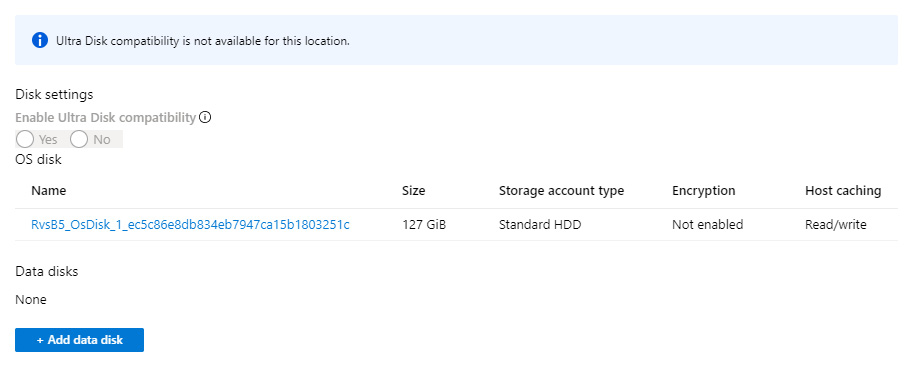
Figure 6.6 – Azure VM disk options to encrypt disks
We need to use Azure Key Vault and we need the key to be stored in the key vault.
We can use Azure PowerShell to enable disk encryption for Azure VM disks. A sample script is provided here:
New-AzResourceGroup -Name "Packt-Encrypt" -Location "EastUS"
$cred = Get-Credential
New-AzVM -Name 'Packt-VM-01' `
-Credential $cred `
-ResourceGroupName 'Packt-Encrypt' `
-Image win2016datacenter `
-Size Standard_D2S_V3
New-AzKeyvault -name 'Pact-KV-01' `
-ResourceGroupName 'Packt-Encrypt' `
-Location EastUS `
-EnabledForDiskEncryption `
-EnableSoftDelete `
-EnablePurgeProtection
$KeyVault = Get-AzKeyVault -VaultName 'Pact-KV-01' -ResourceGroupName 'Packt-Encrypt'
Set-AzVMDiskEncryptionExtension -ResourceGroupName 'Packt-Encrypt' `
-VMName 'Packt-VM-01' `
-DiskEncryptionKeyVaultUrl $KeyVault.VaultUri `
-DiskEncryptionKeyVaultId $KeyVault.ResourceId
Get-AzVmDiskEncryptionStatus -VMName Packt-VM-01 -ResourceGroupName Packt-Encrypt
This script creates a new Azure VM, a new key vault, and a new key. The created resources are then used to enable disk encryption for the just-created Azure VM. Finally, we can check the status of the disk and verify whether it was successfully encrypted. We can verify that the disk is encrypted in the Azure portal, as shown in the following screenshot:

Figure 6.7– Azure VM portal
The Azure VM disk is not encrypted: it can be accessed, used to create a new VM (Azure or a local Hyper-V), or attached to an existing VM. Encrypting the disk will prevent such access, unless the user has access to the key vault that was used during the encryption process.
Working on Azure SQL Database
Azure SQL Database is Microsoft's relational database cloud offering, which falls under the platform as a service model, often referred to as Database as a Service (DBaaS). It's highly available and provides a high-performance data storage layer. Because of that, it's often the choice when it comes to selecting a database in the cloud.
There is a whole section of security-related features in Azure SQL Database's settings. There are four different options:
- ADVANCED DATA SECURITY
- AUDITING
- DYNAMIC DATA MASKING
- TRANSPARENT DATA ENCRYPTION
If we enable ADVANCED DATA SECURITY, we get a few advantages:
- VULNERABILITY ASSESSMENT SETTINGS
- ADVANCED THREAT PROTECTION SETTINGS
- DATA DISCOVERY & CLASSIFICATION
The options to enable ADVANCED DATA SECURITY are shown in the following screenshot:

Figure 6.8 – Azure SQL Database advanced data security
Each of these options has additional configurations, which we need to set before using ADVANCED DATA SECURITY:
- VULNERABILITY ASSESSMENT SETTINGS requires Azure Storage, which is where data will be kept and will provide security recommendations based on the current status. The assessment will be performed manually, and we can select whether the report will be sent to specific users or to all admins and subscription owners. The assessment report has the following format:

Figure 6.9 – Azure SQL Database assessment results
The vulnerability assessment compares our current settings to the baseline and provides a list of checks that are not satisfied. It also provides a classification of checks based on risk level: High risk, Medium risk, and Low risk.
- ADVANCED THREAT PROTECTION SETTINGS is very similar to this option in Azure Storage: it detects anything unusual and potentially harmful. We have a couple of additional settings compared to Azure Storage: we can select what types of threats we want to detect and define who gets notifications if a threat is detected.
A list of threats we can monitor is shown in the following diagram:
Figure 6.10 – Azure SQL Database advanced threat protection settings
Similar to VULNERABILITY ASSESSMENT SETTINGS, notifications about threats can be sent to specific users or all admins and subscription owners.
- The final option under ADVANCED DATA SECURITY is DATA DISCOVERY & CLASSIFICATION. This option carries out data assessment and provides a classification for any data that should be confidential. Assessments are carried out based on various compliance and security requirements, and data is classified as confidential based on one or more criteria. For example, we may have some user information that should be classified based on the General Data Protection Regulation (GDPR). But among user information, we may have social security or credit card numbers that are classified by many other compliance requirements. DATA DISCOVERY & CLASSIFICATION only provides information about classified data types, but it's up to the user to decide what to proceed with and how to do so.
This brings us to the next security setting under Azure SQL Database – Dynamic Data Masking. In the past, we could provide the user with access to different layers, such as database, schema, table, or row. However, we could not provide access based on the column. Dynamic Data Masking changes this and enables us to provide user access to a table but mask certain columns that the user should not be able to access.
For example, let's say that we want to provide access to a customer table, but the user should not be able to access the customer's email address. We can create masking on the email column, and the user will be able to see all the information except the masked column, which will be displayed as masked (there are default masks for common data types, but custom masks can be created). For masked columns, we can exclude certain users. All administrators are excluded by default and cannot be excluded. An example of Dynamic Data Masking is shown in the following screenshot:

Figure 6.11 – Dynamic Data Masking
Dynamic Data Masking is connected to DATA DISCOVERY & CLASSIFICATION. The user will receive data masking recommendations based on information provided by DATA DISCOVERY & CLASSIFICATION.
The Auditing option enables us to define where various logs will be stored. There are three different options available:
- Storage
- Log Analytics
- Event Hubs
As many regulatory and security compliance standards require access and event logs to be stored, this option enables us to not only keep logs for auditing purposes but also to help us to understand and trace events whenever needed. Auditing can be enabled for a single database or on a server level. In the case that server auditing is enabled, logs will be kept for all databases located on that server.
The last security setting under Azure SQL Database is Transparent Database Encryption (TDE). TDE is a method of encrypting data at rest and performs real-time encryption and decryption of data and log files at the page level. It uses a Database Encryption Key (DEK) to encrypt data, associated backups, and transactional logs.
For older databases, this setting is not enabled, the TDE status is OFF, and Encryption status is Unencrypted. An example of this is shown in the following screesnhot:

Figure 6.12 – Azure SQL Database TDE settings
For newer databases, TDE is already on and the encryption status is encrypted, as shown in the following screenshot:

Figure 6.13 – Azure SQL Database encrypted with TDE
We will get the same effect by switching TDE on for older databases. However, this method uses Microsoft-provided keys for encryption. If we need to follow regulatory and security compliance standards and manage keys ourselves, we must turn to Azure Key Vault once again. To enable TDE with our own key from Azure Key Vault, we must enable this setting at the server level. Under TDE settings, under Server, we can turn Use your own key on, as in the following screenshot:

Figure 6.14 – Using a custom key for TDE
Once we turn this option on, we need to provide the key vault and key that will be used. Optionally, we can set the selected key to be the default TDE protector.
Enabling the option to use the key from the key vault for TDE will not enable TDE on every database located on the selected server. TDE must be enabled for each database separately. If this option is not set on the server, enabling TDE on the database will use Microsoft-managed keys. If the option is enabled on the server level, enabling TDE on the database will use the key from the key vault that is defined.
Encryption can be set using Azure PowerShell, as in the following sample script:
- We need to define parameters for execution. These will be used across the entire script, basically in each and every command we execute:
$RGName = 'Packt-Encrypt'$servername = 'packtSQL'$DBName = 'test'
- Next we need to log in to our Azure subscription:
$cred = Get-Credential
- We will create Resource group, Azure SQL Server and Azure SQL database.
$RG = New-AzResourceGroup -Name $RGName -Location 'EastUS'
$server = Set-AzSqlServer -ResourceGroupName $RG.ResourceGroupName `
-ServerName $servername `
-AssignIdentity
$server = New-AzSqlServer -ResourceGroupName $RG.ResourceGroupName `
-Location 'EastUS' `
-ServerName $server.ServerName `
-ServerVersion "12.0" `
-SqlAdministratorCredentials $cred `
-AssignIdentity
$database = New-AzSqlDatabase -ResourceGroupName $RG.ResourceGroupName `
-ServerName $server.ServerName `
-DatabaseName $DBName `
-RequestedServiceObjectiveName "S0" `
-SampleName "AdventureWorksLT"
- Next, we need to create the Azure Key vault, which will be used in the data encryption process:
New-AzKeyvault -name 'Pact-KV-01' -ResourceGroupName $RG.ResourceGroupName`
-Location 'EastUS' `
-EnabledForDiskEncryption `
-EnableSoftDelete `
-EnablePurgeProtection
$KeyVault = Get-AzKeyVault -VaultName 'Pact-KV-01' `
-ResourceGroupName $RG.ResourceGroupName
- We now need to set the key vault access policy to enable encryption and add a key that will be used to encrypt the data:
Set-AzKeyVaultAccessPolicy `
-VaultName $keyVault.VaultName `
-ObjectId $storageAccount.Identity.PrincipalId `
-PermissionsToKeys wrapkey,unwrapkey,get,recover
$key = Add-AzKeyVaultKey -VaultName $keyVault.VaultName `
-Name 'MyKey' `
-Destination 'Software'
- Finally, we assign a key to Azure SQL Server, enable TDE using custom key from Key Vault, and encrypt the database using that key:
Add-AzSqlServerKeyVaultKey -ResourceGroupName $RG.ResourceGroupName `
-ServerName $server.ServerName `
-KeyId $key.Id
Set-AzSqlServerTransparentDataEncryptionProtector -ResourceGroupName $RG.ResourceGroupName `
-ServerName $server.ServerName `
-Type AzureKeyVault `
-KeyId $key.Id
Get-AzSqlServerTransparentDataEncryptionProtector -ResourceGroupName $RG.ResourceGroupName `
-ServerName $server.ServerName
Set-AzSqlDatabaseTransparentDataEncryption -ResourceGroupName -ResourceGroupName $RG.ResourceGroupName `
-ServerName $server.ServerName `
-DatabaseName $database.DatabaseName `
-State "Enabled"
If the database has TDE enabled, with Microsoft-managed keys, enabling our own key from the key vault on a server level will not automatically transfer the encryption from the managed key to our own key. We must perform decryption and enable encryption again to use the key from the key vault.
Summary
With all this work on the network and identity levels, we still need to do more and encrypt our data in the cloud. But is that enough? Often it is not, and then we find ourselves needing to do even more. Threats are becoming more and more sophisticated, and we need to find ways of increasing our security. In this chapter, we briefly mentioned Azure Security Center. It may be the one thing that can give us an advantage in creating a secure cloud environment and stopping threats and attacks before they even happen.
In the next chapter, we will discuss how Azure Security Center uses security intelligence to be a central security safeguard in Azure.
Questions
- What will the Secure transfer required option do?
A. Enforce data encryption
B. Enforce HTTPS
C. Enforce FTPS
- To protect data from accidental deletion, what needs to be enabled?
A. Data protection
B. Recycle Bin
C. Blob soft delete
- Is data in Azure Storage encrypted by default?
A. Yes
B. No
- Are Azure Virtual Machine (VM) disks encrypted by default?
A. Yes
B. No
- Is Azure SQL Database encrypted by default?
A. Yes
B. No
- Data in Azure can be encrypted with…
A. Microsoft-provided keys
B. User-provided keys
C. Both of the above
- Data in Azure SQL Database can be restricted using…
A. Data Classification
B. Dynamic Data Masking
C. Transparent Database Encryption (TDE)