Chapter 3: Managing Cloud Identities
Back in the days when IT security was synonymous with blocking network traffic, life was easy. You could be sure that your physical walls built your perimeter, so you simply needed to protect your borders. However, today, your network endpoints are no longer enough to secure your perimeter. Today, we see an increasing amount of phishing and credential theft attacks against corporate environments. We're in an age where corporate data is moving out of its secure enterprise network environment. It's the age of cloud services such as Office 365, and so traditional security strategies aren't enough to safeguard data as the data is outside secure walls. We need a new approach to add on top of the traditional approach. This new approach is "identity is the new perimeter." This makes identity something we need to protect more than ever before. Of course, this does not mean that we have to do away with the old method of protecting the network, and we'll explore this in Chapter 4, Network Security.
In general, to avoid random attacks, you need to raise the bar and make an attack attempt as expensive as possible for an attacker. It's just like protecting your home: if you secure your front door with a higher resistance class (RC), have grids in front of your windows, an automated lighting system to light up your property, and your neighbor does not, then burglars looking for random targets will most probably not even try to attack your home. This is because an attack attempt against your home would probably be too time consuming, or the probability of being detected is too high; thus, it would be too expensive from an attacker's point of view. This does not work if you are suffering a sophisticated attack that is planned and targeted against your home or identities (there is no absolute security!), but it helps against all the random attack attempts out in the wild.
In this chapter, we will not only cover strategies to protect your identities, but you will also learn how to reduce the attack surface of your privileged accounts. The topics we will cover are the following:
- Exploring passwords and passphrases
- Understanding multi-factor authentication (MFA)
- Using Conditional Access
- Introducing Azure Active Directory (Azure AD) Identity Protection
- Understanding role-based access control (RBAC)
- Protecting admin accounts with Azure AD Privileged Identity Management (PIM)
- Hybrid authentication and Single Sign-On (SSO)
- Understanding passwordless authentication
- Licensing considerations
Exploring passwords and passphrases
When talking about identity security, there is one principle you always have to keep in mind: assume breach. The question is not whether your accounts are attacked but whether you know about it and whether you can prevent attackers from being successful. We can already see that there are many successful attacks against cloud identities every day. There is no single solution for protecting your identities, but you need to leverage a broader toolset to be resilient against identity attacks.
Important Note
The question is not whether your cloud identities are under attack but whether you can make sure that attackers are not successful.
If we start with passwords, you could say that no one likes them. Well, attackers do, because they often give attackers leverage for a following identity-focused attack attempt. Given the fact that people tend to create their passwords based on their life experiences, an attacker generally needs to be good at gathering background information about a specific user to guess their password. This, of course, means some effort on the attacker's side, and this would most probably be executed in a sophisticated attack against a high-value target. You can see that passwords are not a good solution for protecting your accounts.
Furthermore, passwords can lead to denial of service (DoS). In Active Directory Domain Services (AD DS) on Windows Server, lots of companies use a respective security policy that will lock out user accounts for a given time (or infinitely) after a given number of failed login attempts. The problem is that authenticated users—that is, users that have been able to log into Active Directory — are able to read this security policy, and they are able to list user accounts from AD. An authenticated user can be any employee (internal attacker), or someone who is trying to attack a company from outside and who was able to get access to a set of login credentials (external attacker). Leveraging PowerShell, an attacker can easily:
- Find out what security policy is in place
- List all user accounts
- Lock all user accounts by trying to log in with incorrect passwords
- Repeat this script every x number of minutes.
If someone does so, no one in this directory will be able to log in again, so the company will suffer a DoS. That said, you should not implement this lockout policy but monitor login attempts instead, and then make educated decisions if something unusual happens. Keep an eye on your security event logs on Windows servers or the syslog/auth log domain on Linux.
Dictionary attacks and password protection
Dictionary attacks, such as brute-force and password spray attacks, still find success every day. In a dictionary attack, attackers try combinations of usernames and well-known and often-used passwords against an authentication service. The brute-force attack is more noisy and easier to recognize. With brute force, an attacker will try lots of passwords for a single user account, hoping that one of the attacks will be successful. In the backend, you will see lots of failed login attempts, so you can easily react to it. However, a password spray attack is way more sensitive since an attacker will only use a small set of passwords against lots of user accounts. If the attacks are very slow and widely distributed, it is very hard to notice an attack. To avoid successful password spray and brute-force attacks in the cloud and, to be more precise, in Azure AD, there are some easy best practices:
- Encourage your users to use passphrases instead of passwords
- Block passwords or patterns that should not be used in your environment
Currently, you can use passwords or passphrases with up to 256 (!) characters in Azure AD. Even if you were to only use all 26 letters from the alphabet in uppercase and lowercase, this would mean (2x26)²⁵⁶ 256 possibilities, which results in a number near infinity.
That said, and knowing that you cannot only use uppercase and lowercase letters, but also numbers and other characters in a passphrase, it makes a whole lot of combinations. You see, you should definitely enable and encourage your users to use passphrases with a lot of letters.
For passwords you do not want to allow in your organization, there is another option you can enable. By default, Microsoft does not allow you to use passwords or password patterns that can be found on password lists and that are known to be used in dictionary attacks. For example, a pattern that is not allowed is your username, or any part of it. In addition to that, it might make sense for your company to avoid passwords that are easily relatable to your enterprise. This could be well-known marketing phrases, corporate abbreviations, and so on. In Azure AD, there is an option to create a custom banned password list that can be used to either audit or enforce the usage of secure passwords. You can even use this custom list to enable password protection for your on-premises Windows Server AD by installing and enabling an on-premises agent.
The custom banned password list can contain up to 1,000 case-sensitive terms between 4 and 16 characters in length. One nice feature is the fact that character substitution such as "e" and "3" or "o" and "0" is considered.
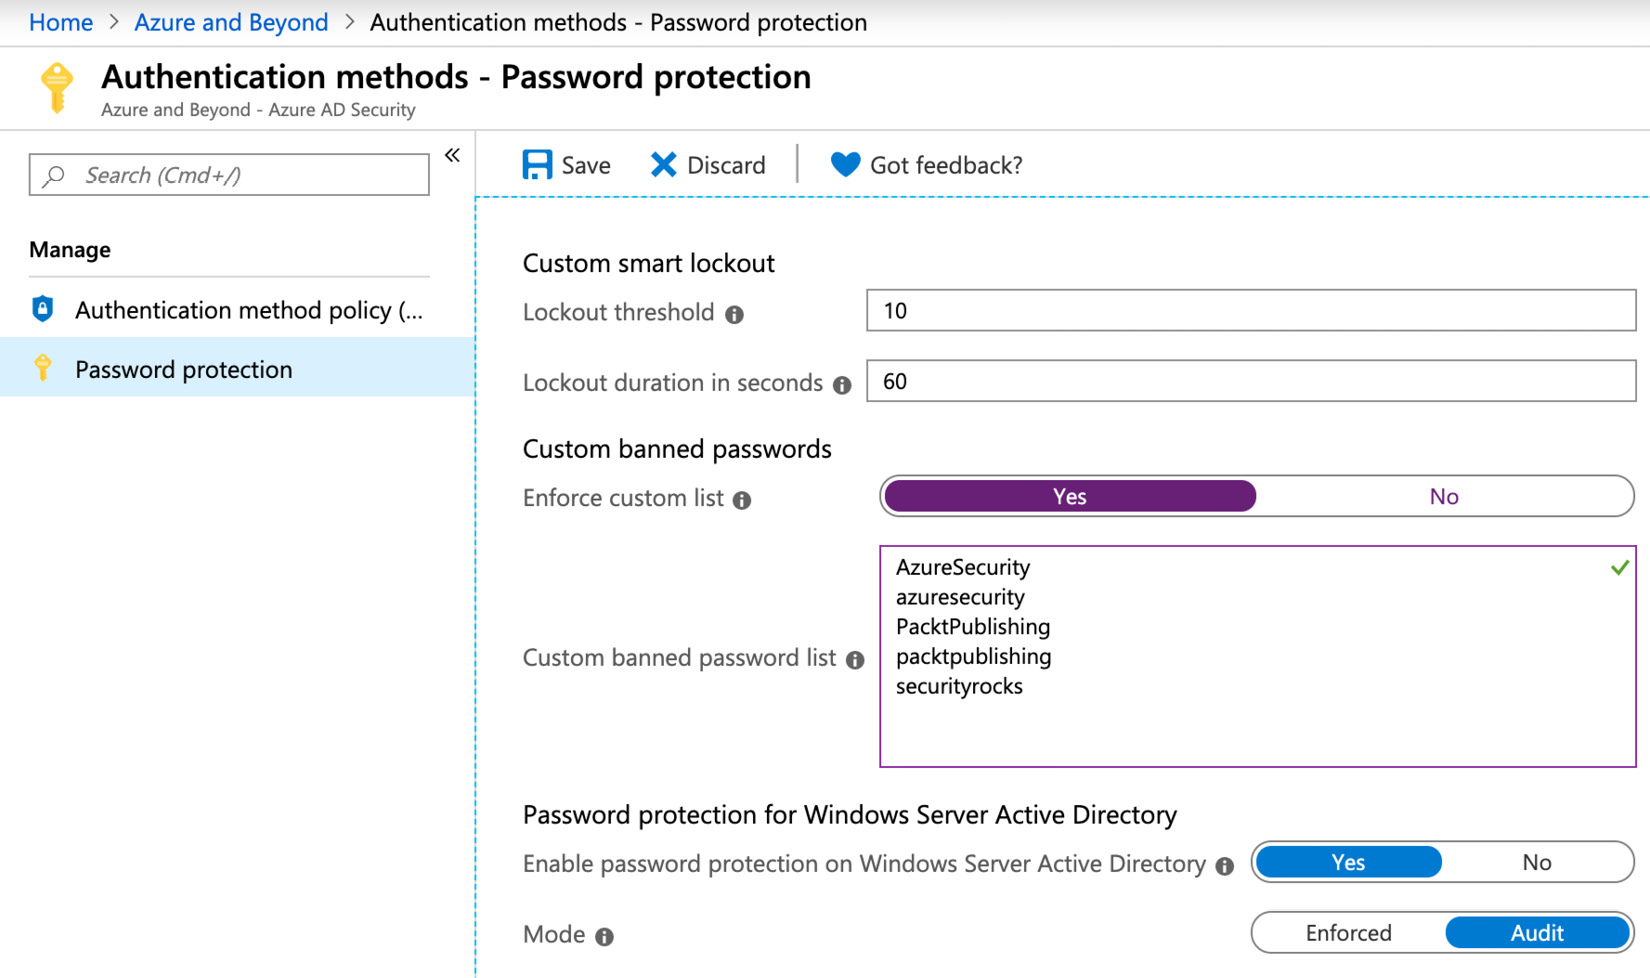
Figure. 3.1 - Configuration of a custom banned password list in Azure AD
In order to configure a custom banned password list, you need to navigate to Azure Active Directory -> Authentication methods -> Password protection in the Azure portal, as seen in Fig. 3.1. On that screen, you'll also find configuration options for the Custom smart lockout feature. As mentioned before, you might find an on-premises AD security policy forcing accounts to be locked after a given number of failed login attempts. This is kind of an on/off decision and you can easily increment the lockout counter with the same password to force account lockouts. Remember that this is why you should disable such policies in your on-premises AD and monitor login attempts instead.
However, in Azure AD, smart lockout is the feature that combines the best of two worlds: letting users work without blocking them unnecessarily and preventing attackers from guessing your passwords at the same time. To achieve that goal, smart lockout comes with some interesting features:
- Users are not meant to be blocked from working. Smart lockout recognizes attack attempts and login attempts from valid users. Attack attempts are treated differently, so legitimate users are still able to work while attackers are blocked.
- Smart lockout stores the last three bad password hashes. Doing so, you cannot simply use the lockout counter to enforce DoS by using the same bad password several times.
- The default lockout threshold is 10 bad attempts with a lockout duration of 60 seconds. Smart lockout is always on for Azure AD; however, it does not guarantee that legitimate user accounts are never locked out. The service uses familiar versus unfamiliar locations to try to figure out whether a login attempt comes from a bad actor or a genuine user. However, there is still a probability that users will be blocked from logging in. And one important point is that the service does not necessarily protect you from highly sensitive password spray attacks. This is not because the service is bad but because those kinds of attacks can become really difficult to discover.
- Imagine an attacker has a list of nine passwords and they use a widely spread network of bots to attack thousands of user accounts in one custom domain over a time frame of weeks. In that situation, there are some facts to realize:
The number of login attempts per user account will not exceed the default threshold.
By using several widely spread host systems to run the attack, it is hard to discover whether a login attempt is valid or malicious. However, Microsoft will also take into account whether a login attempt comes from a known bad IP address or an unfamiliar location.
So, in this scenario, the service will probably not block an attacker. Of course, the nine passwords in the list need to be quite sophisticated to be accepted. However, there is still a probability of an attacker being successful at guessing your passwords.
Now that you know why passwords are not enough to protect your accounts, let's move one step further and see how MFA can give an additional layer of security to your accounts.
Understanding Multi-Factor Authentication (MFA)
There are only a few technical features that protect your accounts more than using MFA. With MFA, it is not enough to know a username and a password; you are also challenged to prove who you are using another authentication factor. With MFA, you generally need to be able to log in with:
- Something you are, such as your user account name or a biometrical attribute
- Something you know, such as a password
- Something you have, such as an additional authentication factor (smartcard, smartphone app, or security key).
Given the fact that an MFA challenge is only triggered after a successful login attempt, it is still reliant on passphrases that are not easy to guess. In other words: if an MFA challenge is triggered, the respective username/password combination has already been successfully validated.
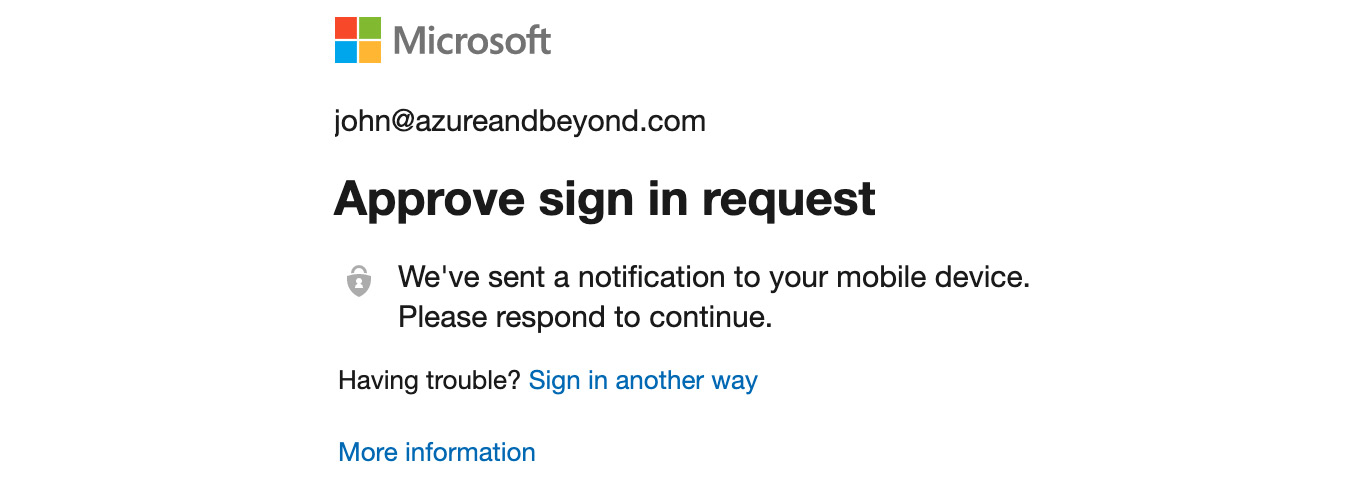
Figure. 3.2 - An MFA challenge is triggered after the user's credentials have successfully been validated
Today, there are several options for using MFA in Azure AD:
- A push message from the Microsoft Authenticator smartphone app
- A one-time password (OTP) from the Microsoft Authenticator smartphone app
- A text message with an OTP sent to your mobile device
- A phone call to an authentication phone
- A security key or token
If you have set up MFA the right way, you can literally react to all situations with a combination of these options. If you do not have access to mobile data or Wi-Fi, you can use the OTP code from a text message or from your smartphone app. If you leave your smartphone at home, you can get a call to your office phone (or another authentication phone you defined during the configuration process).
Important Note
Important to note is the fact that you should not use your mobile phone number as your authentication phone because of obvious reasons. If you lose your phone or leave it at home, there won't be many options left.
In Chapter 2, Governance and Security, you learned about the segregation of duties and the principle of least privilege. Accounts only get the access rights they really need to fulfill a task. However, it is important to prevent being accidentally locked out from your Azure AD environment. So, there is still a need for accounts with higher privileges, such as subscription owner or Global Administrator access. This is why you need to create at least two administrative emergency access accounts. Some of these emergency access or break glass accounts need to be protected with MFA, too. Now, a single smartphone does not seem to be a good option for these kinds of accounts, because, according to Murphy's law, something will go wrong; the smartphone's owner is always on holiday, ill, or not available because of other reasons when you need them. A good thing to know is that you can have up to five authentication factors connected to a single account. For example, you could associate three security keys, one smartphone app, and a phone number with one account to make sure that there will always be at least one method you can use to fulfill an MFA challenge.
MFA activation in Azure AD
From an administrator's perspective, activation of MFA in Azure AD is pretty straightforward:
- In the Azure portal, navigate to Azure Active Directory and select the Users navigation pane. In the upper-right corner, navigate to •••More and then select Multi-Factor Authentication, as shown in the following screenshot:
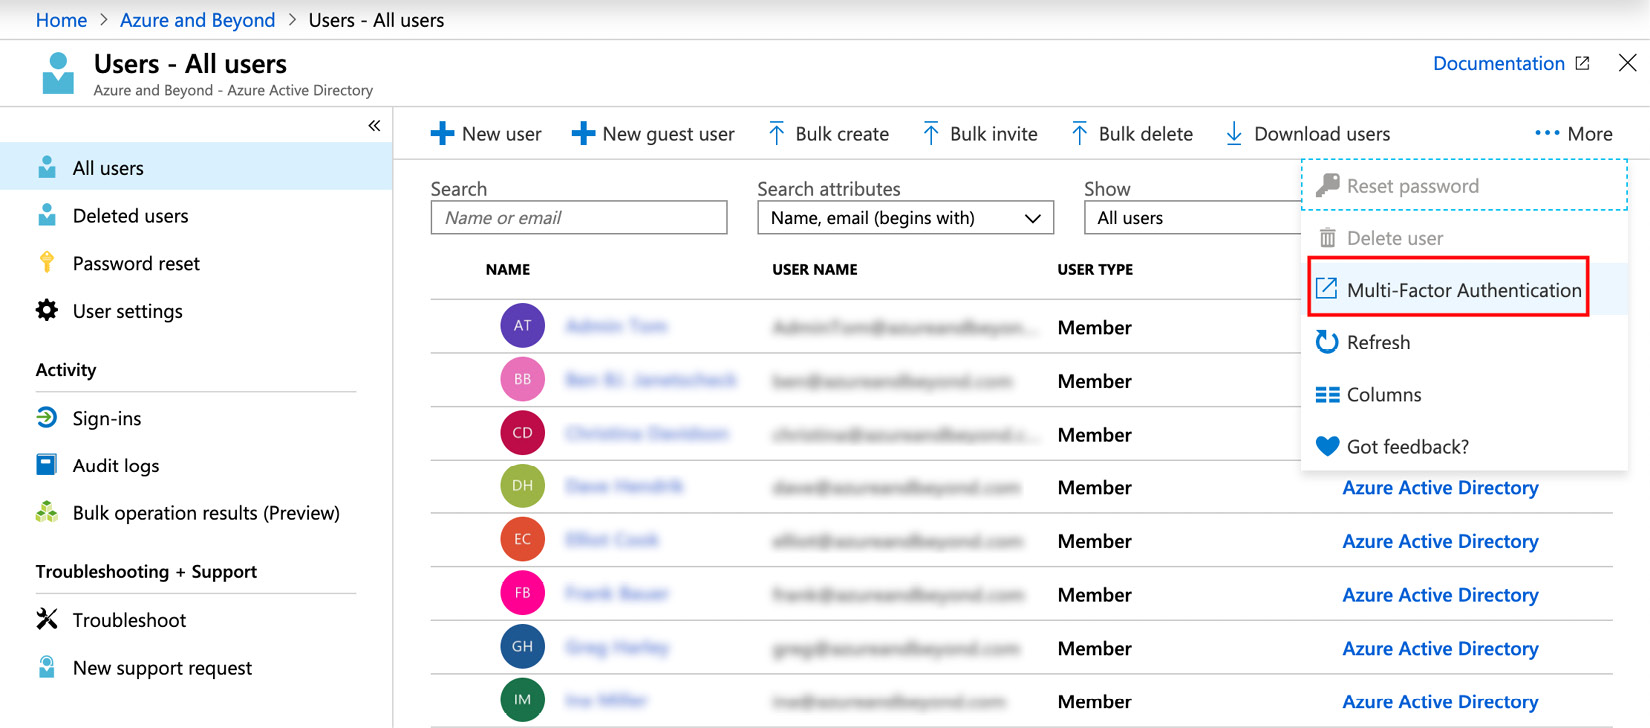
Figure. 3.3 - MFA activation in the Azure portal
You will be redirected to a retro-style portal at the windowsazure.com domain, in which you can enable or disable MFA for single users or bulk-update them by selecting several accounts or using a CSV file in the users tab.
- Before you enable MFA for user accounts, first switch from the users tab to the service settings tab to configure some custom settings for your environment, as shown in the following screenshot:
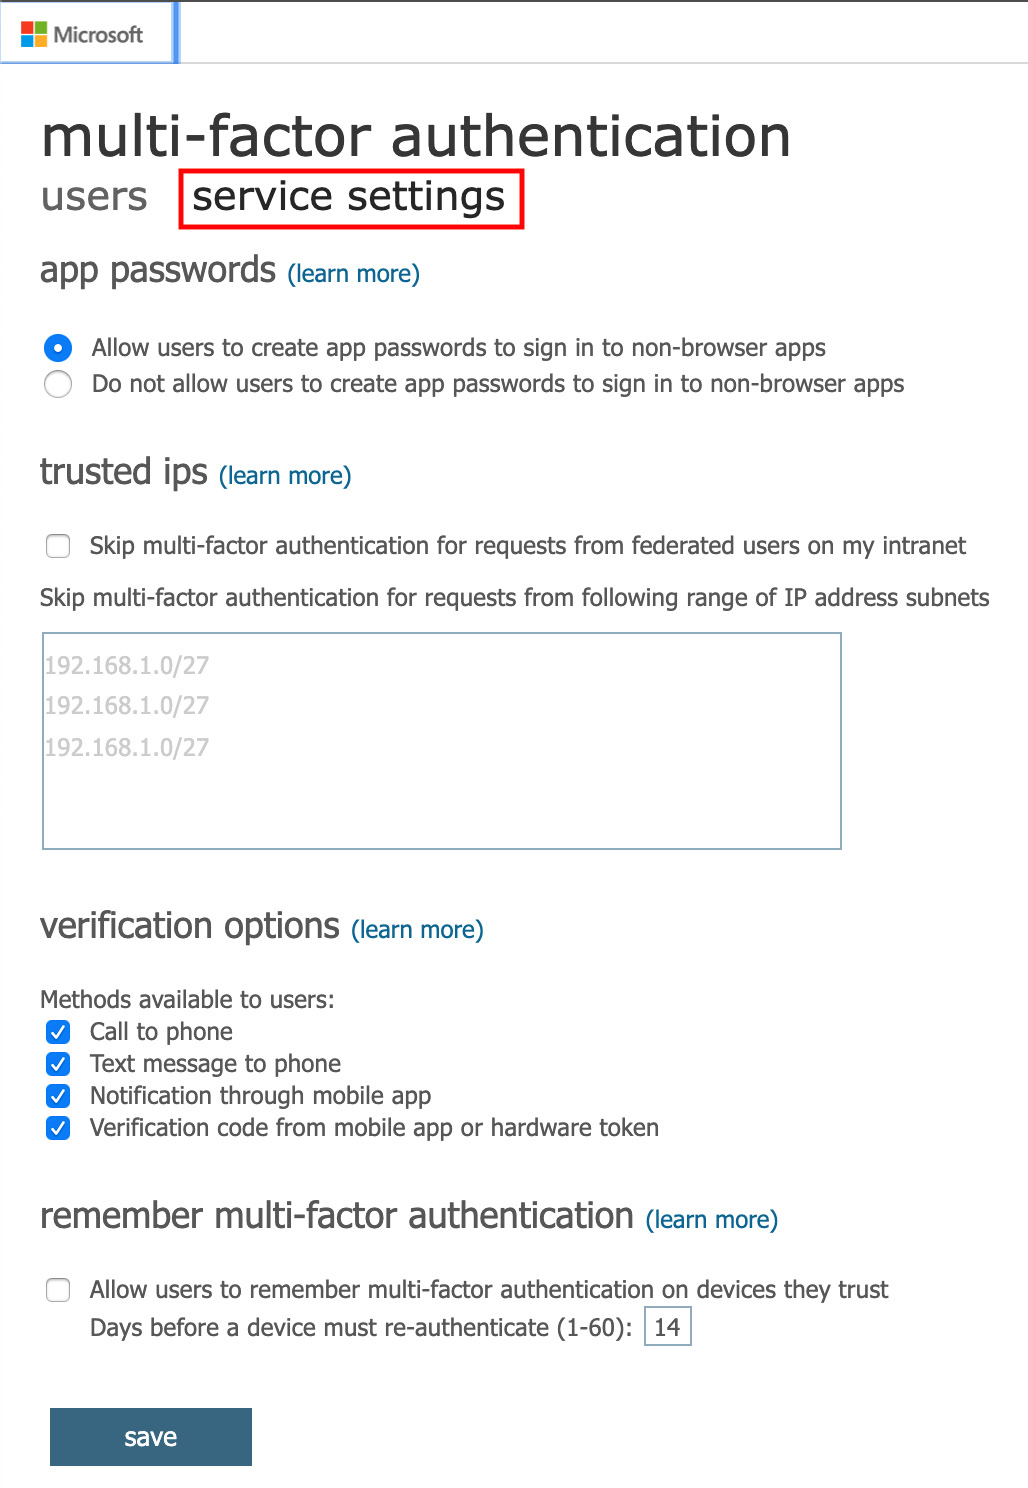
Figure. 3.4 - MFA - service settings
The first option is to allow or disallow users to create app passwords for legacy non-browser apps that do not support MFA. Outlook used to be such an application; however, nowadays, most applications should be able to authenticate with MFA.
You can also define trusted IPs for which you can skip MFA. So, for example, if your users are authenticating from one of your corporate offices and you have defined your external IP range(s) here, you can define that MFA challenges are only triggered when someone wants to authenticate from outside your corporate buildings. You can also enable and disable single verification options if they do not fit your company's needs. The last setting is to allow users to remember MFA for devices they (but not you as a company!) trust. If you enable that option, users are not prompted with an MFA challenge again for a given period of time (between 1 and 60 days) on a particular device.
- Now, back to enabling user accounts for MFA on the users tab. When you click the Enable link on the right side after selecting one or several user accounts, you are prompted to read the online deployment guide and then click on enable multi-factor auth. That's all from an administrator's point of view. Pretty easy? Indeed.
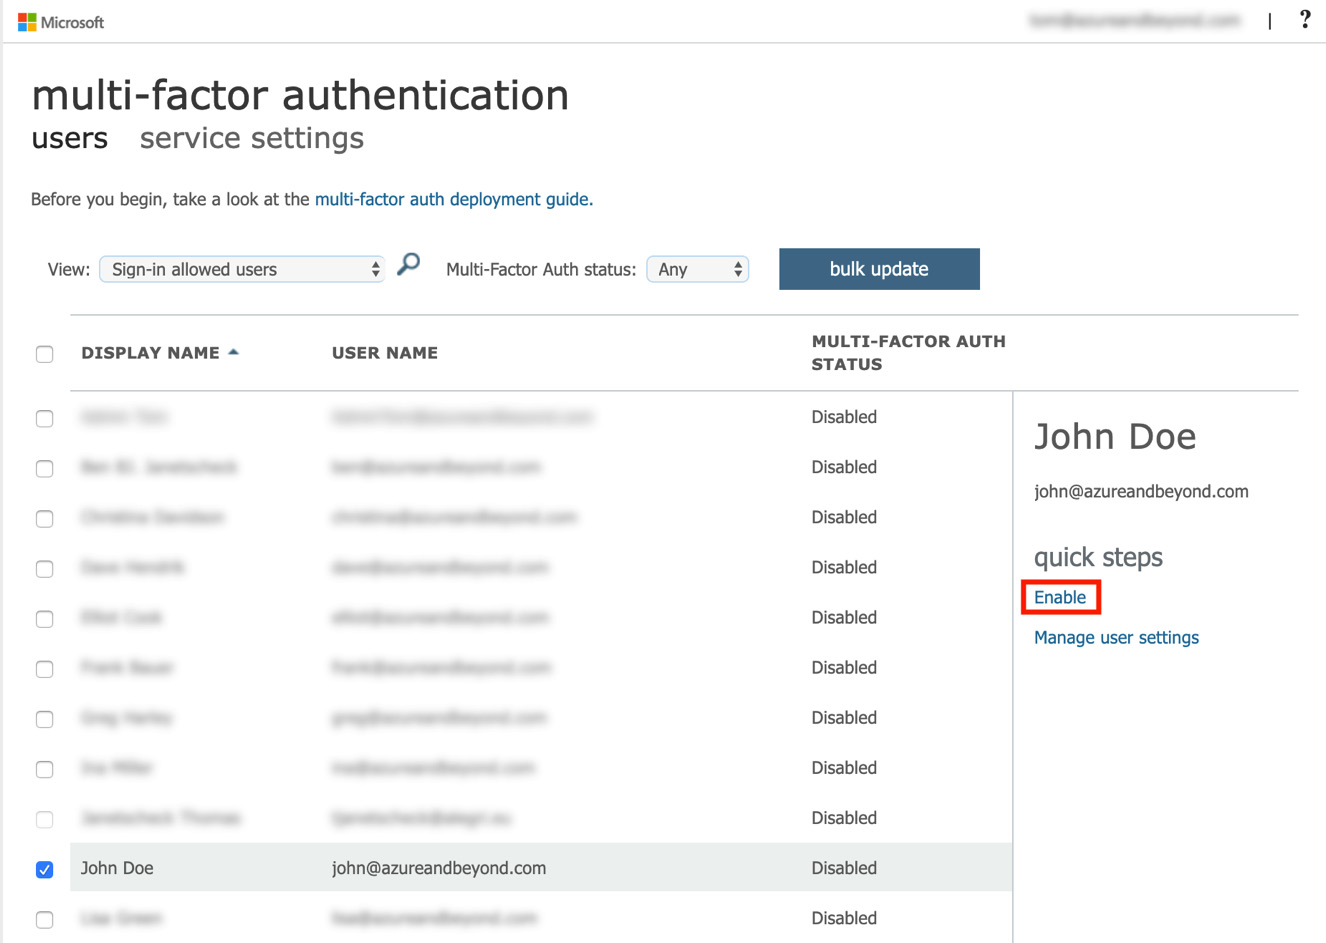
Figure. 3.5 - Enabling MFA for one or several user accounts
The MFA-activated user has to configure all individual settings after the next login attempt. Telephone numbers for the account are taken from the information that is already stored in Azure AD. However, the user can update these numbers in the wizard that appears after the next logon.
MFA activation from a user's perspective
After enforcing MFA for John, a new window will appear after his next successful login, telling him that his organization needs more information to protect his account, as shown in the following screenshot:
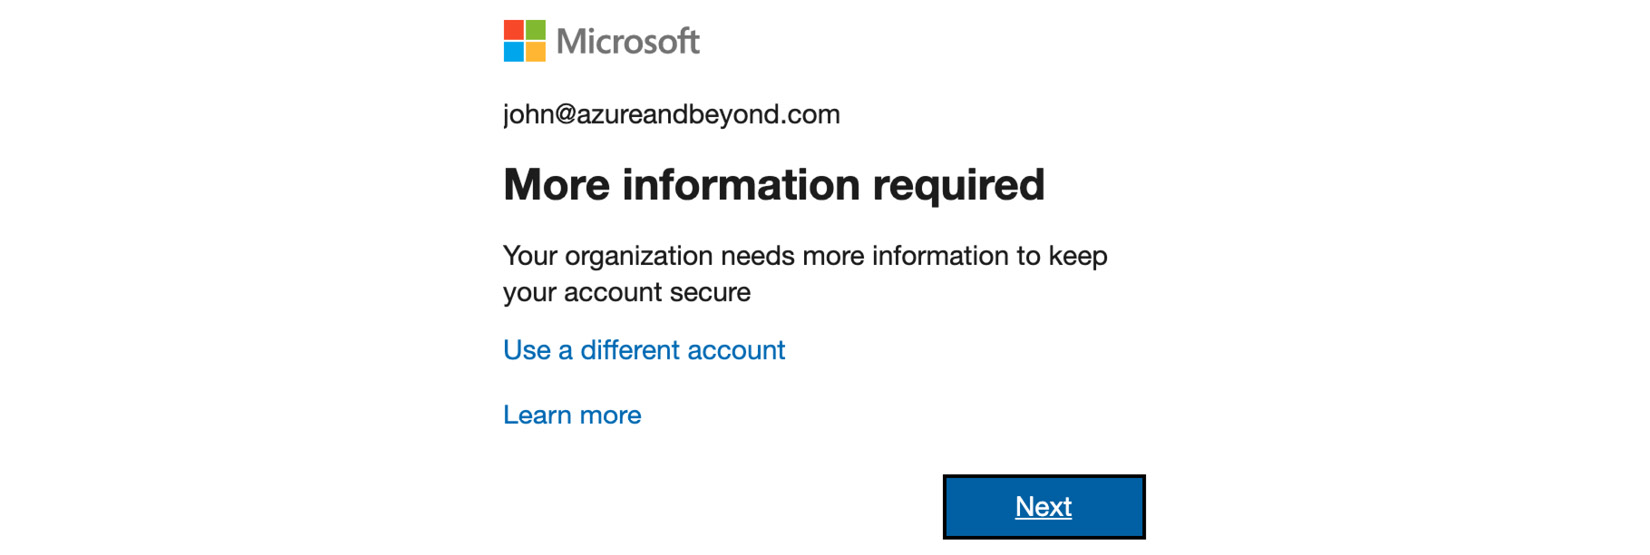
Figure. 3.6 - New window at the first login after MFA activation
John now only has two options: Use a different account to log in or click Next to proceed through the MFA activation process. That said, you should inform your users before activating MFA to let them know what's going to happen and to reduce the amount of support tickets required!
Let's look at what happens if John decides to complete the process:
John decides to proceed and clicks the Next button. On the following screen, he can decide which is going to be his primary authentication option. John's office phone number is already filled from the information stored in his Azure AD user account, and he cannot change it. The authentication phone number, however, can be individually configured.
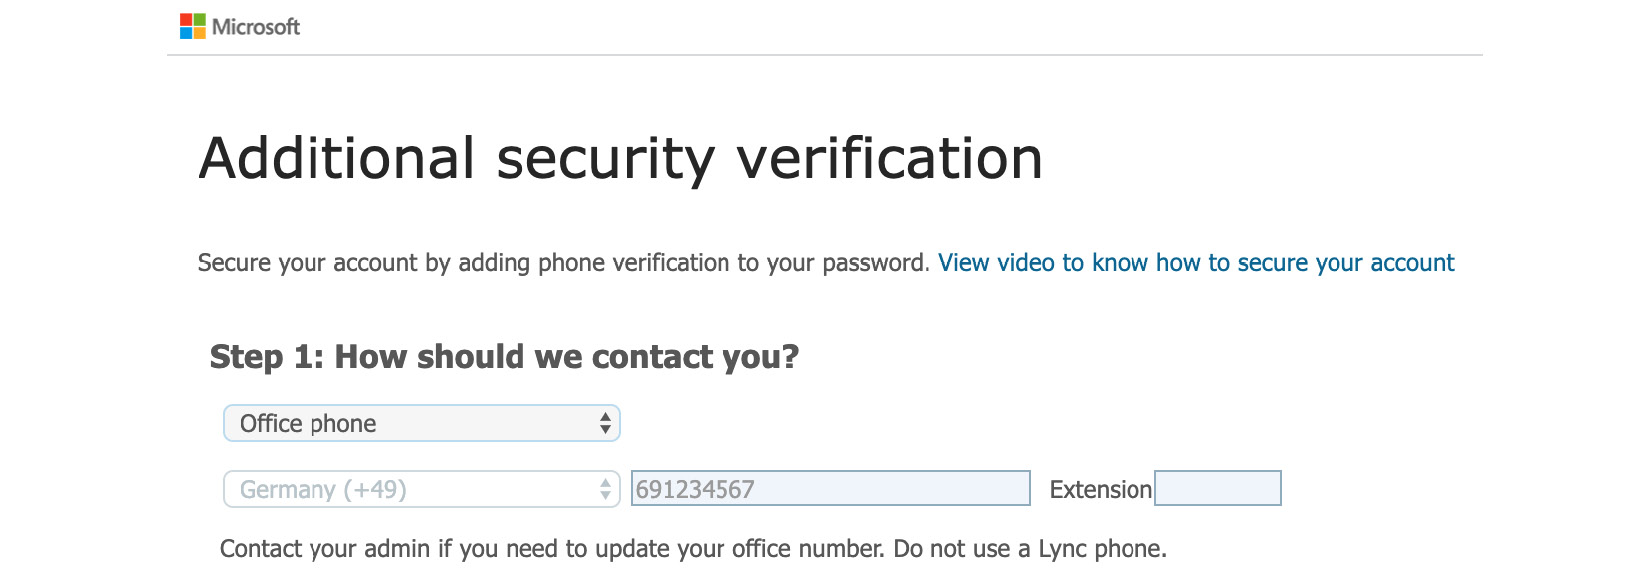
Figure. 3.7 - Office phone numbers cannot be individually changed but are filled from the values stored in the Azure AD user account
If John decides to use the authentication phone as his primary MFA option, he has to configure the number and then decide whether he wants to receive a phone call or a text message containing an OTP:
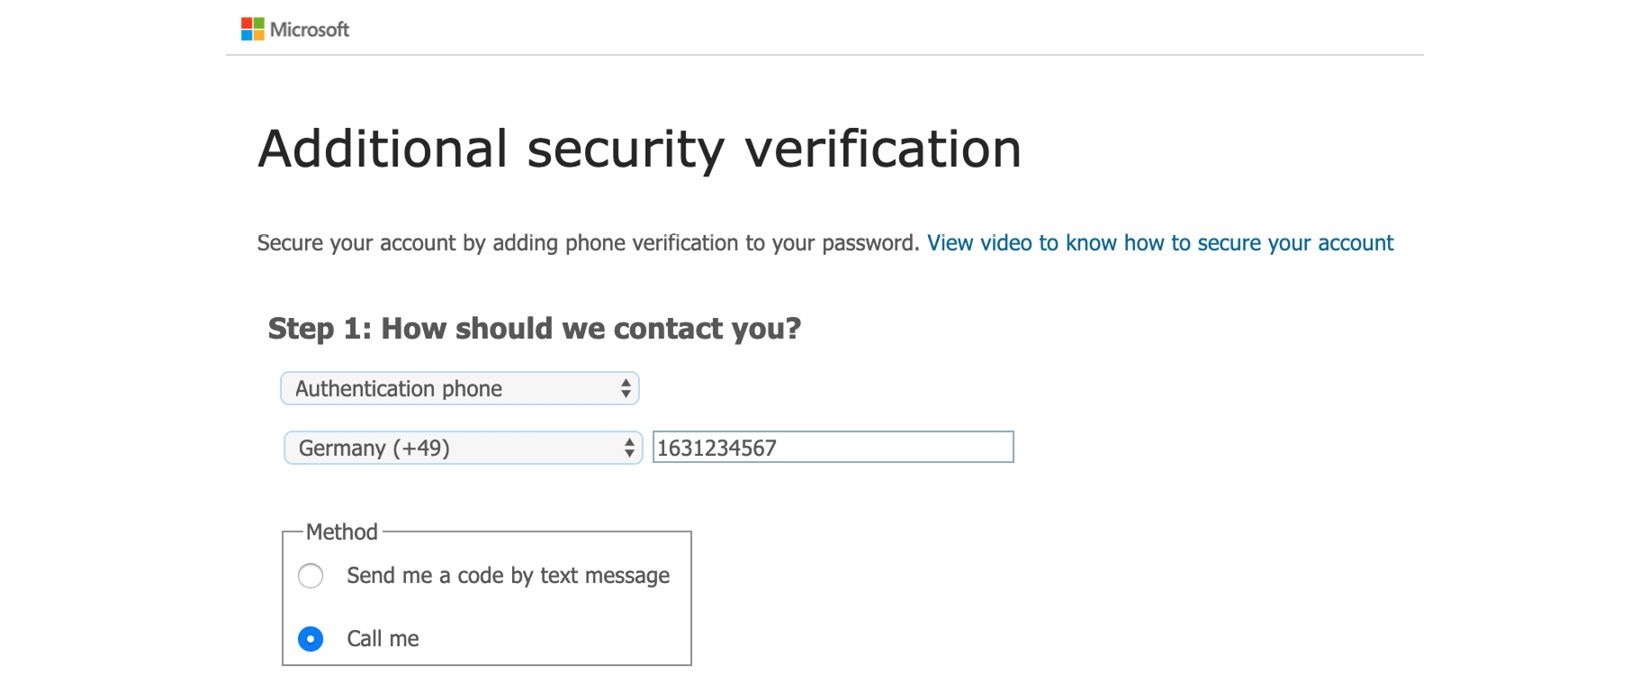
Figure. 3.8 - Authentication phone - individually configure the number and select the contact method
The third option is for John to use the Microsoft Authenticator app, which is available for all major smartphone operating systems in their respective app store. Here, again, he has two options to select from: either being informed by a push notification or using the verification code from the app, which is an OTP that changes every 30 seconds.
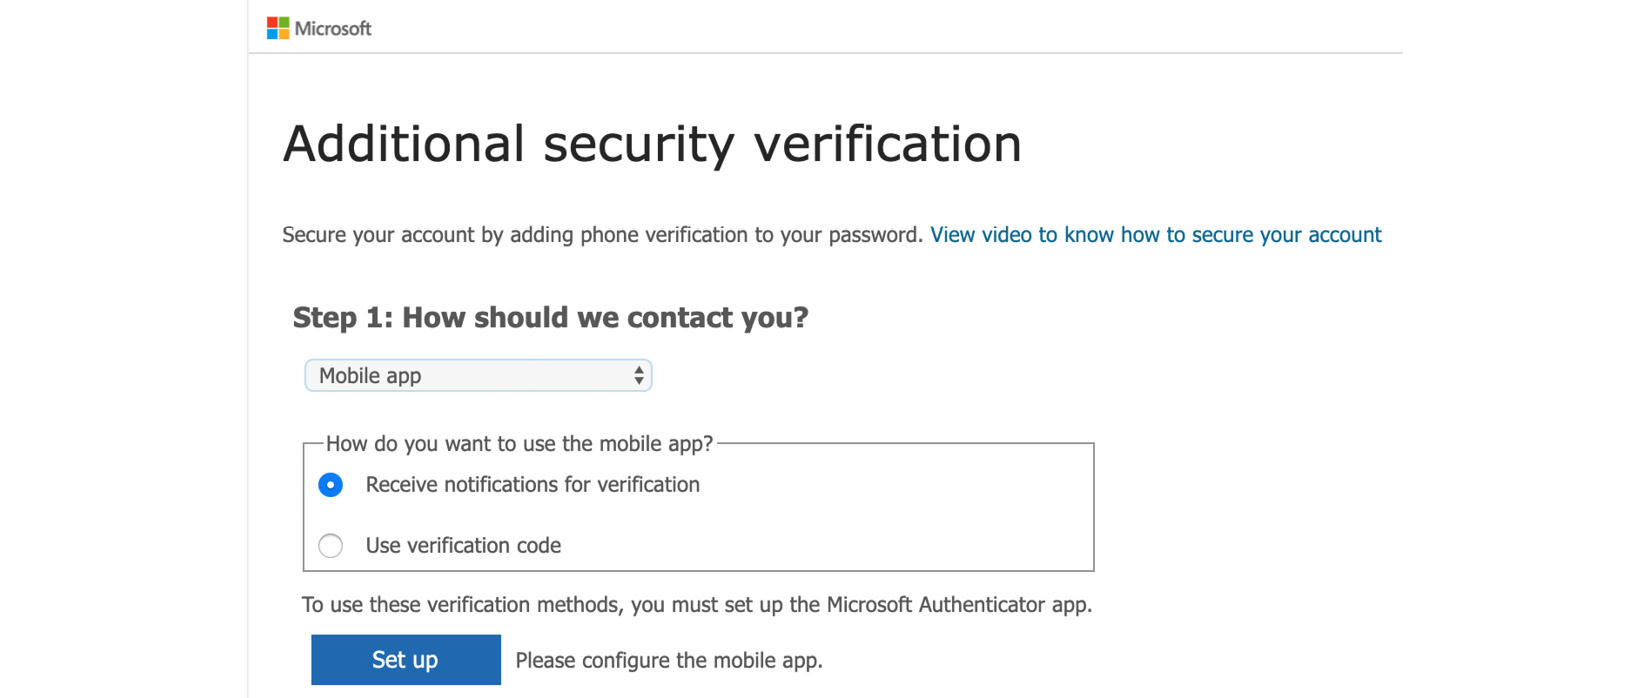
Figure. 3.9 - Mobile app - select the primary MFA verification option
John decides to use the mobile app and so has to click on the Set up button. He has already installed the Microsoft Authenticator app on his smartphone, so he can now easily proceed. A new window opens that shows John a Quick Response (QR) code to scan with the mobile app, as shown in the following screenshot:
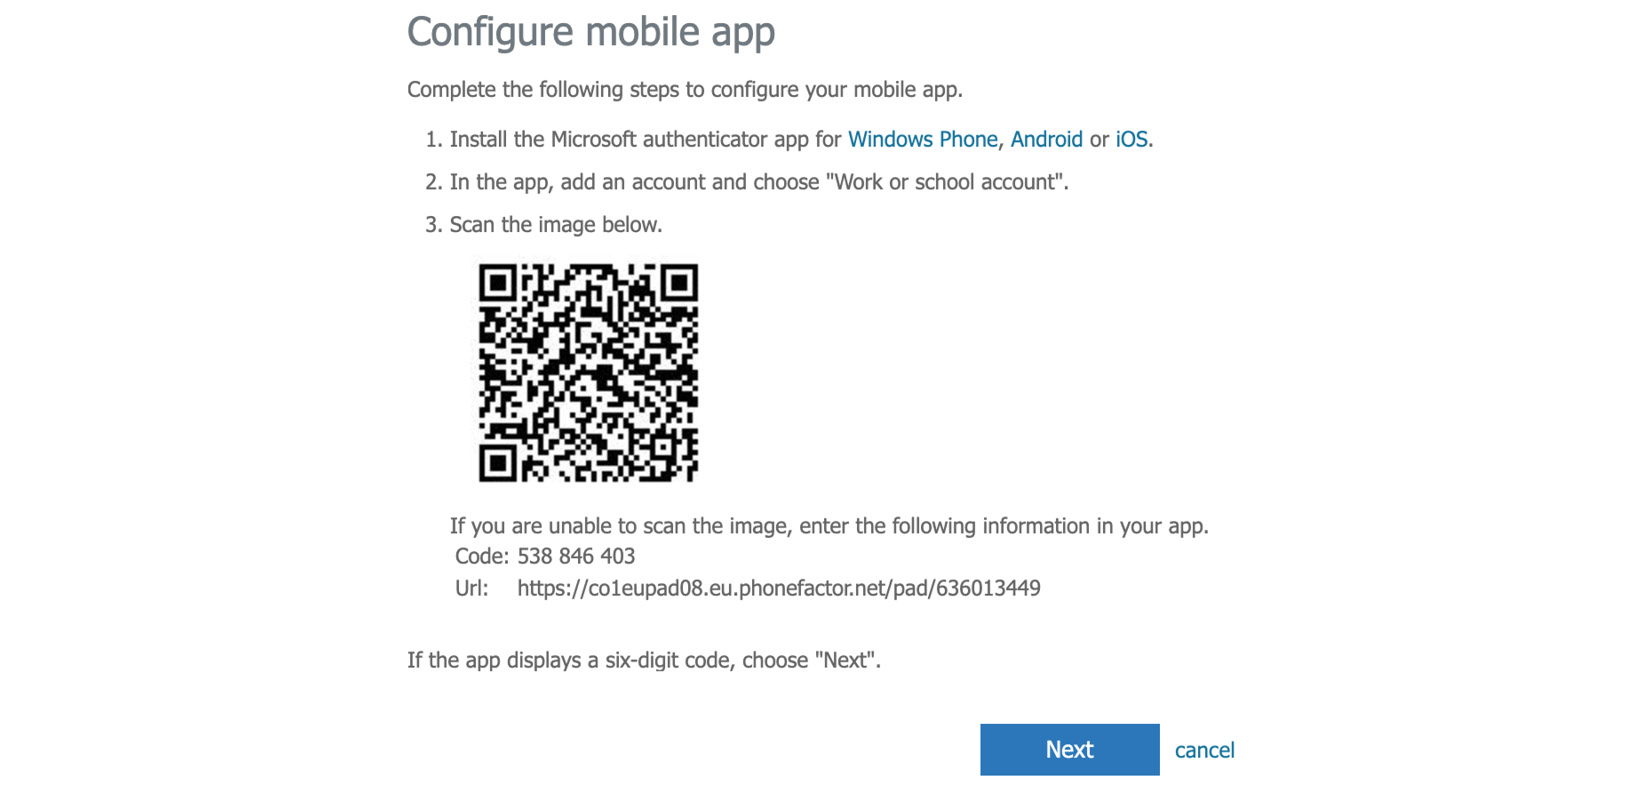
Figure. 3.10 - Mobile app configuration window
In his app, John clicks the + symbol and selects the option to add a new work or school account. With the QR code scanner that opens in the smartphone app, John scans the code from his screen and will immediately find his account added to the app's account list, as shown in the following screenshot:
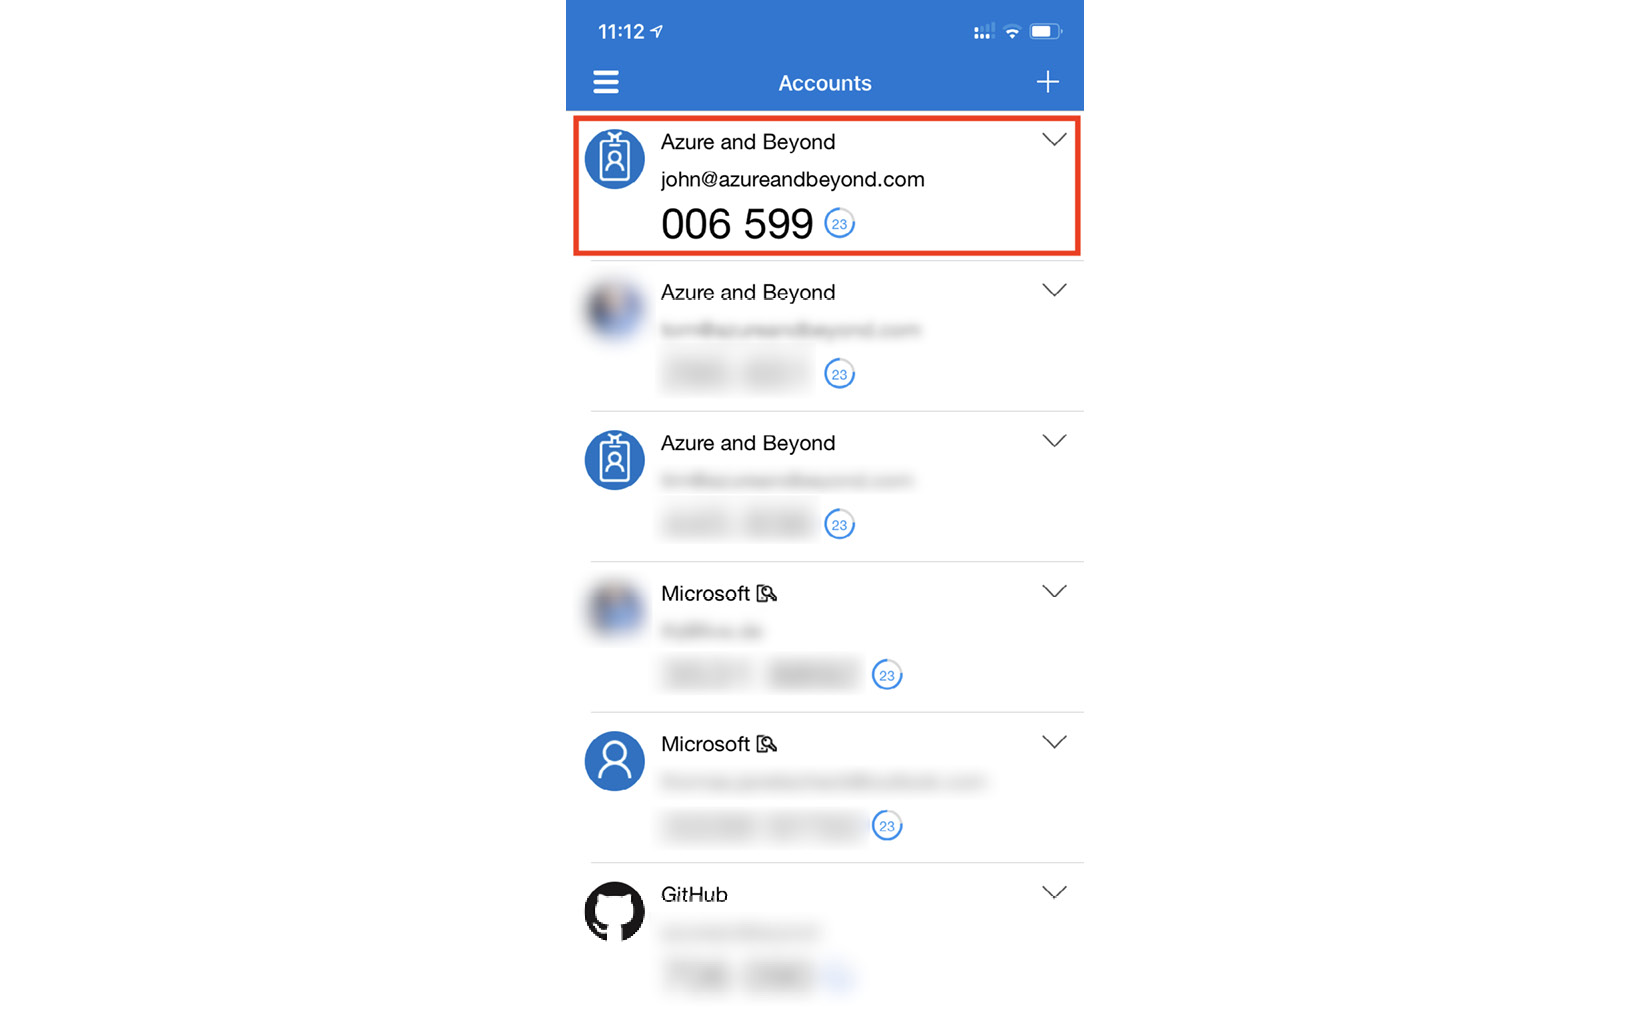
Figure. 3.11 - John's account has been added to the account list in his smartphone app
On his computer, John clicks Next so the app and the backend service are synchronized. The configure mobile app window will disappear again and John is then able to click the Next button. A push notification to the smartphone app is triggered, which can then be approved or declined, as shown in the following screenshot:
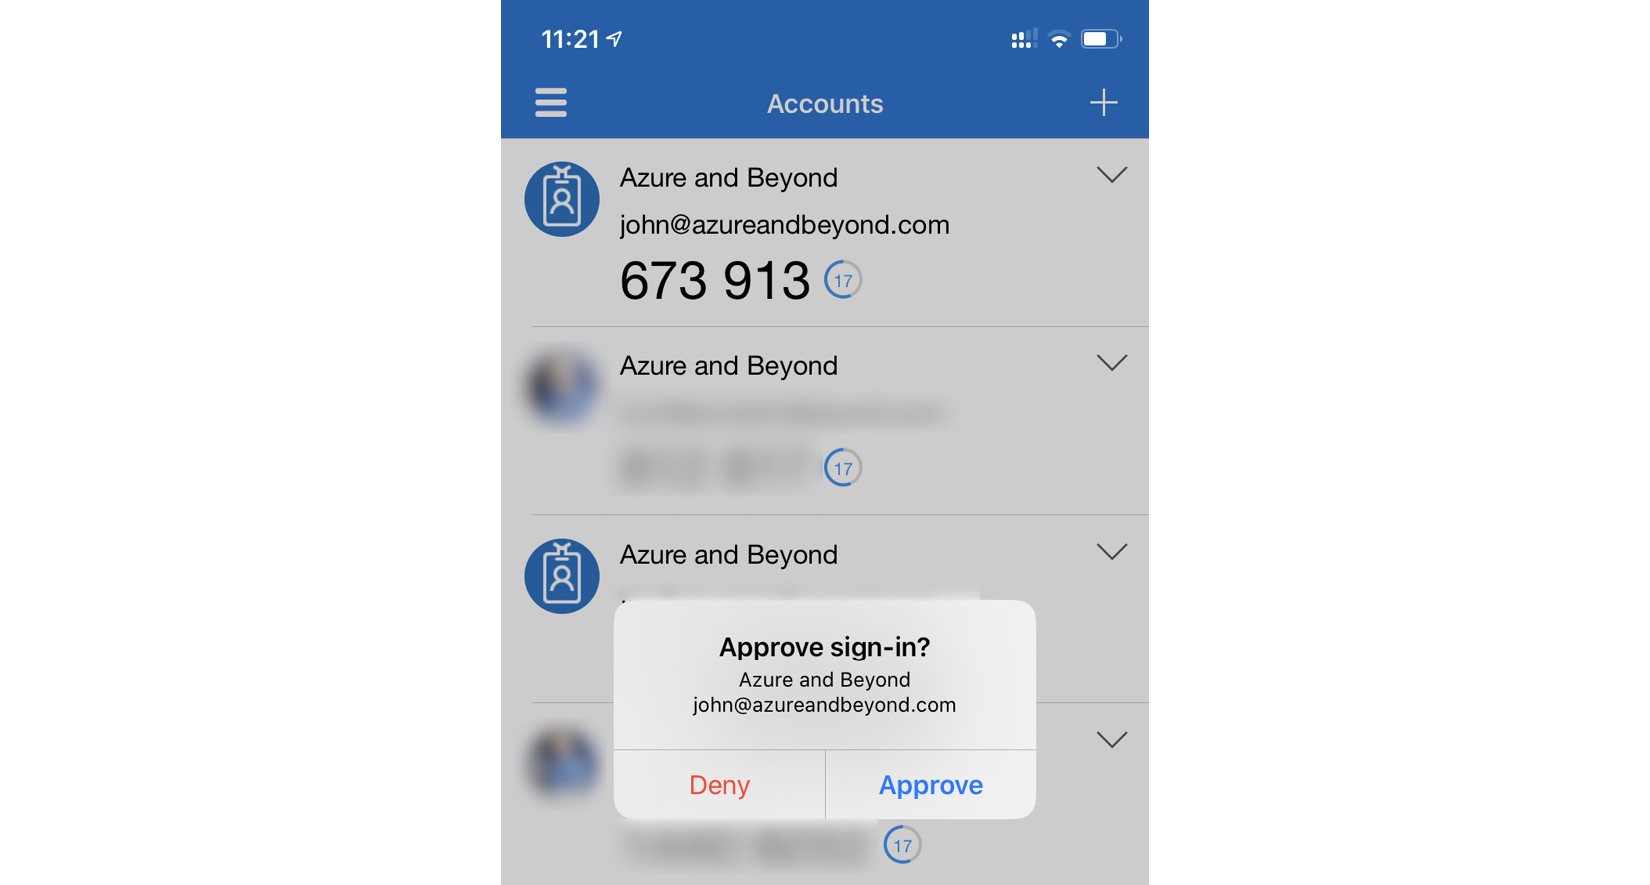
Figure. 3.12 - Push notification in the Microsoft Authenticator app
Next, John is asked to enter his authentication phone number so Microsoft can make sure that John can authenticate logins even when he loses access to the mobile app.
Step 4 then presents John with the app password he needs to use instead of his own user account password. In applications that do not support phone-based MFA today, this password is only shown once, so users need to copy and store it so it can be used when needed. If the app password is not stored safely, users can create new app passwords later, but then again, the respective password is only shown once during creation. After that, the MFA configuration is finished, and John will be logged off. When he logs on again, John will have to accept the MFA challenge.
MFA, in combination with strong passwords, can protect accounts from more than 95% of attacks, and given the fact that Azure MFA can be used free of charge in the default configuration, there is no reason not to enable it.
Now that you know how to configure MFA from an administrator's and a user's perspective, let's move one step further and learn how conditional access can be used to fine-tune the MFA process according to your company's business needs.
Using Conditional Access
MFA, the feature we discussed in the previous section, is the perfect option for better protecting your cloud identities. But it is still kind of an on/off decision. Either you activate a user account for MFA or you don't. Wouldn't it be great to dynamically react to authentication attempts and then decide whether an MFA challenge is needed? With Conditional Access, there is a feature that enables us to define authentication conditions that require more or fewer challenges in the authentication process.
Conditional Access gives customers a broad variety of options to include or exclude in a policy. For example, you could enforce the usage of MFA for specified directory roles, such as Azure AD Global Administrators, and in addition to that, require that the login is performed on a corporate-owned device. Or, you could exclude your "normal" Office 365 workers from being challenged by MFA, but only if they are working from a corporate office. As soon as one of them tries to log in from a train station, mobile device, home office, and so on, an MFA challenge is triggered. You see, there are lots of options, and we'll cover them in this section.
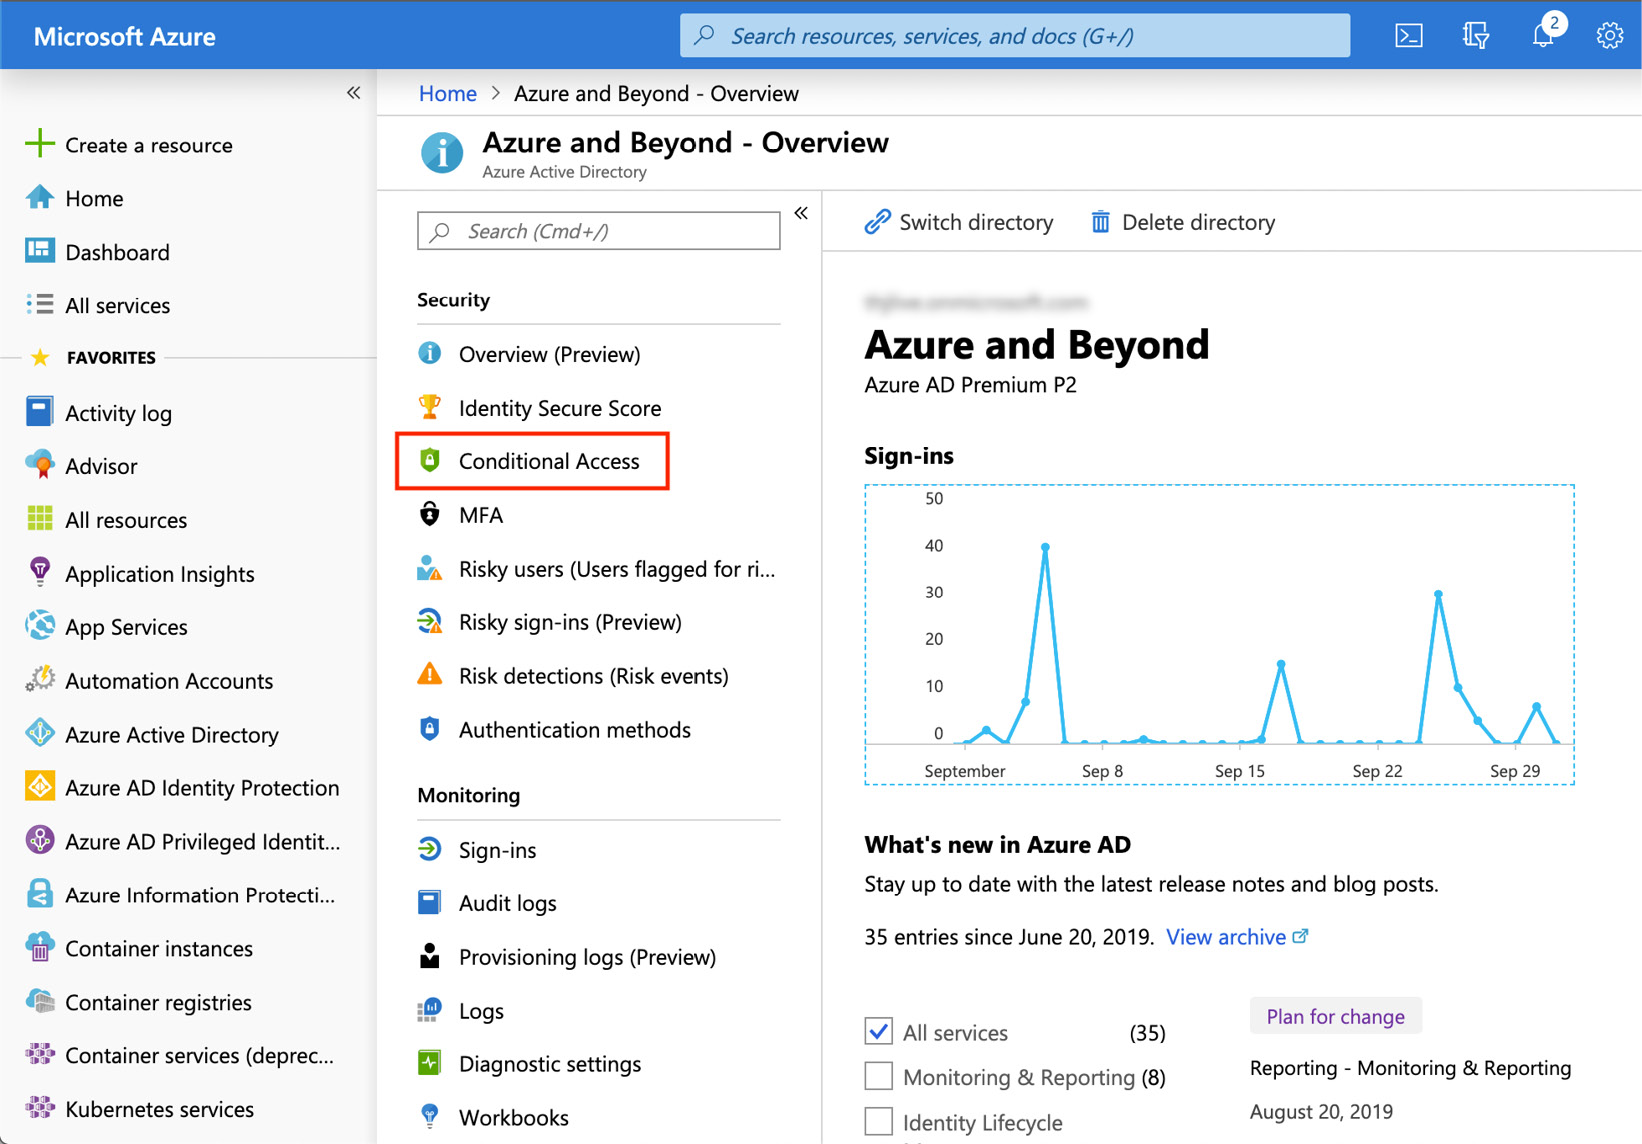
Figure. 3.13 - Conditional Access in Azure AD
You'll find all Conditional Access-related settings in the Azure portal under Azure Active Directory > Conditional Access:
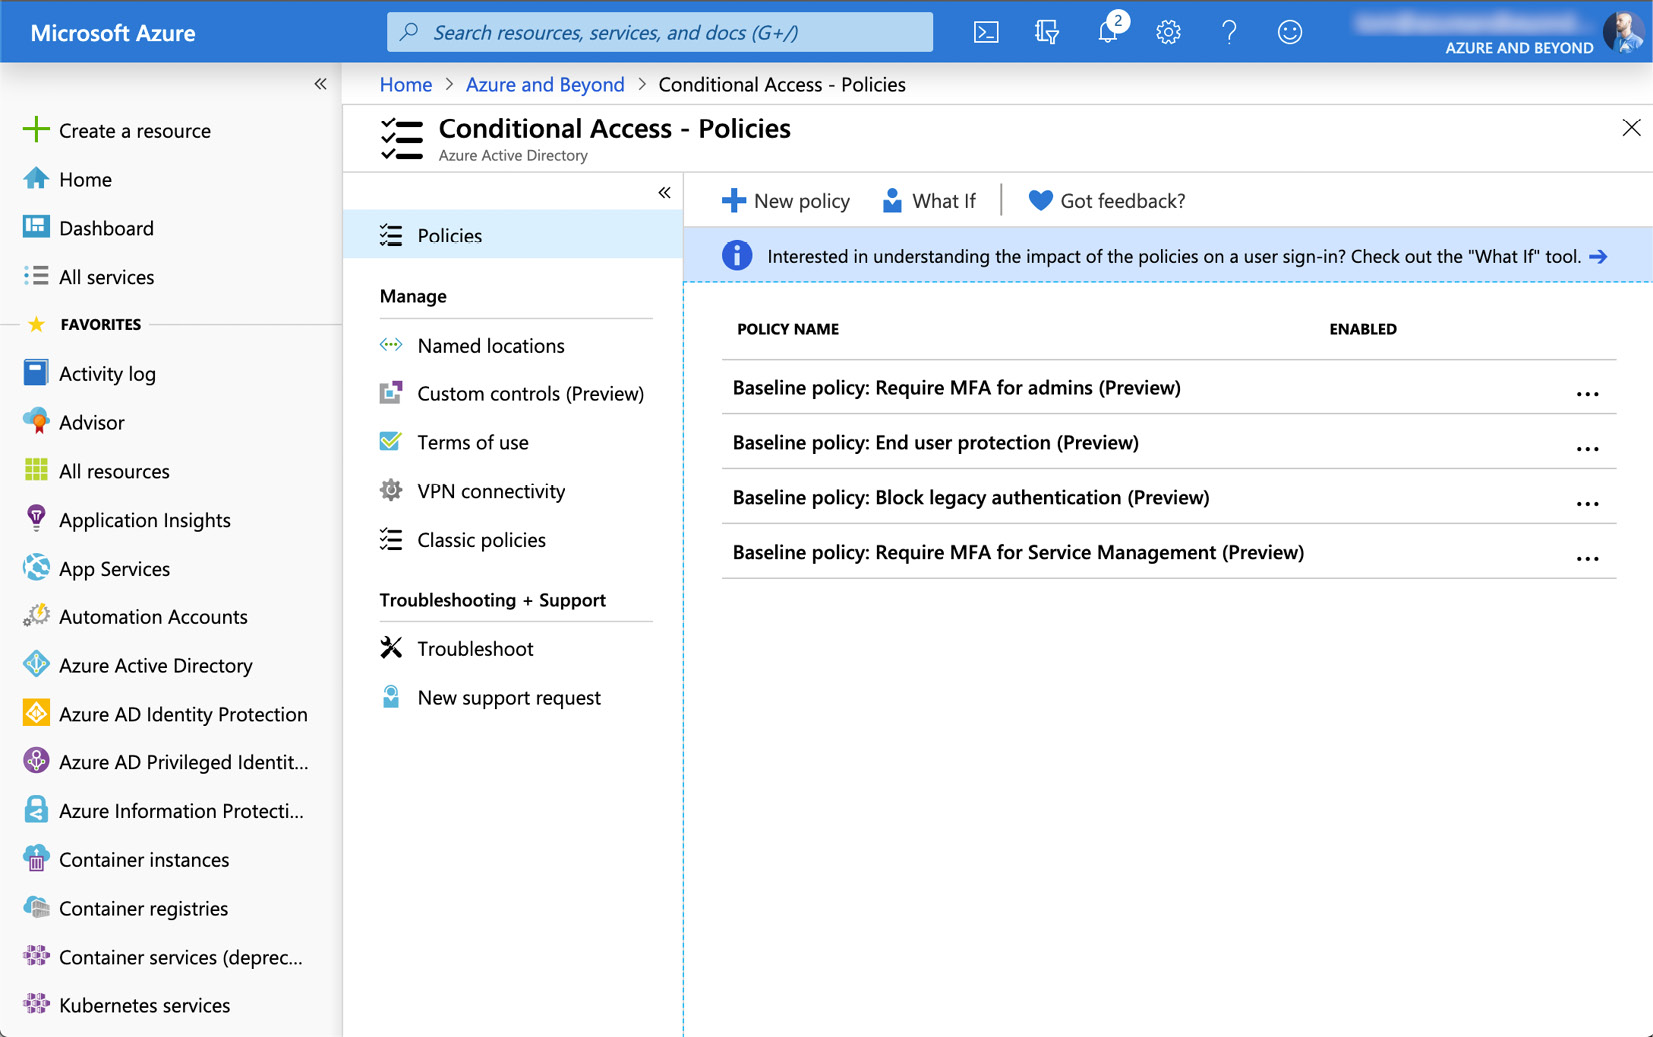
Figure. 3.14 - Conditional Access overview page
The main section that appears now is the Policies section. Conditional Access policies define and enforce the complexity of authentication based on several conditions. Policies can depend on locations from which authentications come, user and sign-in risk, devices, applications, or a combination of all of these. You can use Conditional Access policies to decide when and for whom access to your cloud environment will be allowed or blocked. So, by using Conditional Access policies, you can always make sure to apply the right amount of security enforcements when they are needed to keep your environment secure, and not to challenge your users unnecessarily when not needed.
Before we take a deeper look at how to define all those conditions in a Conditional Access policy, let's first have a look at named locations that can be used within these policies.
Named locations
There is a management area to define custom settings you can use in your Conditional Access policies. The first area to mention is Named locations. For Named locations, there are two different options to click. The first option is Configure MFA trusted IPs, which will redirect you to the Services settings in the legacy portal you already know from the previous section. You can use this option to define IP address ranges that should always be excluded from MFA challenges.
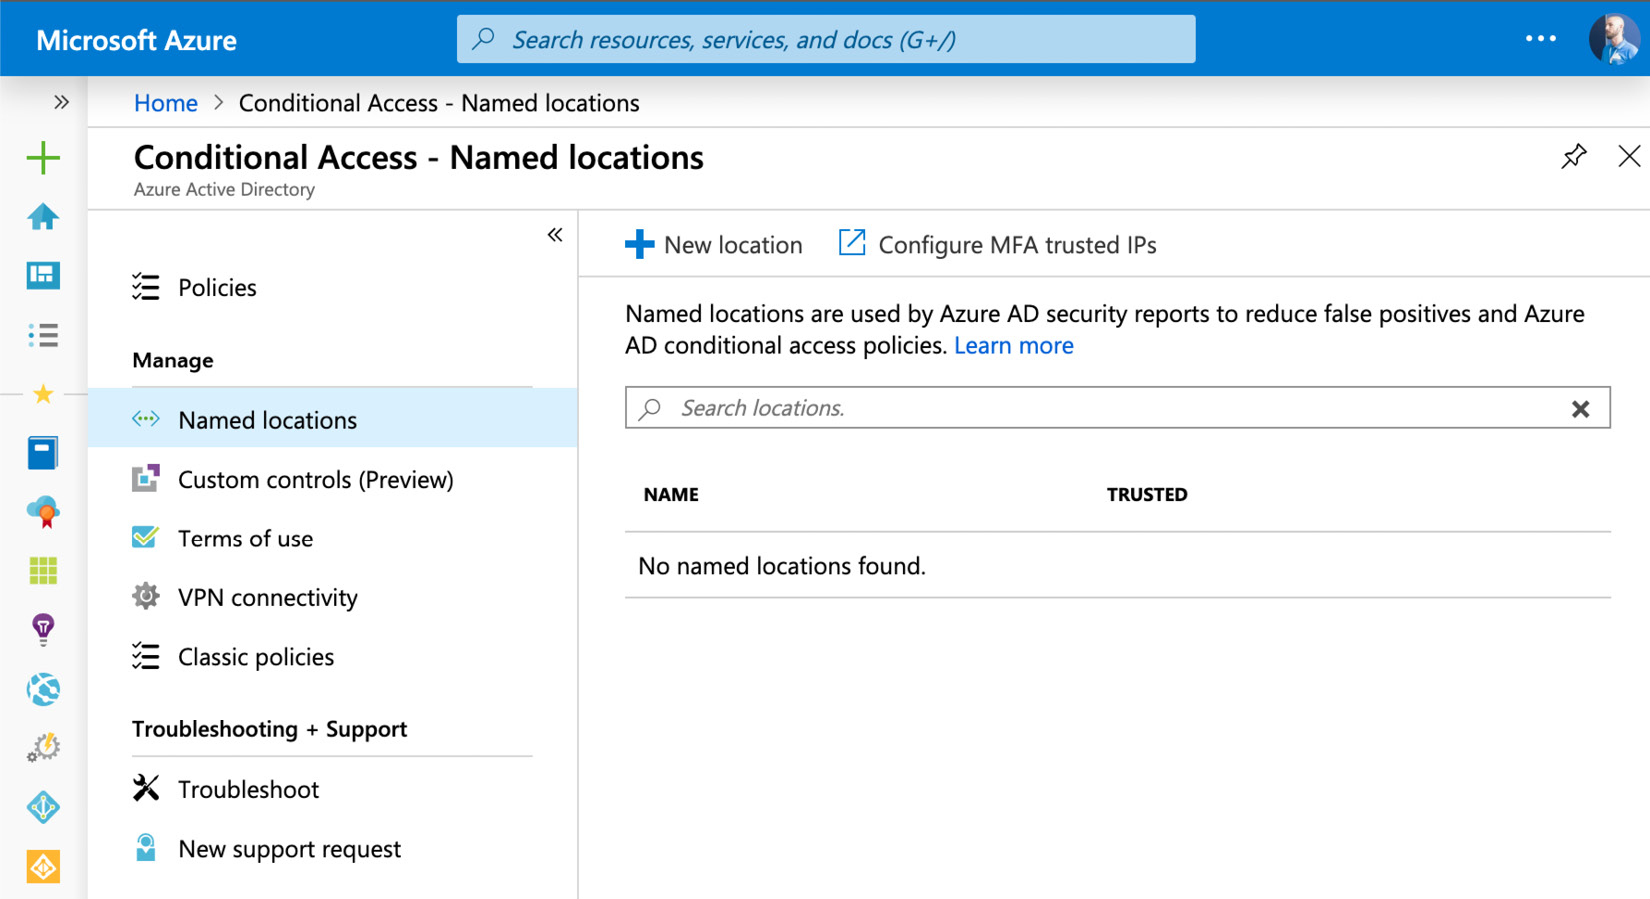
Figure. 3.15 - Conditional access - named locations
The second option is + New location, with which you can define IP ranges, and even countries and geographical regions, to use them for custom Conditional Access policies. If you select Mark as trusted location for an IP range, a user's sign-in risk is lowered when an authentication request comes from there.
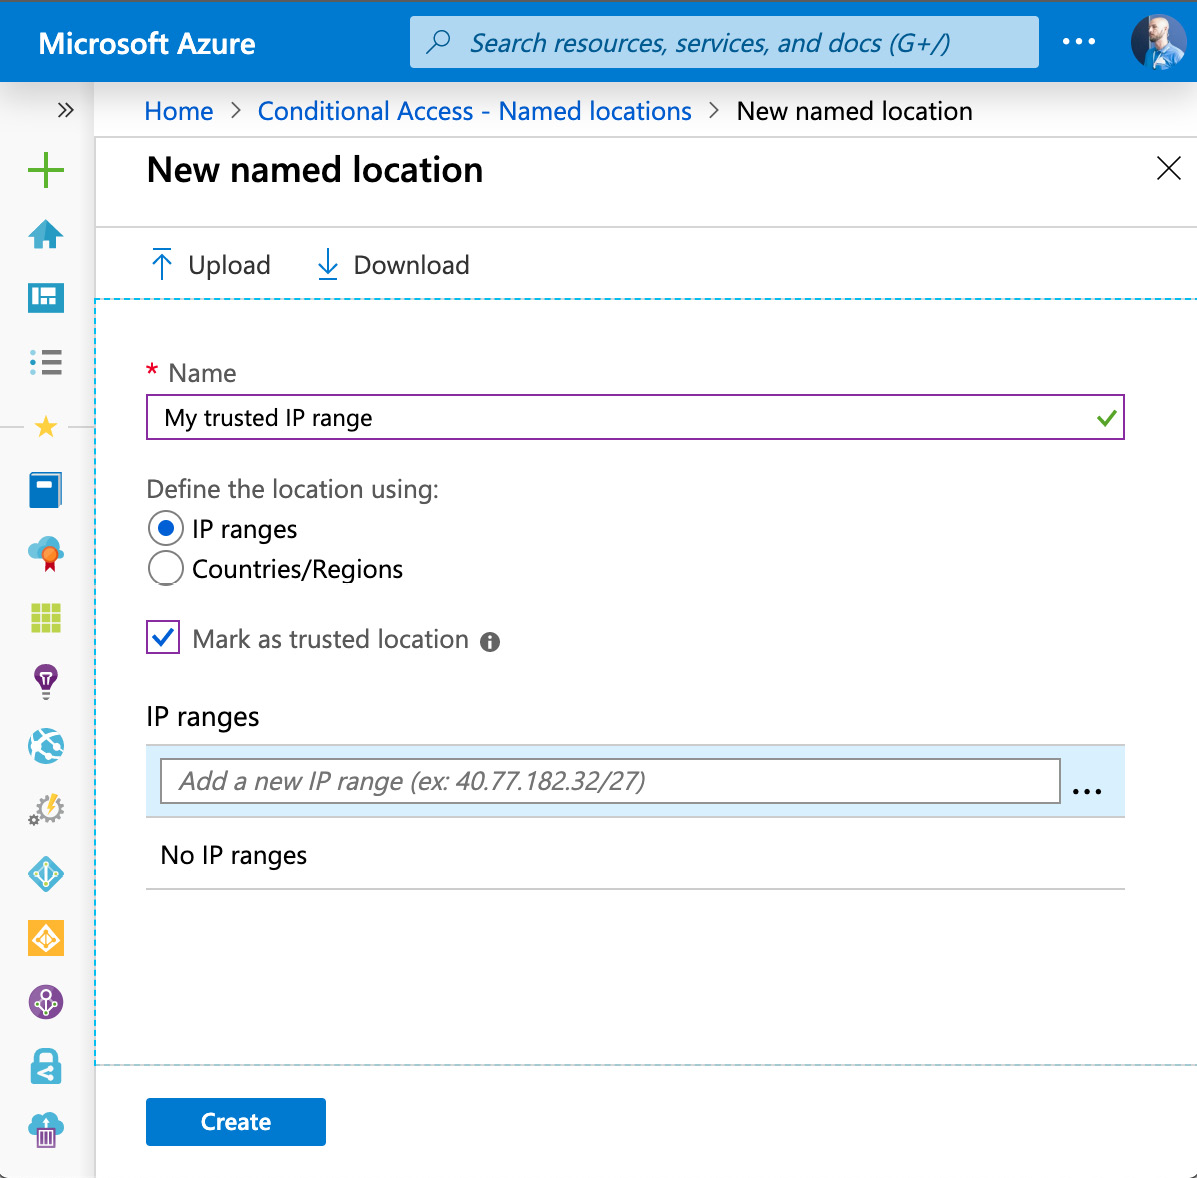
Figure. 3.16 - Creating a trusted named location
Sign-in risks are important for Azure AD Identity Protection, the feature we look into in the Introducing Azure AD Identity Protection section.
Custom controls
With custom controls, you can redirect your users during the authentication process to an external compatible service to satisfy further authentication requirements outside of Azure AD. The user's browser window is redirected to a third-party service, where the user needs to perform any further authentication requirements before being granted access to their cloud resources. Custom controls depend on the third-party application. For example, you could integrate a third-party MFA provider into your authentication workflow instead of relying on the Azure AD MFA service.
Terms of use
You can define custom terms of use that need to be accepted before users are allowed to access certain cloud applications. For example, you could allow users to use their own devices to access your environment, but only if they accept your terms of use.
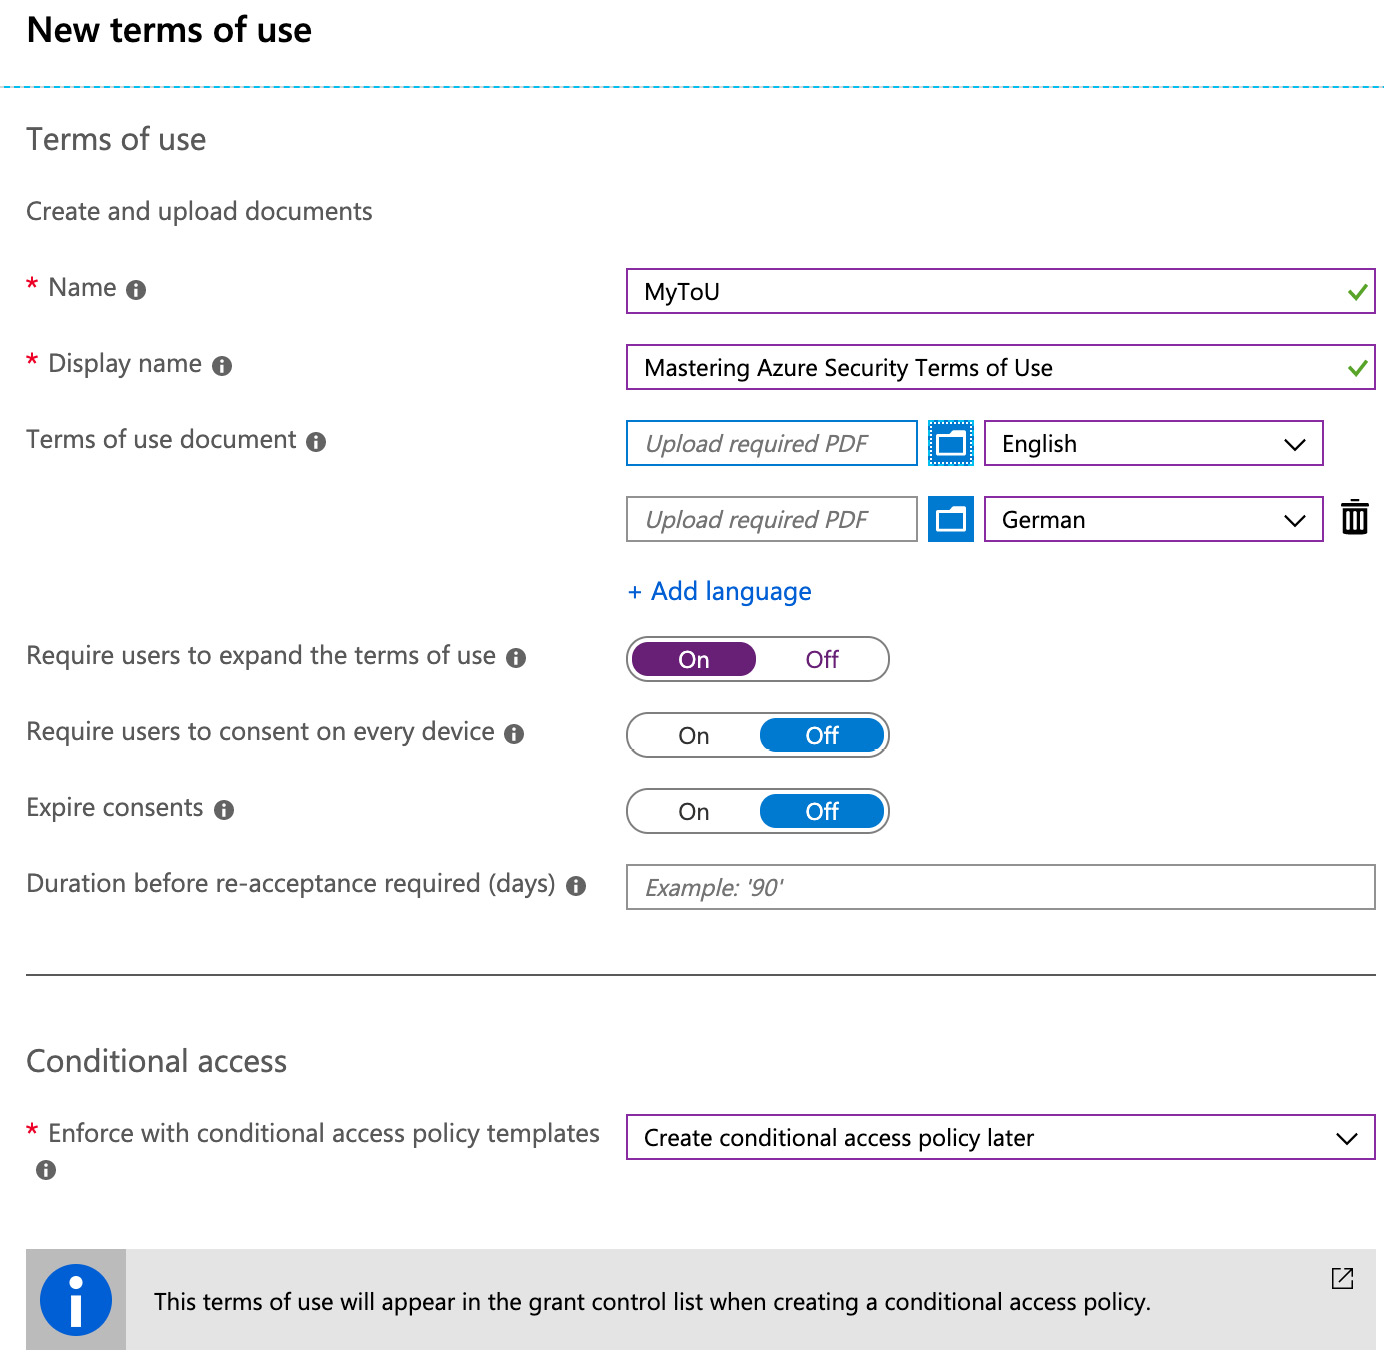
Figure. 3.17 - Terms of use
To configure your custom terms of use, you need to upload one PDF for every language you want to create them for. After saving, the terms of use will appear in the grant control list when creating a new Conditional Access policy.
Conditional Access policies
As mentioned before, Conditional Access policies help you to always apply the right amount of security for every authentication situation, without unnecessarily blocking or challenging your users when not needed. They can be seen as is, then.
Conditional Access policies consist of assignments and access controls. Assignments define who will be impacted by this Conditional Access policy and in which situation. Access controls define whether access is blocked or granted, and if it's granted, on which conditions.
Assignments
In the Assignments section, you can select users and groups, cloud apps or user actions, and conditions to include or exclude in a Conditional Access policy, as shown in the following screenshot:
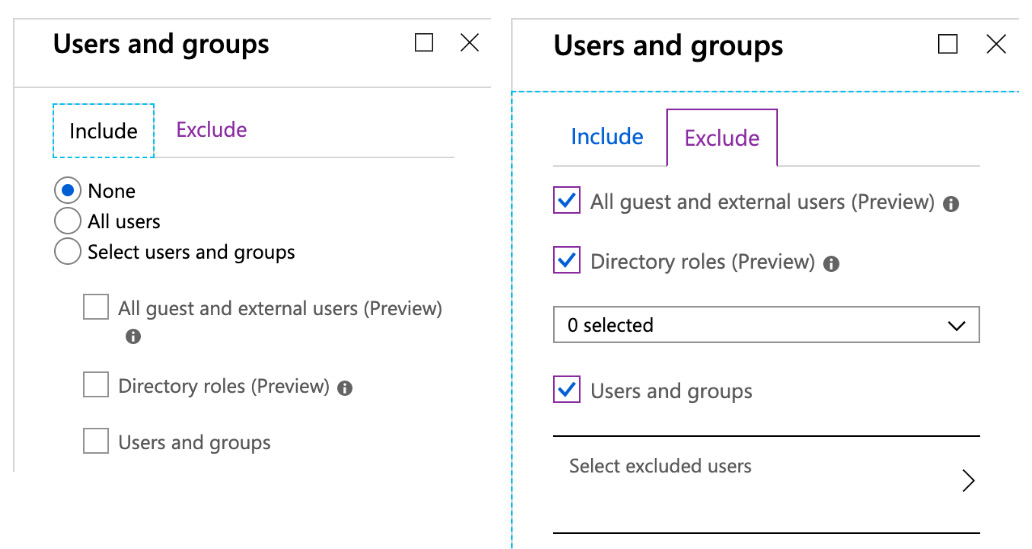
Figure. 3.18 - Users and groups - select which users and groups are to be included or excluded in a Conditional Access policy
You can choose to Include or Exclude None, All users, or a defined subset of users and groups in a Conditional Access policy. You can also select to exclude all guest and external users, directory roles (such as Global Administrators), or a defined subset of users and groups in your Conditional Access policy.
Important Note
When selecting all users and then blocking access with this policy, this will also affect all your administrator accounts. That said, you could lock yourself out when activating this policy. It is recommended to apply a policy to a small set of users first to make sure it behaves as expected!
You can also Include or Exclude cloud applications or user actions in the Conditional Access policy. Again, you can select None, All apps, or selected apps to be included, or define selected apps to be exempted from the policy.
Important Note
When selecting all cloud apps to be included in your policy, this will also affect the Azure portal. Make sure not to lock yourself out by only activating the policy to a small set of users first, so you can make sure that it behaves as expected!
In the User actions section, you can select whether this policy affects the registration of security information for your users. That means that the policy is active for users when proceeding through the MFA registration process.
Conditions to be included in your assignments are sign-in risk, device platforms, locations, client apps, and device state. Sign-in risk is calculated by Azure AD Identity Protection. You can select the sign-in risk level this policy will apply to from No risk/Low/Medium/High. Device platforms can be included or excluded. You can select to include any device platform in your policy, or to include or exclude one or several of the following:
- Android
- iOS
- Windows Phone
- Windows
- macOS
You can include any location or select to include or exclude all trusted locations, or selected locations you have already defined in one of the preceding steps.
Client apps to include can either be a browser, or mobile apps and desktop clients, including modern authentication clients, Exchange ActiveSync clients, or other clients (older office clients or other mail protocols).
You can either include all device states in a policy, or exclude devices that are hybrid Azure AD joined or marked as compliant in Intune.
Access controls
In the Access controls section, you define whether you want to block or grant access to your environment depending on the selection you made before. If you want to grant access, you can either grant it without any condition or you can require one or all of the following controls to be enforced:
- Require multi-factor authentication: When the conditions you defined in the policy are met, user access is granted when the user responds to the MFA challenge.
- Require device to be marked as compliant: In Intune, you can define device compliance policies. For example, you can mark a device as compliant only when it is corporate owned and currently patched.
- Require hybrid Azure AD joined device: Devices that are hybrid Azure AD joined are owned by an organization. They exist in the cloud and on-premises, which means that they are joined to both Windows Server AD and Azure AD.
- Require approved client app: Access is only granted if one of the approved client apps is used to access corporate information. Today, an approved client app can be one out of more than 25 apps related to Microsoft 365, including, but not limited to, Microsoft Azure Information Protection, Microsoft Excel, Microsoft Edge, Microsoft Intune Managed Browser, Microsoft Teams, and Microsoft Outlook.
- Require app protection policy: You can use Intune to define an app protection policy for Microsoft Cortana, Microsoft Outlook, Microsoft OneDrive, and Microsoft Planner. With this setting, you can enforce that an app protection policy is present before granting access to corporate information, as illustrated in the following screenshot:
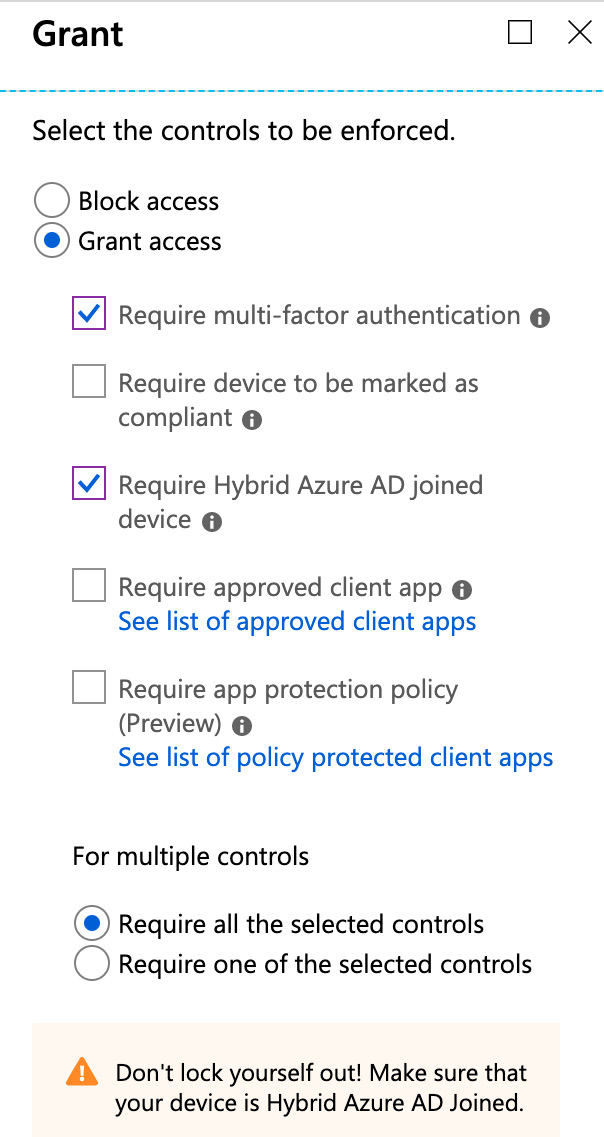
Figure. 3.19 - Conditions for granting access using Conditional Access
Now that you know how to configure Conditional Access policies in theory, let's go a step further and try to define settings for some behaviors.
For example, you could create a policy that blocks access for all devices that are not hybrid Azure AD joined. However, this policy should not affect users that are members of a particular group of administrators. A policy that would fit your needs could include the following:
- Include all users and exclude the particular group of administrators.
- Exclude devices that are hybrid Azure AD joined.
- Block access.
You might also want to enforce MFA when authentication attempts are not coming from a trusted location or if users are not using corporate-owned devices. This policy would:
- Include all users.
- Include all locations and exclude all trusted locations.
- Grant access and require MFA.
Important Note
It is best practice not to include all users without exception in your Conditional Access policies. This is because you would risk locking yourself out of your cloud environment.
Your organization might enforce your users to proceed through the MFA enrollment from their office. That way, your organization can make sure that even if a user's credentials have been leaked, an attacker would need to be within your network perimeter to configure MFA. A Conditional Access policy to enforce that might be configured like this:
- Include all users and exclude privileged roles or a particular user group containing administrative accounts.
- Activate the Register security information user action.
- Include a selected location that defines your office location.
- Block access.
With Conditional Access, you can granularly define when and how access to your cloud environment is granted or declined. During the course of this topic, we have already touched on Azure AD Identity Protection. Now, let's move on to the next section, in which you will learn what Azure AD Identity Protection actually is and how you can use it.
Introducing Azure AD Identity Protection
As already mentioned, an important goal in terms of security is to make attack attempts as expensive as possible for an attacker. That said, it is important to raise the bar and have several complementing technologies in place that add extra value to your security posture. On the other hand, you want to make sure not to block legitimate user authentications so you do not negatively affect your users' login experience. Microsoft has been protecting cloud identities for more than 10 years now, and with Azure AD Identity Protection, they let you protect identities using their protection systems.
Stealing the credentials of user accounts, even if they are not highly privileged, has always been a good way of gaining access to corporate resources. Over the years, attackers have learned to leverage third-party breaches or highly sophisticated phishing attacks to get hold of corporate credentials. Even if attackers gain access to low-privileged user accounts, as soon as they do, it is relatively easy for them to elevate their level of privilege or gain access to important corporate resources through lateral movement.
So, what we need to do is the following:
- Protect all identities at all levels of privilege
- Prevent compromised identities from accessing corporate resources
Now, the second step is the more difficult one because you first need to find out whether an identity is compromised. This is when Azure AD Identity Protection comes into play.
Azure AD Identity Protection at a glance
Adaptive machine learning algorithms and heuristics are what Azure AD utilizes when determining anomalies and suspicious behavior during the authentication of user accounts. With this data, Azure AD Identity Protection can generate reports and alerts that enable customers to evaluate recent logons. Furthermore, Azure AD Identity Protection can calculate user and sign-in risk levels that can be used in risk-based Conditional Access policies. For example, you can decide to enforce the usage of MFA when a login attempt's risk level is calculated as medium or above, or to block a sign-in attempt based on the risk calculation.
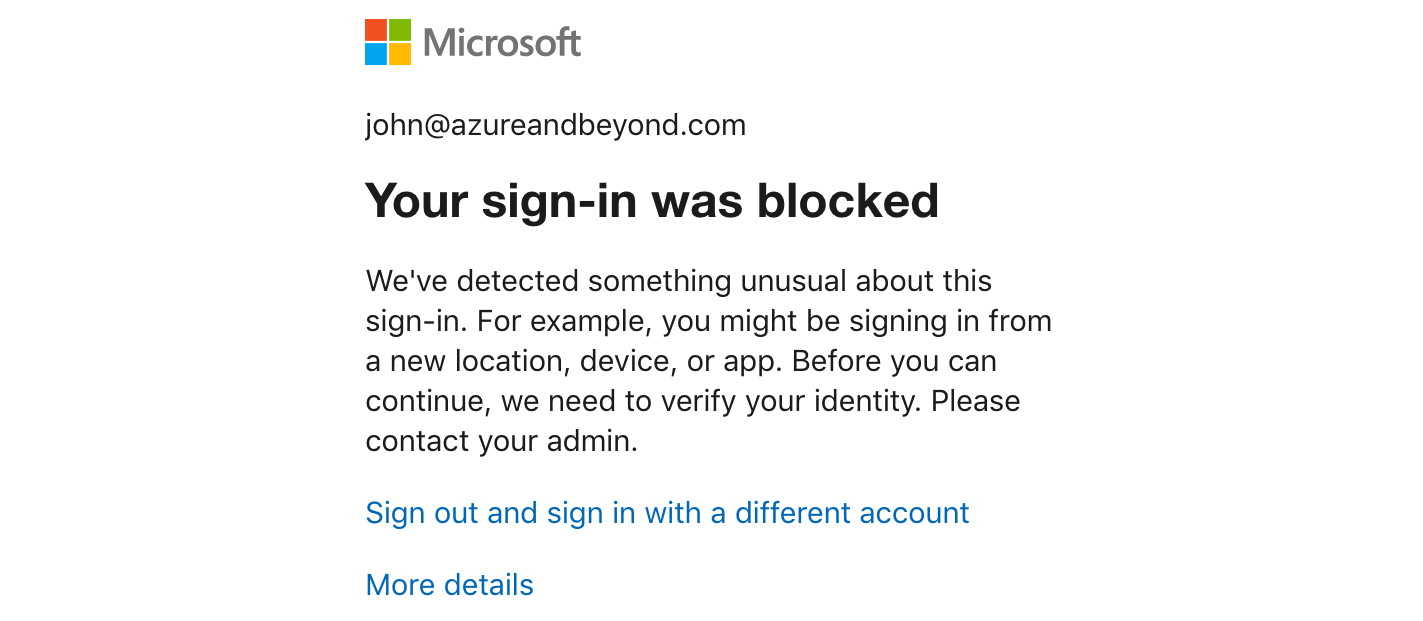
Figure. 3.20 - A sign-in was blocked by Azure AD Identity Protection
In the preceding screenshot, you see that a sign-in was blocked because the user's identity could not be verified. This is because John did not have MFA configured before this suspicious sign-in activity was detected. Of course, the person trying to log on and being blocked now is not able to configure MFA at this stage because that would enable attackers to configure the service according to their needs.
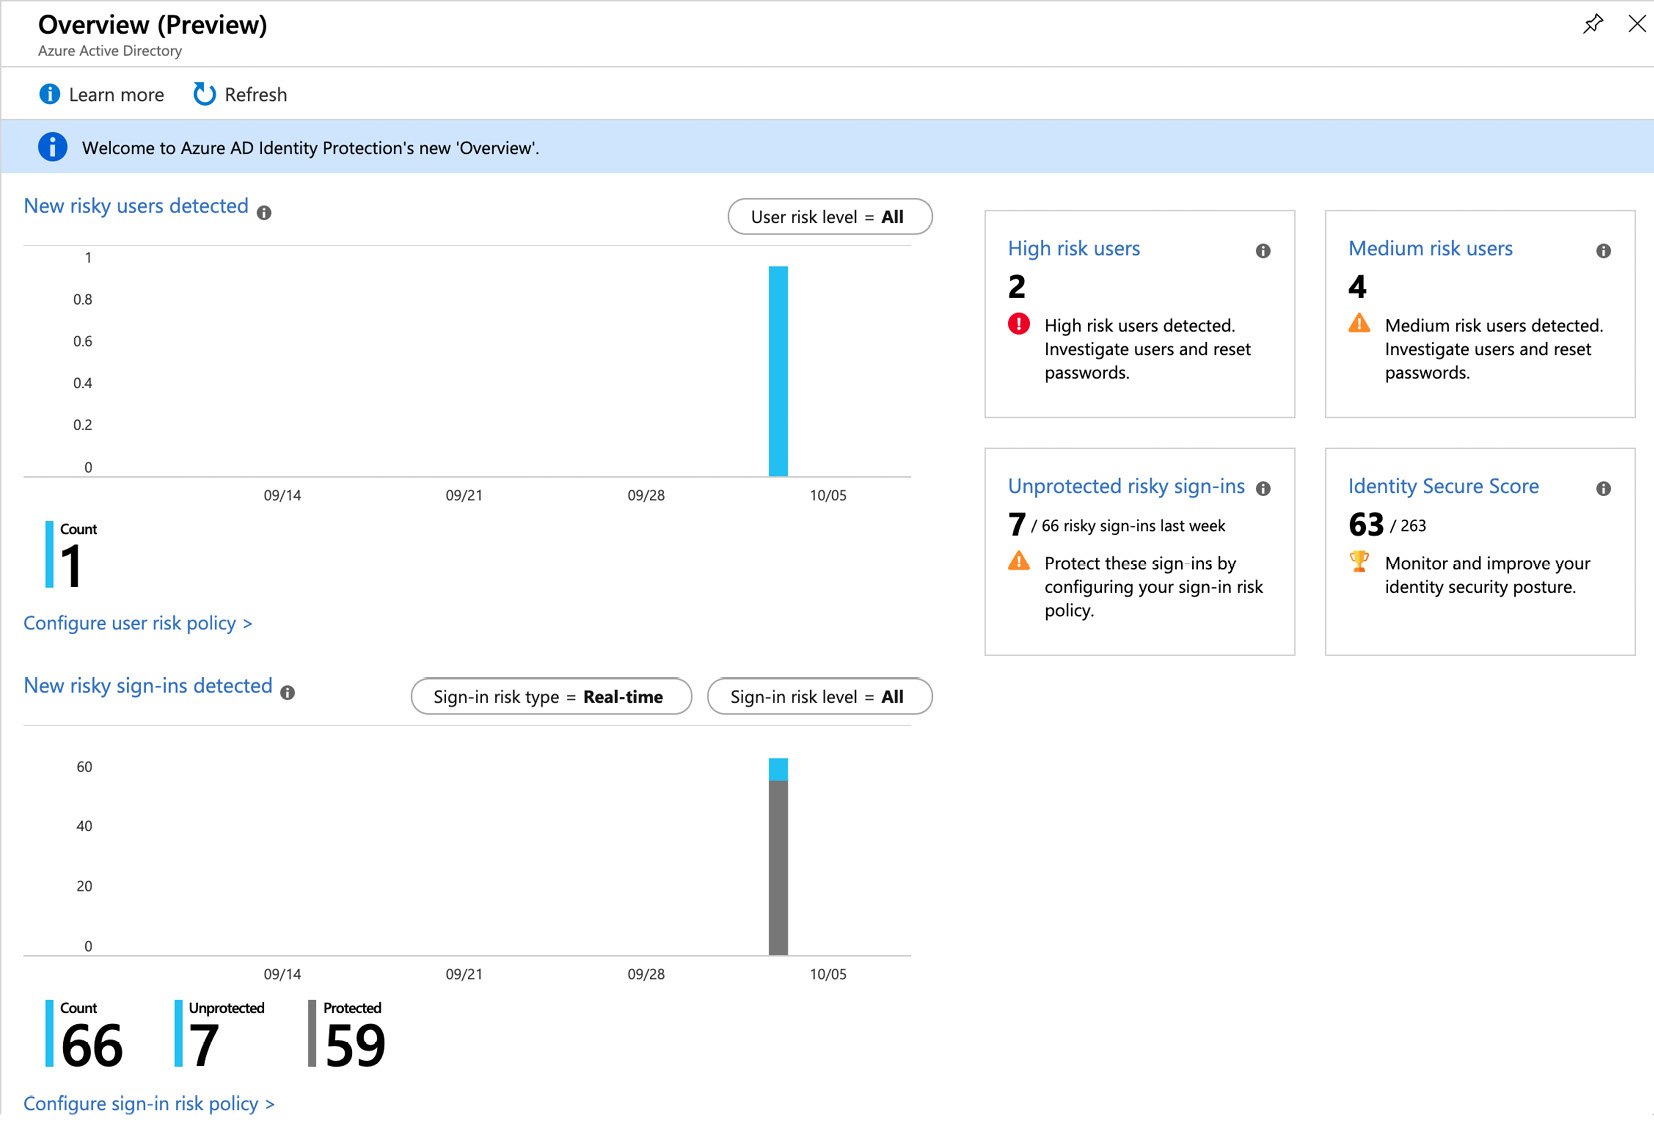
Figure. 3.21 - Azure AD Identity Protection Overview dashboard
Azure AD uses several types of risk detection in realtime (5-10 minutes) and offline (2-4 hours). As soon as there has been a risk detection related to an account sign-in, this detection is added to a logical concept called risky sign-ins. A risky sign-in indicates a sign-in attempt that might have been performed by an attacker and not the legitimate account owner. Based on those detections, the probability that the sign-in has been performed by a bad actor is calculated and is reflected in the sign-in risk level. You can use the sign-in risk level (Low, Medium, High) to define a sign-in risk policy. The sign-in risk policy is an automated response depending on the specified sign-in risk level that is used to either block access to your resources or to require a user to pass an MFA challenge before being granted access to your corporate environment.
Besides the sign-in risk, Azure AD also detects the probability that a user account has been compromised. This behavior is called user risk detection. All risk detections that have been detected for a user and that have not been resolved are known as active risk detections. All active risk detections that are associated with a user define the user risk. Based on the user risk, Azure AD calculates the probability (Low, Medium, High) that the user account has been compromised. This probability is known as the user risk level. For example, if a risky sign-in is detected and the MFA challenge is passed, there is no active risk detection for this user. Thus, in this case, the user risk level will stay low. You can define a user risk policy as an automated response for a specific user risk level. With this policy, you can either block access to corporate resources or enforce a password change to get the user back to a clean state.
Risk detection
In Azure AD, there currently are six different types of risk detection:
- Users with leaked credentials: Leaked credentials occur due to mass credential theft by cybercriminals followed by public posting of these credentials, particularly on the dark web. Microsoft actively monitors such channels and compares the leaked username and password pairings against existing users, and identifies accounts that have leaked credentials.
- Sign-ins from anonymous IP addresses: Anonymous IP addresses are used by people who want to mask their device's real IP address. There can be a number of reasons that lead to the use of such IP addresses, some of them malicious. Microsoft checks incoming sign-ins from IP addresses that have previously been identified as anonymous IP addresses.
- Impossible travel to atypical locations are sign-ins from geographically distant locations. At least one location needs to be an atypical location based on the user's sign-in behavior. For example, the user is on his or her first business trip to the US and logs in from there. In addition to that, the underlying machine learning algorithm considers the time between the sign-ins and the time it would have taken the user to travel from one location to the other. Microsoft tries to ignore obvious false-positives, such as virtual private networks (VPNs) between locations, or locations that have been known as familiar for other user accounts within the same organization. This risk detection type needs 14 days of analyzing user behavior before being able to calculate the risk for a user account.
- Sign-ins from infected devices: This method of risk detection depends on Microsoft keeping track of IP addresses that are known to communicate with bot servers. Microsoft matches all IP addresses connecting to the service against these known rogue IPs to determine whether there are sign-ins from infected devices. This type of risk detection also targets simple attack methods such as password spray attacks.
- Sign-ins from IP addresses with suspicious activity: In this method of detection, Microsoft examines IPs for signs of suspicious activity. The main indicator is when an IP address has a large number of failed sign-ins in a relatively short period of time. This can be an indication of a bad actor who is trying to guess passwords using simple attack methods such as brute-force or password spray attacks.
- Sign-ins from unfamiliar locations: This method of risk detection involves Microsoft maintaining a historical record of the IP addresses used by users regularly. The system detects whether a request is coming from an IP address that has not been used before. The system needs at least 30 days to create a useable history of familiar and unfamiliar locations.
Creating a sign-in risk or user risk policy
Policy creation is the easiest part of Azure AD Conditional Access. In order to create a sign-in risk policy, you just need to navigate to Azure AD Identity Protection -> Sign-in risk policy in the Azure portal. There, you define conditions (Sign-in risk level - Low and above, Medium and above, or High), access controls (block access or challenge the user with MFA), and select for which user or group you want to enable the policy. That's it.
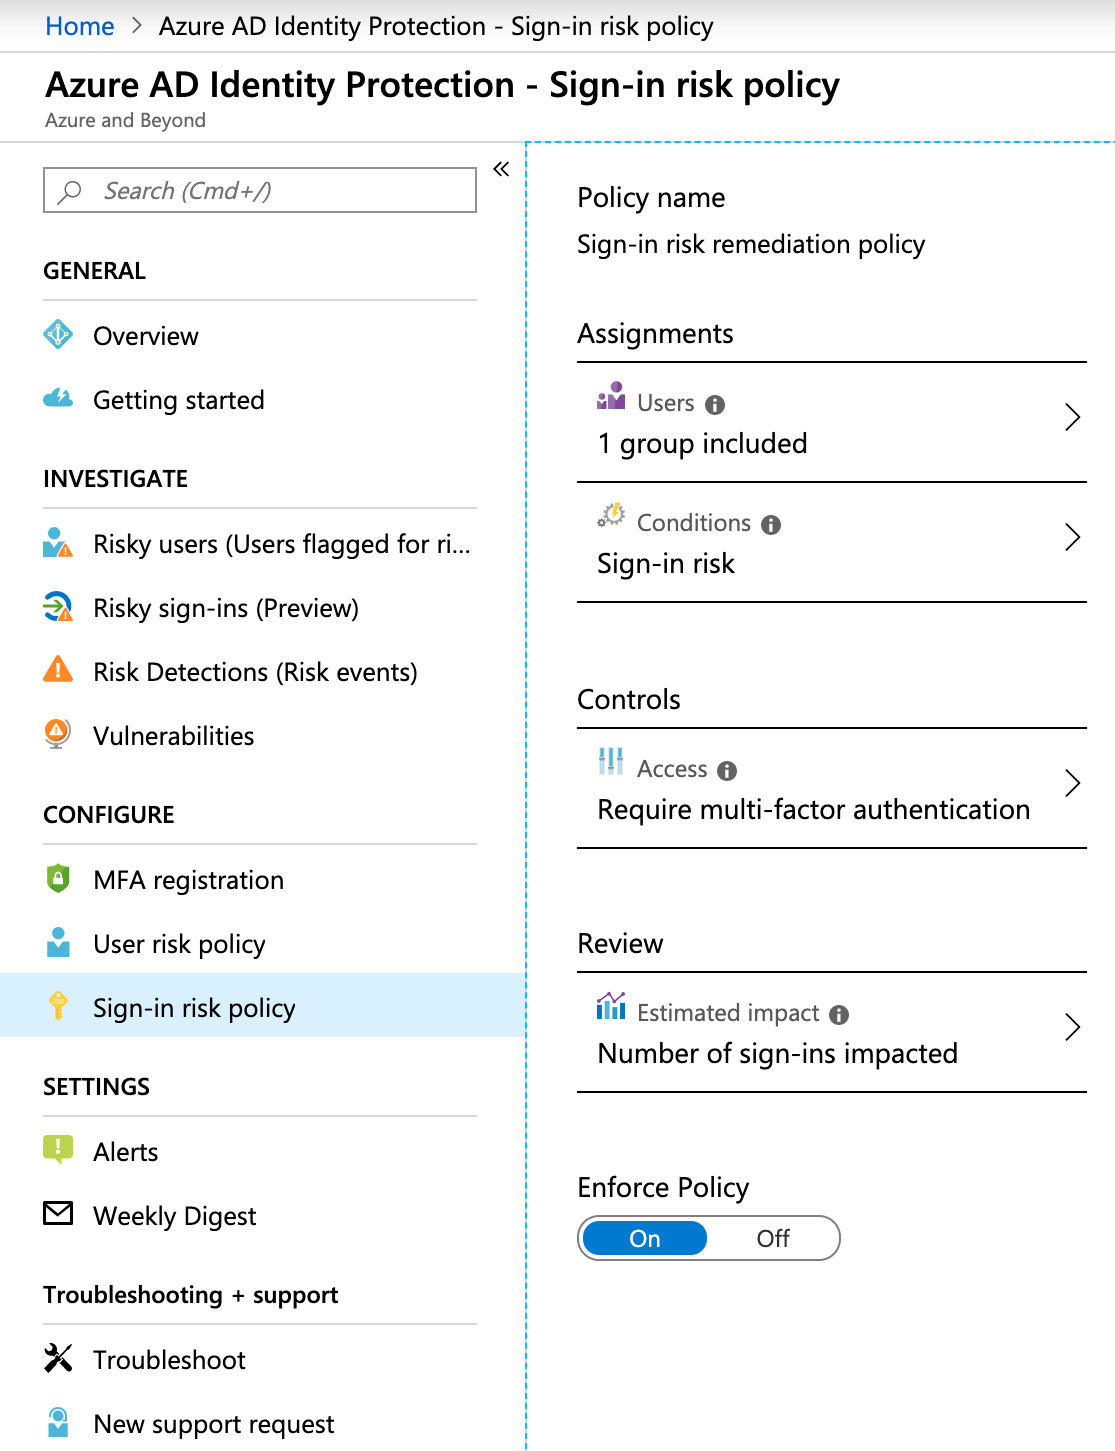
Figure. 3.22 - Creating a sign-in risk policy
For a new user risk policy, you navigate to Azure AD Identity Protection -> User risk policy and define the respective parameters. The difference from a sign-in risk policy is that you can either block access or enforce a password change for a risky user.
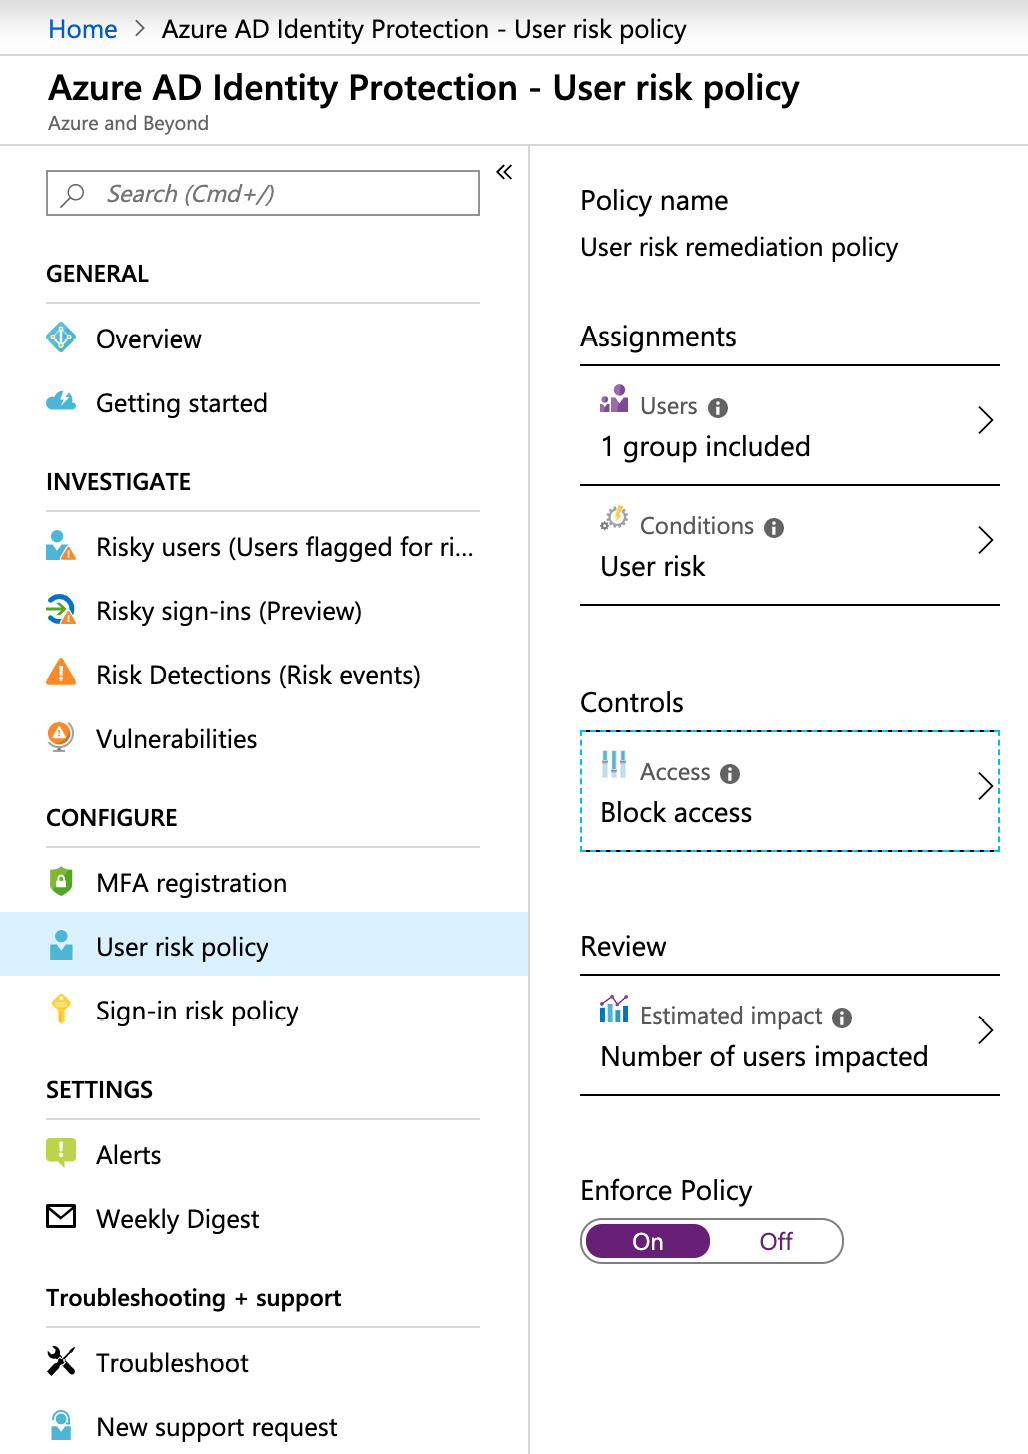
Figure. 3.23 - Creating a user risk policy
Now you know how Azure AD Identity Protection works and how you can use calculated user and sign-in risk levels to protect your accounts. Now, we will move forward and focus on privileged user accounts.
Understanding RBAC
In Chapter 2, Governance and Security, we mentioned security principles such as segregation of duties and the principle of least privilege. With RBAC, we have the technical feature to implement these principles in Azure AD. RBAC is the way to manage access to all Azure resources, but also to Azure AD and Office 365.
As already discussed, Azure offers several levels of scope that can be used to grant access rights to accounts. Furthermore, there are several roles, such as Owner, Azure Sentinel Contributor, or Reader, as can be seen in the following screenshot:
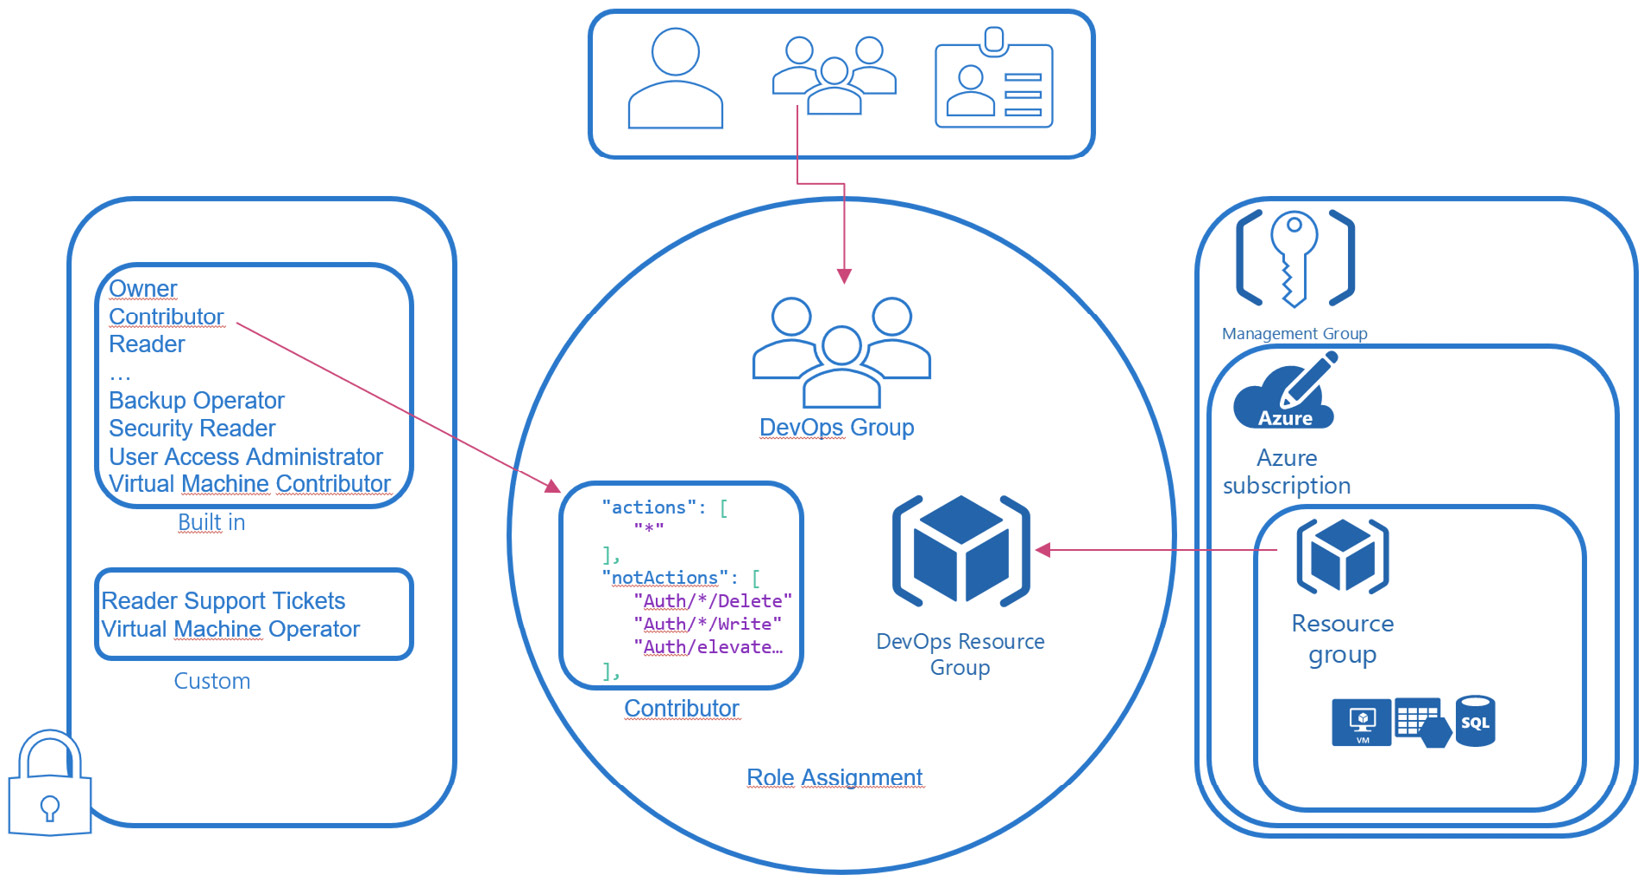
Figure. 3.24 - RBAC role assignment in Microsoft Azure
You need three different entities to create a role assignment:
- A security principal, which can be either one of users, groups, or service principals.
- A role, which describes a set of management rights. For example, the contributor role contains all actions, except authorization-related rights. So, a contributor may manage all aspects at a given scope without being able to grant access to resources.
- A scope to set the access rights, starting from the management group level down to single resources.
If those three come together, this is what we call an RBAC role assignment.
Important Note
You need to be granted Microsoft.Authorization/roleAssignments/write and Microsoft.Authorization/roleAssignments/delete rights in order to be able to create or delete role assignments. These rights are, by default, granted to the RBAC roles User Access Administrator and Owner.
You can edit role assignments at all management scopes of Azure. It is important to know that role assignments are inherited top to bottom. This means that if you configure a role assignment at a resource group level, the access rights are also valid on all resources within this particular resource group; and if you configure a role assignment at a management group level, it is inherited to all subscriptions, resource groups, and resources within that scope.
In the Azure portal, there is the Access Control (IAM) blade that is used to manage all aspects of RBAC. You can check access for particular accounts, find out explicit and inherited roles and deny assignments, and find out which built-in or custom roles exist for the given scope.
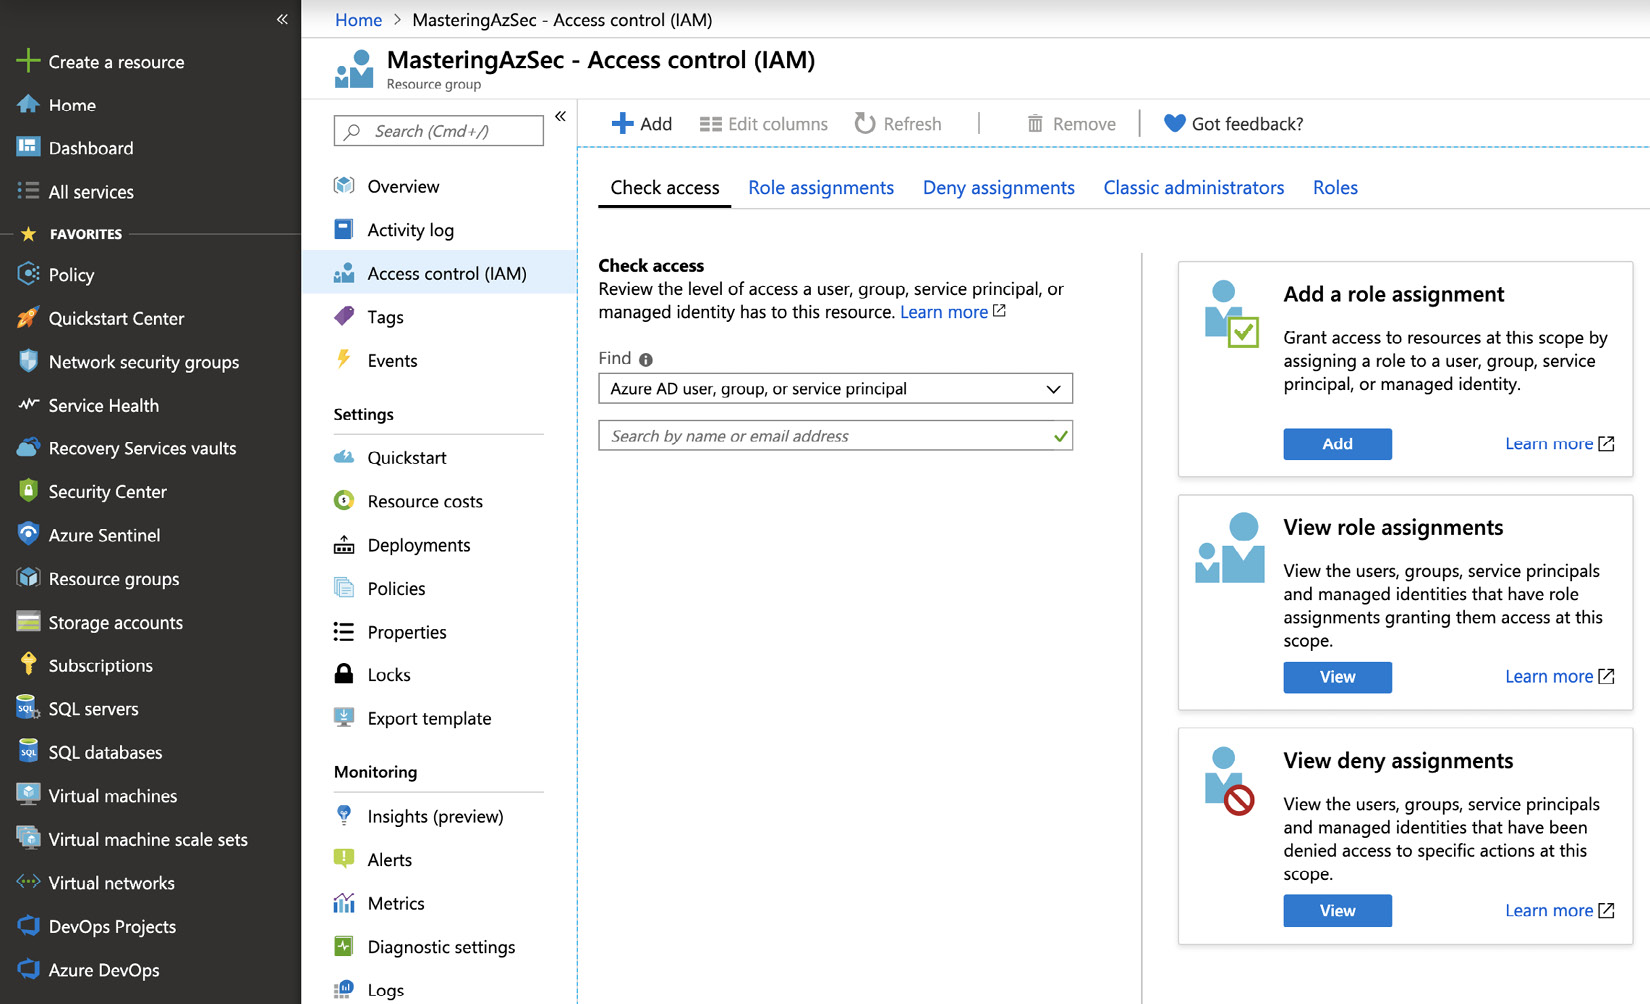
Figure. 3.25 - RBAC management blade in the Azure portal
To create a new role assignment, you need to click + Add and then select Add role assignment.
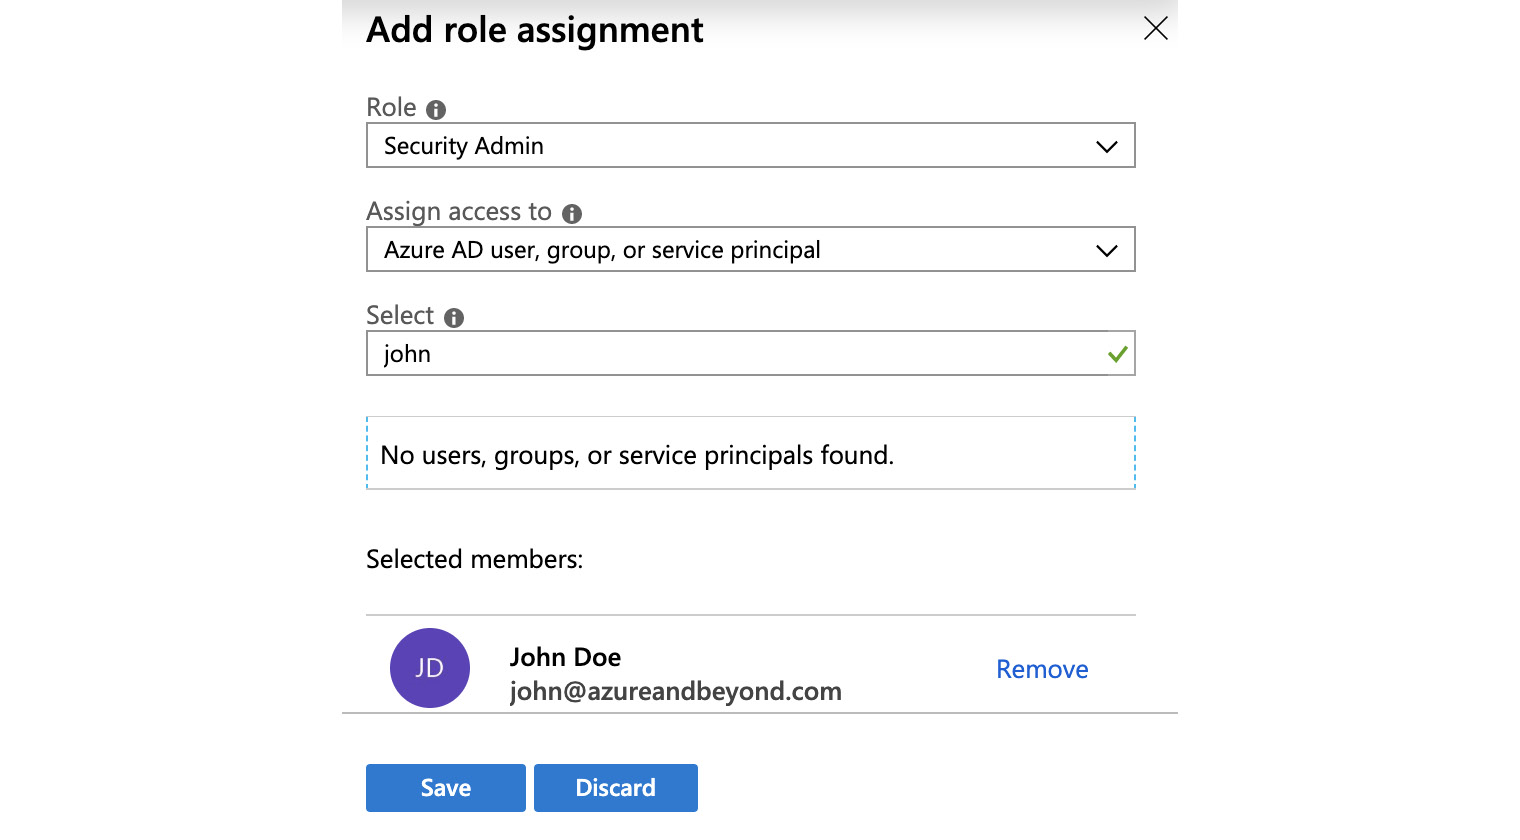
Figure. 3.26 - Adding a role assignment
You then select the role and security principal you want to grant access, and then save your selection. Done.
RBAC is pretty straightforward to implement, but can be way more challenging when planning for access rights in your environment. This is why you should already plan for RBAC roles when defining your governance concept.
Important Note
Define the RBAC roles you need in your environment when creating your governance concept. Doing so, you will have a good overview of which access rights (roles) you need and who (which security principal) you need to grant access to. That said, it will be much easier to create your role assignments later.
In the following section, we will show you how to create custom RBAC roles so you can more granularly use roles according to your needs.
Creating custom RBAC roles
Custom RBAC roles are used whenever built-in roles do not entirely fit your company's needs regarding access rights to your cloud environments. As mentioned before, a role is basically a set of management rights that then are applied to users or groups in a role assignment. There is a difference between custom Azure AD RBAC roles and custom RBAC roles for Azure resources. If you want to create a custom Azure AD RBAC role, you need to go through the following steps:
- Navigate to Azure Active Directory -> Roles and administrators and then click the + New custom role button in the Azure portal, as shown in the following screenshot:
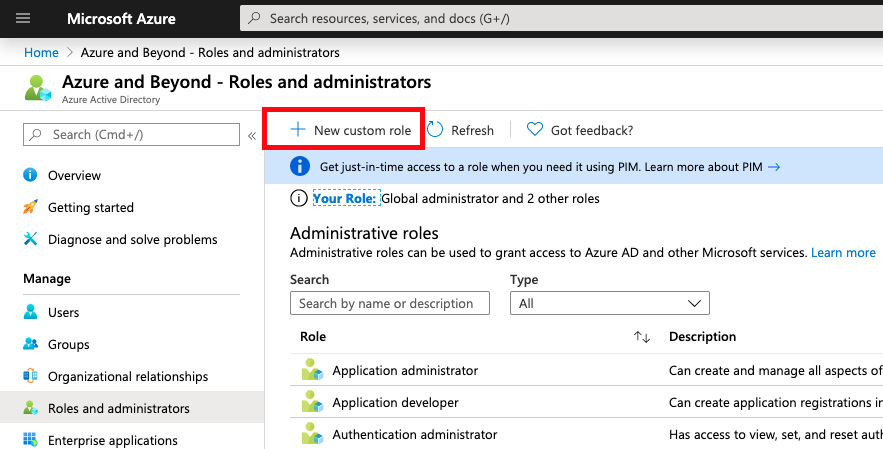
Figure. 3.27 - Creating a new custom role
- Enter a Name and, optionally, a Description for your custom role. You can decide either to Start from scratch, or to Clone from a custom role to continue with your custom role creation. In the following example, we decide to Start from scratch:
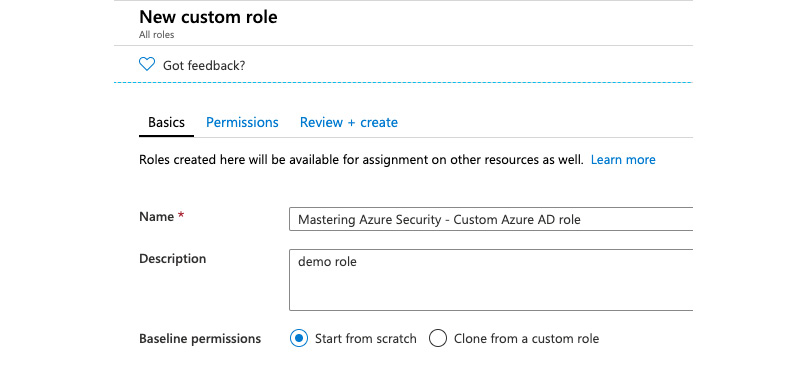
Figure. 3.28 - Defining basic information
- On the Permissions tab, you select all permissions that you later want to grant to your identity.
- On the Review + create tab, you can finally confirm your settings, and by clicking the Create button, your custom Azure AD RBAC role is created, as illustrated in the following screenshot:
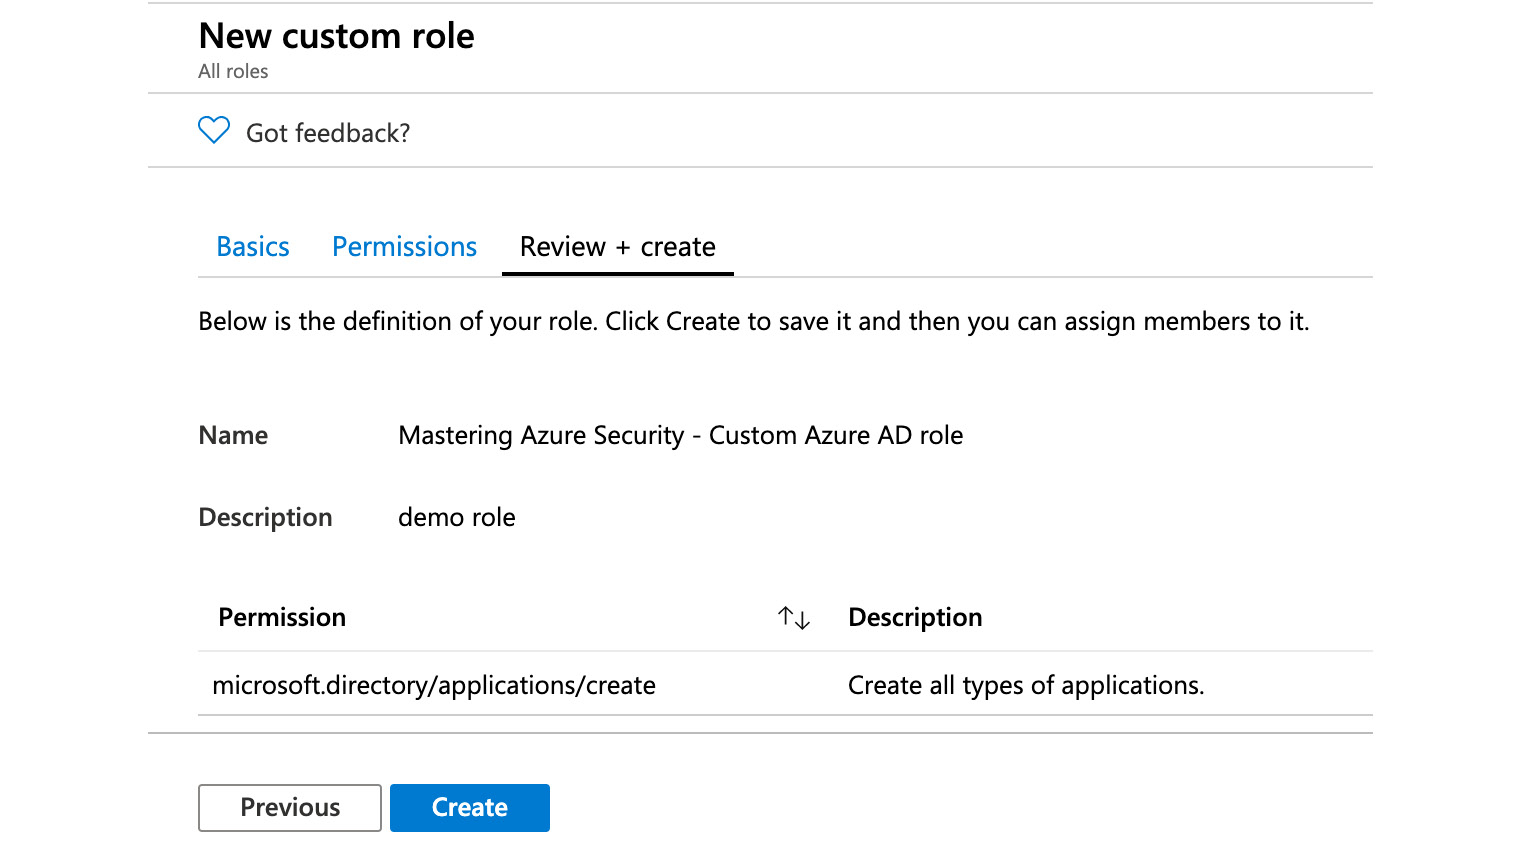
Figure. 3.29 - Reviewing and creating your custom Azure AD RBAC role
The creation of custom RBAC roles for Azure resources cannot be done in the Azure portal. You need to use PowerShell, the Azure command-line interface (CLI), or the Azure representational state transfer (REST) API. In this example, we will create a custom RBAC role with PowerShell.
To create a custom RBAC role, you need to define which resource operations per resource provider have to be allowed to meet your goals. Therefore, you should initially find out which resource provider operations exist. You can do so by using the Get-AzProviderOperation cmdlet, as shown in the following code block:
Get-AzProviderOperation <operation> | FT OperationName, Operation, Description -autosize
For example, if you want to find all resource provider operations for the Microsoft.Compute/VirtualMachines/* resource provider, the command and the result could look like this:
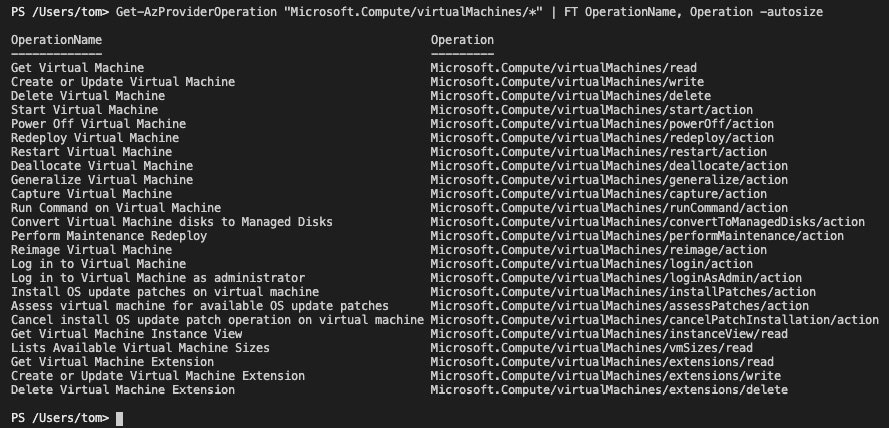
Figure. 3.30 - Resource provider operations for Azure VMs
The resource provider operations that are listed in the preceding screenshot are all actions related to virtual machines (VMs) to which you can grant access to users, groups, or service principals. If you want to know which resource provider operations are tied to a specific RBAC role, you can find this out with the following command:
(Get-AzRoleDefinition <role name>).actions
For example, if you want to know which actions are allowed for the Virtual Machine Contributor RBAC role, the command would be as follows:
(Get-AzRoleDefinition "Virtual Machine Contributor").actions
When you know which resource provider operations exist, you can start creating your custom RBAC role. Again, you can start by creating a new role from scratch or by using an existing role as a template to alter according to your needs. You will find examples for creating custom RBAC roles for Azure resources in the GitHub repository belonging to this book.
Now that you have learned what RBAC is and how you can leverage it, we will give you an introduction to Azure AD Privileged Identity Management (Azure AD PIM), another service focused on protecting privileged user accounts. Let's move on!
Protecting admin accounts with Azure AD PIM
In Chapter 2, Governance and Security, we discussed the fact that we often see customer environments in which administrators have a huge set of privileges they do not necessarily need. We also discussed Separation of Duties (SoD) and the fact that no one should have more privileges than ever needed for doing a particular job. Now, what if you could even reduce that set of access rights to a particular point in time or time range? Or what if you need an approval process for granting privileged access? Maybe you want to monitor the usage of privileged roles or want to decide whether a person still needs privileged access rights?
Azure AD PIM is a service that offers several features that help you further protect privileged accounts, some of which are the following:
- Just-in-time and time-bound privileged access
- Approval to activate privileged roles
- Access reviews to ensure that roles are still needed
- Enforcing MFA for role activation
With Azure AD PIM, you can—but do not need to—infinitely grant access rights to privileged users; you make them "eligible" for requesting access rights. So, users are only granted access rights when they really need them. Access can be either approved automatically after a user requests access or by manual approval. The nice thing is, you can cover both Azure AD and Azure resource roles with Azure AD PIM.
Tip
Make sure you have enforced the principle of least privilege in your organization before starting with PIM.
Enabling PIM
Before using PIM, you have to enable the service for your directory. You can do so by signing in to the Azure portal as a Global Administrator of your directory and then navigating to Azure AD Privileged Identity Management. Once there, you will find the option Consent to PIM, as shown in the following screenshot:
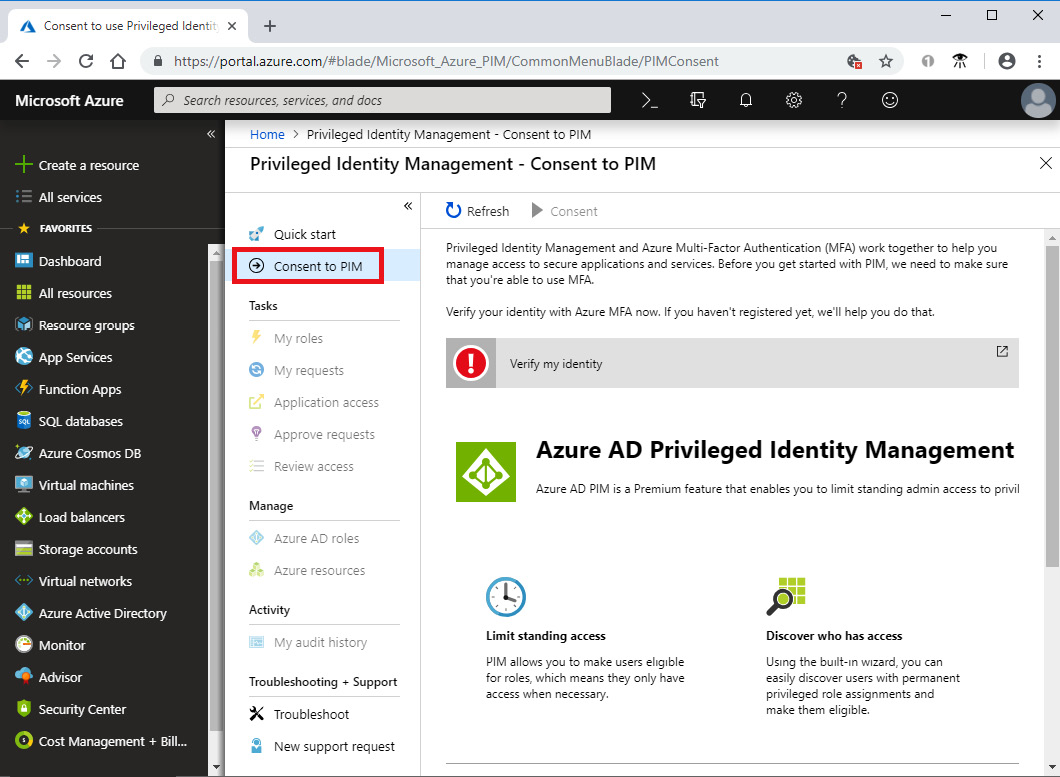
Figure. 3.31 - Consenting to PIM
You then click on Verify my identity to verify your identity with MFA. If you haven't already done so, you will be asked to activate MFA for your account, as covered in the Understanding Multi-factor Authentication (MFA) section in this chapter. Once your identity has been verified, you can click the Consent button and confirm the dialog by clicking Yes, as shown in the following screenshot:

Figure. 3.32 - Confirming PIM consent
Now that you have activated PIM for your directory, you need to sign up to PIM to manage your Azure AD roles. You do so by navigating to the Azure AD roles section of the Azure AD PIM dashboard and clicking on sign up. Once sign-up completes, the Azure AD options will be enabled.
Managing Azure AD roles in PIM
In the Azure AD roles view, you can manage PIM behavior for all Azure AD roles and also have access to Azure AD role-related tasks such as access reviews, approvals, or your own roles and access requests, as shown in the following screenshot:
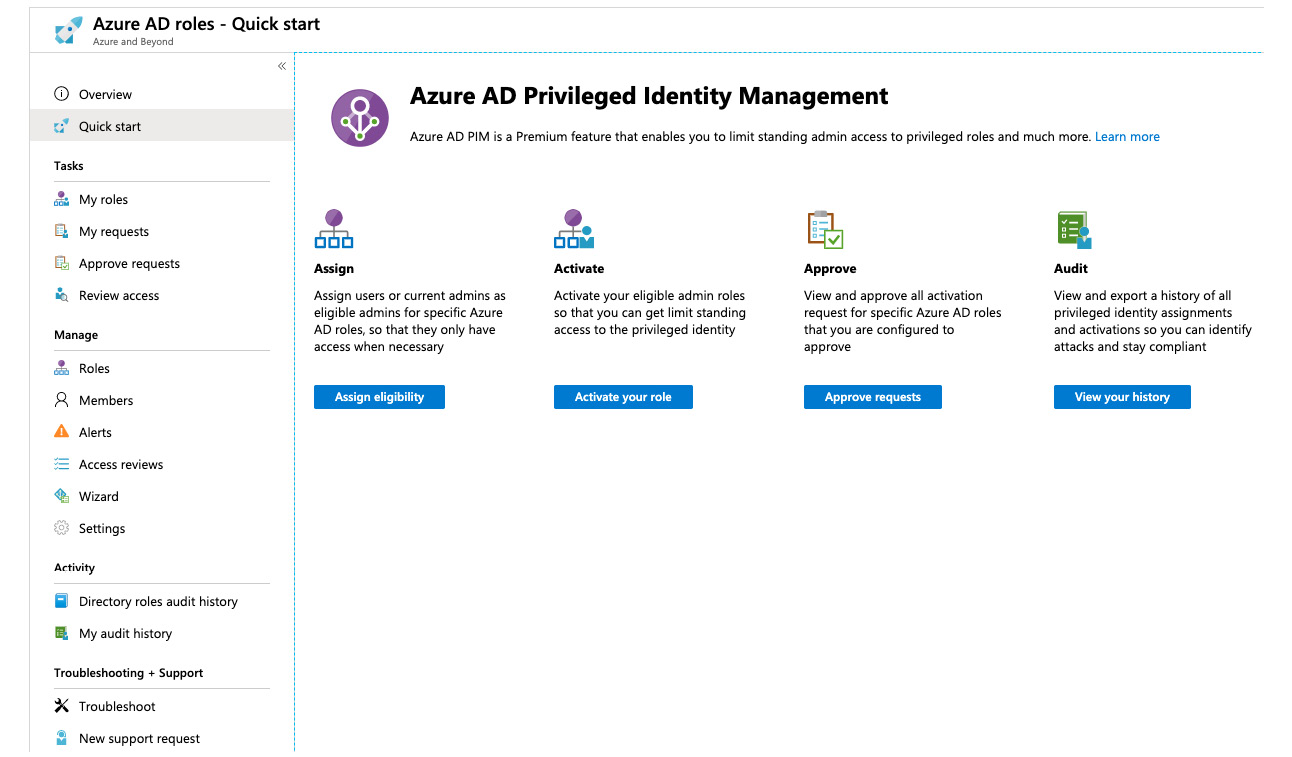
Figure. 3.33 - Azure AD role management in PIM
The Manage section offers all the Azure AD PIM configuration options for your Azure AD directory. Roles gives you an overview of all Azure AD roles and enables you to add members to a particular role. In the Members section, you get an overview about all accounts that are either eligible or permanent members of privileged roles. It is an at-a-glance view of all users that have elevated rights in your directory. The Alerts section shows you issues to review. For example, you will get an overview of administrators that are not using their privileged roles (and therefore can be unassigned). You can also create regular Access reviews to determine whether particular accounts still need to be role members. In the respective section, you find a configuration wizard to create these recurring reviews. The Wizard in the respective section leads you through a process to convert users with existing permanent role assignments into eligible users. Finally, in Settings, you can configure global settings for Azure AD roles, alerts, and access reviews.
Tip
You can require approval for a role activation. This requirement is a setting that comes with the role, not with the user account. That said, when you configure this requirement, it is valid for all users that are eligible to request access for this particular role.
Once an account is made eligible, its owner needs to request access before conducting a task. Let's walk through an example: John works in the helpdesk team and this team is responsible for managing user accounts. Therefore, we make John's account eligible for the User Administrator role. When John signs in to the Azure portal and then wants to manage user settings in Azure AD, he will only be able to see what usual user accounts are able to see; he won't be able to manage any accounts. So, John navigates to the Azure AD PIM dashboard and sees that he needs to activate his role first.
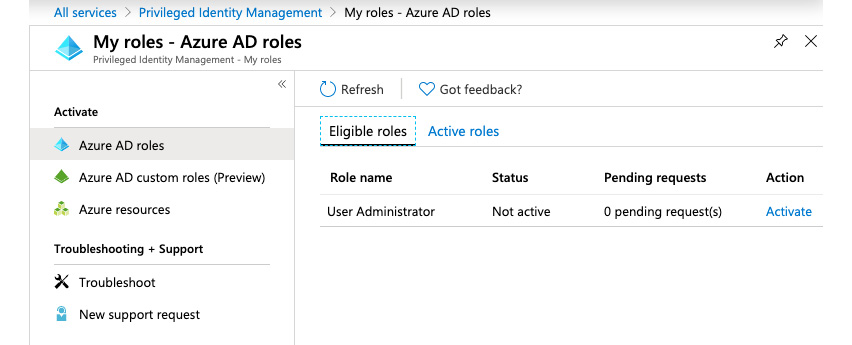
Figure. 3.34 - Eligible roles for a user
John can activate the role for the time that you configured before in the Settings pane for this particular role (all as the default for all roles). In the following example, the maximum activation duration is 1 hour only. In addition to that, we have enforced entering a justification that later can be reviewed in the audit history:
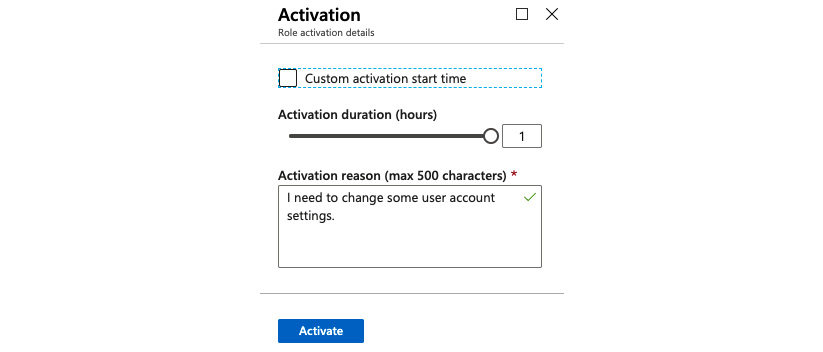
Figure. 3.35 - Activating a role
John could also set a custom activation start time. For example, when John knows that he will need access later that day, he could manually set an activation time in the future. With a click on Activate, an activation request is submitted and validated once the activation is done. Then, after signing out and logging back in, John will have role membership in User Administrators for 1 hour.
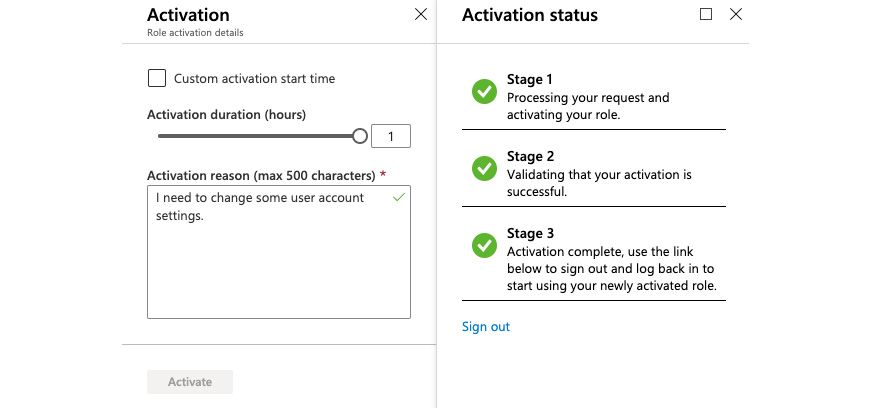
Figure. 3.36 - Successful role activation
So, the process for the user is straightforward. Request access; log out and back in again; and then do the job. Of course, every activation request is logged, as well as every configuration change a user does when having elevated rights. As already mentioned, monitoring is essential, and so there's no way around it.
Managing Azure resources with PIM
You can not only use PIM for managing Azure AD roles but also for Azure resource management based on RBAC. You first need to onboard Azure subscriptions to PIM so that you can use it to manage resource-based access rights. To do so, you navigate to Azure resources on the Azure AD PIM dashboard and select Discover resources. You then filter for unmanaged resources and select Manage resource, as illustrated in the following screenshot:
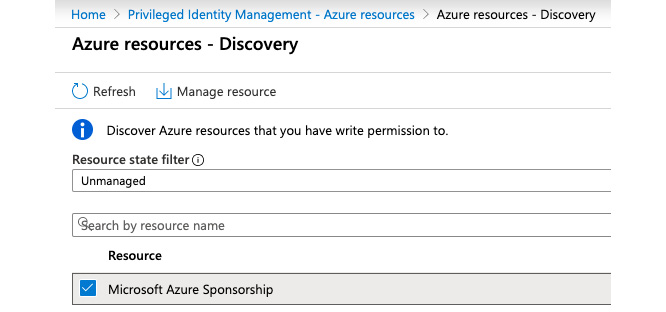
Figure. 3.37 - Onboarding an Azure subscription to PIM
You can also select a Management group to onboard to PIM. PIM will automatically manage role assignments for all child resources within the given scope after onboarding. The configuration options are similar to the ones for Azure AD management with PIM. One difference is that you need to enter a start and an end date for the role assignment. After the end date, the user will no longer be eligible for requesting access. The maximum is a time frame of 1 year.
Let's take an example. In his role as project owner for the Mastering Azure Security project, John needs to manage all resources within a particular resource group that has been created for this project. However, he should not be able to give other users or groups access to that resource group so access to the Contributor role should be the right one for him.

Figure. 3.38 - John is a member of the Contributor role via PIM
If John logs in to the Azure portal, he won't be able to see any resources or resource groups because he has no permanent access rights to Azure resources. Again, he navigates to the Azure AD PIM dashboard, selects Azure resources, and then activates his role. After logging out and signing in again, John is able to manage his resources in the MasteringAzSec resource group.
Tip
PIM always activates roles for 1 or several hours, even if access is only needed for 10 minutes. Therefore, users can find an option to deactivate roles after they have finished their tasks by navigating to My roles and then Active roles in both the Azure AD roles and the Azure resources sections.
You have now learned how to further reduce your privileged accounts' attack surfaces by using Azure AD PIM.
Hybrid authentication and SSO
Organizations have come a long way from an on-premises IT infrastructure since they started to roll out cloud-based Software as a Service (SaaS) applications such as Microsoft Office 365. Users usually do not want to keep track of several accounts and, as they already have a corporate account based on Windows Server AD, they usually want to also use that account for cloud-based authentications. Now, this is when Azure AD Connect comes into play.
Azure AD Connect is a directory replication service that helps you to synchronize existing user accounts from an on-premises Windows Server AD with Azure AD. This is a mandatory step because you can only grant access rights and licenses to cloud-based identities in Azure AD, not to on-premises accounts.
With Azure AD Connect, you have several options to provide a single sign-on experience to your users. In the following diagram, you can see a decision tree that helps you to decide which of them is the best for your organization:
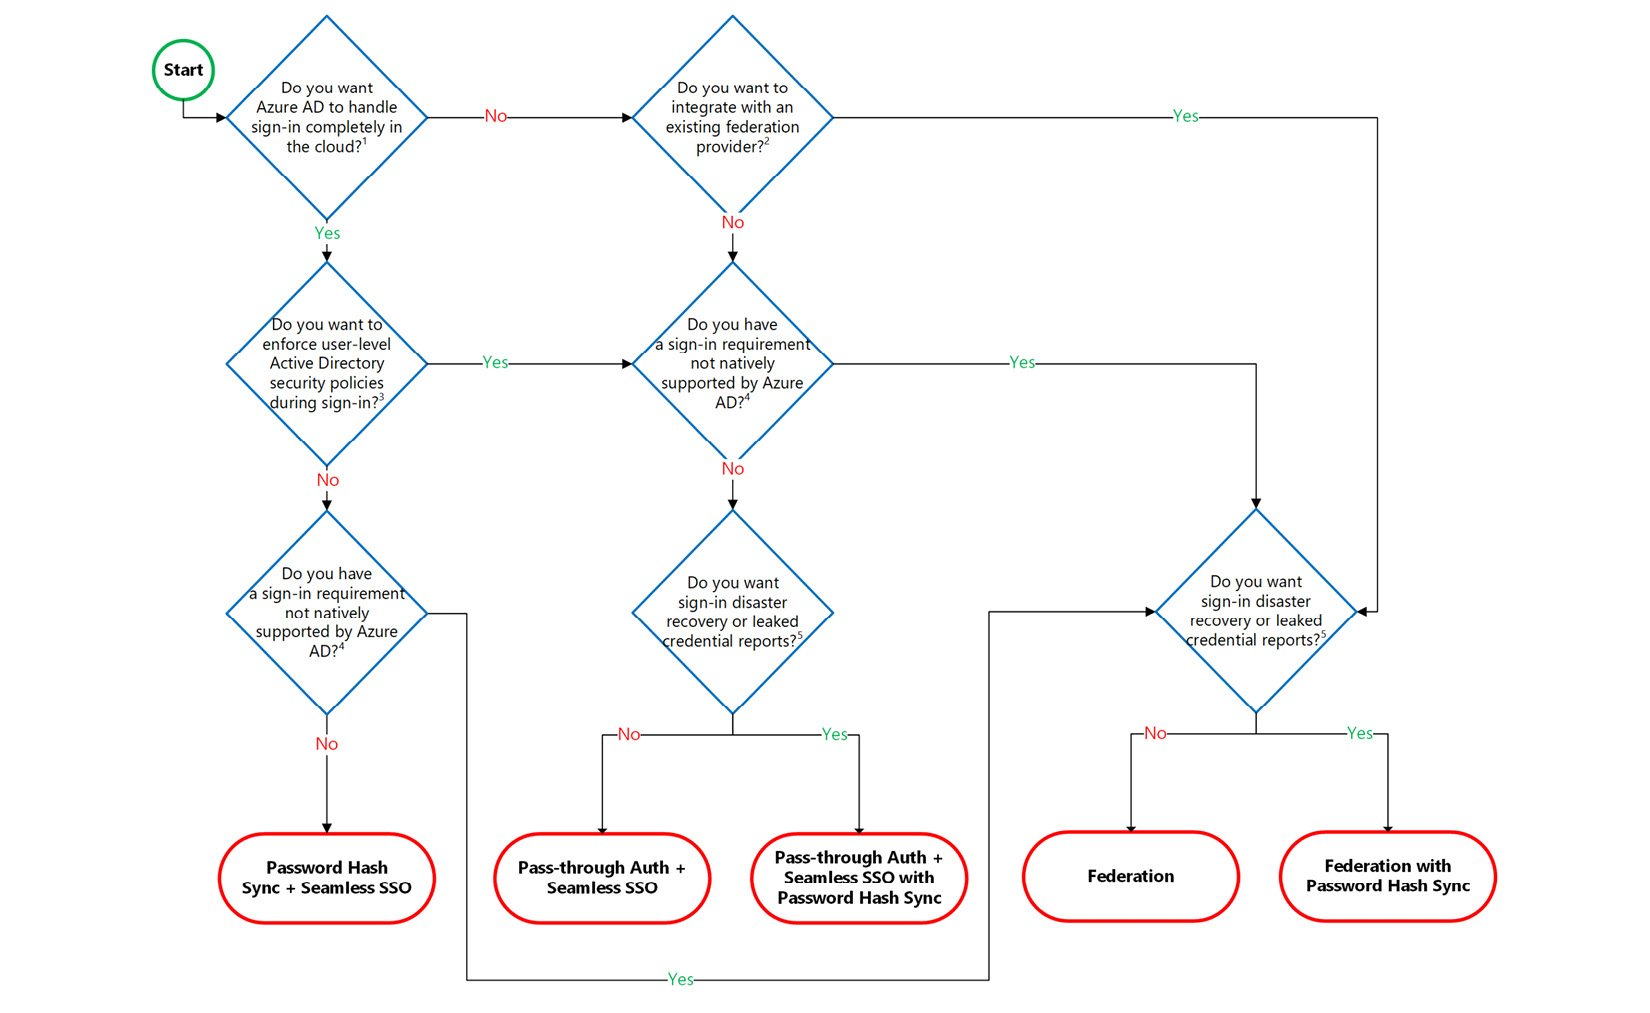
Figure. 3.39 - Azure AD Connect authentication decision tree
Password Hash Sync + Seamless SSO is the easiest way to go. With this, your on-premises password hashes are replicated to the corresponding cloud identities, so users can use the same usernames and passwords across all login environments. Seamless SSO eliminates unnecessary login prompts when users are signed in.
If you have stronger requirements, such as user-level AD security policies that should be enforced during sign-in, you can go with Pass-through Auth + Seamless SSO. In this scenario, you install a software agent on one or more on-premises servers. These servers can validate your user credentials directly against your on-premises domain controllers by building up a secure tunnel through which cloud-based logons can be validated.
Federation with Active Directory Federation Services (AD FS) or another federation service is the most complex authentication method. It should be used in scenarios where sign-in features are not natively supported by Azure AD. These features include the following:
- Sign-in using smartcards or certificates.
- Sign-in using an on-premises MFA server.
- Sign-in using a third-party authentication solution.
- Multi-site on-premises authentication solutions.
Tip
We recommend always enabling password hash synchronization in Azure AD Connect. Doing so, you have a fallback scenario in case your on-premises authentication platform is not working properly, and you can use Azure AD Identity Protection to get leaked credential reports. Furthermore, you can enable self-service password reset (SSPR) when password hash synchronization is enabled.
With SSPR, you can effectively reduce both users' non-effective time and support efforts for your helpdesk team. SSPR provides users with an effective means to unblock their corporate accounts if they forget their passwords. In order to use SSPR, users must provide a secondary authentication method. When they lose access to their corporate password, users need to verify their previously registered alternate authentication method to prove their identity. After that, the user can enter a new password. If it is a hybrid user account, meaning an account that is replicated by Azure AD Connect, the new password is written back to the on-premises Active Directory. The feature you need to enable in Azure AD Connect in this case is called password writeback.
Currently, there is a preview for the combined registration of SSPR and MFA that offers you a new experience for your users' security registration.
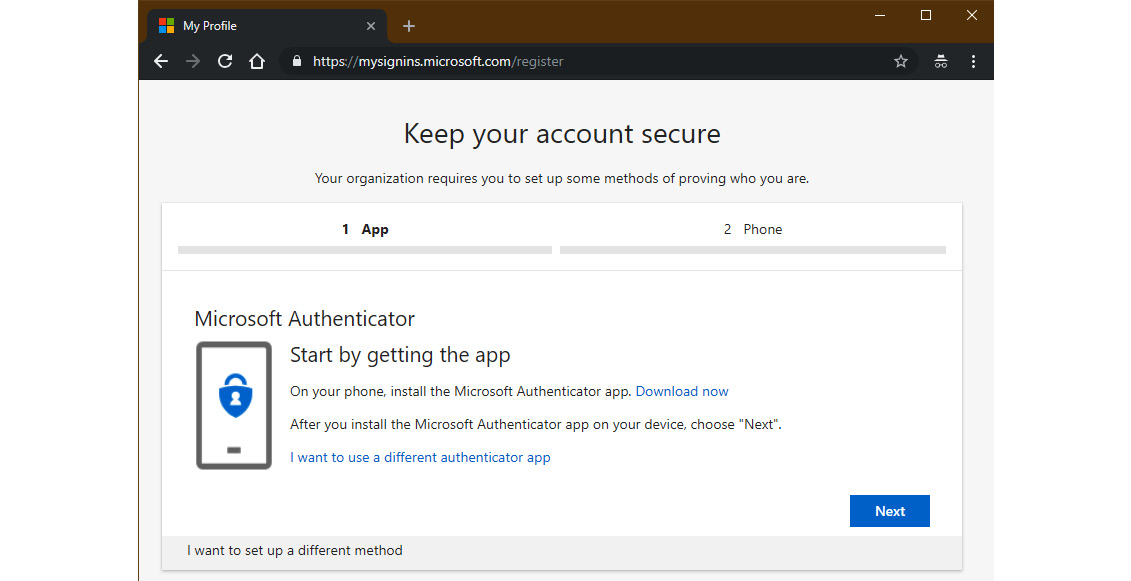
Figure. 3.40 - Combined registration for SSPR and MFA
Today, you can enable it for your Azure AD tenant by navigating to Azure Active Directory -> User Settings -> Manage User Feature Preview Settings. You can enable the preview features for all users or a selected group, as shown in the following screenshot:
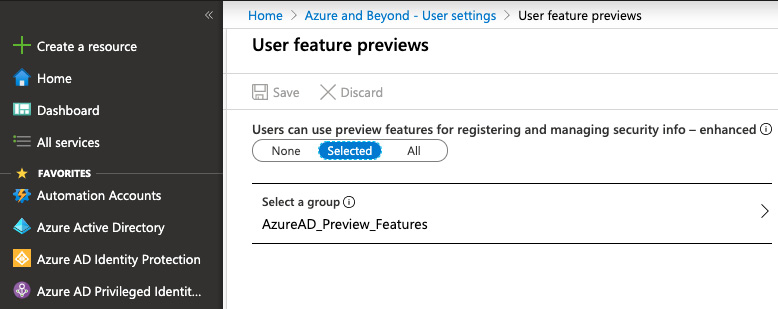
Figure. 3.41 - Enabling combined registration for SSPR and MFA in your tenant
After that, users for whom this setting applies are able to use the new experience at https://myprofile.microsoft.com/.
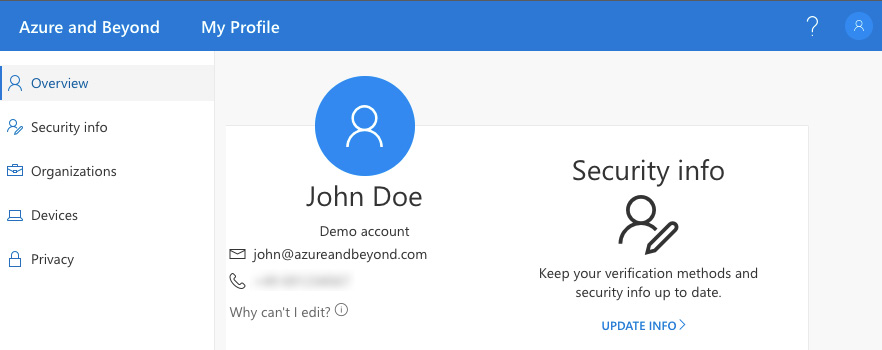
Figure. 3.42 - The new combined experience
Integrating on-premises identities into Azure AD is a great way to enhance the sign-in experience across your hybrid organization, and you just learned about the considerations to bear in mind before starting your hybrid journey. In the Exploring passwords and passphrases section, you learned that passwords are not good enough to protect your accounts. So, let's move on now to passwordless sign-ins in Azure AD.
Understanding passwordless authentication
In a world in which passwords are not enough to protect identities, we need another, more secure, approach to further protect identities. Passwords can be guessed or phished without physically having access to a user's device or storage. With passwordless authentication, Azure AD offers two different methods to sign in to a cloud-based user account without needing passwords anymore.
You can use the Microsoft Authenticator app, the app you already know from the Understanding MFA section. With this method, you are prompted to approve your sign-in by tapping a number in the Authenticator app, as shown in the following screenshot:
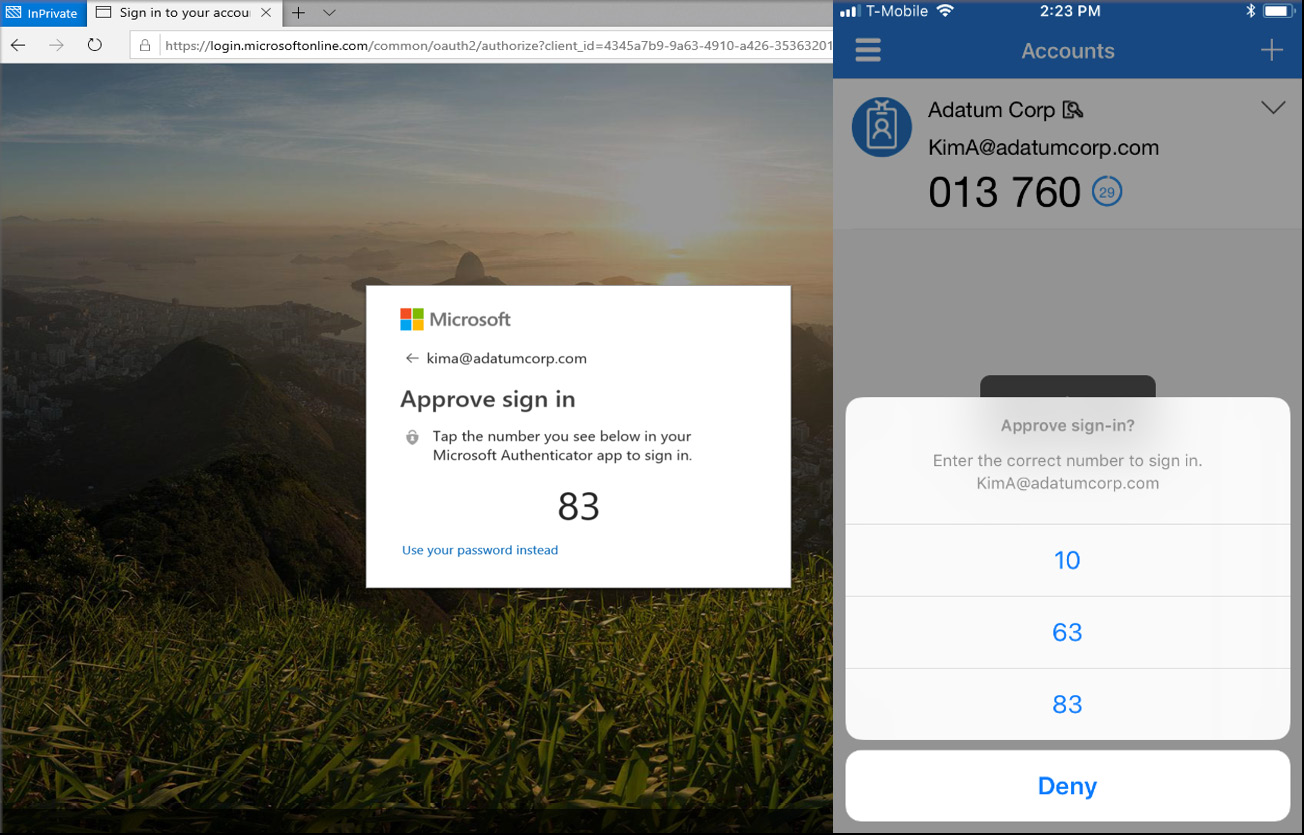
Figure. 3.43 - Phone-based passwordless authentication
All the user has to do is to register the app as an MFA option and then, in the smartphone app, choose Enable phone sign-in from the drop-down menu. After following the instructions in the app, the user can sign in to the app, without entering a password.
The second option is to use a FIDO2 security key to sign in against Azure AD. FIDO2-based passwordless authentication is currently in preview and is only supported on Windows 10 and in the Microsoft Edge browser.

Figure. 3.44 - FIDO2 security keys
Using this method, the user needs to have physical access to the security key that is needed during the authentication process. The user needs to be enabled for the enhanced security registration preview so access to the https://myprofile.microsoft.com/ portal is enabled, as described in the Hybrid authentication and SSO section. To use a security key, it needs to be added to the user's security info, as shown in the following screenshot:
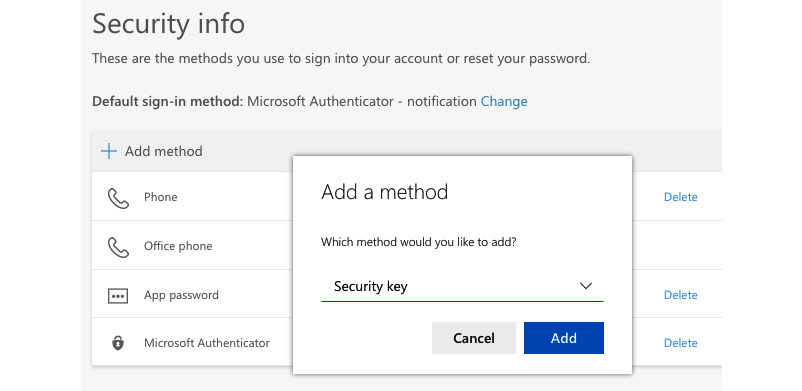
Figure. 3.45 - Associating a security key with a user's profile
After following the instructions, the user will be able to authenticate against Azure AD without entering a password.
Global settings
Before you can enable passwordless authentication on a per-user basis, the feature needs to be enabled for the Azure AD tenant. The settings can be found in the Azure AD portal under Azure AD -> Security -> Authentication methods, as shown in the following screenshot:
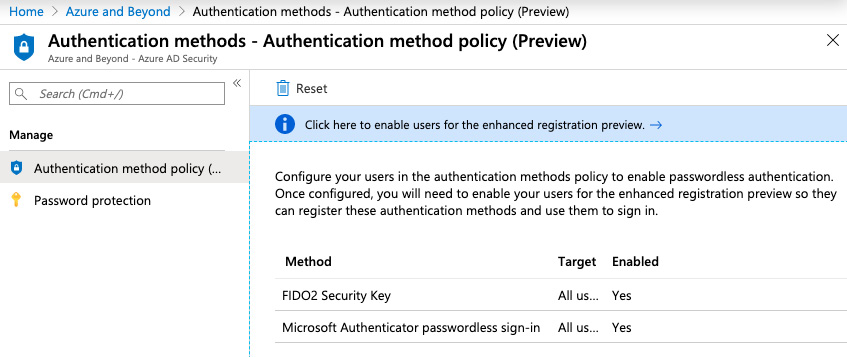
Figure. 3.46 - Enabling passwordless authentication for an Azure AD tenant
You have now learned how to enable passwordless authentication for your users. In the next section, you will learn about the licensing of security features in Azure AD.
Licensing considerations
Azure AD licensing can become a bit complex when it comes to security features. This is why we decided to compare different licenses and to explain which license you need for which feature. Azure AD is always licensed on a per-user basis, so you need one respective license for each user. For all security features that have been discussed in this chapter, you will either need an Azure AD Premium P1 or an Azure AD Premium P2 license. These licenses are also part of Microsoft 365 and Enterprise Mobility + Security (EMS) license packages.
- Microsoft 365 E3 contains EMS E3, which contains features of Azure AD Premium P1.
- Microsoft 365 E5 contains EMS E5, which contains features of Azure AD Premium P2.
- For the following features, you will need an Azure AD Premium P2 license:
- Azure AD PIM
- Azure AD Identity Protection
- Risk-based Conditional Access policies
For the following features, an Azure AD Premium P1 license is sufficient:
- Azure MFA
- Conditional Access based on group, location, and device status
- Self-service password reset
Summary
Identity is the new perimeter and so it's essential to properly protect user and administrator accounts in the cloud. In this chapter, you have learned why passwords are not enough to protect your accounts and how to protect them with MFA, Azure AD Identity Protection, and passwordless authentication. You are able to reduce your privileged accounts' attack surface as of now, to integrate Azure AD into your existing environments.
In the next chapter, you will learn how to protect network infrastructure resources on Azure and which platform services you need to achieve a better security posture.
Questions
- With the cloud, identity is…
A. More exposed to attacks
B. Less exposed to attacks
C. Equally exposed to attacks
- We can control password settings with…
A. Azure AD protection
B. Account protection
C. Password protection
- We can increase account security with…
A. More complex passwords
B. More frequent password changes
C. Multi-Factor Authentication (MFA)
D. Two-Factor Authentication (2FA)
- You can control actions that require MFA.
A. Yes
B. No
C. Only for some actions
- Which report is not available in risk detection?
A. Users with leaked credentials
B. Impossible travel
C. Infected users
D. Infected devices
- With roles in Privileged Identity Management (PIM), the user has…
A. More privileges
B. Fewer privileges
C. To activate privileges
- The most secure authentication is…
A. A strong password
B. MFA
C. Passwordless
