Chapter 7: Azure Security Center
Azure Security Center is meant to be that one tool that gives you a unified overview of your hybrid cloud environment's current security configuration, and informs you about current threats and attacks against your services.
In this chapter, we will cover the following topics:
- Introducing Azure Security Center
- Secure score and recommendations
- Automating responses
- Just-in-time access for Azure Virtual Machines
- Advanced Cloud Defense
Introducing Azure Security Center
With cloud computing the main paradigm in the modern IT world, there are many benefits that come with this new way of working. IT is no longer an end in itself and employees are way more productive than they were back in the day. But there are also new challenges when it comes to protecting modern IT environments.
In Chapter 3, Managing Cloud Identities, we already covered advanced identity protection and that it is no longer enough to protect network boundaries, however, there are some other main security challenges that come with cloud computing.
How can you make sure you protect your ever-changing cloud services and applications? This is one of the value propositions of cloud computing and, in fact, probably the main benefit is that you can easily change and adapt in cloud environments. Be it Define acronym continuous integration (CI)/ continuous delivery (CD), Virtual Machine (VM). Define acronym upscaling, or service decommissioning, cloud environments are dynamically changing. But at the same time, one of the main challenges is to keep track of these changes and to make sure that a company's services always adhere to their security baseline.
The threat landscape is evolving, and attacks are becoming increasingly sophisticated. Bad actors are using attack automation and evasion techniques, and at the same time, they are leveraging tools that help them to conduct attacks across the cyber kill chain. So, they no longer need to be highly trained technology experts, which results in an increasing number of sophisticated attacks, some of which are spear-phishing and credential theft attacks. Also, attackers are using hijacked computers, tied to bot networks, to conduct widely spread password spray attacks, which can be hard to recognize.
We need human expertise, creativity, and adaptability to combat human threat actors. The downside is that security skills are in short supply. Currently, there are about 3 million open positions in the cyber security sector out there worldwide, with that number increasing. This includes not only cyber threat hunters, but also security engineers and administrators with a focus on managing internal IT systems.
Azure Security Center is a service that offers two main solutions:
- As a Cloud Security Posture Management (CSPM) solution, Azure Security Center constantly provides information about the current configuration status of all your cloud resources to avoid misconfiguration with regard to security.
- As a Cloud Workload Protection Platform (CWPP), Azure Security Center provides protection against cyber threats aimed at servers, no matter whether they are running in Microsoft Azure, on premises, or in another cloud platform, as well as protection against threats aimed at your cloud-native workloads in Azure, for example key vaults, storage accounts, SQL databases, and more:
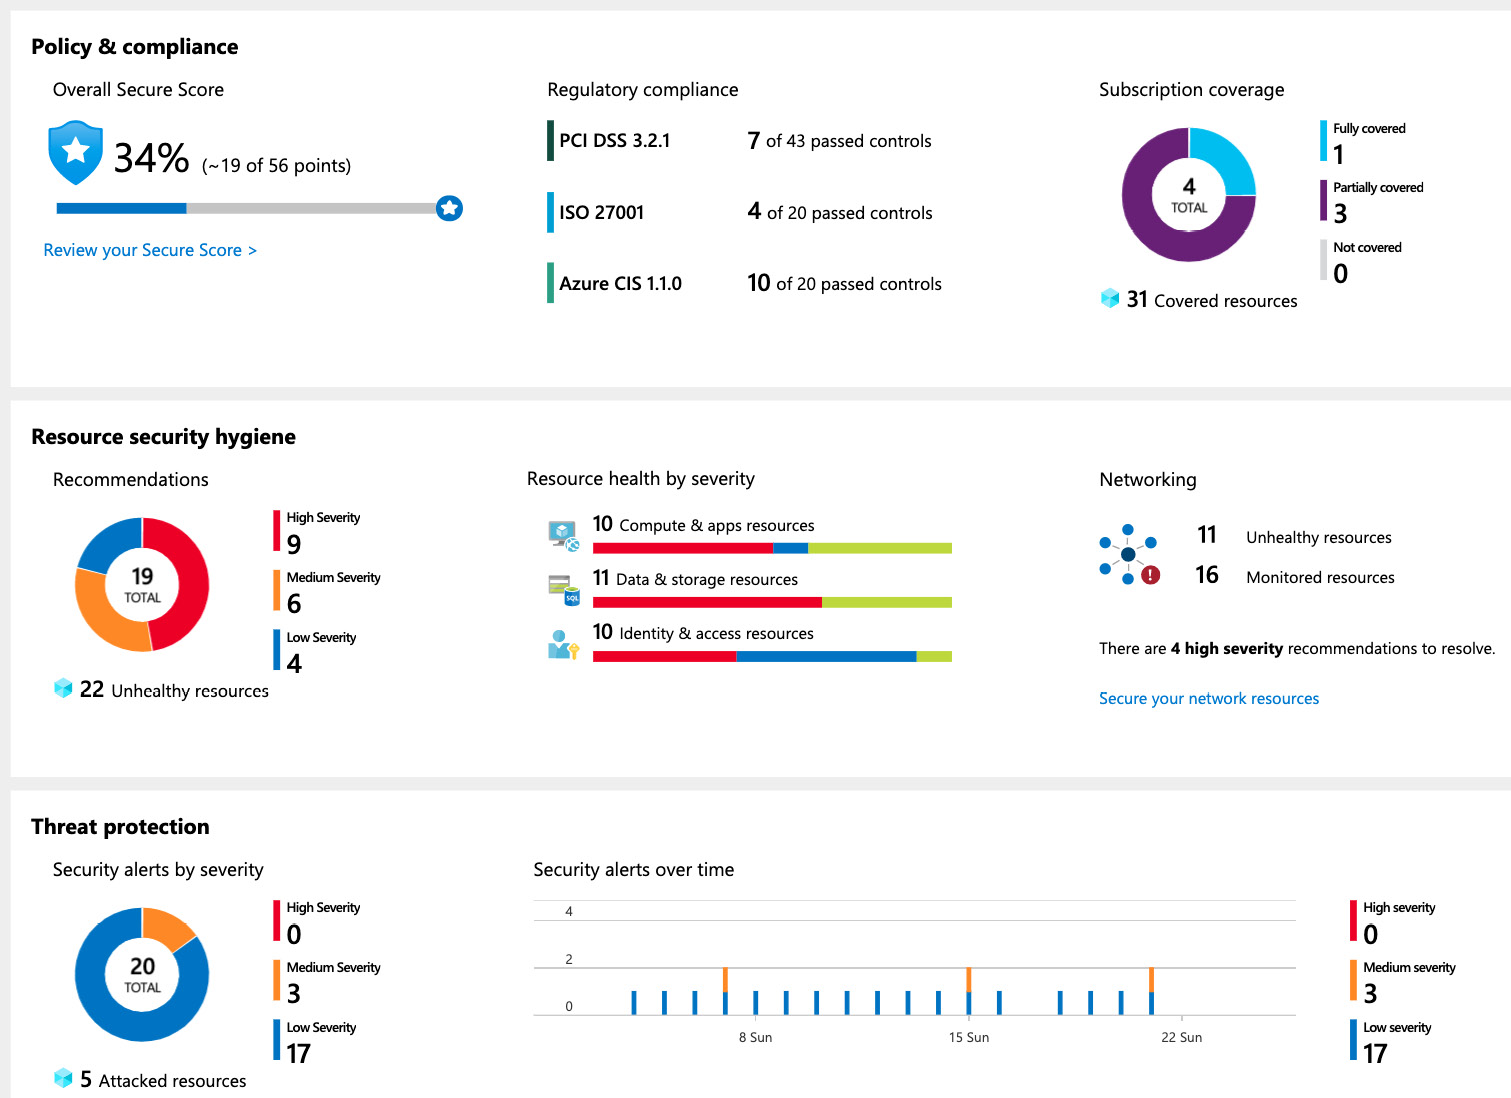
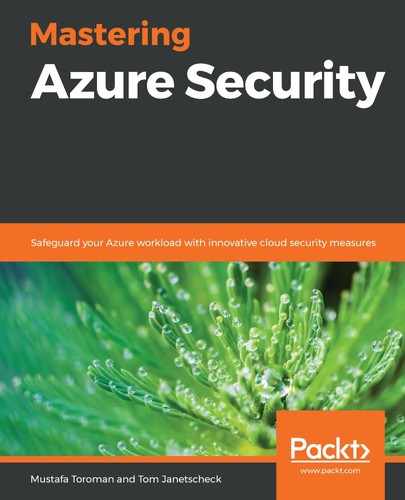
Figure. 7.1 – Azure Security Center Overview dashboard
The central Azure Security Center Overview dashboard is divided into three different areas:
- Policy & compliance
- Resource security hygiene
- Threat protection
In the Policy & compliance section, you'll find information about everything related to compliance and governance. For example, Subscription coverage gives you insights into the enrollment state of Azure Security Center over all your subscriptions. In other words, you can see whether there are Azure subscriptions in your tenant that are not covered by Azure Security Center. You also get a view of your Overall secure score, a number that reflects how well (or badly) your environment is protected. Regulatory compliance, finally, is a part of Azure Security Center that will help you to make sure that your cloud environment is compliant regarding regulations such as Azure CIS 1.1.0 and ISO27001.
The second section in Azure Security Center, Resource security hygiene, is the area that shows you recommendations regarding your current security configuration. By continuously assessing your environmental configuration, Azure Security Center gives you recommendations regarding security best practices to help you protect your environments.
In the Threat protection section, the last of the three main sections, Azure Security Center shows you current security alerts and incidents (which are cumulations of single alerts that are brought into context):
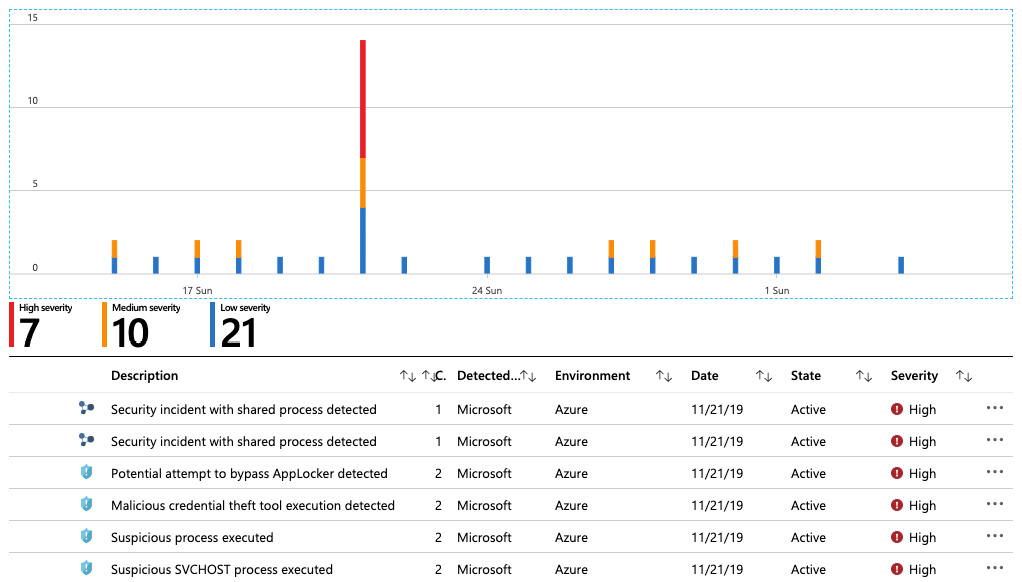
Figure. 7.2 – Security alerts and incidents
You can select an incident or an alert to get more information about the context and about remediation steps for every single alert and can trigger an Azure logic app as a response for the alert. For example, you could create a logic app that sends out an email or a post to a Microsoft Teams channel.
Note:
Azure Security Center is a tool for security engineers and administrators that are responsible for protecting (hybrid) enterprise infrastructures. It is a tool that helps in implementing security best practices and gives a security overview. For threat hunting and digging deeper into alerts and incidents, you would be better off using Azure Sentinel, a SIEM/SOAR solution that we will talk about in Chapter 8, Azure Sentinel.
Now, that you have gotten a quick overview of Azure Security Center and its Overview dashboard, let's dig a bit deeper and see how it technically works.
Enabling Azure Security Center
As a first step in leveraging Azure Security Center, we must enable this service and provide initial configuration parameters. There are several key components we need to consider before starting.
Azure Security Center basically relies on Azure Log Analytics and its respective workspace, on Intelligent Security Graph, and on Azure Policy:
- The Log Analytics workspace is used for storing all kinds of log information, such as Windows Server security event logs, or Linux server syslog entries, but also for storing security alerts and other information.
- Intelligent Security Graph is an AI/ML-based backend used to identify attacks and threats by evaluating the billions of threats signals that are generated in Microsoft products and services every day. Alerts and incidents in the Threat Protection section of Azure Security Center are basically generated using Intelligent Security Graph (and tools that rely on it and integrate into Azure Security Center, such as Microsoft Defender ATP).
- Azure Policy, a service we have already covered in Chapter 2, Governance and Security, is what recommendations in Azure Security Center rely on.
Azure Security Center comes in two different pricing tiers:
- Free
- Standard
With the free tier of Azure Security Center, you get access to your Azure Secure Score, as well as continuous assessments of your current configuration and security recommendations for Azure resources. If you want to also protect on-premise servers or VMs running in another public cloud platform, or if you want to leverage other features, such as just-in-time VM access, adaptive application controls and network hardening, the regulatory compliance dashboards, threat protection, and so on, you need to enable the standard tier of Azure Security Center.
Standard tier pricing depends on the resources you protect and is calculated as follows:
- VMs and servers: $15 per node per month
- Azure App Service: $15 per instance per month
- PaaS SQL Servers: $15 per server per month
- Storage Accounts: $0.02 per 10,000 storage transactions
- SQL Server on VMs: Free (during preview)
- Container Registries: $0.29 per container image (preview pricing)
- Azure K8s Service: $2 per VM core per month (preview pricing)
Important note
Even for the free tier of Azure Security Center, pricing for Azure Log Analytics applies. This is also true for the standard tier of Azure Security Center, where Log Analytics pricing is calculated in addition to the ASC standard tier cost mentioned above. Preview pricing is subject to change after the respective services become generally available (GA).
Before you can start using Azure Security Center, you must define which pricing tier you want to use per Azure subscription and connect Azure Security Center to a Log Analytics workspace. You do so by navigating to the Azure Security Center portal and selecting Pricing & settings, where you can define the pricing tier and other global settings per Azure subscription:
Figure. 7.3 – Selecting an Azure Security Center pricing tier
In the Data Collection area, you can configure Auto Provisioning, which enables the automatic installation of the Microsoft Monitoring Agent:
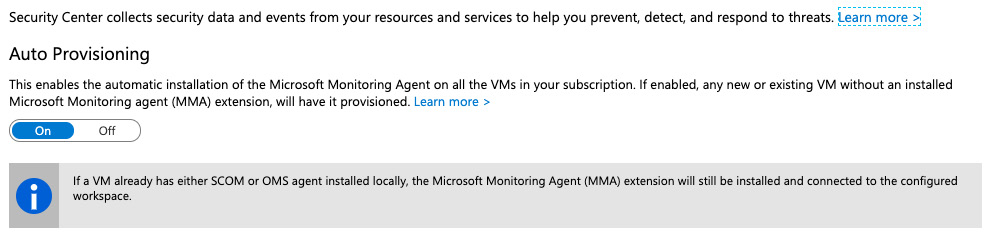
Figure. 7.4 – Enabling Auto Provisioning
You need to also define whether you want to use a default Log Analytics workspace, which is automatically created by Azure Security Center, or whether you want to use an existing workspace:
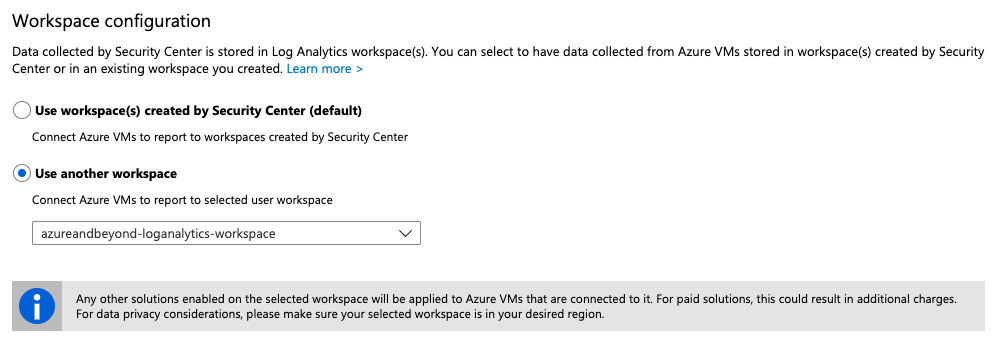
Figure. 7.5 – Selecting your Log Analytics workspace configuration
The last decision you have to make in this section is about the amount of security and the number of AppLocker event log files you want to submit to the configured Log Analytics workspace. You can choose between the following options:
- None
- Minimal
- Common
- All Events
After Azure Security Center is enabled, we can start benefitting from all the advantages it offers and make Azure security better. But Azure Security Center is not limited to cloud resources and can be extended to on-premises resources as well. Next, we will look at tools that Azure Security Center provides that enable us to increase our security posture.
Azure Secure Score and recommendations
Like several other services in the Microsoft enterprise cloud, such as Azure AD, and Office 365, Azure Security Center now also offers a security gamification option, the Azure Secure Score. The idea is to show the number of points you could achieve at a maximum for your currently deployed Azure resources and what your current secure score is. The more points you get, the better your security posture is. It's like bringing the complexity of cloud security down to a simple game:
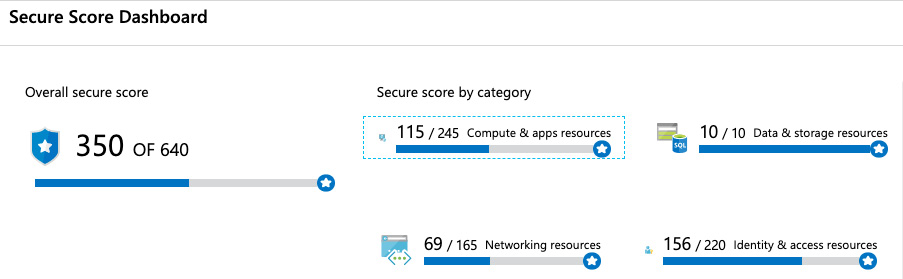
Figure. 7.6 – Azure Secure Score Dashboard
The Secure Score Dashboard offers you an overview of your current Overall secure score and your Secure score by category. If you click one of the Secure Score categories, you will see recommendations within that category with their respective Secure Score impact. The higher a recommendation's Secure Score impact is, the more important it is to remediate the corresponding misconfiguration.
Tip
Secure Score does not reflect industry-standard security benchmarks; for example, more than 700 out of 1,000 points is secure and less than 300 is extremely unprotected. Secure Score will only calculate points you can achieve depending on your currently deployed resources and regarding recommendations that already have been met, just like in a game.
Two Azure environments are never comparable regarding their secure scores. You can only say that the more points you achieve, the better it is. If you compare Figure. 7.1: Azure Security Center overview dashboard and figure. 7.6: Azure Secure Score Dashboard, you'll realize that the overall secure scores do not match (393 of 655 versus 350 of 640). These screenshots show the same Azure environment with 6 days in between. There have been some resources that were deleted in the meantime, but no other configuration changes occurred. Azure Secure Score can be used to compare security levels for the same environment at different points in time. Every change in your cloud configuration will have an impact on the overall secure score and Azure Secure Score is directly connected with recommendations. So, the more recommendations you meet, the better your secure score will be. Now, let's move on to recommendations and see what is provided there.
Working with recommendations
In Chapter 2, Governance and Security, you already learned that monitoring is essential in terms of security and how to leverage policies to create guardrails for your Azure environment. The nice thing about Azure Security Center is that its free tier is automatically enabled once you visit the Azure Security Center dashboard in the Azure portal and security policies, continuous security assessments, and recommendations that help you protect your Azure resources are automatically included. These recommendations are security best practices that can be enabled or disabled in your security policy, which relies on the Azure Policy service you learned about in Chapter 2, Governance and Security. Every recommendation refers to an audit policy, and if a resource is non-compliant regarding a particular policy, the Recommendation dashboard will reflect this failed resource:
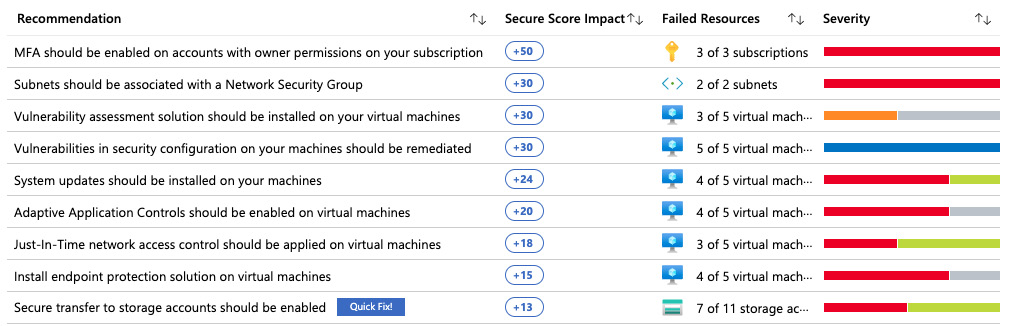
Figure. 7.7 – Failed resources in the Azure Security Center Recommendation dashboard
When you click one of the recommendations, you'll see a description and threats this recommendation protects from. Depending on the recommendation, you can either remediate it directly from Azure Security Center, or you'll be informed about manual remediation steps. The Quick Fix! button from the preceding screenshot enables single-click remediation for several recommendations, one of which is disabling insecure connectivity to all of your storage accounts.
The Azure Security Center community
This section, in the Azure Security Center (ASC), blade, contains some very useful links that can help you expand your usage of Azure Security Center. On the community forum, you can check for various announcements, ask questions, or look for previously posted questions. The community blog offers detailed descriptions on some topics and how-to guides. User Voice offers you the chance to ask for new features or improvements.
One of the useful links in the Azure Security Center community section is to the Azure Security Center GitHub repository. The repository contains security recommendations that are still in preview, Azure Policy custom definition for at-scale management, Logic Apps templates for automated responses (alerting or auto-heal), and security remediations in the form of programmatic tools and PowerShell scripts. This is a community repository, so everyone has the chance to contribute. If you've authored templates, scripts, or something else, and you think they may be helpful to others, feel free to submit them.
Workflow automation and sections in Azure Security Center
Before we start with workflow automation, we need to quickly explain what logic apps are.
Azure Logic Apps is a cloud service that helps you to schedule, automate, and orchestrate different tasks, processes, and workflows. It also offers the ability to integrate with different applications, datasets, systems, and services across organizations. This makes it very useful in a number of scenarios, whether you want to create a repetitive automated task, trigger an action whenever a condition happens, or connect different systems.
In terms of using Logic Apps with Azure Security Center, we can use workflow automation in order to set up a logic app to respond to Azure Security Center alerts. Alerts can be separated into groups, threats, and recommendations. Based on alerts, we can define an automated response based on severity and type.
For example, we can set up a logic app to be automatically triggered whenever a brute-force attack is detected in Azure Security Center. We need to create a workflow that will automatically trigger a logic app based on the detected threat, as shown in the following screenshot:
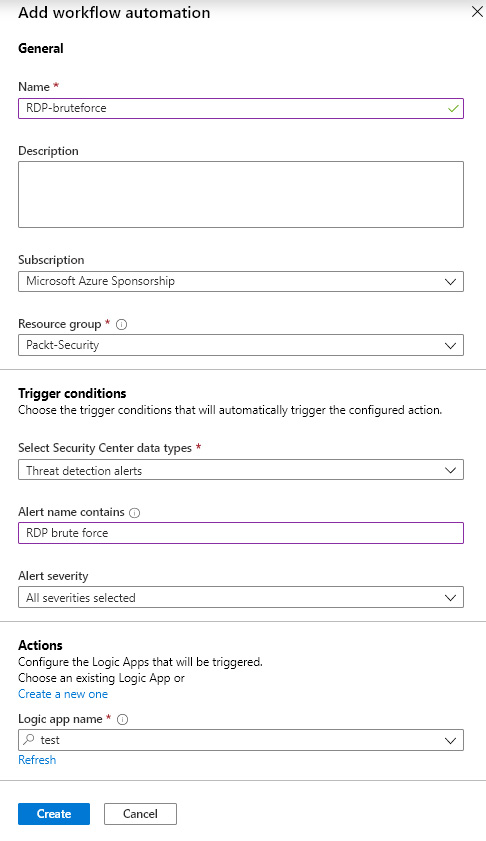
Figure. 7.8 – Configuring a logic app trigger in workflow automation
This will only set up a trigger for the specified logic app. We'll still need to configure a logic app for the response. For example, we could send a notification that a brute-force attack has been detected. Logic apps have many connectors configured and we can set up any or more of them. Some options are to send email notifications or to post messages in a Teams group:
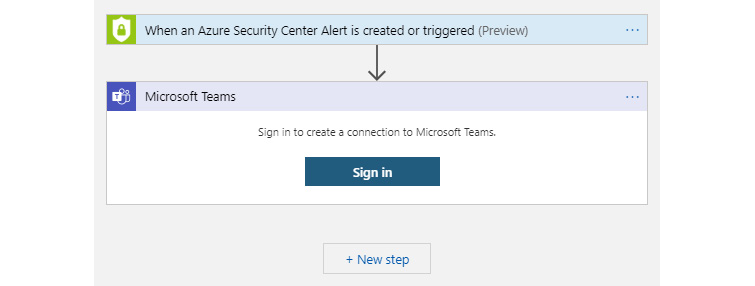
Figure. 7.9 – Configuring an alert to be posted in a Teams channel
This is only one example of what an automated response could be. We can set up a number of custom actions such as temporarily disabling access to an attacked resource or blocking access for IP addresses from which an attack originates. The Azure Security Center GitHub repository offers a number of templates and scripts that can be used to automate a response.
Policy & compliance
The section covering policy and compliance contains four subsections:
- Coverage
- Secure score
- Security policy
- Regulatory compliance
The coverage and secure score sections offer a security overview per subscription. The coverage section shows information about which Azure Security Center plan is enabled on each individual subscription and how many resources are covered per subscription. The secure score section can be seen on the main dashboard but this time it offers per-subscription information, showing us the score for each individual subscription.
The security policy section helps you define what kind of security recommendations will be sent by Azure Security Center. By default, recommendations will be made based on the most common compliance standards and custom Azure CIS. This can be done on the subscription level, and we can set different settings for different subscriptions.
Examples of default settings are shown in the following screenshot:
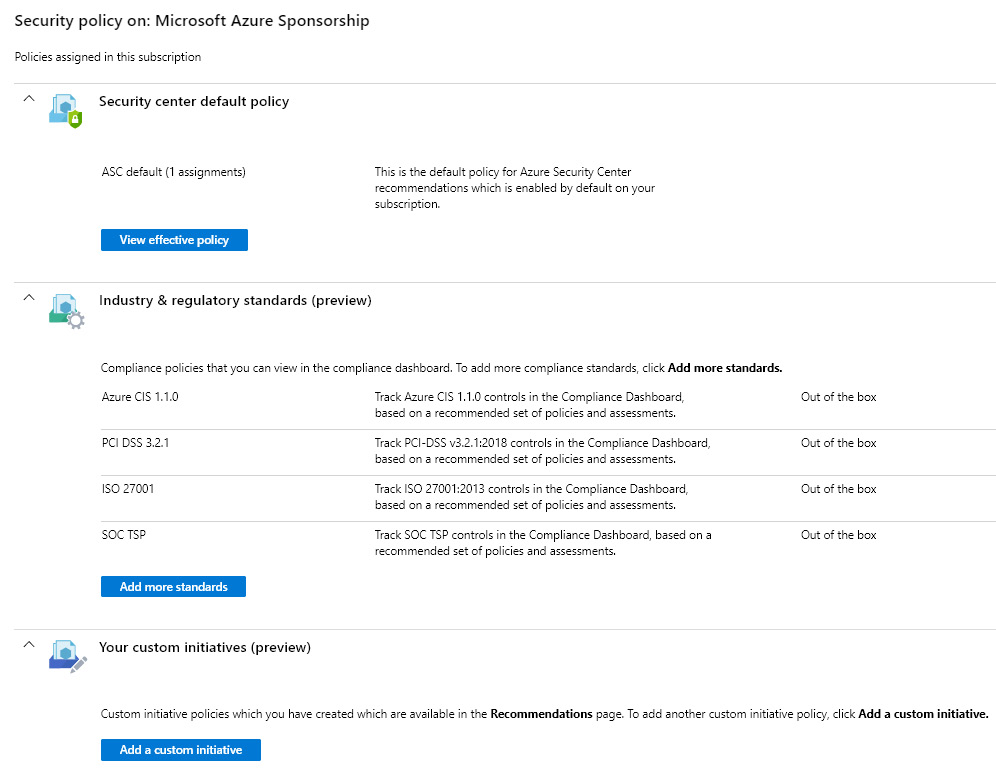
Figure. 7.10 – Default policy settings
Standard policies that are enabled by default are Azure CIS 1.1.0, PCI DSS 3.2.1, ISO 27001, and SOC TSP. Additional industry and regulatory standards that are available are NIST SP 800-53 R4, UK Official and UK NHS, Canada Federal PBMM, and SWIFT CSP CSCF v2020.
Besides industry and regulatory standards, we can create custom policies that apply to our organization. Using custom policies, we can track what happens in our Azure environment, based on special requirements. To create a custom policy, we need to define a subscription to which this will apply and select definitions that we want to track. For example, we can set a policy to track whether SQL-managed instances have Transparent data encryption (TDE) enabled with custom keys, or whether Azure Backup is enabled for Azure Virtual Machines. Azure Security Center will the track resources on a defined subscription and send notifications when policies are not applied. It's important to mention that this will only track and send notifications that resources are not compliant with the policy. We need to act and make changes to recommendations to actually change the state of the resource and comply.
An example of a custom policy is shown in the following screenshot:
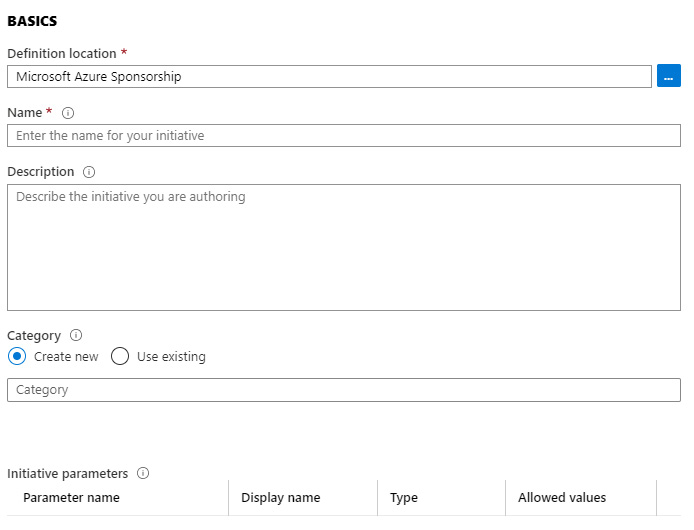
Figure. 7.11 – Creating a custom security policy
With security policies, we can define which (if any) industry standards we want to be compliant with. Under regulatory compliance, we can see how our subscription holds when evaluated on each standard. Four standards are currently available: Azure CIS 1.1.0, PCI DSS 3.2.1, ISO 27001, and SOC TSP. Each standard has controls, and we can see which controls are passed or failed. There are a total of 330 controls that intervene between standards. The regulatory compliance section offers an overview of all the controls and controls for each individual standard, as shown in the following screenshot:
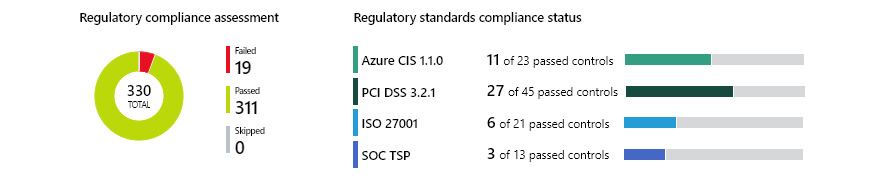
Figure. 7.12 – Regulatory compliance overview
For each available standard, we can see a more detailed report with information on passed and failed controls. Similar to recommendations, we have a list of actions that need to be taken to pass controls. And the same as with recommendations, actions can be presented in the form of instructions that we need to perform manually, or they can offer a quick fix to resolve issues.
An example of failed controls is shown in the following screenshot:
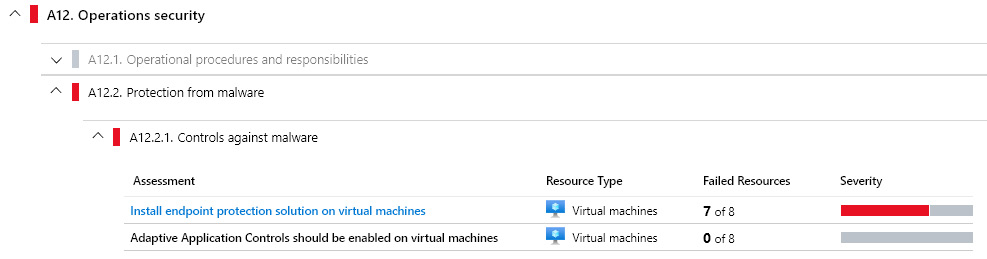
Figure. 7.13 – Regulatory compliance overview
Controls are there only as a guideline; they are not fixed automatically. A list of failed controls is there as a reminder of what needs to be addressed and fixed in order to pass controls.
Resource security hygiene
This section offers a different view of Azure Security Center recommendations. The section is divided into the following subsections:
- Recommendations
- Compute & Apps
- Networking
- IoT hub & resources
- Data & storage
- Identity & access
- Security solutions
The Recommendations section offers the same information as seen in the overview, and the rest of the subsections offer subcategories based on types. For example, the Networking subsection will provide only recommendations referring to Azure network services, such as network security groups, network interfaces, virtual networks, and so on.
The last subsection, Security solutions, enables the integration of third-party tools with Azure Security Center. We can add non-Azure servers to be monitored by Azure Security Center, send Azure Security Center logs to SIEM, or add a web application firewall or next-generation firewall.
A lot of companies and organizations require a central logging solution – SIEM (Security Information and Event Management). All products and systems that have custom logging and a centralized solution that helps you identify events across an organization are very useful. So, the ability to send information and logs gathered by Azure Security Center may be a very important requirement, especially for large organizations and enterprises. Some SIEM solutions that may be integrated with Azure Security Center are IBM QRadar, Splunk, SumoLogic, ArcSight, Syslog server, LogRhythm, and Logz.io.
The option to add non-Azure Virtual Machines to Azure Security Center enables true hybrid-cloud capabilities. The security enhancements that Azure Security Center enables for Azure Virtual Machines can be extended to basically any other server, running in a local data center or another cloud. This allows advanced threat detection and alerts and incident investigation across our environment.
Advanced cloud defense
Advanced cloud defense presents additional tooling for enhanced threat mitigation. Four additional tools are available:
- Adaptive application controls
- Just-in-time VM access
- Adaptive network hardening
- File integrity monitoring
Adaptive application controls enable you to have control over which applications can run on servers protected by Azure Security Center. This applies both to Azure and non-Azure VMs and servers. We can control what can run on servers by allowing only specific applications or types of applications to run and prevent any malicious or unauthorized software. We can create different groups that will track the file type protection based on location, operating system, and environment type. Servers can be added to multiple groups to track different protection modes. An example of a group to protect a Windows VM in Azure, located in the US region with the audit option for any EXE, MSI, or script, is shown in the following screenshot:
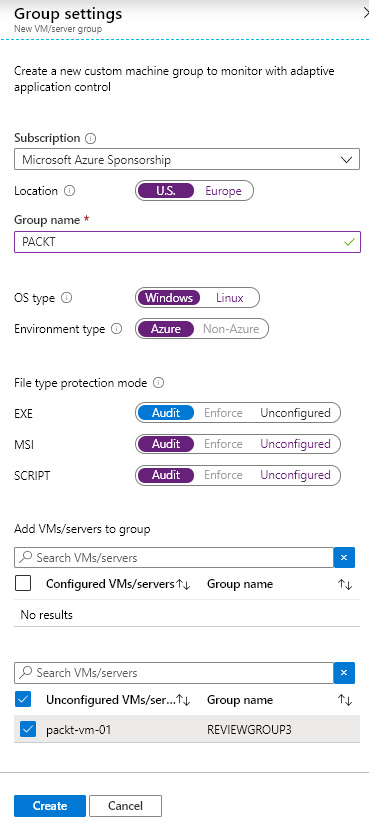
Figure. 7.14 – Adaptive application control group settings
Azure Virtual Machine management is another topic that needs to be taken very seriously. Best practice is to perform any management tasks only over a secure connection, using a P2S or S2S connection. An alternative is to use one VM as a jumpbox, and then perform management from there. But even in this situation, the connection must be secure.
Just-in-time VM access
Just-in-time access for Azure Virtual Machines is used to block inbound traffic to VMs until specific traffic is temporarily allowed. This reduces their exposure to attacks by narrowing down the surface and enabling access. Enabling Just In Time (JIT) will block inbound traffic on all ports that are usually used for management, such as RDP, SSH, or WinRM. The user must explicitly request access, which will be granted for a period of time but only for a known IP address. This approach is the same as is used with Privileged Identity Management (PIM), where having rights doesn't necessarily mean that we can use them all the time; we have to activate/request for them to be used for a period of time.
Important note
JIT access for Azure Virtual Machines supports only VMs deployed through ARM (Azure Resource Manager). It's not available for non-Azure VMs or Azure VMs deployed through Azure Service Management (ASR).
JIT can be configured from the Azure Security Center blade, or from the Azure VM blade. Configuring JIT for an Azure VM requires a few parameters to be defined, such as which ports we want to use, whether we want to allow access from a specific IP address or range in the Classless Inter-Domain Routing (CIDR) format, and the maximum period of time access will be available.
An example of configuring JIT is shown in the following screenshot:
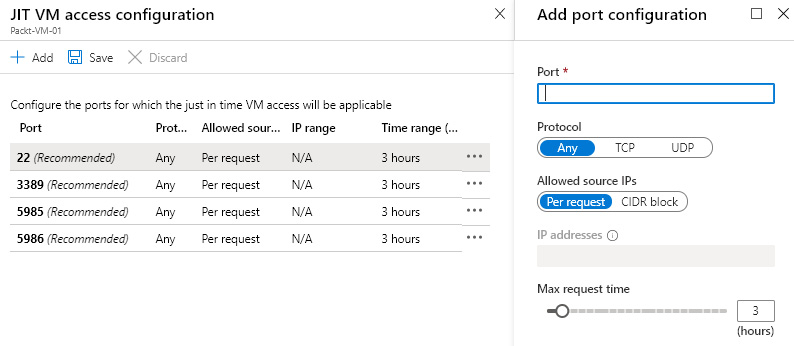
Figure. 7.15 – Configuring JIT access
By default, we have the most common management ports available. We can edit rules for these ports, delete rules, or add custom rules. Besides ports, we can change protocols, the allowed source, and the maximum request time (that can be between 1 and 24 hours).
Once JIT is configured, access needs to be requested each time we want to access the VM. This, again, can be done from the Azure Security Center blade or the Azure VM blade. While we are requesting, we can ask for a specific (or more than one) port to be opened, state whether we want to enable access from our current IP address or from an IP range, and finally, we need to define the time range. The time range depends on the configuration. By default, the time range is from 1 to 3 hours but can be configured for up to 24 hours.
Requesting JIT access is shown in the following screenshot:
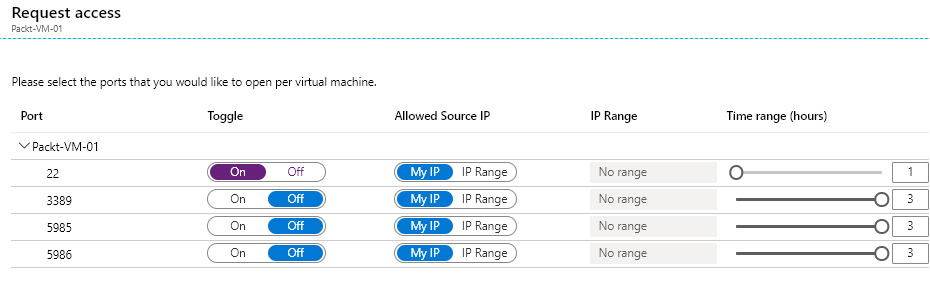
Figure. 7.16 – Requesting JIT access
JIT uses Network Security Groups (NSGs) to control traffic that is allowed or blocked. When JIT is configured for an Azure VM, NSG rules are created to block access over configured ports. Ports that are not configured for JIT should be automatically blocked unless configured otherwise. When JIT access is requested, another NSG is temporarily created that will allow access on the requested port. The new NSG rule will have a higher priority and override the block rule to enable access. Once the requested time period expires, the allow rule will be deleted, and access will be blocked again.
Important note
If JIT is in use, no NSG rules for management ports should be created manually. Azure Security Center should control these ports at all times. If we create rules manually, we may override JIT rules, or we may create a rule that will allow one of the management ports at all times and use JIT for the rest of the management ports. Both situations make JIT pointless.
Advanced network hardening analyzes our traffic communication patterns. Analysis is performed to determine whether NSG rules are overly permissive and create a threat in the form of an increased attack surface. Three potential threats are tracked: a malicious insider, data spillage, and data exfiltration. Azure Security Center reports all threats and assesses the current rules to determine whether changes to NSG rules are required and offers recommendations that will increase security.
File Integrity Monitoring is used to validate files and registries of the operating system and application software. It tracks changes and compares the current checksum of the file with the last scan of the same file to see whether they are different. Information can be used to determine whether changes are valid or the result of a malicious modification.
Threat protection
Threat protection provides information and reports on detected threats. It's very useful to have information on what is happening with our resources and whether anyone is trying anything against us.
Important note
No action will be performed by threat protection automatically; this section only provides information. To act on detected threats, we need to set up workflow automation.
Information provided in the threat protection section can be eye-opening. You might not even be the intended target but still get hacked as a victim of opportunity or due to a moment of carelessness.
To provide an example, we created an experiment where we deployed five Azure Virtual Machines and left the RDP port accessible over a private IP address. These were five blank VMs with no data and nothing special about them. What happens is that 'bad guys' scan public IP addresses in the hope of detecting open ports. After something like that is detected, a 'brute-force' attack will begin. Brute-force attacks use a combination of most common usernames and passwords to try to connect. These five Azure VMs, running for a single month, got hit approximately 20,000 times each.
All these attacks can be tracked and seen in Azure Security Center, in the threat protection section. An example of a report is shown in the following screenshot:
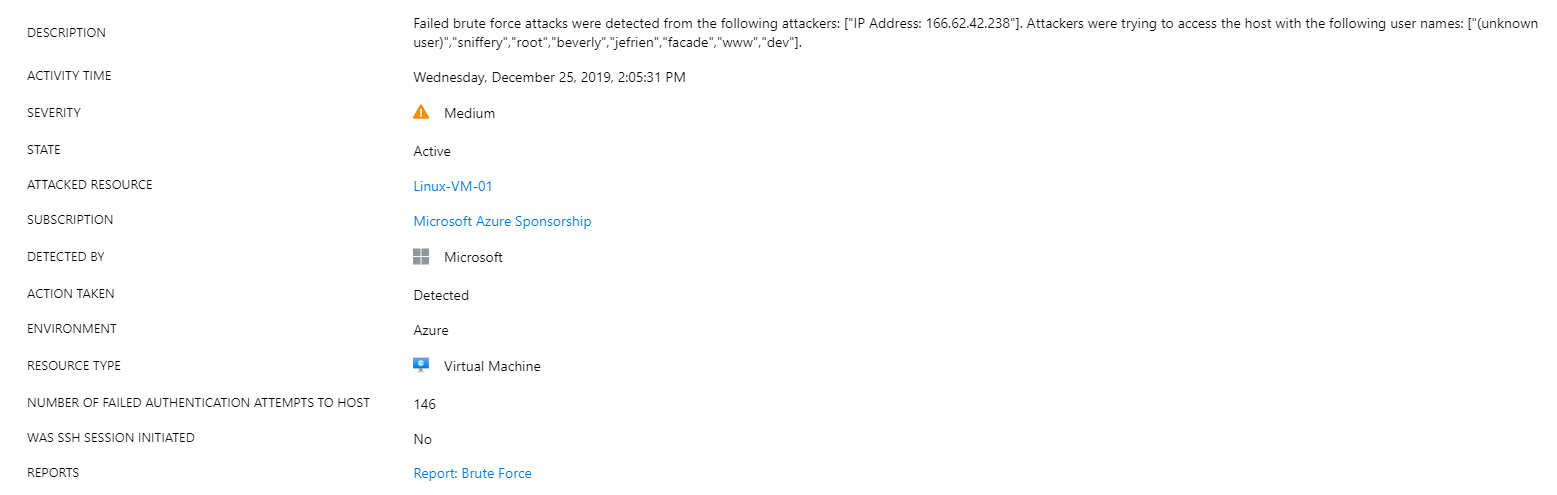
Figure. 7.17 – Bruce-force attack detected
In these reports, we can find information on which usernames were used in an attack, where the attack originated from, and how many times authentication was attempted. We can also see more information on the attack origin and the location from where the attack originated, as shown in the following screenshot:

Figure. 7.18 – Bruce-force attack origin
Summary
Azure Security Center helps us to keep our cloud environment safe in various ways, from offering recommendations on what needs to be improved to detecting threats as they happen, to response automation to act on possible threats. With different settings and policies, we can define our focus, track the health of our resources, and create a more secure infrastructure.
In this chapter, we discussed how important Azure Security Center as a Cloud Security Posture Management (CSPM) and Cloud Workload Protection Platform (CWPP) tool is. The next chapter will focus on Azure Sentinel, which is Microsoft's cloud-based SIEM/SOAR solution.
Questions
- Azure Security Center stores data in?
A. Azure Storage
B. Azure SQL Database
C. Log Analytics workspace
- Azure Security Center has which of the following pricing tiers?
A. Free
B. Standard
C. Premium
D. All of the above
E. Only 1 and 2
F. Only 2 and 3
- Information on how to increase Azure security on our resources is provided in the form of?
A. Fixes
B. Recommendations
C. Suggestions
- We can automate responses to Azure Security Center alerts with?
A. Log Analytics
B. Logic Apps
C. PowerShell
- Which file type cannot be controlled with Adaptive Application Control?
A. EXE
B. JAR
C. MSI
- When JIT is enabled on an Azure VM, the user?
A. Has the same access
B. Has less access
C. Has more access
D. Has to request access
- With Advanced Threat Protection (ATP), what happens when an attack occurs?
A. It will be automatically blocked.
B. The user has to create a response to the attack.
C. Some attacks are blocked automatically, and the user has to create a custom response for unsupported attacks.