The Internet? Is that thing still around?
—Homer Simpson
Now comes the time to begin the mastering of Kodi—for entertainment purposes only, of course.
I have a simple process of learning new software and new things in general and sincerely believe it’ll work for you as well. May I suggest, as we explore Kodi, you follow along. Having a keyboard and mouse attached to your Raspberry Pi, as I described in Chapter 5, allows you easier navigation and the ability to type in commands and configurations. Highly recommended.
In this chapter we’ll try out Kodi’s functions, using the default Estuary skin, by setting up two kinds of resources, Pictures and Videos. Gentlemen and ladies, start your screens.
Pictures
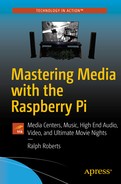
Use a mouse or the arrow keys on a keyboard and move the cursor over PICTURES on Kodi’s main menu (on the left side). The selection turns blue to show it’s now selected. Do not click yet; let’s discuss what we see when the cursor just hovers over the category selection . The majority of the screen (right) now shows the Pictures category as in Figure 8-1.
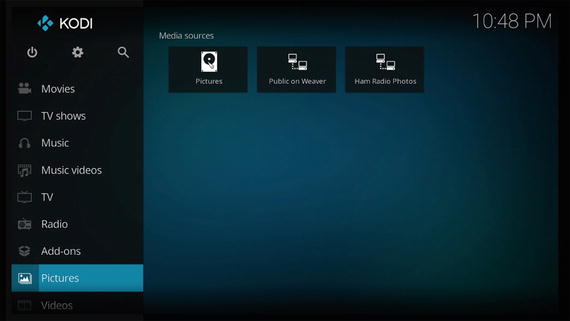
Figure 8-1. Selecting the Pictures option on Kodi's main menu
As shown, I’ve already added two links to picture resources residing on another network computer—Public on Weaver and Ham Radio Photos (my favorite hobby, so I take lots of photographs). Later in this chapter, we’ll be setting up your own picture resources. Clicking on the ham radio link gives access to thumbnails of my pics (Figure 8-2). Clicking on any one of them brings it up full screen. Or I can do automated slide shows with each picture or other illustration showing in sequence.
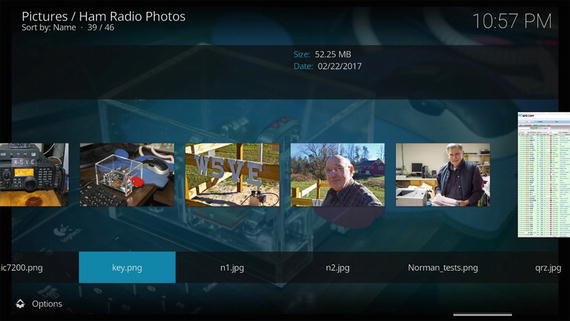
Figure 8-2. One of my photo resources; that 's me in the center and my callsign, W5VE, on the antenna enclosure fence
Picture resources of friends, family, hobbies, trips, events, and so on are fun. Kodi provides powerful ways of tracking and presenting our photographs either for our own enjoyment or to entertain visitors.
Now, back to your cursor hovering over Pictures on the main menu. Click now. The screen changes to the list in Figure 8-3. Again, I have resources already, but the point of interest for you here is the bottommost menu item, Add pictures. That’s how we find and add picture resources.

Figure 8-3. Add Pictures lets us add picture resources to Kodi, creating virtual photo albums and slide shows
Keep these three screens in mind; we’ll be coming back to them shortly. However, this is a good place to add more information on how to navigate around Kodi.
Navigation
As we explore, here’s a couple of tips on how to navigate back up from all the submenus we’ll be visiting.
ESC key: if you have a keyboard attached (recommended for ease of entering text), press the ESC key and Kodi returns you to the main menu (home screen).
Right-click the mouse: Clicking the right mouse button is a fast way of moving back up through the menus.
Arrow icons: Some menus have a left-pointing arrow icon; clicking on it also takes you back up a level.
External Drives
Pictures, music, and videos all require lots of storage space. I recommend a 32GB microSD card for the Raspberry Pi. That’s nothing compared to the space any good media center will need. So, consider adding external drives and networked resources.
External drives are those hooked directly to your Raspberry Pi, the easiest to add (see Chapter 3) being USB drives. To repeat the warning about attaching devices requiring high current such as external drives, use a powered USB hub. The RPi on its own does not have the power capacity to run big drives, but it can certainly read and write to them for your benefit.
One immediate difference is the first item in Figure 8-3, the My_Book item. In Chapter 3 we saw how to add additional storage to our media center. Specifically, I added a 4TB (four terabytes; that’s a lot) drive—a My Book from Western Digital, hence the name. Left-click on the name of your drive or drives (those physically attached to the Raspberry PI), and you’ll get a directory listing as shown in Figure 8-4.
Figure 8-4. External storage drive listing
You could, once more, using powered USB hubs, attach several large hard drives to your Raspberry Pi and they would show up on the Pictures screen. This gives you tons of room for storing pictures, music, movies, video, and so on.
By the way, when we get to the Video and Music selections on the main menu, you’ll see that these hard drives also appear there as well. Kodi, like most powerful software, offers several paths for getting to storage and other resources.
Internal Storage
Right-click your mouse to c ome back up one level to the Pictures menu. In Figure 8-3, we see an item also named Pictures. It links you to the Pictures directory on the internal storage device inserted into your Raspberry Pi.
In my case, internal storage is a 32GB microSD card. Storing media on the microSD card is a bad idea, a very bad idea. It suffers from slower retrieval and can quickly eat up free space better dedicated to the operating system, LibreELEC, and Kodi itself. If, for example, you only have an 8GB card, about two HD (high definition) movies and your system locks up, because all the room for swap files and working memory is gone.
That said, yes you can use it for photos or other media you want quick access to. Currently, I only have one photo in this directory, as shown in Figure 8-5.
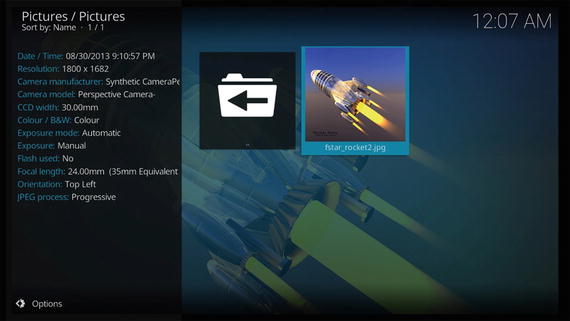
Figure 8-5. The Pictures directory on the RPi's internal microSD storage
When a photo in any directory is selected, Kodi shows you a list of info about it. And, just a reminder about navigation, clicking on the arrow icon takes you back up a level.
To show a photo f rom the list in your Pictures directory on the internal storage, just click on it with your mouse or remote. It then pops up on the screen. The photo in Figure 8-6 is an example of my science fiction “art.” I’m a rocket kind of guy.
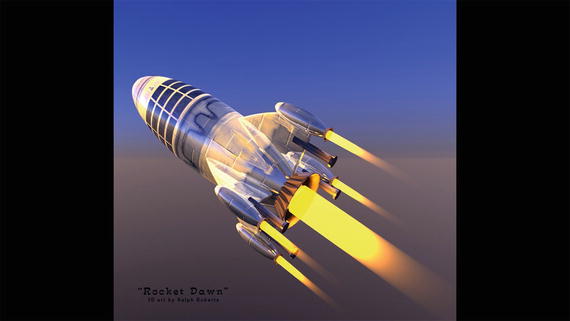
Figure 8-6. Clicking on the photo thumbnail shows the image full size on the screen
A couple of things you can do while the photo’s displayed. With the mouse, left-click on the photo, and Kodi adds animation to it like photos in documentaries. This is random. The photo may move slowly toward you or from one side to the other, and so on. This makes displayed photos more interesting while you talk about them to visitors.
Right-clicking with the mouse or hitting the Esc key on the keyboard takes the picture off the screen and returns you to the directory listing. If your mouse has a scroll wheel, scroll down to move to the next picture in the folder, or s croll up to move to the preceding picture. There are equivalent keys on remotes as well. Which one depends on how you’ve programmed it, but total control of the screen is always possible.
Back to the Pictures directory listing (which works like all directory listings). The top line of the dialog box sports an upward pointing arrow and two dots. Click on it and you go up one level, which takes us back to the Pictures menu as shown in Figu re 8-3.
Picture Add-ons
To begin this topic, click Add-ons on Kodi’s main menu and you will get the Add-ons screen shown in Figure 8-7. Four of the selections in this menu—those concerning video, music, programs, and pictures—include the capacity for add-ons (free mini programs that add features to Kodi). As you move the cursor over each menu item, installed add-ons for that category are shown.

Figure 8-7. Th e Pictures ➤ Add-ons submenu shows installed add-ons
I have a few add-ons already installed in this sample media center (see Figure 8-7). Like almost all resource add-ons, these require an Internet connection to work. The last two items (My add-ons and Download) allow us to configure or remove installed add-ons. The last, Download, facilitates finding, downloading, and installing desired enhancements to Kodi.
At this point, sliding the cursor over and clicking an add-on icon causes it to run.
We’ve moved the cursor down and are hovering over Picture add-ons as shown. Click on that selection and the Add-ons ➤ Picture add-ons screen (Figure 8-8) comes up.

Figure 8-8. The Pictures ➤ Add-ons submenu shows installed add-ons
An add-on for searching and retrieving media from Google Images is highlighted. This gives access to millions of photos and other graphics on Google. We’ll use it as an example of how to find and install add-ons in general and picture adds-ons specifically.
Before we continue, many more sources of add-ons exist than the ones we can find and install through the default Kodi software. Just Google “Kodi add-ons.” However, it must be said, be careful downloading add-ons from other sources. Eve n those through Kodi are of varying quality and some may not even work.
Why?
As we’ve discussed before, Kodi is open source, meaning that anyone can write third-party add-ons for Kodi without getting permission or going through any sort of vetting process. It’s good and bad. Good because a lot of hardworking folks turn out great add-ons. Bad because quality control and respect for legalities (as in copyright issues) are lacking in some add-ons.
I’ve uninstalled the Google Images add-on so we can restore it again together. (To delete an add-on, go to My add-ons, click on the category such as Pictures, right-click on the add-on, and click on Information ➤ Uninstall.) Here’s the procedure to find and install a picture-related add-on:
From the main menu, go to (clicking on each one) Add-ons ➤ Downloads ➤ Pictures.
Scroll down the list to view and select add-ons for installation.
In Figure 8-9, I’ve scrolled down and highlighted the Google Images add-on. By the way, if there’s a check mark next to the add-on’s title, thi s means it’s already installed in your Kodi.
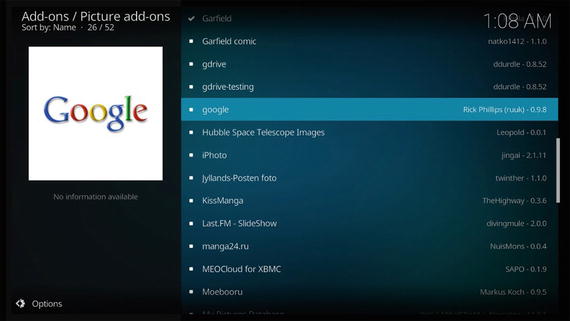
Figure 8-9. Looking at available picture add-ons
Let’s install it as an example of how add-ons are installed.
Click on the title for the one to be installed. You get a scree n like Figure 8-10.
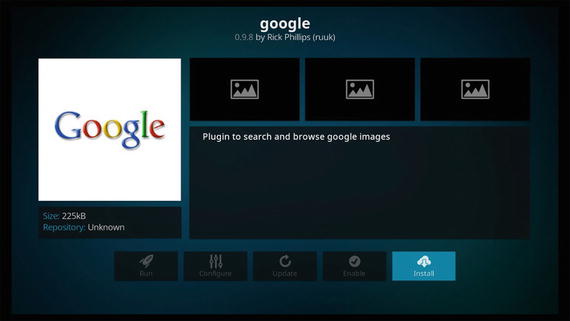
Figure 8-10. Add-on information dialog box
Click on Install and Kodi downloads and enables the add-on. During this process, Kodi sends you back to the list of available picture add-ons. When installation is complete, a check mark appears beside the title, and the add-on is ready to use. Go to Add-ons ➤ Pictures and you’ll see the new add-on’s icon. Click it and you’re ready to go.
Now, before we get too far from Figure 8-10, you can return to this information screen for a specific add-on by simply right-clicking the title or icon for that add-on anywhere you find it, and then clicking on Information in the drop-down menu that appears. For an active add-on, an Uninstall icon appears where the Install icon appeared earlier. This is how you remove an add-on.
In general, the other icons, moving left from the Uninstall one (at least for this add-on), allow disabling or enabling, doing a manual update (better to have automatic updating turned on), various configuration, and the little rocket lets you run the add-on from that there.
Note
By saying “in general” I mean that third-party add-ons come (in their thousands) from programmers outside of Kodi. You’ll find many variations in them, but (generally) the information screen lets you do whatever needs doing for that add-on.
Oh, and what does the Google Images add-on do? Figure 8-11 shows an example. I searched for “Switzerland” and it returned lots of photos. Click on one to view or to start a slideshow.
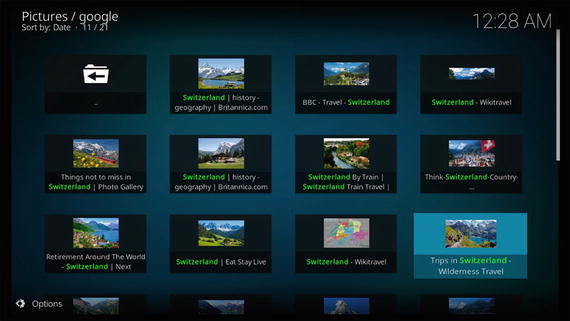
Figure 8-11. Google Images add-on
Add Picture Sources
To add picture sources—directories on the Raspberry Pi SD or attached hard drives, or on your local network, or on the Internet—we want to create a permanent link. Begin by clicking Pictures on Kodi’s main menu, and then on the bottom choice on the resulting menu, Add Pictures. In the dialog box that pops up, click Browse. The menu now appearing allows creation of links to sources of pictures on other computers, either on your local net or the Internet. The menu in Figure 8-12 is the one we’re looking for.

Figure 8-12. Browse for new sources of pictures and link them
We have several methods of connecting to sources on other computers:
Home folder: Connects to the home folder on the Raspberry Pi’s microSD card. While using this location as a picture (or video) source is fine on a larger computer, it’s a bad idea to take up the limited space on the microSD card with media files. Don’t use it.
Network File System (NFS): a method of sharing files found (more often) on Linux systems. An NFS server should have nfs:// as the first part of its link address.
Root filesystem: The root system of the underlying Linux operating system on your Raspberry Pi. Don’t mess with it unless you know what you’re doing. Certainly, never try storing media there.
Screenshots: A folder for storing screenshots. The default has it in the home folder on the microSD card. Later in this chapter, you’ll see how to change it to a better location, such as on an external or network drive.
UPnP devices: A set of p rotocols enabling networked devices to discover each other and communicate over a network. Chapter 16 shows using these to stream live TV among other things.
Windows Network (SMB): SMB (Server Message Block protocol) allows sharing network resources, such as connecting to other computers over the network. This is an easy way to link to directories on your desktop or laptop computers. Click on each computer to see drives shared on the network and to navigate to subdirectories. Figure 8-13 is an example of using Kodi to see and connect to the computers on my network.
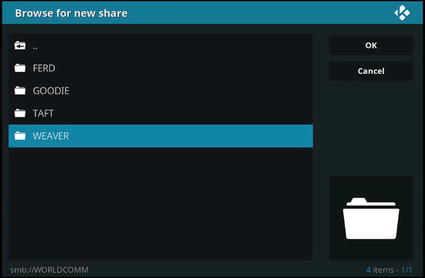
Figure 8-13. Kodi sees computer s on the network;click to navigate to the directory you want. (This depends on permissions being set properly for network access)
Zeroconf Browser: Zeroconf (aka Bonjour) is another set of network protocols. If you browse under this option and have devices on the network with this protocol, this menu option lets you see and connect to them or a resource directory (that is, one with pictures) on them in the same manner as SMB.
Add Network location: Works the same as Windows Network (SMB) earlier.
Here’s how to do an actual link, using linking to a directory on a Windows computer as example.
Click on a network protocol or location on the list in Figure 8-11.
Choose a computer or other device on your network or elsewhere and navigate to the directory desired or an Internet location.
Click the OK button on the right and the Browse for new share menu goes away, leaving the Add Pictures source dialog box—click on the Add button, then OK, and you’re finished.
I’ve chosen the directory with my ham radio pictures mentioned earlier and named it Ham Radio Photos.
Once you’ve selected a directory or other location and set it up with the dialog box you get by selecting the link, return to Kodi’s main menu and click Pictures again. Look at the Pictures menu (Figure 8-14) and we find my new link inserted (the one under my external drive link). From now on, just click on that link and it opens the Ham Radio Photos directory on the linked computer. This is a fast and convenient way to access media without having to store it on your Raspberry Pi. Click Add Photos again to create additional photo sources.
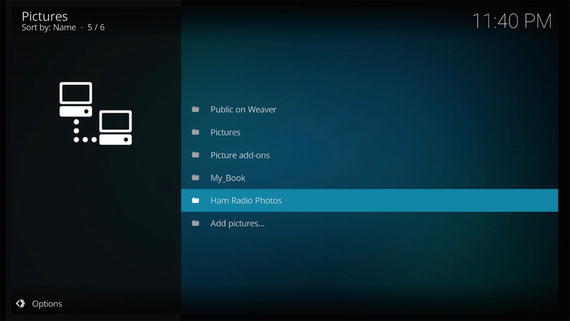
Figure 8-14. The Public line above links to the Public directory on one of my networked computers and serves as a picture source; any picture in that directory and its subdirectories is viewable
Want to edit the link in some way, such as change its name or delete it? No problem. Right-click on the link and you get a dialog box allowing various operations on the selected link:
Edit source
Make default
Remove source
Choose thumbnail
Add to favorites
Video
Let’s explore Videos. You’ll find the option on Kodi’s main menu (Figure 8-15).

Figure 8-15. Video selected on Kodi's main screen by hovering the cursor over it
A number of video-related icons appear, the number varying as you add or remove video sources and playlists. Media sources include those you create, just as we linked to picture sources in the previous section. There’s a lot of duplication on this screen; basically, these are just handy shortcuts.
Adding Video Resources
Adding a video resource is slightly different in the way we start it but then exactly the same as we did in creating picture resources earlier. Here, instead of clicking on Video, move the cursor over Files on the top row of icons and click it. You’ll get a similar menu (see Figure 8-16) but with video sources and other video-related items. Click Add Videos and, again, it’s the same from here in creating a video resource.

Figure 8-16. The Files menu for Video
TV Shows and Videos are directories on the Raspberry Pi’s microSD, card and my strong recommendation is not to use them for media storage. Especially not for video file storage, as they often run into the gigabytes in size and can eat all the space on the microSD card in no time at all. Everything else is a resource link I’ve added to my system.
The last line, also like the Add Photos screen we’ve already met, is for adding resources—in this case, of course, video resources.
Click on it, and then click the Browse button on the dialog box that pops up. We now have the same list of protocols, as you can see in Figure 8-17.
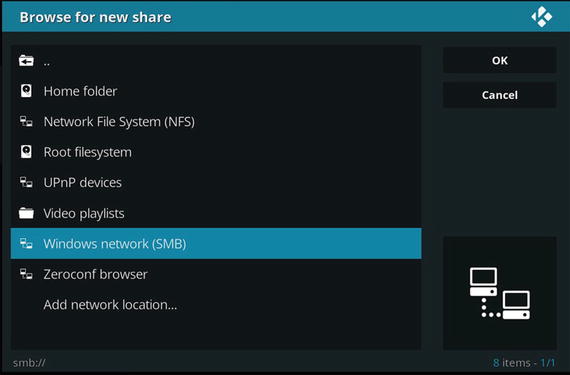
Figure 8-17. Adding a video r esoure (or music) is very much the same technique as adding picture resources
We’ll look at video playlists shortly, but first let’s finish out the Video main menu selection with add-ons. You add video sources using the same method by which we added picture sources previously. The results are different only in that they are added to the Video menu instead of the Pictures menu.
Here’s the method for adding a video resource link, again (like Pictures) using linking to a directory on a Windows computer as the example:
Click on a network protocol or location on the list in Figure 8-17.
Choose a computer on your network and navigate to the directory desired or other location such as an Internet website.
Click the OK button on the right, and the Browse for new share menu goes away, leaving the Add Video source dialog box. Click the Add button, and then OK, and you’re finished.
Return to the Video menu (in Figure 8-16 earlier), and we find the new link. It’s permanent and ready to use. If you want to edit or remove it, right-click on the name and a dialog box including those choices pops up.
Video Add-ons
Now, let’s look at video add-ons. Go to Add-ons ➤ Download (clicking on both) and we get the screen shown in Figure 8-18.
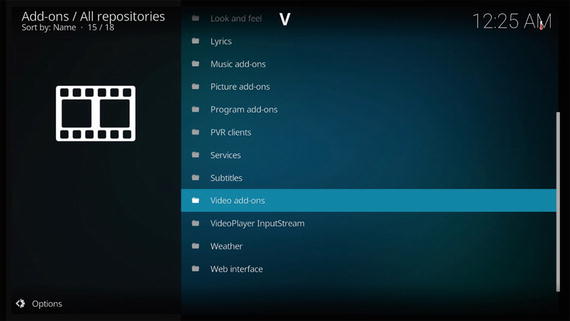
Figure 8-18. Click on the Video Add-ons menu to add third-party video enhancements
Click on Video add-ons to get a list of available third-party enhancements for Kodi (over 2200 on this list along). To install a video add-on, click on it and take these steps:
On the add-on information screen that comes up, click on Install.
Wait for the add-on to download, install, and enable (usually only a few seconds).
Return to the Video Add-ons menu.
Your add-on is now listed. Click on it to use it. As an example (Figure 8-19), I’ve added a selection of how to paint videos by Bob Ross (a fixture of classic TV; even if you don’t want to paint, these shows are often mesmerizing).

Figure 8-19. The add-on for watching Bob Ross show us how to paint
Should you not like an add-on and decide to remove it, there are three ways to do that. First, go to Video ➤ Video - Add ons and right-click on the title of the add-on to be removed. In the small dialog box that pops up, click Add-on Information. In the information screen concerning the add-on, choose Uninstall.
Video Playlists
Playlists contain links to media files, which are played in a specified or randomized order. Kodi offers us two types of playlists—basic and smart. You can have these playlists in both Videos and Music.
Basic Playlists
Basic playlists are noth ing more than regular text files. You can either create your own using Kodi’s built-in playlist editors (there’s one for basic and one for smart playlists) or get pre-made playlists from other sources.
Let’s make a basic playlist from scratch. In my case, I have a directory on the 4TB drive attached to my Raspberry Pi media controller. By the way, one of the many good things I’m getting out of writing this book (and passing along to you kind folk) is the knowledge of how one builds a powerful home theater using RPi/LibreELEC/Kodi. That is a winning combination, and I’m keeping mine.
Anyway, on the attached hard drive I have a folder in which I’m accumulating some of the many videos I’ve made. I like showing them off to visitors, and what better way than to have a playlist showing them in the background with low volume. A playlist for ease of accomplishing this demo of my production ability is in order. We’ll use my construction of that playlist as an example.
The first step is to make a link to the resource, in my case a directory on the attached hard drive called, appropriately enough, Videos. We’ve used this tech nique in the “Pictures” section earlier in this chapter, and it works the same way here and in Music as well. Here we go:
Navigate to Videos ➤ Files.
Click on Add videos.
The Add Video source screen comes up; click the blue Browse button.
On the resulting Browse for new share screen, click on the method required for getting to your source—since my hard drive is connected directly to the RPi via a USB hub, I choose Root file system, then Media.
In my case the 4TB My Book drive is now listed. So I click on it and a directory appears.
Now move down the directories to Videos (that’s what I want to use in building my playlist).
Click on Videos—we get a blank listing, but that’s fine at this point Click the OK button.
We find ourselves back on the Add Video source screen, but the path to our video source is now listed.
At the bottom of t he screen, edit the name of the link (I’m calling this one Ralph Videos) and click OK.
A Set content dialog box appears. I’m accepting the default values, so we just click OK again.
That’s it. We find ourselves where we started, on the Video - Files screen, but now there’s a new link—Ralph Videos (Figure 8-20).
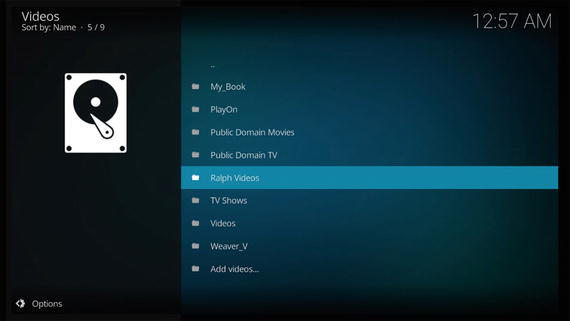
Figure 8-20. We've created a n ew video resources link, Ralph Videos
Well, that is a handy shortcut, and we can right-click on it and tell it to play the videos on the directory. However, it’s still not a playlist. Let’s now make a playlist from this resource link.
Click the Ralph Videos link. The directory listing for my Videos directory on the big hard drive comes up (see Figure 8-21).

Figure 8-21. Videos currently in this video resource link
Good. All the videos I’ve copie d into that directory are there. Now it’s time to build the playlist. Here’s how simple it is from this point:
Right-click the top video and choose Play from here.
Stop the video (click the square stop button at the bottom or press Esc on a keyboard twice).
Slide your cursor over to the left side of the screen to activate the side options menu and click Go to playlist.
Verify that all the videos in the directory are now in the queue (they are; see Figure 8-22).

Figure 8-22. The playlist menu
The playlist menu has now changed. We’ll select Repeat all so that the playlist will continuously play all videos in the directory—a good idea for a background video display, the purpose of this playlist.
Now click on Save an d we’re done.
Go back to Kodi’s main screen, click Videos ➤ Playlists, and you’ll see that our playlist now appears (Figure 8-23).
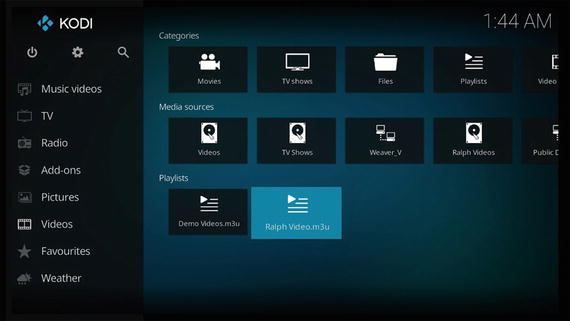
Figure 8-23. The new playlist is now listed
To use this basic playlist, right-click it, and a screen showing titles in that directory pops up. Click Play and we’re off to the races.
There are als o two other kinds of playlists in Kodi—Party playlists and Smart playlists. Playlists in Pictures, Music, and Videos all are created and used in the same way. In fact, you can even make playlists that mix media together.
What We Learned
This extensive chapter has devoted considerable space to Pictures and Video. You’ve learned how to create links to resources, resources being nothing more than collections of media files. Using Kodi, you can link to sources on the microSD card (not recommended due to limited storage space), hard drives or other storage devices attached to the Raspberry Pi, drives or directories on other local computers on our home networks, or sources out on the Internet.
You also learned about the different protocols used to connect to other computers and the Internet, about all the many add-ons available, and side menus. We also constructed a basic playlist.
Now, on to music.