We owe a lot to Thomas Edison—if it wasn’t for him, we’d be watching television by candlelight.
—Milton Berle
The title of this chapter probably should be “Constructing and Using a Complete Media Center ,” but there’s only so much room. That, however, would better cover the purpose of this chapter. We’ll be looking at the building process, specifically getting everything ready for adding your media components.
As I write this chapter, classical guitar music streams off the Internet via Kodi (Figure 4-1) on a Raspberry Pi 3 to some Bose speakers. Background music, I’ve found, keeps me in concentration and churning out more words per writing session.

Figure 4-1. Using Kodi to play background music for writing
Let’s dive in.
At this point, you’ll want to have a means of input and output for configuration. A minimal setup should include:
USB keyboard
USB mouse
USB or HDMI display
For the display—since we’re building a media center—go ahead and hook it to the HDMI-enabled TV you’ll be using. Just plug one end of an HDMI cable into the TV and the other into the Raspberry Pi.
It is assumed you know how to select the right input on the TV (that is, the one Kodi HDMI output from the Raspberry shows on your TVs screen) and that you can adjust the height and width of the picture slightly so that Kodi properly fills the screen, if needed.
Constructing a Basic Media Center
You’ve seen now how simple the installation of a bundle operating system optimized for Kodi is. Well, if you think it gets hard now—hooking a bunch of stuff up to the Raspberry Pi—no, it doesn’t. Simplicity continues to rule, as long as we do a bit of planning ahead of time.
Hardware
By “hardware” here, I’m referring to items needed to connect an intelligent controller device into our media center.
Whoops. Intelligent controller? I’d better explain that term. It’s a method of computerized automation. The Raspberry Pi is—you got it—a computer. The RPi, like larger computers, multitasks—that is, it runs hundreds of small programs called processes essentially simultaneously and also larger application programs the same way.
Think of it this way. It’s as if instead of a credit-card sized computer you had 200 people standing around, each person excelling in a particular task. One might help you select a movie, and another would research the plot and actors in the movie. Yet another would lean in and show the movie’s poster and other art work. And so on.
But you can’t get that many people in your living room, nor afford to pay them to just stand around most of the day and night. So we use a $35 computer to emulate all those experts standing around until their one function is need.
That’s an intelligent controller, a tiny computer running hundreds of processes each just waiting to do its little expert task.
It’s the only way to fly.
Let’s list the core necessities for an automated media center:
A Raspberry Pi. We suggest the RPi 3 because it has the faster processor and comes with both WiFi and Bluetooth on the board. The latter two add convenience of placement as we’ll discuss shortly.
A nice-looking case for the Raspberry Pi. You want to protect it and show off the technical prowess at the same time. You do not want someone picking up a bare board and shorting it out with popcorn-greasy fingers. One you might like is the Flirc Pi 3, 2 and B+ case—it’s made of aluminum and has a built-in heat sink (a piece of metal on the top of computer chips to help them dissipate heat better and avoid damage). Since an RPi used as a media center controller runs long hours, a heat sink to keep it cooler is a very good idea.
A power supply for the RPi that plugs into the wall. This allows you flexibility in placement rather than having it plugged into a USB port on your computer. As stated in Chapter 2, you’ll absolutely need one that provides at least 2.5 amps of current. You’ll find that information in the small print on the unit plugging into a wall socket.
Some sort of controlling device. A useful choice is a USB mouse and a USB keyboard for both point and click motions and text entry.
A microSD card with 8GB or more (32GB is the max the Raspberry Pi can currently handle but is inexpensive, and I recommend you use one). Yes, even 32GB is much too small for a media center; but you saw in Chapter 3 how to get as much additional space as needed.
[Optional] A powered USB hub. Absolutely necessary if you want to connect additional hard drives; USB CDs, DVDs, or Blu-ray players; remote control infrared receivers for remotes, and so on.
Those items represent the heart (or brain if you prefer) of your media center. We’ll discuss other hardware needed in connecting various components as the need arises.
Figure 4-2 shows my Raspberry 3, the basis of my intelligently controlled home media center, in its protective case. Counter-clockwise from bottom left, the plugged-in cables and dongle are:
Power cable from a wall power supply
HDMI cable to TV
USB keyboard
USB wireless dongle for mouse
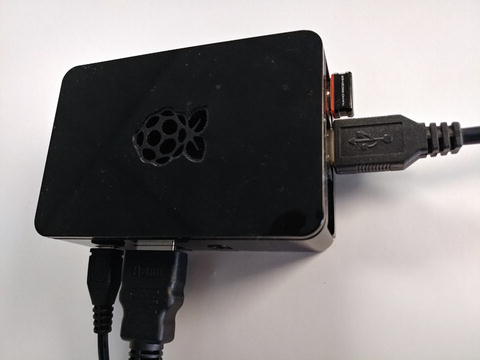
Figure 4-2. Raspberry Pi 3 configured and connected as a media center controller
Placement
The Raspberry Pi 3, keyboard, mouse, powered USB hub (if present) all should be on a table near the largest component, usually a flat-screen TV hanging on the wall. This is the primary control center and the place where new components get hooked into the system. Keeping it close to the TV means you don’t have to run an HDMI cable all the way across the room.
Don’t worry, we’ll still going to have a remote control allowing us to flop down on the couch, binge-watch movies, eat popcorn, and quaff our favorite libation. See, I’m not losing sight of the true basics of home entertainment here.
Considerations for the table include:
Positioning it near the TV, out of the way yet still readily accessible.
A small chair so you can quickly and comfortably sit down whenever using the mouse and keyboard.
Keep the cables and other wiring neat so that adding or removing components is easy and the backs of the units are accessible for plugging and unplugging. Trying to find the right cable in a rat’s nest resembling the stereotypical “explosion in a spaghetti factory” wastes good viewing/listening time.
An outlet strip attached to the top rear of the table is also handy to avoid having to get down on the floor in a darkened room to plug in a new device or remove an old one.
I’ve learned the hard way over the years the awkwardness of not being able to access the backs of units. So, I’m a big fan of a table with space behind it or at least one allowing ease of pulling it out a bit. Ease of access pays off over and over in pure convenience.
What We Learned
In this chapter, we did the basics of constructing a media center. We discussed the necessary hardware needed for controlling a home theater, along with the placement of your control center with ease of access for making changes.
In the next chapter, we’ll be installing an operating system to run our Raspberry Pi and Kodi, the main application software that will deliver all that great entertainment for years to come.