Americans don’t spend billions for entertainment. They spend it in search of entertainment.
Now that we’ve installed media center software on our Raspberry Pi and optimized it for smooth operation on a single-board computer, let’s find out what it does. This chapter shows you:
Hardware tips about hooking things up to our RPi media center controller.
Software in a more comprehensive look at Kodi’s features and operation.
First, we hook stuff up.
Choosing and Attaching Components
A media center controller needs a media center to control. Some of these entrainment-providing devices you already have. A TV, for example, is the biggest and most likely central focus of the media center, so to speak. We’ll start there and connect it first.
TV
First, a few words about TVs in general.
As far as media centers go, your TV is the elephant in the room. It’s big, obvious, and shows colorful moving pictures with sound. In showing off what your media center can do, you’ll no doubt immediately use the TV and show your guests some of the Kodi-driven features. To top off the “gosh-wow” stuff, point out the tiny case of your Raspberry Pi controller. Remark knowledgeably about how this tiny computer turns your media center into a powerful, smart home theater—because it does.
TVs today are wonderful; most likely yours is a large, thin, flat device hanging on the wall. Flat-panel technology drastically changed displays of all types. No more bulky CRTs (Cathode Ray Tubes) for computer displays or televisions. Flat-panel displays also made laptops, smartphones, and all sort of other electronic goodies possible. Flat-panels exploded into use because of their thinness, low power requirements, and downright convenience.
These screens fall into three basic types:
Plasma: Shown in Figure 7-1, a PDP or Plasma Display Panel was once common in large flat-screen TVs. They were invented in the earlier 60s, but manufacturing costs did not come down to make consumer televisions affordable until about 2004. The name “plasma” derives from the method of creating images, which involves using many small cells having electrically charged ionized gases (called “plasma”).

Figure 7-1. A 42" Plasma screen on the wall of my office used for video production (opening credits from a surprisingly popular local TV show I did for several years). Plasma’s color reproduction was superior for years until OLED came along.
LED: The name LED (Light Emitting Diode) for flat-screen displays is a bit misleading. Most screens labeled LED really use LCD (Liquid Crystal Diode; a diode is a two-pole semiconductor allowing current flow in one direction). LCDs suffer from low light emission, so some form of backlighting is needed for bringing out the brightness and color we expect from our TVs. This backlighting was originally provided by fluorescent and still is in cheap units. LEDs became the backlighting solution, giving not only sharper pictures and more accurate colors than fluorescent lighting but presenting the added benefit of being more energy-efficient.
OLED: the third and newest type is OLED (Organic Light Emitting Diode) . OLED displays do not use LCDs for generating the image. Instead every pixel in this type of display consists of a material that glows when electricity is applied. It’s been described in an article by tech writer Geoffrey Morrison on http://cnet.com as “… kind of like the heating elements in a toaster but with less heat and better resolution.” The organic part comes from the organic compounds enabling the various screen colors.
Assuming you don’t have a TV yet, which is best?
For many years, plasma won hands down. It had darker blacks and sharper colors than LCD/fluorescent and the current LCD/LEDs. In 2006, flush with a big royalty check, we laid out $3200 for a 42” Samsung plasma TV. Today, for about a tenth of that price, you can score an even larger LED screen that certainly approaches plasma’s picture quality. Plasma TVs remain expensive and are disappearing from the consumer market. Two giants in TV manufacturing, LG and Samsung, discontinued their plasma models in 2016, for example.
Today, the choice would be LCD/LED, hands down on both price and availability. These units sell for low prices, and the picture quality gets better every year. LCD/LED remains a compromise but one we can afford. Table 7-1 sums up the differences.
Table 7-1. Differences between Plasma and LED TVs
Display | Screens | Viewing Angle | Contrast | Motion | Color | Power |
|---|---|---|---|---|---|---|
Plasma | 42" - 65 | Excellent | Excellent | Excellent | Excellent | Good |
LED | 19" - 94"Very Good | Very Good | Good to Excellent | Excellent |
Tomorrow, your choice will become better as the cost of OLED goes down. OLED screens, as of this writing, remain priced out of reach for most of us. However, this is truly cool technology, surpassing plasma. While plasma has great blacks compared to LEDs, OLED achieves absolute blacks and exceptionally bright whites down to the single pixel level! Currently, LG makes all OLED TVs, although other companies are working on them. Their picture quality is fabulous in its clarity, color reproduction, and viewing (some OLEDs screens curve for better, more realistic viewing).
Let’s get back to hooking up whatever TV you have. I’m hanging on to my beloved plasma for the moment, but larger screens at economical pricing certainly tempt.
HDMI Hookup
The first media center connection we make to our Raspberry Pi/LibreELEC/Kodi controller is the TV. As suggested previously, place the RPi close to the TV, allowing you to use shorter cables, for one advantage.
Make sure your HDMI (High Definition Multimedia Interface) cable has the right plugs on each end. The Raspberry Pi comes with a female HDMI connector, as do TVs. So, we need a standard male-to-male connector, as shown in Figure 7-2.

Figure 7-2. The HDMI cable you need has ends as shown here
Mechanically hooking the RPi media center controller to the TV is simple:
To protect the circuitry, remove power from both the Raspberry Pi and the TV.
Plug one end of the HDMI cable into the RPi and the other into the TV.
Restore power to both.
Use your TV’s remote to rotate through the inputs until you see Kodi’s main screen.
Congratulations, you now have a computer-controlled media center. Well, at least they’re connected and, just like this, you can use Kodi for all sorts for things. However, for great entertainment, we need Kodi to have greater control of not only the TV but its current and future peripherals also. After all, this is the prime reason for building a media center controller—to get the fullest control possible.
Next, you’ll see how that’s done.
CEC
CEC (Consumer Electronics Control) is built-in to HDMI and permits users (that’s us) to control up to fifteen devices. The huge advantage of using CEC for our media center is two-way communications through the HDMI cable, which lets us use our existing remote to also control Kodi.
Full control requires two-way communication. Let’s revisit the best way of enabling the TV, and whatever’s attached, to provide data back to Kodi. Such control includes (as listed in the Kodi Wiki ( http://kodi.wiki/view/CEC ; lots more info about CEC there):
Controlling Kodi from the TV’s remote control
Automatically switching to the right TV input device
Letting Kodi control what mode your audio receiver is on when the TV switches on
Turning all devices off with one remote
Setting volume/mute of the receiver
Using CEC, you can also customize buttons on your existing remote. This allows flexibility in adding Kodi-controlled functions to the remote.
Turning on CEC in Kodi
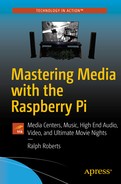
The Raspberry Pi GPU has CEC support, which is thus available to Kodi. To turn on CEC in Kodi and configure it, go to System ➤ Settings ➤ System ➤ Input ➤ Peripherals ➤ CEC adapter.
You start with the Settings icon in the upper-left of the main screen (the gear symbol). Figure 7-3 shows what the CEC configuration screen looks like.
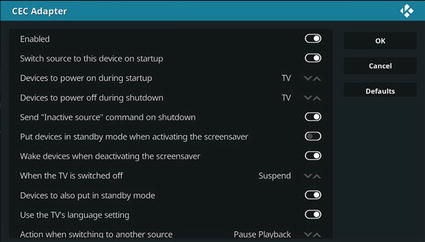
Figure 7-3. CEC configuration screen in Kodi
You also need to enable CEC on your TV. The option to do so is in its menus. Check first using the remote to search for it; otherwise look at the manual or just Google the model of your set and search for “enable HDMI-CEC.”
Determining if Your TV Supports CEC
The good news is that almost all manufacturers include CEC in their sets today, but it gets a bit complicated. Yes, they have CEC; they just don’t call it that! Again from http://kodi.wiki/view/CEC , following is a list of major manufacturers and how they label CEC:
AOC: E-link
Hitachi: HDMI-CEC
LG: SimpLink
Loewe: Digital Link or Digital Link Plus
Mitsubishi: NetCommand for HDMI
Onkyo: RIHD (Remote Interactive over HDMI)
Panasonic: VIERA Link or HDAVI Control or EZ-Sync
Philips: EasyLink
Pioneer: Kuro Link
Runco International: RuncoLink
Samsung: Anynet+
Sharp: Aquos Link
Sony: BRAVIA Link or BRAVIA Sync (You may need to use a port labeled HDMI-MHL if the regular HDMI port does not work).
Toshiba: Regza Link or CE-Link
On the web site, there are lists of specific models known to work with Kodi via CEC control, information about programming CEC functions, and more.
It’s more than worth a little effort to add CEC control to your media center. Also, if you can control Blu-ray players, video recorders, and other peripherals through HDMI/CEC, you have a truly powerful and flexible media system that can grow as you add things to it.
What If There’s No CEC on the TV?
If your TV was made a decade or more ago (like the one in my home), it might not have CEC. In such case, use the older infrared remotes. You won’t have nearly the power as with CEC but it still makes operating your media center more enjoyable. In my case, I’ve got my eye on a 65" screen for under $500, and that fixes that problem.
Game Controllers
Got a game controller ? No problem; Kodi has you covered there as well. Go to System ➤ Settings ➤ System ➤ Input ➤ Configure attached controllers. Figure 7-4 shows what that screen looks like.
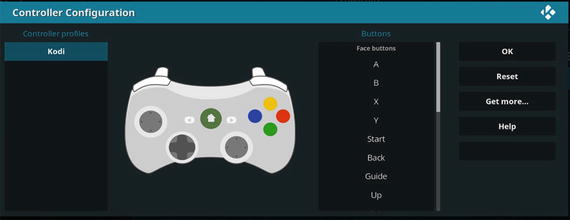
Figure 7-4. Kodi lets you configure and use a game controller
Sound Outputs and Inputs
OK, your TV comes with, again most likely, speakers built-in. Perhaps you’ve also added a sound bar and/or surround speakers, going for the whole theater effect, all connected directly to the TV. That’s good and, assuming you have a CEC-enabled device and have activated CEC on Kodi’s System ➤ Settings ➤ System ➤ Input Devices ➤ Peripherals ➤ CEC adapter menu, you’re good to go. So, why would you want to input music or other sound coming into the RPi or output to sound devices (speakers, headphones, and so on.) directly to the Raspberry Pi? These connections, of course, may be either physically plugging in a cable or wireless.
Some major reasons include these:
Driving speakers in other rooms via Bluetooth or WiFi
Feeding Bluetooth headphones
Streaming video/audio to mobile devices (covered in next chapter, including Netflix, Hulu, and so on)
Connecting high-end audio DAC (Digital-to-Analog Converter) devices to get better sound
That’s just a few, but all four of these uses can dramatically improve the utility of your RPi-controlled media center.
Take remote speakers. They’ve become quite popular of late, reproducing digital music with exceptional quality with wide range and deep pounding bass. I have several, but my favorite is a Bose Mini II SoundLink. With my Kodi software, taking the speaker anywhere in my house or office or sitting outside under a tree using my laptop is easy. We can use our smartphones as remote control of our media centers. Changing music streams is a breeze so long as you’re in range of your system.
In later chapters, we cover not only adding sound systems to Kodi systems but also using the Raspberry Pi to acquire and stream music and video without using media center software. All sorts of possibilities and, right, the RPi is so cheap we can use them as embedded controllers in all sorts of projects, sound-related and more.
Let’s review ways of sending sound from the Raspberry Pi to transducers. A transducer is a device which converts an audio signal into soundwaves the human ear can hear. Speakers and earphones are good examples of output. A microphone—a type of transducer converting real-world sounds into audio signals—is a type of input device.
Methods of outputting audio signals via the Raspberry Pi are
HDMI socket for high-definition input and output of audio and video as well as control signals and other data via the CEC protocol
The 3.5mm audio/video socket
USB receptacles
GPIO pins
HDMI: Having just connected an HDMI cable between our Raspberry Pi and the TV, I know it’s necessary. But what if you have two or more HDMI devices—such as Amazon Firestick or Google Chromecast—and want to control them as well? Search online for “HDMI switch.” You’ll find many of them—including two, three, four, and five cable versions—in the $10 to $30 range. An easy problem to solve, but do read the reviews. Some seem prone to problems with automatic switching between cables, but in general such switches allow lots of scope for expanding your RPi-controlled media center.
Audio Socket: The 3.5mm audio/video socket is a standard like the headphone socket on smartphones and all sorts of other devices. Like smart phones, the one on the Raspberry Pi is also a 4-pole socket. On the phone, you have left channel audio and right channel audio (stereo), a microphone input, and a ground. The RPi socket is different in that it outputs video instead of receiving audio from a microphone. You can still use a microphone and input voice or live music, but the methods of doing this most often involve the USB receptacles, four of them on the RPi 2 and 3.
The RPi’s socket is cleverly designed so that, despite having video output, it also accepts a standard three-pole mini-plug such as those on headphones and provides stereo sound. Just plug in your headphones. Very neat, see Figure 7-5 for the location of this jack.
Figure 7-5. A Raspberry Pi 3 with the 3.5mm jack at the edge of the board center. To the left is the HDMI jack, and on the right edge are four USB receptacles with a cable plugged into one.
USB: Basically buying one of the plentiful $5 USB soundcard dongles provides microphone and other audio input as well as better quality stereo sound output.
Additionally, many other sound/music related USB devices can be hung off our little single-board computer powerhouse. These include (again using Amazon as example for pricing):
USB sound adapter (“dongle,” from $5 up), adds soundcard to RPi.
USB 6 channel external sound card 5.1 surround sound, about $14.
7.1 USB external sound card audio adapter.
Creative Sound Blaster Omni Surround 5.1 USB Sound Card with High Performance Headphone Amp and Integrated Beam Forming Microphone, about $80 (use powered USB hub for this one).
ELEGIANT USB Powered Sound Bar (also USB hub for power), $30.
Focusrite Scarlett 2i2 (1st GENERATION) USB Recording Audio Interface, about $100.
5-Channel Battery Powered Mixer Professional Compact Audio DJ Mixer Controller with USB Interface, a little over $50.
That is just a random sampling. With USB, you have thousands of other choices from simple to just as high-end professional as you want. There is lots of flexibility and capacity to add all sorts of stuff to your media center.
GPIO: One feature setting the Raspberry Pi apart from much larger computers are the GPIO (General Purpose Input/Output) pins . These 40 pins allow the RPi to control a multitude of real world devices from doorbells to huge electric motors. More to our purpose in building media centers, they also provide a way to plug additional boards into the Raspberry Pi, called tophats. These boards have sockets matching the 40 GPIO pins and just slide into place.
This is not an advertisement, but I own two tophat boards made by HiFiBerry, the DAC+ - Pro and the Amp+. The difference between these two is that the DAC+ requires an amplifier while the Amp+ has a 25 watt per channel amp (with separate power supply) on the board that plugs into my Raspberry Pi, as shown in Figure 7-6.
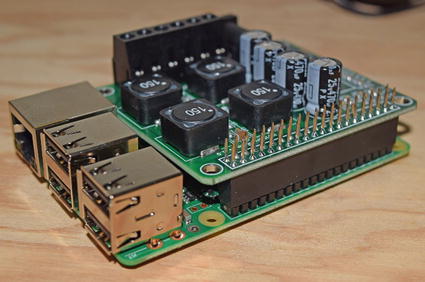
Figure 7-6. HiFiBerry Amp+ 25 watt per channel stereo amplifier tophat board plugged into Raspberry Pi. Note that you don't lose the use of your GPIO pins for other connections; they're passed through the Amp+ board.
These boards both have audiophile-level DACs, markedly better than using the one on the RPi board or even a USB-connected DAC. When paired with good headphones or speakers, the HiFiBerrys give wondrously clear and deep basses and excellent hear-every-instrument-in-the-orchestra clarity. This may or may not be for you but it makes a good example of what’s possible with your Raspberry Pi in the realm of great sound. These boards work with your RPi/LibreELEC/Kodi media center. Kodi recognizes the boards (once installed properly) and gives you control of whichever you have installed.
A little about me. Back in the day I owned and ran two stereo stores, specializing in top-of-the-line audio equipment. I was certified by the Society of Audio Consultants and came to truly appreciate good sound. The fact that I can get even better sound from a $50 add-on board (or $60 for the Amp+) than came from the old-technology analog equipment costing many thousands of dollars that I sold back then truly awes me. I revel in listening to quality digital records or even my collection of direct-to-disc records.
How good is good?
Both boards use a dedicated 192kHz/24-bit high-quality Burr-Brown DAC. This technology provides truly high end sound quality. The beauty of it is that both boards just plug into the RPi. They’re not kits, no soldering, no cables required. Plug, configure, listen.
We’ll look at high end-audio in more detail in later chapters, but let’s get back to Kodi and how to use it.
Kodi Features
First, where did Kodi come from? According to information on the official Kodi website ( http://kodi.tv ), the original software was created in 2003 by a group of like-minded programmers. Team Kodi consists of unpaid volunteers from around the world. More than 450 software developers, the site tells us, have contributed to Kodi to date, and 100-plus translators have translated Kodi into over 65 languages.
A Brief History
The parent organization, the XBMC Foundation, was formed in 2009 to deal with mounting development costs, paperwork, and travel costs to developers’ conferences and tradeshows, and so on. The XBMC Foundation is a nonprofit organization with the mission of developing great software.
The XBMC name derives from Kodi’s first incarnation back in 2003. It was created as independent third party media center software running on the popular game console, Xbox. Not surprisingly, name of this software was Xbox Media Center, known by its acronym of XBMC. XBMC was a hit, and soon versions were coded for Android, Linux, BSD, macOS, iOS, and Microsoft Windows.
Wait for it, things are coming together here. A standalone Linux version (based on Ubuntu, called a “fork”) came out under the name Kodibuntu. In August, 2014, the XBMC Foundation decided new versions of XBMC would henceforth be known as Kodi and registered the name as a trademark.
The Purpose of Kodi
As to Kodi itself, here’s how the official description of Kodi (from http://kodi.tv/about ) begins: “KodiÒ (formerly known as XBMC™) is an award-winning free and open source (GPL) software media center for playing videos, music, pictures, games, and more. …”
It’s worth noting here that Kodi is “open source” under the GPL or GNU General Public Library license. That means any of us can get the source code for the program, modify it however we like, and distribute our own version. Warning: Should you do this, come up with your own name for the package—the name Kodi is protected by trademark.
More realistically, those programmers among us might want to write their own add-ons or, another type of plugin, skins. It’s allowed. Kodi has a common API (Application Program Interface) allowing the creation of binary add-ons with C/C++ or script add-ons via Python scripts. That’s deeper than most of us want to go, but lots of programmers out there—thanks to Kodi’s popularity—are doing it and distributing some quite useful ones. Later in this chapter, we’ll look at those.
The site continues, informing us that Kodi runs on Linux, OS X, Windows, iOS, and Android. Users can play and view most videos, music, podcasts, and other digital media files from local and network storage media and the internet.
They conclude with how easy it is to get help, saying “our forums and Wiki are bursting with knowledge and help for the new user right up to the application developer. We also have helpful Facebook, Google+, Twitter and YouTube pages.”
Kodi is indeed the preeminent media center software; hence the decision to spotlight it here. To recap its advantages for us Raspberry Pi users:
It’s free!
Kodi is comprehensive software covering most functions of a media center, and it’s easy to customize and/or add additional features on demand.
It runs on the Raspberry Pi, enabling a “$35 solution,” giving you a dedicated computer that automates and controls your home theater.
Once you become familiar with its features, menus, and operation, Kodi’s a breeze to use.
Which brings us to what the rest of the chapter covers—the major features of Kodi.
Kodi Main Features
This section introduces you to Kodi’s general features. Actual operation comes in the next section, where we’ll explore all the screens making up Kodi’s GUI (Graphical User Interface).
Keep in mind that Kodi—through skins and add-ons as two examples—allows many ways to customize and enhance this entertainment center software. The Kodi Team continues developing new versions, and there’s also a lot of third-party support thanks, as noted earlier, to Kodi being both open source and popular. For now, in this subsection, we explore the major features of Kodi. In other words, answering the question of “what does it do?”
In general, Kodi supports the most widely used audio, video, and image formats, playlists, audio visualizations, slideshows, weather forecasts reporting, and third-party plugins. It is network-capable (Internet and local networks). The following sections look more specifically at these areas.
Music
Kodi plays pretty much any digital format used for music you throw at it. It has cue sheets, tagging, MusicBrainz integration, and adds smart playlists for almost total control of your music collection.
Audio formats supported by Kodi include these:
MIDI
AIFF
WAV/WAVE
AIFF
MP2
MP3
AAC
DTS
ALAC
AMR
FLAC
RealAudio
WMA
And others
By “and others,” I mean “a lot.” The Kodi Wiki refers to support for “a countless number of formats and codecs.”
Playing Music
Playing music is accomplished from Kodi’s main screen (Figure 7-7) or the full screen visualization. We’ll do that shortly.
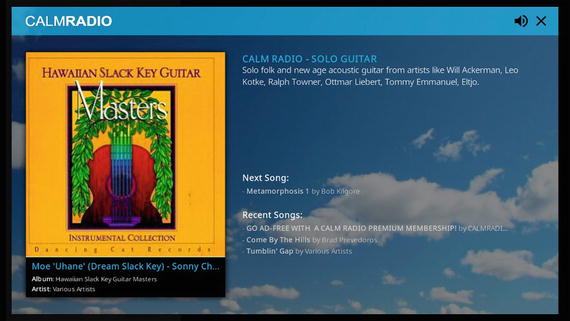
Figure 7-7. Like many writers, I find backgound music helps me concentrate and stay at the keyboard longer. Calm Radio is one of the thousands of add-ons for Kodi and presents hundreds of hours of, as the name implies, calming music. All free.
Music Library
In addition to playing music—selecting a digital music file from local storage, a computer on your home network, or on the Internet and listening to it—Kodi’s Music Library offers functions with wide-ranging features. The wiki listed earlier offers many pages of information on how the library works. Following are some of the library’s major features:
Adding music: Kodi scans music files, searching for identifying data. If the music is “tagged,” Kodi records this tagging information (such as artist, album, year, genre, and so on) and stores it in a database, allowing you to search by artist or any of the other tags. Yes, we turned this off earlier while making Kodi run more efficiently in the limited space of a Raspberry Pi; turn it back if you’ll willing to sacrifice performance for this sort of completeness.
Music navigation: The library sorts your music into categories and offers several methods of finding a specific file or files, and lets you sort and/or add filters to further narrow searches.
Music tagging: Good music tagging is a necessity to use the library features to their fullest. The Kodi Wiki covers tagging in detail.
Cue sheets: When putting together playlists for CDs and other external media, the cue sheets feature gives you a standardized way of passing readable index, playlist, performer, songwriter, title, and so forth.
Music videos: Kodi can include music videos in its Music Library. All scanned music videos (that show in their tags as such) are listed in both music and video playlists. You can search various sources and download music videos using add-ons called “scrapers.”
MusicBrainz metadata: MusicBrainz is an Internet database ( https://musicbrainz.org ) serving as an open music encyclopedia that collects music metadata and makes it available to the public. Kodi can query MusicBrainz for tag information on your untagged music.
Ripping CDs: The library provides several functions that allow you to build and burn music CDs; these are explained in detail in the Kodi Wiki.
Movies and Other Media
Another area Kodi emphasizes on the official site is viewing movies. The software supports all the popular video formats and sources, not the least of which includes streaming online media—movies on demand, for example. Kodi, if you have tags active, imports these movies with full posters, fan art, disc-art, actor information, trailers, video extras, and more.
I’ll show you how to obtain and watch movies in the next chapter, but this is a good place to discuss Video Library functions. As it does with the Music Library, Kodi contains a host of features for cataloging and managing movies, TV, videos, and indeed media of many types (Figure 7-8).
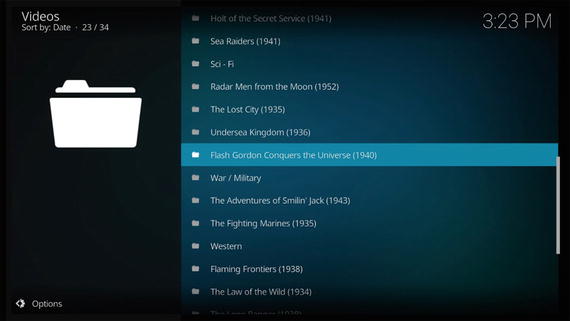
Figure 7-8. I enjoy the old B and serial films of the classic era, so the Classic Cinema add-on was a no-brainer for me. Had to have it.
Let’s look at these in general. Being familiar with the concepts will help you when we start using and enjoying Kodi.
Media Sources
One of the true advantages of enjoying a smart, Internet-connected media center is all the media you can get practically instantaneously. Movies, cat videos, songs, photos, and so on and so on. Kodi makes searching for and downloading this plentiful bounty of great stuff. Whatever you might be in the mood for, chances are you can find it.
What makes this magic possible in Kodi are Media Sources. Media Sources are virtual links you set up, showing Kodi where to find, retrieve, and play such media as:
Those on storage attached to your Raspberry Pi media controller
Computers on your local network
Sites on the Internet allowing media file downloads
Setting up Media Sources in Kodi requires minimal effort, and the software gives you helpful assists in doing so. To get a head start on your own, got to System ➤ File Manager ➤ Add Source and follow the prompts. You can have essentially as many of these links as you like, adding or deleting sources at any time.
In the next chapters, we’ll do several examples in the different media file categories so you’ll be up to speed on using this powerful feature. When you first start with Kodi you should at least add one source, like a drive or directory on your Kodi device to get you started. Copy some media files into it and you’re good to go. Earlier in this book, we’ve already seen how to connect to other computers and hook up external drives (Chapter 3).
More powerful links can be activated in Kodi through add-ons. For a quick overview, if you select one of these three menu choices on Kodi’s main screen—Pictures, Music, or Videos—the small dropdown menu shows two choices, Files and Add-ons. Hundreds of add-ons exist, allowing you to add almost any online media source you could ever want. Even commercial ones like NetFlix, Amazon, and Hulu. You still have to pay for such premium services, however.
TV Shows
Back in a not-so-long-ago day, we used to think that Direct TV and Dish were hot stuff—wow, a hundred or even two hundred channels. Well, using Kodi’s Media Sources feature you can have literally thousands of channels on any given night. Beyond cool, eh?
With all the content out there, we need help, and Kodi gives us a TV show library (part of the overall movie and video library). The TV shows library (as described in http://kodi.wiki ) “supports episode and season views with posters or banners, watched tags, show descriptions and actors. Video nodes/tags and smart playlists can further organize your library for special interests, making specific screens for sci-fi, anime, etc.”
PVR and Live TV
Kodi also provides features for showing live TV, including video recording (DVR/PVR). Kodi has an integral PVR (Personal Video Recording), which can connect to one of the many “backend” TV servers that are available. There are also lots of add-ons providing content, See Chapter 16 for more information.
This incredible wealth of content makes Kodi a true joy. Kodi’s open source software encourages third-party programmers to constantly create new add-ons, bringing us even more content. That’s good, very good indeed, but it also might get us in trouble if we’re not careful.
Streaming video onto our TV via Kodi or in any other manner is OK so long as we have the right to do it. If it’s in the public domain, free is cool. If it’s copyrighted material through a for-pay service like Netflix, Hulu, and so on, we need to have a paid subscription and the right to stream it.
I’m mentioning this because there are a good many add-ons, some rather popular, that allow the watching of paid TV without the minor detail of paying for the content. No, I’m not listing them and you won’t find them in all the add-ons listed in Kodi for download and install. So, just fair warning. Should you get one of those legally questionable add-ons, you could be setting yourself up for trouble. Remember all the suits over music downloading. This is the same thing. Not worth the risk since there’s so much legal stuff out there.
Pictures
Kodi helps you catalog and manage all your photographs as well. I shoot photos all the time, sometimes several hundred a month. Kodi lets us import pictures into a library, scroll through them, set up slideshows, filter them and more—all using just our remote control.
UPnP
Here’s another nice feature. UPnP (Universal Plug and Play) permits devices on the same network to see each other and connect. Kodi employs UPnP to stream to and from Kodi software running on other computers. Remember, Kodi is free—you can have it on your desktop, laptop, everyone in the family’s phone, and stream shows or movies or pictures from and to your media center.
Add all the features to what we’ve met in preceding chapters, and Kodi’s desirability as our media center software becomes increasingly obvious. And because it’s free and the computer to run it, our Raspberry Pi, is so inexpensive, the possibilities just keep growing.
What We Learned
We looked at the differences between modern flat-screen TVs, starting connecting things by running an HDMI cable between our Raspberry Pi and the TV. We discussed CEC remotes, which allow two-way communications between HDMI devices—meaning that the RPi controller can give commands and get feedback from the devices it controls. We learned about the different methods of hooking speakers, headphones, and so on. to the Raspberry Pi—HDMI, 3.5mm audio jack, USB, and through the GPIO pins using plug-in “tophat” boards. Then we went over some of Kodi’s major features.
Coming up next, we do a deep dive into Kodi’s menus and start really using those features.