
Prior to the introduction of Revit Structure, your structural projects more than likely consisted of several files that you assembled into sheets and printed for each issue. These files were probably produced and maintained by a drafter. Another set of files was created by the engineer for the analysis portion, which eventually was put into the documentation portion of the drawings. The use of all these files kept it fairly easy to keep the work spread out so multiple users did not need to have the same file open simultaneously. Even if one person was producing all aspects of the project, at some point a second user was often brought into the project at the tail end to help.
Now Revit Structure has taken all of your individual files that you used to work on and combined them into one database that consists of a single .rvt file. This database is now where all of your plans, details, and sheets exist. This file contains all your project documentation. Chances are, more than one person will have to work in this database. This is where worksharing comes in.
Worksharing allows your project to be broken up into logical pieces called worksets, which allow multiple users to work on the same project at the same time.
In this chapter you will learn to:
Determine when to enable worksharing
Enable and set up the worksharing environment
Request and grant permission of elements
Stay in sync with other team members
Properly maintain your project file
With worksharing enabled, Revit Structure allows several team members to efficiently work on a project at the same time. Revit Structure does a good job of keeping track of ownership—in other words, who has which elements borrowed or checked out. This enables you to coordinate and propagate changes between users. Worksharing involves using worksets to create a multiuser working environment.
To truly grasp the concept of worksharing, you need to understand the workflow, the various terms and concepts associated with worksharing, and when it makes sense to use worksharing and when it doesn't.
A common scenario is where you, a single user, start a project and take it to a certain point before requiring the help of others, thus having a need to enable worksharing.
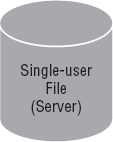
Before that time arrives you set up your project and start the modeling process. You coordinate levels and grids with the architect, and you add generic object placeholders for walls, columns, framing, and so forth to the model. You save this single-user project on your network server, as shown in Figure 13.1, so that it gets backed up, no different than how you saved your individual files in the past.
At some point additional users are needed. You may need someone to help with the analytical model or to help out with creating details. Every company and every project will have its own scenarios. Either way, you see that it is time for multiple users, and thus it is time to enable the worksharing feature.
There are four fundamental steps to prepare any project for worksharing:
Save the project in a project folder with an appropriate name
Enable worksets
Save the file
Synchronize with Central
Once you enable this feature, Revit Structure will take all of the content that you have placed into your project and assign it to logical worksets. The first stages of this organization are all handled by Revit Structure. At this point you are no longer working on a single-user file. The only thing you need to do is save your project so it becomes a central file for other team members to use. Save the central file onto the network just as you saved your single-user file.
Once the central file is created, users will create local files, which are saved on their own workstation's hard drive, as shown in Figure 13.2. These local files maintain a bidirectional link to the central file on the network. Revit actively manages the ownership of elements in the model so that no user can edit the same element as another user at the same time. Since each user opens and works within his or her own local disk copy, multiple users can now work on the same project simultaneously.
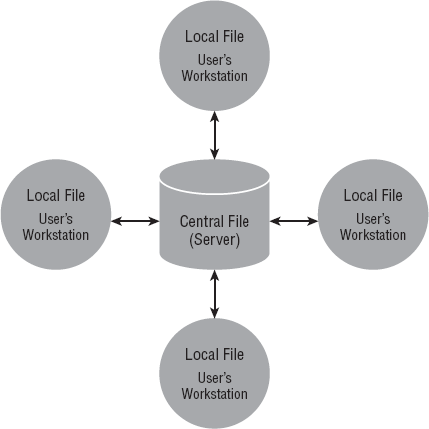
Figure 13.2. This worksharing diagram shows a central file saved to the server and local files saved to each user's workstation.
As users work they add elements and edit existing elements. As they do so they also save their changes frequently to both their own local file and to the project's central file. Revit coordinates the changes that are submitted from each user automatically. Throughout this process, users stay in sync with one another as they continue to work and make changes to the project.
This is one possible scenario, though the most common, that can exist. You will need to determine for yourself the best workflow that works for you. Regardless of your workflow, the remaining topics in this chapter will help you get the process started.
Before we get too much further, let's review some terminology. Don't worry: these terms will become second nature to you as you become more familiar with working on a project with worksharing enabled. You might even come up with your own definitions.
- Worksharing
Worksharing is a broad term Autodesk uses to describe the tools that Revit offers to collaborate with others, such as file linking, exporting data, and using worksets. These tools permit multiple users and, if necessary, multiple firms to collaborate more effectively.
- Workset
A workset is a grouping of elements that can be reserved for editing by a single user. These worksets usually consist of specific zones of responsibility, such as distinct wings or grouping of levels within building. Worksets can also be "checked out" (owned/borrowed) so no other user can edit them.
- Element borrowing
Element borrowing is defined as an event that allows a person to edit an element without checking out the workset it is assigned to. When a user edits an element within the model through his or her local copy, only that element (not the workset it's on) gets checked out or borrowed from the central file by that user; that way, no one else can edit it until it is relinquished. Using a library metaphor, imagine borrowing a book (element) off a shelf (workset) in a library (central file) instead of borrowing a shelf. Borrowing a book is analogous to borrowing an element.
- Checked out
While this terminology isn't actually used in Revit other than in some of its documentation, as a metaphor and again using a library as a comparison, it is useful. The term that Revit uses is "owner." This is the result of a user taking full ownership of a workset, which means no other user can edit elements that are assigned to that workset without asking that user. All elements that are part of a checked-out workset are now owned by the user who has them checked out. In contrast, a user who selects and edits an individual element or elements is a borrower, even though that person "owns" the element. Owner equals workset; borrower equals element(s).
- Central file
This is the type of
.rvtfile that Revit Structure creates once you enable worksharing. It becomes the master project file and contains a building model subdivided into functional areas through worksets. This master file is saved on the network so that more than one person can have access to work on the project. Revit creates one related and important folder for this project file, a folder named the same as the project with_backupappended. Do not alter it or edit its contents.- Local file
Local files are the
.rvtfile(s) used to enable worksharing. A local file is a copy of the central file that resides on a user's workstation's hard drive. This file maintains a bidirectional link back to the central file, which allows all users to interact with one another. Users work on the project by working on their local file. Revit creates the same additional folder for the local file as it is did for the central file.- Editing Requests
When one user tries to edit an element that is already borrowed by another user, the user can place an Editing Request asking the current borrower/owner to relinquish it to them so they can modify the element. The current owner can grant or deny the request as long as they have not changed the element. If they have changed it, they need to Synchronize with Central (SWC) in order to save their work prior to returning the borrowed element.
- Relinquish
The best way to understand this term is to look up a synonym for it. If you were to do this, you would finds phrases and words such as give up, surrender, hand over, and abandon. This is what you will do when you have finished working with borrowed elements from the project. You hand them back over, or relinquish them, so someone else can use them. Revit Structure has a tool called Relinquish All Mine for doing this. With a library in mind, think "return your books."
- Synchronize with Central
This term will be used a lot in the worksharing environment. After you have been working on your local copy, which is linked to the central file, you will execute an SWC to update the central file with your changes so other users can see them. Said another way, it is a two-way transaction, "pulling" changes from the central file to your local file and "pushing" your changes to the central file. Veteran users will have to get used to this new phrase because it used to be called Save to Central, or STC.
- Reload Latest
Just using SWC does not automatically put your changes into other users' local copies, which means they won't see your work yet. Reload Latest is a method to transfer (pull) changes that have been made in the central file into your local file. Changes that may have been made in your local file do not get transferred to the central file by this method. This is a one-way transaction, pulling changes to your local file from the central file only.
You should develop a good understanding of these terms so you are able to take advantage of the worksharing workflow that can occur using worksets. Learning to talk the talk and walk the walk early on will give you the knowledge you need to determine the best time to use worksets as well as how to properly set them up for your project.
You must use worksets/worksharing as soon as you want to permit more than one person to work on the project at the same time. For the most part, almost every model can benefit from having worksharing enabled. More than likely you will have at least two people working within the model at some point in time, such as the engineer and the drafter/modeler. This number may vary depending on the size of the project.
Making the decision to work in a worksharing environment and how to properly set up worksets can be determined by the project size and the potential for multiple users working in the model at the same time. Even if multiple users are not going to contribute to the project simultaneously, there are other benefits such as added visibility control and increased project performance to be gained by enabling worksharing.
What's Up with This Dialog Box?
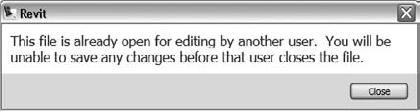
By default, Revit Structure assumes that you are working in a single-user environment. If you are working in your model and another user opens that model, that user will be presented with a dialog box indicating their copy will be in read-only mode, much like any other software and files you might use. Frequently seeing this dialog box on your computer screen can become annoying, which might be a sign that you should consider using worksets/worksharing.
The project size can help determine whether worksharing should be enabled and how your worksets should be created. Prior to starting your project, discuss your options with regard to the project type and the number of potential simultaneous team members. These up-front discussions will allow you to take advantage of worksharing accordingly and allow proper setup for the following project types:
- Small projects (two users)
Worksharing should be enabled, but you probably don't need to create additional worksets to divide up the model. As long as you are not routinely working on the same section or same area of the project, Revit Structure's automatic element borrowing should work fine for two users working on the project. An occasional Editing Request may have to be made.
- Large projects (three-plus users)
Worksharing should be enabled and most likely additional worksets ought to be created. These worksets should reflect obvious physical breakpoints of a building (for example, at expansion joints, discrete wings, and grouping of levels). If additional users are brought on only to help create sections, then automatic element borrowing should be fine.
- Very large projects with multiple buildings and discrete wings
Worksharing should be enabled as well as additional worksets created. For these types of projects, you may want to consider creating and combining separate but linked structural models as well as using worksharing to help maintain more flexible and manageable files. Keep in mind that linking projects will likely hamper your ability to do analysis on the structure as a whole.
Suggested structural worksets are:
By discipline (structural, architectural, MEP)
By group of floors or groups of structural elements
Project construction phase division
Floor plan division at expansion/seismic joints
By material type: steel, masonry, concrete, and so forth
These are only suggestions and certainly may not be specific in any way to how you should create worksets or set up teams. Knowing the simple logic behind determining worksets and potential roadblocks will help you put a basic standard in place. Each project has its own needs, and what worked well for one project may not be necessary for another. Try not to think of worksets as layers or a layer standard; one size does not fit all.
During the beginning stages of a project when only a single user is required on a project, it may not be necessary to enable worksharing. However, there are several other reasons why you should think about using worksharing regardless of the type and size of your project. In these scenarios, additional worksets more than likely would not have to be created:
Saving locally to your workstation's hard drive tends to be much faster than saving across your network. Local saves can happen much more frequently.
For inexperienced users, it may be necessary to allow more advanced users in the project to help perform advanced tasks or help maintain company standards within the model.
It can be nice to allow inexperienced users to work only on sections and details rather than perform advanced modeling procedures. This serves as an excellent mentoring training method. However, understanding and using worksets is not a novice issue. It requires specific instruction and guidance.
There are several other reasons why you should enable worksharing regardless of being in a multiuser environment:
It allows you to have another level of graphic/element visibility display for elements that are not being worked on.
It allows you to load only the portions of your project that are needed for the task at hand, thus increasing computer performance.
It allows you to have additional backups that are on both your local machine and your network.
If you are enabling worksharing to take advantage of the additional visibility settings and improve performance, you may need to create additional worksets. Keep in mind that if you create too many worksets for this purpose, your model can become unmanageable. Individual view overrides and the use of filters may be a better alternative.
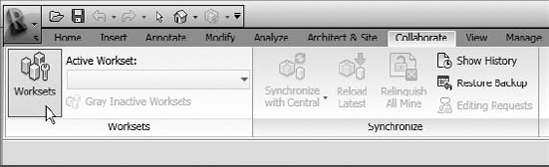
Now that you have the concepts and terminology down, let's get into enabling worksharing. To start the process, on the Ribbon click the Collaborate tab
After you click the Worksets tool you will be presented with a Worksharing dialog box (Figure 13.4).
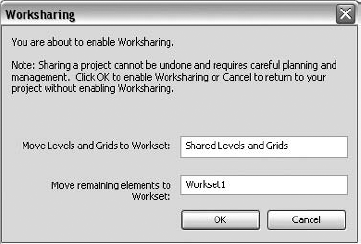
This first dialog box warns you that sharing a project cannot be undone. This sounds pretty scary at first if this is your first exposure to worksharing. But don't worry; just proceed, and we'll explain what will happen.
During the time Revit Structure takes to enable worksharing, it assigns all elements in the model to worksets. There are four kinds of worksets: User-Created, Families, Project Standards, and Views. User-Created worksets are the ones you actively manage and create with the option to create additional ones, to give you more control to manage your model. The other three workset types—Families, Project Standards, and Views—are managed by Revit Structure as you work. Let's take a closer look at each kind of workset.
In the Worksharing dialog box (Figure 13.4) are two text fields available for editing. These are the default User-Created worksets that Revit Structure creates when worksharing is enabled. You can create additional User-Created worksets after you click OK in the Worksharing dialog box.
The Shared Levels and Grids and the Workset1 worksets are automatically defined by Revit Structure but are still called User-Created worksets. These worksets can both be renamed if you like or not used at all.
Revit Structure will take all currently modeled levels and grids and assign them to the Shared Levels and Grids workset. Future levels and grids that you put into your project should also be assigned to this workset. This workset can be renamed to something that might make more sense to you, or it can be deleted altogether. When you delete it, it will not delete any element(s) that might be assigned to it but ask you instead what workset to reassign them to. You are also allowed to assign these elements to another User-Created workset, so if your project requires a different location, you can specify that instead. For example, you may need to separate grids into east and west wings to help control their visibility and to help define who is responsible for them.
Every model element that is not a level or grid will automatically be assigned to Workset1. The elements that are assigned to this workset can be moved to another workset at a later time. You are allowed to rename this workset but do not have the option to delete it. Revit does not allow it, and the Delete button will be grayed out, making it unavailable to select. Be careful when renaming this workset because it can be confusing later when you or another user tries to delete it and can't. For this reason you may want to leave this workset alone and reassign element(s) to a workset that you create yourself. You can then leave Workset1 as an extra "catchall" for elements that may not fall into another workset.
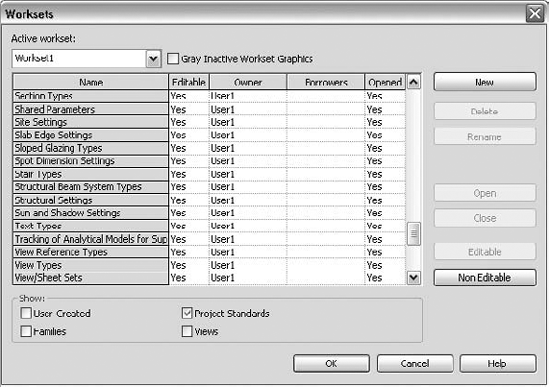
After you click OK in the Worksharing dialog box, Revit Structure assigns all of your modeled elements into the two User-Created worksets. It also creates a new workset for each of your project's views, families, and project standards and groups them into an additional set of default worksets, named Families, Project Standards, and Views. Like the two default User-Created worksets, these three worksets will be created automatically. Since this is hardcoded behavior in the program, you will not be able to rename them, nor will you have to do anything to them or worry about them. Revit manages them for you.
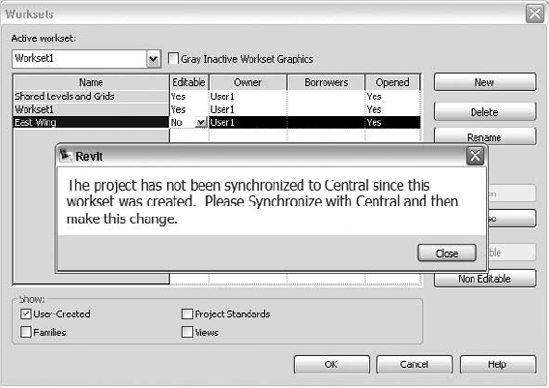
Once Revit Structure has created these worksets, you will see the Worksets dialog box shown in Figure 13.5. Note that when you first enable worksharing you are the owner of every workset—the Yes in the Editable column and your username in the Owner column indicate this. You will also notice check boxes at the bottom of the dialog box. These check boxes allow you to toggle among showing the User-Created, Views, Families, and Project Standards worksets. Your active workset is set to the default User-Created workset, Workset1.

To create a new User-Created workset, click the New button in the Worksets dialog box. This opens the New Workset dialog box (Figure 13.6), where you name the workset. If you do not want to have this new workset visible in all views, deselect the Visible by Default in All Views check box.

Hold On—You Have to Synchronize with Central First
You will not be able to release your ownership of the worksets at this time. Setting the Editable column to No will prompt you to save the file first.
Revit Structure will create a workset for every view inside your project. This workset contains any view-specific elements such as annotations, as well as any view properties within the view. As you work in different views, these elements will automatically be assigned to the view's workset, regardless of which workset is current. Since Revit Structure controls all of this information, these worksets as well as the other default ones cannot be made active, nor can the elements be moved to another workset, except by removing them from one view and placing them into another, for example, by using Cut and Paste. You never have to worry about what workset text, dimensions, tags, or symbols are assigned to; Revit manages that task.
The nice thing about the view workset is that each user can have their own view of the model and control the properties. These properties will not affect other users who are in different views looking at the same portion of the model.
View worksets can be borrowed in several places. You can right-click on the view name in the Project Browser or right-click on any view-specific elements to open a dialog box that lets you select Make Workset Editable. A third method is to go directly through the Workset dialog box. And yet another less obvious but just as effective way is to change a view property. As long as no other user has already borrowed the view, you'll become the borrower of the view.
Revit Structure assigns every family that is loaded into your project to its own workset, and again this is done automatically for you. The family workset governs the definition of the family or "the idea" of the family, not actual family elements themselves. You will borrow the family workset when you edit the Type properties of a family. For example, you can place structural columns all afternoon and never borrow the structural column family workset. If you change the structural column's manufacturer or Type Comments parameter, you'll borrow the structural column definition to do so. Again Revit will transparently let you borrow the structural column's workset as long as no other user has already done so.
All project settings are assigned to Project Standards worksets according to their purpose. Some of these settings include dimension styles, line styles, line weights, object styles, and text types. As Figure 13.7 shows, you can see all of them by clicking on the appropriate check box at the bottom of the Worksets dialog box. You do not need to borrow these worksets to add new information or additional settings to your project. If existing settings are modified, however, you end up borrowing them to make the changes.
After enabling worksharing in your project, you need to save the file. This commits the changes that have been made to the database structure. Specifically, Revit has created two new data fields for each element in the project, parameters called Edited By and Workset. Once the file is saved this file becomes your central file, which will allow multiple users to then make copies of it for worksharing. When making your central file, it is a good idea to perform a Save As with a different filename instead of a Save. This will allow you to keep your original single-user file just in case you need it in the short term.
To create your central file, select the Application menu
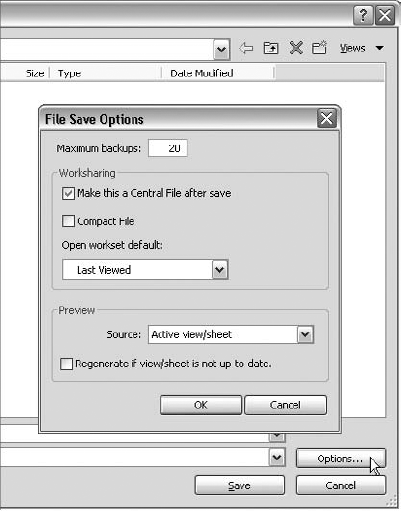
This dialog box also gives you the opportunity to set which workset becomes the default workset when the file is opened. Your options are All, Editable, Last Viewed, and Specify. You can also set which view is used to capture the preview that you see in the Recent Files window. Typically this is set to your current active view/sheet when closing, but you can set it to another view of your choice.
If during the above Save procedure you choose the Application menu
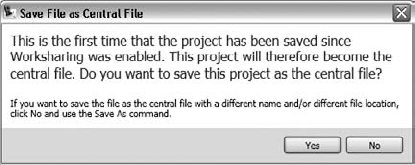
Figure 13.9. Save File as Central File message box confirming your intention to create the central file
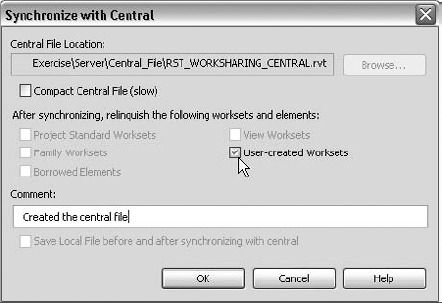
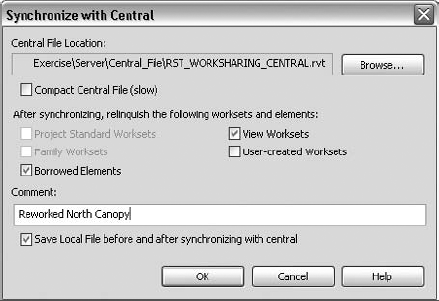
The last step is to Synchronize with Central. You need to relinquish ownership of the worksets that you still own, specifically the User-Created worksets. When you saved the file Revit relinquished the Families, Project Standards, and Views worksets for you as well as any borrowed elements. It did not do so for the User-Created worksets. On the Synchronize panel of the Collaborate tab of the Ribbon, choose Synchronize and Modify Settings from the drop-down. It is important to choose this because you don't get an opportunity to return the User-Created worksets with the other option, Synchronize Now. In the Synchronize with Central dialog box check the box for User-created Worksets and enter a comment in the Comment field. Comments are useful for troubleshooting later if necessary.
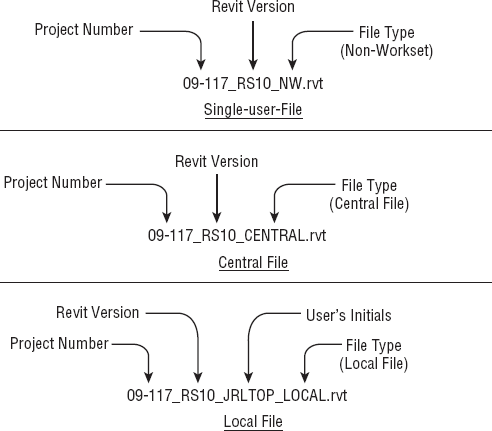
We All Need File-Naming Standards
You should come up with a folder and file-naming convention for your central and local files that best suits your company. The renaming is helpful to the user for visually seeing the difference between a local and a central file. It is also useful for reviewing logs and journal files. Try to avoid using special characters in your naming conventions. These characters can sometimes cause other applications to misbehave. If special characters are desired, you should check with your IT department to make sure your choice is acceptable to them.
On our server, we create a Revit folder inside our normal Project folder. This Revit folder holds all of our Revit-specific information for the project and keeps it apart from any AutoCAD files we may have during our transition to Revit Structure.
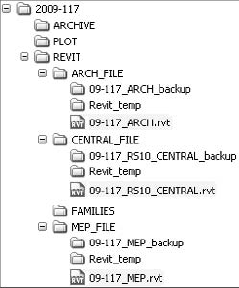
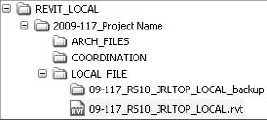
On each user's hard drive, we create a Revit_Local folder on the root of the C: drive. Inside this we create individual project folders, where we save our local files and any other information about the project that does not need to be backed up on the network. Once again, we put the local file in its own folder to separate it from other project file information.
We use a file-naming convention that allows us to tie the project number to the filename as well as the version of Revit Structure that it is using. We specify whether it is a single-user, local, or central file. If it is a local file, the user will also include their initials.
After you create the central file, you will see that a couple of folders have been automatically created where the central file is saved (see Figure 13.11). You will only see these for central and local files. One of the folders is named the same as the central file, with backup appended to it. This backup folder is where Revit Structure keeps track of all of your backups pertaining to the central file. It contains a lot of .rws and .dat files that it writes so Revit Structure can monitor permissions and ownership rights of those using local files. It also contains other various files along with a worksharing log file (.slog) that provides progress information on operations (such as Synchronize with Central) to Worksharing Monitor, a separate application created by Autodesk to enhance the workflow of teams using Revit and worksets. To preserve these backups and other critical files, users should not delete or rename these folders or files.
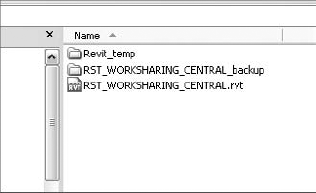
Figure 13.11. Additional folders are created in the same folder as the central file to store backup information.
A Revit_Temp folder is also automatically created. This folder provides information for the Worksharing Monitor tool that is used to help users communicate with one another while they work together on a project. The files that are automatically created in this folder should be only a couple of kilobytes or less in size, so they will not take up much space; they are automatically deleted when users close out of the project. If this folder is deleted, Revit Structure will automatically re-create it when any user resumes work.
There are a few ways that you can create your local file. The method that Autodesk recommended until the release of 2010 is to open the central file and then use Save As. We don't recommend this approach for a couple good reasons.
It is slow! You open the central file (once) and then use Save As to create your local file, which is technically opening a file again (twice). Also consider that opening the central file prevents other users from accessing it, which can prevent them from saving their changes back to the central file. You may have it open for only a minute or so, but it is too easy to be interrupted or distracted by a phone call and continue working while you're still in the central file by mistake. With several team members working on a project and with this as your standard method, it is possible for more than one person to accidentally be working in the central file at the same time. Opening the central file is a bad habit, and we want you to develop good habits. Therefore, a user's normal interaction with the central file should be limited to working through the local file.
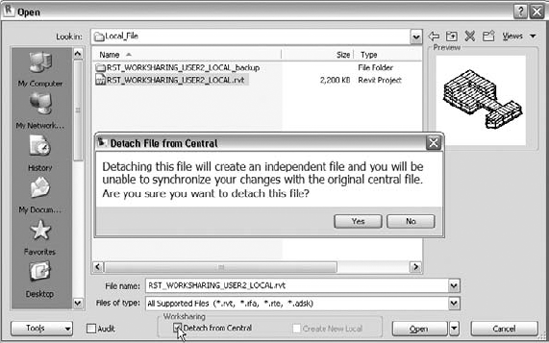
In response to user suggestions, Revit Structure 2010 has a new specific option for creating a local file. This method takes on more of an "on the fly" approach, but it leaves little flexibility as far as the name and location of the local file it creates. When you check the Create New Local check box in the Worksharing section of the Open dialog box (it is checked by default), as shown in Figure 13.12, Revit automatically creates, names, and saves the local file. The option Detach from Central appearing in the same area is also related to worksharing and will be discussed later in this chapter. The option Create New Local will be grayed out when opening project files that are not central files that need to be upgraded to 2010 format or are family files. Detach from Central will be grayed out when you open family files.
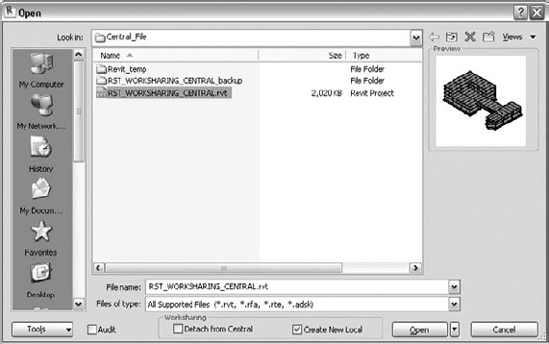
Figure 13.12. Using the Create New Local feature at the bottom of the Open dialog box creates a local file on the fly.
When you open a file with this feature selected, Revit Structure will automatically create the local file and name it using the exact same name as the central file but appending an underscore and the current Revit username. As an example, the central file RST WORKSHARING-CENTRAL.rvt is created as a local file named RST WORKSHARING-CENTRAL_User1.rvt.
The username is determined by the value of the Username field located in the General tab of Revit Structure's Options settings. The location of where the new local file is created is determined by the value of the Default Path for User Files field located in the File Locations tab of Revit Structure's Options settings. The Options dialog box can be found by choosing the Application menu and selecting the Options button at the bottom of the drop-down list.
If a file already exists with the same name, you will be given save preferences, as shown in Figure 13.13, to overwrite the existing file or append a timestamp to it. Appending a timestamp will prevent the file from being overwritten.
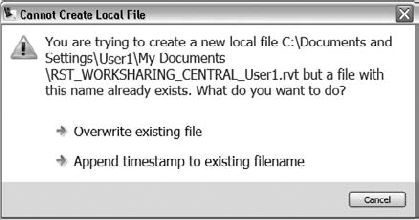
Figure 13.13. Revit Structure warns you with save preferences before overwriting a file when using the Create New Local option.
This is a good way to support a common practice of always starting the day with a new local file, but it also means that the user will be in the habit of selecting the central file daily while in Revit Structure's Open dialog box. Some might say this is dangerous and increases the chance of a user mistakenly opening a central file. To help prevent users from unintentionally opening a central file, Revit Structure determines what type of file you are opening, and if you are opening a local file, the Create New Local option will be grayed out. If you are opening a central file, however, the Create New Local feature will be checked. The user will have to purposely remove the check from the box in order to open the central file.
Though this is a great addition to Revit Structure, it does limit your choices with regard to the central file's name and location. If you desire to have file-naming conventions or folder structures as mentioned earlier, this may not be the best method for you. You may want to use a manual approach that gives you more flexibility and ensures you don't develop a habit of opening the central file at all.
We've discussed two methods so far, one we don't recommend and a second that we like but also has a limitation for file naming and location that may or may not make you consider another approach. Let's discuss another common way that users manage this process.
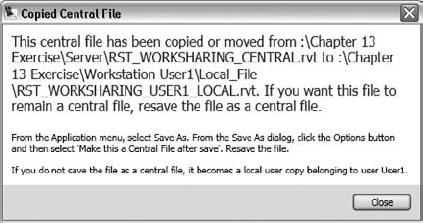
A third method, which many prefer, gives you lots of flexibility. You copy the central file from the network to your workstation by using Windows Explorer and then rename the copy using your company standards for name and location. When you do this, Revit Structure will regard this copy as a local file that is associated with the central file. You will see a message box when opening this file for the first time (Figure 13.14), explaining that the file has been moved or copied from its original location, and if you didn't intend this to happen, how to fix it. Otherwise it will be considered a local copy belonging to you, displaying the current Revit username.
In some cases, users may already have the central file open—for example, right after you enable worksharing and create your central file for the first time. Even though it is much more convenient to create your local file by using the Save As method at this time, you should still avoid doing so. There is no sense in creating bad user habits.
Exercise: Creating a Local File via a Manual Copy/Paste Method
Let's step through the Copy/Paste method by using Windows Explorer:
Browse to the network where your central file is located.
Right-click on the central file and click Copy.
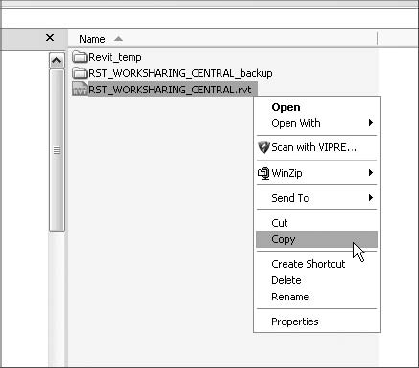
Browse to your workstation's hard drive (for example,
C:Revit Local Files) where the local file will be saved.Right-click within the folder and click Paste.
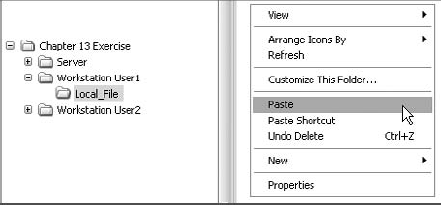
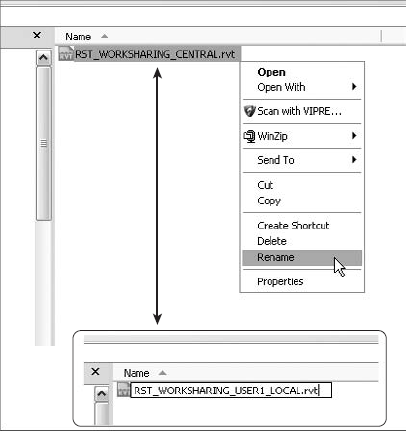
Select the file and press the F2 key to rename it, or right-click on the pasted file, click Rename, and rename it using your naming convention for local files.
Launch Revit Structure and open the local file you just created to continue working on the project. You'll see the warning message we discussed earlier, shown in Figure 13.14. Just make sure your username is listed as the person whose local copy this file will belong to, and click OK.
As you can see, there are several methods that can be used to aid in the creation of a local file. Pros and cons apply to all of them. You will have your own opinions about which ones you feel are the most desirable. Decide for yourself which one will create the best workflow and decrease the potential for error in your environment. After choosing the best method and enforcing it, you will be ready to move on to staying in sync with the central file and other local files that other users may be using.
Now that you've created your local file, you are ready to work on the project with others. The next things to consider are how you work together, how you see what others are doing, and how they see what you are doing.
Revit Structure has several commands to help you stay in sync with other team members as you work together. Prior to enabling worksets, these commands are grayed out and unavailable. They can be found on the Synchronize panel of the Collaborate tab:
Synchronize and Modify Settings
Synchronize Now
Reload Latest
These are the commands that you will use to help the local and central files stay in sync with each other. It is good practice when working with worksets to save your local file as well as Synchronize with Central often. The more consistently you do this, the less time it will take to synchronize your model with the central file, plus it will keep other users up to date with the most current information.
Whenever you want to share your changes with the rest of the team, you will need to do a Synchronize with Central (SWC). This can be done in a couple of ways: by choosing Synchronize and Modify Settings or by choosing Synchronize Now from the Synchronize panel on the Collaborate tab, shown in Figure 13.15. There is a difference between the two.
Clicking the Synchronize Now tool will save your most recent changes to the central file since your last save to the central file and reload any changes others have made. It is a two-way transaction, pulling changes from the central file to your local file and pushing changes you have made in your local file to the central file. You could think of it as showing others your work but not necessarily returning the "books" or "shelves" you may have borrowed. This is because it does not return any User-Created worksets that you may have borrowed. Note that it does not save your local file either.
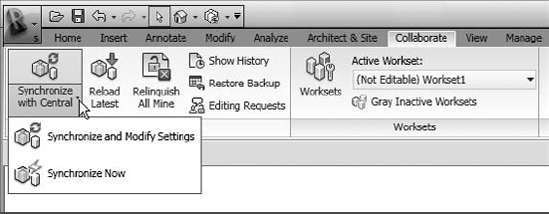
The Synchronize and Modify Settings option opens a dialog box (Figure 13.16) and provides more options for you prior to Synchronizing with Central. You can choose to relinquish worksets as well as save your local file before and after doing a Synchronize with Central. User-Created Worksets will not be checked by default. You are also given the option to enter comments about what you've done prior to synchronizing. These comments can be quite helpful later if you are looking at the backup history information. This is the most thorough way to Synchronize with Central. Using this method periodically, in particular any time you have finished working on the project such as going to lunch, attending a meeting, or leaving for the day, ensures that all borrowed elements will be returned and available for other users to use and, just as important, that your local file and the central file are in sync.
There may be times when you need to get the latest information from other team members. After they use Synchronize with Central, you can use Reload Latest from the Synchronize panel on the Collaborate tab of the Ribbon and pull any changes that have occurred since the last time you used either SWC or Reload Latest. Compared with SWC, it is a one-way transaction, pulling only changes in the central file to your local file. For this reason this command is nice to use when you want to see another user's changes but are not ready for others to see your changes. Remember to save your local file afterward. Saving accepts their changes. Until you save, you are only seeing the changes. This keeps you synchronized with the central file, except for changes that you aren't prepared to share with others yet.
While using worksets, you will be presented with several new commands and notifications that help you stay in sync and share the project with other users. The central and local files along with their backup folders bring everything together, which becomes a critical piece of the puzzle for allowing this type of environment to exist.
Making sure everyone knows the proper methods for working in this environment and when to use these methods will help keep things assigned to the proper worksets. Even then, you may still need to move elements from one workset to another. Worksets help keep all team members working in sync while keeping track of who has worked on what with ownership rights. Above and beyond the assignment of ownership to elements you will find an opportunity to improve performance by controlling the display of elements assigned to these worksets.
Once worksets are created, you will eventually have to move elements from one workset to another. This is usually done when you are moving elements from the default created Workset1 to another workset that you have created or moving added levels in grids back to the Shared Levels and Grids workset. It is also fairly common for users to place elements in the wrong workset by mistake as they are working. Elements are assigned to the active workset, which is displayed on the Worksets panel of the Collaborate tab of the Ribbon (Figure 13.17).
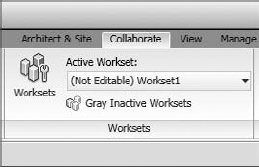
Users forget to check for the active workset because it's a bit too easy to forget and Revit doesn't make it obvious enough. The only way you can tell the active workset assignment is to display the Collaborate tab and look. It's human nature to be too busy to do that, so if you have several worksets, you will more than likely have to perform the task of moving elements between worksets on a regular basis.
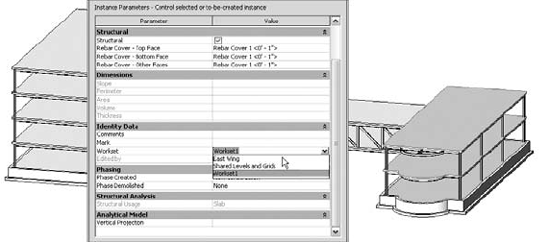
It is necessary to first borrow an element (or its assigned workset—remember the books and shelves analogy) in order to change its assigned workset; therefore it is much easier to move elements (books) between worksets (shelves) when other users do not have elements borrowed or worksets checked out. It is good practice to communicate with other team members when moving large numbers of elements from one workset to another to avoid ownership conflicts. This may mean waiting to deal with major changes when others temporarily stop working on the model or are at lunch or gone for the day. As Figure 13.18 shows, all elements will have additional Workset and Edited By parameters added to their properties under the Identity Data parameter group when worksets are enabled. The Workset parameter is what you change to reassign elements to another workset. The Edited By parameter is read-only and displays which user, if any, is currently editing the element.
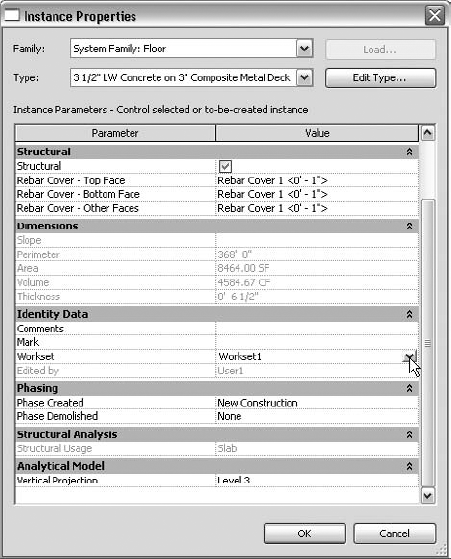
You can move elements to a different workset by selecting one or several elements at a time. Multiple selected elements that are on different worksets will not display a value for the Workset parameter because Revit Structure can display only one value at a time. In some cases where several elements of different categories are selected, the Value for the workset may not be available. Elements such as openings that become part of your selection can prevent the Workset Value from being editable. For example, a wall opening's workset is governed by the wall that it is placed in; if you change the wall workset, you'll see that the opening workset will automatically update with it. Therefore, the wall opening would prevent the workset's Value from being editable.
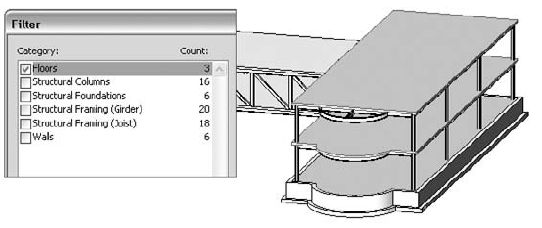
A quick method to resolve this is to select several elements and use the Filter option from the lower-right corner of the Status bar to select only elements of the same category or those categories that will collectively allow the workset identity to be changed. Figure 13.19 indicates that only floors will be selected. The Filter tool can also be found by choosing it from the Multi-Select contextual tab that displays on the Ribbon when multiple elements are selected.
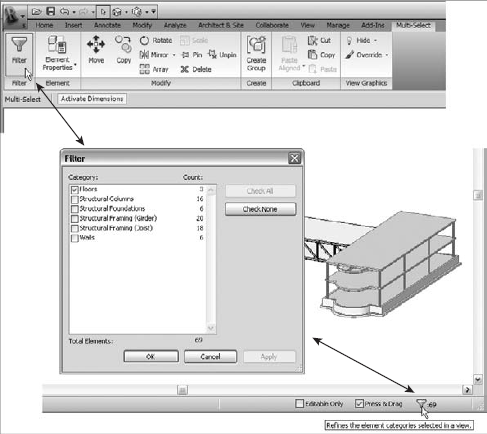
If the workset's Value is still unavailable (grayed out), you need to remember that you must borrow an element before you can assign the element to a different workset. Also remember you can only assign elements like columns and beams to User-Created worksets, and these are the only types of elements that will offer you the opportunity to reassign the workset. Other elements, such as text, dimensions, symbols, and tags, are assigned to Views worksets and will not permit you to change them. They will remain grayed out regardless.
Okay, Who Is Playing a Trick on Me?
Suppose you're trying to select elements, your project is using worksets, and no matter how hard you try you can't select them—you click but nothing happens. Make sure that the Editable Only check box on the status bar below the drawing area is not checked.
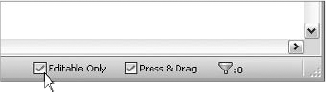
If this box is enabled, you will be allowed to select only elements that you own and have borrowed already. This might be why you cannot select them.
A quick way to verify which workset an element is assigned to is to hover over the element with your cursor until a tooltip appears. Not only does this box show you the element's category, family, and type name, but the first part of the description will show you the workset it is assigned to. In Figure 13.20, you can see that the element is part of the Workset1 workset. An exception to being the first information listed in the tooltip occurs when the element belongs to a design option, another potentially useful tool in Revit Structure. The design option the element is assigned to is displayed first and then the assigned workset. The bottom line is that it is easiest to hover over an element to find out the assigned workset instead of opening the Element Properties dialog box.

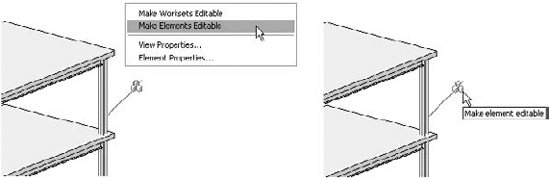
There may be a time when you will need to know whether you own a particular element. Figure 13.21 shows what you'll see if you do not own a selected element: an icon of three stacked cubes. This is the Make Element Editable icon. Selecting this symbol will make the element editable, and the symbol will disappear. Remember the "borrowing books" concept? If you select an element and you do not see the icon, you are already the owner/borrower of it and can move or modify it however you want. This icon will appear only when your project is using worksets.
The idea of borrowing elements versus borrowing worksets is how Revit Structure allows you to work simultaneously with other users. It's important to keep this in mind so that all local files can maintain communication with the central file so Revit can manage access to elements and worksets and users can make Editing Requests and respond accordingly.

By borrowing elements, you are taking only some of the elements that are assigned to a workset, not necessarily all of them. The notion is that you take only what you need to change right now, not what you intend to change during the course of your workday. This is a bit different mindset than users are comfortable with. With CAD they open a file and work and don't worry about anyone else needing the file until they have finished. With Revit everyone is working on the same model, and it is important to leave other things for people to work on while you do your thing "right here, right now."
Revit Structure makes the process of borrowing elements easy for you; it just gives you the element as you modify it. If someone else is already editing that element or elements, then Revit will let you know. You can also right-click an element and select Make Elements Editable from the shortcut menu or select the stacked cubes icon itself, as shown in Figure 13.22. These two methods will allow you to borrow an element even though you might not intend to modify it yet. If you recall from our earlier discussion about changing an assigned workset, you'd need to do one of these before you can assign the element to a different workset.
However, if a user has borrowed the East Wing workset, or just the elements you want to change, and you need to make a framing connection and rotate one of the columns that is assigned to that workset, you can make a request to borrow only that column. To make this request you just need to attempt to borrow it using one of the methods mentioned previously. When Revit detects that another user already owns the element, it will provide you with an opportunity to ask the other user for it: create an Editing Request.
Assuming the user who owns that workset hasn't changed the element in some way, that person can grant you permission, and Revit will transfer ownership to you as the new borrower. You will usually have to use the Reload Latest tool so that Revit can pass the change along to you properly. Once you have finished making your change, you can use Synchronize with Central to relinquish your changes.
If you only borrow elements but don't actually change anything, then Revit will let you use the Relinquish All Mine tool. However, if you have borrowed elements and change something as well, you'll have to use Synchronize with Central to keep your changes and relinquish the elements you've borrowed but not changed.
Borrowing worksets is something that ideally you shouldn't do very often, unless you need to make changes to an entire portion of the building and the elements assigned to its workset. This is a bit different from borrowing elements because you now own every element. Misuse and misunderstanding of borrowing worksets can prevent other users from being able to work efficiently. Using the book and shelf metaphor again, borrowing a workset is like borrowing the shelf instead of individual books. Borrowing elements (books) leaves more available for others, whereas borrowing a shelf restricts what others can work on.
You can borrow worksets by opening the Worksets dialog box shown in Figure 13.23. Click on the workset name at the left and then click the Editable button at the lower right, or just choose Yes from the Editable column. Yes indicates that it is editable by you, and you are also listed under the Owner column. If this is set to No, the workset is not editable by you and your name does not appear in the Owner column. If your username shows up under the Borrowers column, it means that you have elements borrowed from the workset, "books from a shelf." As a general rule your username listed under Owner column equals "bad"; your name under Borrowers column equals "good."
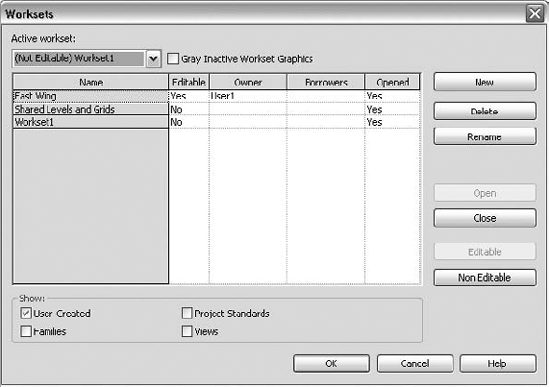
Figure 13.24 shows that you can also right-click on a selected element to select Make Worksets Editable. This means you are borrowing the workset that the selected element is assigned to and, yes, you are the owner of that workset now.

If you want to edit an element that another user owns, you can create an Editing Request to borrow it. Likewise, other users can request to borrow elements that you own. If you select an element that someone else owns and try to modify it, you will be presented with the dialog box shown in Figure 13.25. Naturally this will occur only if you are working in a project that is using worksets. This dialog box indicates that another user owns the element already. You can click the Expand button to get a more in-depth list of the errors and warnings.
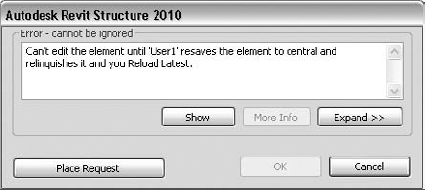
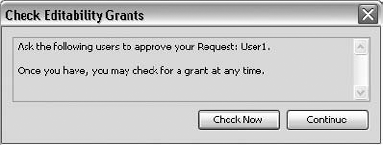
At this point, you have the option to click Cancel, in effect saying "never mind" and moving on to something else, or you can click Place Request, which will store a message for the other person to review. Clicking the Place Request button opens the dialog box shown in Figure 13.26, where you can continue checking to see if your request has been granted. Clicking the Check Now button will keep looping back to the same dialog box until the other user has taken action. If you do not want to wait, you can click Continue and then cancel out of the reminder dialog box. This will not cancel your request but will allow you to continue working on another area until your request has been granted.
Once you place the request, you have to wait until the current owner grants or denies you permission to use the workset. Other users will not automatically receive any indication that you have made a request for an element that they own. You need to contact the user by calling, emailing, tapping on the shoulder, or using Worksharing Monitor, which does improve this process. (The Worksharing Monitor tool is discussed later in this chapter.)
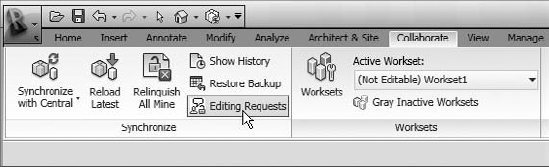
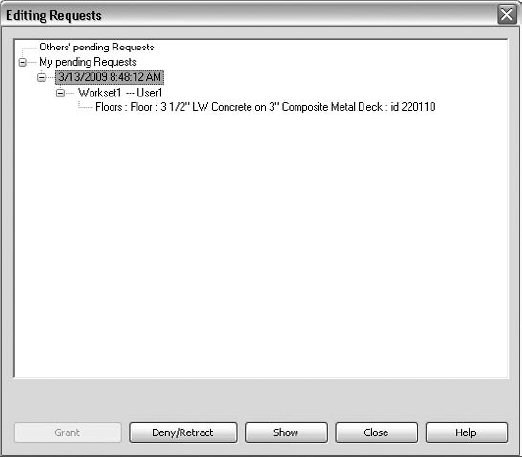
Once you have the user's attention, they will need to go to their Editing Requests window by choosing the Editing Requests tool from the Collaborate tab
The Editing Requests dialog box will show you any requests that have been made to you as well as any pending requests that you may have. Figures 13.28 and 13.29 show two different versions of the Editing Requests dialog box. Three options are available to address the request:
- Grant
This option gives permission to the user making the request. You can't grant a request for an element that you have changed unless you are prepared to discard all the changes you made since your last save.
- Deny/Retract
This option denies permission to the user making the request or allows you to retract your request to another user.
- Show
This option shows you the exact element(s) that have been requested. You can examine this element in additional views by clicking Show as often as needed to see the element clearly.
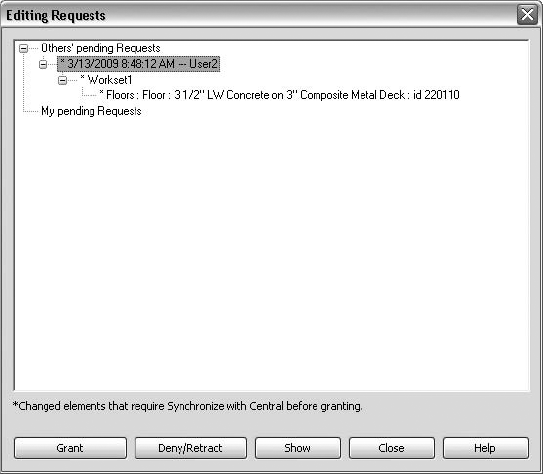
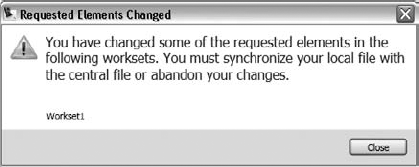
In the case where an asterisk (*) is shown, as in Figure 13.28, you will need to Synchronize with Central before granting the request. Attempting to grant a request without doing this will generate the warning box shown in Figure 13.30. This occurs because you've changed your local file and the central file does not match yours. You will need to exit the dialog box and Synchronize with Central, which will in effect grant the request automatically.
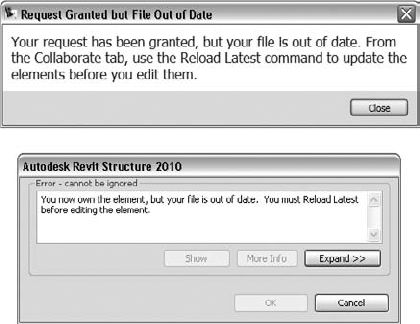
After the request has been granted, the user who is making the request will see one of the two dialog boxes shown in Figure 13.31. The ownership has been transferred over, but the local file is out of date, so a Reload Latest or a Synchronize with Central will have to be performed before editing of the element can occur.
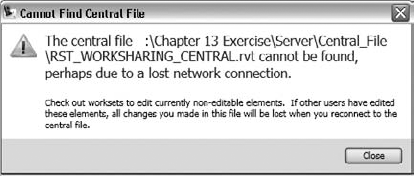
You may have to work on your project when the central file is not accessible for the local file to communicate with through the bidirectional link. If this is the case, you will see the warning box shown in Figure 13.32, telling you that your connection cannot be found and your changes may be lost. This means that you are working at risk. Depending on your actions, several warnings notifying you that the central file cannot be found will be displayed.
Revit Structure has no way of communicating back to the central file any ownership information that you may have created. If another user working on the project takes ownership of elements or worksets that you borrowed at risk, you will be prevented from saving to the central file, thus losing your work. Your work will be lost, although you will be able to copy and paste elements from one file to the other.
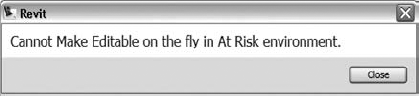
If you are working at risk and try to borrow an element, you will be given a warning stating, "Can't obtain permission to edit element: The Central File is inaccessible. You can check out worksets at risk, but consider carefully!" In order to check out worksets, you will have to do so through the Worksets dialog box. Attempting to make a workset editable through the shortcut menu will present the warning dialog box shown in Figure 13.33.
If you are working at risk and try to check out a workset through the Worksets dialog box, you will see a warning similar to the one shown in Figure 13.34, warning you yet again that you are in an at-risk workset environment.
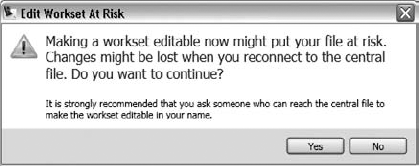
You should use caution when using this procedure. If you do decide to work at risk on your project, communicate your actions with other team members, and consider the advice within the warning dialog boxes wisely.
It is pretty easy to go overboard with detail in your project. The natural tendency is to model everything down to each and every little plate and connection. When doing this, the size of your file will increase significantly and your project performance may suffer. Keep this in mind as you work.
Take advantage of the additional options that become available to you when using worksets by shutting off the display of worksets in certain views or closing them with the Selective Open options when opening your project.
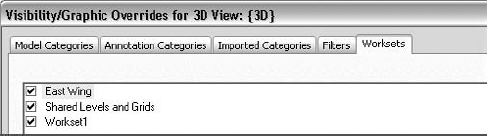
With worksets enabled, an additional tab called Worksets becomes available in the Visibility/Graphic Overrides dialog box. As Figure 13.35 shows, you can turn the visibility of any User-Created worksets on or off. Access this dialog box by right-clicking in the view and choosing View Properties, or by selecting the View tab
Also available is an option called Gray Inactive Workset Graphics, which can be activated from various locations: by clicking the Gray Inactive Worksets tool on the Worksets panel or by checking the check box in the Worksets dialog box (see Figure 13.36).

The Gray Inactive Workset Graphics command can be used to show you elements that are not in the current workset or to display the elements you might not be working with but want to see in the background as a nonemphasized element. This option can make it much easier to realize that you are assigning new elements to the wrong workset. Another nice thing about this command is that if you forget to reset it to normal and you plot, the view will still plot correctly because it affects only what you see on screen.
Using the Visibility Control allows you to easily turn off worksets that are not needed in an individual view for display or just not needed at the time when you are working in that view. Since several categories can be assigned to a workset, it is much easier to turn the workset on and off than to pick individual categories. If you turn off a workset as a temporary override, make sure that you return it to its original state because it will not reset itself.
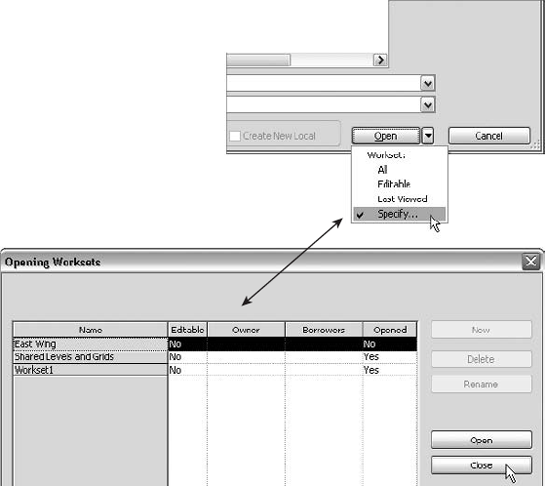
There may be times when you do not need to see particular worksets while you are working. For instance, if you have a workset called East Wing and you are not working in that area, not opening that workset will increase your performance because those elements do not have to be displayed. When opening your local file, you can access the Open options shown in Figure 13.37 by clicking the down arrow next to the Open button.
- All
Opens all the worksets in the project.
- Editable
Opens all worksets checked out by you. Under normal circumstances, borrowing elements, not worksets, using this option means that nothing will be visible in the view. You will have to open the workset you want to see as a separate step using the Worksets dialog box. For this reason the last option, Specify, is a better choice.
- Last Viewed
Opens the worksets that were open when the project was last closed.
- Specify
Lets you decide which worksets to open by presenting you with the Opening Worksets dialog box before fully opening the project.
Linking other discipline models such as architectural, mechanical, or civil into your project and having them all loaded to display at the same time can consume your computer resources. The Performance Monitor portion of the Worksharing Monitor application can help you evaluate the demand these extra linked files may put on your system's resources. We'll discuss the Worksharing Monitor in a moment.
Another benefit of making additional User-Created worksets is that you can assign each of these linked projects/files to its own workset. This will allow you to open only the ones that you need, when you need them. For example, if you will not be coordinating with mechanical for the day, you can choose to not open that workset. This is usually a much better approach than reloading and unloading the link in the Manage Links dialog box.
The Worksharing Monitor is useful only if you are working on a project with worksets enabled. The only use for a single-user model environment is to display your current system's performance. This application is not part of Revit Structure's installation. It is a separate extension available through Autodesk and is strictly a tool that monitors temporary files that are placed in the Revit_Temp folder adjacent to your central file.
So, how can the Worksharing Monitor help you in your workflows? Well, it can answer many questions that you might have as multiple users work on your project. For instance:
How long has it been since your last Synchronize with Central?
Is your local file out of date?
Other than yourself, who is working in the project?
Is someone working in the central file?
Has your request been granted yet?
Who last worked on the central file?
Do you need to respond to any editing requests?
Once the Worksharing Monitor is installed, you will need to launch it separately from Revit Structure. You can do this by clicking on the shortcut that the installation places on your desktop, going through the Windows Start menu, or (within Revit Structure) by choosing the Add-Ins tab from the Ribbon
Since this is a separate program and it has its own window, it is nice to have a dual-monitor setup. However, if you do not have dual monitors in your environment, you can configure Worksharing Monitor to display desktop alerts. These alerts will show up in the bottom-right corner of your screen with brief messages. When they appear, you can bring up the Monitor window for additional information. Keep in mind that this is only a monitoring tool, and all actions by you still need to be done from within Revit Structure.
Using the Worksharing Monitor interface is quite simple; it allows you to set it to interact with a user's individual work methods and preferences. It displays the pertinent information needed at your fingertips while you are working.
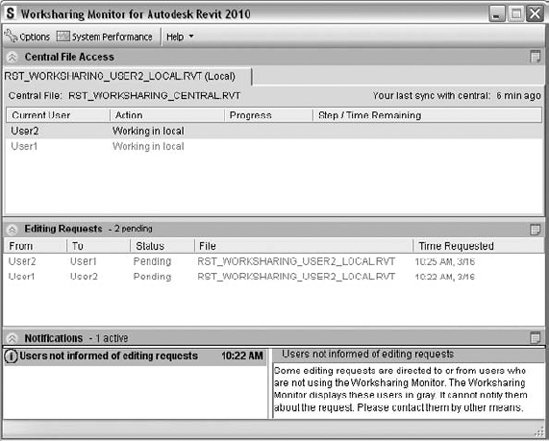
The Worksharing Monitor's main display shown in Figure 13.38 is organized into three sections:
- Central File Access
This section shows information about the project you are working on, such as the central and local filenames as well as who is working in what files. It also will tell you when other users are saving and how long before they are finished saving.
- Editing Requests
This section displays any Editing Requests that you may have made of other users. It displays the current status as well as who created the requests and who needs to respond.
- Notifications
This section displays warning information such as low memory, potential delays in saving, or users not informed of your request.
The Options button allows you to configure the notifications for behavior of each section in the main dialog box. You have control over whether you receive pop-up messages and, if so, how long they display before disappearing.
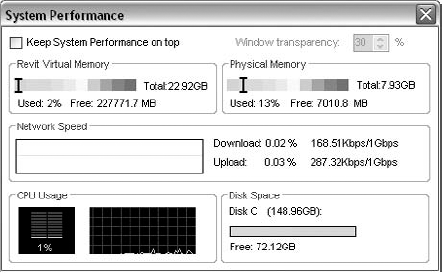
The System Performance monitor shown in Figure 13.39 is a great little tool for showing you your system's performance when you are working on your project. Since this dialog box pulls information from your system rather than from the Revit_Temp folder, this feature will work when you're working on a single-user file.
It is good practice to do regular maintenance on your central file. This includes keeping all users informed of how they should be working with the central and local files as well as what to do when things go wrong. Most of this maintenance should be done by a team captain or project manager so proper notification is given and tasks are performed consistently.
There are times when you will need to access the backup files for your projects. Most of the time this happens in the heat of the moment, so knowing how to do this and feeling comfortable doing it are things you will have to develop. Teaching users when to use the Detach from Central feature might help avoid trouble. Proper upgrading and routine audits will help keep your central file healthy and free of corruption.
Salvaging a workset project's backup file is a little different than just renaming the BAK file as you did in AutoCAD. You can use a tool that is located in the Synchronize panel of the Collaborate tab: Restore Backups.
After selecting Restore Backups, browse to the backup folder that you want to retrieve (roll back) backups from. Backups can be retrieved from either the local file backup or the central file backup. Choose whichever one is most current or contains the information that you are trying to retrieve. The number of backups you chose to keep when you created your central and local files determines how far back your backups will go.
Once you have located and opened the backup folder, you will be presented with a list of backup files similar to those shown in Figure 13.40 that are available for a Save As or Rollback operation. The number of backups is specified in the Options button when you perform a Save As. The default is 20; in Figure 13.40 it is set to 5. This is where it can become useful to add comments when you Synchronize with Central. Comments will allow you to easily determine which backup you need to get back to. If you recall, earlier we encouraged you to enter a comment when you use Synchronize with Central; you'll see comments listed in the Comment column of the Project Backup Versions dialog box (Figure 13.40). Providing comments can make it easier to determine which backup is the most appropriate one to use.
Before attempting to roll back a project, take a few minutes to think about what will be happening. Most of the time when you have to perform this action, you are caught up in the heat of the moment and not always thinking clearly. All later versions in the backup folder will be lost when you roll back a project And all team members will have to make new local files from the file that you use the Rollback feature on. For these reasons, we recommend that you use the Save As option instead of using Rollback; keep in mind that Save As creates a new local file, not a central file. It is still necessary to do a Save As
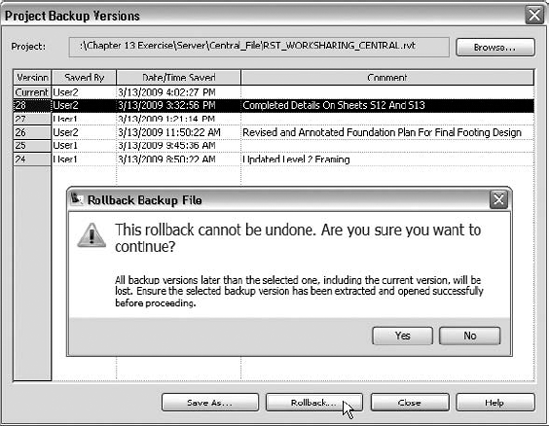
Figure 13.40. Salvaging a backup from a workset project: choose Save As to save to a new file or choose Rollback to revert to a previous backup version.
What Is It, a Single-User or Workshared File?
Determining what type of file your project is can be pretty simple. If your project file has additional files adjacent to it with .000X.rvt appended to the filenames, then it is a single-user file. These files can be renamed (remove the .000X) just as you would rename an AutoCAD BAK file.
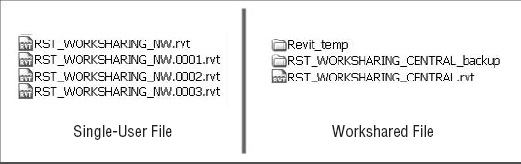
If your project file has an additional folder next to it with the same name and backup appended to it, then this is a workshared file. You need to use the Retrieve Backup tool to retrieve previous backup versions.
If for any reason you need to work inside the project and you know that you do not want to save your changes or risk borrowing elements that you do not want, you can perform a Detach from Central (DFC) prior to opening. This option is quite useful when you're performing tasks that do not need to be saved to the central file, such as:
Transferring project standards
Archiving a copy of the project
Reviewing the project (by a manager)
Exporting views for client collaboration
Displaying the project in meetings
Performing studies
Detach from Central is available in the Open dialog box. When you select the Detach from Central check box, you will see the notification shown in Figure 13.41 telling you that you are creating an independent file. All path and permission information is reset, and no changes can be saved back to the central file. If saved, the file will become a new central file. If this check box is selected for a single-user file, the option will be ignored and the file will open normally.
When upgrading to a new version of Revit Structure, you should use the following procedure to upgrade the central file for each of your projects using worksets. Create a backup copy of your project in the current release before performing the upgrade. This backup file will be valuable if for any reason the new central file becomes corrupted.
To create your backup copy, make sure that all team members have saved their latest information to the central file. Using the same version of Revit that the file was created with, open the central file using the Detach from Central option. This will ensure that all user ownerships are relinquished and allow you to create a clean central file with a new name.
To retain your backup history, you will have to copy the central file and its backup folder to a new location. Be careful because Revit will regard the copy as a local file that will be looking for the original central file at its original location. If you create the new central file using the original, this can create problems later if someone tries to open the archived copy.
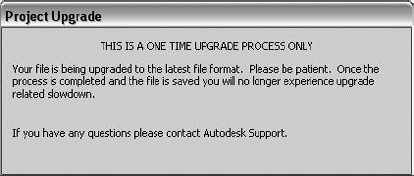
When upgrading the project, make sure that any Revit links in your project are upgraded first. To upgrade your file, open it in the new version of Revit Structure. You will see the message box shown in Figure 13.42, indicating that your file is being upgraded. To ensure that the backup history of the project is retained, perform a Synchronize with Central in lieu of using the Save As command from the Application menu. Remember that once your project's central file is upgraded and saved, each of your team members needs to make new local files from the upgraded central file.
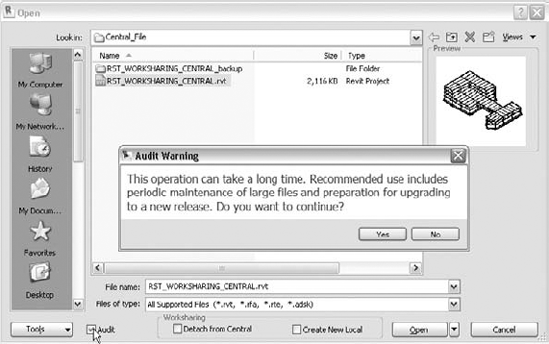
Part of keeping your central file healthy is occasionally performing an audit on it. This should be done at least once a month, and you definitely want to perform an audit before you upgrade to a new version. This will help fix and detect any corruption that might be inside the database. The Audit check box appears at the bottom of the Open dialog box, shown in Figure 13.43. Performing an audit on your project can increase the time it takes to open your file. Keep this in mind on some of your larger projects. Prior to performing this task, tell all users to save their local files to the central file and close out of the project. After auditing, have all users create new local files. Don't bother waiting for a status report of what the audit is doing or problems it has found and/or fixed. Don't worry; nothing is wrong. Revit does not provide any of these results for you to review.
Exercise: Working in a Multiuser Environment
For this exercise you are going to make temporary settings in your Revit Structure session(s) to simulate two users working in a worksharing environment. This will require you to open two sessions of Revit Structure on your workstation and reset the username of each session on the General tab located in the Application menu
Before beginning, you will need to use the RST_WORKSHARING_NW.rvt file (from the book's companion web page at www.sybex.com/go/masteringrevitstructure2010) and set up a folder structure like the one shown in the following illustration on your workstation's C: drive. This folder structure will act as both the server and user workstations. In a real-world scenario, the single-user file will be on the workstation and the central file will be on the network.
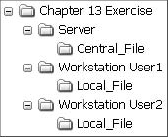
Once the folder structure is created, copy the RST_WORKSHARING_NW.rvt file into the Server folder. This will be your single-user file saved to the server.
Enable Worksharing
Launch two sessions of Revit Structure on your workstation.
In session 1, select the Application menu

User1: Open
RST_WORKSHARING_NW.rvtand take a look at the project. Notice that the tools on the Synchronize and Worksets panels in the Collaborate tab are grayed out. This indicates that worksharing is not yet enabled.User1: Click Worksets.
User1: Acknowledge the two default User-Created worksets (Shared Levels and Grids and Workset1) and click OK.
User1: Take a look at the Worksets dialog box to see how the existing elements are organized into worksets. Toggle through the check boxes for the default worksets. Do not exit the dialog box yet.
User1: Create a new workset called East Wing and click OK to exit.
Create the Central File
User1: Use Save As to rename your new workset model to the server in the Central File folder as
RST_WORKSHARING_CENTRAL.rvt.User1: Choose the Synchronize and Modify Settings tool from the Collaborate tab to relinquish all worksets. Make sure all workset check boxes are checked prior to clicking OK.
Close out of the central file (Application menu
Create the Local File
Using Windows Explorer, copy the central file on the server to the
Local_Filefolder on workstation User1.Rename the new local file to
RST_WORKSHARING_USER1_LOCAL.rvt.Repeat steps 1 and 2 of this section for User2's local file.
User1: Open the local file
RST_WORKSHARING_USER1_LOCAL.rvt. Review the This Is Not a Central File dialog box and click OK. User1 is now working in a local file that has a bidirectional link with the central file.User2: Repeat step 4 of this section.
Review New Items
User1/User2: Observe the additional tools and commands that are available to you:
Collaborate tab
Collaborate tab
Status bar
Visibility/Graphic Overrides dialog box
Element/View Properties
Move Elements between Worksets
User1/User2: Choose the Synchronize and Modify Settings tool from the Collaborate panel. Click any required workset toggles to make sure you did not borrow any elements while observing the model.
User1: Borrow the Workset1 workset. You will be moving elements from this workset onto the East Wing workset. Typically you would just need to borrow the elements when moving elements from one workset to another, but since we are going to be moving several elements (an entire wing), you will borrow the workset instead.
To borrow a workset choose the Collaborate tab
User1: Go to a 3D view and orient your view so you can select the East Wing objects with a left-to-right crossing window, as shown here. Once the objects are selected, use the Filter selection to select only elements of the same category, Floors.
User1: Open the properties of the selected elements shown here and find the Identity Data section. Change Workset1 to East Wing. Click OK.
User1: Repeat steps 3 and 4 of this section for all elements until they are all on the East Wing workset.
Tip: Turn the East Wing workset off in the Visibility/Graphic Overrides dialog box so the elements disappear when you put them in the East Wing workset. When you have finished, you can turn the workset back on to see your elements. Note that having to select elements of the same category may not always be the behavior that Revit Structure presents. Depending on the element types within your selection set, you may be able to select several elements from several categories and still have the option to switch their workset to another workset without having to repeat steps 3 and 4.
User1: With Workset1 active and the East Wing workset turned back on, gray out the inactive workset with the Gray Inactive Workset Graphics tool. You should see the East Wing grayed out, as shown here.

User1: Choose the Synchronize and Modify Settings tool from the Collaborate panel, and click the available workset check boxes to relinquish ownership of any elements.
User2: Choose Reload Latest from the Collaborate tab to update your local file with User1's recent changes to the East Wing.
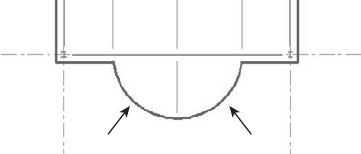
User1: Switch to the Level 3 view and edit the slab edge to run to the centerline of the curved beam, as shown. When it is complete, finish the sketch.
User2: Switch to the Level 3 view and attempt to edit the slab edge. Note that you do not see the new slab edge edits in the User2 local file. This is because User1 did not Synchronize with Central. Attempting to edit the slab edge at this point will prompt you to make a request because you do not own the element.
User2: Place the request and notify User1.
User1: Open the Editing Request dialog box and observe the message. In this case User1 will have to Synchronize with Central before being able to grant the request. Do the Synchronize with Central, and then grant the request.
User2: Check to see if your request has been granted. Yes, you should now own the element, but since your local file is out of date and does not reflect User2's recent slab changes, you will need to perform a Reload Latest before you can edit the elements.
This concludes the brief exercise for this chapter. Continue to work on the files on your own as if you were working in a multiuser environment. When you have finished, make sure that you set your username back to its original setting.
- Determine when to enable worksharing
Looking past day 1 of your project to help determine the proper game plan for moving forward will make things go much smoother.
- Master It
What can determine when you should enable worksharing?
- Enable and set up the worksharing environment
When working in Revit Structure, you'll almost always be in a multiuser environment. Knowing how to enable worksets and use the central and local files is important for communicating among team members.
- Master It
How do you enable worksets, and where should the central and local files be saved?
- Request and grant permission of elements
Working in a multiuser environment where you are sharing a project with ownership rights will eventually lead to team members tripping over one another. Understanding how borrowing elements works is important to work efficiently.
- Master It
What are the methods used so you can borrow an element(s)? What do you do if another team member has already borrowed an element(s) that you need?
- Stay in sync with other team members
Creating the central file and communicating with it using a local file is how to work effectively using Revit's worksharing features.
- Master It
What is the most flexible method to create a local file? What commands are used to get information back and forth between the central and local files?
- Properly maintain your project file
Keeping your central file as healthy as possible will decrease chances of file corruption and increase overall performance.
- Master It
When should you audit the central file? How should you go about upgrading your file to a new version?