Chapter 12
User Administration
“The job would be easy if it weren’t for the users!” Or so the saying goes. This chapter is all about how Skype for Business handles users. There are simple elements, such as the ability to use Skype for Business Server Control Panel (SBSCP) and Skype for Business Server Management Shell (SBSMS, commonly known as PowerShell) to find, enable, disable, and generally manipulate users both individually and collectively. Then there are more complex elements, such as understanding how to set the wide variety of policies available. Lync Server 2010 changed this aspect dramatically compared with OCS 2007 R2, and Skype for Business continues this approach. The vast majority of policy is now set using in-band provisioning rather than the mix of Group Policy objects (GPOs), in-band provisioning, and registry settings required in OCS 2007 R2. This means you now have a single place to configure and assign policy, making things far simpler to manage. In addition to the changes in the way you apply policy, many more settings are available to give organizations plenty of control over exactly what users can and can’t do with Skype for Business.
In this chapter, you will learn to
- Search for users in the SBSCP and PowerShell
- Perform basic user administration in the SBSCP and in PowerShell
- Understand Skype for Business policies
- Manipulate Skype for Business policies
- Choose the right policy for the job
User Configuration Basics
The starting point for user configuration is the Skype for Business Server Control Panel (SBSCP). As detailed in Chapter 11, “Role-Based Access Control,” to carry out the full range of user administration, you must be logged in with an account that has been delegated the CSAdministrator or CSUserAdministrator RBAC role through membership of the CSAdministrator or CSUserAdministrator group or a new role with a superset of these capabilities that you have created yourself using the RBAC features in Skype for Business.
SBSCP can be accessed in various ways. You can do so directly on the Skype for Business server using the SBSCP icon by clicking Start and choosing Skype for Business Server 2013 Control Panel from the app location (of course this changes with each version of Windows, so maybe searching is the best approach).
You can also install the administrative tools on another machine; this approach gets you not only the icon from which to launch the SBSCP but also the Topology Builder and PowerShell. Essentially, the workstation must meet the following prerequisites:
- OS as supported by Skype for Business Server with the addition of Windows 7 SP1 x64, Windows 8 x64, or Windows 10 x64
- Browser with Silverlight plug-in version 5 or later
- .NET Framework 4.5 64-bit version
- Windows Installer version 4.5
- PowerShell v3.0
Finally, you can use the admin simple URL defined in Topology Builder. For the examples used in this chapter, that was https://admin.rlscomms.net. To actually access the SBSCP from the admin URL, you must append /cscp, which is the required virtual directory. Following these steps allows you to log into the SBSCP from any computer with a supported browser.
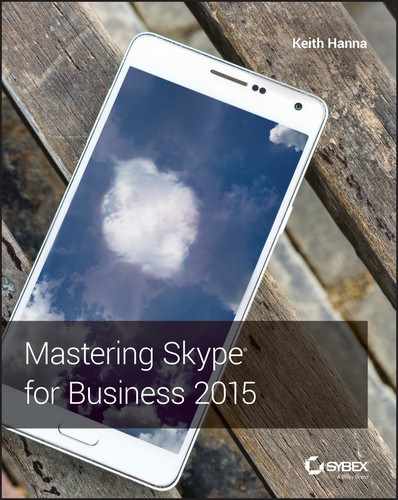
Once you have logged in with your SfBUserAdmin account, you will see the SBSCP with only the interface elements related to user administration visible, as shown in Figure 12.1.
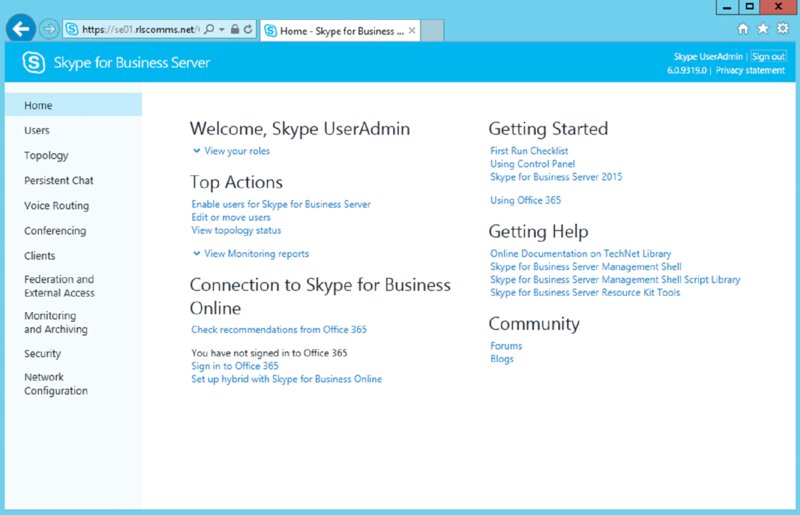
FIGURE 12.1 Logged into the Lync Server Control Panel as SfBUserAdmin
Now that you’ve gained access to the SBSCP, the first task you need to master is searching; this will allow you to locate users for administration. Each tab of the SBSCP has a search interface, and all of them except the one on the Users tab are very basic. The first thing to note about the searches that can be performed is that they only return objects that are Skype for Business (or Lync!) enabled. Don’t get caught out by this if you are looking for users to enable! This is done in a similar way but in a different location, which we will discuss shortly.
To carry out a search, first switch to the Users tab. At this point, if you click Find, you will simply bring back all Skype for Business–enabled users. Thankfully, the search interface on the Users tab allows you to customize certain search parameters. For example, you can perform a standard or LDAP search. The standard search will search for users by display name, first name, last name, Security Accounts Manager (SAM) account name, SIP address, or line Uniform Resource Identifier (URI). Wildcards appear to work only in part. For example, you can search for *2015, which would bring back any user with a name ending in 2015. However, you can’t search for *2015* to bring back users with 2015 in the name and neither would 2015* bring back all users starting with 2015. However, you can enter 2015 and have that bring back all users starting with 2015. If you want to search on SIP or line URI fields, you must include the tel: or sip: preface to the attribute data; otherwise, no results will be returned. The LDAP search allows even greater flexibility. You can use any attribute available through an LDAP query to be very granular about which objects are returned. For example, to start with, you could use the following filter to bring back only user objects:
(objectclass=user)Selecting the radio button next to LDAP Search and entering this filter brings back all Skype for Business–enabled users. That’s not very exciting, so how about this:
(description=Marketing)This brings back all users with a description of Marketing. This next one brings back users with the letter U in their common name:
(cn=*u*)Finally, this last one is much more complex:
(&(objectCategory=person)(objectClass=user)(userAccountControl:1.2.840.113556.1.4.803:=2))This brings back all Skype for Business users who have a disabled AD account—as might be the case if the AD team had disabled a user in preparation for deletion but not told you yet.
As you can see, there is a huge amount of flexibility with which you can experiment. For more information about the syntax of the search query for LDAP filter, look at the resource here:
http://msdn2.microsoft.com/en-us/library/aa746475.aspx
Another feature of the search capability is its ability to create quite complex searches using only the GUI. Clearly a lot is possible through LDAP searches, but if you just want to put together something without needing to research LDAP, you can use the Search Filter feature. Search filters allow you to add various operators to a basic search and operate only in basic search mode rather than LDAP mode. You cannot use wildcards in the search filters, but you can use the operators that PowerShell allows.
- Starts with
- Ends with
- Equal to
- Not equal to
- Contains
- Not contains
To add a filter, click the Add Filter button on the search bar. You can add up to 15 filters to build significantly complex queries. These queries can be saved and reloaded at a later date if this search is regularly used. Saved searches are stored as USF files (filename extension .usf). This approach might be useful if, for example, it is needed to regularly check whether a certain group of users have the correct PIN policy. You could set up the relevant saved query, perform the search, and then use the assign policy action to ensure that all the users had the relevant policy.
Figure 12.2 and Figure 12.3 show the filter interface and some of the attributes that can be used in searches built with filters.

FIGURE 12.2 The Filter interface showing the AND operator, the Add Filter option, and the Save and Import query buttons

FIGURE 12.3 Some of the attributes that can be added to searches based on filters
Once the results are returned, you can perform actions on the resulting set of users by selecting one or many of them using either Shift+click or Ctrl+click and using the Actions drop-down; you’ll learn more about this shortly.
When you are searching in the SBSCP, you might run into a couple of issues, one of which is that by default the search interface will return only 200 users. However, it is straightforward to change that using the Maximum Users To Display entry box. The other issue is more of a problem: You can’t customize the way data results are displayed. For example, you couldn’t perform a simple SBSCP search to find and display all the DDI numbers deployed. You could search and return all users with a DDI; however, to see the DDIs you would have to go into the properties of each user because it is not possible to edit the columns of data that are shown. For this level of data manipulation, you would have to dive into PowerShell.
If you want to search using PowerShell, a couple of useful PowerShell cmdlets are available for finding users to manipulate: Get-CsUser and Get-CsAdUser. Get-CsAdUser retrieves all user accounts in Active Directory Domain Services (AD DS), Skype for Business enabled or not, whereas Get-CsUser retrieves only Skype for Business enabled users inside AD DS.
In this section, we will discuss Get-CsUser, a cmdlet that focuses on Skype for Business–enabled objects and Skype for Business–specific attributes. Get-CsUser allows similar searches to those described in the preceding section. We will cover Get-CsAdUser in the next section, “Enabling and Disabling.”
To run these cmdlets, you need to be connected via a remote PowerShell console to the Skype for Business server using your Skype for Business user admin account. You can do this manually as described in Appendix B, “Introduction to PowerShell, the Skype for Business Management Shell, and Regular Expressions,” or if you’ve installed the administrative tools, you can use SBSMS, which is a little simpler because the connection is made automatically.
Once at the prompt, you have even more flexibility than you had in the SBSCP. For example, you can search for all Skype for Business–enabled users in a specific OU and return up to 2 billion results, which should be enough for most people!
To get started, simply run Get-CsUser, which will return a list of all Skype for Business–enabled users. Next, you can be more specific about which user or users you will return, by using the -Identity parameter as follows:
Get-CsUser -Identity "Test User1"
Get-CsUser -Identity "Test User*"
The first command brings back only Test User 1, and the second brings back any user starting with Test User.
Of course, you can also be more specific and search within an OU.
Get-CsUser -Identity "Test User1" -OU "cn=users,dc=rlscomms,dc=net"Again, as with the SBSCP, you can use filters. They can be of the usual PowerShell filter, as implemented in a Where-Object command, or they can be LDAP filters. You should note that only one of these parameters can be used in any one Get-CsUser command. The next command shows the use of a PowerShell filter via piping to Where-Object:
Get-CsUser | Where-Object {[String]$_.Registrarpool ↵
-eq "se01.rlscomms.net"}
This command will bring back all users homed on the se01.rlscomms.net pool. As you have seen, the simple Get-User command outputs all the properties on which the user can be filtered. The previous filter was simply performed with only one parameter. You can expand the filter to create complex searches. For more specifics about how to format the filter string, see the article at the following location:
http://technet.microsoft.com/en-us/library/ee177028.aspx
The other type of filter is the LDAP filter. It works in much the same way as through the SBSCP but through PowerShell.
Get-CsUser -LDAPFilter Description="Office Based"This command will pull back all users where the description contains the text "Office Based".
Here’s another:
Get-CsUser –LDAPFilter "!(Department=Marketing)"This will pull back all users who are not in the Marketing department. As you can see, a great deal of flexibility is available to enable you to retrieve only the users you want.
Now that you know how to search and filter users in the SBSCP and in PowerShell, let’s move on to what you can do to the users you find.
Enabling and Disabling
Enabling users in the SBSCP is relatively straightforward.
- Open the SBSCP as a user with CSAdministrator or CSUserAdministrator rights and click the Users tab. In the main pane, click Enable Users, which will open the main page to select and enable users, as shown in Figure 12.4.
-
Click Add and locate the user or users you want to enable through the searching methods that were described earlier in the chapter. Once you have located and selected the relevant users, click OK.
Note that multiple users can be selected either in one block using the Shift+click method or individually using the Ctrl+click method, which should be familiar from Windows Explorer.
-
You should be back in the main configuration page shown in Figure 12.4, this time with users listed in the Users section. You must assign the users to a Registrar pool. In Figure 12.4, this will be
se01.rlscomms.net, which is the only pool available in the drop-down; however, your organization may have pools in different locations around the world. You must also select a method to generate a SIP uniform resource identifier (URI). We will cover these choices in more depth later when discussing how to enable the user from PowerShell. At this point, you will simply select Use User’s Email Address because you know the email address field is populated with an address that fits the naming scheme of the SIP domain,@rlscomms.net.You could now simply accept the defaults and click Enable to finish setting up the users; however, you should be aware of a few other settings.
- The Telephony section allows you to configure the way in which the user can use Skype for Business features to make telephone calls. The default is PC-To-PC Only, which is what you should leave set for the user. This setting allows voice and video calls to be made only within the Skype for Business system between machines with the relevant client installed. Other options are to enable coexistence with a third-party PBX, to configure the user to use Skype for Business as a PBX, or to disable audio and video entirely. These settings will be covered in more detail in Chapter 16, “Getting Started with Voice.”
- The rest of the settings you can configure on this page enable you to assign immediately the various policies Skype for Business provides to enable control of the user environment. For now, leave them at the default settings. We will discuss many of the policies in much more depth later in this chapter; at that point, you can come back and change those policies assigned to users if you like.
- After you’ve looked through all the settings available, click Enable to make the users selected live on Skype for Business.

FIGURE 12.4 The main configuration page with options for enabling users
Although the SBSCP is fine for enabling a single user, and even acceptable for doing them in bulk, some people just love to do things from the shell. For those people, here’s how you enable a user from PowerShell. As discussed earlier, you need to locate the relevant user or users. When working in PowerShell, that means using the Get-CsAdUser cmdlet, unless you know the display name of the user, in which case you can simply start with the Enable-CsUser cmdlet. In this case, you know the display name is Test User1, so you can move right on; but if you didn’t know the name, you could use the Get-CsAdUser cmdlet to bring back the relevant user or users and pipe the output of Get-CsAdUser into the Enable-CsUser command, discussed next.
As you saw in the SBSCP, certain fields are mandatory. First, of course, you must identify the user or users, using the AD display name, SIP address, user principal name (UPN), or domainSamAccountName. Again, in this case, you can stick with AD display name. Next, you need to specify the Registrar pool and the SIP address. In this simple example setup, this is pretty straightforward because there is only one Registrar pool (se01.rlscomms.net). The choice of SIP address is possibly more complex. As a rule of thumb, the SIP address should match the email address of the user if at all possible. However, unless Exchange is installed, the email address field might not be populated. Make sure it is for the user account you will be creating so you can use it later. In this example, Test User1 is set up with the email address [email protected].
To enable the user, use the following command:
Enable-CsUser -Identity "Test User1" -RegistrarPool ↵
se01.rlscomms.net SipAddressType EmailAddress
This command will enable the user Test User1 for Lync on the se01.rlscomms.net pool with a SIP address matching the email address [email protected]. The one parameter here that may not be immediately obvious is SipAddressType. It could have been very specific, used the SipAddress parameter, and manually specified the SIP address testuser1@rlscomms .net; however, the SipAddressType parameter is potentially more useful because it allows various options to form the SIP address. One thing you will note is that when you use certain SipAddressType settings, you will need another parameter, SipDomain. In this environment, things are simple with only the one SIP domain. However, large organizations commonly need to support multiple domains, perhaps to represent different brands or company units.
The options for SipAddressType are as follows:
EmailAddress: As shown previously, this uses the email address from the user in AD and doesn’t require theSipDomainparameter.SamAccountName: This uses the SamAccountName from AD and does require theSipDomainparameter to specify the suffix of the name after the@sign.UserPrincipalName: This uses the UPN of the user in AD and, because the UPN is in the same form as an email address, doesn’t require the use of theSipDomainparameter.FirstLastName: This takes the first and last name of the user and puts a period between them—in our example,test.user1. It requires the use of theSipDomainparameter.
You now know how to find and enable users for Skype for Business. As you have seen, the SIP address is key. This forms the unique ID and is what makes users show up in searches carried out for Skype for Business–enabled users. On occasion this can cause unintended results, as you might ask yourself what happens if a user already has a SIP address populated in their msRTCSIP-PrimaryUserAddress attribute. This could have happened as part of a previous deployment when the user maybe became orphaned. Thankfully, there is a PowerShell command that can help identify these users and get them all set up for Skype for Business.
Get-CsUser –UnassignedUser | Select-Object DisplayNameWhen run, this command will identify any users who have a SIP address but are not assigned to a Registrar pool. It will then output their display name. You could, of course, simply pipe the output to the Enable-CsUser cmdlet and get them set up directly for Skype for Business.
Making Changes to Users
Now that you’ve enabled some users for Skype for Business, you no doubt feel suitably pleased. However, it won’t be long before the changes start rolling in. For example, someone might move to a different office or even a different country and be served from a different pool. Another typical occurrence is when a name changes because of marriage, and of course, people will leave your organization temporarily or permanently and their accounts will need to be disabled and then deleted. As with all the other user administration tasks, the first requirement is to make sure you target the relevant user or users; that is where the search skills you’ve learned come in handy.
The SBSCP is well laid out, so by now you should be pretty familiar with it. On the Users tab, search for the user you need to alter. Once you’ve selected it, you can explore the available options and find the Edit and Action drop-downs.
The Edit drop-down is straightforward. It gives you an easy option to select all the users returned by a search, after which you can move to the options on the Action menu, which we’ll discuss shortly. Other than that, the only option is Show Details, which takes you to the configuration page for that particular user. This will look familiar from the steps taken to enable the user in the SBSCP described earlier. The Action drop-down gives many more options, as shown in Figure 12.5.
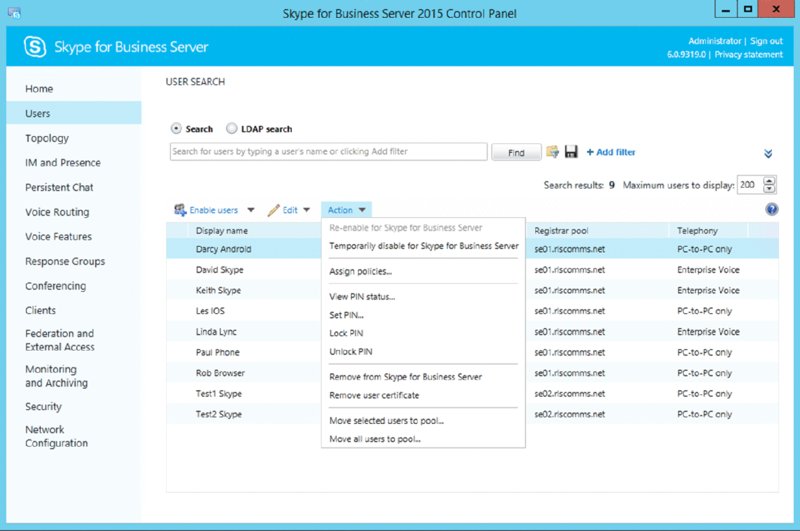
FIGURE 12.5 The options on the Action drop-down
MOVING USERS
As you can see, moving users to another pool is simple. You select the relevant user or users and then, on the Action menu, click the Move Selected Users To Pool entry. This opens a dialog box where you can choose the pool in the drop-down shown in Figure 12.6. There is also a Force check box that should be used if the standard process for moving fails. The standard process of moving users between pools will take across their conferences and buddy lists. If for some reason the source pool is unavailable, you would have to use the Force check box to move the user without this data from the source pool. Be careful, though, because there is a risk of data loss any time the Force parameter is used. This is discussed in more detail in Chapter 15, “Troubleshooting.”
FIGURE 12.6 The Move Users dialog box allows you to move selected users to a pool.
Selecting the Move All Users To Pool option will bring up a dialog that allows you to select both a source pool and a destination pool and enables moving all users from the source to the destination, as shown in Figure 12.7. Again, the Force check box allows scenarios where the source pool isn’t available.

FIGURE 12.7 The Move Users dialog box allows you to move all users between pools.
To perform these moves from PowerShell, you would use the Move-CsUser cmdlet, a simple cmdlet. The required parameters are -Identity to target a specific user and -Target to specify the pool to which you want to move the user. There is also the -Force parameter, which provides the same functionality to move users in failure scenarios without taking user data across to the new pool. For example, this command moves Test User1 to the SE02 pool:
Move-CsUser -Identity "Test User1" -Target "se02.rlscomms.net"Instead of having a separate cmdlet to allow all users to be moved from one pool to another, this time the PowerShell pipe is used for functionality.
Get-CsUser | Where-Object {[String]$_.Registrarpool -eq ↵
"se01.rlscomms.net"} | ↵
Move-CsUser -Target "se02.rlscomms.net"
This command first runs the Get-CsUser command you are familiar with, and using a filter it selects all users on the Se01.rlscomms.net pool. These are then piped to the Move-CsUser cmdlet, which moves them to the se02.rlscomms.net pool.
CHANGING USERNAMES
In addition to moving users between pools, another commonly needed task is to change usernames, for example after a marriage. In this case, most of the work will be done by other teams, namely, the AD and Exchange teams. (Of course that might be you, but that’s a topic for a whole other book!) In Skype for Business terms, when the AD team has made its changes, the user will show up in searches with a new display name. However, what won’t have changed is the SIP URI, which as we have said should match the primary email address of the user. To ensure that is the case, in the SBSCP locate the user, and on the Edit drop-down, click Show Details. In the configuration pane that opens, edit the SIP Address field as required and then click Commit. To do the same process from PowerShell, use the Set-CsUser cmdlet as follows:
Set-CsUser -Identity "Test User1" -SipAddress [email protected]This command will update the SIP address of Test User 1 to [email protected].
This also has the added benefit of updating the contact lists of users who have added the newly married user prior to the name change. Unfortunately, this works only within your organization; any federated users will be required to manually update their contacts.
DISABLING AND REMOVING USERS
There are actually a couple of ways of disabling users, and they have slightly different effects. On the Edit drop-down, if you click Show Details, one of the options on the user configuration page is an Enabled For Skype for Business Server check box. If this check box is cleared, a user cannot log on to Skype for Business, but it doesn’t remove any of the user’s settings from Skype for Business and doesn’t remove Skype for Business attributes, such as the SIP URI, from the user object. This is a sensible option if the user in question is going to be out of the organization for a period of time but will return. In PowerShell, this is the same as running the following command:
Set-CsUser -Identity "Test User1" -Enabled:$FalseThis command will ensure that a user can’t log on to Skype for Business but doesn’t delete any settings or policy assignments.
To reverse the process, simply run the following command:
Set-CsUser -Identity "Test User1" -Enabled:$TrueThis command will bring the user back to life and ensure that they can log on again as before. These steps can be carried out from the Action drop-down using the Temporarily Disable For Skype for Business Server and Re-enable For Skype for Business Server options. If instead you want to be more permanent, then you need to use the Action drop-down in the SBSCP or the Disable-CsUser cmdlet in PowerShell. With the relevant user or users selected, move to the Action drop-down and select Remove From Skype for Business Server. You will be prompted to click OK if you are sure. This action will remove the user entirely from the Skype for Business server by removing Skype for Business attributes on the user account and wiping out user data such as buddy lists and policy assignments. It will not remove the Active Directory user object. To carry out the same action in PowerShell, use the following command:
Disable-CsUser -Identity "Test User1"This will remove the user from Skype for Business. At this point if you wanted to reenable the user, you would have to go back and use the Enable-CsUser cmdlet or the SBSCP process just described.
OTHER USER ACTIONS
The other options on the Action menu that we haven’t covered are Assign Policies, the various PIN settings, and the Remove User Certificate setting. We will cover the Assign Policies option in the rest of this chapter, and the PIN settings are covered in the chapters in Part 4, “Voice,” so the final element to cover is the Remove User Certificate option. As explained in Chapter 3, “Security,” Skype for Business allows users to be authenticated not only through traditional username and password combinations but also through the use of a certificate and PIN. This makes authentication from phone devices simpler because users only need to enter the numeric PIN. Of course, as an administrator, you may want a way to prevent a user from logging in this way. That is what the Remove User Certificate option does. Although it doesn’t remove the certificates from the devices, it does remove them from the server, which prevents the user from logging on. Through PowerShell, the same thing can be carried out using the Revoke-CsClientCertificate cmdlet.
Understanding Skype for Business Policies
The ability to control systems through the use of policies is critical to an enterprise. It is standard to have different groups of people carrying out different functions and to provide them with only the required tools to do the job. In this way, systems can be sized correctly and security can be maintained. In OCS 2007 and OCS 2007 R2 there were, of course, policies to enable control and management of the user experience. However, these policies could not always be applied in a way that provided the same experience for users no matter where they logged on. The policies were also applied in different ways and did not always allow enough granularity of control without significant effort. Thankfully, Lync Server 2010 brought in a completely different methodology for policies that Skype for Business continues to maintain and, indeed, expand. There are numerous policies that can be applied in granular ways to give a single consistent experience to users and to ensure that administrators can control Skype for Business users without constantly needing the approval of other IT teams (as was the case when Group Policy was used). The remainder of this chapter looks in depth at just what you can do—and how—to keep order in your Skype for Business environment.
In-Band Provisioning
In-band provisioning describes the application of policy to the client through information contained in SIP messages and passed to the client during usage so that settings apply immediately. For a really detailed description of how this works, see the following TechNet article. Note that it describes the process in Lync 2010, which is just as valid for Skype for Business Server 2015.
https://technet.microsoft.com/en-us/magazine/hh219341.aspx
Because of the way policy is applied, different types of clients apply the relevant policy settings to the functionality they offer. Whatever the client, the user will have the same experience because this method of applying policy is as relevant to the browser client as it is to the PC that’s not domain joined and even to the domain-joined PC. Another benefit is that administrators are not constrained to fit Skype for Business policies around another policy engine, such as Group Policy in OCS. Almost all Skype for Business policies can be created and applied either through the SBSCP or through PowerShell (see “What About Group Policy?” later in the chapter for the exceptions). Not using group policies provides greater flexibility because policies can be applied at global, site, service, and user levels, and these policies take effect immediately rather than having to wait for a Group Policy refresh cycle.
Understanding Where Policies Apply
One of the principal benefits of moving to the in-band provisioning model is that Skype for Business policy can closely follow Skype for Business architecture and users, allowing a high degree of granularity. As discussed in Chapter 7, “Planning Your Deployment,” Skype for Business has added to the architectural concepts of OCS 2007 R2 (the organization and the pool) and includes the concept of sites, which generally map to data centers. It is now possible to apply policy at all these levels. Default policies are applied at the Global level, but administrators can create certain types of policies at other levels, such as the site, service, or tag level. Tag-level policies are what allow policy to be assigned to an individual user or selection of users. (As you will see, the search skills you learned earlier can be used to locate users to apply policy to, thereby giving you the ability to specifically target users.)
Of course, all these different levels mean that you need to understand their precedence. The following rules apply:
- If a per-user policy is assigned to the user, then the per-user policy is used.
- If no per-user policy is assigned to the user, then the service policy is used.
- If there is no per-user or service policy, then the site policy is used.
- If there is no per-user, service, or site policy, then the global policy is used.
Simply summarized, the policy set closest to the user wins! Understanding this is important because it has a material effect on which settings are applied to users. For example, certain settings in a policy could be left blank by the administrator to allow the user discretion over how Lync works for them. For example, you could allow the user to choose whether to display a photo by leaving the DisplayPhoto section of the CsClientPolicy blank. But what would happen if you set the DisplayPhoto section of the CsClientPolicy to force the use of the AD stored photo on the global policy but then left that setting blank on a policy closer to the user (that is, site or user tag)? The user would still be able to choose. The whole policy is applied even if settings are blank, not just the settings that have an explicit value.
To understand the various levels more closely, you need to understand the difference between policy name and scope, which defines how policies are referenced using the -Identity parameter in PowerShell. The following are some examples of how different policies are referenced:
Identity globalpulls back the global policy of whichever cmdlet is used.Identity site:PolicyNamereflects a policy that is assigned to a site.Identity registrar:server.domain.xyzreflects a policy that is assigned to a specific service, in this case a registrar.Identity Tag:PolicyNamereflects a policy that is assigned to users.
You can see clearly the concept of policy name and policy scope. The element in the identity before the colon (:) is the scope; the element after the colon is the policy name. In the case of either site or service scopes, the policy name matches that of the site or service where the policy is to be assigned. In the case of the tag scope, the policy name should describe where the policy will apply. You will see how this works when you create and assign policies later in this chapter.
What About Group Policy?
We’ve mentioned that all policies could be created through SBSCP or PowerShell; however, that is not quite true. When the Skype for Business client starts up, it needs certain bootstrapping settings passed to it. For example, if you are not using autoconfiguration through DNS records, the client would need to be provided the Skype for Business server address to log on to. Another such configuration is to enable or disable the welcome screen that pops up when the client is launched for the first time. Clearly in-band provisioning won’t work in these instances because the client hasn’t logged on or been able to check settings. Therefore, the use of Group Policy is maintained for these client bootstrapping settings only.
To apply these Group Policy settings, you will need to obtain the relevant ADMX (.admx) template file. The Lync16.admx file is available as part of the pack of Office 2016 ADMX files. At this time of writing, it can be downloaded here:
www.microsoft.com/en-us/download/details.aspx?id=49030
Interestingly, although part of Office 2016 and called Skype for Business (rather than just an upgrade), the file is still called Lync16.admx!
You will see that there are 32-bit and 64-bit versions of the download. Don’t worry about this. This is important when you are going to be doing custom installs of Office, but in this case, we will just download the 32-bit version.
The file you download will be called admintemplates_x86_4286-100_en-us.exe. On running the application, you will be prompted to extract the contents to a folder. In the folder where you extract the files, you will find that you have two more folders and a spreadsheet. The spreadsheet is called office2016grouppolicyandoctsettings.xlsx and contains details of every setting that the GPO can control. Ignore the fact that neither Skype for Business nor Lync is listed on the Introduction tab! To locate the Skype for Business settings that can be manipulated, go to the ADMX tab and filter the first column, File Name, to show Lync16.admx only. You will see all the settings that can be set. If you move back to the folder where you extracted the files, you will see the folder called admx. Inside is the Lync16.admx file. There is also a folder called en-us. In here you will find the Lync16.adml file, which is a language-specific file for the Lync GPO template file.
Once you have the template file, you will need to load it into a Group Policy object (GPO), which will then be applied at the level in AD where you want to control settings. This is subject to all the usual constraints, such as delays in policy propagation as mentioned earlier.
Since with Skype for Business you are now dealing with ADMX templates rather than the older ADM templates that Lync 2010 used, the method of use has changed. Instead of manually importing the template into a specific GPO, you now have two options to load the new settings template. You can either add them locally on a single machine or load them centrally and have them replicated to any DC for multiple admins to access. Both processes are described in detail here:
www.petri.co.il/add-administrative-templates-to-gpo.htm
Given that this is Active Directory work, it is out of scope for this book, so we will stick to the simplest method, which allows you to test things by using the local store on one machine. If you are rolling this out in production, then speak with your AD specialist to understand the best method for your network.
- To load the template into a GPO, on a domain controller (or anywhere else you have the Group Policy Management tools installed), open the
%systemroot%PolicyDefinitionsfolder. Copy thelync16.admxfile to this folder. Then open theen-USfolder and copy thelync16.admlfile in there. - Next open the Group Policy Management tool by finding the Group Policy Management app and clicking. On the left pane, drill down into the forest and domain and right-click Group Policy Objects. Select New, as shown in Figure 12.8.
- Give the policy a name, but don’t select a starter GPO, and click OK.
- Right-click the new GPO and click Edit. In the left pane, drill down to User Configuration ➢ Policies ➢ Administrative Templates: Policy Definitions (ADMX Files) Retrieved from the Local Machine. One of the folders you will find underneath is called
Skype for Business 2016. - If you then drill down to the next level, you will find
Microsoft Lync Feature Policies, under which all the settings will be visible in the right pane. Each setting is fairly self-explanatory and comes with a useful help article built into the GPO, as shown in Figure 12.9. - After you set up the policy as needed, you can apply it to the relevant group of users by using the standard method.

FIGURE 12.8 Creating the new GPO object

FIGURE 12.9 The newly created GPO with the Skype for Business settings imported
Manipulating Policies
You are getting close to the process of testing policies. As you will soon come to expect, Skype for Business policies can be manipulated in the usual two ways: either through SBSCP or through PowerShell. In general, though, most manipulation is done through PowerShell because the policies are wide ranging. Because these policies must be manipulated using PowerShell, administrators must take the time to really think through what they are doing as they prepare and research the necessary commands. One final thing to note before you dive right in is that although the SfBUserAdmin account used in this chapter’s examples so far can assign policies to users, it can’t create them; therefore, to carry out the operations discussed next (except for the assignment of policies), you should be logged on as a member of the CSAdministrator RBAC role.
Viewing Policies
You will undoubtedly want to know what policies already exist before you create new ones. Skype for Business comes with a global policy set up for each policy type available, and the default settings are hard-coded into the software. You will see this in action later in the chapter when we discuss what happens if you try to delete a global policy.
Because we discussed some of the policies earlier in this chapter, you already know several of the policy types. In the SBSCP, they are spread out in the various tabs to which they apply. For example, to see the available ClientVersionPolicies, you would navigate to the Client tab in the SBSCP; in the main pane under Client Version Policy, you would see all available policies. This is shown in Figure 12.10.
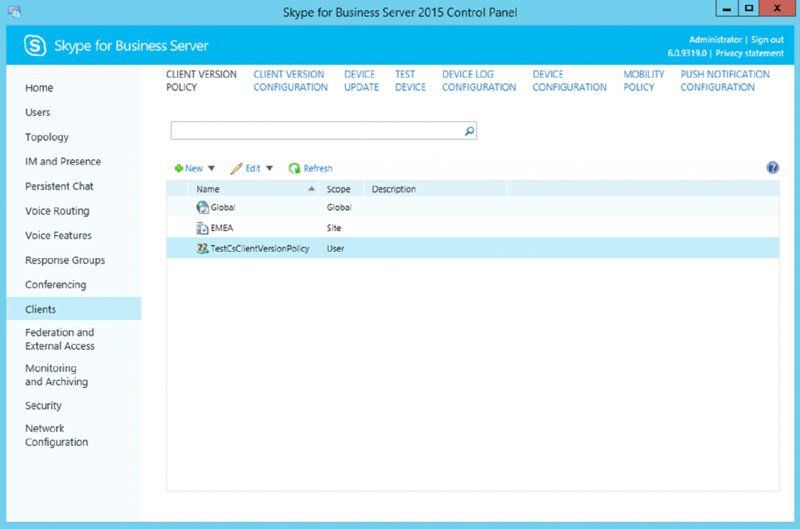
FIGURE 12.10 Viewing the Client Version Policy tab in the SBSCP
What you can see is not only the default global policy but also some other more focused policies, which you will create shortly. If you view one of the other policy sections, under the Federation and External Access tab, you can see the External Access policy. If you double-click the global policy, you will see the settings in Figure 12.11. Interestingly, this is one of those areas in the GUI that has changed since Lync 2010 (aside from branding) because external access now includes settings to configure XMPP, more of which is covered in Chapter 21, “Reverse Proxies, Load Balancers and Gateways.”
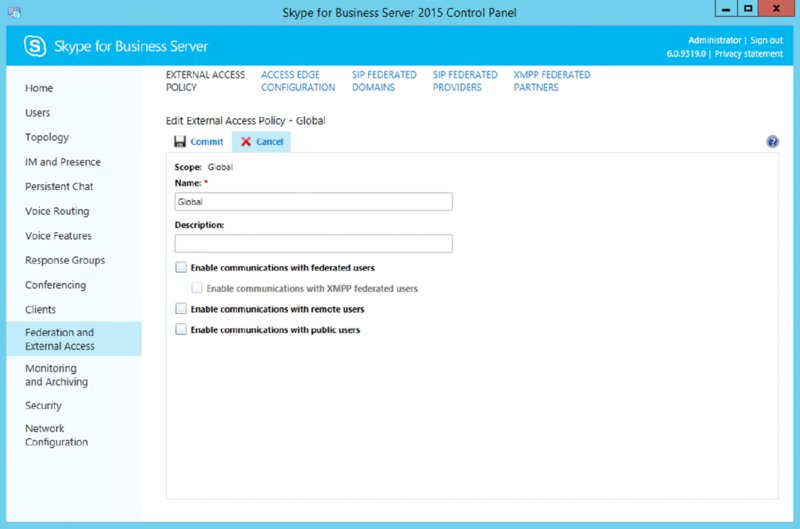
FIGURE 12.11 Viewing the settings of the default global External Access policy
To change any of the settings, simply check the relevant check box and then click Commit. You can see how easy it is to retrieve policy information and change settings in the SBSCP. If you look carefully enough at all the possible options, you will also notice that some of the more wide-ranging policies like the CsClientPolicy are not visible through the SBSCP.
Given that some of the settings are not available through SBSCP and in keeping with the rest of the book, let’s take a look at how you would use PowerShell to view policies.
As we have already discussed, there are various default global policies. To retrieve one of them, the CsClientPolicy type, you would use a command such as this:
Get-CsExternalAccessPolicy -Identity globalBecause you want to retrieve the default global policy, notice the naming convention. Also notice the output of this command, which shows the current settings that you saw in Figure 12.11.
Identity                          : Global
Description                       :
EnableFederationAccess            : False
EnableXmppAccess                  : False
EnablePublicCloudAccess           : False
EnablePublicCloudAudioVideoAccess : False
EnableOutsideAccess               : False
To get the remaining policies, you simply need to identify the relevant cmdlets. Sadly, this is not as simple as it could be because the developers didn’t quite stick to a naming convention. Most of the cmdlets are formatted like the previous one, Get-CsXxxPolicy. However, there are a couple that stand out. First, note that although the Get-CsNetworkIntersitePolicy and Get-CsEffectivePolicy cmdlets follow the relevant naming format, the first actually works with Call Admission Control (CAC) and as such is not related directly to users, and the latter is a new cmdlet enabling administrators to see which set of policies applies to a user. We cover Get-CsEffectivePolicy later in this chapter. The other anomaly is the Get-CsDialPlan cmdlet; although it doesn’t have Policy in the name, it retrieves dial plans related to Enterprise Voice that are applied to users, and it is targeted as the other policy cmdlets are, based on global, site, and user. Dial plans are covered in Chapter 13. With this knowledge, you can run the following command to get a list of all the relevant cmdlets:
Get-Command -Module SkypeforBusiness | Where-Object {($_.Name -like "Get-Cs*Policy" ↩
-or $_.Name -eq "Get-CsDialPlan")} | Where-Object ↵
{$_.Name -notlike "*Effective*"} | Where-Object {$_.Name ↵
-notlike "*Network*"} | Select-Object Name
This command will first get all the commands in the Skype for Business module and then sort through them listing only those that fit the criteria of starting with Get-Cs and ending with Policy. It will omit the Get-CsNetworkIntersitePolicy and Get-CsEffectivePolicy cmdlets and include the Get-CsDialPlan cmdlet. When it is run, you will see the following output:
Name
----
Get-CsArchivingPolicy
Get-CsCallViaWorkPolicy
Get-CsClientPolicy
Get-CsClientVersionPolicy
Get-CsConferencingPolicy
Get-CsDialPlan
Get-CsExternalAccessPolicy
Get-CsHostedVoicemailPolicy
Get-CsLocationPolicy
Get-CsMobilityPolicy
Get-CsPersistentChatPolicy
Get-CsPinPolicy
Get-CsPresencePolicy
Get-CsThirdPartyVideoSystemPolicy
Get-CsUserServicesPolicy
Get-CsVoicePolicy
Get-CsVoiceRoutingPolicy
If you are familiar with Lync 2010 or Lync 2013, you will notice that there are a few new policies in Skype for Business Server 2015 (highlighted in bold in the previous list). First, Get-CsCallViaWorkPolicy is used to define the settings for enabling users to control non-Skype phones, such as legacy PBX devices. Second, Get-CsThirdPartyVideoSystemPolicy is similar to Get-CsVoicePolicy, except it is focused on the settings and interaction with video systems. Now you have a useful list of all the cmdlets that can be used to retrieve policy settings. They all (even Get-CsDialPlan) take the same command structure as shown earlier to get the current global policy settings.
It’s useful to see the current settings for each of the global policies, but sometimes you’ll want to see the default settings. There are a few ways of doing this.
- Check TechNet.
- Create a new, empty policy and retrieve it to display its settings. This method has a disadvantage that we’ll discuss next.
- Create a new policy but use the
-InMemoryparameter. This is rather clever.
As mentioned, creating a new policy with no parameters other than a name will create a policy using the default settings, as shown in this example:
New-CsClientPolicy -Identity TestDefaultSettingsThis command would create a new client policy called TestDefaultSettings. However, you don’t really want to have to create policies every time you want to see the default settings because it would be too easy to forget one and clutter up the system. Fortunately, another option is available. One of the parameters of the New-CsXxxPolicy cmdlets is -InMemory. When appended to the command just shown, it creates a policy but holds it in memory and never writes it to the configuration store. To see this parameter in action, run the following command:
New-CsClientPolicy -Identity TestDefaultSettings -InMemoryThis will output the default settings of the client policy but not actually create the policy. Of course, this functionality is not provided just to let you see the default settings of a policy. It will also allow you to create a new policy in memory and assign it to a variable. You can then manipulate the policy settings as you need and put the policy into action, thereby ensuring that the correct settings are applied immediately, as shown in the following example:
$newpolvar = New-CsClientPolicy -Identity NewPolicy1 -InMemory
$newpolvar.DisableEmoticons = $True
$newpolvar.DisablePresenceNote = $True
Set-CsClientPolicy -Instance $newpolvar
$newpolvar = $NULL
What this does is set the variable $newpolvar to the default settings of the NewCsClientPolicy cmdlet, creating in memory a policy called NewPolicy1. Next, you edit certain properties of that variable to disable emoticons, for example. Then you write back those setting with the Set-CsClientPolicy cmdlet, which actually creates the policy. Finally, you end by resetting the variable $newpolvar to Null so that it can’t accidentally be used.
You’ve looked at how to retrieve the global policies and the default settings, but what about easily viewing the other policies of a specific type? The next command will list all policies of a certain type:
Get-CsClientVersionPolicy | Select-Object IdentityThis command will list all the CsClientVersionPolicies, as in the output shown here:
Identity
--------
Global
Site:EMEA
Service:Registrar:se01.rlscomms.net
Tag:TestDefaultSettings
Actually, we’ve skipped ahead a little; you’ll learnt to create policies in the next section, but it’s not very interesting to show only one line of output!
This output nicely demonstrates the naming conventions showing scope and assignment. The Tag:TestDefaultSettings entry is ready to be assigned to users.
Creating and Assigning Policies
So far we’ve covered the basics of creating a policy using the New-CsXxxPolicy cmdlets. You know that simply using the cmdlet followed by an identity will create a new policy with the default settings. We’ve also discussed the basics of what the different identities for the policy mean to where they apply, but it will be useful to recap that here. This time you will use the New-CsClientVersionPolicy because it can be created against all the various scopes available as follows:
New-CsClientVersionPolicy -Identity global
New-CsClientVersionPolicy -Identity Site:EMEA
New-CsClientVersionPolicy -Identity registrar:se01.rlscomms.net
New-CsClientVersionPolicy -Identity TestDefaultSettings
These commands will create policies with the default settings. Of course, you can also create new policies through the SBSCP. One of the benefits of this is that you get guidance in creating the policies of different scope, as shown in Figure 12.12.

FIGURE 12.12 Creating a new CsClientVersionPolicy through the SBSCP, showing the different policy scopes available
Once you have selected the scope type, you will be presented with a search box to locate the relevant pool (registrar) or site, or you will be taken straight into the policy settings windows with a text box to name the policy if it is to be a user (Tag:) policy.
After policies have been created in the SBSCP or PowerShell, the next stage is the assignment of these policies. Global policies, site policies, and service policies don’t need to be assigned; they just work immediately on creation because their identity specifically references an element of Skype for Business architecture where they are to be active. That’s why the name of a policy can be edited only with user policies. Of course, this means you can’t use one site policy on another site; you must create a new one because the naming format is specific to the site, such as Site:EMEA or Site:APAC. If you do need to do this, there is no simple method. It would be worth reviewing the following article, which details a possible workaround:
http://blogs.technet.com/b/csps/archive/2011/03/21/copypolicies.aspx
The user policy (sometimes called tag level) will need to be assigned. This is where the Grant-CsXxxPolicy cmdlets come in. To assign the TestDefaultSettings client version policy to the Keith_Skype user, you need to do the following:
Grant-CsClientVersionPolicy -Identity "rlscommskeith_skype" ↵
-PolicyName "TestDefaultSettings"
This will apply the policy to Keith_Skype. But suppose you want to apply this policy to all members of a department or to those with a special custom attribute or specifically to members of an AD group.
Well, this is once again where PowerShell comes in. You can again utilize the searching skills you learned at the beginning of this chapter. You first locate the relevant group of users you need and then pipe the output to the relevant Grant-CsXxxPolicy cmdlet. Here is an example:
Get-CsUser –LdapFilter "Department=Marketing" | ↵
Grant-CsClientPolicy –PolicyName "TestCsClientPolicy"
This will first use an LDAP filter to get all the members of the Marketing department who are Lync enabled and then apply TestCsClientPolicy to them. If you are using the SBSCP to assign policy, things follow much the same format. You would use the search skills covered earlier to locate the relevant Skype for Business–enabled users. Then you would select the users and, in the Action drop-down, click Assign Policies. This will open the window you see in Figure 12.13. You can assign the relevant policies to the users by using the relevant drop-down menus and clicking OK to apply.
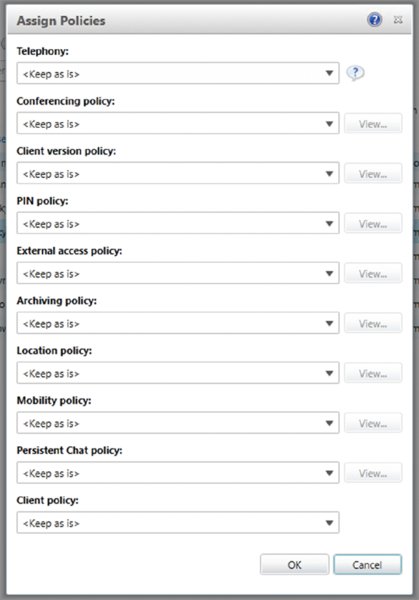
FIGURE 12.13 Assigning policies in the SBSCP
Applying a policy to members of a specific AD group is unfortunately not quite so simple. Like many things, though, it can be achieved with a line of PowerShell.
You first need to get the members of the group. This can be done as follows:
Import-Module ActiveDirectory
Get-AdGroupMember -Identity TestGroup
Here, you are first importing the AD module so you can manipulate AD objects and then get the members of the group TestGroup. However, the output looks like this:
Get-ADGroupMember -Identity TestGroup

distinguishedName : CN=Keith Skype,Cn=users,dc=rlscomms,dc=net
name              : Keith Skype
objectClass       : user
objectGUID        : 43cea8f9-5d84-4007-bd4b-d2daac38986a
SamAccountName    : Keith_Skype
SID               : S-1-5-21-1801160900-2869415974-1656638013-1144
If you try to pipe that directly into the Grant-CsXxxPolicy cmdlet, you will get an error because the Grant-CsXxxPolicy cmdlet doesn’t understand the input. To work around this, you need to understand the type of input that the Grant-CsXxxPolicy cmdlet takes. You can get this from the help file, as shown here:
String value or Microsoft.Rtc.Management.ADConnect.Schema.ADUser object.
Grant-CsClientPolicy accepts pipelined input of string values
representing the Identity of a user account. The cmdlet also
accepts pipelined input of user objects.
This tells you that the cmdlet accepts pipelined user objects, as you proved when passing it output from Get-CsUser, and that it also accepts strings that represent user accounts. Therefore, what you need to pass the Grant-CsXxxPolicy cmdlet is something in the form of Keith Skype.
As you can see from the output from the Get-AdGroupMember cmdlet, this particular format is found under the .name attribute. You can, therefore, use the following PowerShell command to grant policy to the membership of a specific AD group:
Get-ADGroupMember -Identity testgroup | ForEach-Object ↵
{Grant-CsClientPolicy -PolicyName testdefaultsettings -identity $_.name}
This command first gets the members of the group and then for each member runs the Grant-CsClientPolicy cmdlet using the .name attribute for the identity.
Realistically, you probably don’t want to create all your policies with the default settings. After all, there would be little point in that because you could simply use the default global policies. So to create new policies with settings other than the default, you need to specify what settings you want in New-CsXxxPolicy. As an example, creating a custom presence policy enables you to manage two important aspects of presence subscriptions: prompted subscribers and category subscriptions.
New-CsPresencePolicy -Identity MarketingPresencePolicy ↵
-MaxPromptedSubscriber 600 -MaxCategorySubscription 900
This would create a new presence policy using the settings entered. The MaxCategorySubscription parameter lets you control the maximum number of category subscriptions allowed at any one time. A category subscription represents a request for a specific category of information—for example, an application that requests calendar data. The MaxPromptedSubscriber parameter enables you to control the maximum number of prompted subscribers a user can have at any one time. By default, anytime you are added to another user’s contacts list, a notification dialog appears onscreen informing you of this fact and giving you the chance to do such things as add the person to your own contacts list or block the person from viewing your presence. Until you take action and dismiss the dialog box, each notification counts as a prompted subscriber.
Creating a presence policy in this way is easy. However, what about a policy that has many more options you could set, like a client policy? In that case, you need to plow through them and set the ones you want. The options that you don’t explicitly set will take on the default settings for that policy.
As you’ve seen, it is also possible to create policy using the SBSCP. In this case, configuring the relevant settings is simply a case of using the GUI and then clicking Commit.
Editing Existing Policies
We have shown how to create several policies, but what about editing the existing ones? Editing policies is also a simple matter in PowerShell or the SBSCP. With PowerShell, you would use the relevant Set-CsXxxPolicy cmdlet and identify the policy using the naming conventions outlined previously (Scope:Name) and then use the relevant parameter to change the setting, as in the following example:
Set-CsPresencePolicy -Identity Tag:MarketingPresencePolicy ↵
-MaxPromptedSubscriber 200 -MaxCategorySubscription 400
There is at least one policy that works slightly differently than the others. That is the client version policy. This policy is made up of rules to allow or disallow certain versions, and it uses the CsClientVersionPolicyRule set of cmdlets to amend and create rules.
Having created and assigned all these policies, the last thing we will cover in this section is how to see which user has which policy assigned. After all, it could get rather complex with all those different levels in play.
To see the policies applied to a user, run the following command:
Get-CsUser -Identity "Keith Skype"This will output something similar to the following:
Identity                : CN=Keith Skype,CN=Users,DC=rlscomms,DC=net
VoicePolicy             :
VoiceRoutingPolicy      :
ConferencingPolicy      :
PresencePolicy          :
DialPlan                :
LocationPolicy          :
ClientPolicy            : TestDefaultSettings
ClientVersionPolicy     :
ArchivingPolicy         :
ExchangeArchivingPolicy : Uninitialized
PinPolicy               :
ExternalAccessPolicy    :
MobilityPolicy          :
PersistentChatPolicy    :
UserServicesPolicy      :
HostedVoiceMail         :
HostedVoicemailPolicy   :
HostingProvider         : SRV:
RegistrarPool           : se01.rlscomms.net
Enabled                 : True
SipAddress              : sip:[email protected]
LineURI                 :
EnterpriseVoiceEnabled  : False
ExUmEnabled             : False
HomeServer              : CN=Lc  Services,CN=Microsoft,CN=1:1,CN=Pools,CN=RTC  Service,CN=Services,CN=Configuration,DC=rlscomms,DC=net
DisplayName             : Keith Skype
SamAccountName          : Keith_Skype
Note that although some of the policies applied are shown, others are not. This is because the only ones shown here are the ones assigned specifically to the user, namely, the Tag: policies.
In the past with Lync 2010, seeing all the policies that applied to a user required some fairly serious PowerShell. If you’re interested in that, then take a look at the Lync Server PowerShell blog.
http://blogs.technet.com/b/csps/archive/2010/06/07/scriptuserpolicyassignments .aspx
However, in Lync 2013 we were given a new built-in cmdlet to do exactly what we need. The Get-CsEffectivePolicy cmdlet will return all the policies applied to a user even if they are applied only at a global or site level. For example, if you run the following command, you will see the policies applied to Test User5:
Get-CsEffectivePolicy –Identity "Test User5"The output looks like this:
Identity                       : Keith Skype
ConferencingPolicy             : Global
PresencePolicy                 : Global
LocationPolicy                 : Global
VoicePolicy                    : Global
LocationProfile                : Global
ClientVersionPolicy            : Global
ClientPolicy                   : Tag:TestDefaultSettings
ImArchivingPolicy              : Global
UserPinPolicy                  : Global
ExternalAccessPolicy           : Global
HostedVoicemailPolicy          : Global
MobilityPolicy                 : Global
PersistentChatPolicy           : Global
VoiceRoutingPolicy             : Global
UserServicesPolicy             : Global
ThirdPartyVideoSystem          : Global
CallViaWorkPolicy              : Global
GraphPolicy                    : Global
AddressBookServerPolicy       : Global
OnlineDialinConferencingPolicy :
You can see that all the policies are applied at the global level except for ClientPolicy, which is defined at the user level. There is no definition for OnlineDialinConferencingPolicy as this environment is not connected to online services.
Removing or Resetting Policies
With all the experimenting with policies you’ve done in this chapter, you have probably ended up with lots of policies you don’t want! You also may well have changed the settings of the default global policies and, for that matter, other policies as well. What can you do about that? Well, removing a policy at any of the levels other than global is simple. Use the relevant Remove-CsXxxPolicy cmdlet with the identity of the policy as follows:
Remove-CsClientVersionPolicy -Identity Site:EMEA
Remove-CsClientVersionPolicy -Identity registrar:se01.rlscomms.net
Remove-CsClientVersionPolicy -Identity TestDefaultSettings
In the SBSCP, removing policies is just as simple; you simply select the relevant policy and then, from the Edit drop-down, select Delete.
Interestingly, if you remove a policy currently assigned to a user, you will get a warning, and you are given the opportunity to continue. Assuming you select Yes, the policy will be removed, and the user will be reset to a Global policy assignment. See Figure 12.14 for the result of rerunning the Get-CsEffectivePolicy command.

FIGURE 12.14 Results of removing a policy in use
However, if you run the Get-CsUser cmdlet, you will receive the following response:
WARNING: "ClientVersionPolicy" with identity "2" assigned to "sip:[email protected]" has been removed from configuration store.This indicates that the user configuration still believes there to be a policy assigned, and it is identified with the value of 2. This is known as an anchor.
In this case, the user will be applied to the next policy defined by the scope, which is why Get-CsEffectivePolicy looked OK and, while it may be messy and unclear, there is no specific need to tidy further.
Of course, removing site and service policies automatically removes their assignment because the identity and assignment are intrinsically linked.
Interestingly, if you try to delete the default global policies, Skype for Business won’t let you! Essentially, all that happens is that any changes you have made to the global policy revert to the default settings. To try this for yourself, you would use a command like the following one:
Remove-CsClientVersionPolicy -Identity globalWhen you run this, you will reset the global CsClientVersionPolicy to its default settings. By way of warning, you will see the following output:
WARNING: Global configuration for "ClientVersionPolicy" cannot be removed. Instead of removing it, the Global configuration for ClientVersionPolicy" has been reset to the default value.Choosing the Right Policy for the Job
You have looked at the policy architecture in Skype for Business and have seen how policies operate, how they are targeted, and also where Group Policy is still needed. You have also looked at the basics of manipulating policies in Skype for Business. Finally, you will dive in and look at the individual policies and the settings they control.
The first element of examining individual policies is knowing where to view and change those settings. Clearly, the SBSCP gives access to many policy elements, including the ability to edit and assign policies as well as create and delete them. However, not all policies can be accessed in this way. Table 12.1 lists the elements of SBSCP that deal with policies (for example, assigning them to various scopes), and it shows how the settings in the SBSCP equate to PowerShell cmdlets; it also indicates which chapter of this book covers the related policies.
TABLE 12.1 A mapping of SBSCP settings to PowerShell cmdlets
| SBSCP TAB | SBSCP SETTING | POWERSHELL CMDLET | NOTES | CHAPTER COVERED |
| IM & Presence | File Filter | CsFileTransferFilter Configuration |
3 | |
| IM & Presence | URL Filter | CsImFilter Configuration |
Note that the IM Filter Configuration is different from the basic enabling and disabling of hyperlinks that is possible through the CsClientPolicy through the EnableURL setting. | 3 |
| Persistent Chat | Persistent Chat Policy | CsPersistent ChatPolicy |
App C | |
| Persistent Chat | Persistent Chat Configuration | CsPersistentChat Configuration |
App C | |
| Voice Routing | Dial Plan | CsDialPlan |
16 | |
| Voice Routing | Voice Policy | CsVoicePolicy |
16 | |
| Voice Routing | Trunk Configuration | CsOutboundTranslation RuleCsTrunk Configuration CsVoiceRegex |
16 | |
| Conferencing | Conferencing Policy | CsConferencing Configuration |
16 | |
| Conferencing | Meeting Configuration | CsMeeting Configuration |
16 | |
| Conferencing | PIN Policy | CsPinPolicy |
Note that this is the same policy defined in the Security tab and controls both Conferencing and Device access. | 3, 6 |
| Clients | Client Version Policy | CsClientVersion Policy |
3, 12 | |
| Clients | Client Version Configuration | CsClientVersion Configuration |
Allows you to modify the default action for clients not specifically mentioned in the active policy. | 3 |
| Clients | Device Log Configuration | CsUCPhone Configuration |
6 | |
| Clients | Device Configuration | CsDeviceUpdate Configuration |
6 | |
| Clients | Mobility Policy | CsMobilityPolicy |
5 | |
| Clients | Push Notification Configuration | CsPushNotification Configuration |
5 | |
| Federation and External Access | External Access Policy | CsExternalAccessPolicy |
4 | |
| Federation and External Access | Access Edge Configuration | CsAccessEdge Configuration |
Note that this is a global-only setting. | 4 |
| Monitoring and Archiving | Call Detail Recording | CsCdrConfiguration |
13 | |
| Monitoring and Archiving | Quality of Experience Data | CsQoEConfiguration |
13 | |
| Monitoring and Archiving | Archiving Policy | CsArchivingPolicy |
13 | |
| Monitoring and Archiving | Archiving Configuration | CsArchivingConfiguration |
13 | |
| Security | Registrar | CsProxyConfiguration |
3 | |
| Security | Web Service | CsWebServiceConfiguration |
3 | |
| Security | PIN Policy | CsPinPolicy |
3 | |
| Network Configuration | Global Policy | CsNetworkConfiguration |
17 | |
| Network Configuration | Location Policy | CsLocationPolicy |
18 |
What you may notice in Table 12.1 is that there is no mention of the CsClientPolicy, CsPresencePolicy, PrivacyConfiguration, CsCallViaWorkPolicy, CsThirdPartyVideoSystemPolicy, or UserServicesConfiguration. Some of the most far-reaching policies can be changed only through PowerShell. In the rest of this chapter, we will drill into the settings of these policies and any particular quirks of operation related to individual policies.
ClientPolicy
The client policy is manipulated using the CsClientPolicy cmdlets. It is this policy that replaces the vast majority of settings that would previously have been set using group policies in OCS 2007 R2. Client policies can be applied at the site or user scope.
It is the client policy that allows the configuration of such elements as these: MaximumNumberOfContacts, whether to add a disclaimer message to an IM with the IMWarning setting, whether to force saving of IMs in Outlook with the EnableIMAutoArchiving setting, and whether to display a photo with the DisplayPhoto setting.
Of course, there are many more settings available, which are all described in detail in the Skype for Business help file. However, if the setting is not in the default scope, there is a way to make client policies even more flexible. You can use the New-CsClientPolicyEntry cmdlet to add additional areas of control to the Skype for Business ClientPolicy. This functionality has to be used in conjunction with Microsoft, which could add the relevant new element to control in a cumulative update, as detailed here:
http://technet.microsoft.com/en-us/library/gg399046.aspx
In the past, this was used to add a method for providing a link to a feedback URL to capture client requests during the beta periods of Lync.
ClientVersionPolicy
The client version policy is set to ensure control over which different clients can register to a Skype for Business pool. Client version policies are made up of rules that identify specific clients. These rules are defined using the ClientVersionPolicyRule cmdlets. Each SIP client sends identifying information in its SIP headers. This identifying information is then matched against the defined rules.
These policies are used to ensure both a consistent user experience and security by making sure that old, unpatched clients cannot connect to the service.
Client version policies can be applied at the global, site, service (registrar), and user scopes.
ClientVersionConfiguration
The ClientVersionConfiguration cmdlets allow you to control, at either the global (default) or site (new policy) level, what happens when clients attempt to connect to Skype for Business. This is where you turn on or off the facility in Lync to check client version. If this policy is enabled, the ClientVersionPolicy policies apply. The other side to ClientVersionConfiguration is what happens when Skype for Business denies access to a client. You can use the settings to set the default action if a client version is not specifically noted in a ClientVersionPolicy policy. You can also configure whether to prompt the user with a URL to get an updated client if they have a client that is not compliant with the policy.
PrivacyConfiguration
Presence is a great resource; the ability to see whether someone is available can significantly streamline communication. However, some people are not eager to present this information. Lync 2010 introduced a way of managing this situation, which Skype for Business Server 2015 continues to maintain, by applying Privacy Configuration settings. The fundamental aim of these settings is giving users control. It allows users to show their status to only those people on their contacts list.
Given that only allowing contacts to see your status is very restrictive, you can help users prepopulate their contacts list with their manager and direct reports using the AutoInitiateContacts setting. Other settings configure Skype for Business to ensure that the user must specifically opt in to sharing photo and location information with others.
Policies can be configured at the global, site, and service scope. At the service scope, the policy can be applied only to the User Services service.
PresencePolicy
The presence policy controls two settings, the MaxCategorySubscription and the MaxPromptedSubscriber. Presence as a concept is all about providing information about whether someone or something (a group, for example) is available. However, the simple process of providing that information creates network traffic and database load because all the people who are tracking an object are communicated with and logged. Skype for Business is a fairly efficient system and scales to hundreds of thousands of users; however, if all those users subscribed to a single object, then when it came online or changed status, that would generate hundreds of thousands of messages to let all those users know.
To mitigate this potential flood of network traffic, you can use the settings in the presence policy. The first setting, MaxCategorySubscription, controls the individual types of information that each user can subscribe to—for example, calendar information.
The MaxCategorySubscription property enables you to limit the number of category subscriptions a user can have.
The second setting is the MaxPromptedSubscriber setting. Each time you are added to another user’s contacts list, the default client behavior is to prompt you with a pop-up that gives you the chance to reciprocate and add the user to your contacts list. Each of these prompts counts as someone subscribed to the requesting user’s presence. It is common practice to limit the number of unacknowledged presence subscriptions; this can be done with the MaxPromptedSubscriber property. If a user were to reach the maximum number, they would not receive new contact notifications until some of the outstanding prompts have been acknowledged.
The CsPresencePolicy cmdlets can apply at the global, site, or per-user scope.
CsCallViaWorkPolicy
CsCallViaWorkPolicy only has four settings that can be controlled. They are the Identity and Enabled settings, which every policy has, and then simply AdminCallBackNumber (and associated UseAdminCallBackNumber).
Of all of these, the only setting of interest is AdminCallBackNumber, which allows the use of a generic “administration” number rather than the individual users’ number.
CsThirdPartyVideoSystemPolicy
With even less to configure, CsThirdPartyVideoSystemPolicy simply has a flag (SupportSendingLowResolution) to indicate whether the particular policy enables lower resolutions.
UserServicesConfiguration
User Services are the services that control the basic settings for maintaining presence for users and also some baseline meeting settings. The meeting settings cover the length of time an anonymous user can remain in a meeting without an authenticated user and the maximum time that any meeting can remain active. On the user side, you can set the maximum number of contacts each user can have and the maximum number of meetings that they can schedule.
The user services configuration policies are applied at site or service scope. You can also edit the global policy.
When the user services configuration settings and the client policy settings are in conflict (for example, when different maximum number of contacts per user has been set), the lower number wins.
The Bottom Line
Search for users in the SBSCP and PowerShell. Skype for Business offers huge flexibility in what can be done to configure and control the user experience. However, to work efficiently, being able to identify and retrieve information about different groups of users based on various criteria is critical. It is this skill that enables you to target specific groups with specific policies. As with most administration, you can search for users in both SBSCP and PowerShell.
Master It
- You have been asked to run a report on two groups of users. How would you handle the following requests? Can you use two different types of search?
- Locate all users in Marketing.
- Locate all users who register to the
se01.rlscomms.netpool.
Perform basic user administration in the SBSCP and in PowerShell. As would be expected, most basic administration can be performed in the SBSCP and in PowerShell. New users can be created, deleted, enabled, and disabled in both. You can, of course, also change various user properties—in particular, things like the SIP URI of a user and the pool to which they register. User administration is generally carried out by a user who is a member of the CSUserAdministrator RBAC role.
Master It You have been asked to enable all users, except those who are in Sales, for Skype for Business. How would you do this? In addition, one of your colleagues, who is a domain administrator, has asked you to make some changes to his account. What problems might you face?
Understand Skype for Business policies. Skype for Business has significantly improved the policy architecture since OCS 2007 R2. Although AD Group Policy still can have a role to play in getting the client up and running, Skype for Business enforces the majority of policy through in-band provisioning. It uses SIP messages to push policy out to the client instantly and ensures that there is no requirement for domain membership. Users get a consistent experience no matter where they log on. To apply Skype for Business policies properly, it is important to understand the new scope model, in which policies can be applied at the global, site, service, and user levels, and how inheritance works so that the policy closest to the user wins.
Master It You have been asked to explain to a new administrator the different scopes at which a policy can be applied and how different scopes affect the identity of the policy. What would you tell her?
Manipulate Skype for Business policies. Policies are controlled and applied to users either through PowerShell or through the SBSCP. When in the shell, your search skills are critical to ensure that you can closely target relevant user groups. It is here that the piping capabilities of PowerShell are so useful. You can, of course, also apply policy through the SBSCP, which has a helpful Assign Policy page where you can apply applicable policies to one or many users from a single screen.
Master It You have been asked to create a new client policy for the APAC site. You first need to check the default settings for the policy and then customize it to limit the number of users a person can have on their contacts list to 300. How would you proceed?
Choose the right policy for the job. There is a vast range of policy settings available. One of the hardest things an administrator must do is understand where to make certain configurations. SBSCP makes available many policy settings, but it is not always obvious which PowerShell cmdlet sets which setting, compared to what is presented in the SBSCP. Equally, it is not possible to carry out all configuration through the SBSCP, with some of the most wide-ranging policies being configured only through PowerShell.
Master It You have been asked to design a set of policies for your organization. Where would you gather more information about specific settings?