As organizations start to migrate their enterprise telephony to Microsoft Skype for Business, they often require more functionality than is available within the core Enterprise Voice (EV) functionality. To fulfill the most common of these requirements, Microsoft has provided the following extended voice functions: dial-in conferencing, Response Groups, Call Park, and unassigned numbers.
For organizations that require additional functionality, a number of independent software vendors (ISVs) provide applications designed for Microsoft Skype for Business; you can find additional details of these and other third-party applications in Chapter 23, “Skype for Business 2015 Development.”
In this chapter, you will learn to
Understand the extended voice functionality
Design solutions using extended voice functionality
Implement extended voice functionality
Setting Up Dial-in Conferencing
For years PBXs have had the ability to create conferences. In the early days, conferences were usually limited to three people and required using a dedicated key on the phone. Most people found this type of conference hard to set up and would usually end up cutting people off.
To provide a better solution, tools known as conference bridges were created. They allow participants to access their conference by calling an access number and then entering a conference ID and sometimes a passcode. These conference solutions usually come in two forms: ad hoc and scheduled.
Ad hoc conference bridges are often referred to as “meet-me” conference bridges because each user has an individual conference ID and can use it when desired. Because these conferences are ad hoc, even though users can use them when needed, there may be overall limits for the conferencing system in the number of people who can attend conference calls at any one time; these limitations can be in the form of license, hardware, or the number of available PSTN lines.
Scheduled conferences usually have to be booked, and a conference ID is assigned at the time of booking. One advantage of a scheduled conference is that resources are usually assigned to the conference, ensuring that if, for example, a conference is configured for four people from 15:00 to 17:00, then those resources will be available.
In addition to the type of conferencing bridge used, organizations have a choice of using either an on-premises system, usually integrated with their PBX, or a hosted solution. The recent trend has been for organizations to use hosted meet-me solutions. The move to hosted solutions has tended to be due to the cost of implementing on-premises solutions, with organizations preferring monthly costs rather than up-front purchases.
Now that you have looked at what dial-in conferencing is, you can see how Skype for Business handles it.
Understanding Dial-in Conferencing
In OCS 2007 R2, dial-in conferencing was a distinct feature with its own functionality, and when collaboration was required, the LiveMeeting client needed to be used. Since Lync Server 2010, conferencing and collaboration have become a single feature called Online Meeting. The Online Meeting functionality removes the distinction between conferencing and collaboration, allowing all modalities to be used within a conference with a variety of access methods.
This section focuses specifically on the dial-in conferencing aspects that Online Meeting has to offer. Its approach falls within the meet-me category of conference bridges, with each allowed user (as defined by your policies) provided with their own conference ID. Dial-in conferencing provides the following functionality:
PSTN access
Roster of attendees
Attendee management via roster
Ability to secure conferences with a PIN
Ability for Conferencing server to call attendees
Meeting lobby
Dual-tone multiple-frequency (DTMF) codes for management
Name recording for anonymous users
On-demand recording (client side)
Built-in web scheduling
The bold items were new in Lync Server 2010 (although the built-in aspect of the web scheduler is new in Lync Server 2013; it was a separate download previously), and they addressed the limitations that prevented some organizations from migrating their dial-in conferencing facilities to OCS 2007 R2. In addition to the specific dial-in conferencing capabilities just listed, the following Online Meeting functions are also relevant:
Scheduling via Microsoft Outlook is easy.
Scheduling meetings via the Web Scheduler allows non-Outlook users to set up meetings. Functionality can be restricted to a group of users.
Clients can participate in meetings through a browser.
While Skype for Business has not offered dramatically new functionality in conferences (see Chapter 10, “Online and Hybrid,” for coverage of the broadcast meeting capability), there have been a lot of changes around the usability and consistency of the user experience across different clients.
You’ll see many of these functions later as you explore configuration, implementation, and client-side functionality, but for now let’s look at the architectural and back-end elements.
Architecturally, there are two main items to take into consideration when planning and setting up dial-in conferencing: the Audio/Video Conferencing service and server and the configuration of Enterprise Voice, which is discussed in Chapter 16, “Getting Started with Voice.” With Lync Server 2010, it was possible to separate the A/V components of conferencing into a separate pool. This allowed for better scaling of conferencing, but this capability was removed in Lync Server 2013, and Skype for Business continues with the consolidated approach.
The only additional architectural component needed for Skype for Business Server is the Office Web Application (WAC) server (covered in Chapter 22, “Exchange, SharePoint, and Office Web Applications Server”). Without this additional server, meetings will be unable to host PowerPoint presentations (even when using legacy Lync Communicator 2010 clients).
Focusing specifically on the dial-in capabilities, a number of components depend on the Front End servers.
Web Components These are used for the Dial-In Conferencing web page, allowing participants to look up conference access numbers and for users to set their PIN.
Conferencing Attendant Application This accepts calls from the PSTN, prompts for conference details, and then routes the calls to the correct conference.
Conferencing Announcement Application This is used once the participant has joined the conference; it plays announcements to callers and monitors and accepts DTMF tones for conference controls.
Web components also provide a Reach client option, which allows access to Online Meetings in the context of dial-in conferencing; the web components allow participants to specify a number for the conference bridge to call them (also known as call me), and participants can also view the meeting in a browser (including audio, if they do not want to be called back, and also video). The ability for the conference bridge to call a Reach client participant can be restricted with a policy.
Although having the Skype for Business Edge components deployed is not a requirement for dial-in conferencing, it does add another access method to conferences, and it allows federated users to access the conference the same way a user belonging to the organization would. This allows them to view the roster for the conference in the same way a user of the organization would and to bypass any costs associated with dialing access numbers.
Anonymous users are able to connect to the conference either through dial-in or via the Skype Web App, provided not through the Skype for Business Edge server but via a Reverse Proxy (see Chapter 21, “Reverse Proxies, Load Balancers, and Gateways,” for more information).
Before you learn how to configure dial-in conferencing, it is worth briefly looking at the meeting lobby. This feature, new in Lync Server 2010, creates a “lobby” where users can be “parked” when they enter a meeting; the meeting presenter can then choose whether to allow them into the meeting. This provides a level of access control for the meeting. When creating the meeting, users can configure whether the lobby is to be used.
Configuring Dial-in Conferencing Features
Now that you know what dial-in conferencing in Skype for Business can do, it is time to look at how it is configured. Configuration—most of it—can be performed either through the Control Panel or through PowerShell. That is, all the required configuration to get conferencing up and running can be done through both interfaces, but you need to use PowerShell to configure some of the more complex and custom features.
For dial-in conferencing to work, you need to configure the following components:
Enterprise Voice
Web components
Conferencing policies
Meeting configuration
Access numbers
PIN policies
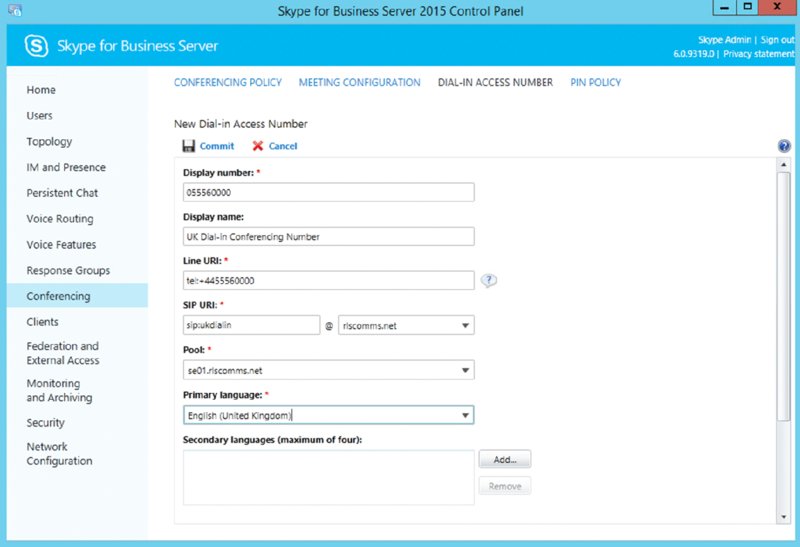
Of these, all but the first two can be configured using the Control Panel as well as the related PowerShell cmdlets. For example, Figure 19.1 shows the Control Panel tab for configuring access numbers. In addition, the following optional components can be configured using PowerShell:
Edge servers
DTMF mappings
Join and Leave announcements
Conference directories
Figure 19.1 Configuring access numbers via the Control Panel
Chapter 8, “Installation,” covers configuring web components and publishing them to the Internet as well as deploying Edge servers. In addition, setting up Enterprise Voice is covered in Chapter 16.
Conferencing Policies
Conferencing policies can be configured on a global, site, or user basis, depending on whether you require different users to have different settings. The global policy is created by default but can be modified as required.
The conferencing policy is used to control all aspects of conferencing, not just dial-in conferencing, but in this section we’ll cover only the options that are either required or relevant to dial-in conferencing. In the following and similar definitions throughout the chapter, only the PowerShell parameters will be listed. Options equivalent to most of the cmdlets and parameters are available through the Control Panel.
When reviewing the PowerShell cmdlets, we’ll focus on the creation cmdlets. They use the verb New, and for each of these cmdlets there are cmdlets for changing settings (Set), reviewing settings (Get), and deleting them (Remove), and although they are not explicitly discussed except as needed, they are available. The Set and New cmdlets use the same parameters; the Get and Remove parameters are limited to the Identity parameter.
As mentioned previously, conferencing policies can be managed either through the Control Panel (Conferencing ➢ Conferencing Policy) or through PowerShell. To create a new policy through PowerShell, the New-CsConferencingPolicy cmdlet is used in conjunction with the parameters outlined here:
Identity: This is the policy name, which is prefixed with site: if the policy is a site policy rather than a user policy.
AllowAnonymousParticipantsInMeetings: This allows anonymous participants.
AllowAnnotations: This allows participants to annotate slides and use the whiteboard.
AllowAnonymousParticipantsInMeetings: This allows users to connect to a meeting without authenticating.
AllowAnonymousUsersToDialOut: This allows anonymous users to dial out. It is the “call me” functionality mentioned earlier.
AllowConferenceRecording: This allows the call to be recorded.
AllowExternalUserControl: This allows external and anonymous users to record.
AllowExternalUsersToRecordMeeting: This allows external users to record meeting content. This setting can be important in restricted environments where data cannot be allowed to leave the site.
AllowExternalUsersToSaveContent: This is similar to the preceding setting, but it’s for downloadable content rather than recorded.
AllowIPAudio: This allows audio and covers PSTN audio as well.
AllowIPVideo: This allows video to be used in the meeting.
AllowLargeMeetings: This allows the meeting size to be greater than 250 attendees.
AllowMultiView: This allows the multiple simultaneous video setting to be controlled.
AllowNonEnterpriseVoiceUsersToDialOut: This allows participants to dial out of a conference even if their user settings do not normally allow for Enterprise Voice capability.
AllowParticipantControl: This allows control of desktop sharing to be passed to other attendees.
AllowPolls: This allows polls to be created.
AllowSharedNotes: This allows the shared note capability of OneNote to be leveraged in a meeting.
AllowUserToScheduleMeetingsWithAppSharing: This allows a user to create a scheduled meeting and leverage App Sharing within the meeting.
AppSharingBitRateKb: This defines the maximum kilobits allowed for App Sharing.
AudioBitRateKb: This defines the maximum kilobits allowed for audio.
DisablePowerPointAnnotations: This disables the capability to annotate PowerPoint slides.
EnableAppDesktopSharing: This allows for limited granular control of desktop sharing, either the full desktop or a single application (or none).
EnableDialInConferencing: This allows participants to call into a conference using a PSTN access number.
EnableFileTransfer: This controls the ability to transfer files within a meeting.
EnableMultiViewJoin: This allows the user to join a conference with MultiView enabled.
EnableP2PFileTransfer: This allows file transfer between individual users (outside of a meeting).
EnableP2PRecording: This allows peer-to-peer recording (outside of meetings).
EnableP2PVideo: This allows peer-to-peer video calls.
FileTransferBitRateKb: This defines the rate for file transfers.
Once the policy has been created, it needs to be assigned to users. Global and site policies are assigned automatically as described in Chapter 12, “User Administration”; therefore, only user policies need to be assigned. You can do this through the Control Panel or through PowerShell using the Grant-CsConferencingPolicy cmdlet, as in the following example:
Grant-CsConferencingPolicy -Identity "rlscommskeith_skype"
-PolicyName "Std Dial In Policy"
This grants Std Dial In Policy to the domain account with the username rlscommskeith_skype.
Meeting Policies
Meeting policies allow you to specify the types of meetings that can be created, and they can be created at a global, site, or pool level. They can be managed through the Control Panel (Conferencing ➢ Meeting Configuration) or through PowerShell. To create a new policy, use the New-CsMeetingConfiguration cmdlet.
The parameters for configuring meeting policies are as follows:
Identity: This specifies the policy name.
For a site policy, this needs to be prefixed with site:.
For a pool policy, this should be the pool FQDN prefixed with service:UserServer:.
AdmitAnonymousUsersByDefault: This parameter permits anonymous users in the meeting by default.
AssignedConferenceTypeByDefault: This parameter sets the conference default type. Set it to True for meetings to be public by default. Set it to False for meetings to be private by default.
CustomFooterText: This defines the text footer applied when users join a meeting.
DesignateAsPresenter: This parameter designates which users are automatically presenters. It can set to None, Company, or Everyone.
EnableAssignedConferenceType: This parameter sets the conference type. If set to True, users can create public or private conferences, and setting it to False means only private meetings can be created. The only difference between them is that a different conference ID and access URL will be used for each private conference.
PstnCallersBypassLobby: This bypasses the lobby for PSTN users.
RequireRoomSystemAuthorization: This is used by Lync room systems, defining the requirement for someone to log in to the room system itself.
PINs
To authenticate when calling into a meeting via the PSTN, users need to set a PIN, which is used in conjunction with their phone numbers. This PIN is also used to allow users to log in to Lync IP phones. The policy for managing PINs can be configured on a global, site, or user basis.
If you are managing PIN policies using the Control Panel, you can access them under Conferencing ➢ PIN Policy; alternatively, you can manage them through PowerShell using the New-CsPinPolicy cmdlet. The following options are used:
Identity.
Allow Common PIN Patterns (AllowCommonPatterns). Common patterns are defined as follows:
Containing four or more consecutive digits—for example, 781234
Repeating digits—for example, 114488
Matching the user’s phone number or extension
Description.
Maximum Logon Attempts (MaximumLogonAttempts).
Minimum Password Length (MinPasswordLength). This is the minimum PIN length; it can be set to a minimum of 4 and a maximum of 24 digits.
PIN History (PINHistoryCount). This can be set to 0 for no history and a maximum of 20.
Days before the PIN must be changed (PINLifetime).
PIN lockouts work in two ways, based on the concept of local logon failures and global logon failures. The Local Logon Failures value is the number of failed attempts allowed within 30 minutes. If this is exceeded, the PIN is locked for an hour, at which time the Local Logon Failure count is reset. Global Logon Failures is the maximum number of PIN attempts allowed before the PIN is locked out and has to be unlocked by an administrator. This value is not reset when a user successfully logs in, and failed login attempts continue to be added to the Global Logon Failure counter. The counter resets only when an administrator unlocks a user’s PIN.
The Local Logon Failure and Global Logon Failure values are predefined. Setting Maximum Logon Attempts in the PIN policy will override only the Local Logon Failure value. The global lockout value cannot be modified. As shown in Table 19.1, both limits depend on the number of digits in the PIN rather than the minimum password length specified in the policy.
The PIN policy is granted to users using the Grant-CsPinPolicy cmdlet.
Conference Access Numbers
Some organizations have only one access number; others have numbers covering many countries. Before you can create access numbers, you’ll need to take a quick look at Enterprise Voice dial plans because the access numbers you’ll need depend on them.
Dial plans are used to provide a link between users and access numbers. When a user schedules a conference, the default numbers shown in the meeting request are the ones associated with the dial plan with which the user is associated. They are also used to translate extensions to full E.164 numbers. When users authenticate via DTMF, this allows them to enter their extension number rather than their full Direct Inward Dial (DID) number.
To use a given dial plan, its dial-in conferencing region needs to be defined. You can do this when you create the dial plan or edit it; you can find details on how to perform these actions in Chapter 16. You can enter any text you want in the dial plan region field, but it should be something that external participants can understand, such as a city or country. This will be shown on the dial-in web page so that participants can look for a number other than the one specified on the invitation to the conference. It is also used in Outlook, allowing the user to select a different region and thus change the access numbers shown in their invitation.
Once the dial plans are finished, you can create the access numbers, either through the Control Panel (Conferencing ➢ Dial-In Access Number) or through PowerShell (New- CsDialInConferencingAccessNumber) using the following parameters:
PrimaryUri: This is the contact URI, prefixed with sip:.
DisplayName: This is the display name of the contact and how it should appear in Lync.
DisplayNumber: This is how the number should be displayed in meeting requests and the dial-in web page.
LineURI: This is the phone number prefixed with tel:.
Regions: This is a comma-separated list of the regions the number is assigned to, such as US and Canada.
Pool: This is the pool with which the access number is associated.
PrimaryLanguage: This is the primary language used.
SecondaryLanguages: This is a comma-separated list of up to four secondary languages, such as en-US and fr-CA.
Each access number can be configured with a primary language and up to four secondary ones. This option is often used when access numbers are defined for locations in which multiple languages are commonly spoken—for example, Montreal, Canada, where French is usually the primary language, followed by English.
You can find a list of supported languages by running this command:
Get-CsDialInConferencingLanguageList | Select-Object -ExpandProperty Languages
This command retrieves a list of the supported languages and restricts it to displaying only the language codes.
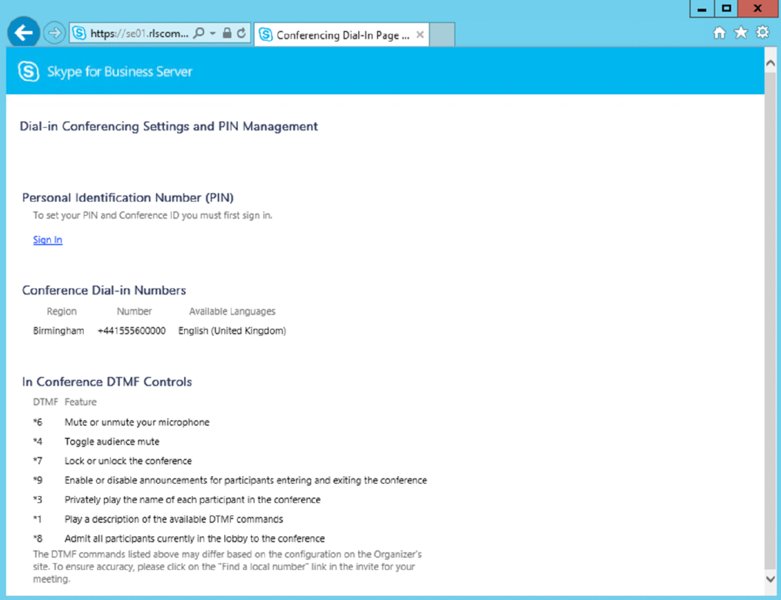
Once the access number has been created, users will be able to call it to access the conferences; users can also see the numbers on the Dial-In Conferencing web page, which is shown in Figure 19.2. In a change since Lync Server 2010, the In-Conference DTMF controls also appear on this page.
Before moving on, it is worth looking at the order in which the numbers are presented in the meeting requests and Dial-In Conferencing web page. By default, the order is alphabetical by region. If there are multiple numbers within the region, they are listed by comparing the first digit in each number. The lowest number is listed first, followed by the second lowest to the highest. If the first digit is the same, then the second number is compared. This process is continued as long as necessary to order the numbers. You may decide to reorder the numbers for a region for a number of reasons. For example, you may want a number with a higher capacity at the start of the list or a toll-free number at the end of the list. (Reordering regions isn’t possible.) You can set a specific order using the Set-CsDialInConferencingAccessNumber cmdlet and its Priority and ReorderedRegion parameters, as in this example:
This will move the Toll Chargeable number to the top of the list for the U.S. region numbers.
Additional Conferencing Configuration Options
The next three configuration items (entry and exit announcements, DTMF mappings for PSTN users, and conference directories) are not exposed through the Control Panel; they can be configured only through PowerShell.
Entry and Exit Announcements
Entry and exit announcements will be played only to people who access the bridge using the PSTN. It is assumed that announcements are not required for users who have access to the conference roster through one of the Skype for Business clients. These settings are configured on either a global or site level. They are created using the New-CsDialInConferencingConfiguration cmdlet, and the following options are available:
Identity, either Global for the global policy (used only when viewing or modifying the settings) or, if creating a site policy, the site name prefixed with site:.
EnableNameRecording specifies whether users are able to record their names when they access a conference. If it is disabled, EntryExitAnnouncementsType needs to be set to ToneOnly.
EntryExitAnnouncementsEnabledByDefault.
EntryExitAnnouncementsType can be set to either UseNames or ToneOnly, depending on the announcement type needed.
DTMF Mappings
The next items to look at are the DTMF mappings for PSTN users that can be used during a conference call. Most of the options are limited to presenters, but two of the commands, Mute/Unmute and Private Rollcall, can be used by any participant.
These settings are configured on either a global or site level. The following options are available to create the New-CsDialInConferencingDtmfConfiguration cmdlet:
Identity, either Global for the global policy (used only when viewing or modifying the settings) or, if creating a site policy, the site name prefixed with site:.
AdmitAll: Admit all participants who are in the lobby.
AudienceMuteCommand.
CommandCharacter: Prefix for the commands; can be an * or #.
EnableDisableAnnouncementsCommand: Play Entry/Exit announcements.
HelpCommand.
LockUnlockConferenceCommand.
MuteUnmuteCommand.
PrivateRollCallCommand: Play roll call.
Digits assigned to these commands need to be in the range from 1 to 9 and need to be unique. The command prefix can vary or remain constant for each of the entries. If you need to disable any of these settings, you can do so by setting them to $null.
Conference Directories
The final item to look at is the conference directory; because Skype for Business is based on SIP URIs, you need a way to map the numeric conference IDs that are required to access a conference to the relevant SIP URI. This is where the conference directories come into play.
By default, there is a single conference directory. This lone directory is sufficient for some organizations, but for larger organizations or for those who use different conference IDs for each conference, the conference ID number can grow rather long.
To keep the ID at a length that people will accept—usually no more than six to seven digits—multiple conference directories can be created. A new conference directory should be created for every 999-enabled user.
To create a conference directory (New-CsConferenceDirectory), you must specify the following parameters:
Identity: This is a unique numeric number in the range from 1 to 999.
HomePool: This is the Lync pool that hosts the conference directory. To get a list of the current conference directories, you can use the command
Get-CsConferenceDirectory | FT Identity, ServiceID
which will return an easy-to-read listing of each directory.
Now that you’ve looked at the capabilities of dial-in conferencing, you need to see how to implement it. To do this, let’s work through the following scenario:
Your organization is migrating away from its current hosting provider to Skype for Business dial-in conferencing. Dial-in numbers are required in the following countries:
United States
United Kingdom
All users should be able to use the conference bridge. In addition, to match the current conference bridge, the Lock And Unlock Conference DTMF option needs to be set to *2.
After studying the requirements statement, you see that you need to complete the following steps:
Create two regions, each with its own access number.
Modify the DTMF mappings for Lock and Unlock.
In addition to the explicit requirements just detailed, you will need to configure some other options for dial-in conferencing to operate. You are going to set each of them to have a global scope. Some of the settings are configured by default, but you will set them in the PowerShell commands to make sure they are configured as required.
The first thing you need to configure is the global conferencing policy.
This code modifies the global conferencing policy, allowing the required settings for all users who are not affected by a site policy or who have a user policy assigned.
The next item to configure is the global meeting policy.
Set-CsMeetingConfiguration -Identity Global
-AdmitAnonymousUsersByDefault $true
-AssignedConferenceTypeByDefault $true
-DesignateAsPresenter Company
-EnableAssignedConferenceType $true
-PstnCallersBypassLobby $true
This code modifies the global meeting policy, allowing the required settings for all users who are not affected by a site policy or who have a user policy assigned.
The final policy to configure is the global PIN policy.
Set-CsPinPolicy -Identity Global -AllowCommonPatterns $True
-MinPasswordLength 5
This modifies the global PIN policy, allowing common PIN patterns and shorter PIN lengths for all users who are not affected by a site policy or who have an assigned user policy.
Now you can configure the access numbers; they will be assigned to two existing dial plans.
These two commands create the two dial-in conferencing numbers, the first for the United States with U.S. English and the second for the United Kingdom with U.K. English. When these two commands are run, the output for the U.S. access number will be similar to the following:
Identity           : CN={f50ac1dc-f9cb-412e-a612-6ff28bf1876f},
CN=Application Contacts,CN=RTCService,CN=Services,CN=Configuration,
DC=rlscomms,DC=info
PrimaryUri         : sip:[email protected]
DisplayName        : US Dial In Number
DisplayNumber      : 1-425-555-9595
LineUri            : tel:+14255559595
PrimaryLanguage    : en-US
SecondaryLanguages : {}
Pool               : se01.rlscomms.net
HostingProvider    :
Regions            : {US}
The DTMF mappings are the last things to configure; to configure them, you will need to modify the existing global policy.
Set-CsDialInConferencingDtmfConfiguration -Identity Global
-LockUnlockConferenceCommand 2
This modifies the global DTMF mapping to use 2 as the unlock code for the conference; this will affect all conferences except where the conference is hosted in a site that has a site policy assigned.
This completes the dial-in conferencing configuration. To check the configuration, run the corresponding Get commands to view the settings just configured.
Using Dial-in Conferencing
Now that you have implemented dial-in conferencing, you need to take a look at how users will use it. Although a conference can be accessed from virtually anywhere, here you should concentrate on how an information worker will use dial-in conferencing using Outlook and their Skype for Business client.
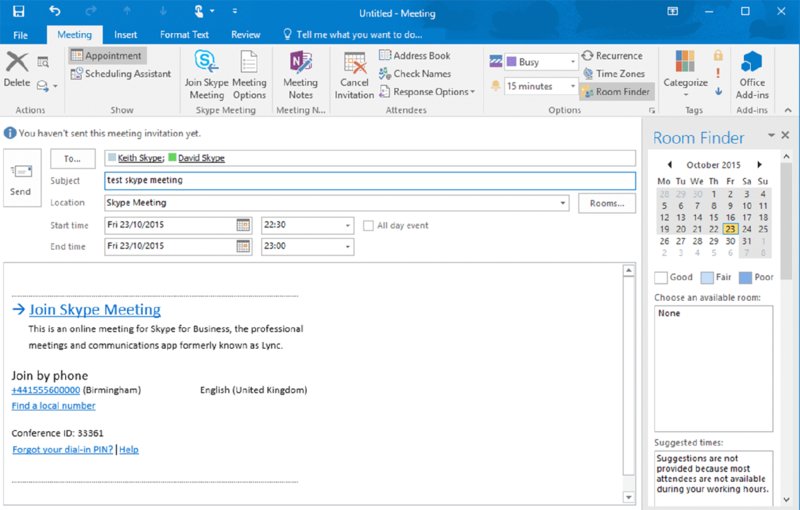
Although scheduling a conference call is not a requirement for a user to use the conference bridge, Microsoft has provided an easy way to populate a meeting request in Outlook with the required information, as shown in Figure 19.3. To access this screen, go to the Calendar view and select Online Meeting or create a new Online Meeting item. You can customize these settings for a conference; by selecting Meeting Options when you create or view the meeting, you can access the following settings:
Who can access the meeting
Who will be a presenter
If a different conference ID and URL should be used
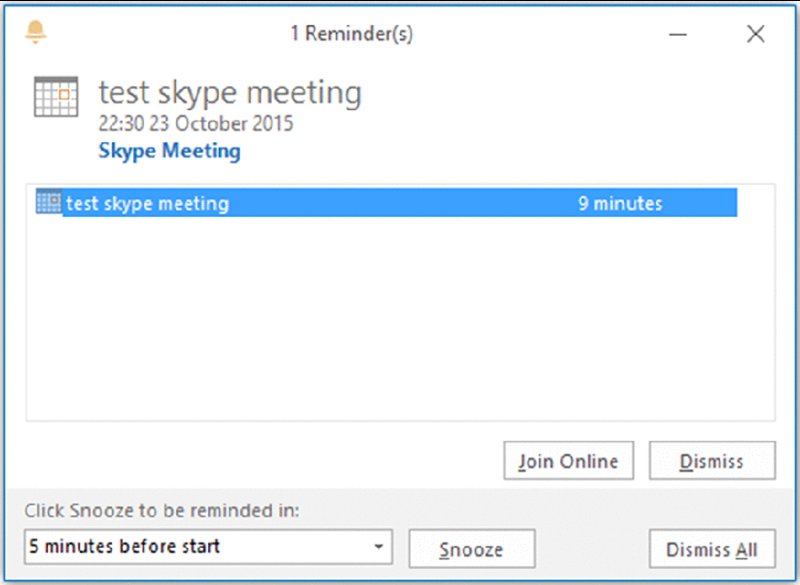
Once a conference has been organized, the attendees need to be able to join it. There are a few ways to do this: They could call the access number, click the Join link in the meeting request, or access it from the reminder for the meeting (shown in Figure 19.4).
The last two options launch the simple join process, in which the user’s default web browser starts quickly, followed by the Skype for Business client joining the conference. If the Skype for Business client was not installed, the Lync 2010 Attendee client will start if it is installed; if not, by default, the Reach client will start. With Skype for Business Server 2015, the preferred client (if the Skype for Business client itself is not available) is the web client.
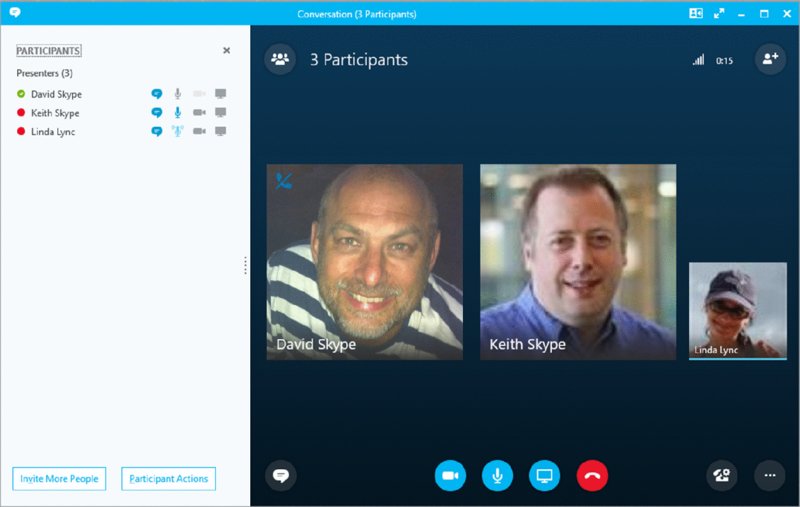
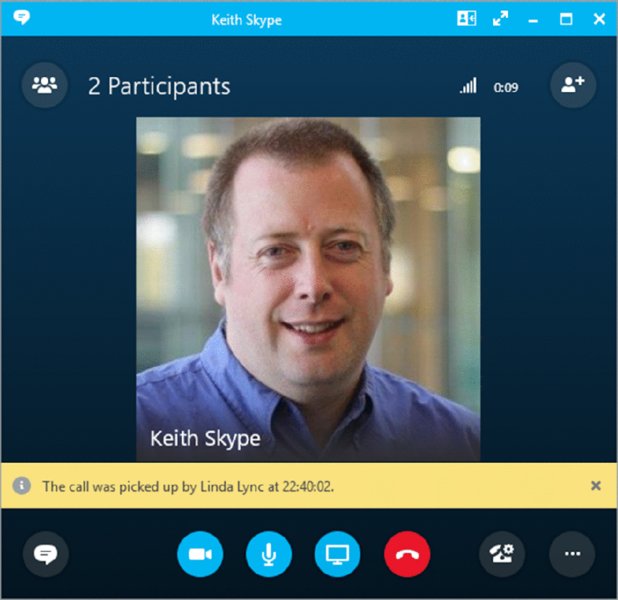
Once you’ve joined the conference, you can see the participants, as illustrated in Figure 19.5. On this screen, you can also control the Audio settings; for example, you can escalate the conference to a videoconference if video is enabled. Endpoints that do not support video will continue to access the conference using audio only.
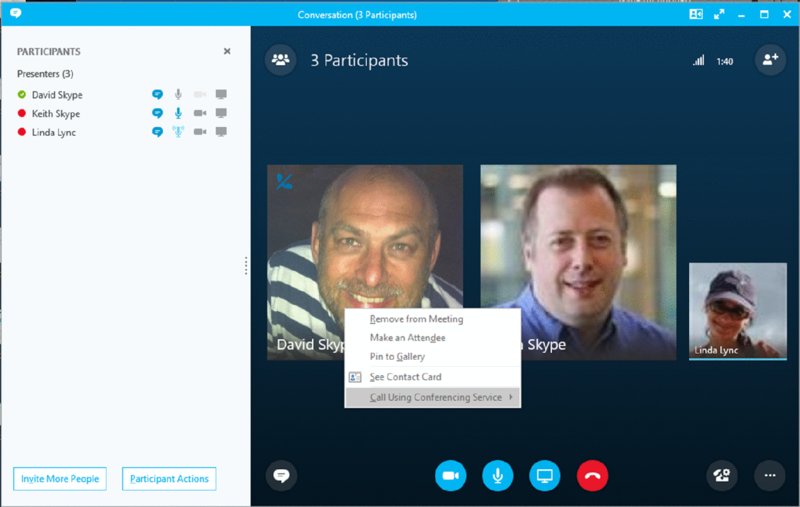
From the roster, you can also control a participant’s conference options. As shown in Figure 19.6, you do this by right-clicking the participant and choosing the required option from the context menu.
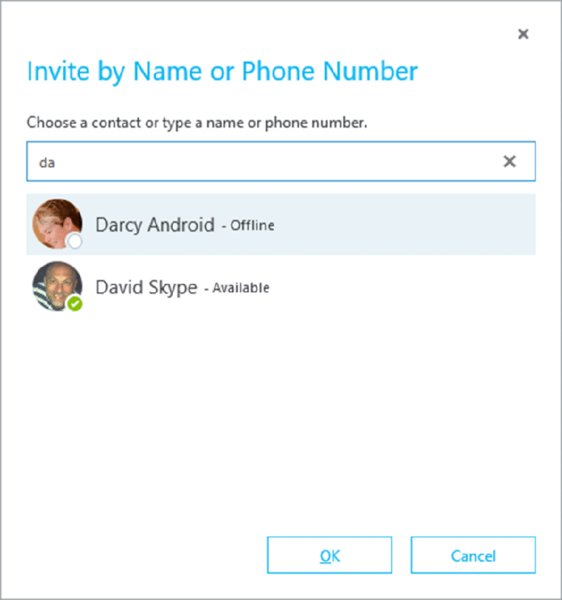
The final option to look at in the Skype for Business client is inviting people to an active conference. You can do this in the following ways: by dragging and dropping someone from the buddy list into the conference, by entering their name (retrieved via the address list) or phone number (as shown in Figure 19.7), or by sending them an email with the conference details. One thing to note is that for the first two of these options, the users will be added straight to the conference. If the invited person is using Skype for Business, they will see that they are joining a conference; however, if they are joining from a cell phone, for example, it may come as a shock!
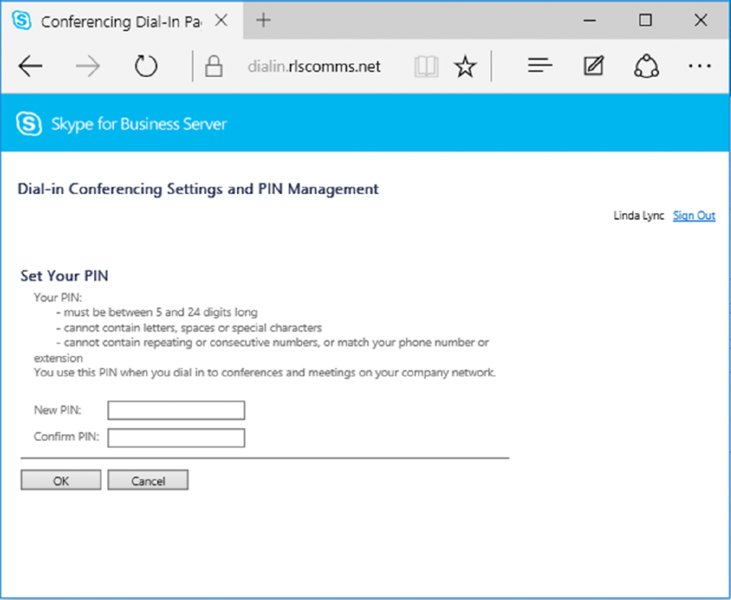
The other element to consider is the Dial-In Conferencing web page, as shown in Figure 19.8. This interface is what users will use to configure their PIN to authenticate a conference with an access number. Additionally, this page lets participants look up more access numbers for Online Meetings.
Figure 19.8 Setting a PIN on the Dial-In Conferencing web page
In general, users will be want to authenticate using their extension and PIN rather than with their full number. You can enable this functionality and allow them to retain the ability to log in using the full number; when enabling users for Enterprise Voice, their TelURI should be defined with ;ext=xxxx appended to their number, where xxxx is the user’s extension.
For example, assuming the user DDI number is 01234 567890 and the extension is 7890, when you enable this user, rather than simply enabling as TEL:+441234567890, you would enable the user as TEL:+441234567890;ext=7890.
Not only can you use the Skype for Business client, but you can manage a meeting from the Aries IP phones. On these devices, you can add people to a conference, view the attendee list, remove people, and allow access to people waiting in the lobby. If extended features are enabled, you will also be able to join a conference from the Calendar view.
Defining Response Groups
Most PBXs provide hunt groups and basic automatic call distribution (ACD). These features allow calls to be distributed between multiple users, but their functionality varies between PBXs, and the majority of them provide a minimum level of functionality.
Hunt groups provide the most basic form of call distribution. For each hunt group, a list of numbers to which to route calls is defined. The PBX will route each incoming call according to the distribution method defined, which is usually one of the following:
Serial This always starts at the first entry. If there is no answer or the line is busy, it tries the second number and continues until someone answers. When the list is exhausted, it goes back to the beginning, effectively starting over.
Parallel This rings all the numbers at the same time.
Round Robin For the first call, this starts at the first entry. If there is no answer or the line is busy, it tries the second number. If the second answers, then the next call starts at the third number. When the list is exhausted, it goes back to the beginning, effectively starting over.
Most Idle This starts at the number that has been idle the longest, and if there is no answer, it tries the next longest idle, and so on, through the list.
Most PBXs allow the administrator to define the ring time on each number, along with a maximum wait time. Once the maximum wait time has been reached, calls will be either terminated or, more commonly, routed to a different number; this could be an overflow number or a voice mailbox.
ACD operates in a similar way to hunt groups in that calls are distributed to a range of numbers; the difference is that there tends to be more intelligence involved. With ACD, callers may be provided with a DTMF-based Interactive Voice Response (IVR), allowing them to choose based on a question. The call is then usually routed to a defined hunt group.
For example, the question could be “To which department would you like to speak?” This would be followed by a list of options, such as “Press 1 for Sales, press 2 for Support, press 3 for Customer Service.” The customer would then select 1, 2, or 3 and then be routed to the correct set of numbers. Once they make a selection, depending on the PBX, they may hear ringing or music on hold (MOH) until their call is answered. The announcement will usually have to be provided in a certain format, which tends to be a basic file type. In addition, there is usually a limit to the number of ACDs that can be defined. If the organization requires more complex call routing abilities, then a contact center is usually required. In Skype for Business, hunt groups and ACD features are incorporated into the Response Group application.
Understanding Response Groups
To provide hunt group and basic ACD features for organizations, Microsoft created the Response Group application and its set of cmdlets. Response Groups match the functionality found in most PBXs and exceed it to a point that they can equal some basic call center offerings, although there are limitations that prevent this feature from being classed as a call center. Response Groups exceed the following capabilities in the majority of PBXs:
Text-to-speech for announcements
Voice along with DTMF IVR options
Ability to specify working hours
Ability to build custom workflows
Response Groups consist of three main components:
Agent Groups These are used to define whether the agents will need to sign in or not, the number of seconds that a call will wait for an agent to answer, the routing method, and which users are members of the group.
Queues These are used to define which agent group will handle the call, along with the Timeout and Overflow settings.
Workflows These are the initial entry points into the system. They provide the IVR functionality, which queues the call should be routed to, and other options such as working hours. In Skype for Business as in OCS 2007 R2, there are predefined workflows. These are as follows:
Hunt groups
Interactive, up to two levels, and up to four questions per level IVR
Configuration Order
When configuring Response Groups, whether you are using the Control Panel and Response Group web interface or the PowerShell cmdlets, you need to create the items in a certain order. You need to define the agent groups first, followed by queues, and then the workflows. If you do not create them in the correct order, you may end up not being able to complete the configuration of an item. This results in you needing to create the prerequisite item and then starting again to configure the item.
If you are using PowerShell, note that for queues and workflows, PowerShell commands usually need to be run before the main queue and workflow commands are run, as you’ll see in the following sections. Creating queues and custom workflows through PowerShell can be a complex task, and it is a task that should be carefully planned and thoroughly tested to ensure that nothing is missed. After the following summary of the configuration tools and options, we’ll go through a complete implementation of a Response Group, demonstrating the most important cmdlets and parameters.
Response Group Configuration Options
Only a couple of configuration options are available at the Response Group level, and they are set on a per-pool basis. These settings are automatically created by Skype for Business during the pool-creation process; as such, there is no New cmdlet. The settings can, however, be modified and viewed using Set-CsRgsConfiguration and Get-CsRgsConfiguration, respectively. The following parameters are available:
Identity: The name of the pool hosting the Response Group prefixed with service:ApplicationServer:.
AgentRingbackGracePeriod: The ringback grace period is the period in which a call will not return to an agent if they declined it. This comes into effect only when too few agents are available, and it is defined in seconds between 30 and 600.
DefaultMusicOnHoldFile: The default MOH file used when no specific MOH file is defined in the workflow.
DisableCallContext: The call context consists of the details of the IVR responses and the wait time that is shown to the agent when it answers a call using the Skype for Business client.
Before looking at the rest of the Response Group cmdlets, you need to see how the Set cmdlets work because they operate in a slightly different way than most of the other Skype for Business Set cmdlets. The difference is that the settings cannot be directly edited; instead, an instance of the setting first needs to be retrieved into a PowerShell variable, then the required updates need to be performed, and finally the instance needs to be fed into the Set command. Here’s an example:
You also need to use this method when you’re creating queues and workflows because instances often need to be passed into these commands. Some of the PowerShell cmdlets are used only for populating a variable to pass into another cmdlet.
Agent Groups
Agent groups define a list of agents and their associated settings, such as call routing method and alert time. A single group can be assigned to multiple queues. Agent groups can be managed through the Control Panel (Response Groups ➢ Group) or through PowerShell. To create a new agent group, use the New-CsRgsAgentGroup cmdlet; the following parameters are available:
Parent: This is the FQDN of the pool to host the agent group; it is prefixed with service:ApplicationServer:.
AgentAlertTime (Ring Time On Agent): This cmdlet is defined in seconds with a range from 10 to 600.
AgentsByUri (Agent List): This cmdlet is a comma-separated list of agents. Each agent should be prefixed with sip:.
Description: This is a description of the agent group.
DistributionGroupAddress (Distribution Group Containing Agents): This is the email address associated with the distribution group.
ParticipationPolicy (Participation Type): This is set to Formal if the agent needs to sign in to receive calls from the Response Group or Informal if they will always receive calls from the Response Group.
RoutingMethod: The routing methods are as follows:
Longest Idle (LongestIdle)
Round Robin (RoundRobin)
Serial (Serial)
Parallel (Parallel)
Attendant (Attendant)
Except for the Attendant routing method, all of these methods were discussed earlier in this section. As its name implies, the Attendant method is a routing method in Skype for Business used primarily for attendants. It operates like the Parallel method except that it ignores the user’s presence state when routing a call. Normally, Response Groups will route a call to an agent only if it has a presence of Available or Inactive. When the Attendant routing method is used, the call will be routed to the agent irrespective of its presence state; the only exception to this is if the state is Do Not Disturb.
There are two ways to define which users are members of an agent group—either by defining a list of agents using their SIP URIs or by specifying a distribution group. Although specifying a distribution group can save having to specify a list of agents, you need to be aware of the following:
Nested distribution groups will be ignored.
Only a single distribution group can be defined.
For the Serial and Round Robin routing methods, the calls will be routed to agents in the order listed in the distribution group. This can often cause issues when you want to use a different agent order.
When creating the agent group, you should specify only one of the two options, either AgentsByUri or DistributionGroupAddress. If you are creating a group in which you intend to use this agent group, you should store the result of the New command in a variable.
Queue and Workflow Preliminaries
Once the agent groups have been created, you’ll need to create the queues and then the workflows. To create these elements, you will need to pass into the respective cmdlets the results of a number of other cmdlets, which define various characteristics of the queue. The elements you need to configure first are as follows:
Prompts
Answers
Questions
Call actions
Prompts are either uploaded recordings or messages generated using text-to-speech, and they are used to read messages such as “Welcome to the Sales Department” or IVR questions. These prompts are not created in their own right; they are passed into a variable to pass into another cmdlet.
New-CsRgsPrompt accepts two parameters: either TextToSpeechPrompt, which allows for up to 4,096 characters to be specified, or an audio file, using the AudioFilePrompt parameter.
If you use audio files rather than TTS, they needs to be either a WAV file (.wav) or a Windows Media Audio file (.wma). WAV files need to meet the following criteria:
8 or 16 bits
Linear pulse code modulation (LPCM), A-Law or mu-Law
Mono or stereo
4MB or less
For Windows Media Audio files, there are no specific limitations imposed by Skype for Business. However, you should give some consideration to the bit rate because the higher the bit rate, the greater the load placed on the servers, and the maximum bit rate played back via the PSTN is limited.
The audio file containing the prompt is not directly uploaded; instead, the cmdlet requires a byte array representation of the file. This byte array is created using the Get-Content cmdlet; this array is used with the Import-CsRgsAudioFile cmdlet to upload the file. Here’s an example:
This code imports the audio file to the Skype for Business server. It first gets a byte array of the RGSPrompt.wav file, which is sent to the Skype for Business servers and saved as ResGroup1FirstPrompt.wav. The FileName specified needs to be unique and does not need to match the name of the file you are uploading. That is because you are uploading the prompt to Skype for Business as a byte array rather than the actual file; therefore, the original name is never uploaded.
The next cmdlet you need to look at is New-CsRgsAnswer, which is used to specify an answer for a question. This cmdlet does not create anything, and it is used only to populate a variable. It uses these parameters:
Action: This parameter is used with the New-CsRgsCallAction cmdlet to specify the action that occurs when the response is chosen.
DtmfResponse: The DTMF response can be *, #, or 0 through 9.
Name: This is the name of the answer.
VoiceResponseList: This is a list of voice responses this answer will match, separated by commas.
When creating the answer, either DtmfResponse or VoiceResponseList or both must be specified.
Now that you can create both the answer and the prompt, you can create a question using the New-CsRgsQuestion cmdlet. Like the previous two cmdlets, this one also needs to be passed into a variable. The New-CsRgsQuestion cmdlet uses these parameters:
Prompt: This is the question to be asked. It should be a prompt object.
AnswerList: This is a comma-separated list of answers. If the question allows two answers, at least two answer objects should be specified.
InvalidAnswerPrompt: This is a prompt object that will be played if an invalid answer is entered.
Name: This is the name of the question.
NoAnswerPrompt: This is a prompt object that will be played if no answer is entered.
When a question with associated answers has been created, you need to look at the call action. To make Response Groups even more complicated, the New-CsRgsAnwer cmdlet requires that a call action already be created; therefore, to get to a stage where you have a question created, you will already have had to create a call action. But a call action can also be linked to a question if required and may require a prompt to be created.
A call action can do any of the following things:
Terminate: This ends the call.
TransferToQueue: This allows an agent to answer the call.
TransferToQuestion: This transfers to a question.
TransferToUri: This transfers to a SIP URI, such as another Response Group, specified in the Uri parameter.
TransferToVoiceMailUri: This transfers to the voice mailbox, specified in the Uri parameter.
TransferToPSTN: This transfers to a PSTN number specified in the Uri parameter.
To create a call action, use the New-CsRgsCallAction cmdlet. The following parameters are available:
Action: This is one of the previously specified actions.
Prompt: This is a prompt to play before the action is carried out. It should be a prompt object.
Question: This is required only if the Transfer to Question action is chosen and should be a question object.
QueueID: This is used if Transfer to a Queue is specified. It should be the identity of the queue that was previously created. If the queue is in a variable, this is retrieved using $variable.Identity.
Uri: This is used if Transfer to a URI or PSTN is specified. It should be prefixed with sip:.
You’ll see examples of all these commands in action in the “Implementing Response Groups” section coming up shortly.
Queues
Queues are used to define the actions once the caller has been processed by the workflow. This could be after an option is selected on an IVR, or callers could be routed straight to a queue as soon as they call the workflow if, for example, the workflow is configured as a hunt group.
With all the preliminaries configured, you are ready to create a queue. Unlike the last few sets of cmdlets you’ve looked at, the New-CsRgsQueue cmdlet actually creates groups. It uses the following parameters:
Parent: This is the FQDN of the pool to host the agent group, prefixed with service:ApplicationServer:.
Name: This is the group name.
AgentGroupIdList: This is a comma-separated list of agent groups. The groups will be worked through in order; if no agent in group 1 answers, then group 2 will be tried, and so on.
Description: This describes the queue.
OverflowAction: This is a call action object.
OverflowCandidate: The Call to Overflow can be set to NewestCall or OldestCall.
OverflowThreshold: The call count to overflow can be set between 0 and 1000. When the specified number of calls is in the queue, either the oldest or newest call will overflow.
TimeoutAction: This is a call action object.
TimeoutThreshold: This threshold is specified in seconds with a range from 10 to 65536. When the timeout is hit for a queued call, it will follow the timeout call action defined.
Queues can also be configured through the Control Panel. With this method, the preliminary configuration of items such as Overflow Action is not required because they are configured at the same time as the queue, which can be accessed at Response Group ➢ Queue. Once the queues and associated aspects have been created, you can move on to workflows and the additional cmdlets required.
Workflows
Workflows are the initial entry points. They define the phone number and contact URI associated with the workflow, the questions to be presented, whether it is an IVR, and the associated queues for the call to be routed to, along with settings such as opening hours and holidays.
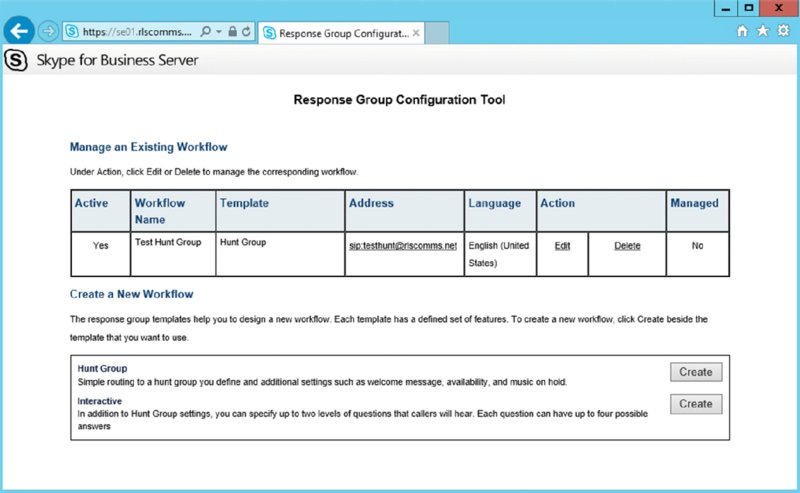
Workflows can be configured through PowerShell, in which case there are a number of items that need to be configured before the actual workflow is created. If configuration is performed using the Response Group Configuration Tool, then all configuration is performed when the workflow is created. You can access the Configuration tool (Figure 19.9) through the Control Panel (Response Group ➢ Workflow ➢ Create Or Edit A Workflow) or through https://poolfqdn/RgsConfig.
The first workflow elements to define are holidays; you do that using the New-CsRgsHoliday cmdlet. This cmdlet does not create anything and as such needs to be passed into a variable. It lets you specify a start date and time along with an end date and time. The following parameters are required:
Name
StartDate
EndDate
Dates should be formatted as MM/DD/YYYY HH:SS AM|PM, as in this example: 12/25/2011 12:00 AM.
When an individual holiday has been created, you need to add it to a holiday set. These are created and as such have associated Get, Set, and Remove cmdlets.
The New-CsHolidaySet cmdlet is used to create the holiday sets, which are linked to the workflows to indicate when the Response Group should be open. The following parameters are required:
HolidayList: This is a comma-separated list of holiday objects.
Name: This is the name of the holiday list.
Parent: This is the FQDN of the pool to host the holiday set, prefixed with service: ApplicationServer:.
Now you need to define the business hours the Response Groups are open. To do that, you need to define time ranges to pass into the Hours of Business cmdlet.
Time ranges are defined using the New-CsRgsTimeRange cmdlet. This doesn’t create anything, so its result needs to be passed into a variable. The cmdlet takes the following parameters:
Name: This is the name of the time range.
OpenTime: This is defined as HH:MM using a 24-hour clock.
CloseTime: This is defined as HH:MM using a 24-hour clock.
If the business hours are the same for multiple days, such as Monday to Friday, only one time range needs to be defined for these hours.
Next, the business hours need to be defined using the New-CsRgsHoursOfBusiness cmdlet. Business hours are created and, as such, have associated Set, Get, and Remove cmdlets. New-CsRgsHoursOfBusiness allows two sets of hours to be specified for each day of the week, allowing it to close for lunch, for example. This cmdlet has the following parameters:
Name: This is the name of the business hours.
Parent: This is the FQDN of the pool to host the business hours, prefixed with service:ApplicationServer:.
MondayHours1 and MondayHours2 through SundayHours1 and SundayHours2: These are TimeRange objects.
Once all the required objects have been created, you can finally create the workflows. Workflows link together all the elements you’ve reviewed, and creating them is the final step required to complete a Response Group. They are created with the New-CsRgsWorkflow cmdlets, using the following parameters:
Name: This is the name of the workflow.
Parent: This is the FQDN of the pool to host the workflow, prefixed with service:ApplicationServer:.
PrimaryUri: This is the SIP address of the Response Group, prefixed with sip:.
Active: This specifies whether the workflow is active. If it is not active, calls will not be accepted.
Anonymous: If this is set to True, the agent’s identity will be hidden.
BusinessHoursID: This is a Business Hours object.
CustomMusicOnHoldFile: This is an Audio File object, which is created using the Import-CsRgsAudiofile cmdlet.
DefaultAction: This is the default call action to use when the workflow is open; it requires a Call Action object.
Description: This is a text-based description for the workflow
DisplayNumber: This is the number displayed when searched for, or calling, both incoming and outgoing calls.
EnabledForFederation: This defines whether federated users can access the workflow via Lync. If False, federated users would be required to dial the actual number.
HolidayAction: This is the call action to use during a holiday; it requires a Call Action object.
HolidaySetIdList: This is the Holiday Set object to use.
Language: This is used to specify the language to be used for text-to-speech.
LineUri: This is the PSTN phone number for the workflow, prefixed with tel:.
Managed: This defines whether management of this workflow has been delegated.
ManagersByUri: This is a collection of SIP addresses of the managers for the workflow.
NonBusinessHoursAction: This is the call action to use outside business hours. It requires a Call Action object.
TimeZone: This is the time zone for holidays and business hours.
As part of the workflow creation process, an application contact is created in the configuration partition in Active Directory. The contact stores the same information the Skype for Business–enabled user would (for example, the display name and line URI). This contact is used for a number of tasks.
When an incoming event occurs, such as a phone call, Lync will search both user and application contacts for a match. The application contact provides the application for the call to be routed to, in this case the Response Group application.
It will be processed by the Skype for Business Address Book service, allowing users to search for and add the contact to their local contacts list.
To view a list of application contacts in Skype for Business, you can use the Get-CsApplicationEndpoint cmdlet.
Implementing Response Groups
Now that you’ve looked at what you can do with Response Groups, it’s time to see how you can implement them. To do this, let’s work through a fairly complete, realistic scenario.
Your organization requires a Response Group to be configured for routing calls to a group of three attendants. All attendants should see all of the calls, but they should be able to specify whether they will receive calls. The identity of all attendants should be hidden.
In addition, the callers should be told that they are being placed in a queue and hear music on hold while waiting. Outside business hours, calls should be routed to an Exchange mailbox along with calls that have been waiting for longer than five minutes. Callers should be told they are being transferred to voice mail.
After studying the requirements statement, you determine that you need to do the following:
Create an agent group
Create a queue with overflow settings specified for callers waiting in the queue
Create a workflow with the announcement, working hours, and agent anonymity defined
With this command, you created the agent group. It is created as a formal group, with the three specified agents and routes using the Attendant routing method to ensure that calls are presented to agents irrespective of their state (except for Do Not Disturb).
Now you need to create the prompt to transfer the caller to voice mail on timeout.
$TimeoutPrompt = New-CsRgsPrompt -TextToSpeechPrompt
"Unfortunately all of our operators are busy,
we are transferring you to voice mail."
This stores the prompt in $TimeoutPrompt, allowing you to pass it into the next command.
Next, you need to create the call action for the timeout.
This creates the queue and stores the details in the $AQueue. It also references the agent group you created earlier; because you need the Identity value out of $AGroup, you specify $AGroup.Identity.
Now you’re ready to create the objects required for the workflow. The first step is to define the time range for the business hours.
This creates the business hours. Into this statement, you’ll pass the $TimeRange several times because you require the same opening hours for each day that the business is open. Because the hours aren’t specified for Saturday or Sunday, the Response Group will default to being closed on those days.
Now you need to create the prompt to transfer the caller to voice mail outside business hours.
$OBHPrompt = New-CsRgsPrompt -TextToSpeechPrompt
"We are currently closed, we are transferring you to voice mail."
This creates the Out of Business Hours prompt. Note that only a sort of “ghost object” is created at this point; the information is merely stored in the $OBHPrompt variable until the command to create the workflow is run.
Now you need to create the call action for outside business hours.
This creates the Out of Business Hours action. Again, at this point, the information is merely stored in the $OBHCallAction variable until the workflow is created.
Now that you have created the business hours, you need to create the default call action and associated prompt.
$DefaultPrompt = New-CsRgsPrompt -TextToSpeechPrompt
"Thank you for calling RLS Comms, please wait for an attendant."
This creates the default prompt. Again, at this point, the information is merely stored in the $DefaultPrompt variable until the workflow is created.
Next, you need to create the call action to route to the agents.
This creates the default call action. Again, at this point, the information is merely stored in the $DefaultCallAction variable for use in the next command.
Now that you’ve created the required objects for the workflow, you can finally create the workflow.
This creates the actual workflow. Into this workflow you can reference the call actions created earlier. For the business hours, reference the Identity stored within $BusinessHours. The two action variables are not actually created in Skype for Business; they are stored within the variables, so you don’t need to specify a particular setting in them.
When this command is run, the output is similar to the following:
Identity               : service:ApplicationServer:se01.rlscomms.net
/6876ce92-7b33-450f-8a73-38fc7d5c1789
NonBusinessHoursAction : Prompt=We are currently closed, we are transferring you to voice mail.
Action=TransferToVoicemailUri
Uri=sip:[email protected]
HolidayAction          :
DefaultAction          : Prompt=Thank you for calling, please wait for an
attendant.
Action=TransferToQueue
QueueId=dbaf6136-9386-4964-a49f-8610f0f761de
CustomMusicOnHoldFile  :
Name                   : Attendants
Description            :
PrimaryUri             : sip:[email protected]
Active                 : True
Language               : en-US
TimeZone               : GMT Standard Time
BusinessHoursID        : service:ApplicationServer:se01.rlscomms.net
/6f7314e7-a88f-4f23-aa64-a9262404a050
Anonymous              : True
Managed                : False
OwnerPool              :
DisplayNumber          : 1-425-555-1000
EnabledForFederation   : True
LineUri                : tel:+14255551000
HolidaySetIDList       : {}
ManagersByUri          : {}
Now that the Response Group is configured, you can run the corresponding Get commands to check the configuration.
Using Response Groups
Now that you’ve implemented Response Groups, you need to see how network users work with them. As with dial-in conferencing and other client features, admins may need to provide some level of training or support to their users. Here you are going to look at only the agent aspects of Response Groups.
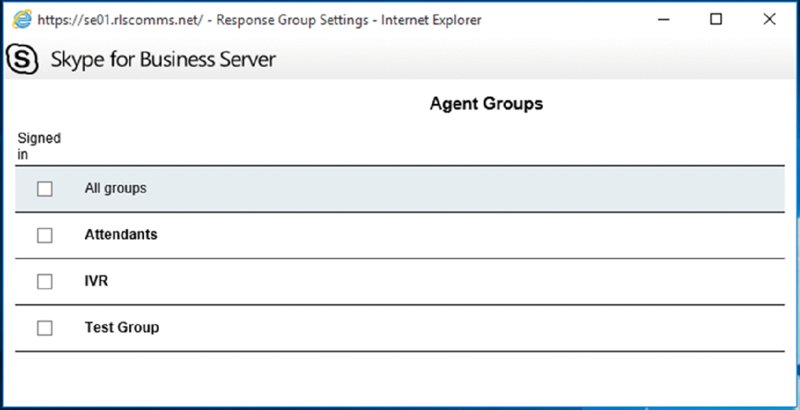
If a user is assigned to a formal workflow, the first thing they need to do is log into the workflow by selecting Response Group Settings from the Skype for Business client, which then loads the web page shown in Figure 19.10. Users will be presented with the queues to which they are assigned, and they will be able to check the queues they want to sign into.
Note that users are presented with the queues from only their home pool. If they are members of queues on another pool, they must manually direct their browser to the path to sign in on the other pool: https:<pool fqdn>/RgsClients/Tab.aspx.
When the agent receives a call, the toast that appears to notify the agent of the call (Figure 19.11) will contain the name of the Response Group. By receiving this information, the agent knows, for example, what greeting to use when answering the call.
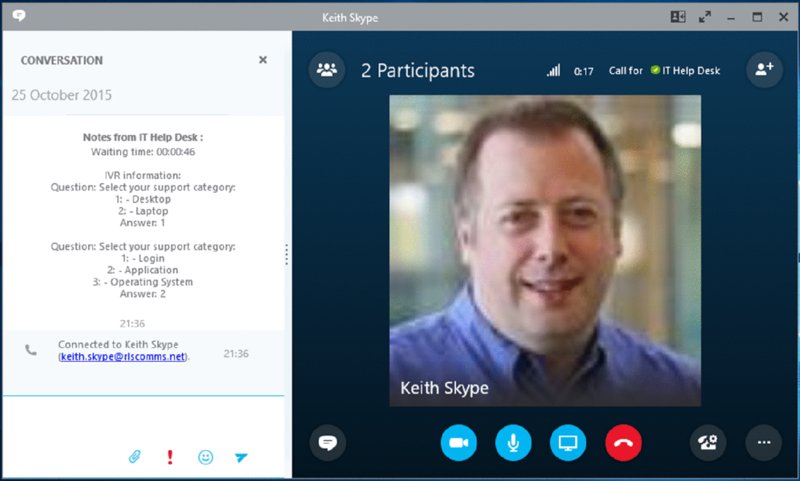
If the call is from a Response Group that uses an IVR, the agents will be presented with the IVR options that the caller selected along with their wait time, as shown in Figure 19.12.
With this information, the agent can handle the call as required. In addition, the agent can introduce additional modalities, as with a normal Skype for Business call, and can escalate to a conference if needed. The only time this is restricted is if the Response Group that the agent answered the call on is configured for Agent Anonymity, in which case the agent cannot do any of the following:
Share individual applications, the desktop of a single display, or the entire desktop
Transfer files
Use whiteboard or data collaboration
Escalate to a conference
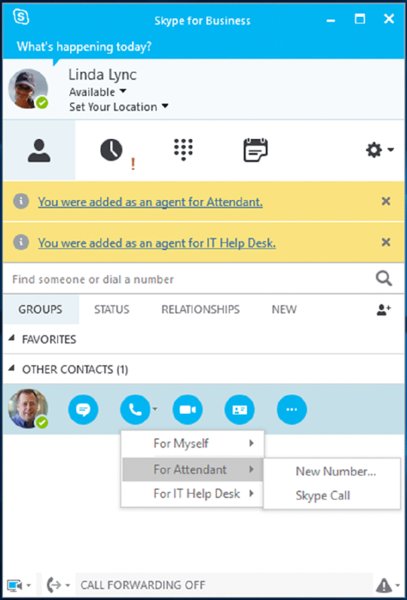
What happens when the agent needs to make an outbound call? For the most part, making an outbound call is no different for a user configured as an agent than it is for a normal user. The only time this differs is if a user is a member of a Response Group that is configured for Agent Anonymity. In this case, as shown in Figure 19.13, agents can choose whether they are making the call on behalf of themselves or the Response Group.
Figure 19.13 Choosing whether to make an anonymous outbound call
Understanding Call Park
Education, healthcare, warehousing, and retail are just a few of the organization types that take Call Park for granted. It is a feature they use every day and assume that it will be available on any PBX that they want to deploy. To fulfill the requirements of these organizations and others, Call Park was added as a voice application in Skype for Business, removing a potential stumbling block for these organizations to migrate.
While you may not have heard of Call Park before, you have probably heard of it being used. If you have been in a store and heard “Call for Joe Blogs on extension 1023” over the public address system, they were probably referring to an incoming call for Joe Blogs that was “parked” on extension 1023. This allowed Joe Blogs to easily retrieve the call by calling 1023 from any of the store phones and be connected immediately.
Why would a store use Call Park rather than, for example, having the switchboard operator put the call on hold, page Joe Blogs to call them, and then transfer the call? The new technology has emerged because of the limitations of PBXs and the way they operate. The easiest way to understand this is to look at how a call flow would operate.
The customer calls the store.
The switchboard answers.
The customer asks to talk to the store manager.
The switchboard operator places the call on hold and pages the store manager.
The store manager calls the operator; if the operator is busy, it could take a while for the call to be answered.
The operator takes a note of the number the store manager called from and hangs up.
The operator takes the customer off hold and transfers it to the number the store manager called from; if by sheer chance someone else has called this number before the operator managed to transfer the call, then the operator will have to wait to transfer the call.
As you can see, this is a long process and includes a number of areas where issues can occur. For example, suppose the switchboard operator is busy. While that may not happen in a small retail store, in a busy hospital, the wait time could be tremendous. Some PBXs, including Skype for Business, can shortcut part of this process by allowing calls to be joined, effectively removing the last two steps. However, there can be other limitations, such as the number of calls a person can put on hold at any one time.
In summary, Call Park allows a call to be parked on an extension number and retrieved by calling that extension number.
Setting Call Park Options
Now that you understand what Call Park is, you need to examine how it works within Skype for Business and the configuration options available. No separate installation is required for Call Park; it is installed as part of Skype for Business. To use Call Park, you just need to configure it. You do that in the following stages:
Voice policy configuration
Call Park extensions
Call Park Service configuration
Call Park music on hold
In Skype for Business, any user can retrieve a parked call by calling the extension on which it was parked. From a user standpoint, the only configuration option is whether the user can park a call. This is configured through the Voice policy assigned to the user, which was covered in Chapter 13, “Archiving and Monitoring.”
Call Park Extensions
Call Park extensions are referred to in Skype for Business as orbits, and they can be configured through the Control Panel or using PowerShell. These numbers have a lot of restrictions.
The maximum number of orbits per range is 10,000.
The maximum number of orbits per pool is 50,000.
They cannot be Direct Inward Dial numbers.
They must match this regular expression:
([*|#]?[1-9]d{0,7})|([1-9]d{0,8})
The first two restrictions are not likely to cause an issue because most organizations usually require a small range of numbers to use. This range should be no larger than required; for most organizations, this tends to be less than 100 extensions.
The requirement that the number not be a DID is fairly unusual for Skype for Business because most voice-related features require E.164 numbers to be assigned to them. A Call Park number cannot be a DID because retrieving calls from the PSTN is not supported, although retrieving calls from a PBX is supported.
The final requirement is for the number to match a specific regular expression. This breaks down as follows:
It must start with a *, #, or one of the digits 1 through 9.
If the number starts with a * or #, it must be followed first by a single digit in the range 1 through 9 and then followed by up to seven digits.
If the number starts with a 1 through 9, it can be followed by up to eight digits.
When assigning numbers to be orbits, you need to make sure they will not be affected by number normalizations, such as those found in the dial plans. If the number a user tries to call is converted to another number, they will be unable to retrieve the call.
This also applies to any normalizations that may be performed by a gateway linking to a PBX or by the PBX itself, if there is a requirement to retrieve calls from the PBX.
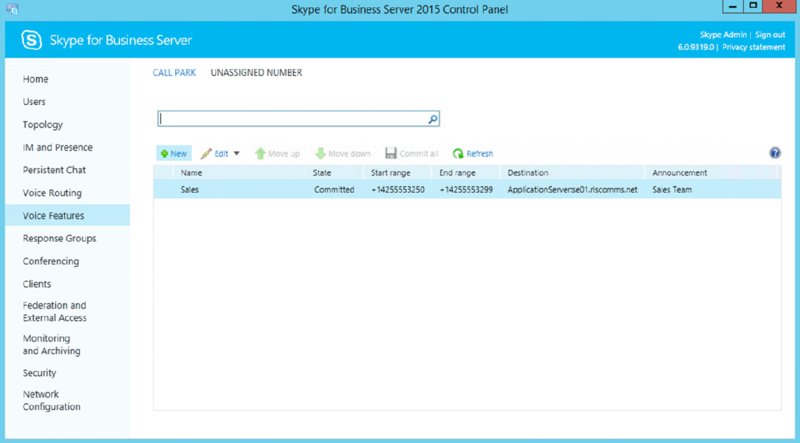
Orbits can be configured through the Skype for Business Control Panel under Voice Features ➢ Call Park as well as via PowerShell. From the Call Park tab, shown in Figure 19.14, they can be created, edited, and deleted. To create the orbit using the New-CsCallParkOrbit cmdlet, you specify the following:
Identity: This is the orbit range name.
NumberRangeStart: This is the orbit range start number.
NumberRangeEnd: This is the orbit range end number.
CallParkService: This is the Application server to host the orbits.
For Call Park, the application server is a pool FQDN prefixed with ApplicationServer:. This allows you to define which pool will host the parked calls. If you will be parking a large number of calls, this could be resource intensive because the pool needs to manage these calls and also stream music on hold if configured.
Managing the Call Park Service
The Call Park service configuration can be managed only through PowerShell. There are two configuration levels: global and site. The global level will apply to all Skype for Business sites unless a site-level configuration exists. Both levels have the same configuration options; to create a new configuration, use the New-CsCpsConfiguration cmdlet.
EnableMusicOnHold: A True or False option. This indicates whether music on hold should be played. There is a default MOH file that ships with Lync; this can be replaced if required.
CallPickupTimeoutThreshold: Defined as HH:MM:SS. This defines the length of time before the call recalls. This can be as little as 10 seconds or as long as 10 minutes. The default is 90 seconds.
MaxCallPickupAttempts: The number of times the call will ring the person who parked the call before it will reroute to the timeout URI. The default is 1.
OnTimeoutURI: A SIP address to which the parked call will be routed if the call is not answered after the defined number of call pickup attempts. The SIP URI can be either a user or a Response Group.
Music on Hold
A custom MOH file is uploaded to the Call Park service using a dedicated PowerShell command. Only one MOH file can be used per application server; when a new file is uploaded, the existing file will be overwritten.
The file needs to be in WMA 9 format, and it is recommended that it has the following characteristics: encoded at 44kHz, 16 bit, mono, with a constant bit rate (CBR) or 32kbps.
The MOH file is not directly uploaded; instead, the cmdlet requires a byte array representation of the file. This byte array is created using the Get-Content cmdlet, which is combined with the Set-CsCallParkServiceMusicOnHoldFile cmdlet to upload the file. Here’s an example:
These two commands create a byte array of the file music_on_hold.wma in the $MoHFile variable and then upload it to the Skype for Business server and set it as the Call Park service music on hold.
Implementing Call Park
Now that you know what you can and can’t do with Call Park, let’s look at how you can implement it. To do this, use the following scenario:
As part of the Microsoft Skype for Business deployment, some of the staff members need access to the Call Park functionality. All other staff members should be able to retrieve calls but not park them. The staff members who should be able to park calls are the switchboard operators and the personal assistants. There should be capacity to park 30 calls at any one time; calls should re-call after 30 seconds, and if a call is not answered when re-called, it should be directed to the switchboard.
After reviewing the given scenario, you determine that Call Park should be configured as follows:
Only the switchboard and the PA require Call Park.
Only 30 orbits need to be set up.
The pickup timeout needs to be 30 seconds.
The timeout URI needs to be the switchboard Response Group.
There should be only one re-call attempt.
Although Skype for Business does not require these tasks to be completed in any particular order, you don’t want to enable the users until the rest of the configuration has been completed; therefore, you should work through the list in reverse order.
The first step is to configure the Call Park service, which can be performed only via PowerShell. Since there is only a basic setup, you will configure the service at the global level rather than on a per-site basis.
Set-CsCpsConfiguration -Identity Global
-CallPickupTimeoutThreshold 00:00:30
-OnTimeoutURI "sip:[email protected]"
-MaxCallPickupAttempts 1
This sets the call pickup threshold, which specifies that a call reaching the timeout is routed to the switchboard after the call has rung back to the person who parked it once. This setting will apply to all users who are not covered by a site-specific policy.
Once the Call Park service is configured, you need to create the orbit numbers; although you could configure these through the Control Panel as shown earlier, you will continue to use PowerShell. Since you were not provided with specific extensions to utilize, you will use the range 1000 to 1029.
This creates the Call Park orbit, with a range of 1000 to 1029, allowing 30 calls to be parked; this pool is shared across all users in the pool. Its output will be similar to the following:
Almost everything is configured, but you still need to enable the users to park calls. To do this, you need to modify the Voice policies for the switchboard operators and personal assistants; because they already exist, you need to modify the existing policies.
Set-CsVoicePolicy -Identity Switchboard -EnableCallPark $true
Set-CsVoicePolicy -Identity PA -EnableCallPark $true
These two commands enable Call Park for the two Voice policies, one for PAs and the other for the switchboard.
This completes the Call Park configuration; run the corresponding Get commands to check the configuration.
Using Call Park
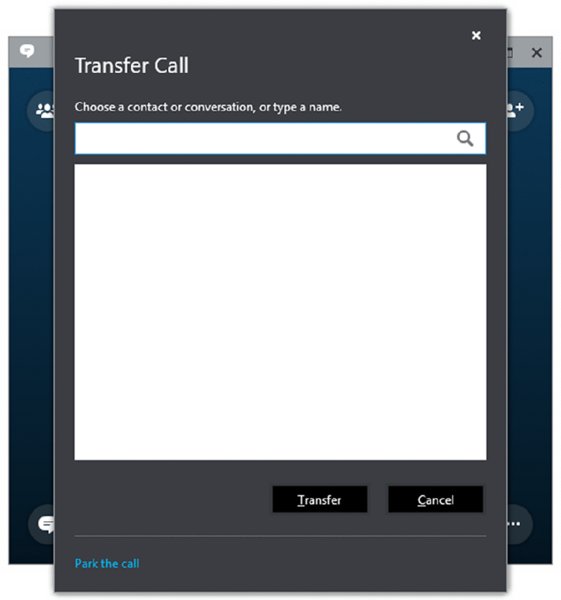
Now that you’ve implemented Call Park, you need to understand how network users can park and retrieve calls. Calls can be parked using the Skype for Business client, the Attendant client, or Phone Edition. These clients operate in the same way; calls are parked by transferring the call to the parking lot, as shown in Figure 19.15.
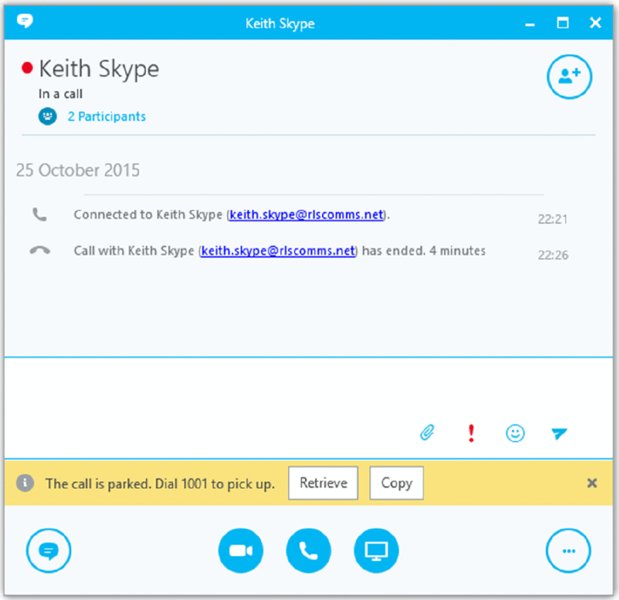
When the call is transferred, you will see that the call has been placed on hold; this notification is then replaced with the number on which the call was parked, as shown in Figure 19.16.
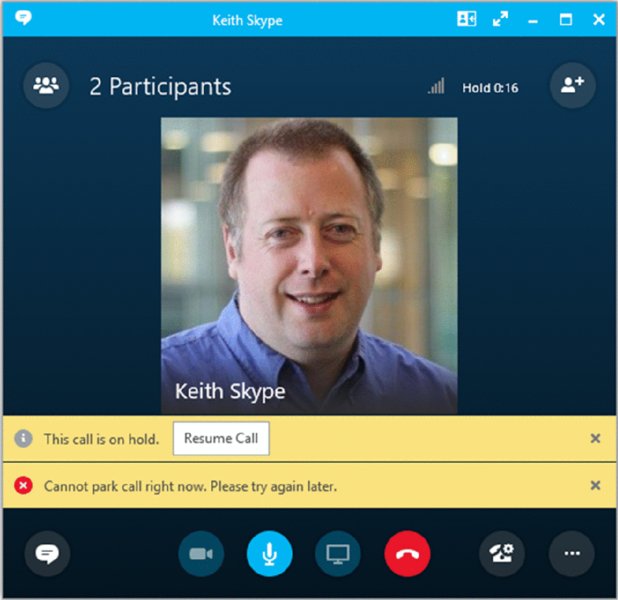
If there are no available extensions on which to park the call, the user will receive a notification like the one shown in Figure 19.17. Note that the call is left on hold to ensure that the caller being parked does not accidentally overhear anything they shouldn’t.
If the parked call has not been retrieved, it will recall to the user who parked the call, as shown in Figure 19.18; this is to avoid a situation where a call is never retrieved. When the recall occurs, the user will be informed that it is a recall.
To retrieve the call, the extension on which it was parked needs to be called. Once the call has been retrieved, it will operate like any other call.
Configuring Unassigned Numbers
Organizations often have phone numbers that they do not use, for a variety of reasons. For example, they may be utilizing only part of the number range allocated to them, or staff may have left—but the organization may still receive calls to such numbers. Traditional PBXs have responded in the following ways:
Presenting announcements, played to the calling party, for numbers that are not allocated to a phone or service
Allocating multiple extensions to a single phone
Leaving phones configured with Call Forward All set to route to a different number such as an attendant
These tend to be blunt tools, using features within the PBX for purposes for which they were not intended. Although they may do what is required, the end result may not be the best solution. For example, the first of these methods would usually result in an announcement being played, followed by the call being terminated. For some organizations, this may be satisfactory; many others would prefer the call to be transferred to an attendant. The second and third methods will have similar results for the caller, who will be expecting to speak to Joe Blogs. Instead, their call will be answered by someone completely different, which can often lead to confusion or to the caller just hanging up.
There are also limits to the number of extensions that can appear on a single phone, often requiring more expensive phones or expansion modules to have more extensions configured. In addition, depending on the PBX type, the more expensive the phones, the more licenses required on the PBX. There are similar issues with leaving phones configured to forward calls.
From these scenarios, you can see that there is usually no ideal way to handle unassigned numbers, although some PBXs do provide a more complete features set for this. To provide a better solution than most and to ensure that organizations do not lose these features if they have them, Microsoft implemented the Unassigned Number functionality in Skype for Business.
Using Unassigned Numbers
In Skype for Business, the Unassigned Number functionality works by defining number ranges and associated call treatments. The call treatments can send the call either to an Exchange Auto Attendant or to the Announcement Service.
The Announcement Service is used to play an announcement to the caller; the call can then be redirected to a SIP URI, voice mailbox, or telephone number. Alternatively, the call can be redirected without an announcement being played. The final option available with the Announcement Service is for it to play a busy tone to the caller. While this is better than the call just being disconnected, it does not provide any context. Using the Announcement Service allows an organization to tell the caller that a person has left the business, for example, and then redirect them to someone who can help them. For the majority of organizations, this is better than the call just being terminated after the announcement has been played.
The Announcement Service is a separate voice application within Skype for Business, but it can be used in conjunction only with the Unassigned Number functionality. The announcements that are played to the caller can be provided either by providing an audio file or by using text-to-speech (TTS).
When configuring the Unassigned Number functionality, you need to perform the basic tasks in the following order:
Import Announcement Service audio files.
Create announcements and Exchange auto attendants.
Define Unassigned Number ranges.
Importing Audio Files
If you choose to use audio files rather than TTS, these audio files need to be in a specific format and must be uploaded to the pool on which the unassigned numbers are defined. An audio file needs to be either a WAV file or a Windows Media Audio (WMA) file. For WAV files, the following characteristics need to be met:
8- or 16-bit file
Linear pulse code modulation (LPCM), A-Law or mu-Law
Mono or stereo
4MB or less
For WMA files, no specific limitations are imposed on the file by Skype for Business. However, you should consider the bit rate because the higher the bit rate, the greater the load placed on the servers.
The announcement file is not directly uploaded; instead, the cmdlet requires a byte array representation of the file. This byte array is created using the Get-Content cmdlet; this is used with the Import-CsAnnouncementFile cmdlet to upload the file. Here’s an example:
This stores the contents of AnnouncmentFile.wav as a byte array in the $AnnFile. This is then imported using the second command and stored as AnnouncementFile.wav. The FileName value specified needs to be unique and does not need to match the name of the file you are uploading.
When the file has been uploaded, you can configure the call treatments. Next, we’ll discuss only the configuration of the Announcement Service, as Exchange Unified Messaging is covered in Chapter 22.
Announcement Service
When using New-CsAnnouncement, there are a number of ways to create new announcements depending on what is required. Each method, of course, has different configuration options. At a minimum, all announcement will use these parameters:
Identity
Name
Identity is the FQDN of the Skype for Business pool on which the announcement should be created, prefixed with ApplicationServer:. Name is the name of the Announcement Service.
If an announcement is created with only these settings, the caller will hear a busy tone. If you need to create an announcement using an announcement file that you have previously uploaded, you will also need to use AudioFilePrompt.
If you want to create an announcement using TTS, then in addition to Identity and Name, you need to use the following:
Language
TextToSpeechPrompt
For each of these three options, you can add an additional parameter, TargetURI, which will transfer the caller to the SIP URI, telephone number, or voice mailbox specified. Each of these must be specified as a SIP URI, as in the examples shown in Table 19.3.
When the call treatments have been created, you can define the Unassigned Number ranges. They can be created through the Control Panel (Voice Features ➢ Unassigned Numbers) or through PowerShell; no additional configuration options are exposed through PowerShell. To create a new number range, use the New-CsUnassignedNumber cmdlet, which has the following options:
AnnouncementName: This is the announcement name.
AnnouncementService: This is the Announcement Service used.
ExUMAutoAttendantPhoneNumber: This is the Exchange Auto Attendant phone number.
NumberRangeStart: This is the range start number.
NumberRangeEnd: This is the range end number.
Priority: This is used if number ranges overlap; if they do, the announcement with the highest priority will be used.
All of these parameters are required, except Priority, which is required only if you have overlapping number ranges. Note that when managing unassigned numbers through the Control Panel, there is no priority field; instead, priorities are managed by manipulating the order of the numbers using the Move Up and Move Down options, shown in Figure 19.19.
Figure 19.19 Managing unassigned numbers via Control Panel
The Announcement Service is the FQDN of the pool on which the announcement should be created, prefixed with ApplicationServer:. If you are also using TTS, this should match the pool to which the audio file was uploaded.
The number range start and end numbers must comply with the following:
The range must match this regular expression:
(tel:)?(+)?[1-9]d{0,17}(;ext=[1-9]d{0,9})?
The end number must be equal to or greater than the start number.
The regular expression breaks down as follows:
The regular expression starts with a tel:—although if it doesn’t, it will automatically be added.
This can then optionally have a + following it.
This is followed by a digit, 1 to 9.
This is followed by up to 17 digits.
This can then be followed by ;ext=, 1 to 9, and then up to nine additional digits if the organization uses a single DDI and an extension range.
In addition to the requirements set out by the regular expression, when the extension field is used, the start and end numbers must be the same number because the extension field is used to define the number range in use. Table 19.4 lists some examples.
Now that you have seen how unassigned numbers operate and the options for configuring them within Skype for Business, let’s look at how you can implement them.
Implementing Unassigned Numbers
You’re ready to build a configuration based on the following scenario:
No caller should receive an unknown number response when calling into your organization. Calls to all numbers will be answered and routed as appropriate. Where there is no specific requirement, calls will be routed to an auto attendant. Calls to any numbers that used to be assigned to a sales representative will be sent to the attendants after the caller has been told they are being redirected. The sales department has its own allocated range.
Organization DDI Range: +14255551000 to +14255559999
Sales Department DDIs: +14255553250 to +14255553299
From this scenario, you determine the following:
You need to create an Unassigned Number range to cover all numbers.
You need to set up an Exchange Auto Attendant.
You need to create an Unassigned Number range for the sales departments.
You need to set up an announcement for the sales team that will play a message to any caller who dials an unused number, such as a former salesperson’s number, and then redirect the call to the Attendants Response Group.
As with other configurations, you need to make sure you perform these tasks in the correct order. The call treatments must be set up before the Unassigned Number configuration. Configuring the Auto Attendant in Exchange is outside the scope of this book, but for this example assume it exists and has an associated phone number of +14255551010.
In Skype for Business Server, you first need to create the announcement for the sales team. This will be performed using the Announcement Service and can be done only via PowerShell.
New-CsAnnouncement -Identity "ApplicationServer:se01.rlscomms.net"
-Name "Sales Team"
-TargetURI "sip:[email protected]"
-TextToSpeechPrompt
"Thank you for calling a member of the sales team, please
be patient while we redirect you to an attendant"
-Language "en-US"
This creates a new announcement using text-to-speech and routes calls to the Attendants Response Group; it will also produce output similar to this:
Identity           : Service:ApplicationServer:se01.rlscomms.net
                      /07086c48-0bc5-4ce2-a6f4-f85c369a9
Name               : Sales Team
AudioFilePrompt    :
TextToSpeechPrompt : Thank you for calling a member of the sales team, please
                      be patient while we redirect you to an attendant
Language           : en-US
TargetUri          : sip:[email protected]
AnnouncementId     : 0786c48-0bc5-4ce2-a6f4-f85c369a91dc
Now that you’ve created the announcement, you can create the unassigned numbers. Although you can do this through the Control Panel, continue to use PowerShell for the example. Because of the requirement to overlap the number ranges, you need to ensure that the Priority field is specified, which will allow for the sales unassigned number to supersede the organization one. Here are the final commands:
This creates an Unassigned Number configuration for all the numbers the organization uses by specifying the entire number range, and it routes all calls to the Exchange Auto Attendant.
This creates the Unassigned Number configuration for the sales team number range and routes them to the announcement that was created earlier, thereby producing output similar to this:
This completes the Unassigned Number configuration; to check the configuration, run the corresponding Get commands.
The Bottom Line
Understand the extended voice functionality. Extended voice functionality provides additional voice applications that many organizations expect a PBX to have. Understanding what these applications can and cannot do is important so you can make the correct decisions when implementing them and know when a third-party solution is better.
Master It The manager for an internal help desk has been to a trade show and has been told he needs to have a full contact center to implement certain requirements. All he needs is to route calls to agents. He does not care about reporting or recording; he just needs to make sure that calls get to the right people. He is adamant that he needs a call center because this is what the experts have told him.
Design solutions using extended voice functionality. Designing is usually seen as a boring, time-consuming task, when all you want to do is get your hands dirty and implement something. Although some of the extended voice functionality is straightforward, other elements are complex, and missing the design stage could cause you problems later. Design, design, design—and implement once.
Master It You need to implement a dial-in conferencing solution globally. You need to have global dial-in numbers and support at least 100 concurrent PSTN calls to the conferencing solution.
Implement extended voice functionality. Lync’s extended voice functionality is useless if you do not know how to implement it and use it to its fullest potential. To do that, you need to make sure that what you implement works and is fully tested.
Master It You have implemented Call Park, but users are complaining about intermittent issues with parking calls. The complaints are coming from all user types, which is strange because not all users should be able to park calls.