 Reading files from a web server upload directory
by Marc Delisle
Mastering phpMyAdmin 3.4 for Effective MySQL Management
Reading files from a web server upload directory
by Marc Delisle
Mastering phpMyAdmin 3.4 for Effective MySQL Management
- Mastering phpMyAdmin 3.4 for Effective MySQL Management
- Mastering phpMyAdmin 3.4 for Effective MySQL Management
- Credits
- About the Author
- About the Reviewers
- www.PacktPub.com
- Preface
- 1. Getting Started with phpMyAdmin
- PHP and MySQL: The leading open source duo
- What is phpMyAdmin?
- Installing phpMyAdmin
- Configuring phpMyAdmin
- Installing phpMyAdmin configuration storage
- Upgrading phpMyAdmin
- Summary
- 2. Configuring Authentication and Security
- 3. Over Viewing the Interface
- 4. Creating and Browsing Tables
- 5. Changing Data and Structure
- Changing data
- Changing table structure
- Summary
- 6. Exporting Structure and Data (Backup)
- 7. Importing Structure and Data
- 8. Searching Data
- 9. Performing Table and Database Operations
- 10. Benefiting from the Relational System
- 11. Entering SQL Statements
- 12. Generating Multi-table Queries
- 13. Synchronizing Data and Supporting Replication
- Synchronizing data and structure
- Supporting MySQL replication
- Summary
- 14. Using Query Bookmarks
- 15. Documenting the System
- 16. Transforming Data using MIME
- Browsing data without transformations
- Enabling transformations
- Examples of transformations
- Summary
- 17. Supporting Features Added in MySQL 5
- 18. Tracking Changes
- 19. Administrating the MySQL Server
- A. Troubleshooting and Support
To get around cases where uploads are completely disabled by a web server's PHP configuration, or where upload limits are too small, phpMyAdmin can read upload files from a special directory located on the web server's file system.
We first specify the directory name of our choice in the $cfg['UploadDir'] parameter, for example,'./upload'. We can also use the %u string, as described in Chapter 6, to represent the user's name.
Now, let us go back to the Import page. We get an error message:
The directory you set for upload work cannot be reached.
This error message is expected, as the directory does not exist. It is supposed to have been created inside the current phpMyAdmin installation directory. The message might also indicate that the directory exists, but can't be read by the web server.
Note
In PHP safe mode, the owner of the directory and the owner of the phpMyAdmin-installed scripts must be the same.
Using an SFTP or FTP client, we create the necessary directory, and can now upload a file there (for example book.sql) bypassing any PHP timeouts or upload maximum limits.
In most cases, the easiest way is to allow everyone to read the file.
Refreshing the Import page brings up the following screenshot:
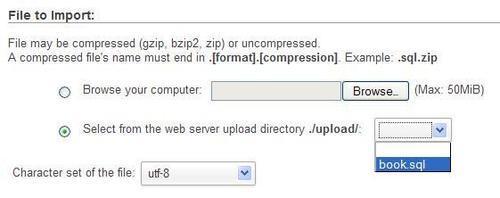
Clicking on Go should execute the statements located in the file.
Automatic decompression is also available for the files located in the upload directory. The file names should have extensions such as .bz2, .gz, .sql.bz2, or .sql.gz.
-
No Comment