
Three criteria columns are provided by default. This section discusses the options we have for editing their criteria. These include options for selecting columns, sorting individual columns, entering conditions for individual columns, and so on.
The Column selector contains all the individual columns for the selected tables, plus a special choice ending with an asterisk (*) for each table, which means that all the columns are selected.
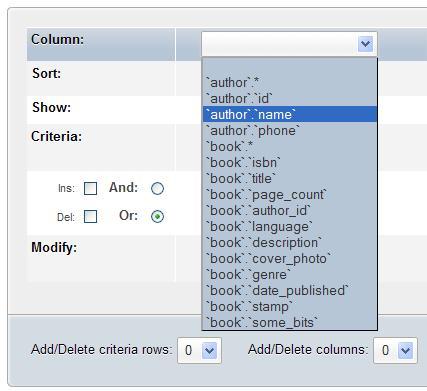
To display all the columns in the author table, we would choose `author`.* and check the Show checkbox, without entering anything in the Sort and the Criteria boxes. In our case, we select `author`.`name`, as we want to enter some criteria for the author's name.
For each selected individual column, we can specify a sort (in Ascending or Descending order), or let this line remain intact (no sorting, which is the default behavior). If we choose more than one sorted column, the sorting will be carried out from left to right.
We check the Show checkbox so that we can see the column in the results. Sometimes, we may just want to apply a criterion on a column, and not include it in the resulting page. Here, we add the phone column, ask for it to be sorted, and choose to show both the name and the phone number. We also ask for a sort on the name in the ascending order. The sort will be done first by name, and then by the phone number if the names are identical. This is because the name is in a column criterion to the left of the phone column, and thus has a higher priority.

At any point, we can click on the Update Query button to see the progress of our generated query. We have to click it at least once before executing the query. For now, let us click it and see the query generated in the query area. In the following examples, we will click on the Update Query button after each modification.
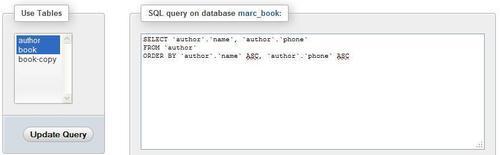
We have selected two tables, but have not yet chosen any column from the book table. Hence, this table is not mentioned in the generated query.
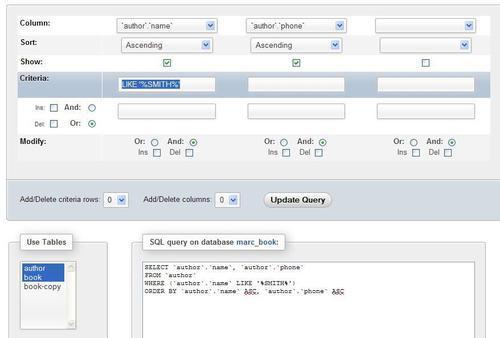
In the Criteria box, we can enter a condition (respecting the SQL WHERE clause's syntax) for each of the corresponding columns. By default, we have two criteria rows. To find all the authors with Smith in their names, we use a LIKE criterion (LIKE '%SMITH%') and click on Update Query.
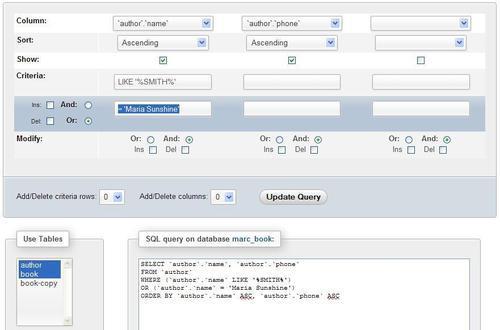
We have another line available to enter an additional criterion. Let us say we want to find the author Maria Sunshine as well. This time, we use an = condition. The two condition rows will be joined by the Or operator, selected by default from the left side of the interface.
To better demonstrate that the Or operator links both the criteria rows, let us now add a condition, LIKE '%8%', on the phone number as shown in the following screenshot:
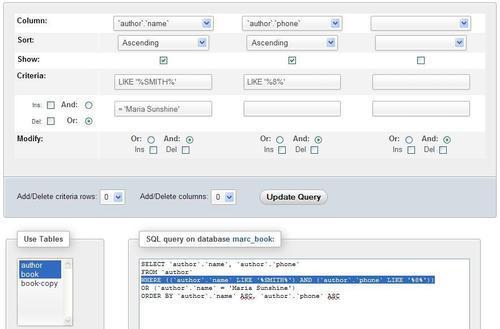
By examining the positioning of the AND and OR operators, we can see that the first row of the conditions is linked by the AND (because AND is chosen under the name column) operator, and the second row of conditions is linked to the rest by the OR operator. The condition that we have just added ' (LIKE %8%') is not meant to find anyone, because we changed the phone number of all the authors with the name "Smith" to "444-5555" (in Chapter 11).
If we want another criterion on the same column, we just add a criteria row.
The number of criteria rows can be changed in two ways. First, we can select the Ins checkbox under Criteria to add one criteria row (after clicking on Update Query). As this checkbox can add only one criteria row at a time, we will uncheck it and use the Add/Delete criteria rows dialog instead. In this dialog, we choose to add two rows.
Another click on the Update Query button produces the following screen:
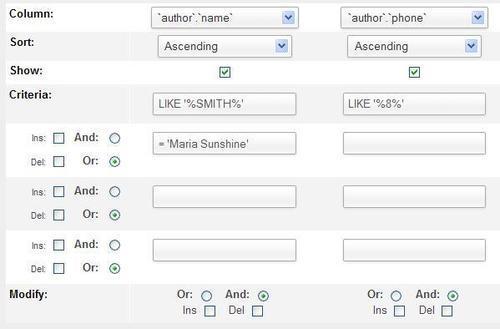
Now, you can see that there are two additional criteria rows (which are empty at the moment). We can also remove criteria rows. This can be done by ticking the Del checkbox beside the row(s) we want to remove. Let us remove the two rows we have just added, as we don't need them now. The Update Query button refreshes the page with the specified adjustment.
Using a similar mechanism, we can add or delete columns by checking the Ins or Del checkboxes under each column in the Modify dialog, or the Add/Delete columns dialog. We already had one unused column (not shown on the previous images). Here, we have added one column using the Ins checkbox located under the unused column (this time, we will need it):
