
The Databases page is intended to create new databases, and quickly get privileges information for each database. Optionally, it can also be used to obtain global statistics on these databases without having to click on each database in the navigation panel. When we enter the Databases page, we see the list of existing databases:
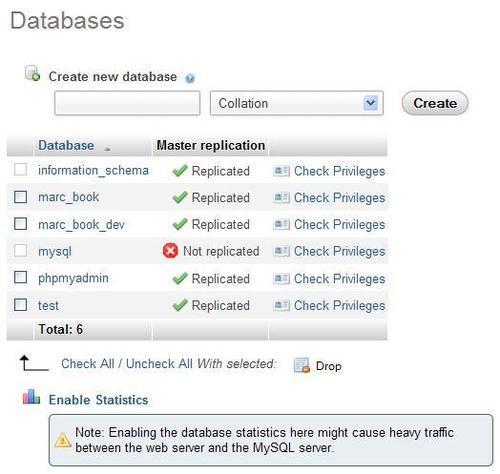
We also see an Enable Statistics link. By default, statistics are not enabled because computing the size of data and indexes for all the tables in all the databases may consume valuable MySQL server resources.
If we click on the Enable Statistics link, a modified page appears. For each database, we get the default collation for tables in this database, along with the number of tables in the database and the total number of rows for all tables. Next, information about the space used by the data portion of the tables is given, followed by the space taken by all indexes, and total space for all tables. Next, the space that could be reclaimed by optimizing some tables in this database is presented under Overhead column header. Finally, we can see replication information, followed by Check Privileges links:
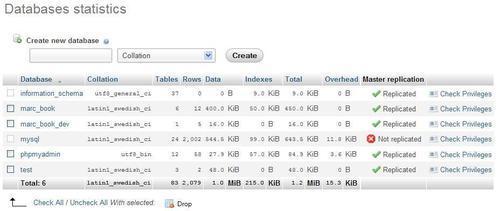
By default, the statistics list is sorted by database name in ascending order. If we need to find the database with the most tables or the database that takes the most space, a simple click on the Tables or Total column header sorts the list accordingly. A second click reverses the sort order.
Clicking on the Check Privileges icon or link displays all of the privileges on a specific database. A user's global privilege might be shown here, as it gives him or her access to this database as well. We can also see the privileges specific to this database. An Edit Privileges link takes us to another page, which is used to edit the user's privileges.
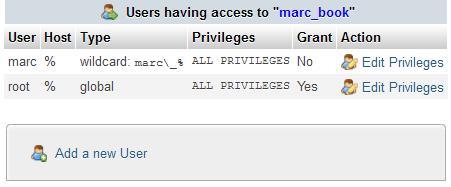
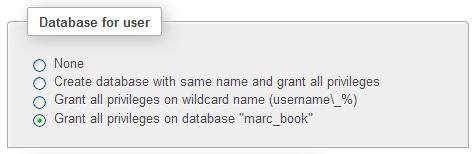
We notice that this panel also contains the Add a new User link. Clicking on this link is a convenient way of creating a user that has privileges to the database we are currently examining. Indeed, after entering the user-creation panel from this link, a fourth choice in the database creation or privileges granting dialog is shown and selected by default, as shown in the following screenshot:
To drop one or more databases, we go to Server view and click on the Databases menu tab; put check marks next to the names of the databases to be dropped; and then click on the Drop link next to With selected. We then get a confirmation screen. Two of the databases (mysql and the virtual information_schema) cannot be selected; the first one to avoid making a big mistake and deleting all of our accounts, and the second one cannot be selected as this is not a real database.