
When developing an application, requirements about data structure often change because of new or modified needs. Developers must accommodate these changes through judicious table structure editing. This section explores the subject of changing the structure of tables. Specifically, it shows how to add a column to an existing table and edit the attributes of a column. We then build on these notions to introduce more specialized column types, and to explain their handling through phpMyAdmin. Finally, we will cover the topic of index management.
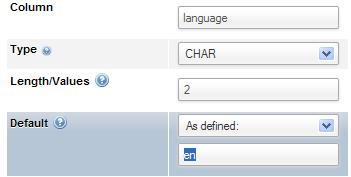
Suppose that we need a new column to store a book's language and, by default, the books on which we keep data are written in English. We call the column language, which will contain code composed of two characters (en by default).
In the Structure page of the Table view for the book table, we can find the Add column dialog. Here, we specify how many new columns we want, and where they will go.
The positions of the new columns in the table matter only from a developer's point of view. We usually group the columns logically, so that we can find them more easily in the list of columns. The exact position of the columns will not play a role in the intended results (output from the queries), as these results can be adjusted regardless of the table structure. Usually, the most important columns (including the keys) are located at the beginning of the table. However, it is a matter of personal preference.
We want to put the new column At End of Table. So, we check the corresponding radio button and click on Go.
Other possible choices would be At Beginning of Table and After (where we would have to choose from the drop-down menu, the column after which the new one must go).
We see the familiar panel for entering column's attributes. We fill it in. However, as we want to enter a default value this time, we do the following two actions:
- Change the Default drop-down menu from None to As defined:
- Enter the default value: en
We then click on Save.
The previous panel appeared in vertical mode because the default for $cfg['DefaultPropDisplay'] is 3. This means that for three columns or less, the vertical mode is used, and for more than three, horizontal mode would be automatically selected. Here, we can use a number of our choosing.
If we set $cfg['DefaultPropDisplay'] to'vertical', the panel to add new columns (along with the panel to edit a column's structure) will be always presented in vertical order. This parameter can also take a value of'horizontal' to force a horizontal mode.
On the Structure page, we can make further changes to our table:
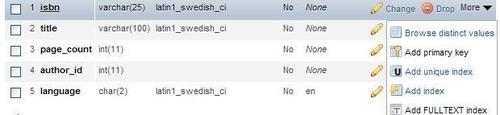
This panel does not allow every possible change to columns. It specifically allows:
- Changing one column structure, using the Change link on a specific column
- Removing a column, using Drop operation
- Adding a column to an existing Primary key
- Setting a non-unique Index or a Unique index on a column
- Setting a FULLTEXT index (offered only if the column type allows it)
These are quick links that may be useful in some situations, but they do not replace the full index management panel. Both of these are explained in this chapter.
We can use the checkboxes to choose columns. Then, with the appropriate With selected icons, we can edit the columns with Change or do a multiple column deletion with Drop. The Check All / Uncheck All option permits us to easily check or uncheck all boxes.
We will now explore how to use the TEXT column type and the relevant configuration values to adjust for the best possible phpMyAdmin behavior. First, we add to the book table a TEXT column called description.
There are three configuration directives that control the layout of the text area that will be displayed in Insert or Edit mode for the TEXT column type. The number of display columns and rows for each column is defined by:
$cfg['TextareaCols'] = 40;
$cfg['TextareaRows'] = 15;
This gives (by default) space to work on a TEXT column type as shown in the following screenshot:

The settings impose only a visual limit on the text area, and a vertical scroll bar is created by the browser if necessary.
Note
Although MEDIUMTEXT, TEXT, and LONGTEXT column types can accommodate more than 32 KiB of data, some browsers cannot always edit them with the text area—the mechanism offered by HTML. In fact, experimentation has convinced the phpMyAdmin development team to have the product display a warning message if the contents are larger than 32 KiB. The message warns users that the contents may not be editable.
The last configuration directive, $cfg['LongtextDoubleTextarea'], has an impact for LONGTEXT column types only. The default value of TRUE doubles the available editing space.
BLOB column types are generally used to hold binary data (such as images and sounds), even though the MySQL documentation implies that TEXT column types could be used for this purpose. The MySQL 5.1 manual says: "In some cases, it may be desirable to store binary data such as media files in BLOB or TEXT columns". However, another phrase: "BLOB columns are treated as binary strings (byte strings)", seems to indicate that binary data should really be stored in BLOB columns. Thus, phpMyAdmin's intention is to work with the BLOB column type to hold all binary data.
We will see in Chapter 16 that there are special mechanisms available to go further with BLOB column type, including being able to view some images directly from within phpMyAdmin.
First, we add a BLOB column type named cover_photo to our book table. If we now browse the table, we can see the length information, [BLOB - 0B], for each BLOB column type.
This is because the Show BLOB display option (do you remember the Options slider?) has no check mark by default. So, it blocks the display of BLOB contents in Browse mode. This behavior is intentional. Usually, we cannot do anything with binary data represented in plain text.
If we edit one row, we see the Binary do - not edit warning and a Browse… button. The exact caption on this button depends on the browser. Even though editing is not allowed, we can easily upload a text or binary file's contents into this blob column.
Let us choose an image file using the Browse button—for example, the logo_left.png file in a test copy of the phpMyAdmin/themes/pmahomme/img directory located on our client workstation. We now click on Go.
We need to keep in mind some limits for the upload size. Firstly, the blob column size is limited to 64 KiB, but in Chapter 16 we will change the type of this column to accommodate bigger images. Hence, phpMyAdmin reminds us of this limit with the Max: 64KiB warning. Also, there could be limits inherent to PHP itself (refer to Chapter 7 for more details). We have now uploaded an image inside this column for a specific row.

We notice that BLOB - 4.9KiB is a link; it permits to download any binary data to our workstation should the need arise.
If we put a check mark for the Show BLOB Contents display option, we now see the following in the BLOB column type:

Note
To really see the image from within phpMyAdmin, refer to Chapter 16.
The $cfg['ProtectBinary'] parameter controls what can be done while editing binary columns (BLOBs and any other column with the binary attribute). The default value blob blocks the BLOB columns from being edited but allows us to edit other columns marked binary by MySQL. A value of all would block even binary columns from being edited. A value of FALSE would protect nothing, thus allowing us to edit all the columns. If we try the last choice, we see the following in the Edit panel for this row:
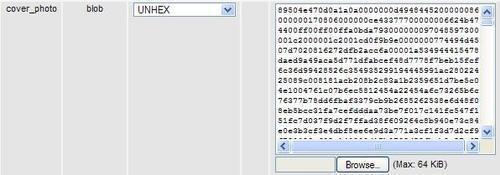
The content of this BLOB column type has been converted in hexadecimal and the UNHEX function is selected by default. We probably don't want to edit this image data in hexadecimal but this is the best way of safely representing binary data on screen. The reason for this hexadecimal representation is that the Show binary contents as HEX display option (in Browse mode) is currently marked. But we did not mark this option; it was checked because the $cfg['DisplayBinaryAsHex'] directive is TRUE by default.
Should we decide instead to not mark this option, we would see the following pure binary data for this image:
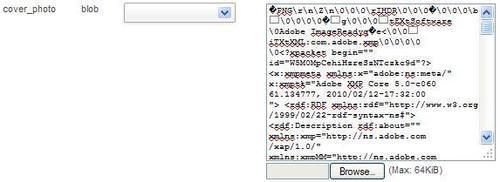
There are chances that this is not our favorite image editor! In fact, data may be corrupted even if we save this row without touching the BLOB column type. But the possibility of setting $cfg['ProtectBinary'] to FALSE exists, as some users put text in their BLOB columns, and they need to be able to modify this text. This is why phpMyAdmin can be configured to allow editing of BLOB columns.
MySQL BLOB data types are actually similar to their corresponding TEXT data types. However, we should keep in mind that a BLOB has no character set, whereas a TEXT column type has a character set that impacts sorting and comparison.
Both ENUM and SET column types are intended to represent a list of possible values. The difference is that the user can choose only one value from a defined list of values with ENUM, and more than one value with SET. With SET, all the multiple values go into one cell; but multiple values do not imply the creation of more than one row of data.
We add a column named genre to the book table and define it as an ENUM. For now, we choose to put short codes in the value list and make one of them, F, into the default value as shown in the following screenshot:
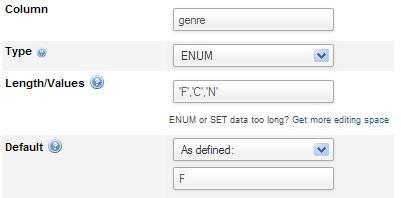
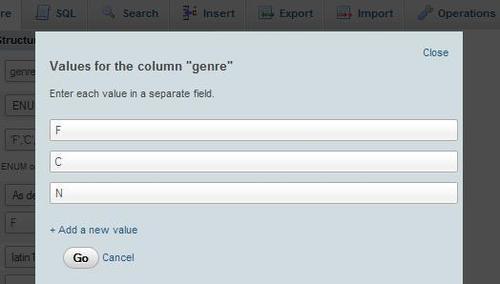
In the value list, we have to enclose each value within single quotes, unlike in the default value field. Starting with version 3.4.0, an editor targeted for ENUM/SET columns is available. With this editor, we don't need to bother enclosing values within single quotes. Clicking on Get more editing space brings this editor into action:
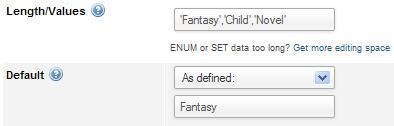
In our design, these values stand for Fantasy, Child, and Novel. However, for now, we want to see the interface's behavior with short code. In the Insert panel, we now see a radio box interface as shown in the following screenshot:
If we decide to have more self-describing values, we can go back to Structure mode and change the values definition for the genre column. We also have to change the default value to one of the possible values, to avoid getting an error message while trying to save this column structure's modification.
With the modified value list, the Insert panel now looks as follows:
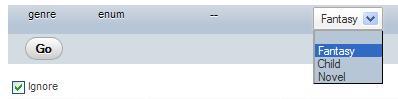
Observe that the radio buttons have been replaced by a drop-down list because the possible values are larger in length.
If we want more than one possible value selected, we have to change the column type to SET. The same value list may be used. However, using our browser's multiple value selector (control-click on a Windows or Linux desktop, command-click on a Mac), we can select more than one value as shown in the screenshot:

We could use a normal character column to store date or time information. But DATE, DATETIME, and TIMESTAMP are more efficient for this purpose. MySQL checks the contents to ensure valid date and time information, and offers special functions to work on these columns.
As an added benefit, phpMyAdmin offers a calendar pop up for easy data entry.
We will start by adding a DATE column type —date_published— to our book table. If we go into Insert mode, we should now see the new column where we could type a date. A Calendar icon is also available. This icon brings a pop-up window, synchronized to this DATE column type. If there is already a value in the column, the pop up is displayed accordingly. In our case, there is no value in the column, so the calendar shows the current date as shown in the following screenshot:
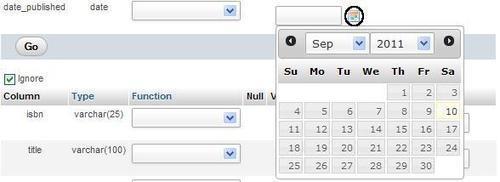
Small arrows permit easy scrolling through months and years. A simple click on the date we want transports it to our date_published column. For a DATETIME or TIMESTAMP column type, the pop up offers the ability to edit the time part.
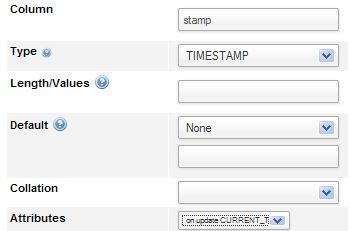
Starting with MySQL 4.1.2, there are more options that can affect a TIMESTAMP column type. Let us add to our book table, a column named stamp of type TIMESTAMP. In the Default drop-down, we could choose CURRENT_TIMESTAMP; but we won't for this exercise. However, in the Attributes column, we choose on update CURRENT_TIMESTAMP. More details are available at http://dev.mysql.com/doc/refman/5.5/en/timestamp.html.
MySQL 5.0.3 introduced true bit columns. These take the same amount of space in the database as the number of bits in their definition. Let us say we have the following three pieces of information about each book, and each piece can only be true (1) or false (0):
- Book is hard cover
- Book contains a CD-ROM
- Book is available only in electronic format
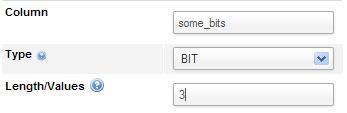
We will use a single BIT column to store these three pieces of information. Therefore, we add a column having a length of 3 (which means 3 bits) to the book table:
To construct and subsequently interpret the values we store in this column, we have to think in binary, respecting the position of each bit within the column. To indicate that a book is hard cover, does not contain a CD-ROM, and is available only in electronic format, we would use a value of 101.
phpMyAdmin handles BIT columns in a binary way. For example, if we edit one row and set a value of 101 to the some_bits column, the following query is sent at save time:
UPDATE `marc_book`.`book` SET `some_bits` = b '101'

WHERE `book`.`isbn` = '1-234567-89-0' LIMIT 1;
The highlighted part of this query shows that the column really receives a binary value. At browse time, the exact value (which in decimal is 5 —a meaningless value for our purpose) is redisplayed in its binary form 101, which helps to interpret each discrete bit value. More details about the notation for bit values are available at http://dev.mysql.com/doc/refman/5.5/en/bit-type.html.
Properly maintained indexes are crucial for data retrieval speed. phpMyAdmin has a number of index management options, which will be covered in this section.
We have already seen how the Structure panel offers a quick way to create an index on a single column, thanks to some links such as Add primary key, Add index, and Add unique index. Under the columns list, there is a section of the interface available to manage indexes:
This section has links to edit or delete every index. Here, the Column part lists only one column per index, and we can see that the whole column participates in the index. This is because there is no size information after each column name, contrary to what will be seen in our next example.
We will now add an index on the title. However, we want to restrict the length of this index to reduce the space used by the on-disk index structure. The Create an index on 1 columns option is appropriate. So, we click on Go. In the next screen, we specify the index details as shown here:
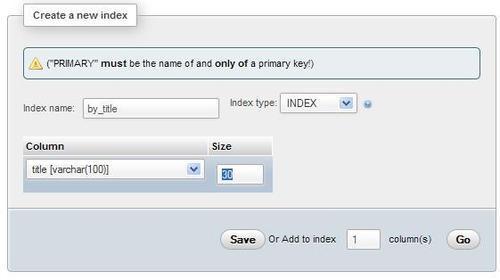
We fill in the following information in the options of this panel:
- Index name: A name we invent, that describes the purpose of this index
- Index type: We can choose INDEX
- Column: We select the column that is used as the index, which is title
- Size: We enter 30 instead of 100 (the complete length of the column) to save space in the table's physical portion that holds index data
After saving this panel, we can confirm from the following screenshot that the index is created and does not cover the entire length of the title column:

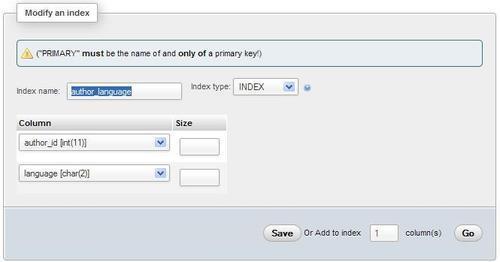
In the next example, we assume that in a future application we will need to find the books written by a specific author in a specific language. It makes sense to expand our author_id index, adding the language column to it.
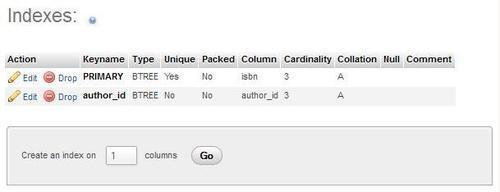
We click on the Edit link (small-pencil icon) on the line containing the author_id index; this shows the current state of this index. The interface has room to add another column to this index. We could use the Add to index 1 column(s) feature should we need to add more than one column. In the selector, we pick language. This time we do not have to enter a size, as the whole column will be used in the index. For better documentation, we change the Index name (author_language is appropriate) as shown in the following screenshot:
We save this index modification. In the list of indexes, we can confirm our index modification.
This special type of index allows for full text searches. It is supported only on MyISAM tables for the VARCHAR and TEXT column types, but MySQL 5.6 should be offering this feature for InnoDB too. We can use the Add FULLTEXT index link in the columns list or go to the index management panel and choose FULLTEXT in the drop-down menu.
In this section, we want to get some information about the index that MySQL uses for a specific query, and the performance impact of not having defined an index.
Let us assume we want to use the following query:
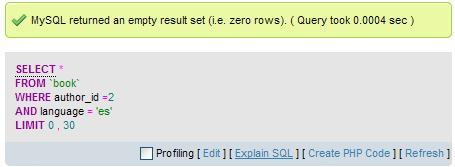
SELECT *
FROM `book`
WHERE author_id = 2 AND language = 'es'
We want to know, which books written by the author whose id is 2, are in the es language—our code for Spanish.
To enter this query, we use the SQL tab from the database or the table menu, or the SQL Query window (refer to Chapter 11). We enter this query in the query box and click Go. Whether the query finds any results, is not important right now.
Note
You could obtain the same query by following explanations from Chapter 8 to produce a search for author_id 2 and language es.
We will now use the [Explain SQL] link to get information about which index (if any) has been used for this query:
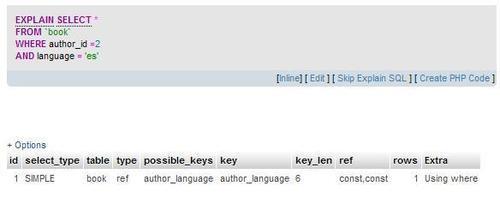
We can see that the EXPLAIN command has been passed to MySQL, telling us that the key used is author_language. Thus, we know that this index will be used for this type of query. If this index had not existed, the result would have been quite different.
Here, key (NULL) and the type (ALL) mean that no index would be used, and all rows would need to be examined to find the desired data. Depending on the total number of rows, this could have a serious impact on the performance. We can ascertain the exact impact by examining the query timing that phpMyAdmin displays on each result page (Query took x sec), and comparing it with or without the index. However, the difference in time can be minimal if we only have limited test data, compared to a real table in production. For more details about the EXPLAIN output format, please refer to http://dev.mysql.com/doc/refman/5.5/en/explain-output.html.
To help users maintain an optimal index strategy, phpMyAdmin tries to detect some common index problems. For example, let us access the book table and add an index on the isbn column. When we display this table's structure, we get a warning as shown in the following screenshot:
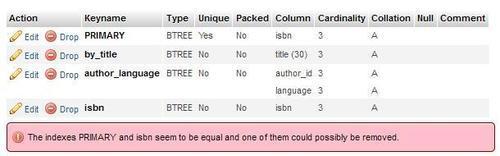
The intention here is to warn us about an inefficient index structure when considering the whole table. We don't need to have two indexes on the same column.