
In this chapter, we will cover two features that were released in phpMyAdmin 3.3.0. The first feature is the ability to synchronize databases, and was asked for by developers who work on more than one server. The second feature permits the management of MySQL replication, which is used in environments where performance and data security are important. These features are somewhat related because we usually need to synchronize the database to a slave server when setting it up in a replication process.
In earlier phpMyAdmin versions, it was possible to achieve some synchronization of the structure and data between two databases on the same server or on different servers, but this required manual operations. It was (and still is) possible to export structure and/or data from one database and import in another one. We can even visually compare the structure of two tables and adjust them according to our needs. However, comparing the two databases to ascertain what needs to be imported had to be done with the developer's own eyeballs. Moreover, differences in structure between the databases were not taken into account, possibly resulting in errors when a column was missing in the target table.
The synchronize feature of phpMyAdmin permits much flexibility, by taking care of the initial comparison process and, of course, by performing the synchronization itself. We will first discuss the reasons for synchronizing, and then examine and experiment with all the steps involved.
Although the reasons for wanting to synchronize two databases may be many, we can group them into the following categories.
A sound database development strategy includes performing development and testing on a server that is distinct from the production one. If having a separate development server is not an option, having at least a distinct development database is encouraged. Over time, differences in structure between test and production environments build up, and this is normal. For example, a column may be added in the test version, or character column may be enlarged. The synchronize feature permits us to first see the differences and then apply them to production if they make sense.
Moving data sometimes needs to be done the other way around, for example, to populate a test database with real production data in order to measure performance.
Due to the easy manner in which a MySQL test server can be put in place, the situation might arise where each member of a development team has his own server (or his own copy of the database) in which he develops some aspect of a project. When the time comes to reconcile everyone's changes for the same table, the synchronize feature is invaluable.
MySQL supports asynchronous replication between a master server and one or many slave servers. This data replication is termed "asynchronous" because the connection between master and slaves does not need to be permanent. However, to put a replication process in action (and assuming that the master already contains some data), one needs to copy all the data over to the slaves. A suggestion to accomplish this copy is given in the MySQL manual that can found at http://dev.mysql.com/doc/refman/5.1/en/replication-howto.html, and is mentioned as follows:
"If you already have data on your master and you want to use it to synchronize your slave, you will need to create a data snapshot. You can create a snapshot using mysqldump (...)"
However, this requires using a command-line tool that is not always possible depending on the hosting options. Besides, some parts of the database may already exist on the slave; therefore, the synchronize feature comes in handy because it's integrated into phpMyAdmin, and also because it takes care of the comparison phase.
The important principle is that synchronization is done from a source database to a target database. During this operation, the source database remains unchanged. It's up to us to correctly identify which database is the source and which one is the target (and will be possibly modified).
The whole process is subdivided into steps which can be stopped at any stage:
- Server and database choice
- Comparison
- Full or selective synchronization
We could elect to stop the process for one of the following reasons:
- We don't have the necessary credentials to connect to one of the servers
- We see discrepancies between two databases and are not ready to synchronize because further research needs to be done
- We notice after the comparison phase that the target database is adequately synchronized
Before performing synchronization, we will put the necessary elements in place.
As we will play with only the author and book tables, this exercise will assume that there are no other tables in the marc_book database. We start by copying the marc_book database to marc_book_dev (refer to Chapter 9 for the exact method for doing this).Then we open the marc_book_dev database and perform the following actions:
- Delete the
booktable - Delete one row of the
authortable - Change the type of the
namecolumn fromVARCHAR(30)toVARCHAR(29) - Delete the
phonecolumn from theauthortable
Chapter 5 covers how to perform the previous actions.
The initial Synchronize page is displayed via the Synchronize menu tab in Server view. Please note that this is the only place where this menu is available.
The first panel permits us to connect to servers (if needed) and to pick the correct database. If the $cfg['AllowArbitraryServer'] parameter is set to its default value of false, the following panel appears:
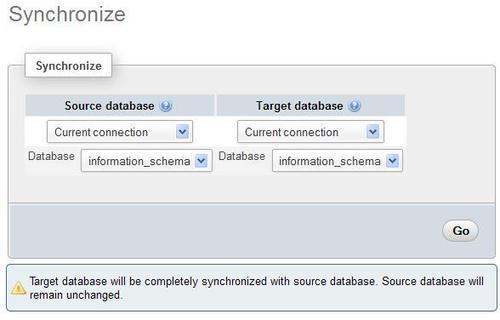
This means that we can only use the servers already defined in config.inc.php. If arbitrary servers are allowed, we see a different panel, shown in the following screenshot:

For both the source and target databases, we can select the server location. By default, the selector is placed on Enter manually and we can enter its hostname, port, socket name, username, password, and database name. In most cases, the port should be left to the default 3306 and the socket name should be left empty. Notice that we are currently connected to a MySQL server (via the normal login panel) and this panel could permit us to connect to two more servers.
Another choice for server location is Current connection. This refers to the server on which we are connected for normal phpMyAdmin operations; its name is displayed at the top of the main panel. Should we choose this, a JavaScript-enabled browser hides all choices except for the database name (connection credentials are unnecessary in this situation) and a selector becomes available, showing all of the databases to which we have access.
It's perfectly possible to pick the same server on both the source and target sides; however, we would at least choose a source database different to the target one in this case. Another common case is to pick the current server and some database as the source, and a remote server with the same database as the target, assuming that the remote server is the production one and that both servers hold a database with the same name.
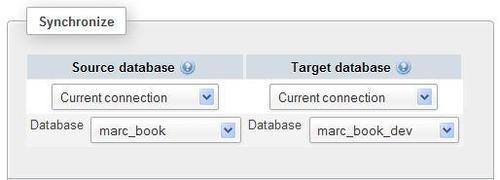
For this exercise, let us pick Current connection for both source and target servers; we can then choose marc_book as the source database and marc_book_dev as the target one, as shown in the following screenshot:
After clicking on Go, phpMyAdmin attempts to connect to the servers if needed. At this point, a connection error message may be displayed. However, the connection should hopefully succeed and the program will start comparing both databases and then show us the results.
The comparison results panel contains three sections. The first section displays the structure and data differences, and contains icons that will be used to initiate a selective synchronization:

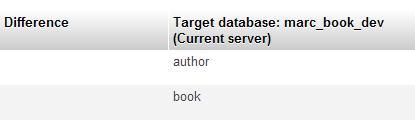
As depicted in the upper part, the red S icon triggers structure synchronization, whereas the green D icon is for data synchronization. Then, for each table, we get a rundown of the differences. The central Difference column would be empty in the case of identical structure and data for the corresponding table. Here we see a red S and a green D for both tables, but the reason is not the same for each table.
The middle part shows the actions that are scheduled as part of the synchronization process (there are currently none, as can be seen in the following screenshot):
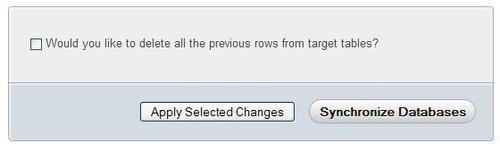
The lower part contains a checkbox (Would you like to delete all the previous rows from target tables?) and two action buttons. We will see their purpose in the following sections:
Please note that the book table has a plus sign (+) next to it on the Source side, to show that this table is in the source database but not in the target database. We even see a not present comment for this table on the Target side. If a table was in the target database but not in the source one, it would be marked with a minus sign (-) on the Target side.
At this point, we can decide that we are satisfied with the comparison and don't want to proceed further; in this case, we would just have to continue in phpMyAdmin by picking a database and resuming our work. We also have the opportunity of synchronizing the databases in one sweep (complete synchronization) or to make changes in a more granular way (selective synchronization). Let us examine both methods.
If we don't want to ask ourselves too many questions and just need a complete synchronization, we click on Synchronize Databases. Note that in this case, we don't have to use any red S or green D icons.
Note
If one of the target tables contains some rows that are not present in the corresponding source table, these will remain in the target tables, unless we tick the Would you like to delete... checkbox. This is a safety net to avoid unintended loss of data. However, we should select this option if we want an exact synchronization.
After clicking, we obtain the following message: Target database has been synchronized with source database. In the lower part of the screen, we see the queries that had to be executed in order to achieve this operation. We also get a visual confirmation that the databases are now synchronized:
If we prefer to be more cautious and receive a preliminary feedback on the actions that are about to be done, we can synchronize selected tables. This section assumes that the databases are in the same state as at the end of the Preparing for the synchronization exercise section, covered previously in this chapter.
If we click on the red S icon on the line describing the author table, this S icon turns to grey and the middle part of the screen is updated with the actions to be done, as shown in the following screenshot:
No real action on the data has been done yet! We still can change our mind by clicking on the same icon which would turn back to red, removing the proposed changes as depicted in the middle part of the screen.
Now we click on the green D icon and see another line of proposed changes show up, as shown in the following screenshot:

A row in the author table needs to be inserted because there is one less author in the target database. Altogether four rows need to be updated, because we removed the phone column in the same table.
We can now click on Apply Selected Changes button. The Would you like to delete... checkbox does not apply to this operation.
We now see that the upper part of the screen proposes fewer changes to make:

We can go on by selecting structure or data changes and then applying them in the order we deem appropriate.
This concludes the section describing the synchronization feature. We continue with coverage of replication support.