
Lesson 7
Advanced Dialogue Editing

In the process of clay sculpting, you shape a mound of clay by adding raw material until the general shape emerges. Then you use specialized tools, like fine wires and picks, to whittle away the excess clay until your finished sculpture emerges. Editing is not dissimilar: You build a rough cut by throwing clips onto the timeline, but it’s not until you cut away the excess that a polished story emerges. To create the precise, fine edits that are needed in the craft of video editing, Media Composer has specialized trim tools.
This lesson delves deep into the Media Composer Trim tool in the context of editing a dialogue scene, although the tools and techniques are applicable no matter what kind of content you’re cutting.
Media Used: None
Duration: 45 minutes
GOALS
![]() Learn to edit by using a Radio Edit
Learn to edit by using a Radio Edit
![]() Understand why dynamic trimming often creates more natural edits
Understand why dynamic trimming often creates more natural edits
![]() Be able to isolate a problematic frame or audio glitch to the outgoing or incoming clips
Be able to isolate a problematic frame or audio glitch to the outgoing or incoming clips
![]() Use the keyboard to perform precise trims
Use the keyboard to perform precise trims
![]() Create and remove split edits
Create and remove split edits
![]() Understand why clips go out of sync and learn techniques to restore sync
Understand why clips go out of sync and learn techniques to restore sync
![]() Learn how and when to trim in two directions simultaneously
Learn how and when to trim in two directions simultaneously
![]() Understand asynchronous trimming, which involves trimming two heads or two tails
Understand asynchronous trimming, which involves trimming two heads or two tails
How Trimming Works
Trimming works on the basis that the length of a clip in the timeline is not necessarily proportionate to the length of a clip’s media file. When you trim, you adjust the clips in the timeline to show more or less of the original media.
Trimming is an expected part of the editing process. If you always set perfect IN and OUT marks, you would not need to trim. During your rough cut, let yourself go wild—throw those clips into the timeline. When it’s time to refine, the Trim mode will be ready.
Note: Some functions of the Trim tool expect that your clips have handles. That means the clip is shorter than the media file to which it points. Handles are the frames before the IN mark and after the OUT mark. If you don’t use IN and OUT marks, or if you set them to the very beginning and end of the clip, you will be able to trim to remove frames, but not to lengthen clips. You can’t lengthen a clip if there’s no more media.
Trim Tool: Reloaded
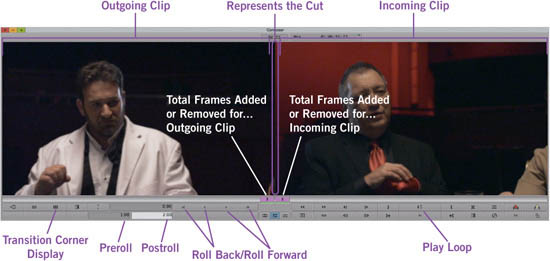
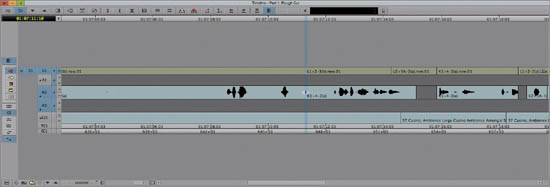
Normally, for general-purpose editing, Media Composer operates in the Source/Record editing mode. In Trim mode, things work and behave a little differently. Refer to Figure 7.1 as you review the following items that change as a result of working in Trim mode.
Figure 7.1
Media Composer’s Trim mode.
Incoming and Outgoing Frames
The Source and Record monitors are replaced with Outgoing (left) and Incoming (right) frames, respectively. The Outgoing (left) monitor shows the last frame you’ll see before the cut, whereas the Incoming (right) monitor shows the first frame you’ll see after the cut.
The line that divides the Outgoing and Incoming shots represents the edit (the cut) in the timeline.
Playback Function Changes
The Play button is replaced with a Play Loop button, which responds to the keyboard shortcut of spacebar. In Trim mode, the default method of playing is playing in a loop, which means Media Composer begins playing back before the edit, and then plays to a certain point after the edit, at which time it repeats. (The fact that an editor can listen to the looped playback again, and again, and again, and again, and again, and again...without becoming, herself, loopy lends credence to the notion that editors are a different caliber of person.)
The amount of time that Media Composer plays before and after an edit is referred to as preroll and postroll, respectively, and you can set your own times in the boxes shown in Figure 7.1. In Figure 7.1, playback includes one second of media before the edit, followed by two seconds of media after the edit.
You might want to change the pre- and postroll settings in scenarios where there is a short shot and you don’t want the playhead to roll over into the adjacent shot (second-previous or second-next shot from the edit). You want to focus the playback to include just the two shots that are related to the cut you are trimming.
Tip: To permanently change the default preroll/postroll settings, adjust them using Project Window > Settings > Trim.
Trim Counters
You’ll either add or remove frames to one or both sides of the edit as you trim. To help you keep track of the number of frames changed since you entered Trim mode, Media Composer displays A and B side trim counters, shown with purple backgrounds in Figure 7.1.
The numbers are cumulative, so if you add ten frames but remove six, the number will be four. If you then exit Trim mode and re-enter Trim mode, the number is back to zero, because Media Composer only tracks the changes while you are in Trim mode and then clears the changes when you exit and re-enter. If you hold Alt/Option while going back into trim mode, Media Composer will retain the previous values of the Trim counters.
The actual meaning of the Trim counters is as follows:
![]() The A-Side counter (outgoing clip) indicates the change in the position of the clip’s OUT mark. A positive number means the OUT mark was moved later in time, thus making the clip longer. A negative number means the OUT mark of the outgoing clip was moved earlier, which shortens the clip.
The A-Side counter (outgoing clip) indicates the change in the position of the clip’s OUT mark. A positive number means the OUT mark was moved later in time, thus making the clip longer. A negative number means the OUT mark of the outgoing clip was moved earlier, which shortens the clip.
![]() The B-Side counter (incoming clip) indicates the change in the position of the clip’s IN mark. A positive number means the IN mark was moved forward in time, which shortens the clip, whereas a negative number indicates the IN mark was moved earlier in time, which lengthens the clip.
The B-Side counter (incoming clip) indicates the change in the position of the clip’s IN mark. A positive number means the IN mark was moved forward in time, which shortens the clip, whereas a negative number indicates the IN mark was moved earlier in time, which lengthens the clip.
By using a combination of single roller trims, in which only one side of the edit is affected, you can easily have numbers that are not the same, because you’ve removed or added more frames from one side than the other. If you use only a double-roller trim, both shots are changed simultaneously and in the same direction, and the numbers will match, as is the case in Figure 7.1
Trim Buttons
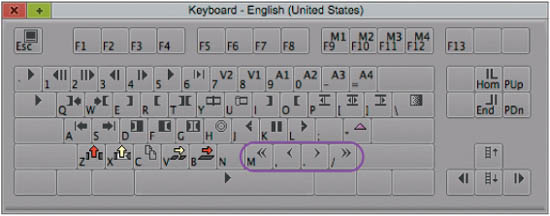
Trim mode displays four buttons under the outgoing (left) monitor, which are also mapped to keys on your keyboard, shown in Figure 7.2. The buttons are used to perform the following functions when editing at 30 frames per second (fps):
![]() << Trim Left 10 Frames: Keyboard Shortcut: M
<< Trim Left 10 Frames: Keyboard Shortcut: M
![]() < Trim Left 1 Frame: Keyboard Shortcut:,
< Trim Left 1 Frame: Keyboard Shortcut:,
![]() > Trim Right 1 Frame: Keyboard Shortcut:.
> Trim Right 1 Frame: Keyboard Shortcut:.
![]() >> Trim Right Ten Frames: Keyboard Shortcut:/
>> Trim Right Ten Frames: Keyboard Shortcut:/
The actual number of frames moved varies depending on your frame rate. For example, instead of moving 10 frames, they only move eight frames when editing at 24fps.
Figure 7.2
The trim keys on the keyboard correlate to the trim keys in Trim mode (as shown in Figure 7.1).
Tip: You can’t change the number of frames that are trimmed when using the buttons or shortcut keys. You can, however, use the numeric keypad to enter precise edits, as described in the following section.
You can use those buttons or keyboard shortcuts instead of dragging the trim rollers in the timeline. The keys are not the same as 1—4 on the keyboard, although they do move the Current Time indicator by the same number of frames. The difference is that the 1—4 keys will move the Current Time indicator, and exit Trim mode instead of performing a trim, whereas the Trim Left/Right buttons (and their corresponding keyboard shortcuts) will perform a trim and not exit Trim mode.
There is one substantial difference between the Trim Left/Right buttons on the screen in contrast to the corresponding keys on the keyboard: The keyboard keys will not cause Play Loop to be interrupted, whereas the onscreen keys will cause playback to be stopped. This becomes important when you’re trimming on-the-fly using Play Loop.
Tip: Generally, in Media Composer, pressing any onscreen button will cause playback to be interrupted, while key presses are fine and do not interrupt playback.
Specifying the Clips Affected by a Trim
Trim mode can affect either the outgoing or incoming footage, or both. The kind of trim you are performing—single roller versus dual roller—is controlled by the position of the rollers on the clips in the timeline.
Note: If rollers are not on a clip, the clip is not participating in the trim.
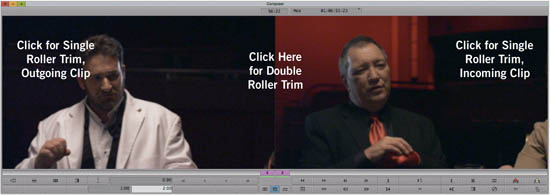
You can switch to a single or double roller trim by clicking on the Outgoing frame, Incoming frame, or on the line that divides both of them, as shown in Figure 7.3.
You can also use the keyboard shortcuts P, [, and ] to toggle the rollers to the outgoing, both, or incoming shots, respectively. Again, the benefit to using the keyboard to toggle the rollers is that Media Composer will not stop playback if you use the keyboard shortcut. This allows you to play in a loop, and while playing, change the rollers and then use the M,./keys to move the rollers. Each time the loop restarts, Media Composer updates the timeline based on your key presses and you can see the change.
Figure 7.3
Toggle the Trim mode by clicking on the clip(s) to be adjusted in the Composer window.
Edits, Including Trims, Are Applied Immediately
In Media Composer, you’ll rarely find an Apply button. As you press buttons and keys, the action is performed immediately. When you play in a loop as part of Trim mode and you press the keyboard shortcuts to reposition the rollers, the trim is applied immediately and when the loop is restarted, the Media Composer timeline is redrawn to reflect the edit you performed.
If you don’t like the edit, you can press Edit > Undo. There are 99 levels of Undo in Media Composer 6. That means you can make 99 trim adjustments and back out of all of them, but if you made 100 mistakes, you’re a bit out of luck when it comes to Undo.
Jumping Between Edits in Trim Mode
The keyboard shortcuts A and S are used to jump to the previous and next edits, respectively, while staying in Trim mode. If you are not already in Trim mode, these keys will put you in it. They are different from the Fast Forward/Rewind buttons in that fast forward/rewind will not cause you to enter Trim mode.
Using Relative Timecode Offset for Trimming
You can use the numeric keypad, located on the left side of a full-size (extended) keyboard, to move the rollers while in Trim mode.
To move rollers earlier:
![]() Enter the negative symbol followed by the number of frames, and then perform the edit by pressing the Enter key.
Enter the negative symbol followed by the number of frames, and then perform the edit by pressing the Enter key.
1. Position the Current Time indicator at an edit.
2. Perform a Match Frame.
Note: Use the Enter key associated with the numeric keypad, as opposed to the Return key associated with the alphanumeric portion of the keyboard.
For example, you could enter Trim mode and type -35 (and then press Enter). That will move the rollers back 35 frames. If the Trim mode is set up for a single roller trim, this will either move the OUT mark back 35 frames, which shortens a clip, or it will move the IN mark back, which will lengthen a clip. If the Trim mode is configured for a dual-roller trim, this will move both edits back 35 frames, shortening the outgoing clip and lengthening the incoming clip, by adding frames to the head of the incoming clip.
Tip: You can also use this technique for moving the Current Time indicator when not in Trim mode.
If you’re using a keyboard that doesn’t have a numeric keypad, such as a laptop computer, you’ll find it almost impossible to enter timecodes. The numeric keys along the top of the alphabetical keys are used for functions like Play and Play Loop and for enabling the video and audio tracks. If you want those number keys to be interpreted as though they are the numeric keypad, tap the Control key twice. Those keys will temporarily be interpreted as being the same as the numeric keypad, instead of performing their normal functions.
Digital Audio Scrubbing
When trimming, it may be helpful to hear the audio samples so you can locate particular audio cues. Audio Scrubbing is the feature in Media Composer where snippets of audio are played each time the blue Current Time indicator is moved. Activate audio scrubbing temporarily by pressing and holding the Shift key while moving the Current Time indicator, or activate it indefinitely by enabling Caps Lock.
Unobstructed Waveforms
Sometimes the rollers will obstruct the waveforms. You can’t see small audio ticks because Media Composer is putting the roller directly on top of the audio waveform, as shown by comparing Figures 7.4 and 7.5. In Figure 7.4, there is a small waveform near the edit but you can’t see it because of the roller. In Figure 7.5, it’s revealed because transparent arrows are used instead of opaque rollers.
Figure 7.4
The trim rollers are obstructing the waveform on the incoming clip.
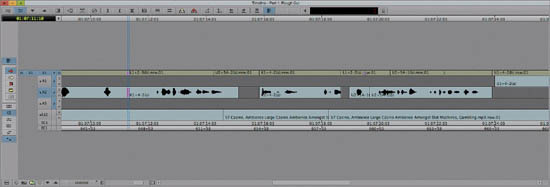
Figure 7.5
The waveform is easier to see when transparent arrows are displayed instead of solid rollers.
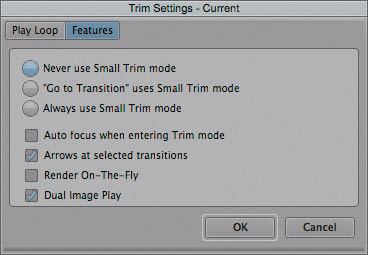
You can configure Trim mode to display small semi-transparent arrows instead of the relatively large opaque rollers by selecting Arrows at Selected Transitions in Trim settings, as shown in Figure 7.6.
Figure 7.6
It’s easy to replace the opaque rollers with transparent arrows using Trim settings.
Tip: A quick way to access Trim settings from within Trim mode is to right-click in the Composer window and select Trim Settings, or press Ctrl/Cmd+=.
Creating a Radio Edit
Long before television, radio dominated the mass entertainment market. Radio programs like War of the Worlds, voiced by actors and enriched with sound effects and music, were broadcast as hundreds of thousands listened weekly to their favorite programs. There is something to be said for being able to create a compelling story from the sound and dialogue alone, without any pictures.
In fact, Gene Roddenberry, creator of Star Trek, once commented that when he was learning to be a storyteller, he would sit with his back toward his television and listen. In this exercise, he developed skills in timing, pacing, and dialogue editing.
The technique of editing a show while disregarding the visual content is referred to as performing a radio edit. Your goal in a radio edit is to ensure that the pacing and delivery of the lines is natural and appropriate for the genre. You want to ensure comedies are funny and dramas are dramatic by ensuring the lines are delivered at the right pace. You’re as interested in the timing of when the lines are delivered as when they are not. Sometimes the most poignant note in a symphony is a rest, and in a film, the extra beat (pause) you add after a line can be more effective than any close up or additional line of dialogue.
Disabling the Video Monitoring
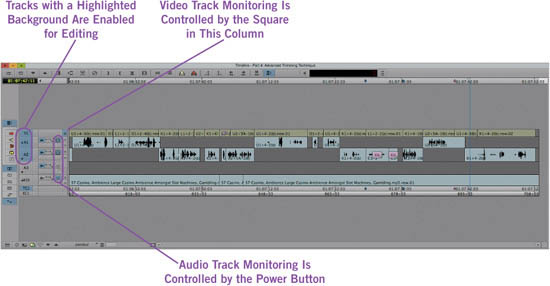
Media Composer tracks can be enabled for monitoring and enabled for editing, and those two enablements are independent of each other. When a track is enabled for monitoring, it can be seen or heard. When it is enabled for editing, clips on the track can be trimmed, lifted, extracted, and edited.
Figure 7.7 shows where to click to toggle the editing or monitoring of tracks.
Figure 7.7
Enabling tracks for editing and monitoring.
Note: Final Cut Pro 7 editors can think of enabling tracks as similar to the Auto-Select, whereas monitoring tracks in Media Composer is similar to enabling a track in Final Cut Pro 7.
When performing a radio edit, you might prefer to totally disable the video monitoring by clicking the video monitor. If you do that, remember to leave the video tracks enabled for editing. While your focus on a radio edit is the audio, by leaving the video tracks enabled, they will also be trimmed and you will not likely put your clips out of sync.
Tip: Editing video and audio tracks together reduces the risk of breaking sync. You can also enable sync locks, covered in the following section, to further reduce the risk of breaking sync.
Sync Locks
Media Composer includes sync locks, which prevent two or more tracks from falling out of sync. When enabled, Media Composer either prevents an edit from happening, or adds filler, as is required to prevent the loss of sync.
When Sync Locks are enabled, shown in Figure 7.8, Media Composer will play a bonk sound when the feature activates. Enabling sync lock when doing your radio edit is a surefire way to ensure you do not accidentally forget to trim the video while focusing on the audio.
Figure 7.8
Sync locks enabled for V1, A1, and A2.

Add Edit
Aside from Sync Locks, another way to maintain sync while trimming across multiple tracks is to add edits to filler. Rather than taking the time to carefully deselect the tracks with video, you can add edit points to filler only by adding the Alt/Opt modifier key.
To add edits to all filler tracks, regardless of track selection:
1. Position the CURRENT TIME INDICATOR at the desired location.
2. ALT/OPTION+CLICK the ADD EDIT button.
EXERCISE Take a moment to complete Exercise 7, Part 1.
Using Dynamic Trimming
The previous section covered a kind of trimming that could be called static trimming. It’s a very functional, although basic, way to trim using the Trim tool. But the Trim tool has many more secrets lurking under the surface and they emerge when the Trim tool is playing back in a loop. They are referred to as dynamic trimming (or trimming on-the-fly) and the goal is for you to perform your trim during playback.
Good trimming can evoke an emotional response. The act of speaking is based on a sense of timing and rhythm, and to trim naturally, you need to hear the audio and see the video in real-time as opposed to adjusting a trim, playing it back, stopping, and then repeating the process.
You may have had the (mis)fortune of working with a producer who asks you to play the timeline and then he snaps his fingers and blurts out “THERE!,” at the moment where he wants an edit to occur. Although it might seem a bit rude, he’s essentially doing dynamic trimming—while the piece is playing, you fall into the rhythm of the performance and the existing cuts, and from those you derive the natural place for the next edit.
There is no toggle switch, nor any button that must be pressed to instruct Media Composer to allow dynamic trimming. It’s always on. That’s convenient but it could be a bit dangerous because some features—like Mark IN and the J-K-L keys—take on alternative behaviors when used from within Trim mode, as you will soon read.
Tip: Remember: If it isn’t in motion, it’s not dynamic.
Shortcuts While Playing in a Loop
While Media Composer is playing in a loop, you can use the keyboard shortcuts of M,./ to move the rollers forward or backward, as discussed in a previous section and shown in Figure 7.2. Because the sequence is playing while you use these keys, this is a form of dynamic trimming.
Isolating the Incoming or Outgoing Side
When playing in a loop as part of Trim mode (and only when playing in a loop), the Go to IN (Q) and Go to OUT (W) keys on the keyboard take on new behaviors. They affect the playback of the loop by isolating it to one side of the cut or the other.
![]() Q: Play the outgoing clip, from the preroll position through to the edit, and then repeat.
Q: Play the outgoing clip, from the preroll position through to the edit, and then repeat.
![]() W: Play from the cut forward to the postroll position, and then repeat.
W: Play from the cut forward to the postroll position, and then repeat.
Media Composer provides two visual cues in the Composer window to indicate that you have isolated one side of the edit, as shown in Figure 7.9.
Figure 7.9
Visual cues that the outgoing or incoming sides have been isolated.
1. The PLAY LOOP icon updates with an arrow, indicating that the playback occurs up to the edit or from the edit. In Figure 7.9, the Q key was used and the playback occurs up to the edit and then repeats.
2. The corresponding preroll or postroll box is highlighted in green.
To cancel the isolation and return to the normal behavior of playing through the edit, press the same key that was previously pressed. For example, if you are playing up to the edit and then repeating, the Q key was used. Pressing the Q key a second time cancels the feature and restores Play Loop to its normal behavior.
Using Mark IN to Adjust an Edit
While playing in a loop from within Trim mode, pressing the Mark IN key on the keyboard (not the button on the interface) causes the trim rollers to jump to wherever the blue line was at the moment you pressed the Mark IN key.
This feature is useful for aligning edits to a beat in a music clip, or for getting an edit at a precise moment based on feeling. If you can loop through an edit and say “THERE!” at the precise place where you want the edit to occur, this feature could very well become one of your favorites.
To adjust an edit using Mark IN:
1. Enter TRIM mode.
2. Place rollers at the appropriate points.
3. Begin playing in a loop (keyboard shortcut: 6).
4. Press MARK IN (keyboard shortcut: I) when you hear the place where you want the edit to be located.
J-K-L Trimming
You should be familiar with the shuttle controls of J-K-L, where J plays backward, L plays forward, and the more times you press them, the faster the playback. K means stop, and K+L or K+J results in slow-motion playback with a kind of analog audio scrub that sounds like a traditional reel-to-reel tape deck or someone slowing down a record player.
Using the J-K-L controls in Trim mode allows you to actually perform the trim while you watch the footage. Instead of moving only the playhead, J-K-L in Trim mode will move the actual rollers, provided you stop playback using the K key instead of the spacebar.
This method is powerful because it plays your incoming and/or outgoing material beyond the edit point, allowing you to see your source material. You can use this technique to trim long sections of clips quickly, for example, trimming in additional interview material while you watch it in real-time, or faster than real-time.
To use J-K-L trim:
1. Enter TRIM mode.
2. Place rollers at the appropriate points.
3. If you want to trim back from the edit, press the J KEY alone or J-K combination. At the desired frame, release the keys to stop playback and perform the trim.
4. If you want to trim forward from the current edit, press the L KEY alone or K-L combination. At the desired frame, release the keys to stop playback and perform the trim. The system tracks the overall number of frames you have trimmed from either side in the outgoing and incoming trim boxes.
5. If you are not sure which way you want to trim, press the J KEY to back up a little, and then press the L KEY to take you forward again. Press the K KEY to choose your new edit.
Note: J-K-L trim will never completely trim away a shot. It will stop when one frame of the clip remains. If you trim away too much material, just reverse your direction to add more of the shot back in.
Trimming with J-K-L keys also allows you to scrub audio as you trim. Especially in slow-motion, or ¼ speed, J-K-L trim can allow you to hear the precise point a sound begins or ends, even if it is not clearly visible in the waveforms.
Note: Audio scrubbing with J-K-L sounds quite different than audio scrubbing with Caps Lock enabled. When scrubbing using the J-K-L keys, the audio sounds like a traditional reel-to-reel tape player, with high pitch smooth sounds at fast speeds and low pitch smooth sounds at slow speeds. Scrubbing with the Caps Lock enabled, called digital audio scrubbing, sounds very choppy and computerized.
EXERCISE Take a moment to complete Exercise 7, Part 2.
Using Split Edits
A split edit occurs when the video and audio do not cut at the same time. Figure 7.10 shows an edit before it’s split, and Figure 7.11 shows the same edit after the split. Notice that despite the split, the clip still finishes at the same time.
Figure 7.10
An edit before being split.
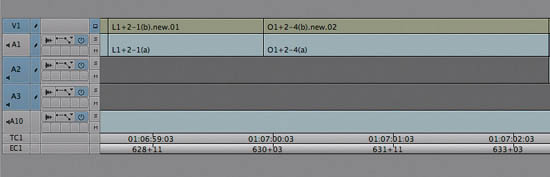
Figure 7.11
An edit after being split.
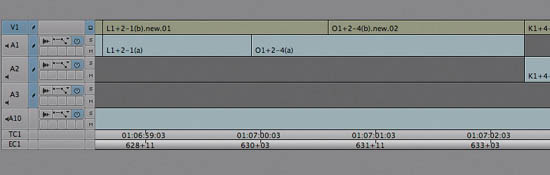
Split edits are created in a way that affects only one edit. Usually, that’s done using a dual roller trim on the video track only. By the time you begin adding split edits, you’ve probably already completed the radio edit and your audio edits are fine, so you would not want to change it further.
The reason you use split edits, sometimes called L-edits or L-cuts, is because they allow you to model the real world. People will change what they’re looking in at in response to sound. In other words: Sound motivates a visual change.
For example, picture a classroom with students and a teacher. One student is looking out the window. The teacher snaps her fingers and the student looks in the direction of a snap. A more vivid scenario is the sound of a car crash while you’re walking down the street. You hear the sound, so you turn your head. You don’t turn your head first, nor do you turn it at the exact same moment as the sound occurs, because you have no reason to. It takes a beat to recognize the sound, so when you create a split edit, you often allow the audio to lead the video so it gives a reason for the cut. In this way, the cut becomes a bit less obvious and a bit more transparent.
Most primetime TV shows and most movies are almost entirely split cut. Although sound often follows video, there are also times when you might want a visual cue to provoke an audio cue, although that scenario is less common.
Creating Split Edits
There are two ways to create a split edit easily in Media Composer. The first way is to use Trim mode to perform a double-roller trim. The other way is to use the Extend feature.
Creating split edits using dual-roller trim:
1. Start by editing a sequence using straight cuts.
2. Enter TRIM mode at the transition where you want the split edit to occur.
3. Turn off the TRACK button(s) for either audio or video, depending on whether you want to extend the video over the audio or the audio under the video.
4. Ensure you’re in dual-roller TRIM mode where both sides of the cut have the trim rollers visible, and then use your mouse and drag the edit point to the left or the right in the timeline. Notice how the edit point changes as you drag. You can also use any other trim method to adjust the edit point.
5. Play your edit while still in TRIM mode by pressing any of the PLAY buttons on the keyboard (apart from J and L unless you want to J-K-L trim), or clicking the PLAY button on the interface, which has now automatically become the PLAY LOOP button, since you are in TRIM mode.
6. Exit TRIM mode by clicking on the TRIM button on the screen or by clicking on the TRIM key on the keyboard.
Using Extend Edit
The Extend function allows you to adjust transition points without going into Trim mode. With this feature, you roll an edit point left or right in the timeline, thus trimming frames from one side of the transition and adding them to the other. The Extend function prevents you from losing sync, and also enables you to mark the edit point on-the-fly.
1. Start by editing several straight cuts together.
2. Play the edit that you want to adjust and decide where you want the edit to begin or end.
3. If you want the edit to start earlier than it does, mark an IN at that point. If you want it to end later than it does, mark an OUT at that point. In Figure 7.12, the edit point will be extended to the mark OUT.
4. (Optional) To create a split edit, turn off the TRACK button(s) for either audio or video, depending on whether you want to extend the video over the audio, or the audio under the video.
5. Click the EXTEND button to trim the edit back to the IN or forward to the OUT.
Figure 7.12
Extending an edit to the OUT mark.

Tip: To create a split edit on-the-fly, map the Extend button (choose Tools > Command Palette > Trim tab) to a keyboard shortcut. You can navigate with J-K-L, Mark IN or OUT, and use Extend all without moving your hand position on the keyboard.
Using Trim versus Extend Edit to Create Split Edits
You can create split edits using either Trim mode or Extend edit. The choice of which one to use is largely a matter of personal preference. Here are some points to consider:
![]() You can use Extend edit to create split edits on-the-fly (see the previous tip) while doing your final run-through.
You can use Extend edit to create split edits on-the-fly (see the previous tip) while doing your final run-through.
![]() You can’t break sync using the Extend function.
You can’t break sync using the Extend function.
![]() Use Trim mode if you are fine-tuning your program in Trim mode.
Use Trim mode if you are fine-tuning your program in Trim mode.
Removing Split Edits
There are various reasons why you would want to remove a split edit. For example, you may want to segment drag a split edit in the timeline, but can’t without breaking sync. In this case you might want to quickly remove the split first, segment drag the clip, and then add the split back.
Removing a split edit is easy if you remember this simple rule: That which giveth the split edit, taketh away the split edit.
In other words, to remove a split edit simply use either the Trim mode or Extend edit techniques you’ve learned already, in reverse.
EXERCISE Take a moment to complete Exercise 7, Part 3.
Advanced Trim Techniques
When you start trimming in Media Composer, you typically select a single or double-roller trim, and then move the trim rollers in either a forward or backward direction. A secret of professional editors is that it’s possible to move an edit in both a forward and backward direction simultaneously, which is the focus of this section.
Bidirectional Trimming
You don’t have to orient all of the trim rollers in the same direction. You can trim the head on some tracks while trimming the tail on others. This is especially useful when overlapping dialogue in narrative editing, or dialogue and natural sound from cutaway material.
To trim in two directions simultaneously:
1. Enter TRIM mode at the transition you want to adjust.
Using the FOCUS command or ZOOM slider will make it much easier to set the trim rollers accurately.
2. SHIFT-CLICK to place trim rollers on the desired side of the edits on each track in the sequence, as shown in Figure 7.13.
Figure 7.13
Rollers on opposing sides of the edit.
3. Click the TRIM roller on the track you want to use as the watch point.
This roller indicates the type of trimming that J-K-L trimming will perform. For example, if you click on a head trim roller, pressing the J key will add material to all selected tracks and pressing the L key will remove material from all selected tracks. If you click on a tail trim roller, pressing the J key will remove material from all selected tracks and pressing the L key will add material to all selected tracks.
4. Trim using any of the trim methods you would normally use.
Tip: When getting started with this technique, you may find it easiest to start by dragging the trim rollers. Media Composer will display ghosted edit points allowing you to see the direction each roller is moving.
Asynchronous Trimming
Media Composer enables you to select two A-sides (tails) or two B-sides (heads) anywhere in the timeline and perform an asynchronous trim on those two edits.
Here’s just one scenario illustrating this feature’s usefulness. You are well into the edit and need to shorten clip 1 in a sequence. Unfortunately, the duration of the scene is already locked. What are your options? Well, you could use a dual roller trim at the edit point between Clip 1 and the next clip, Clip 2, but that would change the head frame edit on Clip 1, which you don’t want. Alternatively you could slide Clip 2, but that would change the head frame edit on the following shot, Clip 3, which you also don’t want.
Since neither single trim approach really works, you’ll likely do an A-side trim on the tail of Clip 1, write the number of frames trimmed on a piece of paper, and then find the tail of another shot in the scene that you could extend. It works, but hopefully you won’t get distracted while you’re searching for that other clip.
The solution? Asynchronous trimming.
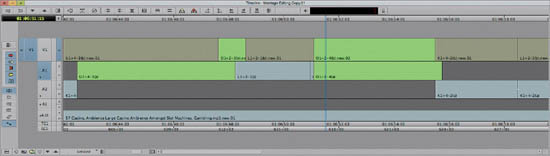
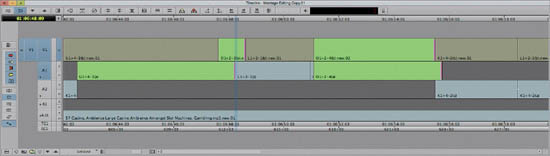
In this scenario you’ll trim the tail of two shots, as seen in Figure 7.14. You can just as easily trim the heads of two clips.
Figure 7.14
The green shots’ tails will be trimmed.
1. Lasso the edit between the clip you want to trim and the next clip.
2. Switch to an A-SIDE trim.
3. SHIFT+CLICK on the other two rollers.
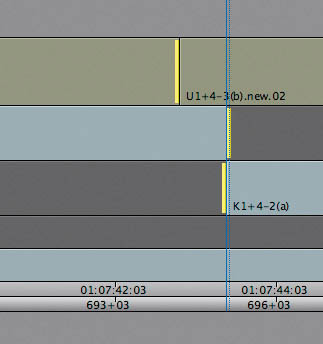
The timeline is shown in Figure 7.15.
Figure 7.15
Notice that the trim rollers, unlike in Slide mode, point in the same direction.
Tip: To use J-K-L or on-the-fly trim, place the Position Indicator on the trim handle you want to control from. Then if you trim backward, for example, with J+K, the other roller trims forward.
4. Use any trim technique you desire (drag rollers, J-K-L, on-the-fly, and so on).
During the trim, notice that the trim rollers move in opposite directions—frames are added to one clip and the same number of frames is removed from the other clip. The duration of the sequence has not changed.
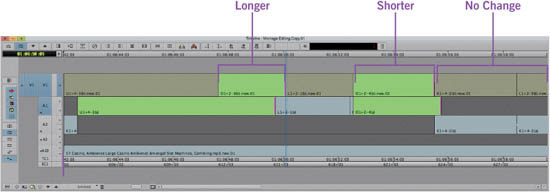
After making the trim, the timeline looks like Figure 7.16.
Figure 7.16
After: one shot is longer, one is shorter and the downstream shots are unchanged.
Tip: Alt/Option+U will re-enter Trim with your previous trim-roller setup enabled. This is a big time saver if you are working with complex trim setups.
EXERCISE Take a moment to complete Exercise 7, Part 4.
Review/Discussion Questions
1. Identify six or more ways that the Composer window changes when you are in Trim mode. (See “Trim Tool: Reloaded” on page 268.)
2. In Trim mode, you perform a single-roller trim on the incoming clip by entering +10, -5, and then press the comma key twice. What numbers are in the Trim Counter boxes and in what way have you modified the outgoing and incoming clips? (See “Trim Counters” and “Using Relative Timecode Offset for Trimming” on pages 269 and 272, respectively.)
3. What’s the significant difference between pressing the Trim Left/Right buttons on the Composer window in contrast to pressing them on the keyboard? (See “Trim Buttons” on page 270.)
4. What are two ways to toggle between trimming the Incoming or Outgoing clip, using the mouse? (See “Specifying the Clips Affected by a Trim” on page 271.)
5. How do you specify the clips affected by a trim using only the keyboard? (See “Specifying the Clips Affected by a Trim” on page 271.)
6. Upon entering Trim mode, the trim rollers are obscuring the audio waveform. How can you fix this? (See “Unobstructed Waveforms” on page 274.)
7. What’s the difference between using the numeric keypad to enter—100 as opposed to—30 when cutting in a sequence having a frame rate of 24fps? (See “Using Relative Timecode Offset for Trimming” on page 272.)
8. What is a radio edit? (See “Creating a Radio Edit” on page 275.)
9. Describe two ways to perform dynamic trimming in Media Composer. (See “Using Dynamic Trimming” on page 278.)
10. When playing in a loop, how do you isolate playback to just the incoming clip? (See “Isolating the Incoming or Outgoing Side” on page 278.)
11. You’re in Trim mode and you use the K+L keys to perform an analog audio scrub. What happens when you let go of the keys? How does this differ from performing the same function in Source/Record mode? (See “J-K-L Trimming” on page 280.)
12. What is an Extend edit? (See “Using Extend Edit” on page 283.)
13. How does your choice of an IN mark or OUT mark influence the behavior of the Extend Edit feature? (See “Using Extend Edit” on page 283.)
14. When might you use bidirectional trimming? (See “Bidirectional Trimming” on page 284.)
15. When might you use asynchronous trimming? (See “Asynchronous Trimming” on page 285.)
16. Compare and contrast bidirectional trimming and asynchronous trimming. (See “Advanced Trim Techniques” on page 284.)