
Lesson 4
Play Together

This lesson extends the media management topics to include collaborative workflows.
Media Used: Agent Zero
Duration: 45 minutes
GOALS
![]() Use markers, colors, and comments to communicate with others
Use markers, colors, and comments to communicate with others
![]() Become familiar with techniques for collaborative editing
Become familiar with techniques for collaborative editing
![]() Learn to safely share projects and media with Avid Unity
Learn to safely share projects and media with Avid Unity
The Editor’s Dialogue
Creating a finished show may involve the skills of an offline editor, online editor, and sound editor. Those could be the same person, or they could be different people in different cities. Regardless, there needs to be a way to communicate the intended vision of one editor to another.
In the case that you’re doing all of it, you might have a great idea for a clip today, but three weeks from now have no recollection what the idea was. You can use these techniques to document and manage your own work.
The offline editor needs to ensure that his vision can be accurately communicated to the online editor and sound editor, because he’s relying on them to add elements that are not part of the offline, but are needed for the story. He may have an idea for a non-obvious sound effect, or perhaps an idea for a specific color treatment, as in Schindler’s List where the little girl had a red coat while everything else remained black and white.
Markers and comments are two features of Avid Media Composer that allow such communication and note keeping.
Markers Are Post-It Notes
A marker is like a 3M Post-It note attached to a specific frame and specific track of a source clip or a sequence. It appears as a colored dot on the track and it also appears below the Source or Record monitors, as shown in Figure 4.1.
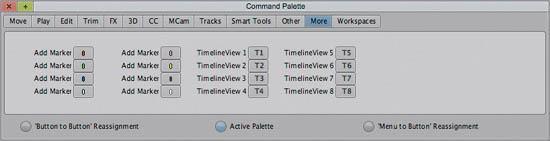
Markers can be one of eight different colors, all of which are available in the Command Palette (choose Tools > Command Palette), as shown in Figure 4.2.
Within your post-production department, you might consider defining a standard color scheme for markers, where you apply specific meanings or messages to specific colors. For example:
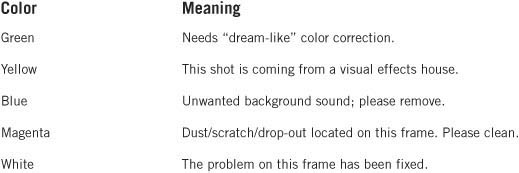
Figure 4.1 A timeline with three markers, which are on the TC, V1, and A2 tracks, and the green marker from the A2 track also appears in the Record monitor.
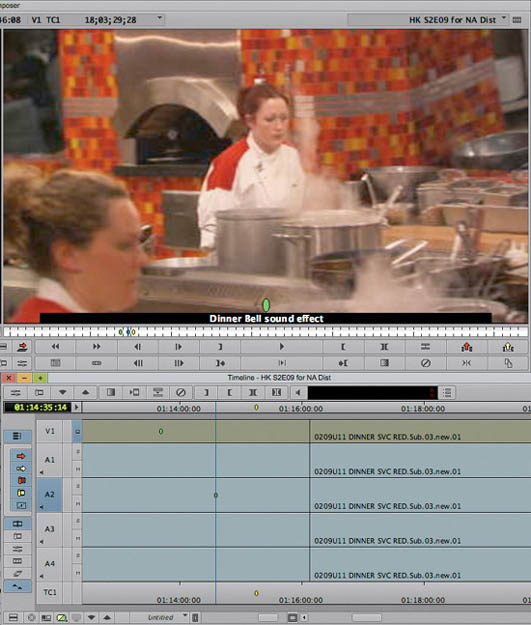
Figure 4.2 The Command Palette has eight colored locators.
If all editors use the same table, additional comments will rarely be needed, which means less typing and more speed and productivity. Using the preceding table as an example, a green marker will be recognized by the online editor as an instruction to make a sequence dream-like, perhaps by desaturating the image and adding a blue tint.
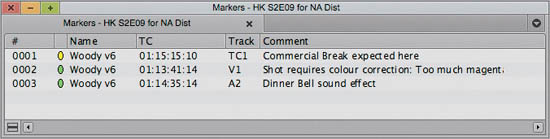
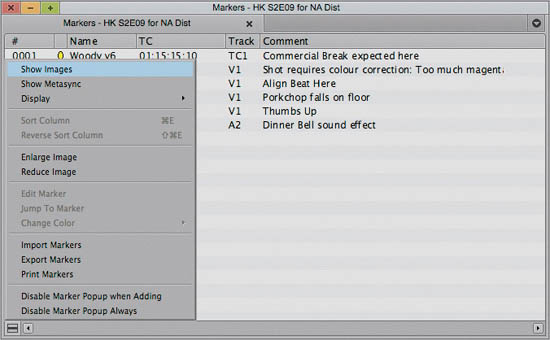
The Markers tool (Tools > Markers), shown in Figure 4.3, is a centralized location for viewing all the markers in a sequence, which makes it suitable as a kind of “To-Do” list. The Markers tool indicates the location of the marker (timecode), the name of the user who added the marker, and the description of the marker, as provided by the original editor.
Figure 4.3 The Markers tool, available from Tools > Markers.
Markers Automate Task List Creation
The Markers tool can be used as a task list, allowing you to easily jump to different markers by double-clicking them. You can also change the marker’s color, and assign tasks (markers) to other editors.
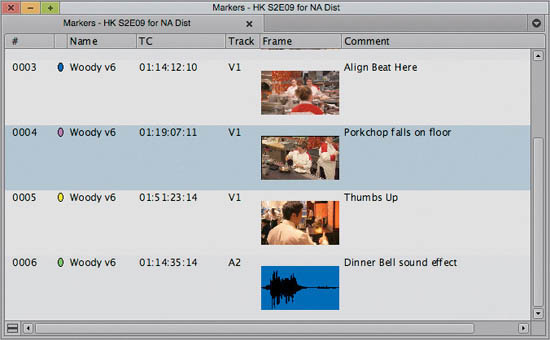
Displaying Marker Thumbnail Images
You can configure the Markers tool to display thumbnail images.
To configure the Markers tool to display thumbnails:
1. Open the MARKERS tool (choose TOOLS > MARKERS).
2. Enable the images’ display by choosing SHOW IMAGES from the FAST MENU of the MARKERS tool, as shown in Figure 4.4.
Figure 4.4 Image thumbnails are enabled from the Marker window’s fast menu.
Images make it easier to identify the shot, but their larger size results in fewer markers being visible in the Markers tool, as shown in Figure 4.5.
Figure 4.5 Markers tool with image thumbnails.
Sharing the Task List (Markers Tool)
The contents of the Markers tool can be printed with true what-you-see-is-what-you-get fidelity. You can print the contents of the Markers tool (choose File > Print) and distribute it to your assistant editor, or perhaps share it with the producer.
Tip: OS X Lion includes the PDF Printing and PDF Print to Email options, allowing you to print the contents of the Markers tool to a PDF that will be attached to an email. Similar software is available for Windows 7.
Editing Markers
You can edit a marker by doing one of the following:
1. Click the colored dot in the RECORD monitor.
2. Right-click a marker in the MARKERS tool, and then select EDIT MARKER.
After doing either of these methods, the MARKER window appears, as shown in Figure 4.6.
Figure 4.6 Markers can be edited after they have been added.
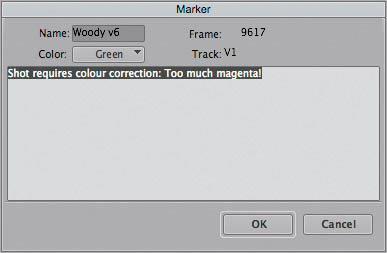
When editing a marker, you can:
![]() Change the color
Change the color
![]() Change the comment
Change the comment
![]() Change the assignee’s name
Change the assignee’s name
Consider a scenario in which you are working with a couple of other editors. You have a marker that defines a specific task, and you want to assign it to the editor on the nightshift, David. You would just type over the existing name, as shown in Figure 4.6.
Now when David arrives for his shift and opens the Markers tool, he’ll see a marker has been assigned to him with a specific task. When he finishes the task, your organizational policy might dictate that he revise the marker description to include the completion date and any further comments about the challenges encountered in performing the task.
Note: Unlike previous releases of Avid software, markers added in Media Composer 6 will be recognized by Pro Tools 10. This ensures markers are an effective way for an offline editor to communicate with both the online editor and the sound editor.
EXERCISE Take a moment to complete Exercise 4, Part 1.
Comments Appear in Bins
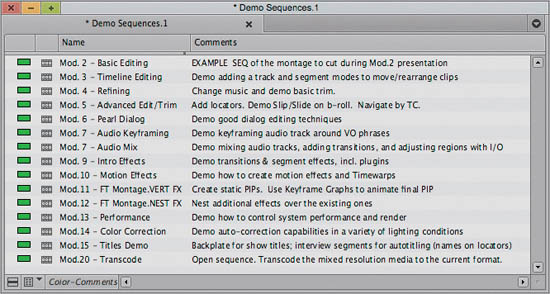
Each clip in a Media Composer bin has a column called comments. You can use it for whatever comments you’d like, such as “Good clip” or “Can’t use this clip,” or even to write the voiceover that your talent will read when that clip is visible. Because comments are visible from the bin, unlike markers, they are useful for annotating sequences at a bin level. Annotations might include comments like “16:9 for Luftansa” or “4:3 for Pan Am Airways,” thus allowing you to differentiate between different versions of a sequence.
The Comments column in a bin is normally only visible from Script view, as shown in Figure 4.7, but it can be manually added to Text view, as shown in Figure 4.8.
EXERCISE Take a moment to complete Exercise 4, Part 2.
Figure 4.7 A bin in Script view displaying the Comments column.
Figure 4.8 A bin in Text view displaying the Comments column.
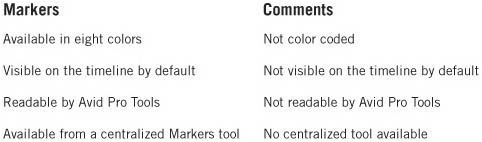
Comments versus Markers
Clip comments tend not to be as useful as markers for adding notes to specific clips in a sequence because, unlike markers, the timeline does not display comments unless it has been reconfigured. If the online editor does not reconfigure his timeline, he will have no idea the comments are there. Additionally, there is also no central place to view all the comments, unlike the Markers tool, and comments do not move forward to Avid Pro Tools.
Comments are more useful at the bin level, because they will be shown without additional configuration when the bin is in Script view. Table 4-1 summarizes the characteristics of both of these features.
Table 4-1 Comments versus Markers
Color-Coding Clips
Color-coding clips can be a very effective way to further organize your clips and expedite your workflow. Colors can be used for a variety of uses. For example, color tags can identify clips that come from the same camera or shoot and will need similar color or audio correction. Colors could be assigned based on the status of usage rights, such as cleared, pending, restricted, and so on.
Colors can be assigned to clips in the bin, and will show on all segments of that clip in the timeline. A color can also be assigned to an individual segment in the timeline, as a way to flag just that one segment, rather than all material from a given clip.
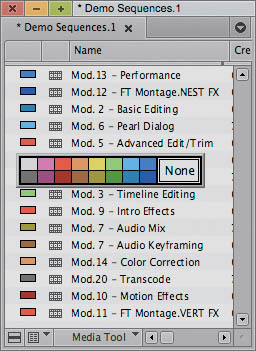
Media Composer 6 makes it easy to incorporate Clip colors into your standard workflow, because the Clip Color column is now enabled in bins by default. The new color picker also has twice as many preset colors as Media Composer 5.
Let’s look at the different ways to customize the color of clips in the bin and in the timeline.
Assigning Clip Colors in Bins
You can assign one of the eight presets or any of the 16.7 million custom colors to clips in a bin. This is referred to as setting the “source clip” color. The color assigned to a clip in a bin can also be used to color the clip in the timeline. Swatches are convenient when sorting a bin by clip color, because the clips will sort by one of the 16 colors. Sorting by custom colors is less predictable because it’s less likely that an editor will pick the same color every time from the 16.7 million custom colors.
When assigning colors to a clip, you can assign a color to one clip at a time, or to multiple clips at the same time.
To choose a color for one clip in a bin, you can use preset swatches:
1. Right-click the color swatch adjacent to the clip’s icon in the bin.
2. Choose one of the eight preset color swatches, as shown in Figure 4.9.
Figure 4.9 Sixteen preset color swatches.
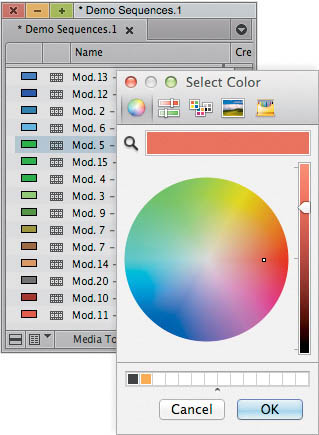
You can use a custom color instead. Use the same technique, but hold the Alt key before right-clicking the color swatch. Media Composer will present the Macintosh or Windows color picker, from which you may choose any of 16.7 million colors, as shown in Figure 4.10.
Figure 4.10 Need more colors? Hold Alt when you right-click the color swatch in Text view.
This method works well for assigning colors to multiple selected clips:
1. Select one or more clips to which you want to assign a color.
2. Choose EDIT > SET CLIP COLOR > [SELECT A COLOR ].
The clip’s icon turns the selected color.
Using Clip Colors in the Timeline
You can use colors to highlight the following types of clips in the timeline:
![]() Displaying clip colors overrides any track color you assign from the timeline’s fast menu.
Displaying clip colors overrides any track color you assign from the timeline’s fast menu.
![]() For HD and SD projects, DVCPRO HD clips are colored light red. You cannot customize this color, which is an indicator that DVCPRO HD media plays by skipping frames. To avoid skipped frames, use the Transcode command and select a compatible resolution.
For HD and SD projects, DVCPRO HD clips are colored light red. You cannot customize this color, which is an indicator that DVCPRO HD media plays by skipping frames. To avoid skipped frames, use the Transcode command and select a compatible resolution.
![]() Offline or mixed rates color indicators override any custom local or source colors you assign.
Offline or mixed rates color indicators override any custom local or source colors you assign.
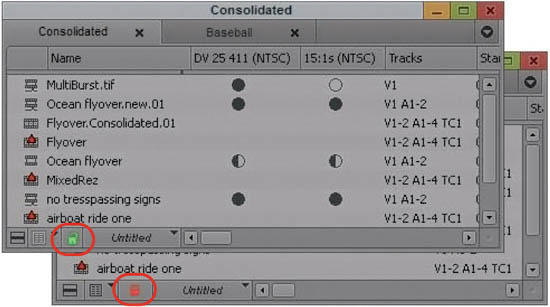
Tip: If you are working in a MultiRez environment, you can also use colors to track available resolutions.
Displaying Clip Colors in the Timeline
Media Composer can be configured to display clip colors in the timeline. Those clip colors can be the source clip colors, which allow the colors you assign to clips in the bin to also be used to color the clips in the timeline. The colors can also indicate if a clip has media offline, which is a useful way to see at a glance if your timeline has offline media before outputting it. You might be doing a conform from SD to HD and want to mark all the clips that don’t match your project format with a specific color, which makes it easier to see how much more of the timeline must be conformed to HD.
1. Click the timeline FAST MENU button, and select CLIP COLOR. The CLIP COLOR dialog box opens, shown in Figure 4.11.
Figure 4.11 Editors can communicate by setting clips to meaningful colors. Perhaps a green clip means “This is an expensive shot!” Choose the timeline’s fast menu > Clip Color.
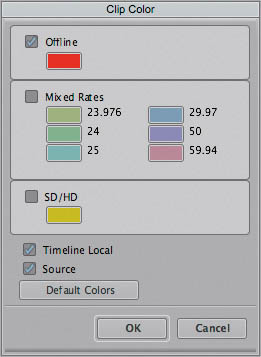
2. Select one or more of the following options:
Changing the Display Colors
Most people have a favorite color. Maybe you do. Maybe you want to see your favorite color on the timeline when your HD/SD media is mismatched, instead of the default gold color. You can do that. In fact, you can change the display colors for any of the color codes, such as resolution tracking, offline, mixed rates, and SD/HD.
To change the display colors:
1. Click the timeline FAST MENU button, and select CLIP COLOR. The CLIP COLOR dialog box opens, as shown in Figure 4.11.
2. Click the color swatch for the option you want to change. A color picker grid opens.
3. Click a color in the grid.
The color you select becomes the display color for that option.
Resetting the Display Colors
If you’ve customized the display colors and then change your mind, you can reset them by using the following steps:
1. Click the timeline FAST MENU button, and select CLIP COLOR. The CLIP COLOR dialog box opens.
2. Click DEFAULT COLORS.
The Offline, Mixed Rates, and SD/HD color swatches reset to their default colors.
Local Clip Colors Are Assigned to Clips in the Sequence
You can assign local colors to clips in a sequence, for example, to indicate clips that should be grouped together. You could select entire scenes or acts and give all the clips in the scene the same color. This makes it easier to identify scenes. You can add local clip color to make clips stand out for any other reason while you are working in the timeline window.
Assigning a Local Clip Color
To assign a local clip color, you select multiple segments in the timeline and then specify the color, using the following steps:
1. Click the timeline FAST MENU button and choose CLIP COLOR. The CLIP COLOR dialog box opens, as shown in Figure 4.11.
2. Select TIMELINE LOCAL and then click OK.
3. Enable at least one of the SEGMENT MODE buttons on the SMART TOOL and select a clip you want to color.
4. Do one of the following:
![]() Right-click on the selected segment(s). Choose SET LOCAL CLIP COLOR >[COLOR] to select a standard color.
Right-click on the selected segment(s). Choose SET LOCAL CLIP COLOR >[COLOR] to select a standard color.
![]() Select EDIT > SET LOCAL CLIP COLOR > [COLOR] to select one of the 51 preset local clip colors.
Select EDIT > SET LOCAL CLIP COLOR > [COLOR] to select one of the 51 preset local clip colors.
The assigned local color appears in the clip in the timeline.
To Remove a Local Clip Color
You can remove the local clip color(s) that has been assigned to a clip using the following steps:
1. Click one of the SEGMENT MODE buttons and select the clip whose color you want to remove.
2. Select EDIT > SET LOCAL CLIP COLOR > NONE.
The assigned local color no longer appears in the clip in the timeline.
EXERCISE Take a moment to complete Exercise 4, Part 3.
Play Together
In this section, you’ll be introduced to workflows that enable you and other editors to work on the same projects and media. Those workflows are driven through media management acrobatics. “Play together” refers not only to editors collaborating, but it also refers to media and clips playing together.
There are three popular collaborative workflows addressed in this section:
![]() Duplicating media and bins
Duplicating media and bins
![]() Offline with low-resolution media; online with high-resolution media
Offline with low-resolution media; online with high-resolution media
![]() Sharing media and bins
Sharing media and bins
You’ll also draw upon your skills involving the Relink tool, as well as the Media and Consolidate/Transcode tools.
Duplicating Media and Bins
In this scenario, you have a working Avid project with bins and media. You will duplicate the project and media, which another editor will work on. After working independently on your own copies of the project and media, you and the other editor bring your bins into the same editing system and assemble the final show by splicing your sequences together into a new sequence.
Here are some useful scenarios for duplicated media and bins:
![]() Another editor will cut some of the scenes of a show. You will incorporate those scenes back into your project.
Another editor will cut some of the scenes of a show. You will incorporate those scenes back into your project.
![]() Another editor will recut your existing scenes in order to prepare the show for an alternative market (such as cutting out more risqué bits, to make it suitable for younger audiences).
Another editor will recut your existing scenes in order to prepare the show for an alternative market (such as cutting out more risqué bits, to make it suitable for younger audiences).
![]() A copy of the project and media are being provided to an advertising agency, which will prepare the trailer and commercial promos.
A copy of the project and media are being provided to an advertising agency, which will prepare the trailer and commercial promos.
![]() The sound editor wants the original audio media and bins.
The sound editor wants the original audio media and bins.
![]() The Visual Effects or Production units need a copy of the work-in-progress edit to verify the material they are creating follows the right angles and eye-lines as the existing scenes.
The Visual Effects or Production units need a copy of the work-in-progress edit to verify the material they are creating follows the right angles and eye-lines as the existing scenes.
If the intent is for the work of both editors to be merged into a final sequence, consider using clip colors on the sequences and then clear the bin names to reduce ambiguity as to who cut which sequences.
Advantages of using duplicated media and bins include:
![]() Sharing the work means finishing faster.
Sharing the work means finishing faster.
![]() Editors can be in separate locations with no network connectivity between editing systems.
Editors can be in separate locations with no network connectivity between editing systems.
Disadvantages of using duplicated media and bins include:
![]() The two copies of the project will be out of sync once editors begin working independently.
The two copies of the project will be out of sync once editors begin working independently.
![]() There needs to be clear rules about who edits what. If both editors cut the same scene, it will be difficult to reintegrate those two scenes into a single one.
There needs to be clear rules about who edits what. If both editors cut the same scene, it will be difficult to reintegrate those two scenes into a single one.
![]() If footage is added to one project, it won’t appear in the other project.
If footage is added to one project, it won’t appear in the other project.
![]() Edits operate as isolated islands: Neither editor can see the work of the other editor until footage is merged, which may result in adjacent scenes having a different sense of timing, look, or feel.
Edits operate as isolated islands: Neither editor can see the work of the other editor until footage is merged, which may result in adjacent scenes having a different sense of timing, look, or feel.
The Plan
You’ll use the Consolidate tool to duplicate the media that is required for the other editor, and then you’ll copy the project files. You could duplicate all of the media, or just the media that’s required for the scenes being cut by the other editor.
Duplicating All the Media
To efficiently duplicate all the media, consider using the Media tool. The Media tool can expose all of the master clips associated with the project, making it a convenient and centralized place to begin the consolidation of media onto a drive that’ll be taken by the other editor.
Duplicating Only Needed Media
If the other editor is cutting a select number of scenes, and the master clips for those scenes are easily sifted (or, better yet, located in their own bins), select those master clips in their bins and consolidate just that media.
Tip: Be mindful that an editor might find another clip useful, even if it wasn’t a clip originally intended for the scene. The other editor might be able to make a clip work by flipping it, or using it as a cut-away to hide another edit. For that reason, if storage space permits you to give the other editor all the media, go for it.
Duplicating the Project
After consolidating the media to duplicate it, you must remember to copy the project. In Lesson 1, “How Workflow Makes, Manages, and Moves Media,” you learned about the Avid project folder and where bins are stored. Refer to “Locating the Project Folder” in Lesson 1 for the technique to locate the project folder.
If the media has been consolidated onto an external drive, you would likely place the project files there, too. Placing the project folder on the external drive is only a matter of convenience for the purpose of delivering the project to the other editor. You would not typically store your project and media on the same drive, as the loss of the drive would result in the loss of both media and sequence. Alternatively, you could compress the project into an archive and email it.
You have now duplicated media and bins. Let’s see some workflows that extend from having duplicated media and bins.
Using the Duplicated Project
The Consolidate tool was used to duplicate media. The project folder or some bins were copied to another editing system. Now you and another editor are working on duplicates of the same project. You could be in adjacent edit suites of the same broadcast facility, but to make it more interesting, let’s imagine that one editor is in Nova Scotia, and the other editor is in Atlanta.
The drive containing the media was sent by FedEx, and the project was zipped and emailed. Tasks that can be performed by you and the other editor include:
![]() Incorporate the scenes cut in Atlanta into the sequence in Nova Scotia
Incorporate the scenes cut in Atlanta into the sequence in Nova Scotia
![]() Review and critique each other’s edits
Review and critique each other’s edits
![]() Color-correct in Nova Scotia and send the corrected scenes to Atlanta over instant message chat (such as iChat, AOL IM, or Skype)
Color-correct in Nova Scotia and send the corrected scenes to Atlanta over instant message chat (such as iChat, AOL IM, or Skype)
Each of the previous scenarios relies on the fact that bins are small and contain only metadata, and that clips link to media files. Once you and another editor have the same media files, you can share bins over email or through instant messaging, and the clips and sequences in those bins will link to the media on either editing system.
Caution: These techniques work because both editors have the same media. Once either editor ingests and incorporates new material, the related sections of a timeline will be displayed as Media Offline on the other editor’s workstation because the other editor is missing the newer media.
Sharing a Sequence with Another Editor
You share a sequence with another editor by placing the sequence in a bin and giving it to the other editor. You do not simultaneously work on the same sequence at the same time.
To share a sequence with another editor, follow these steps:
1. Place the sequence (or a duplicate of it) into an empty bin, and then save the bin using FILE > SAVE BIN. (If you don’t use SAVE BIN, the bin file might be empty when you send it.)
2. RIGHT-CLICK the bin in the project window and select REVEAL FILE.
3. RIGHT-CLICK the revealed Avid bin and choose COMPRESS (OS X Lion) or SEND TO > COMPRESSED FOLDER (Windows).
4. Send the compressed file using the electronic method of your choice.
Sharing a Section of Sequences with Another Editor
As opposed to sharing an entire sequence, you may find it preferable to share a portion of a sequence with another editor. You might be sharing a few scenes of a very long documentary. Although sequences don’t take up a lot of space, compared to the media files, they still could be a few megabytes and that’s significant when sending emails.
To share a section of a sequence:
1. Create a bin. This bin will be sent to the other editor.
2. Load the sequence in the timeline.
3. Mark IN/OUTS around the section of interest.
4. Create a sub-sequence, by ALT-dragging anywhere in the RECORD monitor to an empty bin. Save the bin using FILE > SAVE BIN.
Sub-sequencing a sequence is similar to making a subclip of it. Only the portion from the IN mark to the OUT mark is saved to a bin.
5. Save the bin and compress it for electronic transfer by continuing from Step 2 of the previous section, “Sharing a Sequence with Another Editor.”
When the other editor receives the bin, he can unzip it and either copy it into his project folder, or open the bin from the location of his choosing by using FILE > OPEN BIN, as shown in Figure 4.12.
Figure 4.12 Choosing File > Open Bin allows you to open bins that are not located in the project folder.

Handling the Media Offline Message
Upon receiving the bin, the other editor will open it in Media Composer and load the sequence. When Media Composer opens the sequence, it will read the clips in the sequence and retrieve the media by searching its media database. If it all works, the sequence’s media will be online and everything is great. In some scenarios, particularly after media has been further consolidated from other projects, the media might not automatically link.
There are two quick steps you can do to try to get the media to come online, before using the Relink tool, which is covered in Lesson 13, “Mastering the Media.” It is preferable to use these steps first because they are quick and can’t hurt, unlike the Relink tool, which could, if used incorrectly, change the media associated with a sequence to one of an undesired resolution (codec) or take the media offline.
In the event that the sequence does not link to the media already on the system, you should try the following steps:
1. Choose FILE > REFRESH MEDIA DIRECTORIES.
Media Composer will compare the contents of the managed media folders with the items in the media databases and fix any inconsistencies. If files have been moved without Media Composer being aware of it, this command will help Media Composer catch the discrepancies and keep the database accurate.
2. Choose FILE > LOAD MEDIA DATABASE.
Media Composer’s databases can be quite large, so to conserve memory (RAM), Media Composer loads portions of the database on-demand. It knows what is “demanded” based on what bins you have opened. You might open a bin with a sequence, but the bins with the master clips are closed, so Media Composer does not have all the database in memory yet. This command tells Media Composer to load the rest of the database, which often causes offline clips to come online, almost magically.
3. Select the sequence in a bin, and then select CLIP > RELINK.
Relinking is covered in Lesson 13.
Shared Media and Bins with Avid Unity
In the previous section, you learned about duplicating media and a project. This allows two editors to work independently on the same material, and then merge the final results by exchanging bins. It’s effective when editors are across the country, but it’s a lot of effort when the editors are in the same building, or when there are more than two editors involved. It also doesn’t scale well: The more editors who are working on a show, the more time spent dealing with synchronizing the media files between editing suites, often by consolidating to external hard drives, walking them to the other suite, and then further copying media. For some facilities, “media monkey” is a full-time job.
The solution is Avid Unity.
Avid Unity centralizes media storage on a server. Instead of a stack of external hard drives in your edit suite, your computer is connected to the server with a fiber channel or Ethernet cable. The server pools together arrays of hard drives to create a massive pool of shared, redundant, scalable storage.
![]()
On the Web
Curious about Avid Unity? Read more about it on Avid’s website: http://www.avid.com/US/products/family/ISIS-Unity.
Avid offers numerous technical training and certification courses for Avid Unity. Read more about those at http://www.avid.com/training.
Unity Saves the Day at Danish Broadcaster TV2
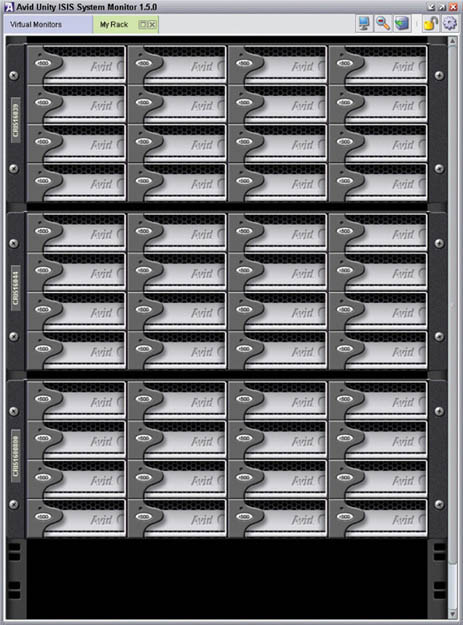
Figure 4.13 96 drives in an Avid Unity ISIS.
The one truth you must know about hard drives is this: Hard drives will fail. They’ll all eventually crash. One day a hard disk will begin making a clicking sound. It’s called the “click of death.” It’s not “If my hard drive crashes,” it’s “When my hard drive crashes.” It’s not a slight to hard drives, it’s that they have moving parts and those parts will wear out.
Note: SSD hard drives are different; they have no spinning disks. Time will tell how they hold up in the long run, but for now they seem quite reliable, although they are more expensive than disk-based drives and therefore tend not to be used for video storage, where you want the most gigabytes for the dollar.
Avid Unity was designed with the knowledge that hard drives fail. It protects media from the eventual failures through a number of techniques, including:
![]() Continuously redistributing media over multiple drives to guarantee uptime in the event of a failure
Continuously redistributing media over multiple drives to guarantee uptime in the event of a failure
![]() Allowing drives to be hot-swapped: Removed and replaced while the system is running
Allowing drives to be hot-swapped: Removed and replaced while the system is running
![]() Monitoring the health of the drive and reporting this to the site administrator
Monitoring the health of the drive and reporting this to the site administrator
As you move into cutting features, primetime TV, reality TV, and news, you are more likely to be working with editing systems connected to Unity: An Avid Unity Environment.
Note: There are other shared-storage systems, aside from Avid Unity. Many of them do an admirable job trying to be Avid Unity, but they are not Avid Unity. Media Composer and Unity are made to work together. You might think of it like iPod and iTunes: They are tightly integrated because the iTunes developers and the iPod developers work together, sharing knowledge to ensure an integrated product ecosystem. You could use another MP3 player, but the experience probably won’t be as smooth, and when it comes to needing support, good luck—to which company do you turn? The same is true for Media Composer and Unity.
If you’ve looked at Avid Unity in the past and found it too expensive, check it out again. In 2011, Avid introduced two new models of Unity, including the ISIS 5000, targeting smaller post-production facilities and educational environments.
Avid Unity provides centralized storage, which:
![]() Is easy to allocate between suites, on an ad-hoc as-needed basis
Is easy to allocate between suites, on an ad-hoc as-needed basis
![]() Is easy to expand by adding more hard drives to the centralized pool of storage, which then makes it available for all the edit suites
Is easy to expand by adding more hard drives to the centralized pool of storage, which then makes it available for all the edit suites
![]() Saves time because the offline editor, online editor, and sound editors can all access the same footage at the same time
Saves time because the offline editor, online editor, and sound editors can all access the same footage at the same time
![]() Opens a significant number of new workflow options
Opens a significant number of new workflow options
Note: There are two variations of Avid Unity that you’ll likely encounter: Avid Unity MediaNet, now discontinued, and Avid Unity ISIS. From the perspective of an editor, you work on both of them the same way. They differ in how they are implemented by the Avid Certified Support Representative (ACSR), the IT technician trained in supporting Avid solutions at a broadcaster or post-production facility.
Avid Unity Usage Scenarios
Avid Unity ISIS lets you share bins and projects across the network. When you place your bins and projects on Avid workspaces (drive volumes provided by Unity), several users can work on the same project and media at the same time.
For example, you can create sequences in one bin while an assistant recaptures media in another bin. At the same time, the users add audio effects or titles to other bins in the project.
Each editor performs tasks from her own editing system. Media Composer provides a locking mechanism to help you keep track of who is currently working in a bin. The method allows one user to write to a bin; multiple users can read the files in that bin.
Caution: The lock does not prevent you from deleting the media in a locked bin if you have write access to the workspace. It ensures only that you do not overwrite changes to the bin.
In an Avid Unity environment, Media Composer creates and stores projects and bins in your Avid projects folder (usually on an internal drive). If you move or save these projects and bins to the workspace, only one editor can change or update the contents of a bin at a time. That doesn’t prevent you from opening the clips and playing the clips. You can even cut those clips into a sequence, as long as that sequence is located in a bin that you can change.
Unity Rule #1: You can’t make changes to a locked bin.
Unity Rule #2: The first person to open a bin wins the right to change/update the contents. The bin will be locked for everyone else.
Unity Rule #3: You forfeit the right to write to a bin when you close the bin. At that point, it’s fair game for anyone else to open it and win the right to change/update it.
Sharing Bins and Projects with Avid Unity
Projects, bins, and media are three different kinds of computer files. Projects are actually folders along with a couple files for project settings (containing default sample rate, start timecode, and so on). Bins are saved as .avb files, and media files are .mxf files in a folder on Unity.
The location of the project and bins affects how sharing works in an Avid Unity Environment. This section considers two scenarios—sharing only bins and sharing bins and projects.
Sharing Only Bins
If you share only bins, you store the project on your local system and store bins (.avb files) and media files on the shared workspace. You can have some bins on your local hard drive and some on the Unity workspace. Other Avid Unity users will not see the bins on your internal drive, only those on the workspace.
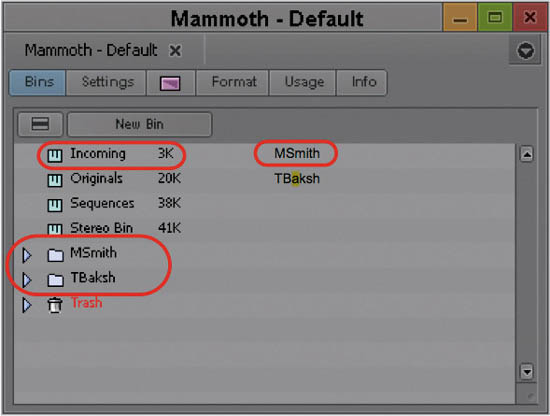
Media Composer identifies the shared bins in the project window as shown in Figure 4.14. Specifically, Media Composer:
![]() Stores the bin in a Unity Bins folder in the project window. This folder is similar to the Other Bins folder.
Stores the bin in a Unity Bins folder in the project window. This folder is similar to the Other Bins folder.
![]() Displays a second column of information for the bin that identifies the computer that currently has the bin locked.
Displays a second column of information for the bin that identifies the computer that currently has the bin locked.
![]() Uses bold text to identify bins that are locked by another user.
Uses bold text to identify bins that are locked by another user.
Figure 4.14 Media Composer’s project window in an Avid Unity Environment. A bin that is locked for editing (bold text, top left), the name of the computer that currently has the bin locked (top right), and folders for each computer that accesses the project (bottom).
Sharing Bins and Projects
If you share bins and projects, you create and store the project folder and bins on the shared workspace (or copy an existing project, bins, and the related media files). Media Composer identifies information from each suite sharing the workspace as follows:
![]() Creates a project folder for each computer that accesses the project. Media Composer adds your computer’s name to the folder name to create a unique name and stores any project-specific information in the folder. This prevents users from overwriting the project-specific data for other users.
Creates a project folder for each computer that accesses the project. Media Composer adds your computer’s name to the folder name to create a unique name and stores any project-specific information in the folder. This prevents users from overwriting the project-specific data for other users.
![]() Displays an extra column in the project window that identifies the computer that has the bin locked, as shown in Figure 4.14.
Displays an extra column in the project window that identifies the computer that has the bin locked, as shown in Figure 4.14.
![]() Uses bold text to identify bins that are locked by other users.
Uses bold text to identify bins that are locked by other users.
![]() Creates a folder at the top level of the shared workspace called Unity Attic. This folder contains backup files for each project on the shared volume.
Creates a folder at the top level of the shared workspace called Unity Attic. This folder contains backup files for each project on the shared volume.
Tip: Depending on the number of users sharing a workspace, you might want to increase the number of files that Media Composer stores in the Unity Attic folder. You do this from the Settings tab of the Project Window > Bin Settings. It is a user setting, so it must be done for each user profile in each suite that is using Media Composer on the same workspace.
Opening a Shared Project
To open an existing project on the shared volume:
1. In the SELECT PROJECT dialog box, navigate to the project on Avid shared storage. To do that, click the icon of a folder, which enables you to browse the network and file system.
2. The PROJECT window opens.
3. Double-click a bin icon to open one of the bins.
The bin appears with a BIN LOCK STATUS button, shown in Figure 4.15. You can click the red (locked) or green (unlocked) BIN LOCK STATUS button to view a history file that shows which computers and users have modified the bin and the date and time of the modifications.
When a bin is unlocked, you have permission to make changes. You should not make changes to a locked bin.
Note: The Bin Lock Status button does not appear if the bin is not on genuine Avid shared storage.
Figure 4.15 The Bin Lock Status button. Green means the bin is unlocked and red means the bin is locked.
Working with Locks and Shared Bins
Media Composer uses a locking mechanism to help you keep track of who is currently working in a shared bin. Only one user can write to the bin, but multiple users can read the files in the bin.
The user who opens the bin first controls the lock and obtains write access to the bin. Bold text in the project window also identifies bins that are locked by another user. When the person who controls the lock closes the bin, it becomes available for another user to open and control the lock.
If one user has the lock and another user has the same bin open, when the first user closes the bin, the second user must close and reopen the bin to control the lock.
You can instruct your Avid editing application to keep a bin locked even after you close it. You can also open a bin without taking control of it.
Opening a Bin Without Changing the Lock
You can open a bin without locking it for other editors. You might know for certain that another editor will be working on a sequence in the bin, and Unity is reporting that the other editor has yet to open the bin. Your interest in the bin is only to read the contents of it.
If you were to open it normally, you would be assigned the lock and only you could modify the bin’s contents. To open a bin without changing the lock, you simply Alt/Option-double-click the bin in the project window.
Locking and Unlocking Bins
A bin might contain items that you do not want to be easily changed. Those items may include an opening sequence for a TV show, or reusable items such as your company’s logo.
You can lock a bin on Unity, so write privileges are not granted when another editor opens the bin:
1. Select one or more bins in the project window.
2. Right-click the bin icon and select LOCK PROJECT BIN.
An asterisk appears next to the username in the project window. In this case, the bin remains locked even after you close it.
To unlock a bin, you right-click the bin in the project window and select Unlock Project Bin.
Tip: The Lock Project Bin and Unlock Project Bin commands are also available from the Clip menu.
Caution: In the unlikely event that Media Composer crashes while an editor has the lock for one or more bins, the lock might remain until the crashed system is restarted and the bin is opened, then closed to reset the lock. The lock mechanism works in part by placing a lock file (with the .lck extension) in the same folder as the bin. To force a bin to unlock, you can have a Unity Administrator delete that .lck file.
Never delete the .lck file for a bin that is in use by a functioning Media Composer system, as this can lead to bin corruption.
Considerations for Working with Shared Bins and Projects
The following information is provided to improve performance when working with shared bins in an Avid shared storage environment.
![]() Do not use the same name for your editing system machine name and your user name. Do not use the same name for security objects such as machine names, user names, group names, and domain names. If any two security objects have the same name, Windows might become confused and sharing might not work properly.
Do not use the same name for your editing system machine name and your user name. Do not use the same name for security objects such as machine names, user names, group names, and domain names. If any two security objects have the same name, Windows might become confused and sharing might not work properly.
![]() Do not use the same prefix for machine names in a shared environment. No full name can be a prefix of another name. If one of the systems has a machine name that is the full name, and others in the environment have the prefix as part of their machine name, problems can occur. For example, if an editing system has a machine name ABC and additional editing systems in the shared environment have machine names ABCnn and ABCxx, the following problems could occur:
Do not use the same prefix for machine names in a shared environment. No full name can be a prefix of another name. If one of the systems has a machine name that is the full name, and others in the environment have the prefix as part of their machine name, problems can occur. For example, if an editing system has a machine name ABC and additional editing systems in the shared environment have machine names ABCnn and ABCxx, the following problems could occur:
![]() When the system with the machine name ABC is writing to a directory, the systems whose machine names have the same prefix (ABCnn and ABCxx) might not be able to access the directory.
When the system with the machine name ABC is writing to a directory, the systems whose machine names have the same prefix (ABCnn and ABCxx) might not be able to access the directory.
![]() When the system with the machine name ABC is rendering, systems whose machine names have the same prefix (ABCnn and ABCxx) might be unable to launch.
When the system with the machine name ABC is rendering, systems whose machine names have the same prefix (ABCnn and ABCxx) might be unable to launch.
Caution: Avid recommends that you do not use a common prefix for machine names. If you must use a common prefix, make sure all the names are the same length (ABC01, ABC02, ABC03, and so on).
![]() Do not use Windows Explorer to examine, copy, or manipulate shared bin files or shared project folders or their contents when you use those files or folders. If you do, when you attempt to access those shared bins or projects you might experience delays accompanied by a progress dialog box that says, “Filesystem busy, retrying (MESSAGE).” If the busy condition persists, a failure message appears. Make sure that you are not using Windows Explorer for the shared bins you are trying to access, and then try the operation again.
Do not use Windows Explorer to examine, copy, or manipulate shared bin files or shared project folders or their contents when you use those files or folders. If you do, when you attempt to access those shared bins or projects you might experience delays accompanied by a progress dialog box that says, “Filesystem busy, retrying (MESSAGE).” If the busy condition persists, a failure message appears. Make sure that you are not using Windows Explorer for the shared bins you are trying to access, and then try the operation again.
![]() When you have an environment in which more than five users are sharing bins on Avid shared storage, Avid recommends using an Avid Interplay server in the workgroup environment.
When you have an environment in which more than five users are sharing bins on Avid shared storage, Avid recommends using an Avid Interplay server in the workgroup environment.
![]() When an Avid Interplay server is available in an Avid workgroup environment, Avid does not recommend sharing bins or projects. Use the Avid Interplay server and the Interplay Window to share media. All editing systems in a workgroup environment that include an Avid Interplay server must have the Avid shared storage client software installed. The Media tool might become unreliable if an editor in the Avid shared storage workgroup environment does not have the Avid shared storage client software installed.
When an Avid Interplay server is available in an Avid workgroup environment, Avid does not recommend sharing bins or projects. Use the Avid Interplay server and the Interplay Window to share media. All editing systems in a workgroup environment that include an Avid Interplay server must have the Avid shared storage client software installed. The Media tool might become unreliable if an editor in the Avid shared storage workgroup environment does not have the Avid shared storage client software installed.
Restrictions and Limitations for Locked Bins
The following restrictions apply to bins that are locked by another user:
![]() You cannot select a locked bin for operations such as capture, title creation, and import. This helps to minimize the problems of modifying a locked bin.
You cannot select a locked bin for operations such as capture, title creation, and import. This helps to minimize the problems of modifying a locked bin.
![]() You cannot drag an item to a locked bin.
You cannot drag an item to a locked bin.
![]() If you drag an item from a locked bin to a writable bin, the Avid system creates a duplicate (not a copy) of the selection in the writable bin. The original item is not removed from the locked bin. This operation is the equivalent of duplicating a selection and then dragging the duplicate to another bin.
If you drag an item from a locked bin to a writable bin, the Avid system creates a duplicate (not a copy) of the selection in the writable bin. The original item is not removed from the locked bin. This operation is the equivalent of duplicating a selection and then dragging the duplicate to another bin.
![]() You cannot move a bin that is locked by another user.
You cannot move a bin that is locked by another user.
![]() If you modify a locked bin, your Avid editing application does not let you save the bin to the same name, but it lets you save the bin to another name.
If you modify a locked bin, your Avid editing application does not let you save the bin to the same name, but it lets you save the bin to another name.
However, this causes duplicate bin IDs and might cause system-level conflicts with the contents of the two bins. Your Avid editing application sees the duplicate contents of these bins and resolves the conflicts by newest modifications. Avoid creating duplicate bins when you modify a locked bin. If you do create a duplicate bin, you should manually merge the changes into the original bin and delete the duplicate bin.
Caution: The lock does not prevent you from deleting the media in a locked bin if you have write access to the workspace. It ensures only that you don’t overwrite changes to the bin.
Limitation When Using the Shared Bin Lock Icon
Occasionally, when two editors attempt to open a shared bin at the same time, both editors get the green lock icon. However, only one editor really has the lock, and that editor’s machine name appears beside the bin name in both project windows.
Both editors can modify their copies of the bin, but only the editor who controls the lock, as indicated in the project window, can save that bin. The other editor is warned that the bin is locked but is allowed to save a copy of the changed bin.
Avid recommends that you use the Save Bin Copy As button and continue working.
Review/Discussion Questions
1. What’s the difference between markers and comments with regard to how they function in a bin? (See “Comments versus Markers” on page 173.)
2. What’s the difference between markers and comments with regard to how they function in Media Composer’s Timeline window? (See “Comments versus Markers” on page 173.)
3. How can markers be used to collaborate with other editors cutting the same sequence? (See “Comments versus Markers” on page 173.)
4. Why are clip comments not the preferable technique to communicate with a Pro Tools editor, in contrast to using markers? (See “Comments versus Markers” on page 173.)
5. How do you assign one of the 16 color swatches to a clip? How do you assign one of the 16.7 million colors to a clip? (See “Assigning Clip Colors in Bins” on page 174.)
6. Why might you want the timeline to visually indicate the clips that do not match the project format? (See “Displaying Clip Colors in the Timeline” on page 176.)
7. How does Local Color differ from Source Color? (See “Assigning Clip Colors in Bins” on page 174.)
8. Give one or two scenarios where you might choose to use Local Clip Color. (See “Local Clip Colors Are Assigned to Clips in the Sequence” on page 178.)
9. You and another editor are sharing the job of editing a large documentary. All the media is on your system, along with the master clips. You are on the West Coast; the other editor is on the East Coast. The final show will be output from your system. What workflow do you propose? How will you review the other editor’s edits as she completes scenes? How will she incorporate your work into her sequences for scene-to-scene consistency? (See “Duplicating Media and Bins” on page 180.)
10. What are some differences between local storage (external media drives) and Avid Unity storage? (See “Avid Unity Usage Scenarios” on page 187.)
11. How do you share a portion of a sequence with another editor, after providing that editor with a duplicate of your media? (See “Sharing a Section of Sequences with Another Editor” on page 183.)
12. After another editor sends you a sequence, you open the sequence but the media is reported as being offline. You are certain you have the media. What two things might you try prior to choosing Clip > Relink? (See “Handling the Media Offline Message” on page 183.)
13. How does the project window change when you are working from a project stored on Avid Unity? (See “Sharing Bins and Projects with Avid Unity” on page 188.)
14. You need to use some clips in a Unity shared bin, but you do not want to lock the bin because you know another editor will be cutting a sequence in that bin. How should you approach the situation? (See “Opening a Bin Without Changing the Lock” on page 180).
15. You are cutting a reality TV series with seven additional editors. You each cut a portion of a show, frequently including flashback material from previous episodes. How would your workflows be different if your team used separate, local storage in contrast to if your team used an Avid Unity ISIS? (See “Avid Unity Usage Scenarios” on page 187.)