Exercise 7
Performing Advanced Editing

In these exercises, you’ll practice the advanced editing techniques you’ve learned in this chapter.
Duration: 75 minutes
GOALS
![]() Minimize the amount of times that you exit and re-enter Trim mode. Try to perform the entire exercise by only entering Trim mode once.
Minimize the amount of times that you exit and re-enter Trim mode. Try to perform the entire exercise by only entering Trim mode once.
![]() Use the A and S keys to move between edits
Use the A and S keys to move between edits
![]() Select the kind of trim (single roller/double roller) using the P, [, and ] keys
Select the kind of trim (single roller/double roller) using the P, [, and ] keys
![]() Move the rollers using the buttons in Trim mode
Move the rollers using the buttons in Trim mode
![]() Move the rollers using the keyboard shortcuts for left/right ten/one frames (keys: m,./)
Move the rollers using the keyboard shortcuts for left/right ten/one frames (keys: m,./)
![]() Move the rollers by entering an offset using the numeric keypad
Move the rollers by entering an offset using the numeric keypad
![]() Avoid using the mouse to move the rollers
Avoid using the mouse to move the rollers
![]() Practice using J-K-L trim to align edits to the beat
Practice using J-K-L trim to align edits to the beat
![]() Practice using Mark IN to align an edit with a beat
Practice using Mark IN to align an edit with a beat
![]() Practice asynchronous trimming
Practice asynchronous trimming
![]() Practice trimming in two directions (bidirectional)
Practice trimming in two directions (bidirectional)
Exercise 7.1: Performing a Radio Edit
In this exercise, a rough cut of the Agent Zero scene has been created. The editor is no longer on the project and you have been hired to finish the edit. The purpose of this exercise is to allow you an opportunity to practice using Trim mode with its keyboard shortcuts. You are not to use Lift or Extract, nor are you to use the Smart Tool.
To perform a radio edit:
1. Open the AGENT MXZERO PROJECT > 201 > LESSON 7 DLG. EDITING > LESSON 7 SEQUENCES > PART 1: ROUGH CUT.
2. Disable V1’s VIDEO MONITORING.
3. Perform a radio edit using the goals outlined at the beginning of this exercise.
You may edit nonlinearly, in any order, starting wherever in the sequence you like.
Exercise 7.2: Using Dynamic Trimming
In this exercise, you are going to edit a montage of shots from Agent MXZero to music, using two dynamic trim methods—J-K-L and Mark IN.
To practice using dynamic trimming:
1. Open the AGENT MXZERO PROJECT > 201 > LESSON 7 DLG. EDITING > LESSON 7 SEQUENCES > PART 2: DYNAMIC TRIMMING.
2. Shuffle the clips by repositioning them using the SPLICE/OVERWRITE SMART TOOL (yellow arrow). Avoid having adjacent shots of the same characters.
3. Enter TRIM mode and use the dynamic trimming techniques to align each edit to a beat.
The video track contains more material than the audio track, so you will need to remove some footage from the video track. Do not remove any clips entirely; only trim away at the head or tail of some shots.
Exercise 7.3: Creating Split Edits
In this exercise, you practice creating split edits using dual-roller trim as well as the using the Extend function.
Duplicate the sequence from Exercise 7.1 and name the duplicate Part 3: Split Edits. Then go through each edit and add split edits using Trim mode as well as Extend.
Exercise 7.4: Using Advanced Trimming Techniques
In this exercise, you will use asynchronous and bidirectional trimming to perform some complex trim operations on the Agent Zero sequence. During this module, practice reentering trim using the Alt/Opt key. It is especially useful when doing complicated trims, such as those in this exercise.
1. Open the AGENT MXZERO project and choose 201 > LESSON 7 DLG. EDITING > LESSON 7 SEQUENCES > PART 4: ADVANCED TRIMMING TECHNIQUES.
2. Go to 01:07:30:00 (approximately). The clip is surrounded by blue markers.
The producer wants to see more of the agent before cutting to the villain.
3. Before you trim, take a moment to recognize the inherent limitations on this trim:
![]() The action of the villain’s shot begins at the cut. Extend or dual-roller trim or sliding would affect that. In this scenario, you do not want to affect that.
The action of the villain’s shot begins at the cut. Extend or dual-roller trim or sliding would affect that. In this scenario, you do not want to affect that.
![]() You can’t change the incoming frame of this shot because the producer likes it. (No slipping.)
You can’t change the incoming frame of this shot because the producer likes it. (No slipping.)
![]() You do not want to change the overall length of the timeline, as the sequence has already been cut to time.
You do not want to change the overall length of the timeline, as the sequence has already been cut to time.
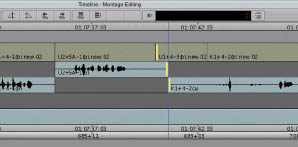
The solution is to trim two tails—an asynchronous trim—as shown in Figure EX7.1.
Figure EX7.1
Asynchronous trim: two tails being trimmed.
4. Set up the trim as shown in Figure EX7.1.
You need to select one edit point normally, and then use the Shift modifier key to add the other roller.
5. Trim the tail by moving forward, to the right, approximately half a second.
The clip of the agent will be longer, and the tail of the villain will be shorter, but the head of the villain clip will be unaffected, although it will occur a half-second later in the timeline than it originally did.
Now you’ll practice bidirectional trim.
6. Go to the PINK marker.
This section needs to be tightened. There are too many beats between the wide shot of the villain and the reverse shot of the agent receiving poker chips.
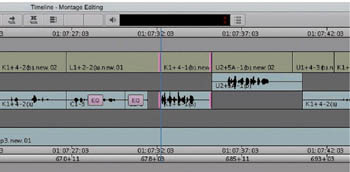
7. Use TRIM mode to select the edits as shown in Figure EX7.2.
Figure EX7.2
Preparing for a bidirectional trim.
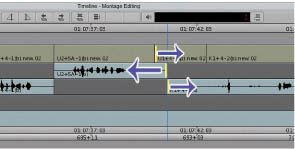
8. Drag any of the rollers according to the arrows in Figure EX7.3.
Figure EX7.3
Rollers move in opposing directions during a bidirectional trim.