
Lesson 5
Multicamera Editing
This lesson explains the Multicamera editing feature of Media Composer and how you can use it to quickly edit scenes simultaneously recorded with two or more cameras.
Media Used: Picture and Sound
Duration: 60 minutes
GOALS
![]() Provide advice to a production on planning for multicamera editing
Provide advice to a production on planning for multicamera editing
![]() Learn the technique and synchronization options for creating group clips
Learn the technique and synchronization options for creating group clips
![]() Differentiate between group and multigroup clips
Differentiate between group and multigroup clips
![]() Manage MultiCamera mode when editing with three or more camera sources
Manage MultiCamera mode when editing with three or more camera sources
![]() Edit a multicamera sequence
Edit a multicamera sequence
Preparing the Production Team
Your production team shoots the footage that you’ll edit. If you intend to edit using the MultiCamera feature, you should meet with your production’s technical producer (or camera operators) to ensure footage is shot in a way that’s optimal for multicamera editing. But what would you ask them to do? What tips might you give? That’s the topic of this section, along with a refresher on the multicamera editing workflow.
Multicamera Editing Speeds Production
When a performance is recorded, the production team will obtain multiple angles and takes in order to provide you, the editor, with the raw material from which you select the best performances and create the best story. A production with a single camera will obtain the multiple angles and compositions (such as close-up and wide shots) by having the performers repeat the scene after repositioning the camera. The actors must be consistent in their performances, otherwise continuity discrepancies will hinder your ability to cut between the various takes.
A production will often use a single camera because of budgetary constraints: One camera is often half the price of having two cameras. Having two cameras, however, means it takes half as much time to record the takes because one camera can focus on the main character with a close-up, while the other camera remains in a wide shot. Considering that a production might be renting a soundstage and have a crew of 20 or more people on set, the use of a second camera can offset its cost by shortening production, which reduces wages and facility rental expenses.
A third camera scales nicely to allow a close-up of two people in a dialogue, plus a wide shot to establish their position on the set. Many primetime television sitcoms use a three-camera setup, which is shown in Figure 5.1.
Figure 5.1 Three Camera Setup: Cameras A + B are medium shots, camera X is wide.

Soap operas must produce a significant amount of footage each day and the use of multiple cameras can allow a good performance by the actors sent for editing without requiring further takes. With three cameras, the editor has a shooting ratio of 3:1 and enough material to focus the attention of the audience through the choice of angles.
Shooting a Barbara Walters–or Oprah Winfrey–style interview is practically impossible without at least two cameras: You’d never expect them to run through the interview with the camera facing the respondent, and then run through it again after resetting the camera and positioning it at the interviewer.
Lastly, music videos, sporting events, and concert performances may use 8, 10, or even 20 cameras. A complex concert might have cameras on each performer—three wide shots of the band (from the left, center, and right angles) and multiple cameras recording the audience. Audience camera operators scour the fans looking for those golden moments where a fan is gleefully singing along.
After the recording has completed, the footage is ingested just like any other footage is ingested. Whether it be using Avid Media Access (AMA) or the Capture tool, the footage needs to be in an Avid bin.
Typically, the clips are labeled to identify the scene, take, and the camera angle. For example, “31-8-A” means “Scene 31, Take 8, Camera A.” (Someone must have had the giggles on set; that’s a lot of takes.)
The Multicamera Experience
Avid’s multicamera editing allows you to view and cut among clips presenting different camera angles of a single scene or event, while keeping all of these matching clips synchronized. The ability to maintain synchronization throughout the process saves countless hours compared with loading and matching shots individually.
When you edit using the MultiCamera feature of Avid Media Composer, you collect clips associated with a particular scene into a grouped clip. A grouped clip is like an envelope that contains the original related clips. When you put that one grouped clip onto the timeline, you’ll have access to the clips it contains. This is a more efficient approach than creating a video track for each angle and trimming the clips on each layer to control which angle is visible, which is how you would edit in the absence of the MultiCamera feature.
Note: If you’ve ever used a DVD with the “angle” feature, you’re already familiar with the approach to multicamera editing in Media Composer. There is a single clip (like a single DVD) and once you play it, you can alternate between the different included angles.
Synchronization Options
When you create a group clip, Media Composer will need to synchronize the individual clips with each other: As you cut from camera A to camera B, you want to see the same moment in camera B’s media as you saw on camera A, not a few seconds earlier or later, because that would create sync and continuity errors.
Timecode Sync Overview
A quick and accurate way to synchronize clips is to have all cameras using the same timecode. Media Composer will compare the timecodes and synchronize the clips when you create a group clip.
Figure 5.2 illustrates two clips using common timecode.
Figure 5.2 Two clips with synchronized timecode.
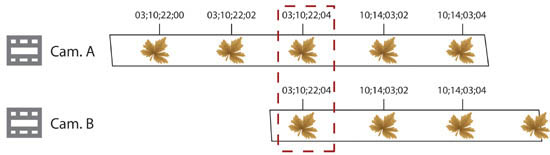
Camera A was recorded first and Camera B was recorded slightly later, so clip A has a bit more footage at the head. Both clips have common timecode, so Media Composer will align the two clips using that timecode and place them into the grouped clip.
Establishing that sync point is easier when your camera crew follows a few guidelines.
Timecode Sync Guidelines for Camera Crew
Timecode sync requires that the clocks on each camera be synchronized, something like how secret agents synchronize their watches at the beginning of a mission. For that to happen, the cameras have to support an external timecode connector (often labeled “EXT. TC”), which is usually implemented on the camera as a BNC spigot found on prosumer and higher-end cameras. You would not find EXT. TC connectors on cameras purchased at a consumer electronics shop, but you would from many Sony or Panasonic professional resellers.
For cameras that support external timecode, you synchronize their clocks using a method along the lines of the following, being mindful that the specifics might vary by camera model:
1. Choose one camera as the “master” camera.
The master camera is the authoritative camera. Its clock gives its timecode to the other cameras. The other cameras are referred as “slave” cameras.
2. Use the menu of the master camera to set the timecode generator (TCG) to internal timecode (sometimes written as “INT. TC”).
The timecode generator is the camera’s private clock for timecode and is unrelated to the time-of-day clock in the camera. Setting the timecode generator to internal timecode instructs the generator to create its own timecode instead of using an externally generated timecode.
3. Connect a BNC cable from “EXT. TC OUT” of the master camera to “EXT. TC IN” of a slave camera.
The step in which cameras are connected is sometimes called “jamming the cameras.”
This camera will not generate its own timecode, but instead will synchronize its timecode generator with the timecode coming in on the EXT. TC IN connector.
4. Use the menu of the slave camera to set its timecode generator to use “EXT. TC.”
5. Confirm that both cameras now display the same timecode.
You only need to jam the cameras for a few seconds, just long enough for the slave camera to read the timecode being sent from the timecode generator of the master camera. After that, the cable can be disconnected.
6. Disconnect the BNC cable and repeat from Step 3 for each slave camera.
For the price that might be paid for one camera with external timecode capabilities, you can often buy two or more cameras without them. Productions operating on a constrained budget—in particular independent music videos—will often shoot with multiple cameras, but without jammed timecode.
That’s no problem, it’s just a slightly modified workflow with one extra step and it’s explained in the next section.
Visual or Audio-Based Sync Overview
Timecode syncing works well because timecode allows Media Composer to identify identical instants of time in different clips. Even if your cameras don’t have the ability to be synchronized using external timecode, as long as you can identify the instant in different clips, you’ll still be able to create a grouped clip.
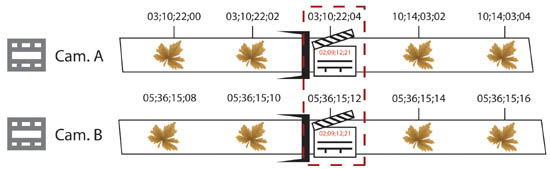
For Media Composer to use that kind of clip, you need to open each source clip, find a frame that they each have in common, and place a mark IN on that frame. The mark IN will be used when you create a group clip, after which it can be removed. It’s not used for editing, only for synchronizing. It doesn’t matter if the IN is toward the beginning, middle, or end of the clip, just as long as it identifies a moment in time that’s common among all clips, as shown in Figure 5.3.
Figure 5.3 Multiple clips that contain the same unique frame can be synchronized by placing an IN mark on the common frame, such as a frame in which a slate slaps closed.
Tips for finding common frames:
![]() A camera flash. Camera flashes are quick but bright and therefore noticeable.
A camera flash. Camera flashes are quick but bright and therefore noticeable.
![]() A performer’s arm movement. If a rock star throws his hand in the air, it’s easy to find and mark an IN.
A performer’s arm movement. If a rock star throws his hand in the air, it’s easy to find and mark an IN.
![]() A drum beat. If all cameras are recording audio, you can find the same drum beat, word, cymbal crash, or any other audio cue.
A drum beat. If all cameras are recording audio, you can find the same drum beat, word, cymbal crash, or any other audio cue.
![]() A clapper or slate. This is explained in the next section.
A clapper or slate. This is explained in the next section.
Visual or Audio-Based Sync Guidelines for Camera Crew
One of the best tips you can give your camera crew, when using cameras that do not have timecode sync, is this:
It doesn’t have to be a Hollywood slate; it can be two pieces of 2×4″ lumber that are clapped together, or even just someone’s hands clapping.
2. Have all cameras focus on the slate (or impromptu clapper).
3. Clap the slate, or pieces of wood, or whatever you have.
The clap action creates a visual and audible reference that you can locate in each of your source clips. When you capture the footage from those cameras, you’ll place an IN mark at the clap, and Media Composer will use that IN mark to synchronize the content of the various cameras.
Final Tips for Camera Crews (Regardless of Sync Method)
Between the recordings of takes, there are often short gaps and camera operators may instinctively pause the recording to save storage space. When the cameras are paused and resumed, gaps in the recording are created, which means footage after that point will not be synchronized in the group clip. To work with clips recorded with pauses, you need to subclip and individually group the subclips into a new group clip.
One way to avoid the problem of gaps in the recording is to have the camera operators not stop recording. If they do stop recording, ask that they reestablish a sync point for you by rerecording the clap of the slate.
Finally, many cameras can be set to record in one of two modes: Free Run or Record Run. The setting controls whether or not the clock stops when the recording stops. Free Run sets the camera to continuously roll the clock (increment the timecode), even when the camera is paused. Record Run means the timecode incrementing when the recording stops. You may want to advise your camera operators to set their cameras to Free Run, so even if they do pause the recording (or change tapes), the clock will continue to increment and all cameras will maintain timecode sync. This means your camera operators can pause the recording and when they resume, the timecode will continue to be consistent across all recordings.
Avid’s Multicamera Editing Workflows
You use multicamera editing to complete your rough-cut in less time with fewer sync and continuity errors than you would have if you created the rough-cut using traditional methods. After the rough-cut has been created, you deactivate MultiCamera mode and refine your edit using the full suite of trim functions available in Media Composer.
The steps of the multicamera workflow are:
1. Create a group clip, syncing the camera angles based on timecode, IN point, or INK number. (INK is used instead of timecode with some film formats.)
2. Load the group clip into the SOURCE monitor, and splice the entire group into a sequence.
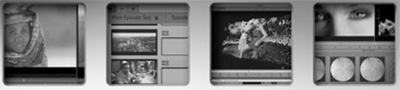
3. Enter MULTICAMERA mode, which gives you a QUAD (OR NINE) SPLIT display, so you can view multiple camera angles.
4. Play back the material, and cut on-the-fly by using the MULTICAMERA keys to select different camera angles.
The camera angles you select with the MULTICAMERA keys are recorded as cuts in the timeline and are displayed in the Record monitor.
5. Use the arrow keys to select edit points and switch to different angles throughout the master scene in the sequence.
6. Leave MULTICAMERA mode to trim and make additional adjustments.
The details of those steps are discussed in the following sections.
Creating Group Clips
Grouping creates a separate group clip out of a single set of master clips, from the start (or IN) point to the end (or OUT) point of the longest clip. The Group function allows you to sync clips based on common source timecode, auxiliary timecode, or marks placed in the footage.
Note: You can create grouped clips using captured or AMA-linked clips. Previous releases of Media Composer did not allow AMA clips to be used when creating a group clip, but that limitation no longer exists. If you find that performance of MultiCamera mode is poor, however, you may find an improvement in performance by consolidating or transcoding the clips onto your managed media drives.
To create a group clip:
1. If you are using an IN or OUT mark for the sync point, load the clips and mark an IN point at the sync point at the start of each clip, or mark an OUT point at the sync point at the end of each clip.
Ideally, during production, a slate was recorded at the head (or tail) of each tape, which you use for marking IN (or OUT) points. (At the shoot, all cameras record a common slate at the beginning of each tape.)
If the shoot didn’t use a slate, use any single, discrete visual or aural event recorded by all cameras simultaneously. For example, if six cameras tape a concert, you can use a distinct sound to mark the IN point.
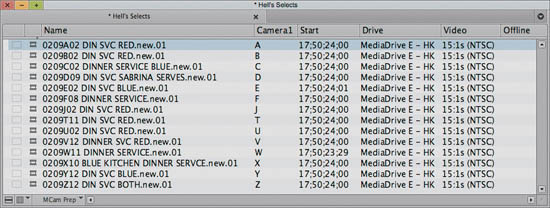
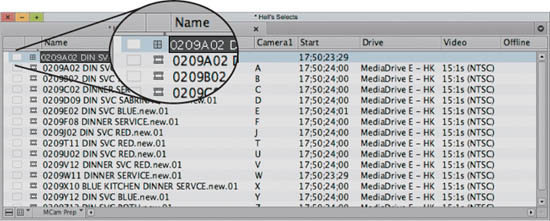
2. In the bin, select the clips you want to group together, as shown in Figure 5.4.
Figure 5.4 All of these clips are from separate cameras that recorded the scene simultaneously.
Note: A grouped clip in Media Composer can contain over 400 clips, of which up to nine will be displayed at a time when in MultiCamera mode, and you can then swap the bank of nine cameras that are displayed at a time. This allows you an almost limitless number of cameras in Media Composer’s MultiCamera mode.
3. (Optional) Sort the clips.
The order of clips in the bin determines the order in which the clips are displayed when grouped together and displayed in the Source monitor. Thus it is a good idea to develop a good, consistent clip-naming scheme.
4. Choose BIN > GROUP CLIPS, or press SHIFT +CTRL/CMD+G.
5. The GROUP CLIPS dialog box appears, as shown in Figure 5.5.
Figure 5.5 The Group Clips dialog box.
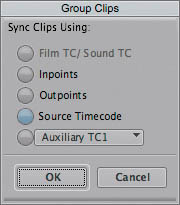
6. Select an option, based on the following:
![]() IN points or OUT points—To sync according to IN or OUT points set in each clip.
IN points or OUT points—To sync according to IN or OUT points set in each clip.
![]() Source Timecode—To sync based on matching timecode.
Source Timecode—To sync based on matching timecode.
![]() Auxiliary TC1–TC5—To sync based on Auxiliary TC.
Auxiliary TC1–TC5—To sync based on Auxiliary TC.
![]() Film TC/Sound TC, INK Number, or Auxiliary Ink—These three options apply only to 24p and 25p projects. With Film TC/Sound TC, sync is based on matching film and sound timecode recorded in the field.
Film TC/Sound TC, INK Number, or Auxiliary Ink—These three options apply only to 24p and 25p projects. With Film TC/Sound TC, sync is based on matching film and sound timecode recorded in the field.
NOTE: Source Timecode and Auxiliary options require that the clips must have matching timecode in the same column.
7. Click OK.
A group clip appears in the bin, with the name of the first clip in the group, followed by the file name extension Grp.n, as shown in Figure 5.6.
Figure 5.6 Group clip in a bin.
8. (Optional) Rename the group clip.
Creating Multigroup Clips
Multigrouping is used in large multicamera productions, such as situation comedies, in which all synchronous camera shots are recorded sequentially with the same timecode.
Multigrouping takes the Group function one step further, literally stringing numerous sequential groups into a rough sequence. For this reason, multigroups are also known as sequence clips.
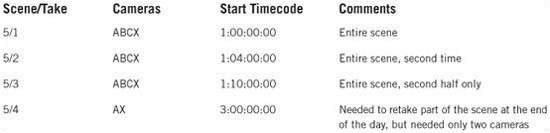
For example, let’s say you’re about to cut a four-camera sitcom project, represented by the clips in Table 5-1. The cameras are named A, B, C, and X, which is a traditional camera naming scheme.
For example, Scene 5 in Table 5-1 consists of four takes. Multigrouping strings these takes together into a sequence. You can edit one take as you would any group clip, and you also have easy access to all of the scene’s footage.
You can also use multigrouping in other situations. For example, let’s say six cameras are used in a music concert, and each shooter is independent of the others, stopping and starting the camera at will. The camera’s timecode generators are using Free Run mode and all cameras have been jammed for timecode synchronization at the beginning of the day, as described in “Timecode Sync Guidelines for Camera Crew” on page 204.)
To use multigrouping to piece together the shots:
1. (Optional) Sort the clips by name in the bin.
2. Select all of the clips you want to combine in the multigroup.
3. Choose BIN > MULTIGROUP.
4. Select an option in the SYNCSELECTION dialog box.
5. Click OK.
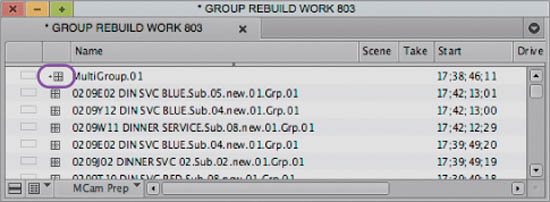
Media Composer creates a group clip for each take in the bin, and then creates a multigroup clip by stringing together these group clips. The multigroup clip has the same icon as the group clips, but the icon is preceded by a tiny plus sign as shown in Figure 5.7.
Figure 5.7 Multigroup clips are differentiated from a group clip by the presence of a plus symbol.
Exploring Additional Grouping Methods
In this section, several methods to create matched clips in preparation for multicam editing are presented. This assumes that your source material was not optimally prepared for multicam editing and/or that time is an important factor.
Fast Workflow for Footage Synced with Slave Timecode from Tape
Scenario: The material was shot on tape with slave timecode, but during capture, the entire clip from slate to the end of the take is not captured, but simply from start to end of the action. This might be done, for example, if the camera ran for minutes after the slate and before action began. There was no need seen to capture all of the “dead time.” Thus, you have no slates.
1. Give each bin into which you will capture clips the name you gave the physical tape.
Tape names should match everywhere—on the physical tape, the tape name in the Capture tool, and bin name.
In these scenarios, assume a tape naming convention where several cameras are recorded for each tape—for a six-camera shoot you might have Tape 1/Camera A = 001A, Tape 1/Camera B= 001B... Tape 1/Camera F= 001F. Then Tape 2/Camera A = 002A, and so on.
If your tape-naming scheme simply uses numeric increments—001, 002, and so on—follow this naming convention.
2. Capture each complete action for each take, with handle, on tape 001A.
3. If speed is of the essence, don’t take the time to name the clips. Each clip will be named the bin name (which is also the tape name) followed by a number, such as 001A 01, 001A 02, and so on.
4. To facilitate sorting later, add a one-character prefix to each clip name. For this first tape (and bin), add an A to the beginning of each clip.
After capturing Tape 001A, you obtain the clips for the other cameras by exporting an Avid Log Exchange (ALE) file. This process unlinks the media and creates new clips upon import, which you can then use to recapture the same content from the other camera’s tapes.
The next steps take you through the process of exporting to ALE:
1. Display the following headings in the tape bin and save this bin view as ALE:
Start
End
Tracks
Tape
2. Select all clips in the bin.
3. Choose FILE > EXPORT.
4. Open the EXPORT settings, and choose AVID LOG EXCHANGE from the pop-up menu, as shown in Figure 5.8.
Figure 5.8 Exporting an Avid log exchange (ALE) file.
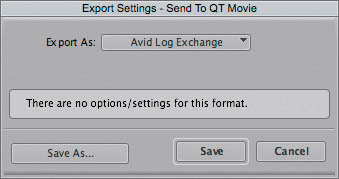
5. Click SAVE AS and name the export setting ALE EXPORT.
6. Save the exported file to your drive and close the bin.
7. Create a new bin, called 001B, or whatever the tape name is.
8. Select the ALE bin view.
9. Choose FILE > IMPORT.
10. Select the ALE file you just created and press OK to import the file and create new clips.
Notice that the NAME, START, END, TRACKS, and TAPE column data has not changed.
11. Manually change the first character of each clip in the 001B bin from A to B. This will facilitate sorting and sifting.
12. Change the tape name to match the TAPE 001B clips.
13. Use CLIP > MODIFY to the SET SOURCE option to give these clips the tape ID 001B.
14. Repeat this process for the rest of the tape 1 cameras, as well as the remaining tapes.
Note: When you import an ALE, the project association of the clips is set to the current project. This can be desirable in some scenarios and undesirable in others. It can have a huge impact on media management in scenarios where you have a lot of projects, and where the project name is the main criterion for sorting or sifting.
Fast Workflow for Footage Synced Without Slave Timecode
Scenario: You’re working on a reality show or low-budget documentary. Several cameras were used in the shoot, and no slave timecode was recorded.
In this scenario, the production used dual-system audio (audio recorded separately on a digital audio recording device). If you’re lucky, the cameras will also have recorded sync audio.
How do you prepare to group clips? Use a method sometimes referred to as “sync-stacking.”
To use sync-stacking:
1. You’ll be loading different tapes on different video tracks, and you’ll want to switch easily between monitoring multiple video tracks.
2. Load the audio, recorded separately, for tape 001 into the timeline on tracks A1 and A2.
3. Display waveforms so you can match the audio tracks from multiple cameras as well as the separate recording device.
4. Load the video and audio for Tape 001, Camera A into the Source monitor and edit it into the sequence on tracks V1, A1, and A2. (If audio was also recorded separately, edit that audio onto two audio tracks.)
5. Use LIFT/OVERWRITE segment mode editing to line up the tracks, using the waveforms as a guide.
If you have standard dual-system audio—the picture has no associated audio as part of the same clip, and audio recorded separately without video—use Sync Point Editing (SPE).
6. Repeat for additional Tape 1 Camera B, C, and so on, stacking each camera on a higher video track, and always syncing to the video on track V1.
You’ll probably have one track of video and two tracks of audio for each tape. In that case, edit the three tracks onto incrementally higher tracks (first: V1, A1, and A2, second: V2, A3, and A4, and so on).
7. Repeat this procedure for Tape 2, 3, and so on.
8. Use Match Frame from a sync point in the timeline to locate a common Mark IN on the master clips in the Source monitor.
9. Create a group clip as normal. Each master clip now has an IN mark that can be used as a reference for syncing.
Grouping Together Fewer Than Ten Clips
Scenario: You just have a few clips to group together. Here’s another way to create the matched clips, prior to grouping.
Tip: If you’re not comfortable unlinking clips from their media, do not use this method. Instead, export an ALE.
1. Duplicate clip 1 by pressing CTRL/CMD+D.
2. To unlink the duplicate clip:
a) Select the clip in the bin.
b) Press the CTRL/CMD+SHIFT keys and choose CLIP > UNLINK BIN SELECTION.
The RELINK command has changed to UNLINK because of the key press, and the clip is unlinked from the media.
3. Use CLIP > MODIFY, and the SET SOURCE option to give these clips the Tape ID 001B.
4. Repeat Steps 1–3 for all clips to be grouped.
5. Capture the media for all clips.
Ganging Footage in Monitors
Scenario: You don’t want to take the time to group clips, or you just need to review one or two alternate camera angles next to a shot in the sequence. Instead, you’ll use ganging to sync multiple cameras with pop-up monitors.
The Gang function locks monitors in sync so that you can move through footage in two or more monitors simultaneously.
In addition, you can use ganging as an alternative to MultiCamera mode to have your group clip stay in sync with the sequence.
Finally, it’s a way to match two sequences when you need to check shots from one cut to another.
To gang the Source and Record monitors:
1. Load several clips and sequences into their own pop-up monitors by ALT/OPT+double-clicking one of the selected items. You can also load a clip into the Source monitor, and a sequence into the Record monitor.
2. Place the position indicators so that they are in sync.
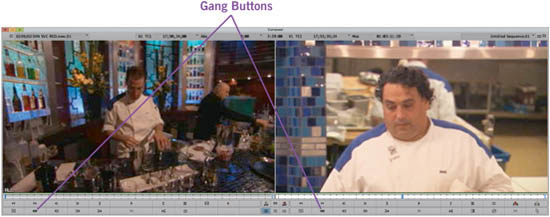
3. Click the GANG button for each monitor that you want to synchronize, as shown in Figure 5.9.
4. When you select the Source monitor GANG button, the Record monitor GANG button automatically becomes active.
Figure 5.9 Gang buttons are located in each monitor; a green status indicator appears below the Source and Record monitors when Gang is enabled.
5. As you move through footage in one monitor, the footage in all other monitors freezes. The footage is updated when the play stops. Simultaneous full-motion playback is not possible, although sync is maintained at all times.
EXERCISE Take a moment to complete Exercise 5, Part 1.
Setting Up Multicamera Editing
You learned to prepare group clips in the previous sections. In this section, you reap the benefits of group clips by using them for multicamera editing. This is where the fun begins. You edit a group clip into the timeline, enable MultiCamera mode, and play back as you cut between cameras in real-time.
Note: The process from this point forward will somewhat resemble a live master control room, into which multiple iso lated camera feeds (ISO cams) are sent. There is a person whose job role is “switcher” and a director who watches all the feeds and calls the shots by using terminology such as “Ready 2. 2!” That means “Prepare to switch to ISO Camera 2” and the second “2” means “Go!”
Although there are multiple isolated cameras feeding into the switcher, only one video is coming out at a time. That output is called the “linecut.”
Editing the Group Clip into the Timeline
After you create a group or multigroup clip, you need to put it into the timeline. Treat it like any other clip because there is nothing special about putting a group clip into the timeline.
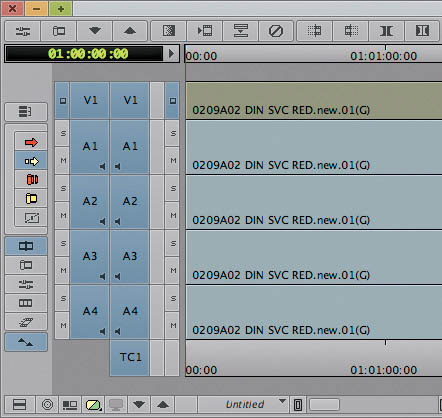
The timeline adds a unique identifier to indicate the presence of a group—the first clip’s name (as selected in the bin), followed by the letter G, as shown in Figure 5.10.
Figure 5.10 Group clip in a sequence, indicated by the (G).
Activating MultiCamera Mode
MultiCamera mode gangs all clips in the group clip displayed in the Source monitor with the sequence displayed in the Record monitor. All clips are synchronized and continually updated during playback and editing.
The Source and Record monitors are ganged under one set of controls, specifically, the Record monitor controls. The controls under the Source monitor are removed when you are in MultiCamera mode.
With a new sequence loaded in the timeline, you choose Special > MultiCamera Mode, or press Shift+Ctrl/Cmd+M, to activate MultiCamera mode.
All camera angles are displayed in the Source monitor and have been synchronized by the Avid system.
To deactivate MultiCamera mode and return to Source-oriented editing, do one of the following:
![]() Deselect Special > MultiCamera Mode, or press Shift+Ctrl/Cmd+M.
Deselect Special > MultiCamera Mode, or press Shift+Ctrl/Cmd+M.
![]() Load a clip into the Source monitor.
Load a clip into the Source monitor.
![]() Enter another mode such as Trim mode.
Enter another mode such as Trim mode.
Displaying Quad Split or Nine Split Mode
Once in MultiCamera mode, the Source monitor displays the clips, by default, in Quad Split Source mode, in which up to four clips of your group/multigroup clip are displayed in four quadrants.
Note: When you use Quad Split or Nine Split buttons, you should be in MultiCamera mode.
To change between Quad Split and Nine Split modes:
1. Activate the SOURCE monitor.
2. Choose TOOLS > COMMAND PALETTE, and click the MCAM tab as shown in Figure 5.11.
Figure 5.11 MultiCamera tab (MCam) of the Command palette.
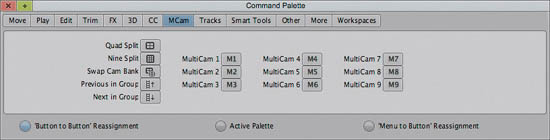
3. Click the ACTIVE PALETTE button.
You can also map the buttons you need to keys or buttons on the interface.
For information on remapping buttons and using the Command palette, check out Media Composer 6, Part 1: Editing Essentials, part of the Avid Learning Series, or consider taking Media Composer 101 at an Avid Learning Partner.
4. Click the QUAD SPLIT OR NINE SPLIT button, depending on the number of panes you want to display in the Source monitor.
Note: The Quad Split button is also in the Source/Record monitor fast menu.
5. To switch to the next bank of four or nine camera angles, click the SWAP CAM BANK button.
You can swap banks on-the-fly while playing in QUAD SPLIT mode, but not in NINE SPLIT mode.
6. To return to full screen display, deselect the QUAD OR NINE SPLIT button.
Displaying the Clip’s Name in a Quadrant
The Source monitor can be configured to temporarily display the names of the individual clips while in MultiCamera mode.
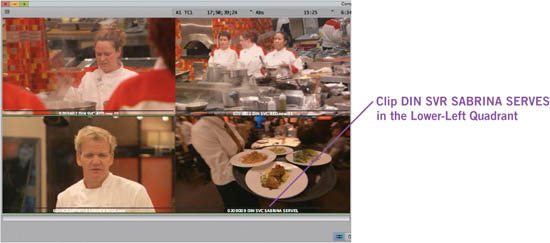
To display clip names in their quadrants, click the Source monitor and then hold down the Ctrl/Cmd key. The clip names appear below the quadrants as shown in Figure 5.12.
Figure 5.12 Clip names in the quadrants of MultiCamera mode.
Assigning Another Clip to a Quadrant
By default the clips are displayed in quadrants in their order in the group clip (which was determined by the clip order in the bin). You can assign a different clip to a quadrant, if you like. To do so:
1. CTRL+ALT/CMD+CLICK a quadrant and choose a different camera angle (or choose SEQUENCE) from the menu that appears, as shown in Figure 5.13.
Figure 5.13 Changing the position of clips in the 4-up or 9-up display.
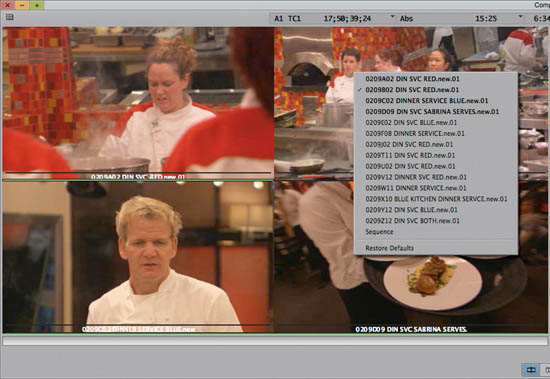
2. Choose RESTORE DEFAULTS from the menu to return to default angles, which is based on the sort order of the clips in the bin at the time the group clip was made.
Editing Audio
There are two basic methods for setting up audio in a multicamera sequence.
![]() Scenario 1: There is one audio source for multiple video sources. This scenario is typical for situation comedies and high-end music videos.
Scenario 1: There is one audio source for multiple video sources. This scenario is typical for situation comedies and high-end music videos.
![]() Scenario 2: In production, each camera recorded both audio and video, and you want to access all of the audio tracks when you cut the program. This scenario uses the Audio Follow Video option.
Scenario 2: In production, each camera recorded both audio and video, and you want to access all of the audio tracks when you cut the program. This scenario uses the Audio Follow Video option.
Using the Audio Follow Video Option
The Audio Follow Video option instructs the system to switch both audio and video for each camera angle. (Use this option with Scenario 2 in the previous section.)
Audio Follow Video overrides the timeline track selectors and switches audio in track A1 only. Audio Follow Video edits appear in the timeline as match frames (the transitions contain an equals sign).
To set up Audio Follow Video:
1. In the Composer settings, activate the SECOND ROW OF INFO option.
2. Click the GROUP MENU icon, which is in the second row of information above the Source monitor. The GROUP menu appears, as shown in Figure 5.14.
Figure 5.14 Group menu above the Source monitor.
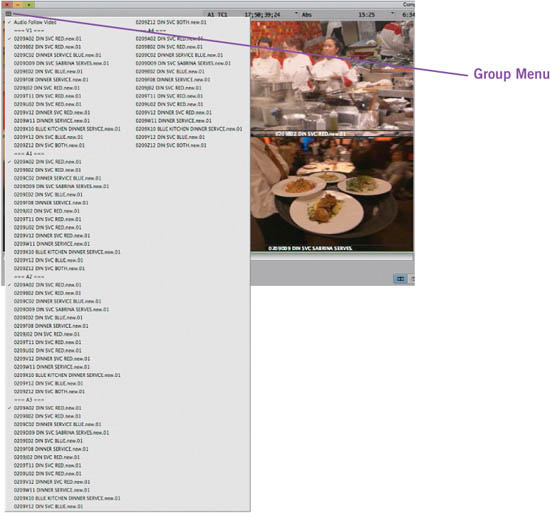
Note: The Group menu may not appear above the Source monitor if your Composer window has been resized to be small, or if you haven’t allowed Media Composer to display the second row of data. You can enable the second row of data from the Composer settings. Choose Window > Data Display at Top.
You can select and patch group clip video and audio tracks, which are listed in the Group menu.
3. Select video or audio channels from any clip in the group to patch the video or audio channels to the tracks available in the sequence.
4. Choose the AUDIO FOLLOW VIDEO option to switch both audio and video for each camera angle when you cut.
The Group Menu icon turns green to indicate Audio Follow Video is enabled.
Multicamera Performance
To play back a group clip in a 4-up or 9-up split screen, you must be in MultiCamera mode.
When Media Composer is playing a clip in 4-up or 9-up mode, it must read four or nine media files from the hard disk, decode them, and composite them into the Source monitor, as well as display the linecut in the Record monitor. That puts a significant demand on your storage subsystem as well as your computer’s processor.
The following section provides tips concerning playback performance for MultiCamera mode.
Tip: If you notice frames are dropping during playback, decrease the size of the Composer window until playback becomes smooth.
Storage subsystems have to move the media files from the disks to the processor. If your media files are large, that can cause a strain on your system. The more compressed your media files are, the faster they can be read from the disk. You will find 15:1s standard definition media is very small and will stress your storage subsystem the least. If your media was captured at the 2:1 Avid resolution (codec), your media files would be 30x larger and your computer may not be able to read all nine video media files plus the audio media files quickly enough to allow for real-time multicamera editing.
HD clips are even larger. If you’re trying to perform real-time multicamera editing using HD source material, you could transcode it to SD 15:1s and afterward relink your sequence back to the HD media.
If your storage subsystem is very fast, your bottleneck could be your processor. Perhaps your computer’s processor is too slow. In that scenario, you might find that Media Composer is able to present real-time multicamera editing using 1:1 SD uncompressed footage, particularly if MultiCamera mode is using a 4-up display in the Source monitor. The 1:1 resolution will usually perform better than 2:1 or 3:1, despite its larger file size, because the video frames don’t need to be decompressed first, which reduces the load on your processor and results in improved performance. (Again, this is only the case when your storage system is fast enough that reading four streams of 1:1 SD media is not a problem.)
Additional Multicamera performance tips:
![]() MultiCamera editing works best with 8-bit resolutions. If you use 10-bit media, Media Composer will treat it as 8-bit media while MultiCamera mode is running, which may result in a slight degrading of image quality temporarily, only while MultiCamera mode is enabled.
MultiCamera editing works best with 8-bit resolutions. If you use 10-bit media, Media Composer will treat it as 8-bit media while MultiCamera mode is running, which may result in a slight degrading of image quality temporarily, only while MultiCamera mode is enabled.
![]() You can change the playback quality to Best Performance (yellow/yellow) mode when editing SD projects, and it’s automatically set to that for HD projects.
You can change the playback quality to Best Performance (yellow/yellow) mode when editing SD projects, and it’s automatically set to that for HD projects.
![]() Four streams are easier to play than nine streams, so if your system can’t perform well with a 9-up display, switch to the 4-up display.
Four streams are easier to play than nine streams, so if your system can’t perform well with a 9-up display, switch to the 4-up display.
Note: Older Avid editing systems used to require that multicamera clips be encoded using one of the “m” resolutions, like 4:1m or 2:1m. This is no longer the case, and there is no requirement to use the m resolutions.
Use the Quad Split (or Nine Split) button to switch the Source monitor between Full-Monitor display and Quad/Nine Split Source viewing and editing modes.
Editing a Multicamera Sequence
To cut multicamera material, you use the MultiCamera keys to select different camera angles. These changes in camera angle are recorded as cuts in the sequence.
1. Play the multicamera material in the timeline.
The Quad Split display and Record monitor display update automatically during playback.
2. When you want to cut to a different camera angle, press one of the MULTICAMERA function keys. The default keys are:
![]() For Quad Split view, press function keys F9–F12.
For Quad Split view, press function keys F9–F12.
![]() For Nine Split view, press function keys F9–F12 and Shift+F9–F12.
For Nine Split view, press function keys F9–F12 and Shift+F9–F12.
Aside from using the keyboard’s function keys, you can also press a number key on the numeric keypad. The arrangement of the numbers on the numeric keypad correlates to the angles in the split display as follows:
![]() 7 key switches to upper left
7 key switches to upper left
![]() 8 or 9 switch to upper right
8 or 9 switch to upper right
![]() 4 or 1 switch to lower left
4 or 1 switch to lower left
![]() 2, 3, 5, or 6 switch to lower right
2, 3, 5, or 6 switch to lower right
You can also cut to a different camera angle by clicking a camera angle in the split display.
A cut is made starting at the position indicator and ending at the end of the current segment (which may, of course, be the end of the sequence).
The sequence updates in the Quad Split display and in the Record monitor display during playback, which means that you typically make your cuts on-the-fly as you play through the sequence. The timeline updates when you stop playback.
1. Open the Apple Menu > System Preferences > Keyboard.
2. Select Use all F1, F2, and so on, as standard function keys.
Note: The Client monitor displays only SD multicam sequences. You can view playback of HD multicam sequences in the Source monitor only.
To play a linecut on the Source and Client monitors:
1. Open the COMPOSER settings, as shown in Figure 5.15.
Figure 5.15 Control playback of multicamera clips and sequences in the Composer and Client monitors.
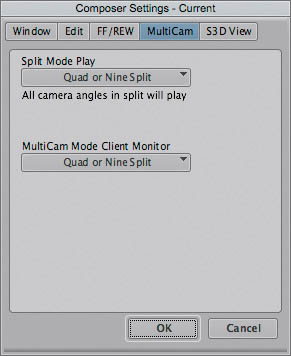
2. Click the MULTICAMERA tab.
3. Click the SPLIT MODE PLAY pop-up menu, and select QUAD OR NINE SPLIT.
4. Click the MULTICAMERA MODE CLIENT MONITOR pop-up menu, and select LINECUT.
5. Click OK.
Editing On-the-Fly
You can add edits on-the-fly by pressing a single MultiCamera key. Of course, you can also use the Add Edit button if you map it to the keyboard. After the edits are added, you use one of the switching techniques from the previous section to switch the clip from edit to edit.
This method is especially useful when editing to music because it allows you to cut to the music without pausing.
1. Load the group or multigroup clip into the Source monitor and edit it into a sequence.
2. Play the sequence, and each time you want to make an edit, press a MULTICAMERA key (it doesn’t matter which one).
3. To remove your edits, do one of the following:
![]() Lasso the edit(s) to enter TRIM mode, and press the DELETE key.
Lasso the edit(s) to enter TRIM mode, and press the DELETE key.
![]() Mark an IN and OUT around the area with edits you want to remove, and choose CLIP > REMOVE MATCH FRAME EDITS.
Mark an IN and OUT around the area with edits you want to remove, and choose CLIP > REMOVE MATCH FRAME EDITS.
4. After adding the edits, place the position indicator within each segment and use the UP and DOWN ARROW keys to switch camera angles.
Refining the Edit
When you have finished your rough-cut of the sequence, you can refine the sequence in all the usual ways. For example, use trimming, slipping, and sliding to adjust edit points and shot content.
Switching Clips with the Arrow Keys
After you have edited the multicamera sequence, you can change any segment in the sequence to a different camera angle. This process does not add a cut point.
To switch camera angles:
1. With the RECORD monitor active, place the position indicator within a segment you want to change.
2. Press the UP ARROW (PREVIOUS IN GROUP) key and DOWN ARROW (NEXT IN GROUP) key to switch the clip for that segment.
Tip: You can also right-click (Windows) or Shift+Control+click (Macintosh) on the segment and choose a camera angle from the menu that appears.
The system cycles through all of the clips in the group clip, even if all camera angles are not displayed in the Source monitor. (The Record monitor displays all camera angles as you scroll through them.)
If the number of camera angles exceeds the number of panes, you can also press the Swap Cam Bank button to display the next bank of cameras.
EXERCISE Take a moment to complete Exercise 5, Parts 2 and 3.
Committing Multicamera Edits
You can remove the grouped clips in a sequence and replace each of them with its selected clip. This might be useful if you experience poor performance with a very complex multicamera sequence on a slower system; for example, on a sequence that uses many multicamera clips and many effects or color corrections.
To commit multicamera edits:
1. Select the sequence you want to affect.
2. Right-click the sequence and select COMMIT MULTICAM EDITS.
Your Avid editing application duplicates the sequence, and then replaces each grouped clip in the duplicate sequence with its selected clip. The original sequence is unaffected and still contains the grouped clips.
EXERCISE Take a moment to complete Exercise 5, Part 4.
Review/Discussion Questions
1. What kind of productions are suitable for a multicamera editing workflow? (See “Multicamera Editing Speeds Production” on page 202.)
2. Are there any kinds of productions that would not benefit from a multicamera workflow? If so, what are they? (See “Multicamera Editing Speeds Production” on page 202.)
3. During hiatus after a season of very high ratings, your production’s technical director has decided to switch the sitcom from shooting single camera to shooting multicamera for the next season. What advice might you offer to the director and the camera operators? (See “Synchronization Options” on page 204.)
4. How does your multicamera workflow (or work load) change when your production shoots using cameras that are not capable of synchronizing external timecode? (See “Visual or Audio-Based Sync Overview” on page 206.)
5. What is external timecode (EXT. TC) and how does it improve a multicamera workflow? (See “Timecode Sync Overview” on page 204.)
6. How can using a slate or clapper during production assist you in grouping clips during post-production? (See “Visual or Audio-Based Sync Overview” on page 206.)
7. List the steps involved in the multicamera editing workflow. (See “Avid’s Multicamera Editing Workflows” on page 207.)
8. Why is it recommended that you sort the clips in the bin before grouping? (See “Creating Group Clips” on page 208.)
9. What is the difference between a group clip and a multigroup clip? (See “Creating Multigroup Clips” on page 210.)
10. Where is the Gang button located for each monitor? (See “Exploring Additional Grouping Methods” on page 212.)
11. What shortcut keys do you use to activate MultiCamera mode? (See “Activating MultiCamera Mode” on page 218.)
12. How do you display the clip name in a MultiCamera quadrant? (See “Displaying the Clip’s Name in a Quadrant” on page 220.)
13. When would you use the Audio Follow Video option? (See “Using the Audio Follow Video Option” on page 221.)
14. What are the steps involved in adding edits on-the-fly in a multicamera sequence? (See “Editing On-the-Fly” on page 226.)