
Lesson 10
Adjusting Audio EQ
This lesson covers audio equalization (EQ) principles and techniques. You’ll learn how to perform EQ adjustments in order to enhance sound by emphasizing some frequencies while de-emphasizing others.
Media Used: Agent MXZero
Duration: 60 minutes
GOALS
![]() Understand EQ terminology, including frequency and Q
Understand EQ terminology, including frequency and Q
![]() Be familiar with four general-purpose EQ filters and understand when and how to use them
Be familiar with four general-purpose EQ filters and understand when and how to use them
![]() Realize that common sounds often fall into predicable frequency ranges
Realize that common sounds often fall into predicable frequency ranges
![]() Learn the frequency ranges for human speech
Learn the frequency ranges for human speech
![]() Be able to use the Audio EQ tool, including use of the sliders and presets
Be able to use the Audio EQ tool, including use of the sliders and presets
![]() Understand the curve in the Audio EQ tool’s graph
Understand the curve in the Audio EQ tool’s graph
![]() Use the EQ III AudioSuite plug-in for advanced EQ
Use the EQ III AudioSuite plug-in for advanced EQ
![]() Understand when it’s best to use the Audio EQ Tool in comparison to EQ III
Understand when it’s best to use the Audio EQ Tool in comparison to EQ III
Understanding Audio Equalization (EQ)
Sometimes simply adjusting volume for clips within a sequence, as covered in the previous lesson, is not enough to perfect the quality of the sound in your show. Despite your best efforts to record clean audio in the field, your audio may contain unwanted sounds, or it might sound muddy or flat. Sometimes the project might require you to alter the sound to create a specific mood or effect. Audio equalization (EQ) allows you to correct audio and create effects that might be required in the final mix.
An EQ adjustment allows you to boost or cut audio based on a particular frequency or range of frequencies. You can raise or lower the volume of a particular audio frequency to make it more or less audible.
EQ adjustments are powerful but they cannot make something out of nothing; they can only adjust sound frequencies that are present in the sound.
When adjusting EQ, you usually try to make as small of a change as possible. Any time you make an EQ adjustment, you are changing the original audio because you are changing the waveform. For example, you should try to isolate the smallest bandwidth to adjust, and make the smallest dB adjustments you can.
In many ways, EQ is to audio what color correction is to video. A shot may be in focus and well framed, but the colors might seem off, or the image might look flat or dull. It’s also possible that the shot just doesn’t evoke the kind of emotion it should. A colorist would color-correct the shot to make the colors accurate and then use some artistic license to make the colors inspire emotion from the viewer. Likewise, you can make similar adjustments to audio, remove the dullness and make it vibrant, by applying an audio EQ adjustment.
Common Uses for EQ
The audio of your soundtrack lives in a soundscape. In that soundscape, there is room for bass, midtones, and treble sound. A soundtrack that sounds full and complete has diverse sounds that are spread out in the soundscape. Some sounds have bass, some have treble, and others have midtones.
An audio clip that you consider to be a midtone, such as someone speaking, might actually include frequencies that overlap into the bass space and possibly other frequencies that overlap into the treble space. A music track will likely fill the soundscape by having its own range of sounds from bass to treble.
If you have too many clips in the same part of the soundscape, they will compete and overlap and your audience may not be able to easily distinguish the sounds.
The speech of your characters may not be intelligible because other clips have frequencies that compete.
One of your primary reasons for using EQ, therefore, is to whittle away unwanted frequencies from clips in order to make room in the soundscape for other clips with similar frequencies to the ones you are removing. For example, if you have speech on A1 and music on A2, you could use an EQ on A2 to reduce the frequencies that are usually used by speech. It’s like cutting a hole in the music to make room for the speech.
The most common uses for EQ are:
![]() To correct audio that sounds dull, thin, or muddy.
To correct audio that sounds dull, thin, or muddy.
For example, if a lavalier mic was placed under an interviewee’s tie or jacket, the voice may be muffled. You can often correct the voice by boosting the midrange (3–4kHz) by +3dB.
![]() To eliminate unwanted noise in the lower frequencies (mic handling, low-frequency hum, or low-frequency wind noise) by dropping out frequencies below 100Hz.
To eliminate unwanted noise in the lower frequencies (mic handling, low-frequency hum, or low-frequency wind noise) by dropping out frequencies below 100Hz.
This step often eliminates noise that you won’t notice with small speakers but would be a problem when playing back on big speakers. Also, dropping out low bass frequencies may improve listener comprehension.
![]() To make dialogue more intelligible.
To make dialogue more intelligible.
The midpoint of the human voice lies around 1kHz. (Sibilant S’s lie at the top of the range. A voice over the telephone occupies a quite narrow range at around 1kHz.)
For the human voice, you generally can adjust low frequencies to affect tone, and adjust high frequencies to affect presence. The midrange, around 1kHz, is where you adjust for intelligibility.
![]() To contain audio, which allows the listener to hear only specific sounds.
To contain audio, which allows the listener to hear only specific sounds.
![]() When adjusting the recording of an instrumental band, you might put a high-pass filter on everything except bass instruments: bass drum, bass guitar, and string bass. High-pass filters allow the higher frequencies to pass. This removes the incidental low frequencies from those instruments, leaving room in the soundscape for the real bass instruments to shine.
When adjusting the recording of an instrumental band, you might put a high-pass filter on everything except bass instruments: bass drum, bass guitar, and string bass. High-pass filters allow the higher frequencies to pass. This removes the incidental low frequencies from those instruments, leaving room in the soundscape for the real bass instruments to shine.
![]() Create audio effects. You might create an audio effect to simulate someone talking on a speakerphone or a mobile telephone, or on a science fiction show you might distort the audio so it sounds like it’s coming from a far away space station.
Create audio effects. You might create an audio effect to simulate someone talking on a speakerphone or a mobile telephone, or on a science fiction show you might distort the audio so it sounds like it’s coming from a far away space station.
EQ Terminology
Understanding how EQ works depends on your knowledge of a few specific terms. These terms will be used repeatedly when discussing EQ and are a fundamental part of the sound engineer’s vernacular.
Frequency
Consider the phrase “I frequently take trips down south” or “The mail delivery is not very frequent.” In those two sentences, the speaker is describing how often something occurs or repeats, perhaps per year or per week. The term frequency is a measurement of how often something happens in a particular time period, whereas hertz is how often something happens in one second.
Sound is created by sending vibrations through the air, which ultimately vibrate your eardrum. Frequency describes how many vibrations are being caused per second. Once you know the frequency of a sound, you can affect it using EQ.
Sound frequency is a measurement of the number of cycles of a sound wave per second, usually referred to as hertz, abbreviated Hz (1,000Hz = 1kHz.) Frequency causes pitch. The higher pitched a sound, the more frequent the vibrations that create the sound.
Putting this in practical context, consider the human voice. To create sound, air passes through the vocal cords, vibrating them. Males typically have larger vocal cords (so large they are encompassed by the Adam’s apple and project through the neck) than females. The larger vocal cords vibrate more slowly and produce a deeper sound than the smaller, tighter female vocal cords, which produce a higher-pitched sound.
The vocal cords vibrate at approximately 1,000 times per second, which is the same as saying they vibrate at approximately 1,000Hz. Males, slightly less; females, slightly more. With that in mind, you can say the human voice is at a frequency of about 1,000Hz, or 1kHz. If you wanted to emphasize the human voice, you would start by emphasizing the 1kHz frequency, and frequencies slightly above and below it.
Note: Human speech occurs at around 1kHz.
Octave
An octave is a doubling or halving of a particular sound frequency. If you have a given sound and you double the number of vibrations per second, the frequency, you have a new frequency one octave above the original.
For example, if you’re a singer and you’re singing a particular note, and then you sing the note one octave higher, your vocal cords are vibrating twice as fast as they were before. If you sing a note one octave lower, your vocal cords are vibrating at half the rate. The three frequencies create the same musical note, just higher or lower than the original.
In terms of EQ effects, octaves are used to specify the width of the adjustment. For example, you have the human voice at 1,000Hz and you want to emphasize it. You can’t make the 1,000Hz frequency louder while leaving the 999Hz and 1,001Hz frequencies. (Not unless the person is genuinely monotone!) You’re more likely to make the 1,000Hz frequency louder, plus a quarter-octave on either side, which will adjust frequencies ranging from 875Hz to 1,250Hz.
Q
Q is the term that means the range of frequencies that are affected by an EQ adjustment. Q refers to the width of the adjustment (from one frequency to another) and is usually expressed in terms octaves or fractions of an octave.
In the previous definition, octave, the example given has a Q of ¼ octave.
Boost/Cut
This is an increase (boost) or decrease (cut) in the volume of a particular frequency. The difference between the original level and the new level is measured in decibels.
![]() An audio frequency increased by 10dB is written as +10dB and is considered to have been boosted by 10dB. An example is boosting the 1kHz frequency by +5dB to bring a human voice more forward.
An audio frequency increased by 10dB is written as +10dB and is considered to have been boosted by 10dB. An example is boosting the 1kHz frequency by +5dB to bring a human voice more forward.
![]() An audio frequency reduced by 10dB is written as –10dB and is considered to have been cut by 10dB. An example is cutting the 100Hz frequency to reduce the bass in a clip.
An audio frequency reduced by 10dB is written as –10dB and is considered to have been cut by 10dB. An example is cutting the 100Hz frequency to reduce the bass in a clip.
Tip: The more you work with sound while thinking about it as frequencies, the more you’ll be able to sweeten, fix, improve, and otherwise use audio effectively.
Audio EQ Filters
An Audio EQ filter is a collection of three parameters: A frequency, along with a value for Q, and an action to boost (increase) or cut (decrease) those frequencies.
Some editing systems use the term filter like Media Composer uses the term effect. In those other editing systems, there is a menu of all the filters and you apply that specific filter to an effect. When working with Audio EQ, the filter does not have the same meaning. There is no menu of all the EQ filters. In Media Composer, you use an EQ effect, and based on how you configure the Q and cut or boost values, you are creating an EQ filter within the EQ effect.
Tip: When you use the Audio EQ tool (choose Tools > Audio EQ), Media Composer automatically applies the Audio EQ effect to the affected clip in the timeline. Unlike video effects in the Effects palette, you do not apply the EQ effect first and then modify it in the Effect Editor. Just open the Audio EQ tool, change the sliders, which defines a filter, and an Audio EQ effect will be added to the clip automatically.
There are five common types of EQ filters: parametric, shelving, high-pass, low-pass, and notch filters. These are discussed in more detail in the following sections.
Parametric Filter
A parametric filter boosts or cuts a specific frequency and a range of adjacent frequencies based on the Q, as shown in the graph of Figure 10.1.
Figure 10.1
The Audio EQ tool configured as a parametric filter.
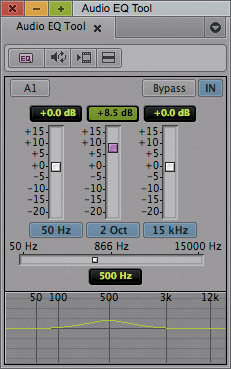
Referring to Figure 10.1, the frequency that is the focal point of the parametric filter is 500Hz, which resides in the exact middle of the Q. The Q itself is specified by the middle slider, which indicates the Q is two octaves wide. Frequencies contained within the Q on either side of this focal point are boosted or cut by the filter along a bell curve, gradually leading up to and down from the focal point, which is represented by the graph in Figure 10.1.
Note: Parametric filters can have very wide Qs or relatively narrow ones. Support for various Q widths varies between EQ effects. The EQ effect that’s used by the EQ tool allows only two octave or ¼ octave Qs, whereas the EQ III effect allows you to custom set the Q. The Audio EQ effect (added by the Audio EQ tool) and the EQ III effect (added by the AudioSuite tool) are discussed later in this lesson.
Notch Filter
Notch filters are similar to parametric filters, but have a very narrow Q. In some instances the Q may be only as wide as 1Hz. These filters are primarily used for “surgical” operations, such as to isolate a specific frequency and boost it or remove it entirely.
For example, an audio recording may have a hum at 50Hz as a result of an ungrounded mic cable. Using a notch filter, you can isolate the 50Hz frequency and cut it while leaving the other frequencies unaffected, as shown in Figure 10.2.
Figure 10.2
The Audio EQ tool configured as a notch filter.
Notice in Figure 10.2 that the Q on the middle slider has been set to ¼ octave, and the frequency has been set to 50Hz. Also notice that the curve shown in the graph is encompassing frequencies on either side of 50Hz. A Q of ¼ octave for a frequency of 50Hz means a range of 44Hz to 62.5Hz, which is pretty wide for a notch. Well, it might not even be considered a real notch because of that width. The Audio EQ tool’s user interface doesn’t allow you to set a tight enough Q for many notching scenarios.
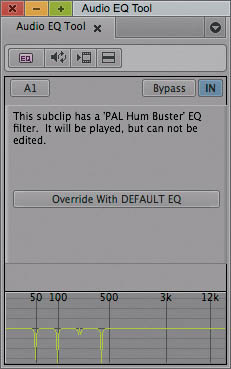
Avid’s engineers were aware of the common problem of hum on an audio recording resulting from an ungrounded cable, so they built the Audio EQ tool with some preset filters to solve common problems, including one specifically for notching out 50Hz, shown in Figure 10.3.
You can see the tight notches in the graph of Figure 10.3. The notches remove 50Hz as well as the three octaves of 50Hz, 100Hz, 200Hz, and 400Hz, which are harmonics of 50Hz. The harmonics are notched because sometimes a hum will exist at harmonic intervals too. (If you’re familiar with a music keyboard, you can think of 50Hz as a low C, 100Hz is the next C note, 200Hz might be Middle C, and 400Hz is the C note above Middle C.)
Figure 10.3
The Audio EQ tool using the PAL Hum Buster preset.
Tip: If you want to create tight notch filters, consider using the EQ III effect that’s part of AudioSuite, instead of using the Audio EQ tool. The AudioSuite EQ III effect allows custom values for Q, so you can create a very targeted, specific notch filter.
High-Shelf and Low-Shelf Filters
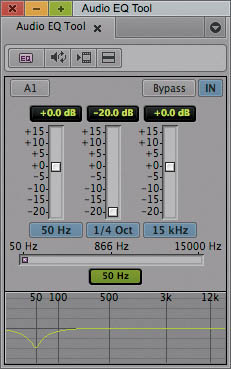
A shelf filter boosts or cuts frequencies above or below a particular frequency. Figure 10.4 shows a high-shelf filter that cuts all frequencies above 6kHz by –20dB.
Figure 10.4
The Audio EQ tool configured with a high-shelf filter.
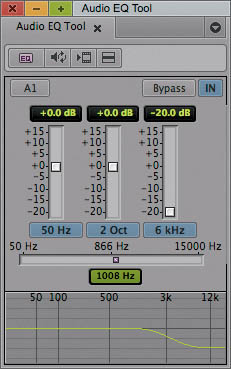
In Figure 10.4, the amount of the cut is set with the third slider, appropriately named the high-shelf slider, while the starting frequency for the high-shelf is defined directly underneath the slider: 6kHz.
Here’s just one of many scenarios where you might use a high-shelf filter: You’re cutting a scene featuring a teenage house party. In the living room, everyone’s partying and dancing to music. Then you cut to a scene of a bedroom where two characters are talking. To maintain consistency that they are at the same party, and in the same house, you want the music to continue under their dialogue.
Low-frequency sounds travel through walls better than high-frequency sounds, as anyone who’s lived in an apartment with neighbors who own a home theatre system is well aware. (Boom, Thump. Thump.) To simulate the effect of music from another room coming through a wall, you can apply a high-shelf filter to the music to diminish the high-frequency sounds. The intelligibility and detail of the sound will be reduced, but the presence and power will remain. You could then attenuate the track using the Audio Mixer to reduce the power, so it’s not as loud in the bedroom as it is in the living room.
High-Pass and Low-Pass Filters
Similar to high- and low-shelf filters, these filters affect all frequencies higher or lower than a given value, but instead of reducing the levels by a given amount, they gradually eliminate it. A high-pass filter allows the high frequencies to pass while eliminating low frequencies. A low-pass filter does the opposite: low frequencies pass and high frequencies are eliminated.
Sometimes it helps to have an image to remember what a high-pass or low-pass filter does. There’s a fancy nightclub with a bouncer who lets in the pretty people and rejects people who don’t meet the dress code: No ball caps allowed. The bouncer is a kind of filter—anyone who dresses well may pass, anyone who doesn’t dress well is rejected. Likewise, a high-pass filter will allow any high-frequency sounds to pass, while any frequencies that are not high are not allowed.
High-pass and low-pass filters gradually roll the level to –∞dB (negative infinity), which is an audio engineer’s way of saying the volume gets turned all the way down.
Figure 10.5 illustrates a low-pass filter, which allows the low notes to pass. The high notes are rolled to –∞, which eliminates them.
Figure 10.5
The Audio EQ tool configured as a low-pass filter; the high frequencies are eliminated.
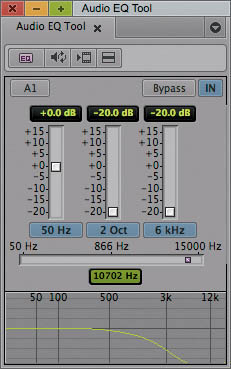
Note: The difference between a shelf and a pass is that a shelf alters the frequencies to a particular level, leaving the sounds there, just boosting or cutting them, whereas a pass actually removes frequencies so they are no longer part of the sound.
Using Average Frequencies for Common Sounds
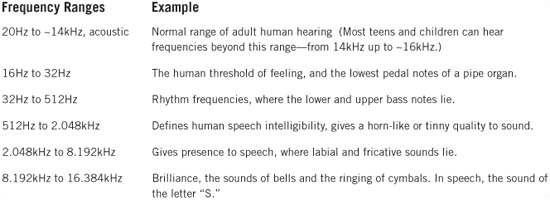
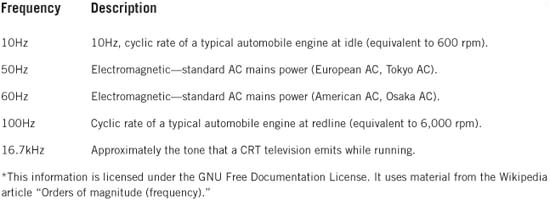
The previous section began by defining an EQ filter as consisting of a range of frequencies and an action to perform on those frequencies, like boosting or cutting them. But how do you know which frequencies to use? Well, treat Table 10-1 as a kind of cheat sheet. It lists frequencies and the sounds that are normally found at those frequencies. Table 10-2 lists frequencies that are often reduced.
Table 10-1 Frequency Ranges of Common Sounds
These tables are only a starting point, not die-hard commandments. Once you create a filter using the frequencies in the tables, you’ll likely have to tweak them along with the Q to hone in on the frequencies you want to adjust. When creating EQ filters, one of your goals is to adjust the frequency and Q specifically enough to only change the frequencies you intend to change, while leaving the others as they were originally recorded.
Table 10-2 Common Frequencies for EQ Elimination/Reduction
Exploring Audio EQ Tools and Plug-Ins
Media Composer provides three tools to manipulate audio EQ:
![]() The Audio Equalization (EQ) tool, which adds the Audio EQ effect
The Audio Equalization (EQ) tool, which adds the Audio EQ effect
![]() The AudioSuite tool, which adds the EQ 3 7-Band effect
The AudioSuite tool, which adds the EQ 3 7-Band effect
![]() The RTAS tool, which adds the EQ 3 Insert on an entire audio track
The RTAS tool, which adds the EQ 3 Insert on an entire audio track
The EQ tool (Tools > EQ Tool) and AudioSuite plug-in (Tools > AudioSuite > EQ 3) support real-time EQ on individual clips. The RTAS version of the EQ III plug-in is applied to an entire track using RTAS inserts, which are the topic of the next lesson.
Each of these tools allows you to adjust the high, low, and midrange frequency ranges of an audio clip. The AudioSuite EQ III effect allows significantly more control by allowing the adjustment of seven bands instead of the three available in the Audio tool’s EQ effect.
As with any other Media Composer effect, you can save audio EQ effects to a bin and reuse them in different circumstances.
Using the Audio EQ Tool
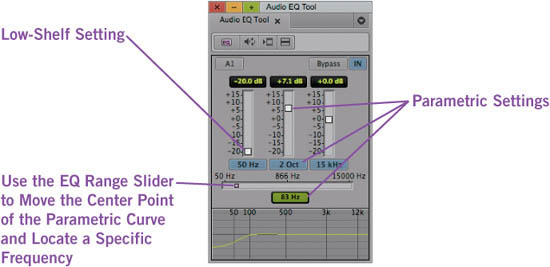
The Audio EQ Tool (Tools > Audio EQ) allows adjustments on three bands—low-frequency (LF), mid-frequency (MF), and high-frequency (HF)—which correspond to bass, midtones, and treble, respectively. The bands are represented by sliders, shown in Figure 10.6.
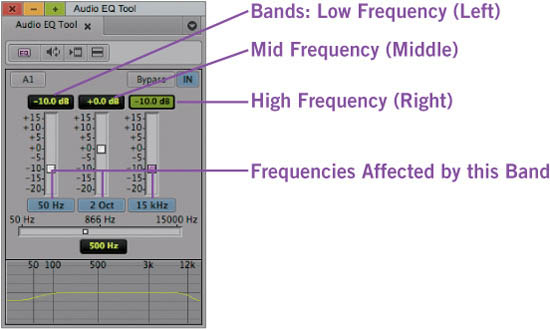
Each band controls the levels of its respective frequencies. In Figure 10.6, the low-frequency band is affecting frequencies less than 50Hz, whereas the high-frequency band is affecting frequencies greater than 15kHz. Those values are indicated under the bands.
By adjusting the three sliders and their associated controls, you can use the EQ tool to create a parametric, high-shelf, or low-shelf filter. The techniques for creating those three filters are discussed in the following sections.
Parametric Filter
The center slider in the Audio EQ tool controls the parametric filter.
With the parametric filter, you can:
![]() Select a frequency between 80Hz and 12kHz
Select a frequency between 80Hz and 12kHz
![]() Boost or cut the frequencies by +15dB or –20dB
Boost or cut the frequencies by +15dB or –20dB
![]() Select the Q used by the parametric filter
Select the Q used by the parametric filter
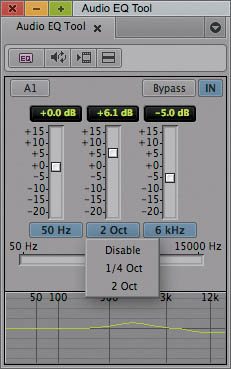
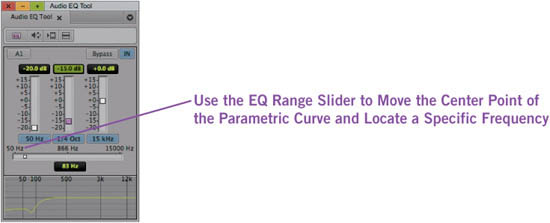
The parametric EQ filter allows Q values of either ¼ octaves or two octaves. The frequency range will be either an eighth of an octave or one full octave on either side of the focal frequency.
A menu under the middle slider allows selecting of the Q value, as shown in Figure 10.7.
Note: The AudioSuite and RTAS EQ III effects allow custom Q settings other than ¼ and two octaves.
For example, a parametric filter focused on 800Hz (the midpoint of the parametric curve) with a two-octave Q will affect frequencies ranging from 400Hz to 1.6kHz with the peak difference in gain occurring at 800Hz.
Figure 10.7
The Octave menu under the mid-frequency band allows selection of a ¼ or two-octave Q.
High-Shelf and Low-Shelf Filters
The left slider controls the low-shelf of the EQ tool’s filters. It has a menu that allows frequencies below 50Hz, 80Hz, 120Hz, or 240Hz to be boosted or cut, as shown in Figure 10.8.
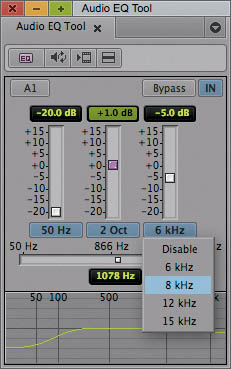
The right slider controls the high-shelf filter. It allows frequencies above 6kHz, 8kHz, 12kHz, or 15kHz to be boosted or cut. The high shelf affects all frequencies from the high shelf’s selected value to 20kHz.
Figure 10.9 shows the high shelf’s menu, displaying the available frequencies at which the shelf will begin.
Figure 10.8
The low-shelf filter affects all frequencies from 20Hz to the value specified in the low-shelf filter menu.
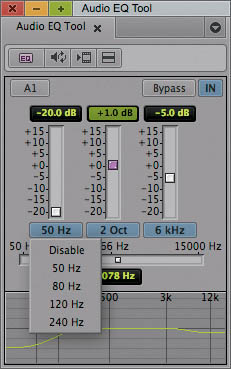
Figure 10.9
The high-shelf filter is being set to affect all frequencies from 8kHz to 20kHz.
You can think of the shelf filters like the treble and bass in your car stereo. If you increase the high-shelf filter, the sound gets brighter; decrease it and the sound gets flat and dull. If you increase the low-shelf filter, the sound gets more “boomy” and if you decrease it, the bass drops out.
Tip: You can’t enter a custom value for the high- or low-shelf filters; you can only choose one of the preset values on the menus. If you need a value that’s not on the menu, consider using the AudioSuite or RTAS EQ3 effects, which do allow for custom values.
Graphical Representation
In addition to the three band sliders, a graphical representation of the EQ adjustment is shown at the bottom of the Audio EQ tool. The graph represents the changes in decibels caused by the low-shelf, parametric, and high-shelf bands of the EQ tool.
Tip: Here are two tips for you:
1. You can hide the graph from view by turning up the triangular icon in the top-right side of the Audio EQ tool.
2. You really shouldn’t hide the graph from view. It provides useful information!
The horizontal centerline of the graph is 0 (zero), which is the natural level for the clip. As you adjust the sliders downward, the curve moves below the zero line and the corresponding frequencies are de-emphasized. Likewise, as you adjust the sliders upward, the curve also moves upward and the corresponding frequencies are emphasized.
The parametric midrange allows a smooth transition from de-emphasized frequencies to emphasized frequencies.
The graph is only provided for informational purposes. It’s not interactive: you can’t drag in it. The EQ III effects, however, do have a graph with which you can interact to define the filters. The EQ III effects are discussed later in this lesson.
Adjusting Audio with the Audio EQ Tool
You can use the Audio EQ tool to apply an Audio EQ effect to one or more clips at the same time.
To adjust audio EQ using the Audio EQ tool:
1. Load the sequence containing the audio track.
2. (Optional) Isolate a portion of an audio segment by placing add edits.
3. (Optional) Mark a range of audio segments by adding IN to OUT points in the track.
4. Select TOOLS > AUDIO EQ.
5. Select the tracks to be adjusted in the timeline or in the Audio EQ tool’s TRACK SELECTION MENU.
If multiple tracks are enabled in the timeline, plus signs (+) appear next to the enabled tracks in the Audio EQ tool.
6. (Optional) Click the PLAY LOOP button, located in the Audio EQ tool.
Media Composer will select the clip to which the EQ has been applied, and loop it. While it’s looping, you can interact with the Audio EQ tool without interrupting playback, which is contrary to normal Media Composer behavior, in which clicking buttons stops playback.
7. Change a value in the Audio EQ tool using any of the methods you use in the Audio Mixer tool.
8. Select AUDIO EQ TOOL FAST MENU > SET EQ - IN / OUT to apply the adjustments to the range of selected clips (if applicable), as shown in Figure 10.10.
Figure 10.10
The Audio EQ tool’s fast menu can be used to apply an EQ effect to all clips from IN to OUT, and can also be used to apply preset EQ effects.
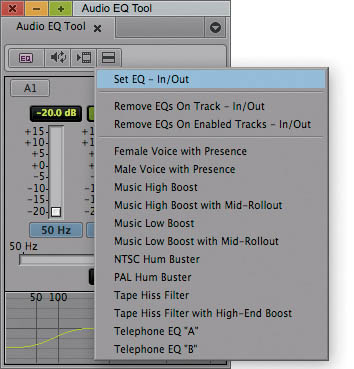
If the sequence does not have an IN or OUT mark, the fast menu will allow the EQ effect to be applied to all clips on the track.
Using Looped Playback
You can use the Audio Loop Play button to create or change an EQ effect while a clip is playing.
If there is no existing EQ effect on the clip before you start, you do not hear any changes until you click the Audio Loop Play button to stop and replay the effect.
As you adjust the EQ values on an existing EQ effect, you might not hear the results immediately. It takes a few seconds for the changes to be applied to the clip.
If you adjust EQ while using the Audio Loop Play button, here are ways to improve the response time:
![]() Monitor as few audio tracks as possible.
Monitor as few audio tracks as possible.
![]() Deselect the video track, if practical.
Deselect the video track, if practical.
![]() Use IN and OUT points to narrow your interval to adjust.
Use IN and OUT points to narrow your interval to adjust.
EXERCISE Take a moment to complete Exercise 10, Part 1.
Using the AudioSuite EQ III Plug-In
AudioSuite digital audio effects are audio plug-ins that expand Media Composer’s audio capabilities. AudioSuite plug-ins are applied to individual clip segments in the timeline, and many can be played in real-time. Even if the AudioSuite effect is not real-time, rendering of audio is almost real-time.
Another category of effects, called real-time AudioSuite (RTAS) plug-ins, are track-based, and are the topic of the next lesson.
Note: Media Composer uses “EQ III” as well as “EQ 3” when referring to these AudioSuite effects. The AudioSuite menu lists “EQ 3,” but when the effect’s interface is displayed, it shows “EQ III.” In this lesson, as in Media Composer, “EQ 3” and “EQ III” refer to the same thing.
You apply an AudioSuite EQ III effect by opening the AudioSuite tool (Tools > AudioSuite) and selecting a plug-in, which results in the AudioSuite effect being applied to the clips under the Current Position indicator for the selected tracks in the timeline. The AudioSuite effects do not exist in the Effect palette. The audio effects that appear in the Effect palette are RTAS effects, which are different than segment-based AudioSuite effects.
AudioSuite’s EQ III Plug-Ins
There are two varieties of the AudioSuite EQ III effects—a 1-band version and a 7-band version—both shown in Figure 10.11.
The EQ III plug-ins (1-Band EQ III and 7-Band EQ III) have similar parameters and purposes as the Audio EQ tool, but they come with a few more bells and whistles. As effects originally designed for use with Avid Pro Tools, they have a rich, interactive, and realistic interface that’s different from the normal Media Composer interface.
Figure 10.11
The AudioSuite menu of effects (plug-ins): there are two EQ 3 effects, which differ in the number of bands available.
One of the most notable changes is that these plug-ins have an interactive graph that you can manipulate to build your EQ filters.
EQ III 1-Band Effect
The EQ III 1-Band effect, shown in Figure 10.12, features a Type control that allows you to choose the kind of filter you want. Setting the type results in the curve graph being configured to match that type.
Figure 10.12
The AudioSuite EQ III 1-band effect.
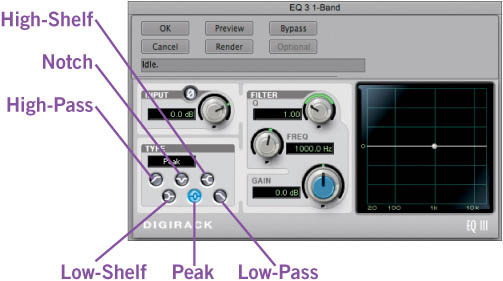
You can further manipulate the curve by dragging the circular control nodes in the graph, or you can manipulate the dials. The dials can be rotated by dragging them. By adjusting the Q and Freq dials, the curve becomes wider or narrower (Q), or the entire curve shifts left or right (Freq). The Audio EQ tool had preset values for Q, but the EQ III has a dial so you can use any Q value. It’s easiest to see how it works by doing it, so feel free to experiment with the dials and observe the effect on the graph. The Gain dial is used to specify if you’re cutting or boosting the levels of the frequencies selected by the graph.
Note: If the High-Shelf and Low-Shelf options look more like tuning forks than shelves, it’s because the icon is showing that the shelf can both attenuate or apply gain to the signals, hence the curve going up or down and the icon showing both scenarios.
The filter types are shown in Figure 10.13.
Figure 10.13
The six EQ filters available in the EQ III effect.
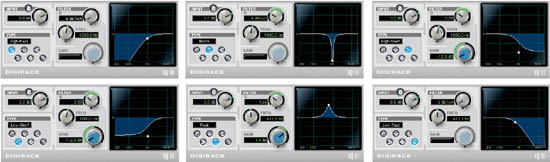
Did you notice the Peak filter? The EQ III plug-ins use the term peak instead of parametric. They’re the same thing.
In comparison to the Audio EQ tool, the EQ III 1-band effect has more control over Q and also has a notch filter that can be narrowed down to a very specific frequency. The Audio EQ tool, however, has three bands that can be adjusted independently, whereas the EQ III 1-band has, as the name suggests, just one band.
Its big brother, the EQ III 7-band effect, however, offers the best of both worlds—lots of granularity for selecting specific frequencies, and seven bands.
EQ III 7-Band Effect
The EQ III 7-band effect, shown in Figure 10.14, gives you the ability to manipulate seven different bands of frequency. This means that you can hone in on very specific parts of the frequency curve to boost or cut different parts of the signal.
Figure 10.14
The AudioSuite EQ III 7-band effect features seven filters, plus direct dragging of the graph.
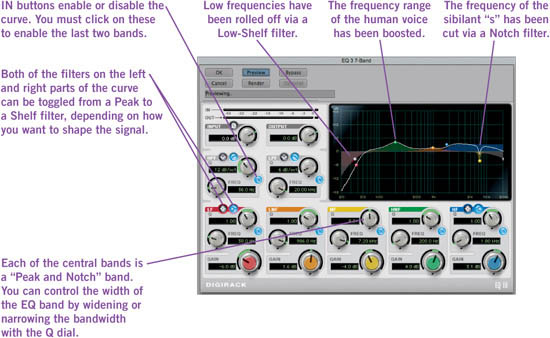
In Figure 10.14, the design of the curve is meant to boost qualities of the human voice while decreasing sssssibilant s’s, which occur at the upper range of the human voice’s frequencies, as referenced in Table 10-1. The effect also removes low-frequency rumbles that might have been picked up by the microphone due to wind.
A brief tour of the seven bands follows:
![]() A high-pass filter (HPF) and low-pass filter (LPF) exist on the extreme ends of the frequency spectrum.
A high-pass filter (HPF) and low-pass filter (LPF) exist on the extreme ends of the frequency spectrum.
![]() Moving inward from both ends are a low-frequency (LF) and a high-frequency (HF) filter. The effect interface allows you to choose between having them be peak filters (parametric) or shelf filters.
Moving inward from both ends are a low-frequency (LF) and a high-frequency (HF) filter. The effect interface allows you to choose between having them be peak filters (parametric) or shelf filters.
![]() The three central bands are identified as low-mid, mid, and high-mid frequencies—LMF, MF, and HMF, respectively. They can be peak (parametric) or notch filters. The only difference between a peak and a notch filter is the width of the Q. Notch filters are very specific because they affect only a few frequencies, whereas peak filters affect a wider range of filters using a curve.
The three central bands are identified as low-mid, mid, and high-mid frequencies—LMF, MF, and HMF, respectively. They can be peak (parametric) or notch filters. The only difference between a peak and a notch filter is the width of the Q. Notch filters are very specific because they affect only a few frequencies, whereas peak filters affect a wider range of filters using a curve.
![]() Each of the seven bands has an IN button that’s used to enable the band. By default, the high-pass and low-pass filters are not enabled, but you can enable them by clicking their IN buttons.
Each of the seven bands has an IN button that’s used to enable the band. By default, the high-pass and low-pass filters are not enabled, but you can enable them by clicking their IN buttons.
Applying the AudioSuite EQ III Effects
AudioSuite effects can be applied to a segment in a sequence or to a master clip in a bin. If applied to a master clip, a new master clip will be created.
To apply an AudioSuite EQ III effect to a segment in a sequence:
1. Park on an audio segment in the sequence.
2. Select the track containing the segment and deselect all other audio tracks.
AudioSuite effects are applied to all segments at the current position on all selected tracks.
3. (Optional) Isolate a portion of an audio segment by placing add edits.
4. (Optional) Mark a range of audio segments by adding IN to OUT points in the track. This applies the EQ effect to full clips from the IN point to the OUT point.
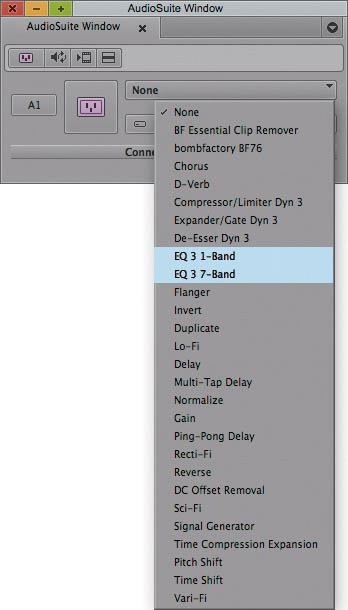
5. Choose TOOLS > AUDIOSUITE. The AUDIOSUITE TOOL opens, as shown in Figure 10.15.
Figure 10.15
The AudioSuite tool.
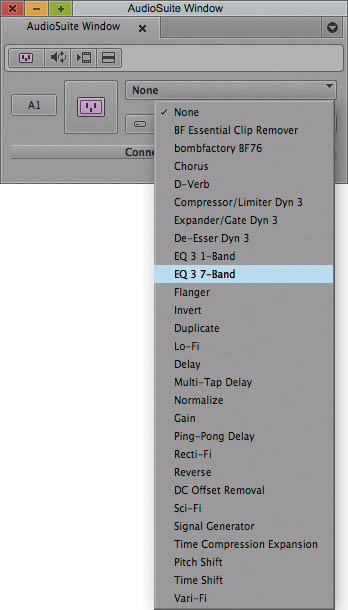
6. Select one of the EQ III plug-ins from the effect selection menu, as shown in Figure 10.16.
Figure 10.16
The AudioSuite tool’s effect selection menu.
7. Choose the drive where you want to render the effect.
8. Click the purple plug-in icon to open the effect’s interface.
9. Adjust the EQ filters as desired.
10. Click OK to save the filter and return to the AudioSuite window.
11. Render the effect by clicking the RENDER EFFECT button.
AudioSuite effects can also be rendered using any of the standard rendering commands.
Caution: Always check the mix after applying an AudioSuite effect. Many plug-ins affect a clip’s volume.
Audio clips in the timeline do not support nesting of AudioSuite effects. You can’t apply more than one AudioSuite effect to a clip; however, you can apply the Audio EQ and one AudioSuite effect to the same clip.
If you want to apply multiple AudioSuite effects to the same clip, you have to apply the effect to a master clip in a bin, and then render the clip using the AudioSuite tool. AudioSuite will then create a new audio clip in the bin, to which you can apply another AudioSuite effect and render out a new audio clip. You can repeat that procedure indefinitely, each time applying another AudioSuite effect.
To apply an AudioSuite effect to a master clip:
1. Choose TOOLS > AUDIOSUITE. The AUDIOSUITE WINDOW opens.
2. Drag a master clip into the AudioSuite window. The AudioSuite window expands to display the master clip options, as shown in Figure 10.17.
Figure 10.17
The AudioSuite window configured for working with master clips.
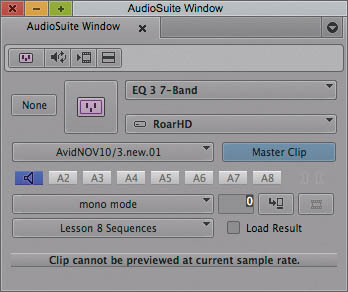
The interface updates to reference the selected clip and the MASTER CLIP button is highlighted to indicate that the effect will be applied to a master clip.
Tip: Disable the Master Clip button if you want to affect a clip in a sequence.
3. Select the desired effect from the PLUG-IN SELECTION pop-up menu.
4. Select the drive where you want to render the effect.
5. Choose the bin where you want to save the processed clip.
6. Click the large, purple plug-in button to open the effect’s interface.
7. Adjust the effect as desired.
8. Click OK to return to the AUDIOSUITE WINDOW.
9. Render the effect by clicking the RENDER EFFECT button.
The processed clip and an effect template containing the effect configuration are saved to the selected bin. If you need to recreate the effect on another clip at a later time, you can drag the effect template to the AudioSuite tool to load effect settings.
Attacking an Unwanted Noise
It is not uncommon to find that you can hear that you have a problem in the audio, but you’re not sure at what frequency or frequencies the problem is audible. The first step is to isolate the frequency or range of frequencies where the problem occurs.
You can use the “search and destroy” method to locate the area:
1. Select a narrow (also referred to as a “high”) Q. In the Audio EQ tool, a good starting point is the ¼ octave in a parametric filter. With the AudioSuite EQ III plug-in, a good starting point is a Q of 10 or greater.
Although you might be tempted to lower the level in the parametric filter to eliminate the problem, remember, you haven’t yet isolated the frequency for the offending sound.
2. Increase the EQ band’s gain by approximately +10dB.
By applying gain to the unwanted sound, it will be much more noticeable—you want to be able to exaggerate the unwanted sound. Once you find the sound, you can bring down the slider.
Caution: Use caution in regards to your personal monitor volume when increasing the band’s gain. As a rough rule of thumb, people generally perceive a difference of +10dB to be roughly two times louder. Thus, if the frequency you seek to eliminate is particularly harsh or pronounced and you’re searching for it with the maximum boost of +18dB, you’re going to give your ears a rather unpleasant taste of that harsh frequency almost four times louder than it was originally!
3. Keep the other EQ bands set to O.ODB GAIN.
4. If you’re not dealing with a short clip, mark an IN and OUT to isolate a small area to loop-play.
5. If you’re using the Audio EQ tool, loop-play the section. If you’re using the AudioSuite EQ III, click the PREVIEW button. While playing, adjust the frequency for the EQ band. With the Audio EQ tool, this is accomplished by adjusting the EQ RANGE slider. With the AudioSuite EQ III plug-in, this is accomplished by adjusting the FREQ knob. Start with a best guess as to which frequency has the unwanted sound.
6. While still loop-playing, if the unwanted sound is not at this frequency, adjust the frequency a little farther along the frequency range, and then wait for the system to catch up and play the new frequency.
7. Repeat the previous step until you can hear the offending sound. This is the frequency you want to adjust.
8. To fix the problem, do one of the following:
![]() If you want to eliminate the sound (such as a 60-cycle hum), drag the gain control all the way down.
If you want to eliminate the sound (such as a 60-cycle hum), drag the gain control all the way down.
![]() If you want to simply reduce the sound, drag the gain control down as little as possible to get the improvement you want. Don’t forget—when you work with EQ, you want to retain as much of the sound as you can.
If you want to simply reduce the sound, drag the gain control down as little as possible to get the improvement you want. Don’t forget—when you work with EQ, you want to retain as much of the sound as you can.
![]() If you want to affect a larger range of frequencies, decrease the Q.
If you want to affect a larger range of frequencies, decrease the Q.
![]() Of course, instead of diminishing or eliminating a sound, you might want to augment it by increasing the gain so the sound is more pronounced.
Of course, instead of diminishing or eliminating a sound, you might want to augment it by increasing the gain so the sound is more pronounced.
Audio EQ Examples
The following examples show two different ways to use EQ to remove excess bass from an audio track. In these examples, assume that a low-frequency rumble in the sound track is very pronounced and EQ is used to de-emphasize it. Also assume that there are voices on the same track. The human voice covers a wide range of frequencies, and the challenge is to preserve the bass frequencies of the voices while de-emphasizing the rumbling sound.
Consider that the goal of the adjustments is the final sound. You should use small adjustments to preserve as much of the original sound track as possible. Do not be overly concerned about specific parameter values.
Low-Shelf Example
This example adjusts the bass by first applying a low-shelf filter. It’s illustrated in Figure 10.18.
To de-emphasize the bass, you simply drop the low shelf to –20dB. However, there are voices on this track, and simply dropping the low shelf also removes some bass from the voices.
To compensate for the loss of bass:
1. Use a wide Q midrange setting to create a wide midrange.
2. Move the midpoint of the mid band curve to around 88-90HZ.
3. Boost the midrange of the mid band to +7.7DB.
Figure 10.18
Low-shelf example using the Audio EQ tool.
Small Octave Range Example
This example, shown in Figure 10.19, uses the parametric midrange to isolate the particular frequency you want to de-emphasize.
To isolate the frequency:
1. Use a moderate Q setting range.
2. Set the midrange EQ GAIN to +15DB.
3. Use the EQ FREQUENCY control to move the midpoint of the mid band until it isolates the bass frequency.
In this case, the bass frequency that you want to de-emphasize is approximately 80Hz. Once you locate the frequency you want, you can adjust it as needed.
Figure 10.19
Small-octave example using the Audio EQ tool.
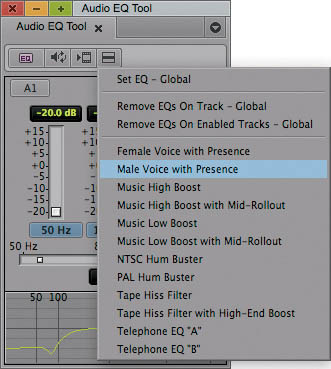
Using EQ Tool’s Preset Filters
Media Composer provides a set of preset EQ tool filters. The preset filters make it easy to perform some quick and common effects, including assisting you to:
![]() Reduce the hum on a line
Reduce the hum on a line
![]() Make two people sound like they’re having a conversation over a phone
Make two people sound like they’re having a conversation over a phone
![]() Remove hiss
Remove hiss
![]() Boost or cut the bass
Boost or cut the bass
Some of the preset filters can use a kind of internal voodoo magic to configure the EQ tool in a way you could never configure it. For example, refer back to Figure 10.3. It shows four notch filters. The EQ tool doesn’t allow for a narrow-enough Q to do a proper notch, nor does it allow for four bands. But when you use the hum-buster preset filters, it can do the job quite well. When you’re using one of those preset filters that goes above and beyond the ability of the EQ tool’s sliders, the EQ tool will hide the sliders since you can’t further customize or tweak those presets.
In addition to the 12 presets that ship with Media Composer, you can also add your own custom EQ effect templates to the fast menu of the EQ tool.
Note: Although the Audio EQ tool offers preset filters, the AudioSuite EQ III effects do not. This section applies only to the Audio EQ tool.
To apply an audio EQ preset:
1. Place the CURRENT POSITION INDICATOR over the clip in the sequence where you want to apply an effect.
2. Enable the clip’s audio track, disabling the other audio tracks,
3. Choose an EQ EFFECT from the EQ TOOL FAST MENU, as shown in Figure 10.20. The effect is applied to the clip where you are parked.
Figure 10.20
The EQ tool’s fast menu contains 12 preset EQ filter templates.
4. To see the parameter values of one of the EQ templates that cannot be edited, view the CONSOLE WINDOW after you apply the effect.
One of the most useful ways to implement the preset EQ effects is to give yourself a starting point for an EQ adjustment by looking to see how the preset handles a given problem. Although you cannot edit existing EQ presets, you can at least use the basic principles to start off in creating your own effects.
EXERCISE Take a moment to complete Exercise 10, Part 3.
Saving Your EQ Filters as Effect Templates
As with Avid video effects, you can create effect templates to save the parameters of an effect to the bin. You can reuse the effect by dragging it back into the AudioSuite or EQ tools.
To save an EQ effect to a bin:
1. Drag the SAVE EFFECT TEMPLATE icon from the Audio EQ tool or plug-in window to a bin. The SAVE EFFECT TEMPLATE icon is indicated in Figure 10.21.
2. Rename the effect, which appears in a bin, to indicate the type of EQ saved.
Figure 10.21
Drag the Save Effect Template icon to a bin to save the effect parameters for easy reuse.

Applying Multiple EQ Effects
Unlike with video effects, you cannot directly apply multiple EQ effects to segments in the timeline. However, there will be circumstances where you need to manipulate the audio using more than one effect. This can be accomplished using an audio mixdown, which is discussed in Lesson 11, “Real-Time AudioSuite (RTAS).”
1. Open the bin containing your EQ templates.
2. Select FILE > OPEN BIN. A dialog box opens.
3. Navigate to the bin named SITE_EQS_BIN.AVB in one of the following locations:
(Windows) drive:Program FilesAvidAvid editing applicationSupportingFiles Site_Effects
(Macintosh) Macintosh HD/Applications/Avid editing application/SupportingFiles/Site_Effects
4. Double-click the SITE_EQS_BIN.AVB file. The SITE_EQS_BIN window opens.
5. Drag one of your EQ templates into the SITE_EQS_BIN window.
6. Name the template by clicking the text and typing a name.
7. Close the bin. Your Avid editing application does not save the effect to the bin until you close the bin.
8. Click the AUDIO EQ TOOL FAST MENU button, and look for your new template.
1. Open the bin containing your AudioSuite templates.
2. Select FILE > OPEN BIN. A dialog box opens.
3. Navigate to the AUDIOSUITE SITE bin file in the following location:
(Windows) drive:Program FilesAvidAvid editing applicationSupportingFilesSite_EffectsSite_AudioSuite_Bin.avb
(OS X Lion) Macintosh HD/Applications/Avid editing application/SupportingFiles/Site_Effects/Site_AudioSuite_Bin
4. Double-click the SITE_AUDIOSUITE_BIN file. The SITE_AUDIOSUITE_BIN window opens.
5. Drag one of your AudioSuite templates to the SITE_AUDIOSUITE_BIN window.
6. If you have not already done so, name the template by clicking the text and typing a name.
7. Close the bin. Your Avid editing application does not save the effect to the bin until you close it.
8. Click the AUDIOSUITE FAST MENU button to locate your new template.
EXERCISE Take a moment to complete Exercise 10, Part 2.
Review/Discussion Questions
1. What’s the difference between the EQ tool and AudioSuite’s EQ III effects? (See “Using the Audio EQ Tool” on page 365 and “Using the AudioSuite EQ III Plug-in” on page 364.)
2. What is frequency? (See “Frequency” on page 358.)
3. How do octaves relate to frequencies? (See “Octave” on page 358.)
4. When creating an EQ filter, what information are you providing to the filter by setting a value for Q? (See “Q” on page 359.)
5. How are a parametric and a notch filter similar? (See “Audio EQ Filters” on page 359.)
6. How are a parametric and a peak filter different? (See “AudioSuite’s EQ III Plug-Ins” on page 370.)
7. What does a high-pass filter do? Give two examples of when you might use it. (See “Audio EQ Filters” on page 359.)
8. A microphone has picked up a lot of rumbling wind. How might you remove it using the Audio EQ tool? (See “Using the Audio EQ Tool” and “Using Average Frequencies for Common Sounds” on page 365.)
9. What is the purpose of the leftmost slider in the Audio EQ tool? Which filters might require you to use it? (See “Using the Audio EQ Tool” on page 365 and “Audio EQ Filters” on page 359.)
10. Suggest an approach for attacking an unwanted noise. (See “Attacking an Unwanted Noise” on page 376.)
11. What’s the process for applying an Audio EQ III effect? (See “Applying the AudioSuite EQ III Effects” on page 374.)
12. How are the seven bands of the Audio EQ III 7-band effect different? (See “EQ III 7-Band Effect” on page 372.)
13. How does the graph of the Audio EQ tool differ from the graph of the AudioSuite EQ III effects? (See “Graphical Representation” on page 368.)