
C H A P T E R 1
Getting Started
In this chapter you’ll unbox a new Kinect—or if you have one already, you’ll disconnect it from your Xbox. Then you’ll install some software, plug the Kinect into a computer, and take a look at what all of the fuss is about with this unique device. You’ll learn what the different components of the Kinect are and be able to play with some simple controls to get a feel for how all the parts work together to make the magic happen.
The Kinect is marketed, packaged, and designed for use with Microsoft’s Xbox gaming console. The Xbox is a remarkable living room entertainment system, and if you haven’t tried Dance Central or Kinect Sports, I recommend that you do—playing those two games at the 24-hour Best Buy in Union Square here in NYC is what got me so excited about the Kinect in the first place. I dragged as many friends as I could down to the store so they could see this amazing technology in action.
That said, this book is the unofficial manual for how to take a Kinect and use it outside the living room—no Xbox required. Now, let’s make sure you have everything you need to unplug your Kinect from the game system—or purchase one by itself, plug it into your computer, and get tinkering.
Buying the Correct Kinect
When I wanted to get my own Kinect, I spent a lot of time trying to figure out the right product to buy out of all of the Xbox Kinect–branded merchandise. I really wanted to play the Xbox games and have a Kinect that could work on my computer. Unfortunately, the Xbox Kinect system bundle isn’t packaged with this goal in mind.
I ended up deciding to purchase the standalone Kinect sensor (Figure 1-1) and saved some money by getting a used Xbox system on which to play the games. The standalone Kinect sensor package includes an adapter cable that lets your Kinect draw power directly from a wall outlet instead of from the Xbox console.

Figure 1-1. Kinect Sensor with Kinect Adventures!—The only Xbox Kinect product that comes with all the parts ready to hook up to your computer.
Another option is to buy the Kinect bundle that includes an Xbox console and the Kinect sensor. You see that bundle as the second item in Figure 1-2. The danger is that people often purchase the Kinect bundle thinking that it will immediately work for them…until they bring it home and find that they are missing a cable and now have to buy one online and wait for it to arrive.
What the Kinect bundle lacks is the power adapter that you need in order to use your Kinect with a personal computer via USB. While I fully endorse getting the full Xbox Kinect system bundle, you’ll need to purchase this additional accessory, a US $30 power adapter, to be able to connect the Kinect to your computer via normal USB. Figure 1-2 shows that power adapter, which is the third item listed in the figure.

Figure 1-2. Online product listings on Amazon.com for Kinect-related products—The first listing is the Kinect you should probably get; otherwise, you will also need to purchase the third listing.
You might choose to go both routes at the same time: buy the standalone sensor for your computer and buy the bundle for playing games. That’s an expensive path, but it lets you keep a Kinect plugged into your computer for tinkering and always have another Kinect to use with your Xbox without having to move cords and cameras around. Newer drivers and software are becoming available to support the use of multiple Kinects simultaneously, so you might find value in having more than one at your disposal.
Separating a Kinect from an Xbox
So, you already have an Xbox? Awesome. Okay, now you need to borrow the Kinect from your Xbox and bring it over to a computer. You’ll probably want to ask permission from whomever’s Kinect you are using before you proceed. I’m sure they’ll miss it! Tell them you’ll give it back after you show them all the cool stuff you can do with a Kinect on a computer once you get through Chapter 3. They’ll thank you!
Disconnecting the Kinect from a late model Xbox is very straightforward. Simply locate the Kinect, follow the cord to the back of your Xbox, and pull it out. Done. Now, you’ll just need the Kinect AC adapter and you’ll be ready to move on to downloading and installing software.
If you’ve got a Kinect successfully hooked up to an early model Xbox, that’s great news—it means you’ve got all the parts necessary to take the sensor and plug it into your computer. To disconnect your Kinect from an older model Xbox, you’ll be removing two components—the Kinect sensor itself, and the attached cable that leads to the Xbox and AC wall outlet (Figure 1-3). Once you’ve disconnected those two things, you are all set.

Figure 1-3. Unplugging the Kinect and AC adapter from an early model Xbox game console (Photo courtesy Microsoft)
Making Sure You Have the AC Adapter
If you have a new model Xbox with a Kinect, it’s possible that they were purchased as a bundle. If that’s the case, then you probably don’t yet own the adapter cable necessary to make the Kinect work on a computer. Unfortunately, now you’ll have to purchase the AC adapter cable before you can continue. The third item in Figure 1-2 shows the product information for the adapter as it should appear on Amazon.com. Figure 1-4 shows a better image of the cable itself.

Figure 1-4. Kinect USB extender on the left for newer XBox syststems, and the Kinect power adapter on the right.
The power adapter cable is required for two reasons. First, the Kinect requires more power than a standard USB port can deliver, probably because of all of the components it has inside, such as a motor, a number of sensors, and a fan to push air through the device for cooling. The special USB port on the late model Xbox can deliver this extra power, but because your computer can’t, you have to compensate for that by plugging the Kinect into an electrical outlet with the AC adapter provided on the cable. This need for an adapter cable is frustrating if you want to go mobile with the Kinect and a laptop—you’ll need a 12-volt battery and some careful modification to get past that problem.
The second reason you need the adapter cable is that the cord on the Kinect uses a proprietary, Xbox-only USB connector. This is frustrating, I know. The AC adapter cable has a port that accepts this special USB shape on one end and turns it into a standard USB connector on the other. The older Xbox systems have a standard USB port, which is why they also require an adapter cable to be compatible with the Kinect. When Microsoft launches a version of Windows with Kinect support built-in, they may introduce a lower-power version of the Kinect for use with computers that doesn’t require this pesky AC adapter attachment.
Inspecting the Kinect, Part by Part
Now that you’ve acquired a Kinect, let’s take a closer look at all the parts. Figure 1-5 shows all the items in the box from a standalone, Kinect Sensor purchase. The only ones you need to follow along with this book are the AC Adapter and the Kinect itself. You can keep the USB extender, manuals, and Kinect Adventures game disc in the box, as you may need them if you have or plan to get an Xbox.
Before you throw away that box, you should know that it functions as a handy way to store and transport the bulky and oddly shaped Kinect. The device is pretty rugged; very few are returned defective or broken, and they can take a beating. However, the original box is a popular way for people to bring the sensor to and from meetups and hackathons in NYC. The foam inside is shaped perfectly to hold the Kinect, making the box a simple, portable container, so you might want to hang on to it just in case.

Figure 1-5. Contents of standalone Kinect sensor box: Manual, Kinect Adventures! game disc, the Kinect itself, AC adapter, and special USB extender.
Now, let’s take a look at the inputs and outputs you’ll be able to take advantage of in applications and when building your own projects or products. Being able to identify all the components on the outside of the device (Figure 1-6) will be very helpful going forward. There’s a lot going on, and many people aren’t quite sure which part does what. After reading through this section, you’ll know the function of every part and be able to apply that knowledge to your advantage.

Figure 1-6. Kinect external component identification— Output: A) IR (infrared) structured-light laser projector, B) LED indicator, and K) motor to control tilt-in base. Input: F-I) Four microphones, C-D) two cameras (RGB and IR), and E) one accelerometer
There are two basic ideas when working with hardware, and with technology in general, that are really important: input and output. Input is information that comes into a system from an external source, and output is information that goes out from a system. I learned about inputs and outputs by hooking up stereos, TVs, and VCRs as a kid. An input to a stereo might be through a microphone or an iPod, whereas an output could be to a speaker or amplifier. Many devices, such as an amplifier, can both receive input and send output. The Kinect has sensors that act as inputs, reading (or sampling) information in space about the physical environment in front of it. The Kinect also has actuators (outputs) that allow it to write or act upon the physical space by changing it in different ways.
There are four microphones on the Kinect—that’s right, four! That’s not just stereo; it’s actually quadraphonic sound. Combined with advanced digital signal processing in software, these four mics can be used to do remarkable things. In combination, these four audio inputs can work to filter out background noise and detect the relative position of anyone speaking within a room. Looking at the Kinect head on, there are three adjacent mics on the right side, just below the “XBOX 360” label (Figure 1-6, G-I). A fourth microphone is on the left side (Figure 1-6, F). Microsoft’s official Kinect SDK (Software Development Kit) is the first to reveal how to access the microphones, although other drivers are expected to provide access to this hardware in the future.
The Kinect kind of looks like a huge, clunky old webcam, which is fitting because there’s actually a standard webcam built right into the middle of it (Figure 1-6, C). Next to it is an infrared camera, which is a bit more exotic than a standard webcam. Equally interesting, if not downright mysterious, is the 3-axis accelerometer inside the device, behind the “XBOX 360” label. Most people didn’t expect the Kinect to contain such a sensor, which is more common in devices designed to be held in your hand, such as a mobile phone or the Nintendo Wii controller.
Now, for the outputs. You may have heard that the Kinect has a laser in it—it’s true. You can see it glowing red (Figure 1-6, A) when the Kinect is plugged in, even though the light the projector emits is in the infrared spectrum and mostly invisible. It works in combination with the infrared camera on the unit (Figure 1-6, D) to derive the exact position in space of everything in the room it occupies. The other light-based output is the LED indicator (Figure 1-6, B). It’s not easily accessible from frameworks such as OpenNI; however, if you have a project that would benefit from feedback through the hardware, this may be of interest to you. It could be an ideal way for the application to alert a user that something is happening without requiring a screen. For example, in the 3D capture tool MatterPort, the user picks up the Kinect and walks around the room—away from the computer—to photograph objects. An audible beep from the computer lets the user know once a particular view has been adequately analyzed. This beep could be accompanied by a flicker of the LED light on the unit as an additional cue, so the user doesn’t have to be looking at the screen to register it.
Finally, the Kinect has the functional opposite of a sensor, called an actuator, in the form of a small motor driving gears that pitch the tilt of the camera 30 degrees up or down. This could be put to novel use in the applications you build. For example, by sweeping the device and its sensor elements up and down through space, the Kinect can be used to capture high-resolution scans of the environment around it. If you want to mount a Kinect to a robot, the motor could provide the mechanical up-and-down motion of the camera. Additionally, if you employ face or body tracking, you can adjust the position of the camera to adapt when a person moves out of the field of view.
Now that we have identified all of the Kinect hardware, let’s put it to use with software. You’ll have a chance to see the imagery that comes from the RGB camera, as well as the depth image computed from the infrared projector and camera combination.
KINECT TEARDOWN!
Downloading and Installing Software
The first time I plugged my Kinect into a computer to see how it worked, I used the software you’ll install in this section. That software is RGBDemo, and I still reach for it whenever I want to demonstrate what the Kinect is capable of and how it is different from a standard webcam. RGB stands for red, green and blue—the colors the webcam in the middle of the Kinect can see. The D in Demo also stands for depth, which the IR projector and IR camera generate with the help of a structured-light chip from a company called PrimeSense. Who is PrimeSense?
PrimeSense is the Israeli company whose hardware reference design and structured-light decoding chip are at the heart of the Kinect’s volumetric 3D camera system. This was a surprise to many who had tracked the evolution of the Kinect (originally code-named Project Natal), as many thought Microsoft would use the intellectual property of the two time-of-flight 3D sensor companies they had recently acquired—3DV Systems and Canesta. Following the lead of the OpenKinect project, PrimeSense went on to help found OpenNI in an effort to put the best tools in the hands of developers. OpenNI has launched the first major store offering PC applications that make use of volumetric cameras such as those in the Kinect with the debut of Arena, which will be covered in more detail in Chapter 3.
While those approaching the Kinect from a natural user-interface perspective see the Kinect as a 3D gesture-recognition device, people from engineering and robotics backgrounds refer to this particular aspect of the Kinect’s hardware as an RGBD sensor. RGBDemo is intended to provide a demonstration of how the Kinect performs as an RGBD sensor in applications such as machine vision and 3D reconstruction—hence, the name RGBDemo. It’s the most straightforward way to get a look at the low-level data from the Kinect on both Mac and Windows machines.
Why do you need to download software if the Kinect “just works” on your Xbox? Well, if you plugged your Kinect into a computer without installing some drivers and applications that know how to talk to the Kinect, nothing would happen! So, while I know you must be eager to get going, please wait until you carefully go through the steps in order before plugging in your Kinect. Some of these steps need to be carried out in a very specific order. Please follow along!
First, you’ll need to go on the Web and download RGBDemo, a powerful suite of open-source software written by Nicolas Burrus to provide a toolkit that others can use to write programs and a means for noncoders to see what the Kinect data really looks like. If you’re on Windows, then you’ll install three included drivers from OpenNI that help RGBDemo make better sense of the data from the Kinect. The RGBD-viewer application included with the software will show you the kind of imagery the Kinect can see and the unique ways in which it does so—this will be how we test that you’ve got everything hooked up correctly.
Nicolas Burrus, originally from Paris, explores the use of depth sensing cameras like the one in the Kinect for his postdoctoral research in computer vision at the robotics lab of Carlos III University of Madrid (http://roboticslab.uc3m.es/). Many thanks are owed to Nicolas for being the first to package up a simple executable program anyone can use with the Kinect on their computer, the same month the Kinect debuted. For coders, the collection of source code and related machine vision libraries he assembled for RGBDemo helped many people get started building applications. For less technical people, RGBDemo provided a means to see the Kinect data for the first time without having to write any code. Burrus and his partner, Nicolas Tisserand, have since formed a company called manctl (http://manctl.com) to further innovate around Kinect-related technology. Let’s take a look at how to get started with RGBDemo.
Finding the Correct Version of RGBDemo
First, you need to find the correct version of RGBDemo for your operating system. Open up a web browser and go to http://labs.manctl.com/rgbdemo in order to pull up the latest information about the software project (Figure 1-7). Nicolas updates the codebase regularly, and you’ll need to pick the most recent version that works on your system. As of this writing, v0.6.1 is the latest version that works for Windows and Intel Mac OS X Snow Leopard. As of this writing, the RGBDemo project has just been given a home on the manctl web site, so be aware that its appearance may have changed by the time you visit.

Figure 1-7. RGBDemo project web page
RGBDemo is an open-source software project. Delightfully, it therefore includes not only an application ready to run as a “binary executable,” but the source code of its composition as well. Open-source projects such as this one are valuable: If you find a problem with the software or want to extend it in a new way, you have the recipe to cook your own version from the original instructions, which you can then compile into your own improved “binary executable” application. Many open-source projects come with only the source code and nothing you can use without knowing how to compile programs. That’s not much fun if you aren’t that technical. RGBDemo is wonderful because it’s ready to run with an executable binary file, in addition to letting you see how it was constructed.
Now, let’s jump to the binary software that can run on your operating system. To do that, the following material is split up into different instructions for Windows and Mac users. After the download and installation, we’ll meet up once again in the “Testing Your Kinect” section, where we’ll launch RGBDemo and tinker around to make sure everything is working.
Downloading and Installing RGBDemo for Windows
Depending on which version of Windows you are using—XP, Vista, or Windows 7—your experience with the details in this section may vary. These instructions address some of the hangups you could face when downloading and installing on Vista that you might not experience on XP or Windows 7. You can just skip the explanations of those problems if you don’t run into them, but they’re included so we don’t leave any of the less advanced readers behind. This process can be tedious on Windows, compared to the much simpler Mac installation.
Downloading the Binaries
Enough talk—let’s get that software! On the RGBDemo web page, click the Windows binaries download link, as shown in Figure 1-8. The page will jump to a line that contains a link to a file called RGBDemo 0.6.1rc1-Win32.zip (Figure 1-9). Before you click that download link, you’ll need to carefully carry out two steps in sequence.

Figure 1-8. The link for Windows binaries on the Kinect RGBDemo page
First, I want you to select and copy the 28-character License Key, as shown in Figure 1-9. You will need to use this in a moment and, if you copy it to your clipboard now, you will be able to paste it in the next step without having to come back to this page and hunt for it. This long string of letters, numbers, and symbols is a license to use the PrimeSense NITE middleware with the OpenNI framework.

Figure 1-9. Screen showing the License Key and the download link for the RGBDemo ZIP file
Great! Now, let’s click the link at the top of the screen (Figure 1-9) to download the RGBDemo-0.6.1rc1-Win32.zip compressed file.
Bam! What just happened? Your browser is now at another site called SourceForge (Figure 1-10), which hosts this popular file. Don’t be alarmed when the RGBDemo software starts to download automatically. Or, you may see a dialog box prompting you to select a save location for the file. The compressed file is over 60MB in size and could take a bit of time to download depending on the speed of your Internet connection.

Figure 1-10. Downloading from SourceForge
You may need to respond to an alert that says something like This type of file can harm your computer. Are you sure you want to download RGBDemo-0.6.1rc1-Win32.zip? Answer affirmatively, and when RGBDemo-0.6.1rc1-Win32.zip is finished downloading, double-click the ZIP file to see the Extract all files window (Figure 1-11). Simply click the icon for the RGBDemo folder and drag it out of the window and over to your desktop to extract it there.
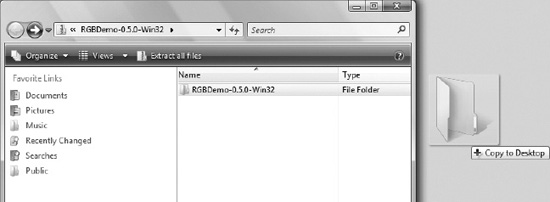
Figure 1-11. Dragging the RGBDemo folder to the desktop
You may be prompted with a Windows Security Warning asking Are you sure you want to copy and move files to this folder? Click Yes. Windows will copy the folder and all its files over to the desktop. Once it has finished, open the folder on your desktop and you’ll see a listing of all the files and folders inside the directory (Figure 1-12).

Figure 1-12. The complete directory of files inside the RGBDemo folder
Now, go into the directory labeled Drivers. Once you are in the Drivers directory, you will see a list of three MSI installation files—don’t click any, yet! You’ll need to install them in a very critical order (Figure 1-13), so pay attention and follow along, please. Perform the installation in the following order:
Notice that the order in which the files are listed in the directory as shown in Figure 1-13 won’t necessarily match the proper installation order. So be careful! Pay attention to the order as I describe it.
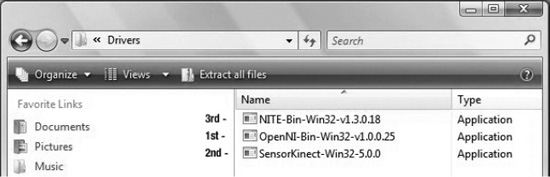
Figure 1-13. Critical order of driver installation: 1.) OpenNI- Win32, 2.) SensorKinect-Win-OpenSource32, 3.) NITE- Win32
First, you need to install OpenNI (Figure 1-14). This is a framework for “natural interface” technology that allows modules for different hardware and software to talk with each other. Next, you’ll install SensorKinect (Figure 1-16), a device module that registers the Kinect with OpenNI so it can read its sensor data. Finally, you’ll install NITE (Figure 1-17), a “middleware” module that processes the volumetric data coming from the Kinect and derives a map of a person’s skeletal structure that can be used by an application, controlling gestures and other interactivity.
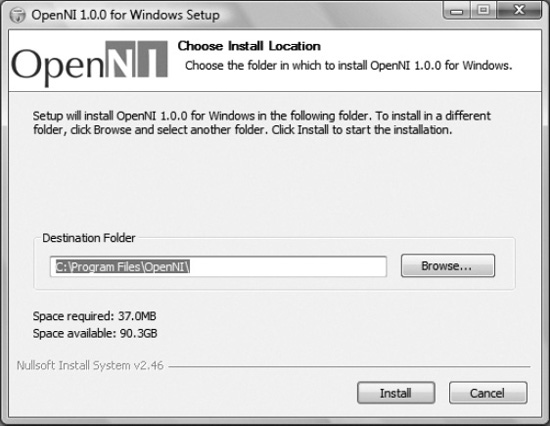
Figure 1-14. OpenNI install dialog showing default destination
Installing OpenNI
Double-click the OpenNI-Win32 file to start the installer. Depending on your settings and which version of Windows you are using, you might get a Windows Security Warning (Figure 1-15, top). Just respond in the affirmative—in this case, Install. Don’t worry, all of the software you are instructed to download in this book are from safe sources. In the OpenNI setup application, you can accept the default path, C:Program FilesOpenNI, click Install, and close the window once it’s finished.

Figure 1-15. Windows Security Warnings—It’s okay to trust software from PrimeSense Ltd; choose Install.
Installing SensorKinect
Next, launch the SensorKinect-Win-OpenSource32 setup application and be sure that both OpenNI and Sensor are checked in the component selection dialog box (Figure 1-16). Near the end of the installation, you may see another Windows Security Warning (Figure 1-15, bottom)—click Install this driver software anyway, then close the window when the process has completed.

Figure 1-16. Component install choices—Make sure both OpenNI and Sensor are checked
Installing PrimeSense NITE
Finally, install the last driver by launching the NITE- Win32 setup application. Agree to the license agreement, keep the default installation path as C:Program FilesPrime SenseNITE, and click Install. In the next step, you’ll be prompted for a license key (Figure 1-17). Paste in the string of 28 characters that you copied from the RGBDemo download page (Figure 1-9) and hit Install. It’s normal for a couple of command prompt windows to open and close by themselves during this step, so don’t be alarmed.

Figure 1-17. PrimeSense prompt for NITE license key—0KOIk2JeIBYClPWVnMoRKn5cdY4=
Plugging in the Kinect
Congratulations! You are done installing. Now, for the fun part—you are ready to plug the Kinect into your computer. Refer back to Figure 1-4 for a visual overview of the cords involved in this next series of steps. Take the special male USB plug directly on the Kinect and plug it into the female USB connector on the AC adapter cable. Plug the AC adapter into a wall outlet, and then plug the standard USB connector into a USB port on your computer. This should look something like Figure 1-3 but instead of unplugging from an Xbox you are plugging into your computer. You may see the Kinect’s LED indicator turn on or blink. Now, go ahead and point the Kinect at yourself from a distance of about two feet.
Once you have plugged in the Kinect, you may see various system notifications (Figure 1-18, bottom) about driver software installation. Depending on your system configuration, you may see individual notifications for the motor, cameras, and Xbox NUI Audio. This could take a while, so please be patient. Windows may be unable to find the audio drivers because these sensor drivers are only for the PrimeSense-related components of the Kinect (Figure 1-18, top). When Microsoft licensed the design, they added their own array of four microphones (See F-I in Figure 1-6) on top of the PrimeSense reference specification. Microsoft has yet to distribute third-party drivers for the audio components on Windows; however, they provide full audio support in their official SDK. Therefore, if prompted to locate audio drivers, select the choice labeled Don’t show this message again for this device and don’t worry about Windows not finding the Xbox NUI Audio device (Figure 1-18, top)—this is normal.

Figure 1-18. Xbox NUI Audio driver not found message and system tray notification
If you are running Windows Vista, you will probably be prompted to restart; go ahead and do that. When you return to Windows, it will show a screen saying it is configuring updates and warn you not to turn off your computer. It could take a while depending on your system. When it’s done, you’ll finally be able to tinker around with the Kinect on your computer!
Navigate to the RGBDemo folder on your desktop and launch the rgbd-viewer application (Figure 1-12, last item in directory). A black command prompt window will appear with the message Setting resolution to VGA. This is normal and should be followed by the graphical user interface window of RGBDemo (Figure 1-21, later in the chapter).
Now, skip to the “Testing your Kinect” section, as the following pages explain the download and installation process for Mac OS X. If you’re curious, take a look at the process as described in this section for Apple computer users.
Downloading and Installing RGBDemo for Mac OS X
RGBDemo is available for the Intel-based Macs and requires Snow Leopard or Lion. Unfortunately, PowerPC-based machines are not supported. Navigate to the RGBDemo site at http://labs.manctl.com/rgbdemo and locate the Mac Binaries link.
The file is hosted at SourceForge, and will download automatically, as pictured in Figure 1-19. You may need to confirm by clicking Yes in response to a message such as This type of file can harm your computer. Are you sure you want to download RGBDemo-0.6.1-Darwin.dmg? There’s nothing in RGBDemo that will harm your computer, so don’t worry.
Once the file has finished downloading, click it so it will expand into a disk image. The resulting disk image (Figure 1-19, bottom) will contain two folders. Drag the RGBDemo folder onto the Applications folder. Then, navigate to the Applications folder, find RGBDemo, and navigate into it. Once inside, you’ll see a listing of all the files and folders in that directory (Figure 1-20). It’s that simple.

Figure 1-19. RGBDemo-0.6.1-Darwin.dmg download and resulting disk image containing RGBDemo folder and link to Applications
Congratulations! You are done installing. Now, for the fun part—you are ready to plug the Kinect into your computer. Refer to Figure 1-4 for a visual overview of the cords used in this next series of steps. Take the special male USB plug on the Kinect and plug it into the female USB connector on the AC adapter cable. Plug the AC adapter into a wall outlet, and then plug the standard USB connector into a USB port on your computer. This should look something like Figure 1-3, but instead of unplugging from an Xbox, you are plugging into your computer. You should see the Kinect’s LED indicator turn on or blink.
Now, point the Kinect at yourself from a distance of about two feet. Let’s launch the rgbd-viewer application as shown in Figure 1-20. You are ready to test the Kinect on yourself! You should see the RGBDemo user interface as pictured in Figure 1-21. This is the end of the section on downloading and installing RGBDemo for Mac OS X. The rest of this chapter applies for both Windows and Apple computers. Well done!

Figure 1-20. The complete directory of files in the RGBDemo folder, with the rgbd-viewer application selected
Testing your Kinect
Are you ready to see yourself in volumetric 3D?! Okay, if you’ve followed the steps successfully, you should be looking at yourself like I am in Figure 1-21. This colorful, realtime view of you looks like a thermal camera image from a science fiction movie, but that’s where the similarity ends.
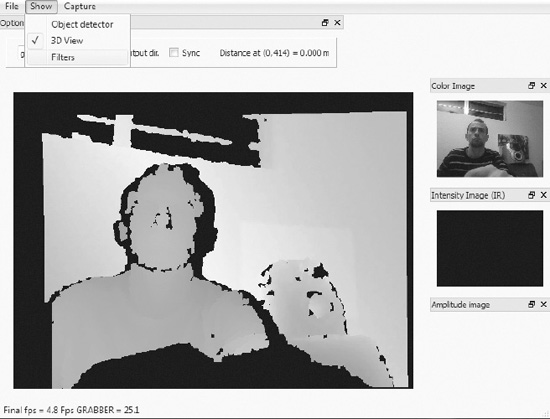
Figure 1-21. RGBD Capture window in rgbd-viewer application. Main image shows merged depth range image mapped to color values representing distance from sensor. Upper right image shows Color Image stream from RGB camera. 3D View and Filters options are shown in the Show dropdown menu. Distance value for each pixel is shown in upper middle Distance at... status corresponding to location of mouse pointer on depth range image.
Instead of showing different colors representing a range of temperatures like a thermal camera, the Kinect shows different colors for a range of distances from the camera. These colors are arbitrary—some other drivers display the depth image as a grayscale range, instead. You can see the exact distance in meters of any pixel, or picture element, in the image from the camera by moving your mouse over any part of the colored image of yourself. Look just above and to the right of the depth image and you’ll see a readout such as Distance at (0,414) = 0.000 m in Figure 1-21. Try rolling your pointer around and see how far different things in your environment are from the camera. The readout is calibrated in meters, not feet, but you can find a converter online.
Take a moment to jump around in front of the camera and observe how the depth image reflects your movements in space. Pick up the Kinect and point it at the walls and floor around you, and note the change in color corresponding to the change in distance of these objects from the device. All of the depth data about the scene can be sent to the programs you write, and the other chapters in this book will go into detail about how that works. Additionally, you’ll learn about the fundamentals of people and skeleton tracking in Chapter 2. For now, we’ll just focus on the basics of the data and imagery coming out of the Kinect without any sophisticated middleware.
It’s a pretty simple idea—every pixel in the image has a location in space as measured from the camera. No other consumer camera has ever had the Kinect’s ability to measure space. This is the raw functionality of a “depth sensor”, which has been used in robotics and engineering for years. With just the depth sensor, as well as skeletal tracking middleware and other tracking methods we’ll look at later, software developers can create simple “natural interface” software that makes it easier to interact with machines without touching them. It’s pretty cool—but what we’ll do next shows how, with the help of the right software, the Kinect breaks away from just depth sensing to usher in a whole new class of equipment, becoming the first consumer-grade volumetric 3D camera, or voxelcam for short.
In Figure 1-21, you can see a normal webcam view of yourself in the upper right corner labeled Color Image. The signal is coming from the visible light camera sensor behind the lens in the middle of the Kinect (Figure 1-6, C). What you are looking at in the Color Image window is a live video stream of visible light, organized on your screen in the same way that still pictures and video have been displayed on screens since the dawn of television—through a 2D table of picture elements, or pixels. Like a spreadsheet with rows and columns of light samples, and a color value for each cell in the table, these elements are stitched together to form a mosaic on the screen. Note that by default the Intensity Image and the Amplitude Image in the lower right of the window in Figure 1-21 are turned off. Nothing is wrong with your setup if you don’t see anything in that area.
Now, you’ll add another dimension to the camera image with the help of the depth range image data. Breaking from all traditional photography and video as we’ve known it, we can now assign each picture element a location in 3D space that reflects the position of the original surface from which it was sampled (Figure 1-22). For every pixel in the depth image, we can extract three dimensions: its distance from the camera (z), its vertical position in a column of the image table (y), and its horizontal position in a row of the image table (x).

Figure 1-22. RGBDemo 3D View—synthetic camera in alignment with actual camera by default
These floating points, or “pixels in space”, are hard to imagine. They have no color or texture of their own. They are merely used to indicate the presence of something that is reflecting the infrared laser pattern. To provide a more concrete way of understanding these points in space, we’ll move from the 2D metaphor of a spreadsheet to a 3D metaphor of a Rubik’s cube. Imagine each point as having a volume of its own as represented by a single cube within the larger Rubik’s cube. An individual cubic volume element, or voxel, from this larger 3D array of cubes acts as a container for information, with an address in x, y, and z coordinates designating a chunk of physical space in the scene. That means we can merge the picture elements from the webcam with the voxels from the Depth Cam to build a volumetric cubic space that has both depth and color. This process assembles a live cloud of colored voxels in 3D space that reconstruct the surface shape and appearance of objects in front of the Kinect (Figure 1-22). Unlike 2D computer vision technology, such as the Playstation Move or Nintendo Wii, this ability to parse the voxel map of a scene with depth information is fundamental to understanding the power of the Kinect and how you can work with it.
Are you ready to get voxelated? Okay, to see yourself in volumetric 3D, first click Show from the menu bar in the RGBD Capture window, and then select 3D View. A new window will pop up labeled 3D View (Figure 1-22). You’re not quite there yet—at this point you should see yourself like you would on a normal webcam, but with some rough edges around your head and other objects. Here’s the fun part: click on yourself and drag. Now, that’s what you’ve been waiting for (Figure 1-23)!

Figure 1-23. 3D View with synthetic camera rotated slightly to the left. Top view shows default PointCloud render mode, bottom view shows Triangles render mode
What you are looking at is a “synthetic camera” image in volumetric space. The synthetic camera isn’t really there—its image is derived from peering at the floating volume elements in space from a different angle than that at which they were originally sampled. You can take this synthetic camera and spin it in any direction to look at the voxel data from any angle. Figure 1-24, for example, shows the image rotated 90 degrees.
Since you are using only a single camera, the image will start to look more incomplete if you try to peer behind objects facing it, and you can extrapolate this from Figure 1-24. It’s possible to arrange a number of voxelcams in a space in order to build a more complete scene. Both the Microsoft Kinect SDK and OpenNI framework actually include support for interfacing with multiple Kinects simultaneously. Therefore, if you wanted to create an application that filled in imagery gaps from multiple angles, it is possible to write software to do that. This single, comprehensive volumetric view of a space could be observed from infinite perspectives, all positioned in real time interactively during playback with synthetic cameras that map to the direction a viewer is looking.
Once people catch on to what this technology can really do, there will be an increased demand for more truly immersive experiences. As volumetric sensor arrays become more common to meet this demand, the possibilities of what can be created from this technology grow even more limitless. The Kinect is the tip of the iceberg. Welcome to the volumetric age!
These buckets of information can be rendered in different ways. The default method for 3D View is just a cloud of pixels in space, also called a point cloud (Figure 1-23, top). This view has lots of holes in it, as you can see. You can zoom in to see the points even closer—the pattern they display reflects the structured-light dot pattern invisibly cascading over you from the IR projector.
Since we don’t have multiple Kinects to fill in all the cracks of this synthetic camera image just yet, let’s use the magic of polygons to render this information in a way we are more accustomed to seeing. Select the button in the upper right section of the 3D View screen (Figure 1-23) labeled Triangles, located to the right of the PointCloud and Surfels buttons. This will create a mesh of triangle-shaped polygons that connect the dots and allow the visible light image data more surface area to display. Notice the difference between point cloud view and triangle view (Figure 1-23, bottom). The ability to create this kind of 3D imagery was only within reach of academic, entertainment, and military institutions that could afford a price tag in the US$15,000 range only a few years ago.

Figure 1-24. RGBDemo 3D View showing volumetric 3D synthetic camera perspective magically rotating 90 degrees perpendicular to the physical Kinect
You’ll notice the big hole in the image “behind” where you are sitting – that’s your shadow! Your shape is silhouetted because you are blocking the IR projector from placing measurable light on the wall behind you. It may not look like much, since this is a very rudimentary use of the technology, but you can get an idea of where this capability is leading when you check out Microsoft Research’s KinectFusion project for realtime dynamic 3D surface reconstruction. This ability to reconstruct the physical world in digital space is a major theme at Microsoft, and simple applications that have you “digitize your world” can be found in the Fun Labs minigames available from Xbox Live.
![]() Note Learn more about the the KinectFusion project at the following URL: http://research.microsoft.com/en-us/projects/surfacerecon/
Note Learn more about the the KinectFusion project at the following URL: http://research.microsoft.com/en-us/projects/surfacerecon/
While most people only see the Kinect as a natural interface 3D gesture recognition device, it is important to understand the imaging data that body-tracking software and other features are built upon. The Kinect’s ability to gather spatial information is the heart of its unique hardware functionality. Some of the great “hacks” seen on YouTube work with just this raw data and don’t even go to the level of using the Kinect for gesture recognition. Microsoft Research’s debut of KinectFusion (Figure 1-25) at SIGGRAPH 2011, the leading industry conference for graphics experts, shocked many in the tech world. Previously, the volumetric video output from the Kinect was panned as too low quality to be useful. KinectFusion’s high-resolution, realtime, photorealistic reconstruction of people and objects, even with a shaky camera, demonstrated that a persistent model of an entire scene could be stored and updated rapidly to fill in missing detail behind the view of the camera.

Figure 1-25. KinectFusion showing realtime reconstruction of person in 3D (left) and photorealistic texture map model with lighting effects (right). Courtesy Microsoft Research.
It’s likely that what you’ve glimpsed in this chapter, seeing yourself in live volumetric 3D video, will play a key part in shaping screen-based entertainment and virtual presence in the future. Instead of using instant messaging or Skype as we know it, you could be communicating with friends, family, and colleagues by “instant personing” them into your room with you. Receiving full 3D data of their bodies, you may be able to tilt your head and look around them as if they were there, something not possible with today’s 2D cameras. Expect a whole class of applications that invite you to “digitize” people and objects in your home and bring them into a game or novel application. Now, you know what the real Kinect data looks like and have a perspective on the kind of experiences that are possible in the not-too-distant future. The rest of the book will go into more detail on how body-tracking points extracted from this “voxelated” physical information can be used today to design applications with natural, gestural interfaces.